[level-membership-for-orthopaedics-category]
CHAPTER 6 Setup and Patient Positioning
PREPARATION
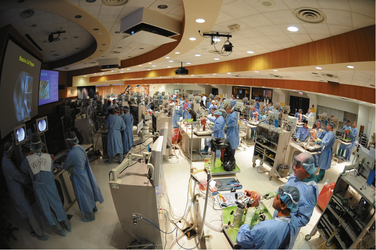
Proper operating room setup and patient positioning are fundamental steps to achieving consistent results with shoulder arthroscopy. Most practitioners learn shoulder arthroscopy based on the preferences of their attending physicians in a residency or fellowship training program. For a well-supervised and sustained hands-on learning experience, I strongly recommend visiting and watching those adept in shoulder arthroscopy and, when appropriate, attending courses at the Orthopaedic Learning Center and those offered by the Arthroscopy Association of North America in Rosemont, Illinois (Fig. 6-1).1 The American Academy of Orthopaedic Surgeons2 also offers courses every year. These include basic to advanced shoulder arthroscopy, as well as arthroscopic courses focusing on other joints. Many choices and decisions depend on surgeon preference, and it is critical to experience as many alternative procedures and techniques as possible so that the shoulder arthroscopist can choose the one that works best. Be systematic, thorough, and consistent in your approach. As the leader in the operating room, expend the time and effort to educate the surgical staff and operating room personnel regarding your positioning, instrumentation, and technical preferences.
SETUP
Operating Room
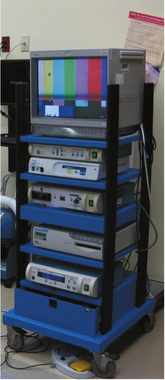
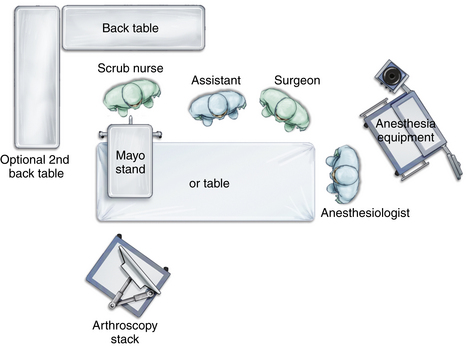
The operating room itself should be large enough to allow space for the surgeon to move about freely, one or possibly two assistants, a scrub nurse, the anesthesiologist and anesthesia equipment, the operating room table, arthroscopy stack with video and power equipment (Fig. 6-2), one or two back tables, and one or two Mayo stands. Most standard operating rooms are sufficient for shoulder arthroscopy. If there are windows in the room, they should be covered with darkening blinds. At the surgeon’s discretion, the room lights may be darkened to allow better viewing of the video without reflections.
Instrumentation and Equipment
An arthroscopy cart or stack is arranged so that the monitor is facing and within easy view of the operating surgeon. Ideally, two video monitors are available and are placed facing each other on either side of the operating room table so that the surgeon has a clear and constant view of the surgery if he or she moves around the head of the patient during the procedure. A Mayo stand is placed near the patient’s shoulder and holds the basic and most frequently used instruments and equipment: an arthroscope and camera, cannulas, trocars, probes, shaver and/or burr, and radiofrequency device. The back table is placed within easy reach of the scrub nurse and will hold instruments and equipment that are needed but less frequently used (Fig. 6-3).
PATIENT POSITIONING
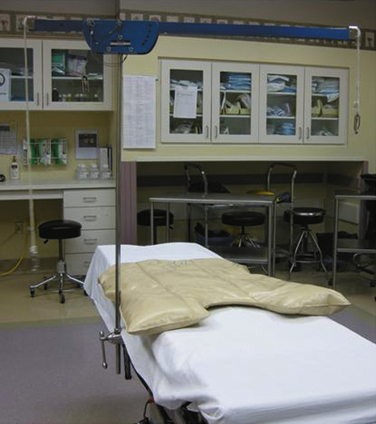
Disadvantages include the need to lift and turn the patient, the possibility of excessive distraction across the glenohumeral joint, with the inherent possibility of nerve damage, limited access to the anterior shoulder, the tendency for the suspension apparatus to place the patient’s arm in internal rotation (possibly resulting in loss of external rotation postoperatively), and the need to reposition the patient if an open anterior approach is needed.3 A vacuum bean bag is placed on the operating room table prior to patient positioning (Fig. 6-4). The patient is moved onto the table and the center of the bean bag in the supine position. Following the induction of anesthesia, both shoulders are examined, most often checking the range of motion and for signs of instability. The patient is then turned onto the unaffected side, directly in the center of the operating room table and the bean bag. In cases in which examination of the contralateral extremity is unnecessary, the patient can position himself or herself in the lateral decubitus position prior to intubation. The patient can find the most comfortable position, and the bean bag is then inflated. Intubation can be easily achieved in the lateral decubitus position and self-positioning can save time and number of staff needed, and allows those with somatic concerns an opportunity to provide feedback about their degree of comfort.
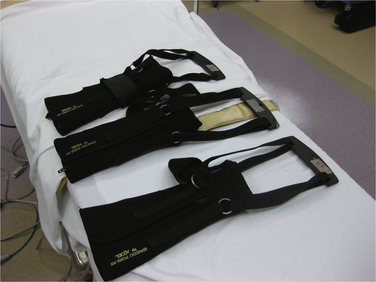
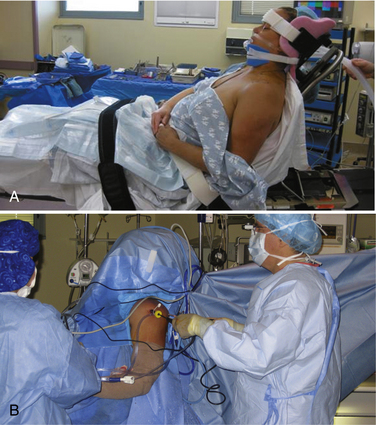
An axillary roll is placed beneath the upper thorax of the unaffected side in an effort to minimize pressure on the neurovascular structures passing through the axilla. Kidney rests, attached directly to the table, help to stabilize the pelvis and upper torso further. Wide adhesive tape, placed over appropriate padding, may be used just above or on the ilium to secure the pelvis directly to the table. Pillows are placed between the legs and between the down leg and the table. All bony prominences and pressure points are padded. Care is taken to support the cervical spine in a neutral position to avoid excessive lateral flexion. The affected shoulder and the entire upper extremity are scrubbed and prepped. The arm is then held up by an assistant using a sterile towel while the lower U-drape is placed over the patient. The forearm and hand are placed into a prefabricated wrist gauntlet (Fig. 6-5) traction device. Careful padding around the arm holder will help prevent superficial nerve injuries. After the draping is completed, the wrist gauntlet is attached to suspension. Approximately 10 pounds is attached, on average, and may be adjusted by adding or decreasing a few pounds for a larger or smaller patient, respectively.
The modified beach chair position is the preferred position of many surgeons. The term used here is modified to distinguish it from the traditional beach chair position, in which the operating room table is flexed approximately 45 degrees (Fig. 6-6).4 Although some surgeons favor the traditional beach chair position, a more upright position used in the modified approach places the acromion parallel to the floor and allows easier access to the posteroinferior shoulder and an easier orientation to the anatomy, because it mimics the upright posture of the physical examination. The table can be lowered into a traditional beach chair position if an open approach to the front of the shoulder is required.5 The seated position also lends itself to using an interscalene block as the primary anesthesia or as an adjunct for pain relief and relaxation. There are several commercially available beach chair and sitting patient positioners, as well as arm holders. The positioner is generally affixed to the table before the patient is brought into the operating room (Fig. 6-7).
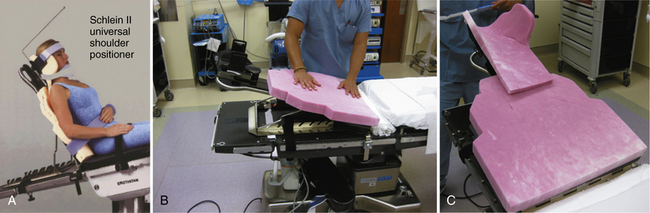
The patient is moved onto the operating room table and anesthesia is induced with the patient in the supine position. The back of the positioning device is then raised and some Trendelenburg positioning applied. The legs are lowered slightly and the knees allowed to flex enough so that the patient does not slide down the table during the procedure. Commercially available devices can help position the hips and knees to avoid this complication. (Fig. 6-8). A footboard may also be placed perpendicular to the foot of the table to support the patient’s feet when positioned to sitting. Intermittent compression stockings may be applied (Fig. 6-9). All bony prominences and potentially sensitive pressure points are padded. An examination under anesthesia may be carried out at this time. Positioning devices for the upper extremity are generally attached to the ipsilateral side of the operating room table (Fig. 6-10). The pneumatic devices have static and dynamic capabilities and assist in the preferred positioning of the extremity.6 Some may be used with beach chair or lateral decubitus positioning (Fig. 6-11).
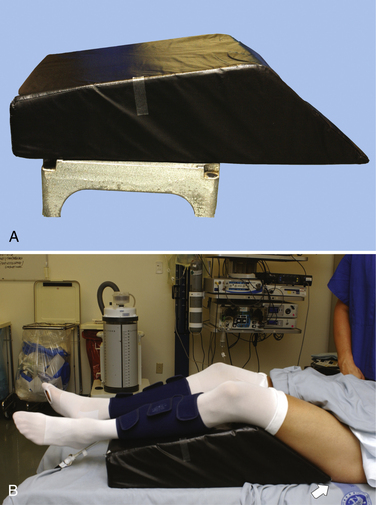
FIGURE 6-8 Foam block (A) fits on operating table to help position hips and knees and prevent patient from sliding down on table when in the beach chair position (B).
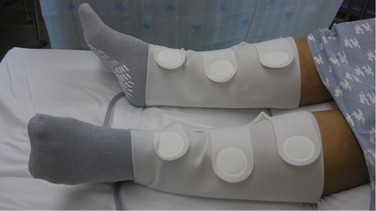
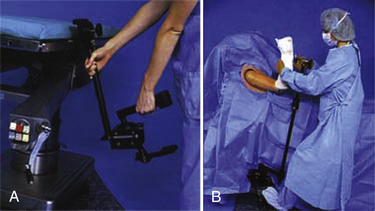
FIGURE 6-10 A, B, Manually operated arm mount with manual lock.
(Courtesy of McConnell Orthopaedics, Greenville, Tex.)
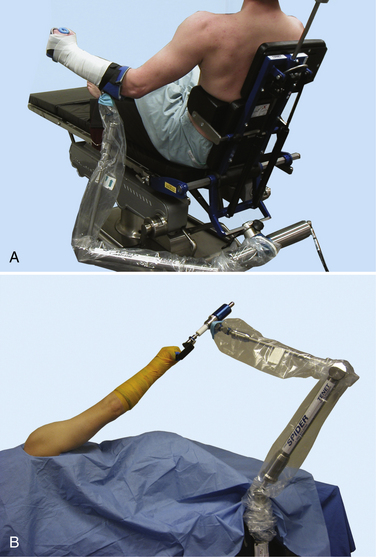
FIGURE 6-11 Spyder pneumatic arm positioner used with the beach chair (A) and lateral (B) positions.
(Courtesy of Tenet Medical Engineering, Calgary, Alberta, Canada.)
Complications
Complications specifically related to the modified sitting or beach chair position with shoulder arthroscopy include hypotension, injury to nerves, cardiac problems, pressure problems, and intolerance to regional anesthesia related to position, stroke, and death. Conscientious effort and attention to detail when positioning the patient and padding all bony prominences are needed to help avoid complications. Nerve injuries, both transient and permanent, have been reported secondary to a lack of attention to detail in padding and positioning patients. Prolonged time under anesthesia has also been implicated as a factor in these types of injuries, in which peripheral nerves remain compressed. Frequent evaluation of patient positioning and padding can be helpful in preventing these complications.7
A specific complication reported in the beach chair position is bradycardia and transient hypotension noted when the patient is positioned upright following interscalene block. This is reported to be secondary to the Bezold-Jarisch reflex. It has been reported in more than 20% of patients undergoing shoulder arthroscopy in the beach chair position under interscalene block. Onset of symptoms is seen between 30 and 100 minutes after interscalene block.8 Symptomatic treatment is usually the only intervention required and the problem is usually transient. Prophylactic use of metoprolol and glycopyrrolate immediately following the block has been shown to be effective in prevention.9
In the beach chair position, cautious interpretation of the patient’s blood pressure is essential. This is particularly true when the blood pressure cuff is placed at the patient’s calf. The blood pressure should be interpreted relative to the heart level pressure to avoid iatrogenic cerebral hypoperfusion related to hypotensive anesthesia. Possible complications of cerebral hypoperfusion are permanent neurologic impairment, stroke, and death.10
PEARLS&PITFALLS
PEARL:
Patient can position himself or herself in the lateral decubitus position prior to intubation.
PEARL:
Keep the blood pressure cuff near heart level (e.g., on the opposite arm rather than on the calf),
1. Orthopaedic Learning Center, Rosemont, IllLearning Center Courses. Information available at http://www.aana.org/CMECoursesMeetings/MastersCourse/CourseDescriptions/ tabid/107/Default.aspx Accessed October 7, 2009
2. American Academy of Orthopaedic Surgeons Home study and course information. Information available at http://www.aaos.org Acessed October 7, 2009
3. Gartsman GM Shoulder Arthroscopy 27-47. Philadelphia: WB Saunders; 2003.
4. Mazzocca AD, Noerdlinger M, Cole B, Romeo A Arthroscopy of the shoulder: indications and general principles of techniques. McGinty JB, editor. Operative Arthroscopy, 3rd ed. Philadelphia: Lippincott, Williams & Wilkins; 2003:413.
5. Peruto CM, Ciccotti MG, Cohen SB Shoulder arthroscopy positioning: lateral decubitus versus beach chair. Arthroscopy, 25; 2009:891-896.
6. Provencher MT, Solomon DJ, Gaston TM Positioning for shoulder arthroscopy: beach chair and lateral decubitis. David T, Andrews J, editors. Arthroscopic Techniques of the Shoulder: A Visual Guide. Thorofare, NJ: Slack, 2009.
7. Stanish WD, Peterson DC Shoulder arthroscopy and nerve injury: pitfalls and prevention. Arthroscopy, 11; 1995:458-466.
8. D’Alessio JG, Weller RS, Rosenblum M. Activation of the Bezold-Jarisch reflex in the sitting position for shoulder arthroscopy using interscalene block. Anesth Analg. 1995;80:1158-1162.
9. Liguori GA, Kahn RL, Gordon J, et al. The use of metoprolol and glycopyrrolate to prevent hypotensive/bradycardic events during shoulder arthroscopy in the sitting position under interscalene block. Anesth Analg. 1998;87:1320-1325.
10. Papadonikolakis A, Wiesler ER, Olympio MA, Poehling GG. Avoiding catastrophic complications of stroke and death related to shoulder surgery in the sitting position. Arthroscopy. 2008;24:481-482.
[/level-membership-for-orthopaedics-category][not-level-membership-for-orthopaedics-category]
CHAPTER 6 Setup and Patient Positioning
PREPARATION
Proper operating room setup and patient positioning are fundamental steps to achieving consistent results with shoulder arthroscopy. Most practitioners learn shoulder arthroscopy based on the preferences of their attending physicians in a residency or fellowship training program. For a well-supervised and sustained hands-on learning experience, I strongly recommend visiting and watching those adept in shoulder arthroscopy and, when appropriate, attending courses at the Orthopaedic Learning Center and those offered by the Arthroscopy Association of North America in Rosemont, Illinois (Fig. 6-1).1 The American Academy of Orthopaedic Surgeons2 also offers courses every year. These include basic to advanced shoulder arthroscopy, as well as arthroscopic courses focusing on other joints. Many choices and decisions depend on surgeon preference, and it is critical to experience as many alternative procedures and techniques as possible so that the shoulder arthroscopist can choose the one that works best. Be systematic, thorough, and consistent in your approach. As the leader in the operating room, expend the time and effort to educate the surgical staff and operating room personnel regarding your positioning, instrumentation, and technical preferences.
SETUP
Operating Room
The operating room itself should be large enough to allow space for the surgeon to move about freely, one or possibly two assistants, a scrub nurse, the anesthesiologist and anesthesia equipment, the operating room table, arthroscopy stack with video and power equipment (Fig. 6-2), one or two back tables, and one or two Mayo stands. Most standard operating rooms are sufficient for shoulder arthroscopy. If there are windows in the room, they should be covered with darkening blinds. At the surgeon’s discretion, the room lights may be darkened to allow better viewing of the video without reflections.
Instrumentation and Equipment
An arthroscopy cart or stack is arranged so that the monitor is facing and within easy view of the operating surgeon. Ideally, two video monitors are available and are placed facing each other on either side of the operating room table so that the surgeon has a clear and constant view of the surgery if he or she moves around the head of the patient during the procedure. A Mayo stand is placed near the patient’s shoulder and holds the basic and most frequently used instruments and equipment: an arthroscope and camera, cannulas, trocars, probes, shaver and/or burr, and radiofrequency device. The back table is placed within easy reach of the scrub nurse and will hold instruments and equipment that are needed but less frequently used (Fig. 6-3).
PATIENT POSITIONING
Disadvantages include the need to lift and turn the patient, the possibility of excessive distraction across the glenohumeral joint, with the inherent possibility of nerve damage, limited access to the anterior shoulder, the tendency for the suspension apparatus to place the patient’s arm in internal rotation (possibly resulting in loss of external rotation postoperatively), and the need to reposition the patient if an open anterior approach is needed.3 A vacuum bean bag is placed on the operating room table prior to patient positioning (Fig. 6-4). The patient is moved onto the table and the center of the bean bag in the supine position. Following the induction of anesthesia, both shoulders are examined, most often checking the range of motion and for signs of instability. The patient is then turned onto the unaffected side, directly in the center of the operating room table and the bean bag. In cases in which examination of the contralateral extremity is unnecessary, the patient can position himself or herself in the lateral decubitus position prior to intubation. The patient can find the most comfortable position, and the bean bag is then inflated. Intubation can be easily achieved in the lateral decubitus position and self-positioning can save time and number of staff needed, and allows those with somatic concerns an opportunity to provide feedback about their degree of comfort.
[/not-level-membership-for-orthopaedics-category]
