2 Setting Up Your Office
Facilities, Instruments, and Equipment
Lighting
Surgical Lamps
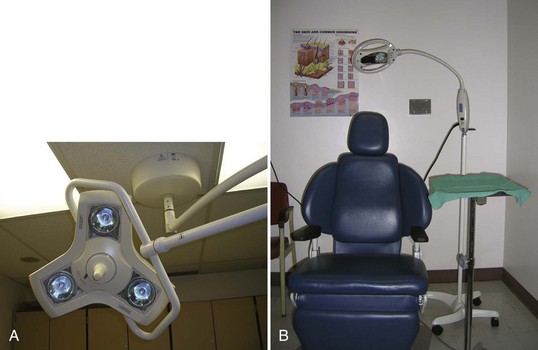
Adequate lighting is best achieved by using surgical lamps that are either ceiling mounted or on a rolling base. There are many lamps from which to choose. We are pleased with the Burton Outpatient II light in our main procedure room (Figure 2-1A). It is very bright but does not get hot. This is Burton’s number one surgical light and is shadow free, can be focused, and is guaranteed to have a no-drift arm. We have found the light to be too bright at times so we have taped photo diffuser sheets over the lights. Another option is to put in a dimmer so you can control the light output. This light focuses with a central handle. The central handle can be covered with a sterile cover, but we just ask our medical assistant to reposition the light when needed. Many other lights are available, but it is worth getting a good one.
Floor Lamps
You should have at least one good-quality movable floor lamp for your exam rooms. One per room is optimal but one good movable lamp is a good start. Look for a lamp that provides excellent illumination, ease of movement, and stability in a small exam light for the floor. The Burton SuperNova exam light (Figure 2-1B) is one lamp that works well for us, but many other floor lamps are available that provide similar features. A gooseneck lamp with a bare incandescent light bulb gets hot and the light is not optimal for skin procedures.
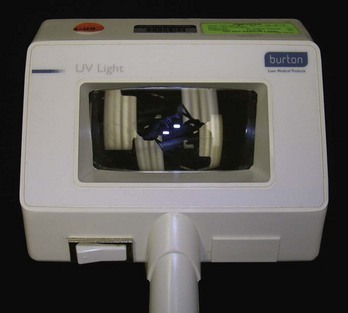
Woods Lamp
The Woods lamp (Figure 2-2) uses an ultraviolet light and is useful for diagnosing or evaluating fungal infections including Microsporum canis and Malassezia furfur. It is also helpful for identifying the coral red fluorescence of erythrasma. It can be used for accentuating the hypopigmentation of vitiligo. In melasma, it is used to see if the hyperpigmentation is within the epidermal or dermal layer. Outside of dermatology the Woods lamp helps to diagnose corneal abrasions.
Surgical Table, Stools, and Mayo Stands
Each room should have a Mayo stand to hold surgical instruments during surgery (Figure 2-1B). Make sure these stands are stable and that the height can be adjusted. We prefer the ones with four or five wheels, rather than those with only two wheels.
Hand Instruments
Small surgical instruments can be categorized by their purpose in surgery, such as the following:
Cutting
Scalpels
A scalpel has two parts, the handle and blade. The four most useful blades (Figure 2-3A) for skin surgery are:

Blades are disposable and can be purchased separately or preattached to disposable plastic handles. The advantage of a totally disposable scalpel is that it eliminates the risk of being cut while attaching or removing a disposable blade from a nondisposable metal handle. The risk of being cut is low with good dexterity and experience. A needle holder or hemostat is helpful when placing a blade on the handle or taking it off. Blade-removal instruments can also be purchased. Although disposable scalpels are convenient, they are not as stable or as sharp as a metal scalpel handle with a disposable blade. For elliptical excisions and flaps, I prefer the sharp blades on a nondisposable metal handle. Special scalpel handles have been designed by surgeons for increased dexterity during more challenging surgeries (Figure 2-3B). Most metal scalpel handles come with a ruler marking for measuring the size of your surgical cuts (Figure 2-3B).
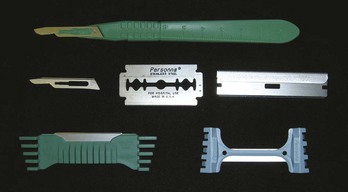
Razor Blades
The full range of razor blades (Figure 2-4) is discussed in detail in Chapter 9, The Shave Biopsy. The DermaBlade is a particularly easy and sharp blade to use for the novice and the expert. The Personna super double-edge blade is very sharp and can be broken in half for easy use. Although these do not come in sterile packaging, they can be used for shave biopsies without putting them through the autoclave. At pennies a blade, these are the most cost-effective tool for shave biopsies. They can be broken in half within their paper container to avoid cutting your hand prior to use.
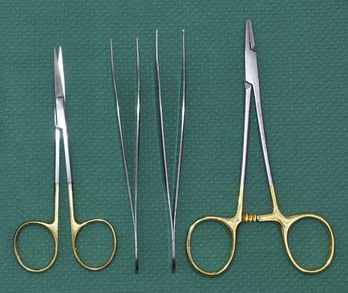
Scissors
Figure 2-5 shows different types of scissors used in skin surgery. The most versatile and affordable scissor for snip excisions and cutting the base of a punch biopsy is the iris scissor, a small, sharp-tipped scissor that may be straight or curved. Use of the straight or curved iris is a matter of personal preference. The curved scissor is a bit more expensive and may allow the operator to get under a punch biopsy specimen with some ease. Scissor length varies from 3 to 5 in. The iris scissor can be used for suture removal and cutting sutures, but the ones used for this purpose should be kept separate from tissue-cutting scissors to avoid dulling your best surgical scissors. The iris scissor can also be used for blunt dissection and undermining. Scissors need periodic sharpening, but properly cleaned and treated instruments will generally last a long time and are worth the investment.
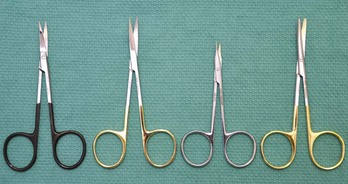
Many companies make specific undermining scissors with sharp or blunt tips and sharp blades. Some of these are tenotomy scissors or Metzenbaum scissors. These could be used instead of the all-purpose iris scissor. New technologies are being used to make the blades of scissors sharper. For a premium price you can now buy scissors that are as sharp as a scalpel (e.g., Supercut scissors). Endarterectomy scissors, which have a longer handle with blunt tips, also provide excellent control and precision for delicate work, but at a somewhat higher price.1
Punches
Punches come in sizes ranging from 2 to 10 mm. Clinicians may choose between disposable, one-use punches and reusable steel punches (Figure 2-6). Disposable punches are presterilized and need no maintenance. Reusable punches require cleaning and sterilization between procedures and must be sharpened periodically. We use disposable punches only because they are always sharp and convenient.
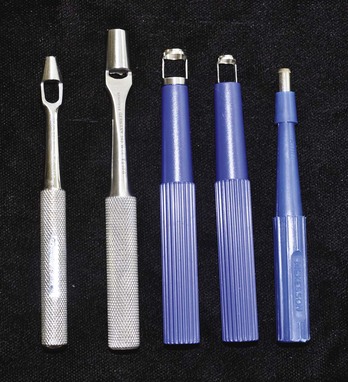
The new Huot VisiPunch has the wonderful advantage of allowing the clinician to see through the punch instrument while performing the procedure. This allows you to place the punch on the skin and make sure the whole lesion is within the punch before starting the cut. Also, you can see the depth better and have a better idea of when the punch core releases from the dermis below. These come in the full range of sizes between 2 and 10 mm. Although a wide range of punch instruments is produced by many manufacturers from 2 to 10 mm, the most useful punch biopsy instruments range from 3 to 6 mm. See Chapter 10, The Punch Biopsy, for more information on this surgical tool.
Curettes
Dermal curettes (Figure 2-7) are useful for treating pyogenic granulomas, molluscum contagiosum, seborrheic keratoses, basal cell carcinomas, and squamous cell carcinomas. The head of the curette may be round (Fox curette) or oval (Piffard curette). One side of the curette head is dull. The other side has a sharp blade that is designed to cut through friable or soft tissue but is not so sharp as to cut normal skin. This allows the curette to distinguish between abnormal and normal tissue and to selectively remove the abnormal tissue.
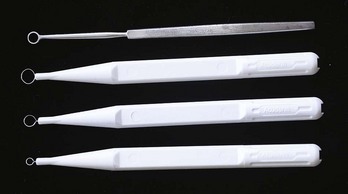
FIGURE 2-7 One reusable curette and three disposable curettes ranging from 7, 5 to 3 mm.
(Copyright Richard P. Usatine, MD.)
Curettes range in size from 2 to 7.5 mm. Nondisposable and disposable curettes are available. The size and shape of the curette used are in part determined by personal preference. Larger curettes allow for removal of larger lesions with fewer strokes. Smaller curettes are more precise and can be used on smaller lesions and for curettage of small pockets of tumor that are more difficult to reach with larger curettes. A range of curettes should be available in the office. Disposable curettes that range from 2 to 7 mm can be purchased. We keep 3-, 5-, and 7-mm curettes in our office and find that this covers our needs (Figure 2-7). Currently we are using the Acu-Dispo-Curette by Acuderm, but other companies also produce excellent disposable curettes.
Tissue Holding
Forceps
The most commonly used type of forceps in skin surgery is the Adson forceps, which has a broad handle and a long narrow tip (Figure 2-8). One common configuration is one tooth on one tip fitting into two teeth on the other tip. Many variations of this configuration exist. We suggest you start with the basic  -in. Adson forceps, with and without teeth, and experiment with others as needed. I personally prefer the teeth for suturing and the forceps without teeth when lifting the punch specimen up to cut the base. Adson forceps without teeth may tend to crush healthy tissue if one is applying a strong force to hold skin under tension.
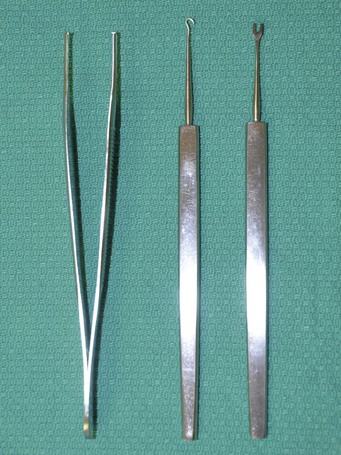
Skin Hooks
Skin hooks are capable of holding tissue in the least traumatic manner. They are better than forceps for reflecting skin while undermining without crushing skin edges. Skin hooks are especially useful for holding skin while undermining and while placing deep sutures (Figure 2-9). Skin hooks are available with single- or double-pronged hooks and with sharp or blunt prongs (Figure 2-8). Single, sharp-pronged hooks are the most versatile type of skin hook. The double-pronged skin hook can be useful in retracting the proximal nail fold and in office gynecologic surgery.
Undermining
The skin may be undermined with any type of sharp tissue scissor. Blunt dissection will cause less trauma to the tissue and displace vessels and nerves rather than cut through them. Undermining with a scalpel is more likely to cut vessels and nerves, but can be done. A sharp iris scissor is a good affordable choice for blunt dissection and cutting tissue while undermining. Other options include tenotomy scissors, Gradle scissors, Metzenbaum scissors, endarterectomy scissors, and specific undermining scissors (Figure 2-5).
Wound Closure
Needle Holders
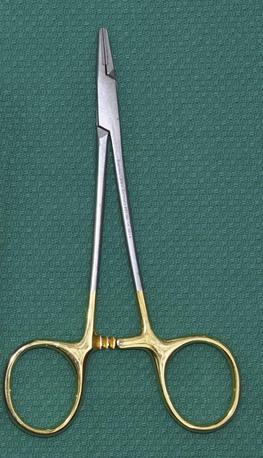
Needle holders for skin surgery should be relatively short because the suturing is not being done in a deep cavity. A short handle allows for more precise needle handling. Smooth rather than serrated jaws are less likely to fray sutures while doing instrument ties. The Webster needle holder with smooth jaws is commonly used in skin surgery and is available in  – and 5-in. sizes. Larger and heavier needle holders may be helpful when suturing tougher, thicker skin (e.g., on the back). Small, fine-needle holders are useful for fine work on the face and other delicate areas. It is important to have good-quality needle holders. Needle holders with gold-plated finger rings and tungsten carbide inserts are worth the price if you do skin surgery on a regular basis (Figure 2-10).The gold-plated handle is not crucial but it is often a sign that the needle holder is of excellent quality.
Small Instrument Sets
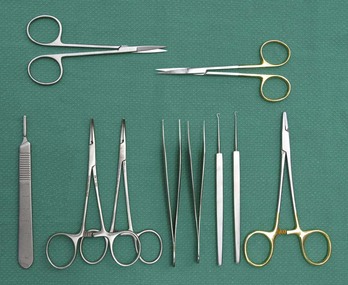
Punch or Small Excision Set (Figure 2-11)
Ellipse or Large Excision Set (Figure 2-12)
Information on nail surgery equipment is found in Chapter 18, Nail Procedures.
Magnification Devices
The advantage of loupes that are mounted to eyeglasses or a headband is that the clinician is able to use both hands in a procedure while getting the benefit of magnification. Magnification levels range from 1.5× to 6×. Two times magnification should be sufficient for most skin lesion diagnoses and procedures and provides a comfortable working distance from the lesion in focus (about 10 in.). The OptiVISOR is a good starting device and various clip-on lights can be added to this product (Figure 2-13). Customized binocular loupes are expensive, high-quality optical instruments that are used by oral surgeons and in the operating room.
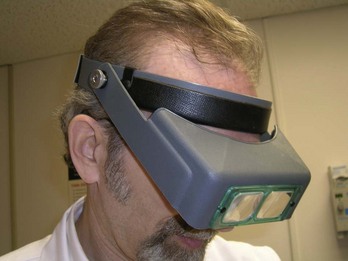
FIGURE 2-13 OptiVISOR loop providing 2× magnification and some eye protection.
(Copyright Richard P. Usatine, MD.)
A dermatoscope provides magnification, light, and the ability to see patterns below the skin. These devices are most helpful in the diagnosis of skin cancers and other benign tumors. Dermatoscopes come in polarized and nonpolarized modes with some new hybrid dermatoscopes that have both modes available. See Chapter 32, Dermoscopy, for further information.
Protective Gear
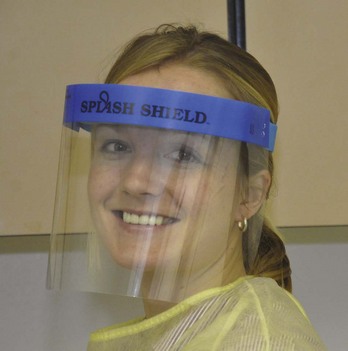
To be protected from blood and fluids during surgery, clinicians must wear surgical gloves and eye protection. Surgical masks and eye protection are especially important for surgeries on known high-risk individuals or for surgeries in which the risk of exposure to blood or fluid is greatest. One particularly well-designed protective device is the Splash Shield, which covers the full face with clear plastic on a comfortable head band (Figure 2-14). Although eyeglasses offer some protection, a face shield provides the best coverage. If you use a laser, special eye shields will be needed. (See Chapters 26 through 30 and Appendix B for information on laser eye shields.)
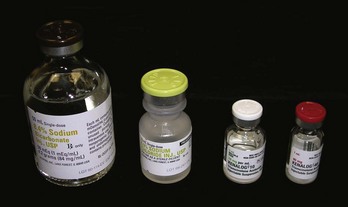
Medications and Chemicals
Medical offices should keep the following medications and chemicals on hand:

Equipment
Cryotherapy Equipment
Cryotherapy equipment for liquid nitrogen includes the following:
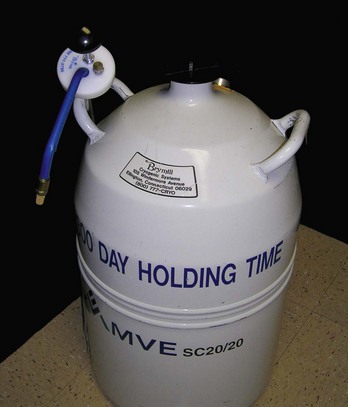
FIGURE 2-17 Storage tank (Dewar) with method to remove liquid nitrogen.
(Copyright Richard P. Usatine, MD.)
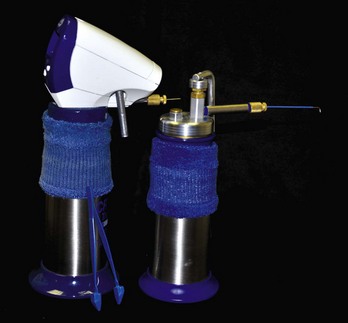
FIGURE 2-18 Methods for cryosurgery: Cryo-Tracker, Cryo Tweezer, and Cry-Ac.
(Copyright Richard P. Usatine, MD.)
Although this equipment can cost from $500 to $1000, it will pay for itself many times over and allow you to treat actinic keratoses, warts, condyloma, seborrheic keratoses, and other benign lesions. See Chapter 15, Cryosurgery, for more on this topic.
Electrosurgery Equipment
Having at least one electrosurgical instrument is essential before performing elliptical excisions (see Chapter 14, Electrosurgery). While the bleeding of shave biopsies can easily be stopped with chemicals, deeper excisions will often require electrocoagulation to obtain adequate hemostasis.
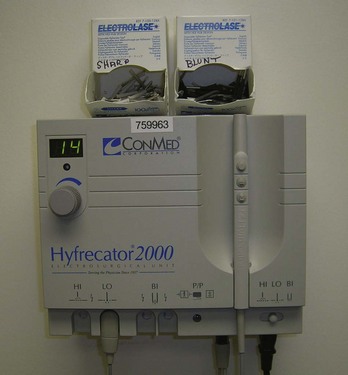
The least expensive way to begin is to get one single electrosurgical unit that is capable of electrocoagulation and electrodestruction but is not a cutting device. These can be obtained for about $1000 and if on wheels can be easily moved from one exam room to another. The next step up is to have multiple units of this type mounted in each exam room (Figure 2-20). For many thousands of dollars an electrosurgical unit with cutting capability can be purchased. Generally one unit per office practice is sufficient and this is usually kept in the principal surgical/procedural room. A smoke evacuator is especially important if a cutting unit is used because cutting produces more smoke (plume).
Electrosurgery without Cutting
Smoke evacuators are made by all of the companies listed above. The equipment for cosmetic procedures will be covered in Chapters 19 through 31.
 – and
– and  -inch, noniodinated for packing wounds