[level-membership-for-neurology-category]
Sensation
General
BACKGROUND
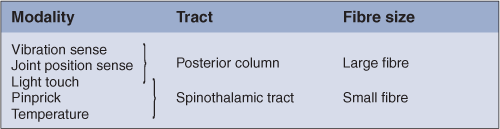
There are five basic modalities of sensation (Table 21.1).
The posterior column remains ipsilateral up to the medulla, where it crosses over. The spinothalamic tract mostly crosses within one to two segments of entry (Fig. 21.1).
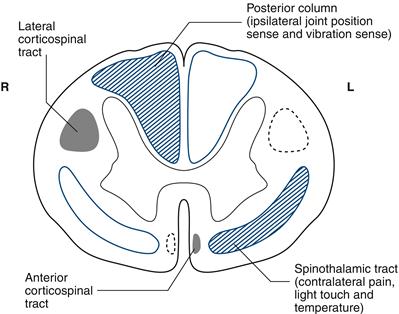
Figure 21.1 Spinal cord section showing sensory input (blue) from and motor output (black) to the right (R) side
Vibration, joint position and temperature senses are often lost without prominent symptoms.
Light touch and pinprick loss is usually symptomatic.
Sensory examination should be used:
Sensory examination requires considerable concentration on the part of both patient and examiner. Vibration sense and joint position sense are usually quick and easy and require little concentration, so test these first. This also allows you to assess the reliability of the patient as a sensory witness.
In all parts of sensory testing it is essential first to teach the patient about the test. Then perform the test. In most patients you will be confident they have understood and that their responses are reliable. Sometimes you will need to check that the patient has understood and carried out the test appropriately. With all testing, move from areas of sensory loss to areas of normal sensation.
Remember that sensory signs are ‘softer’ than reflex or motor changes; therefore less weight is generally given to them in synthesising these findings with associated motor and reflex changes.
Arms
There are four individual nerves which are commonly affected in the arm. The relevant sensory loss is illustrated in the fingers for the median nerve, ulnar nerve, radial nerve and axillary nerve (Fig. 21.2A–C). There may be loss beyond the core sensory distributions illustrated.
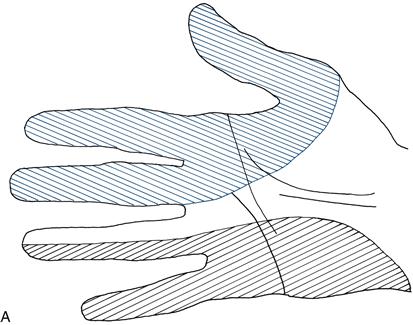
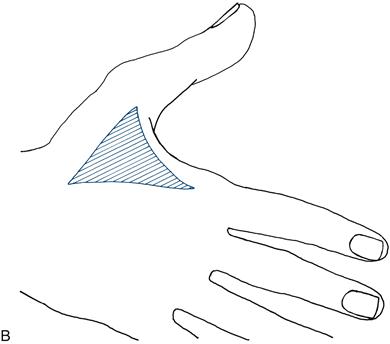
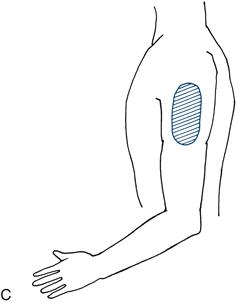
Figure 21.2 A. Sensory loss in the hand: median (blue) and ulnar (black) nerves
B. Sensory loss in the hand: radial nerve
C. Sensory loss in the arm: axillary nerve
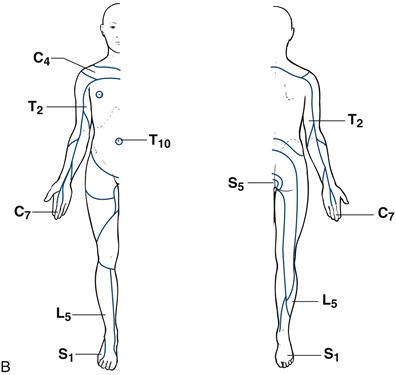
The dermatomal representation in the arms can be remembered easily if you recall that the middle finger of the hand is supplied by C7. This is illustrated in Figure 21.3.
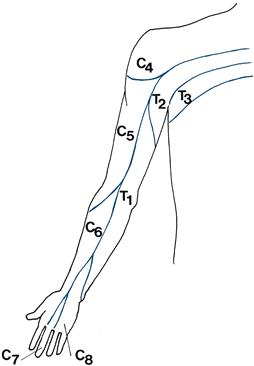
Figure 21.3 Dermatomes in the arm
Legs
Individual sensory deficit is most commonly seen in the following individual nerves:
• lateral cutaneous nerve of the thigh (Fig. 21.4A)
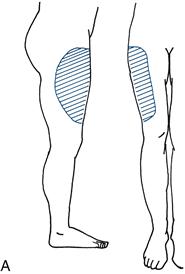

• common peroneal nerve (also referred to as the lateral popliteal nerve) (Fig. 21.4B)
The dermatomes most frequently affected are L4, L5 and S1.
A ‘dance’ to help you remember the leg dermatomes is given in Figure 21.5.
Dermatomes
An overview of the root innervation is given in Figure 21.6. The key dermatomes to be remembered are shown in blue.

WHAT TO DO
Vibration sense
Use a 128 Hz tuning fork. Those of higher frequency (256 or 512 Hz) are not adequate.
Demonstrate: ensure the patient understands that he is to feel a vibration, by striking the tuning fork and placing it on the sternum or chin.
Test: ask the patient to close his eyes. Place the tuning fork on the bony prominence and ask if he can feel the vibration. Place initially on the toe tips then, if this is not felt, on a metatarsal phalangeal joint, medial malleolus, tibial tuberosity, anterior superior iliac spine, in the arms, on the fingertips, each interphalangeal joint, the metacarpal phalangeal joint, the wrist, the elbow and the shoulder (Fig. 21.7). If sensation is normal distally, there is no point in proceeding proximally.

Figure 21.7 Potential sites for testing vibration sense
Check: check the patient reports feeling the vibration and not just the contact of the tuning fork. Strike the tuning fork and stop it vibrating immediately and repeat the test. If the patient reports that he feels vibration, demonstrate the test again.
N.B. Start distally and compare right with left.
Joint position sense
Demonstrate: with the patient’s eyes open, show him what you are going to do. Hold the distal phalanx between your two fingers (Fig. 21.8). Ensuring that your fingers are at 90 degrees to the intended direction of movement, move the digit, illustrating which is up and which is down.
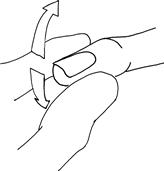
Figure 21.8 How to test joint position sense
Test and check: ask the patient to close his eyes; move the toe up and down. Start with large movements in either direction; gradually reduce the angle moved until errors are made. Test distal joints first. Test more proximal joints if proprioception is abnormal distally, moving to more proximal joints until joint position sense is appreciated.
 TIP
TIP
The size of movement normally detected is barely visible.
• In the leg: distal interphalangeal joint, metacarpal phalangeal joint, ankle, knee and hip.
 TIP
TIP
Romberg’s test is a test for joint position sense (see Chapter 4).
Pinprick
Use a pin—a disposable neurological pin, or dressmaker’s or safety pin—not a hypodermic needle or a broken orange stick. Dispose of the pin safely after use.
Try to produce a stimulus of the same intensity each time.
Demonstrate: show the patient what you are going to do. Explain that you want him to tell you if the pin is sharp or blunt. Touch an unaffected area with the pin and then touch an unaffected area with the opposite blunt end of the pin.
Test: ask the patient to close his eyes, then apply randomly sharp and blunt stimuli and note the patient’s response.
Screening test
Assessing a lesion
Assessing a hypothesis
Check: intermittent use of a blunt stimulus that needs to be recognised correctly allows you to check that the patient understands the test.
 TIP
TIP
While you are testing pinprick, imagine how you would draw a picture of what you are finding for the patient’s notes (as in Fig. 22.2).
Light touch
Use a piece of cotton wool. Some people prefer to use a fingertip. Dab this on to the skin. Try to ensure a repeatable stimulus. Avoid dragging it across the skin or tickling the patient.
Demonstrate: with the patient’s eyes open, show him that you will be touching an area of skin. Ask him to say ‘yes’ every time he is touched.
Test: ask the patient to close his eyes; test the areas as for pinprick. Apply the stimulus at random intervals.
Check: Note the timing of the response to the irregular stimuli. Frequently a pause of 10–20 seconds may be useful.
Special situations
Sacral sensation: this is not usually screened. However, it is essential to test sacral sensation in any patient with:
Temperature sensation
Screening
It is usually adequate to ask a patient if the tuning fork feels cold when applied to the feet and hands. If cold is not appreciated, move the tuning fork proximally until it does feel cold.
Formal testing
Fill two tubes with warm water and cold water. Ideally these are controlled temperatures, though normally the warm and cold taps are adequate. Dry both tubes.
Demonstrate: ‘I want you to tell me if I touch you with the hot tube’ (touch area of unaffected skin with the hot tube) ‘or with the cold tube’ (touch an unaffected area of skin with the cold tube).
Test: Apply hot or cold at random to hands, feet or an affected area of interest.
Check: the random order allows assessment of concentration.
 TIP
TIP
The ankle, knee, groin and axilla are all areas of relatively heightened sensitivity.
Other modalities
Two-point discrimination
This requires a two-point discriminator: a device like a blunted pair of compasses.
Demonstrate: ‘I’m going to touch you with either two points together’ (touch an unaffected area with the prongs set widely apart while the patient watches) ‘or one point’ (touch with one point). ‘Now close your eyes.’
Test: gradually reduce the distance between the prongs, touching either with one or two prongs. Note the setting at which the patient fails to distinguish one prong from two prongs.
Check: a random sequence of one or two prongs allows you to assess testing.
Compare right with left.
 TIP
TIP
It is quite easy to get bogged down testing sensation.
Here are some tips for speedy sensory testing:
FURTHER TESTS
Sensory inattention
Ask the patient to tell you on which side you touch (either with cotton wool or pinprick). Touch him on the right side and then on the left side. If he is able to recognise each independently, then touch him on both sides at the same time.
What you find
[/level-membership-for-neurology-category][not-level-membership-for-neurology-category]
Sensation
General
BACKGROUND
There are five basic modalities of sensation (Table 21.1).
The posterior column remains ipsilateral up to the medulla, where it crosses over. The spinothalamic tract mostly crosses within one to two segments of entry (Fig. 21.1).
Figure 21.1 Spinal cord section showing sensory input (blue) from and motor output (black) to the right (R) side
Vibration, joint position and temperature senses are often lost without prominent symptoms.
Light touch and pinprick loss is usually symptomatic.
Sensory examination should be used:
Sensory examination requires considerable concentration on the part of both patient and examiner. Vibration sense and joint position sense are usually quick and easy and require little concentration, so test these first. This also allows you to assess the reliability of the patient as a sensory witness.
In all parts of sensory testing it is essential first to teach the patient about the test. Then perform the test. In most patients you will be confident they have understood and that their responses are reliable. Sometimes you will need to check that the patient has understood and carried out the test appropriately. With all testing, move from areas of sensory loss to areas of normal sensation.
Remember that sensory signs are ‘softer’ than reflex or motor changes; therefore less weight is generally given to them in synthesising these findings with associated motor and reflex changes.
Arms
There are four individual nerves which are commonly affected in the arm. The relevant sensory loss is illustrated in the fingers for the median nerve, ulnar nerve, radial nerve and axillary nerve (Fig. 21.2A–C). There may be loss beyond the core sensory distributions illustrated.
Figure 21.2 A. Sensory loss in the hand: median (blue) and ulnar (black) nerves
B. Sensory loss in the hand: radial nerve
C. Sensory loss in the arm: axillary nerve
The dermatomal representation in the arms can be remembered easily if you recall that the middle finger of the hand is supplied by C7. This is illustrated in Figure 21.3.
Figure 21.3 Dermatomes in the arm
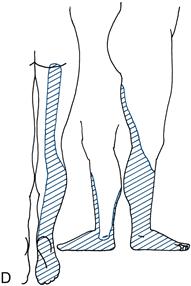
Legs
Individual sensory deficit is most commonly seen in the following individual nerves:
• lateral cutaneous nerve of the thigh (Fig. 21.4A)
• common peroneal nerve (also referred to as the lateral popliteal nerve) (Fig. 21.4B)
The dermatomes most frequently affected are L4, L5 and S1.
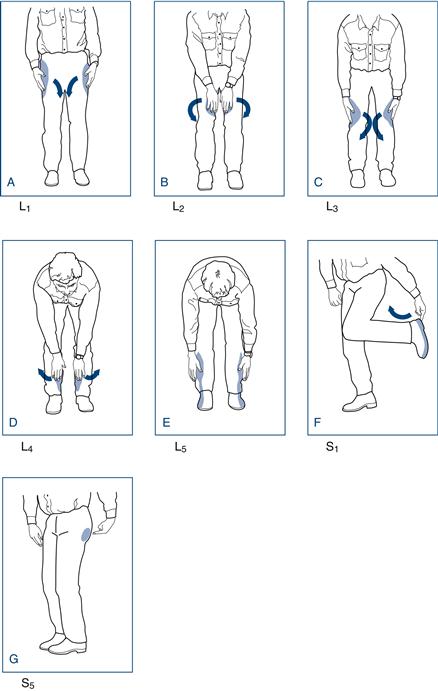
A ‘dance’ to help you remember the leg dermatomes is given in Figure 21.5.
Dermatomes
An overview of the root innervation is given in Figure 21.6. The key dermatomes to be remembered are shown in blue.
[/not-level-membership-for-neurology-category]
