Chapter 95 Ropes and Knot Tying
Rope for Life Safety
Establishing and calculating an appropriate safety factor requires not only a fair amount of sophistication on the part of the user, but also a high starting strength to compensate for strength reductions as the equipment is integrated into a system. According to Cordage Institute specifications, static and low-stretch life-safety rope must meet the minimum strength requirement outlined in Table 95-1.
TABLE 95-1 Minimum Breaking Strength by Size (Diameter) Noted in Pounds-Force (lbf) and Kilonewtons (kN)
| Diameter | Minimum Breaking Strength |
|---|---|
| 7 mm (0.28 inch) | 2200 lbf (9.8 kN) |
| 8 mm (0.31 inch) | 2875 lbf (12.8 kN) |
| 10 mm (0.38 inch) | 4500 lbf (20.0 kN) |
| 11 mm (0.44 inch) | 6000 lbf (26.7 kN) |
| 12.5 mm (0.5 inch) | 9000 lbf (40.0 kN) |
| 16 mm (0.63 inch) | 12,500 lbf (55.6 kN) |
Number of Falls Held
Number of falls held applies only to dynamic climbing rope, on which falls are expected to be taken. To test for this, the impact force test described previously is repeated until the rope breaks. To qualify for Union of International Alpine Associations or European Committee for Standardization certification, a rope is required to sustain a minimum of five falls. The maximum number of falls achieved without breaking the rope is known as the fall rating. It is important to note that, for this test, the impact force requirement of 12 kN or less is measured only on the first fall. After the first fall, impact force is not measured and can be any force, as long as the rope does not break. This fall rating is basically used for comparison of one rope with another when purchasing a dynamic rope; it has little to do with the actual numbers of falls a given rope can take in the real world of climbing. A good-quality dynamic rope can provide good service for hundreds of low-impact falls. Alternatively, just because a rope is rated as something like 12 or 15 falls does not mean that it should be used over and over after an extremely high-impact fall has occurred (see Fall Factors, later, for information about estimating the impact of high-force falls on a rope).
Life-Safety Rope Construction
Rope Type
Dynamic Kernmantle Rope
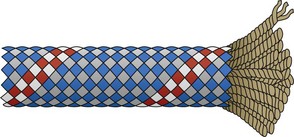
Dynamic ropes also tend to have a lower tensile strength than do static or low-stretch kernmantle ropes because of the same design characteristics that allow it to stretch. Furthermore, dynamic kernmantle designs are often softer and have a lower percentage of sheath than do static kernmantle ropes, making them more susceptible to abrasion and wear (Figure 95-1).
Static Kernmantle Rope
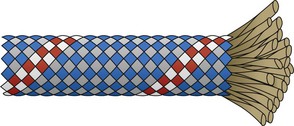
A static kernmantle rope is designed to be very strong and to have minimal stretch (i.e., as little as 3% to 6% at 10% minimum breaking strength). For consistent strength, inner bundles run continuously and unbroken throughout the length of the rope, usually in a near-parallel manner to reduce stretch and spin (Figure 95-2). This load-carrying core is protected from dirt, abrasion, and cutting by a tightly braided outer sheath. Static kernmantle ropes are ideal for lowering and raising heavy loads (e.g., during rescue), work positioning, and fall protection. Static ropes should not be subjected to a fall factor of more than 0.25 unless additional force-absorption provisions are made in the system.
Rope Selection Considerations
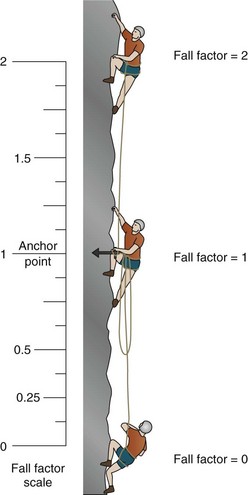
Fall Factors
Fall factors can be calculated by dividing the fall distance by the length of the rope between the load and the anchor or belay. Thus, an 0.9-m (3-foot) fall on a 2.74-m (9-foot) rope would be a fall factor of 0.3; an 0.9-m (3-foot) fall on an 0.9-m (3-foot) rope would be a fall factor of 1.0; and an 0.9-m (3-foot) fall on a 30.48-m (100-foot) rope would be a fall factor of 0.03. This formula assumes that the fall takes place in free air without rope drag across the rock face or through intermediate equipment (Figure 95-3).
Knots in Life-Safety Ropes
Rope and Knot Terminology
Categories of Knots
Stopper Knots
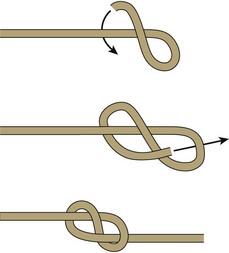
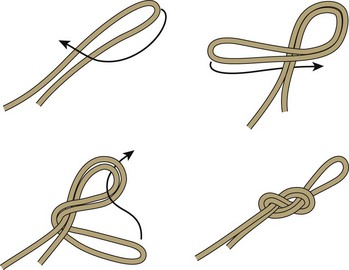
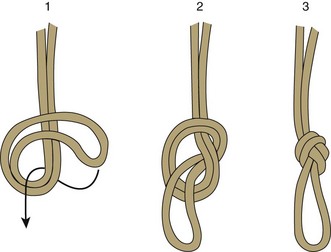
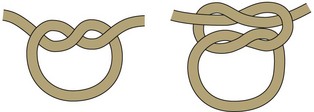
The most common stopper knot is a figure-8 knot (Figure 95-4). When two ropes are used in tandem, the stopper knot should be tied into both lines together. A simple overhand knot (Figure 95-5) may also be used for this purpose, but its relatively low bulk makes it less desirable than a figure-8 knot.

End-of-Line Knots
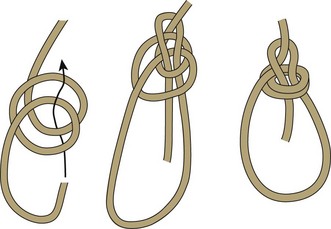
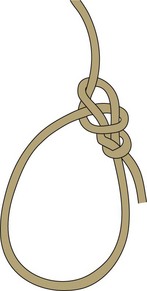
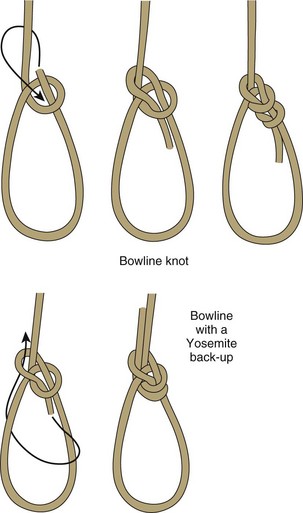
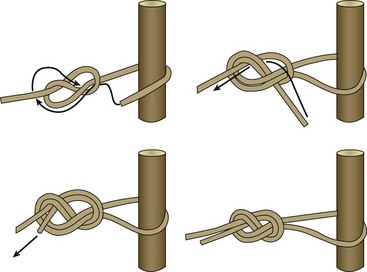
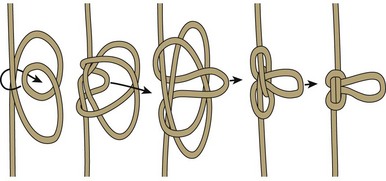
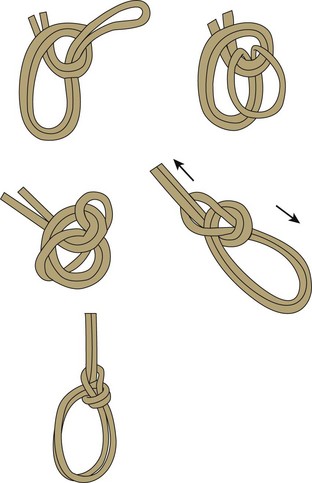
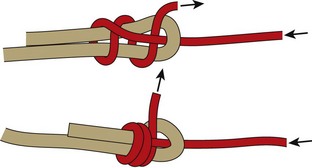
Perhaps the most common use of a knot is to make a loop in the end of a rope to anchor, tie in, or attach the rope to something. Bowline knots have been borrowed from mariners, and have been used by mountaineers for years. However, this knot can “capsize” into a slipknot quite easily when the tail is pulled; therefore, the high-strength bowline knot (Figure 95-6) is often preferred for life-safety applications. Other variations on the bowline knot that include added safety for live loads are the simple bowline with safety (Figure 95-7) and the bowline with Yosemite safety (Figure 95-8).
A handy way to tie a mainline and backup line together for attachment to a live load like a litter with patient and attendant is the interlocking long-tail bowlines (Figure 95-9), which consist of two simple bowlines with small loops tied to interlock, while leaving long tails for additional attachment to the litter and attendant.
Another interesting bowline variation is the bowline on a coil (Figure 95-10). With its several large loops, the bowline on a coil can be used creatively. For example, this knot is sometimes used to attach a person to a belay line if a harness is not available or to create a load-distributing anchor.
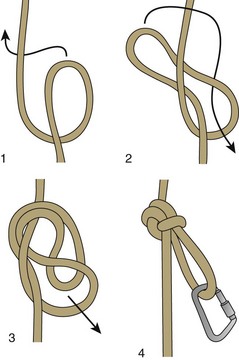
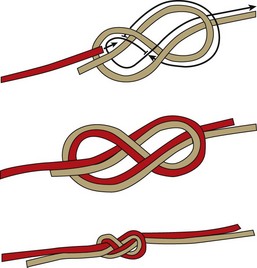
Many people prefer to use forms of the figure-8 knot for multiple applications, perhaps because this way they have to learn only one knot. One advantage is that the figure-8 knot may be tied directly onto a bight (Figure 95-11), or it may be tied as a retrace (Figure 95-12). Although the versatile nature of the figure-8 knot is indeed attractive, it should be noted that learning only one knot may prove limiting. Some people feel that the figure-8 knot is easier to tie and check than other knots. In truth, the redundant nature of the figure-8 retrace can make it deceiving on visual inspection, and this factor has resulted in accidents.
Midline Knots
Knots are often used to form loops in the middle of a rope, for clipping into, for grasping, or for bypassing a piece of damaged rope. Perhaps the easiest and most common method of throwing such a loop is with a simple overhand on a bight (Figure 95-13). Alternatively, a figure-8 on a bight (see Figure 95-11) may be used for this purpose. Either of these options works well as long as the load is attached to the bight. However, both these loops are susceptible to deformation when not loaded. Perhaps more important, if the rope below the knot is loaded, the knot deforms and weakens.
More preferable by far is the butterfly knot (Figure 95-14), particularly if the loop and the line beneath it will be placed under significant load. The butterfly can be pulled effectively either from the loop or from below the knot without negative effect. Caution must be taken with this knot, because if the loop is not big enough and not loaded, it can pull out under tension.
For a quick and versatile solution to creating twin loops in the middle of a rope, a bowline can be tied on a bight of rope. The bowline on a bight (Figure 95-15) results in two relatively symmetric loops that can be used to make an emergency boatswains chair, hand loops, or towing bridle.
Another midline knot is the inline figure-8 knot (Figure 95-16). As the name implies, it is tied with its loop in line with the direction of pull on the rope. It is possible to make a nice foot-and-hand loop ladder out of a single piece of rope using this knot, but it should not be used if multidirectional loading of the loop and the rope’s ends is anticipated. The butterfly knot is much better suited for such multidirectional loading applications.
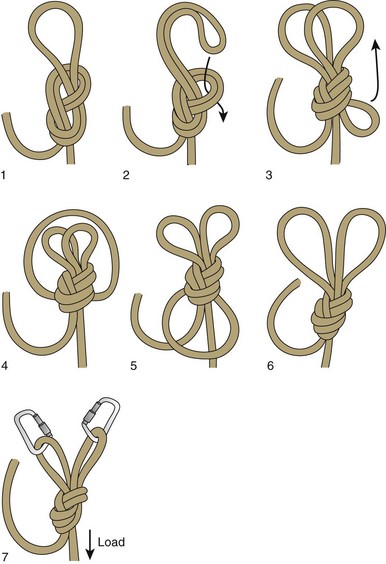
To quickly create two loops for multiple anchor points that need to be equalized to share a load, the double figure-8 (bunny ears) knot (Figure 95-17) can be tied midline or as an end line knot. The loops or “ears” can be elongated or shortened to equalize the load between the two anchor points.
Knots That Join Two Ropes
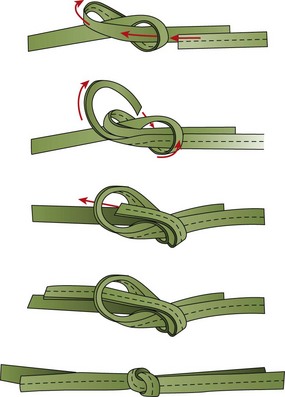
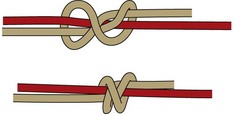
Most people, by about the age of 3 years, have learned to tie a square knot (Figure 95-18) for the purpose of joining rope ends. Although well known and easy to tie, this knot is far from being a secure or reliable tie. It can easily untie itself, either by pulling through when tightened or by shaking apart when loose. In short, the square knot should be avoided for all but decorative purposes.
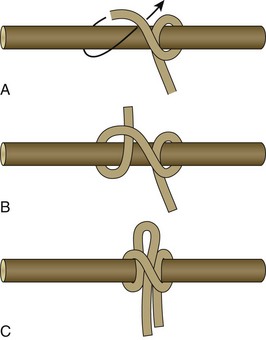
The overhand bend (Figure 95-19) is proclaimed by many in the climbing community to be the preferred choice for joining two ropes. However, this knot may untie while in use and is not deemed secure enough for rescue purposes. Instead, the more secure double fisherman’s bend (Figure 95-20) should be used. This bend is very effective for joining ropes of relatively equal diameter. Care should be taken to ensure that the two halves of the bend nestle against each other and that there is enough tail protruding from the knot to keep the knot from unraveling. This knot is also used to join two ends of a short length of cordage for use as a Prusik hitch (see Hitches, later).
When ropes of unequal diameter are joined, the double-sheet bend (Figure 95-21) is a more effective tie. This is a bulkier alternative that is perhaps not quite as strong, but can be easier to untie and and is preferred for joining ropes of different diameters.
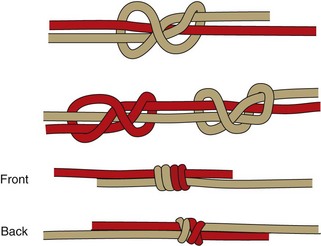
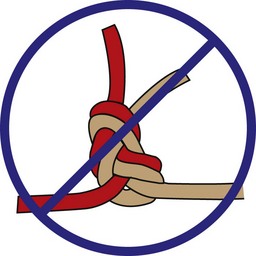
The versatile figure-8 knot deserves honorable mention here. Retracing a figure-8 knot in the opposing direction with a second rope results in what is commonly referred to as a figure-8 bend, an effective means of joining rope ends (Figure 95-22). Care must be taken with this method to ensure that the rope ends exit from opposite ends of the bend. If tied simply as a figure-8 knot, this bend has a tendency to deform and pull itself apart (Figure 95-23). Most knots work best in cordage or rope that has a rounded surface. Flat webbing and similar materials perform differently under tension. The preferred bend for joining webbing ends is known as the ring bend, sometimes also called the tape knot (Figure 95-24). This is most useful for forming webbing slings into a loop, but can also be used for lashing.
Hitches
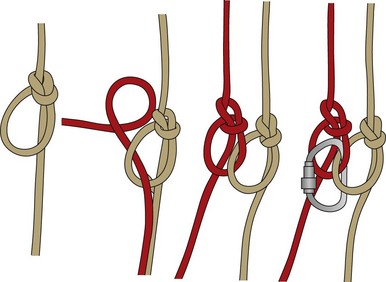
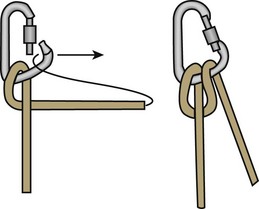
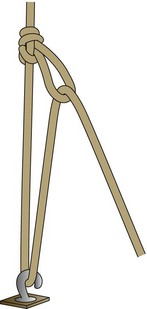
One of the most commonly used hitches is the Prusik hitch (Figure 95-25). A Prusik hitch is a sliding hitch by which a cord can be attached to a rope and slid up and down the rope for positioning. However, under tension, the hitch will not slide. A Prusik hitch is created by tying a length of cordage into a loop by means of a double fisherman’s bend. Wrapping the loop around the main rope and through its own loop two or three times and then pulling it tight forms the hitch.
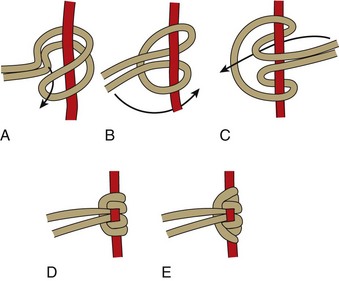
FIGURE 95-25 Prusik hitch. A to C, Tying sequence for the Prusik hitch. D, Two-wrap Prusik hitch. E, Three-wrap Prusik hitch.
Another fairly common hitch used in climbing and rescue applications is the clove hitch (Figure 95-26). This hitch can be useful when trying to shorten the distance between two objects, such as the climber’s belay and the climber or the litter rail and the rescuer. It is also useful in some lashing techniques, but can have a tendency to roll loose.
Another type of hitch, called the Münter hitch or Italian hitch (Figure 95-27), can be used around a carabiner or pole to add friction to a system, as in a belay. This hitch is particularly useful in that it effectively adds friction regardless of which direction the rope is moving. However, care should be taken when using the hitch around a carabiner, because there can be a tendency for the moving rope to slip through the gate of the carabiner, rendering the hitch useless.
A very handy hitch known as a trucker’s hitch is useful for pulling cord or webbing tight across something (e.g., a load in the bed of a pickup truck [hence the name]) or securing a patient snugly into a litter (Figure 95-28).
The handcuff hitch (Figure 95-29), which is not in common use, is possibly useful for combative patients or pulling gently on the arms of someone stuck in a tight spot. Care must be taken to not pull hard enough to rip off hands or arms. A little force applied in the right direction may provide the key to moving a trapped caver or similarly stuck patient.
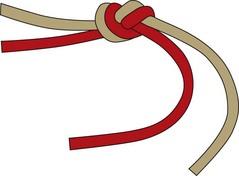
No discussion of knots would be complete without mention of the girth hitch (Figure 95-30), useful for a quick, although not too secure, attachment of a sling or rope to almost anything.
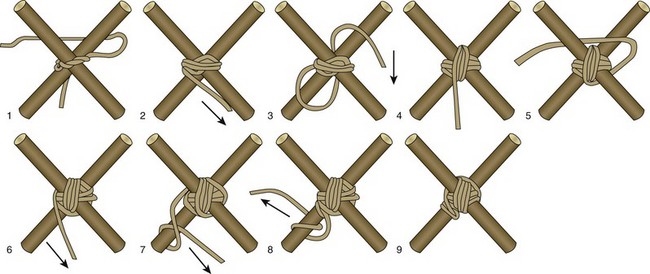
Lashing
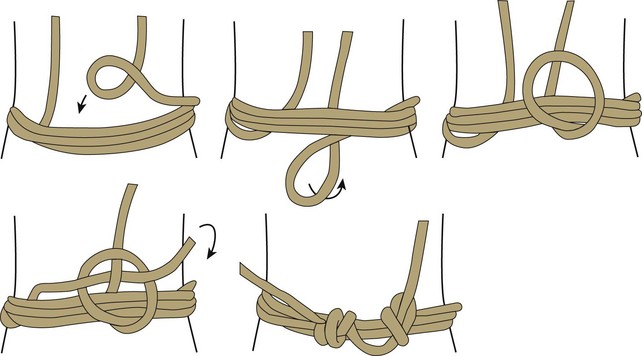
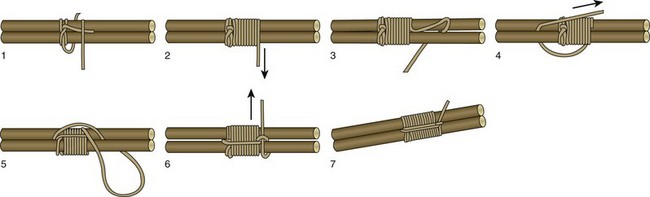
The term lashing refers generally to the process of binding items together, such as poles for a shelter or drag. One basic technique used when starting or finishing a lashing involves the round turn with two half hitches (Figure 95-31). This is a more secure but bulkier solution for lashing than the aforementioned clove hitch. There are several variations on the concept of lashing, including square lashing (Figure 95-32) for arranging the poles to create a corner, diagonal lashing (Figure 95-33) for joining poles to create a triangular shape, and sheer lashing (Figure 95-34) for joining poles side by side. Lashings can be extremely useful tools for creating conveniences at camp as well as for emergency use in creating tripods and other mechanical aids.

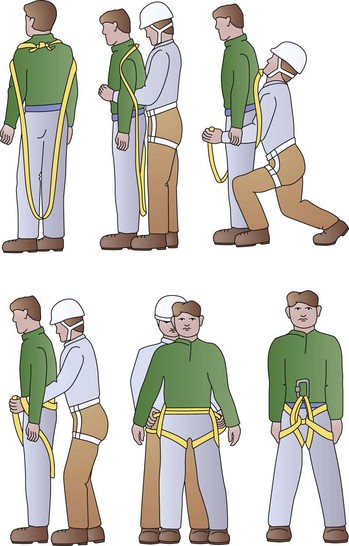
Emergency Harness
The ability to quickly make an emergency harness out of rope or webbing is a key skill for anyone traveling into the wilderness, whether for climbing a damaged mast or belaying someone up an unexpected cliff. One of the simplest and easiest harnesses to tie is the hasty diaper harness (Figure 95-35). A simple loop of webbing is made by tying a ring bend (see Figure 95-24) in the ends of a length of webbing; alternatively, a loop of rope is made by tying a double fisherman’s bend in the ends of a length of rope. The loop goes on like a diaper and closes in the front with a carabiner.
Knots and Rope Strength
The relative breaking strength of kernmantle design ropes with knots follows: