[level-membership-for-emergency-medicine-category]
PROCEDURES
SUBCUTANEOUS INJECTION
Subcutaneous (just below the skin) injection of epinephrine is used to manage a severe allergic reaction. The injection may be performed with a preloaded syringe (already containing the medicine in the barrel—see page 491) or may require that the medicine be drawn up for administration. After you wash your hands, follow these instructions:
1. Select the proper syringe and needle. For the treatment of an allergic reaction, a syringe that holds 1 milliliter (mL) is necessary, commonly equipped with a 25- or 27-gauge needle (the larger the gauge number, the smaller the diameter of the needle).
2. Never touch the metal of the needle with your hands.
3. Never share needles (never use the same needle to inject multiple people).
4. If the medication is in a preloaded syringe, be sure to see that the amount of medicine does not exceed the dose you want to administer. Be certain not to inject too much medicine.
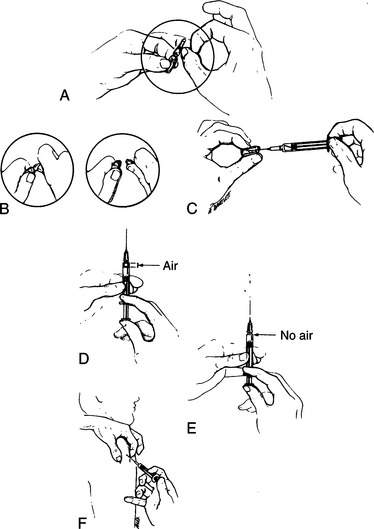
5. If the medicine is in a glass vial, flick the vial a few times with your finger to drive the air bubble to the top, and then snap the vial open at the line marked on the glass at the neck (Figure 247, A and B). Draw the proper amount of medicine to be administered up into the syringe (Figure 247, C). In the case of epinephrine, this will be 0.3 to 0.5 mL for an adult, and 0.01 mL/kg (2.2 lb) of body weight for a child, not to exceed 0.3 mL.
6. If the medication is in a glass bottle with a rubber top, wipe the top of the bottle with alcohol, stick the needle through the rubber, and draw up the desired amount of medication. If you cannot draw the medicine out of the bottle, you may need to inject some air into the bottle first (use the same entry into the bottle to inject air in and to draw medicine out).
7. Before injection, point the needle upward, tap the syringe a few times to float the air bubbles to the top, and squirt out any air that is in the syringe (Figure 247, D and E). You should be left with only medicine. Try not to inject any air.
8. Wipe off the skin with alcohol or with soap and water (if no alcohol is available) where you intend to administer the medicine. The easiest place to inject epinephrine is on the lateral arm at the shoulder.
9. Pinch the skin up between your fingers, and quickly plunge the needle in just under the skin at a 15- to 30-degree angle to the skin (Figure 247, F). With the needle in the skin, gently pull back on the plunger, to see if blood enters the syringe. If it does, you have inadvertently entered a blood vessel, and you should draw back the needle until no blood is returned. If no blood is returned, firmly plush the plunger and inject the medicine. Quickly remove the needle from the skin, and gently massage the injection site.
Again, when administering an injection, never share needles between people.
FISHHOOK REMOVAL
If a fishhook enters the skin, gently scrub the skin surrounding the entry point with soap and water. After the skin is clean, apply gentle pressure along the curve toward the point while pulling on the hook. If the hook is not easily removed, this means that the barb is caught in the tissue (Figure 248, A).
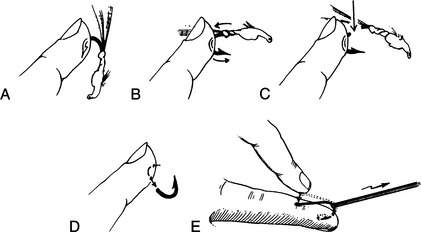
If the hook has a barbed shank, the hook can be removed by pushing it through the skin. This should be done (because of the increased risk of infection) if it will take more than 8 hours to get to a doctor. Grasp the shank of the hook with a pliers. With a steady, firm motion, push the hook through the skin so that the barb appears (Figure 248, B). Cut off the shaft or the barb (take care to cover the area with a free hand to prevent the detached barb from flying into someone’s eye) and then pull the remainder of the hook back out of the skin (Figure 248, C and D).
A method of fishhook removal that has become extremely popular is the “string-pull” or “press-and-yank” technique (Figure 248, E). Attach (tie) a shoelace or 2 ft (60 cm) length of string, fishing line, or rolled gauze around the bend of the hook. Push the shank of the hook down (toward the barb), parallel to the skin. This (hopefully) will disengage the barb from the tissue. Then use the string (at a 30-degree angle) to yank the hook from the skin in a snapping motion. Take care that the flying hook released from the skin does not impale anyone nearby. Wear eye protection or look away when you pull on the string to remove the hook.
Vigorously wash the wound and leave it open with a simple dry dressing. Do not seal in the dirt and bacteria with any grease or home remedies. If the hook was dirty (or was holding a dirty worm), begin the victim on dicloxacillin, penicillin, erythromycin, or cephalexin. If the victim suffers from a depressed immune system, use an antibiotic that is effective against germs acquired in an aquatic environment (see page 354). If a hook enters the skin anywhere near the eye, do not attempt removal. Tape the hook in place so that it cannot be snagged, and take the victim immediately to see a doctor.
RING REMOVAL
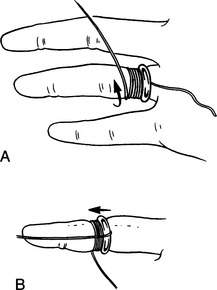
If swelling prevents easy removal, use the “string-wrap” technique (Figure 249). Take a 20 in (50 cm) string and pass it under the ring so that the long portion is left on the fingernail side of the ring. Wrap the long portion around the finger in a spiral fashion, starting next to the ring and working out toward the fingernail, keeping the loops close together. No tissue should bulge through between the loops. The string is then unwrapped by unwinding on the side closer to the hand, which pushes the ring little by little off the finger. The process is repeated over and over until the ring can be forced over the swollen finger joint(s), which may be a bit painful. Take care between wraps not to lose ground by inadvertently pushing the ring back toward the hand.
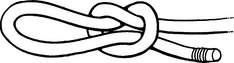
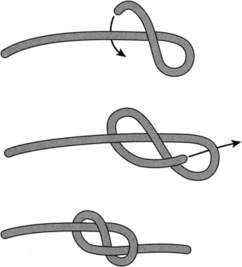
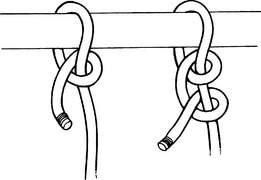
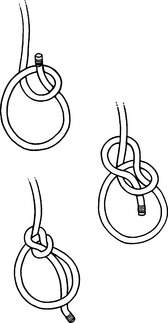
KNOTS AND HITCHES
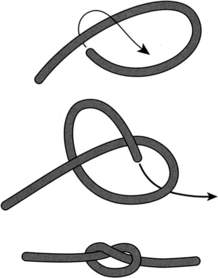
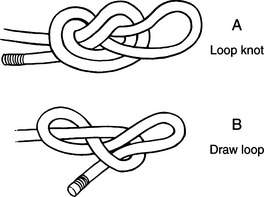
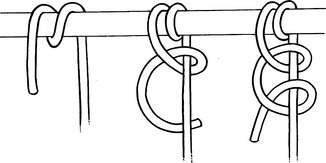
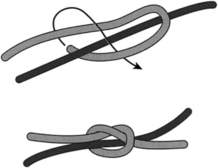
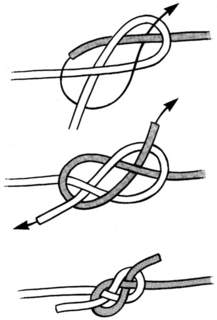
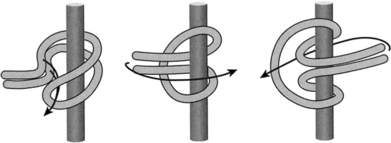
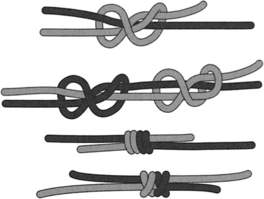
One of the most useful wilderness skills is the ability to quickly tie a secure knot or hitch. This is particularly important when fashioning a litter or traction device. The following diagrams illustrate a selection of common useful knots, hitches, and bends: overhand knot (Figure 250), slip knot (Figure 251), figure-eight knot (Figure 252), half hitch and double half hitch (Figure 253), bowline (Figure 254), double bowline (Figure 255), loop knot and draw loop (Figure 256), round turn with double half hitch (Figure 257), single sheet bend (Figure 258), clove hitch (Figure 259), double carrick bend (Figure 260), prusik hitch (Figure 261), and double fisherman’s bend (Figure 262).


[/level-membership-for-emergency-medicine-category][not-level-membership-for-emergency-medicine-category]
PROCEDURES
SUBCUTANEOUS INJECTION
Subcutaneous (just below the skin) injection of epinephrine is used to manage a severe allergic reaction. The injection may be performed with a preloaded syringe (already containing the medicine in the barrel—see page 491) or may require that the medicine be drawn up for administration. After you wash your hands, follow these instructions:
1. Select the proper syringe and needle. For the treatment of an allergic reaction, a syringe that holds 1 milliliter (mL) is necessary, commonly equipped with a 25- or 27-gauge needle (the larger the gauge number, the smaller the diameter of the needle).
2. Never touch the metal of the needle with your hands.
3. Never share needles (never use the same needle to inject multiple people).
4. If the medication is in a preloaded syringe, be sure to see that the amount of medicine does not exceed the dose you want to administer. Be certain not to inject too much medicine.
5. If the medicine is in a glass vial, flick the vial a few times with your finger to drive the air bubble to the top, and then snap the vial open at the line marked on the glass at the neck (Figure 247, A and B). Draw the proper amount of medicine to be administered up into the syringe (Figure 247, C). In the case of epinephrine, this will be 0.3 to 0.5 mL for an adult, and 0.01 mL/kg (2.2 lb) of body weight for a child, not to exceed 0.3 mL.
6. If the medication is in a glass bottle with a rubber top, wipe the top of the bottle with alcohol, stick the needle through the rubber, and draw up the desired amount of medication. If you cannot draw the medicine out of the bottle, you may need to inject some air into the bottle first (use the same entry into the bottle to inject air in and to draw medicine out).
7. Before injection, point the needle upward, tap the syringe a few times to float the air bubbles to the top, and squirt out any air that is in the syringe (Figure 247, D and E). You should be left with only medicine. Try not to inject any air.
8. Wipe off the skin with alcohol or with soap and water (if no alcohol is available) where you intend to administer the medicine. The easiest place to inject epinephrine is on the lateral arm at the shoulder.
9. Pinch the skin up between your fingers, and quickly plunge the needle in just under the skin at a 15- to 30-degree angle to the skin (Figure 247, F). With the needle in the skin, gently pull back on the plunger, to see if blood enters the syringe. If it does, you have inadvertently entered a blood vessel, and you should draw back the needle until no blood is returned. If no blood is returned, firmly plush the plunger and inject the medicine. Quickly remove the needle from the skin, and gently massage the injection site.
Again, when administering an injection, never share needles between people.
FISHHOOK REMOVAL
If a fishhook enters the skin, gently scrub the skin surrounding the entry point with soap and water. After the skin is clean, apply gentle pressure along the curve toward the point while pulling on the hook. If the hook is not easily removed, this means that the barb is caught in the tissue (Figure 248, A).
[/not-level-membership-for-emergency-medicine-category]
