Principles of minimal access surgery
GENERAL PRINCIPLES OF LAPAROSCOPY
1. The aim of minimal access surgery is to cause the least anatomical, physiological and psychological trauma to the patient.
2. Patient expectations have moved with the new technology, leading to profound changes in patient selection, consent and management.
3. This chapter outlines the basic principles of laparoscopy. Almost all general surgical procedures can be performed with minimal access techniques. This includes surgeries involving the chest and pelvis. We shall describe them in detail under appropriate chapter headings (Table 5.1).
Table 5.1
Examples of minimal access operations
| Basic | Advanced |
| Diagnostic laparoscopy Cholecystectomy Appendicecomy Hernia repair Adhesiolysis Arthroscopy |
Nissen fundoplication Repair of perforated duodenal ulcer Heller’s serocardiomyotomy Gastrectomy Hepatectomy Adrenalectomy Splenectomy Nephrectomy Oophorectomy Hysterectomy Prostatectomy |
4. Minimal access surgery has implications for hospital budgets. Capital equipment is expensive and requires updating at intervals. Consumables are particularly expensive and re-usage of disposable equipment is inadvisable. Theatre times are increased initially, although they decrease as surgeons gain experience. Short-stay and 5-day wards with rapid turnover reduce ‘hotel’ costs, free up main ward beds and help to reduce waiting lists.
5. The success of MAS is largely founded on the team based approached. Complicated procedures are performed with complex equipment that requires constant maintenance and upkeep. In addition, during a surgery, multiple intraoperative adjustments of the equipment (camera, monitors) are required which demand a skilled and collaborative theatre team that work in a coordinated fashion to ensure patient safety and excellent outcomes. Discuss Box 5.1 with PSV.
6. Increasing familiarity with the laparoscopic approach has led to its use in many situations previously contraindicated. Table 5.2 indicates common absolute and relative contraindications for laparoscopy.
Table 5.2
Contraindications to laparoscopic surgery
| Absolute contraindications | Relative contraindications |
| Generalized peritonitis | Gross obesity. Simple overweight is no contraindication; such patients suffer less from postoperative respiratory complications than they would following open operation |
| Intestinal obstruction | Pregnancy |
| Major clotting abnormalities | Multiple abdominal adhesions. Provided the first instrument port is inserted by an open technique, laparoscopy can be safely performed on patients with moderate adhesions following, for example, previous surgery |
| Liver cirrhosis/portal hypertension | Organomegaly (enlarged liver or spleen) |
| Failure to tolerate general anaesthesia | Abdominal aortic aneurysm |
| Uncontrolled shock | |
| Patient refusal |
Preparation
1. Admission: Ideally plan admission for the day of surgery following appropriate investigation and work up. Evaluate patients to see if they can be managed on a day-case basis.
2. Consent: Obtain informed consent, including permission to convert to open surgery if necessary and quote a percentage probability. Warn patients about postoperative shoulder-tip pain and surgical emphysema. Always explain the commonly occurring risks, how they present and how they are managed. Explain the benefits of laparoscopic surgery, which include; small scars, quicker recovery and a reduction in post-operative pain.
3. Prophylaxis: Evaluate the thromboembolism risk and arrange prophylaxis accordingly (typically low-dose heparin and compression stockings). Prescribe prophylactic antibiotics if appropriate (e.g. biliary and bowel surgery). Bowel preparation is unnecessary except for some colorectal procedures.
4. Analgesia: Evaluate the likely postoperative analgesia requirements. Most anaesthetists avoid premedication in patients admitted on the day of surgery. Patients undergoing major laparoscopic procedures may still need opiates, albeit in reduced dosage. Their requirements may be further reduced by the use of intra-peritoneal local anaesthesia or abdominal wall nerve blocks. Patient-controlled analgesia (PCA) is appropriate following major procedures; however, for lesser procedures simple analgesics such as intravenous paracetamol, oral non-steroidal anti-inflammatory drugs and weak analgesics are usually effective.
5. Equipment: Make sure every member of the surgical team is fully familiar with the basic equipment for laparoscopy.
Basic laparoscopic equipment (excluding instruments)
1. Laparoscopic theatre: Modern laparoscopic suites incorporate core equipment (monitor, insufflators, screens) within a mobile, ceiling-mounted console that can be maneouvred quickly to ensure rapid equipment adjustment throughout a procedure, ease of movement of the theatre staff, improved ergonomics and an efficient operating room.
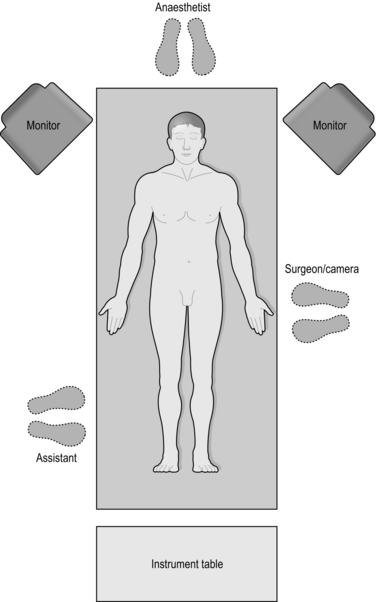
2. Monitor: In the absence of an integrated theatre use a large monitor with high resolution screens. This can be mounted on mobile trolleys with a light source, insufflator and camera (Fig. 5.1).
3. Light source: Illumination of the image is dependent on the light cable and light source. Damage to the optical fibres in the cable will dull the light. Xenon or halogen bulbs are used to create high intensity light, however they also generate high heat which can injure the patient and surgeon through direct contact with the source or the tip of the light cable. Light is absorbed by blood, therefore in a situation of bleeding, the image can become dark quickly.
4. Insufflator: This delivers carbon dioxide from a high pressure cylinder at a high flow rate but a low accurately controlled pressure, to create the pneumoperitoneum. Ensure that it is positioned within your view so that you can monitor the pressures and flows. Familiarity in changing the gas cylinder is important as cylinders may empty at a critical point in surgery, with loss of pneumoperitoneum as a result.
5. Camera: The video camera head, either a single chip or a superior three-chip instrument, is attached to the laparoscope to form an electrical–optic interface. The camera is connected by cable to a video processor, which interprets and modifies the signal and transmits it to the monitors. Most systems incorporate a ‘white balance’ function, which can be calibrated to represent colours accurately. Some newer camera systems dispense with the laparoscope by placing the microchip on the end of a 10-mm rod (chip-on-a-stick).
6. Laparoscope: The standard laparoscope measures 24 cm in length and contains a series of quartz optical rods and focusing lenses that conduct the image to the eyepiece. The telescope can have a flat end with a straight on view (0 degree) or can be angled with an oblique view (30 or 45 degree). The 30 degree scope can provide a much greater fieldview compared to the 0 degree scope. The telescopes can vary in diameter from a 5 mm to a 10 mm (the latter providing the brighter image and more visual acuity). The 10 mm 30 degree telescope is used for most procedures.
KEY POINTS
Instrument & Team Check


7. Suction/irrigation is performed usually through a disposable or reusable 5-mm instrument. The hand piece is connected to a pressurized reservoir of warm saline as well as the suction. Both are controllable by buttons on the hand piece. The disposable instruments tend to be more ergonomic and often come with a mechanical irrigation feed.
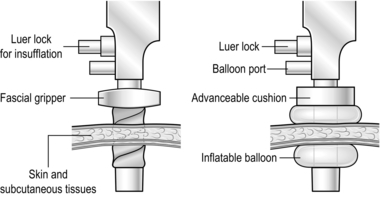
8. Ports provide passages through which to insert instruments, which can be disposable or reusable. The more expensive disposable ports have the advantage of being more ergonomic (Greek: ergon = work + nemein = to manageable: easy to use) as well as being radiolucent and sterile. They may have blunt ends for open induction of pneumoperitoneum or be fitted with a sharp, spring-loaded trocar with a plastic guard that projects beyond the point as soon as the trocar enters the peritoneal cavity. Some of the blunt ended ports are designed so that the tip expands rather than divides while passing through abdominal wall structures. Ports are presented in a range of sizes to accommodate various instruments. Large ports can be fitted with ‘sizers’ to reduce the lumen. Alternatively, some disposable large ports have an inbuilt diaphragm permitting the introduction of a number of instrument diameters without loss of pneumoperitoneum. All have attachments to allow insufflation, and valves to prevent gas leaks. Some have collars, allowing them to be secured in position (Fig. 5.2). It is good practice to rehearse port requirements for specific procedures with the surgical team. This ensures appropriate port availability and avoids the expense of opening unnecessary disposable ports.
9. Instruments: Laparoscopic instruments come in a standard length (30 cm long shaft). However, bariatric surgeries require longer instruments (45 cm in length). Most instruments come in a variety of handles with different locking handles. Instruments can be wholly disposable or reusable but may also be a combination of a reusable hand piece/shaft with a disposable tip. Many reusable instruments are of a modular design with separate hand pieces and shafts (Box 5.2). In any specific procedure a variety of types may be in use. Instrument selection is often dictated by a number of factors, which include procedure-specific requirements, personal preference and cost. Most surgical units possess a number of identical basic trays of non-disposable instruments for laparoscopic procedures. Multidisciplinary input from the surgical and scrub teams is important when there is an opportunity to influence the specification of such trays. Since disposables are expensive, either specify which ones are required beforehand or ensure that they are opened only when needed. A combination of reusable and disposable items (ports and instruments) are usually required.


Consider incorporating a range of dissectors from those available, such as Maryland, Mixter.
10. Anaesthesia: General anaesthesia is usually augmented with muscle relaxation, intubation and ventilation so that a pneumoperitoneum can be induced without causing cardiorespiratory embarrassment. Abdominal distension affects venous return, heart rate and consequently blood pressure. A profound bradycardia is not uncommon even in fit individuals, particularly on induction of the pneumoperitoneum. Abdominal distension also affects chest-wall compliance and the ease with which patients can be ventilated. Aim to use the lowest pre-set intra-abdominal pressure compatible with adequate surgical exposure.
Access
1. Patient positioning: Patients are placed in a supine position with the legs either abducted (allowing the surgeon to operate from between the legs, for example in a hepatectomy) or elevated in stirrups (for access to the pelvis), or in the lateral decubitus position (access to the retroperitoneum when performing a nephrectomy). All pressure points must be adequately padded to prevent neuropathies and skin damage and strapping may be used to stabilise the patient especially when the table is tilted. The arms are usually tucked to the sides to allow ease of movement of the surgeon as she lines up instruments with target tissue.

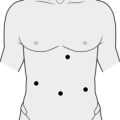
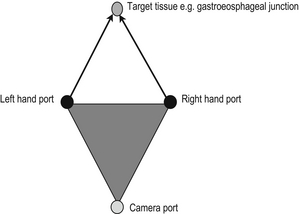
2. Port placement: The camera port is usually at the umbilicus or at a site which is directly opposite the target tissue of interest. Subsequent ports are inserted after a pneumoperitoneum has been established and under direct camera vision. This minimises iatrogenic injury as the trocars pass into the abdominal cavity. The ideal port orientation creates an equilateral triangle between the surgeon’s left and right hand, with the telescope positioned at the apex of the triangle. The left and right hand ports should be approximately 10 to 15 cms apart for optimum instrument use.
3. Camera Holder: The surgeon stands behind the telescope. The camera holder may be required to reach between the Surgeon’s hands to guide the telescope to the area of interest. The ergonomics of this arrangement are sometimes better facilitated if the camera holder is seated on a stool next to the Surgeon.
4. Pneumoperitoneum: Induce a pneumoperitoneum. The initial penetration of the abdominal cavity to produce a pneumoperitoneum can be a hazardous task in laparoscopic surgery. Once the first port is established you can introduce additional ports under direct vision and with relative safety. There are open and closed methods of producing a pneumoperitoneum:
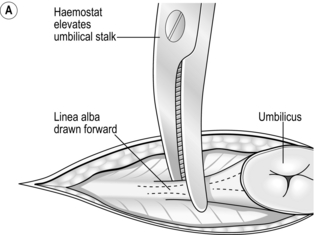
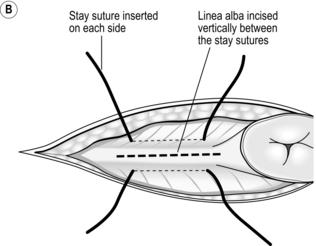
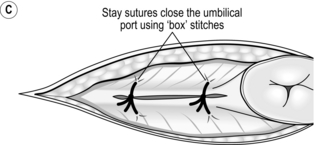
 The open (Hasson) method of port insertion is safer, especially if there has been previous surgery. Make a 1–2-cm infra-umbilical incision, deepening it to the linea alba. Observe the transverse fibres of the linear alba at the base of the umbilical ligament. Incise the linea alba at this point between two stay sutures and open the peritoneum under direct vision. The stay sutures can be tied together to close the port site at the end of the procedure, by using a box stitch (Fig. 5.4). If you have difficulty locating the linea alba in an obese patient, evert the base of the umbilical ligament upwards, using a clip. This brings the linea alba to the surface (Fig. 5.4A). Insert a finger to sweep away any adhesions around the insertion site before introducing a blunt-tipped trocar. Connect the gas supply and establish a pneumoperitoneum. The main disadvantage of this method is the increased incidence of gas leaks around the port. Special ports with sealing balloons have been developed to prevent this.
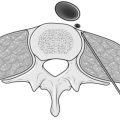
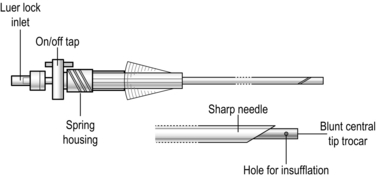
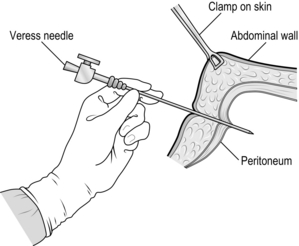
 The closed (Veress needle) technique is also commonly used. As before, make an infra-umbilical skin incision. Apply a 20–30° Trendelenburg tilt to the patient. Together with your assistant, grasp the anterior abdominal wall and lift it up. Insert a Veress needle (Fig. 5.5) perpendicular to the abdominal wall until it penetrates the linea alba and the peritoneum. As soon as you feel the ‘click’ as the needle enters the peritoneal cavity, direct the needle downwards towards the pelvis to avoid damaging the great vessels. When the abdomen is fully distended and tympanitic to percussion, withdraw the Veress needle and enlarge the superficial part of the incision to accommodate the cannula. Insert a 10-mm trocar and cannula, aiming the tip anterior to the sacral promontory, parallel to the aorta. Use a drilling action from the wrist while lifting up the abdominal wall below the insertion site.


5. Inspection: With the first port connected to the insufflator wait until the pre-set pressure is achieved, then insert the warmed laparoscope. Observe the view on insertion to ensure the viscera are not at risk. Inspect the abdomen immediately below the first port to identify structures that could have been damaged. Perform a general laparoscopy looking for any expected or unexpected pathology (see below). The inspection helps general orientation as well as the identification of safe sites for additional ports. Secure ports using either a threaded collar or stay sutures.
6. Additional ports: Insert these under direct vision. Prior to incision infiltrate the skin with local anaesthetic. The sites, size and number are determined by the intended procedure. Instruct the assistant to follow the tip of each trocar carefully to detect potential visceral damage. In more obese individuals these additional ports often need be passed obliquely through the abdominal wall, so lying in the direction in which they are most useful during the procedure.
Assess
1. Upper abdomen: Now survey the abdomen prior to performing the intended procedure. Be systematic in identifying landmarks and inspecting the relevant area. Locate the ligamentum teres and falciform ligament. In the right upper quadrant visualize the liver, gallbladder and the underside of the right hemidiaphragm. Now manipulate the laparoscope under the ligamentum teres to look at the left lobe of the liver and the spleen. Change the patient’s position using table tilt and aid visualization by moving the bowel. Inspect both the left and right paracolic gutters, facilitating the exposure by inserting an atraumatic grasper to manipulate the bowel if necessary.
2. Lower abdomen and pelvis: Place the patient in the Trendelenburg position to locate the caecum and appendix. Insert an atraumatic grasper to manoeuvre the bowel while you examine it from distal to proximal. While the patient is in the head-down position, examine the pelvis; this is especially important in female patients presenting with lower abdominal pain of unknown cause. You can directly visualize the ovaries, uterus and vermiform appendix.
3. In order to inspect organs such as the pancreas, additional manipulation and dissection may be necessary.
Safe use of diathermy
1. Burns: Carefully identify the correct structure. The most common diathermy injury (monopolar and bipolar) results from misidentification and a burn to the wrong structure.

2. Inadvertent activation: Inadvertent activation of the diathermy pedal risks damaging other structures in the abdominal cavity, especially when the electrode is outside the field of view.
3. Insulation failure: Abrasive cleaning, particularly of old instruments, may lead to an insulation failure. It is then possible for a conducting surface other than the electrode to come into contact or create an arc with an adjacent viscus. If burning does not directly cause a perforation, it may lead to necrosis and perforation at a later date.
4. Direct coupling: Current may flow from the active electrode of a monopolar instrument to a contiguous conducting instrument; this is an example of direct coupling. The result is poor function at the active electrode and an unnoticed burn from the second instrument.
5. Residual heat: After use, diathermy electrodes can remain sufficiently hot to cause burns. After use, withdraw the electrode or keep it in view.
6. Current concentration: As in open surgery, monopolar diathermy of a pedicle concentrates the current density. This may lead to inadvertent heating of other structures, for example heat injury at laparoscopic cholecystectomy can lead to a late stricture of the common bile duct.
7. Capacitative coupling: Alternating currents can pass through insulating materials, as occurs in devices called capacitors. During laparoscopy a capacitor may be formed inadvertently so current induced in a metal port then flows into neighbouring bowel and causes a burn. Avoid capacitative coupling by using a non-conducting electrode. If you are using a metal port ensure that it makes good contact with the abdominal wall. Avoid open-circuit activation and high-voltage diathermy such as fulguration.
Dissecting technique
1. Challenges: As in open surgery a safe and effective approach to tissue dissection is crucial to patient outcome. However, there are additional challenges during laparoscopy. In the main these relate to a loss of tactile feedback from tissues and instruments, challenges in exposure/retraction and difficulties in maintaining haemostasis.

2. Tactile feedback: Laparoscopic instruments do provide tactile feedback but you need to spend time either on a simulator or in a mentored environment acquiring sensitivity to the feel and handling of tissues, needles and sutures. Remember that the body wall acts as a fulcrum and forces applied at the hand piece are modified as they are transmitted to tissues at the tip.
3. Instrumentation: Developments in surgical approaches and laparoscopic instrumentation have to a degree mitigated some of the problems associated with dissection techniques. There are a range of purpose built, mainly disposable instruments, that now enable you to develop tissue planes and transect structures without the penalty of major delays in maintaining haemostasis.
4. Effective combinations: There are certain instrument combinations that have proved to be reliable and effective for dissection. The choice of any particular combination depends on the specific procedure, personal preference, instrument availability and cost as follows:


Exposure
1. Gravity: Gravity can be a useful adjunct to aid exposure in laparoscopic surgery. This starts with patient positioning, followed by appropriate table tilt. For each of the commoner procedures there are standard positions for patient, table and surgeon. For procedures requiring prolonged exposure in an extreme Trendelenburg position care must be taken to avoid the risk of retinal vein thrombosis.
2. Retraction: There are a large number of disposable and reusable designs of retractor for specific laparoscopic procedures. Most are 5-mm or 10-mm instruments, which have intra-abdominal parts that are deployed after insertion. Avoid retractors with sharp edges. Favour using fixed table clamps for retractors that are likely to remain in place for long periods during the procedure.
HAEMOSTASIS
1. Small vessels: As in open surgery, applying heat to achieve tissue desiccation, either generated by diathermy or ultrasound, secures most small vessels. All the instruments described above have limitations; adhere to them. Use them to best advantage. They all require a degree of sophistication in handling. In particular, avoid haste when using the ultrasonic shears and tissue sensing bipolar diathermy. In both, the effect on tissues is time dependent. In addition care must be exercised in selecting the appropriate mode (i.e. cut for relatively avascular structures and coagulation for specific vessels).

2. Larger vessels and pedicles: There are a number of methods of securing larger vessels and pedicles as follows:
 Although ligatures remain the cheapest option they are more difficult to secure in laparoscopic surgery compared with open surgery. Knots can be formed in both an extracorporeal and intracorporeal fashion. Both need considerable dexterity to be used quickly and effectively. A preformed Roeder knot mounted on a disposable pusher remains a simple solution to ligation provided it can be passed over the tissue in question, such as an appendix stump or oedematous cystic duct.


3. Coping with haemorrhage: Ability to cope with degrees of haemorrhage is an essential accomplishment in all surgery. The challenge is greater in laparoscopic procedures and best avoided if at all possible by using a more measured approach to dissection. Nevertheless, bleeding occurs from time to time, particularly in complex procedures. This often arises from a single bleeding point. As in open surgery, the correct sequence of applying immediate tamponade, followed by suction/irrigation to clear the field, completed by the definitive step of securing the source of the bleed, is usually effective. A helpful adjunct is to apply tamponade with small swabs over which you can use suction to improve the field of view. Additionally, you may use additional ports through which an assistant can independently control suction and irrigation. This tactic frees both of your hands to effect control. Bleeding can also occur on removal of ports with damage to the inferior epigastric vessels. Application of direct pressure using a Johann or other laparoscopic instrument will buy you time. A suture applied across the vessel and abdominal wall should suffice to stem the bleeding. Alternatively in cases of catastrophic bleeding, a foley catheter can be placed through the trocar site and inflated to create a balloon tamponade effect.
4. Surface control: Controlling haemorrhage on the surface of a raw area is an occasional problem. Typically, this occurs on a friable organ such as liver, perhaps in the gall bladder bed, or the spleen following a capsular tear. Applying a monopolar diathermy instrument effectively produces an area of desiccation, but the eschar may then be torn away as you withdraw the tip of the diathermy instrument. Occasionally, bipolar diathermy is more effective in this situation but is less efficient when you need to control a large area. Such an area can be approached using monopolar diathermy set on ‘fulguration’ (Latin: fulgur = lightning) in which the electrical spark arcs without tissue contact. Be careful to adjust the setting of the electro-cautery device at a safe level. If it is available, use an argon beam diathermy delivered via a laparoscopic probe to control large surface areas. Care needs to be taken in using this instrument as large volumes of argon gas are injected into the pneumoperitoneum at high pressure. Vent this gas via a port to prevent overpressure and argon gas embolus.


Conversion
1. Indications: Do not view conversion to open surgery as a failure on your part. View it as an act performed in the patient’s best interests. There are a number of indications for conversion, including failure to make progress, unsuspected pathology, uncontrolled haemorrhage, technical difficulties and equipment failure.
2. Timing: Uncontrolled haemorrhage is the single commonest reason for rapid conversion. Fatalities have been reported following failure to appreciate the urgency for conversion, particularly following aortic or caval trauma during first port insertion.


Closure
1. Before removing the ports, ensure that you have achieved complete haemostasis. Ensure that there are no retained foreign bodies in the abdomen such as spilt gallstones, small swabs, needles. Wash out any blood remaining in the peritoneal cavity. Remove all laparoscopic instruments and ports under direct vision while checking for port-site bleeding. Make sure no intra-abdominal structures have become trapped in the ports or port sites. Remove the final port slowly, while the laparoscope is still inside so you can finally check for bleeding.
2. Gas can be removed by using the suction device or expelled through palpation of the abdomen. Midline 10 mm port incision should be closed using a 2 o’vicryl suture or PDS mounted on a J needle. A crochet needle may also be applied for a closure technique. Ensure that fascia is taken with each suture bite and triangulate the port defect. Take care not to pick up bowel in the suture. This allows a mass closure of the abdomen and prevents future port site hernia with potential for incarceration.
Postoperative
1. Monitor all patients as following an open laparotomy, with regular observations. Remind the patients of referred shoulder tip pain following pneumoperitoneum. Mobilize them early and encourage them to eat and drink.
2. Most patients can be discharged within 24 hours of laparoscopy; the length of stay increases with more extensive procedures.
Complications
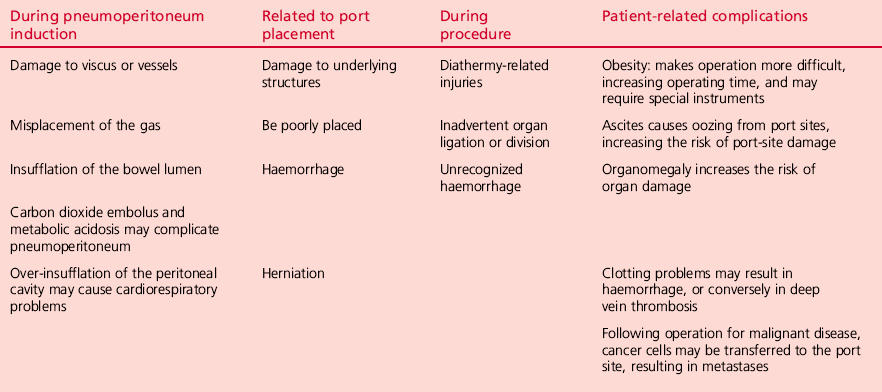
Since laparoscopic surgery usually requires a general anaesthetic, patients are susceptible to the usual complications related to this. Table 5.3 lists complications common to laparoscopy and pneumoperitoneum. Unrecognized bowel injury is a particular worry following any laparoscopic procedure and should be suspected in any patient in whom there is no reasonable explanation for a slow or delayed recovery on their first or second postoperative day.
Darzi, A., Monson, J.R.T. Laparoscopic inguinal hernia repair. Oxford: ISIS Medical Media; 1994.
Darzi, A., Talamini, M., Dunn, D.C. Atlas of laparoscopic surgical technique. London: Saunders; 1997.
Goldfaden, A., Birkmeyer, J.D. Evidence-based practice in laparoscopic surgery: Perioperative care. Surg Innov. 2005; 12:51–61.
Hasson, H. Open laparoscopy: A report of 150 cases. J Reprod Med. 1974; 12:234–238.
Herron, D.M., Gagner, M., Kenyon, T.L., et al. The minimally invasive surgical suite enters the 21st century. A discussion of critical design elements. Surg Endosc. 2001; 15:415.
Hunter, J.G., Jobe, B.A., Minimally Invasive Surgery, Robotics, and Natural Orifice Transluminal Endoscopic Surgery Chapter 14Brunicardi F.C., Andersen D.K., Billiar T.R., Dunn D.L., Hunter J.G., Matthews J.B., Pollock R.E., eds. Schwartz’s Principles of Surgery, 9th ed, New York: McGraw-Hill, 2010.
Hurd, W.W., Amesse, L.S., Gruber, J.S., et al. Visualization of the epigastric vessels and bladder before laparoscopic trocar placement. Fertil Steril. 2003; 80:209–212.
Larsen, J.F., Svendsen, F.M., Pedersen, V. Randomized clinical trial of the effect of pneumoperitoneum on cardiac function and haemodynamics during laparoscopic cholecystectomy. Br J Surg. 2004; 91:848–854.
Lowry, P.S., Moon, T.D., D’Alessandro, A., Nakada, S.Y. Symptomatic port-site hernia associated with a non-bladed trocar after laparoscopic live-donor nephrectomy. J Endourol. 2003; 17:493–494.
Mishra, R.K., Fundamentals of Laparoscopic Surgery. Textbook of practical laparosocpic surgery. 2nd ed. Mc-Graw Hill-Medical, 2009.
Vernon, A.H., Hunter, J.G., Fundamentals of Laparoscopic Surgery Chapter 44Ashley S.W., Zinner M.J., eds. Maingot’s Abdominal Operations, 11th ed, New York: McGraw-Hill, 2007.