[level-membership-for-neurosurgery-category]
Chapter 124 Percutaneous Stereotactic Rhizotomy in the Treatment of Intractable Facial Pain
In this chapter, we review the most relevant data and classic papers1–8 associated with the various physiologic and ablative procedures. Using the experiences of our patients and evidence in the literature, we conclude that the percutaneous techniques, best represented by radiofrequency rhizotomy, provide the most effective and reproducible results, enduring long-term relief from pain, and the fewest side effects when compared with other ablative procedures. Considering these findings and the ongoing refinements in treatment protocols, we now focus our efforts on training in the art and science of these technical procedures, especially for young neurosurgeons and others who treat facial pain. Dedicated to this training effort, our treatment paradigm, with its full complement of modalities, is carefully highlighted in this chapter, and in courses at annual meetings of the American Association of Neurological Surgeons, other educational efforts, websites of professional organizations, and patient support groups (e.g., Trigeminal Neuralgia Association).
Indications and Patient Selection
On the basis of our experience and a review of the literature, we conclude the following. First, percutaneous techniques and posterior fossa exploration offer advantages and disadvantages. Second, radiofrequency rhizotomy is the procedure of choice when medications fail and a first surgical treatment is considered to be unsafe. Age is not a reason in itself for rejecting the idea of a craniotomy as an effective treatment because many patients 75 years and older tolerate this procedure extremely well. Third, microvascular decompression of cranial nerve V is recommended for healthy patients, those with isolated pain in the first ophthalmic trigeminal division or in all three trigeminal divisions, and patients who desire no sensory deficit.9
Cannulization, Stimulation, and Lesion Production
Using the senior author’s experience in performing more than 4000 percutaneous stereotactic radiofrequency rhizotomies, we describe the three key steps of the procedure as (1) cannulization of the foramen ovale and the trigeminal cistern, (2) stimulation for pain reproduction and determination of intensity threshold, and (3) generation of an effective partial sensory lesion. To this end, we first review the nuances related to the successful cannulization of the foramen ovale and trigeminal cistern. Secondly, we define the subtleties of stimulation that allow for superior lesion production. Finally, we provide an algorithm that allows for the generation of an effective partial sensory lesion. This three-step approach to percutaneous radiofrequency rhizotomy of the trigeminal nerve has proven safe and effective in more than 95% of patients.
Step 1: Cannulation of the Foramen Ovale
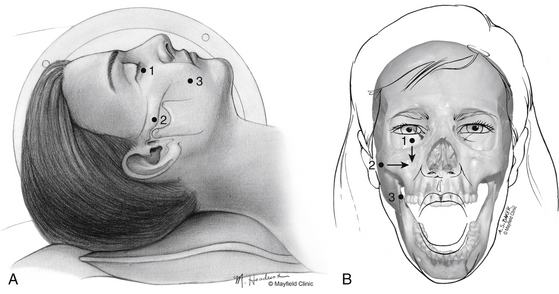
One hour before the procedure, 0.4 mg of atropine is administered intramuscularly to reduce oral secretions and prevent bradycardia. The patient is positioned supine on the fluoroscopic table with the head neutral. Next, Hartel’s three anatomic landmarks are plotted on the face: a point beneath the medial aspect of the pupil, a point 3 cm anterior to the external auditory meatus, and a point 2.5 cm lateral to the oral commissure (Fig. 124-1A and B).10 The first two points provide the rostral/caudal and medial/lateral trajectories for the penetration of the foramen ovale, and the third point is where the needle penetrates the skin of the jaw. The affected cheek is prepared with Betadine (Purdue-Frederick, Norwalk, CT). A 21-gauge spinal needle placed in the deltoid subcutaneous tissue acts as a reference and grounding electrode, or alternatively, a bovie pad can be used.
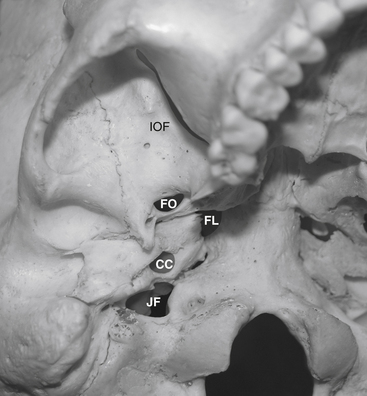
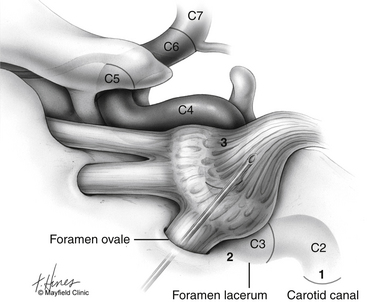
Before cannulization of the foramen, understanding the skull base anatomy and its anatomic variants is essential (Fig. 124-2). Aberrant placement of the cannula can result in unintended neurovascular injuries. Use of lateral fluoroscopic imaging will aid in avoiding the following: cannulization of the inferior orbital fissure (IOF) anterosuperiorly or the jugular foramen posteroinferiorly, or intracranial placement of the cannula through aberrant foramina (e.g., foramen of Vesalius, which lies anteromedial to the foramen ovale, or innominate canal of Arnold, which lies posterior to the foramen ovale). Pulsatile blood flow through the cannula indicates penetration of the internal carotid artery (ICA). Puncture of the ICA can occur in three locations: at the proximal C2 segment at the carotid canal, the C3 segment with the electrode passing through the cartilage of the foramen lacerum, and the cavernous (C4) segment (Fig. 124-3). This third type of penetration was described by Rish,11 who noted that an anteromedial electrode passing through the foramen ovale can penetrate the C4 segment of the ICA. If ICA penetration occurs, the cannula is withdrawn promptly, manual pressure is applied over the posterior pharyngeal space, the procedure is discontinued, and the patient is allowed 24 to 48 hours to convalesce. Ischemic complications, such as hemiparesis, and carotid-cavernous fistula have resulted from puncture of the ICA.11 Generally, arterial punctures are minimized by refraining from broad angular readjustments of the electrode and diligent attempts to avoid trajectories that are either posterolateral or posteromedial to the foramen of ovale; such trajectories jeopardize the carotid canal and foramen lacerum, respectively.
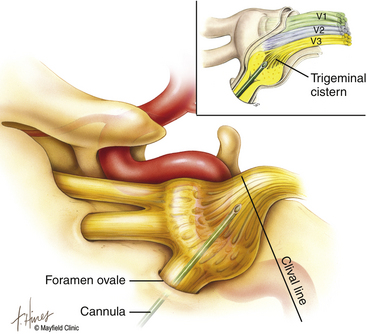
The primary goal of the cannulization step is penetration of the medial portion of the foramen ovale and placement of the electrode’s tip in the retrogasserian rootlets (Fig. 124-4). Using Hartel’s landmarks, we advocate either the direct penetration technique or the sequential palpation in which the surgeon sequentially walks the cannula down the smooth surface of the infratemporal fossa toward the superior-medial aspect of the foramen (Fig. 124-5). If the cannula enters the posterolateral aspect of the foramen, it may elude the trigeminal cistern and not contact the trigeminal ganglion within its dural investment. Additionally, as the electrode is advanced, it may not reach the maxillary or ophthalmic divisions of the rootlet.
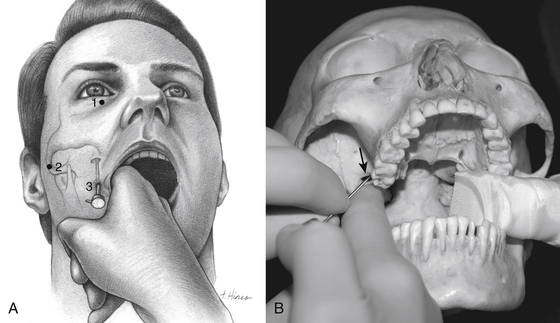
To begin, a 9-mm airway turned sideways or a bite block is inserted into the patient’s mouth between the molars on the opposite side to prevent the patient from involuntarily biting the surgeon’s finger. The patient is anesthetized with a rapid intravenous injection of 30 to 50 mg of methohexital (Brevital) followed by a 10-ml saline flush. Once the patient is fully asleep, the surgeon inserts the indexed finger of gloved hand inside the patient’s mouth, sliding along the inferior and medial wall of the lateral pterygoid to a point where it hooks around the lateral pterygoid, to guide the cannula toward the foramen ovale. A standard 100-mm, 20-gauge cannula, with its stylet in place, is inserted into the cheek 2.5 cm lateral to the oral commissure. The cannula is aimed toward the intersection of an axial plane, passing 3 cm anterior to the external auditory meatus, and a sagittal plane, passing through the medial aspect of the pupil. Although placement is by free-hand manipulation, fluoroscopic visualization is important to assist localization. Use of the image intensifier in the lateral plane effectively localizes the needle.4 Entrance of the cannula into the foramen ovale is signaled by a wince and a brief contraction of the masseter muscle, indicating contact with the mandibular sensory and motor fibers. Before the cannula is advanced any further, a lateral fluoroscopic image is obtained to confirm proper placement in the foramen ovale (Fig. 124-6). Fluoroscopy allows targeting a point along the lateral projection of the clivus, which is 5 to 10 mm below the floor of the sella. If difficulty penetrating the foramen ovale ensues, one should pause and return to a fundamental principle—namely, the safest approach to the foramen ovale is a trajectory that begins anteromedially to the foramen. In this manner, the surgeon can sequentially palpate, using the cannula along the smooth surface of the infratemporal fossa, and enter the superior medial aspect of the foramen. Use of this technique ensures a cannula trajectory in which the electrode will enter the trigeminal cistern at an angle and then sequentially contact each of the three divisions of the trigeminal root. Furthermore, targeting the anteromedial portion of the foramen ovale reduces the risks associated with probing alternative portions of the skull base, lowers the incidence of hematoma due to venous or arterial hemorrhage, and increases the probability of entering the trigeminal cistern.

Step 2: Stimulation of the Trigeminal Nerve
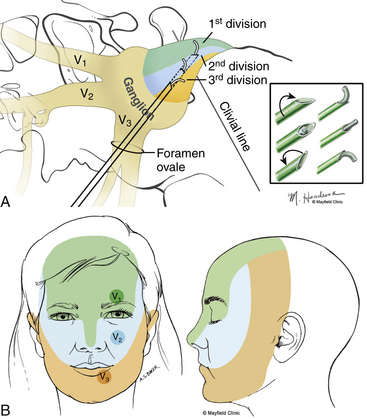
Targeted stimulation begins with the manipulation of the electrode’s tip in two dimensions as viewed on lateral fluoroscopy: the relationship of the electrode tip to the profile of the clivus and the curvature of the electrode’s tip. When the tip rests at the clival level, a stimulating pulse typically elicits paresthesias in the maxillary division rootlets. Advancement beyond the clival profile moves the electrode into the territory of the ophthalmic division rootlets, while withdrawal of the needle from the level of the clivus targets the mandibular division rootlets (Fig. 124-7A). The electrode’s tip should not be advanced more than 10 mm deep to the profile of the clivus because the tip can contact the trochlear or abducens nerve in this region. Sometimes the needle must be redirected more anteromedially to bring the tip closer to the posterior clinoid process for closer contact with the ophthalmic division. If the globe moves during stimulation, the cannula is too near the cranial nerves (CNs) in the cavernous sinus or perhaps near the brain stem. Stimulus-evoked facial contractions indicate that the electrode is either too deep, inclined too low on the clivus, or the stimulation level is too high. A lesion should not be made if there is any indication of motor nerve III, IV, VI, or VII stimulation or arterial bleeding.
After this initial placement and understanding of clival relationships, the axial rotation of the curved electrode permits a secondary form of targeting. Precise anatomic localization within the sensory root is aided by this maneuverability. The curved electrode tip is a coil spring that carries a thermocouple, stimulator, and lesion-generating probe. When the electrode is fully inserted into the cannula, the curved tip extends 5 mm beyond the end of the cannula and projects 3 mm perpendicular to the long axis of the electrode. Insulation of the cannula with polytetrafluoroethylene allows only the extruded portion of the electrode (0 to 5 mm) to be conductive. Rotation of the electrode can occur through a 360-degree axis for stimulation and lesion production (Fig. 124-7A). However, final placement of the electrode’s tip is determined by the patient’s response to electrical stimulation. In the sagittal plane, which can be viewed on lateral fluoroscopy, a tip projecting cephalad or medial provides better access to the fibers of the ophthalmic division, whereas the caudal or lateral projection should enable contact with the mandibular fibers. Additionally, if the electrode contacts the motor root and elicits stimulation of the masseter or pterygoid muscles, the electrode can be rotated laterally to reduce the incidence of a lesion that may result in a trigeminal motor paresis.
Alternatively, stimulation can be achieved with mild heat (less than 50 °C). The evoked response not only localizes but can reliably indicate the probe temperature required for lesion production. Consequently, the threshold current responsible for eliciting pain can be translated into a temperature and duration for the initial lesion, thus fulfilling the second objective. Our paradigm for conversion of a stimulus threshold voltage into a temperature and duration for an initial lesion is found in Table 124-1.
Table 124-1 Cincinnati Paradigm Used to Convert Threshold Stimulus into Lesion Temperature and Duration
| Stimulation Intensity (Volts) | Electrode Temperature (°C) | Duration of Lesion (Seconds) |
|---|---|---|
| <0.1 | 60 | 60 |
| 0.2–0.3 | 65 | 60 |
| 0.3–0.4 | 70 | 60 |
| 0.5–0.6 | 75 | 60 |
| 0.7–0.8 | 80 | 60 |
| >1.0 | No lesion; reposition electrode | |
Printed with permission from the Mayfield Clinic.
Step 3: Lesion Production
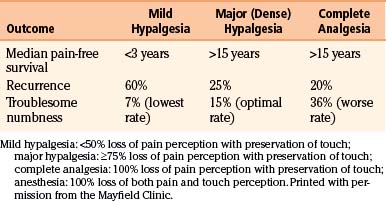
Studies have shown a direct correlation between the extent of facial sensory deficit and the duration of trigeminal pain relief with percutaneous stereotactic radiofrequency rhizotomy.19,28 However, greater sensory deficit also leads to a higher incidence of complaints (e.g., problems eating) and dysesthesia (Table 124-2). Generation of a lesion with mild to moderate hypalgesia in the primarily affected division(s) provides sufficient longevity yet limits the morbidity associated with more dense lesions. For a patient who has not undergone a previous procedure, we recommend producing a mild hypalgesic lesion (<50% loss of pain perception with preservation of touch perception) in the involved trigeminal division. For a patient with pain recurrence after previous procedures have failed, we recommend producing a major or dense hypalgesic lesion (>75% loss of pain perception with preservation of touch perception) in the involved trigeminal division. The ease of performing the procedure allows for additional treatments in patients with recurrent pain.
With the information gained during stimulation, additional intravenous anesthetic is administered and a preliminary lesion is produced. Reproducible lesions are 5 × 5 × 4 mm, are eccentric, and are oriented toward the curve of the electrode. The electrode tip measures 0.5 mm in diameter. A thermocouple sensor located at the electrode tip provides calibration accuracy of ±2 °C over a range of 30 °C to 100 °C. It is important to perform continuous pinprick sensory testing during lesion production to determine when a deficit begins to develop. A facial flush (secondary to antidromic release of vasodilatory neuropeptides, such as substance P and calcitonin gene-related peptide), may be seen and is localized to the division of the trigeminal nerve undergoing thermal lesioning.12–14
After the initial lesion, when the patient is fully awake, sensory testing of the face is conducted to assess numbness. Testing follows a standard regimen, which includes verbal feedback from the patient and observation by the surgeon. We begin by testing gross pinprick sensation in all three divisions on both sides of the face, marching a pin toward and then across midline. If a difference is noted between left and right sides, we ask the patient to use a 10-point scale to quantify the extent of numbness. We then test for the presence of analgesia by comparing pinprick to light touch. Because of overlap among the sensory distributions of the trigeminal nerve, a keen knowledge of the autonomous areas of sensory innervation is fundamental for proper sensory assessment (Figure 124-7B).
Results
Of these initial 1200 patients, 93% reported excellent or good results after percutaneous stereotactic rhizotomy (mean follow-up of 9 years; range, 1 to 21 years). In our prospective study of 154 patients who were followed for 15 years, 95% rated the outcome of percutaneous radio-frequency trigeminal rhizotomy as excellent or good.15
Recurrence of Trigeminal Neuralgia
In a retrospective study of 1200 patients followed for a mean of 9 years (range, 1 to 21 years), pain recurred in 20% of patients, including pain recurrence that was minor and required no medication in 5%; moderate pain that was well controlled with medication in 5%; and severe pain that required a surgical procedure in the remaining 10%.9 In a prospective study of 154 patients followed for 15 years, the Kaplan-Meier analysis estimated a 25% pain recurrence rate at 15 years with recurrences occurring early: 15% within 5 years, 7% within 5 to 10 years, and 3% within 10 to 15 years.15 Pain recurrence correlated directly with the degree of sensory loss: 60% of patients with mild hypalgesia had pain recurrence compared with 25% of patients with dense hypalgesia and 20% of patients with analgesia (Table 124-2). The median pain-free survival rate was 32 months for patients with mild hypalgesia and more than 15 years for those with analgesia or dense hypalgesia.
Adverse Effects
Sensory
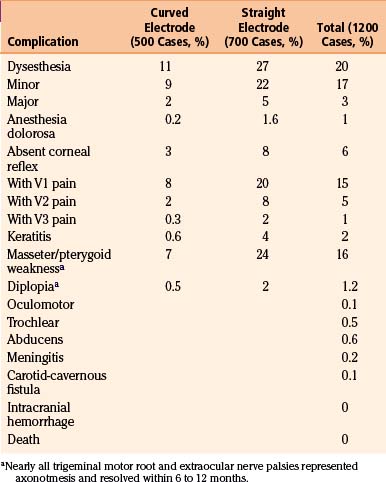
All patients experience some facial numbness after a successful radiofrequency thermocoagulation procedure. Troublesome numbness and paresthesias as a result of the inherent sensory deficit proved to be the most consistent adverse effect. The incidence of this adverse effect decreased with the use of a curved electrode9; our initial 1200 patients had an overall 3% incidence for major paresthesias (Table 124-3). Of the 17% of patients who described an intermittent crawling, burning, or itching sensation that did not require treatment, these paresthesias diminished with time; interestingly, the more active and mentally alert patients reported fewer disturbances of sensation. A constant, severe dysesthesia in an anesthetic or analgesic zone (anesthesia dolorosa) rarely occurred with the straight electrode, and occurred in only one patient with the curved electrode. Tactics to reduce dysesthesia include testing sensations continuously during lesion production, asking the patient whether numbness is tolerable during the procedure, quantifying rather than qualifying numbness, and stopping lesion production when pain during thermocoagulation is no longer felt.
Ocular
Corneal analgesia developed in 6% of patients; rates of this complication declined with the use of the curved electrode (see Table 124-3). Of 2% of patients who developed neurogenic keratitis, 30% had corneal analgesia rather than anesthesia, thus indicating that touch perception did not necessarily protect against corneal ulceration. However, early ophthalmologic care allowed resolution of the corneal abrasions in all patients. Application of a soft contact lens, meticulous eye care, and occasional tarsorrhaphy prevented permanent visual loss.
Motor Paresis
Partial paresis of muscles innervated by the motor root of the trigeminal nerve occurred in 16% of patients. The motor root lies superomedial to the ganglion and may be avoided by lateral rotation of the curved electrode when stimulation causes contraction of the masseter or pterygoid. Thus the incidence of immediate postoperative muscle paresis declined from 24% to 7% by using the more mobile curved electrode (see Table 124-3). In most cases, the deficit was partial and transient.
Discussion
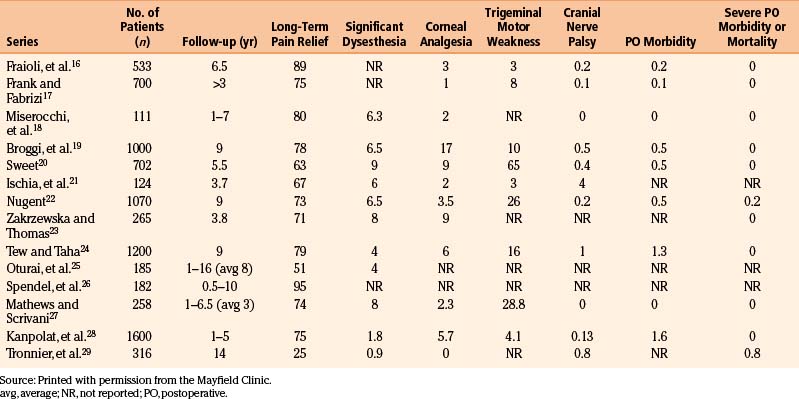
The most troublesome adverse effect after percutaneous radiofrequency rhizotomy is sensory paresthesias. The documented ability of the curved electrode tip to directly contact the involved sensory fibers allows the production of a more selective lesion than that produced by a straight electrode, thus enabling the reduction of undesirable sensory effects. We replaced our early enthusiasm to prevent pain recurrence by creating a large sensory lesion in all trigeminal divisions with a strategy of producing a smaller, more selective sensory lesion in the specific trigeminal division. Although the incidence of pain recurrence may increase, we believe that the ease of repeating the procedure justifies this strategy, the creation of partial sensory lesions, to minimize undesirable side effects (e.g., dysesthesia, corneal sensation). Based on our experience, a dense hypalgesic lesion is associated with a 25% risk of pain recurrence over 15 years and a 15% risk of dysesthesia, which is usually minor and does not require treatment (Table 124-2).15 In our review of the literature from 1989 to 2003,16–29 in which we focused on series that included more than 100 patients, percutaneous radiofrequency rhizotomy was effective in controlling trigeminal neuralgia pain, had minimal morbidity, and demonstrated acceptable rates of recurrence (Table 124-4). Furthermore, the radiofrequency rhizotomy procedure can easily be repeated with neither higher complication rates nor reduction in efficacy.
Table 124-4 Results of Percutaneous Stereotactic Radiofrequency Rhizotomy in Series (Since 1989) of ≥100 Patients (%)
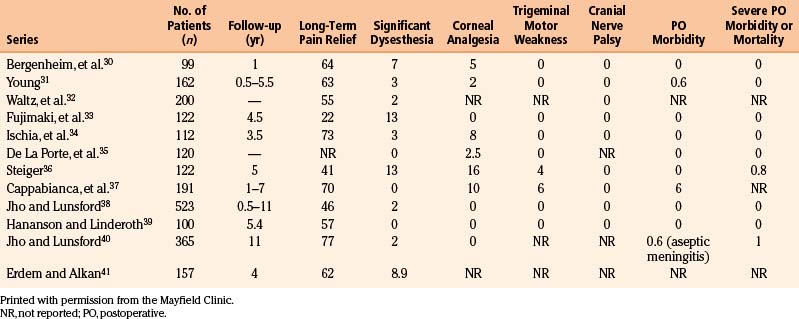
Alternative percutaneous techniques, such as glycerol injection or balloon compression, have not been detailed as thoroughly in the literature. Glycerol injection is appealing because it appears to anatomically preserve the sensory rootlets. Theoretically, it is a mechanism to relieve pain without major sensory loss or dysesthesias while preserving the corneal reflex. However, data suggest that this technique is destructive and requires sensory denervation to avoid a high rate of recurrence.30 In many series, recurrence rates are prohibitively high, and dysesthesia still constitutes a major complication. In addition, unique to this procedure, chemical meningitis occasionally constitutes a major perioperative morbidity.42 Table 124-5 summarizes the results of several large series of patients treated with glycerol injection.30–41
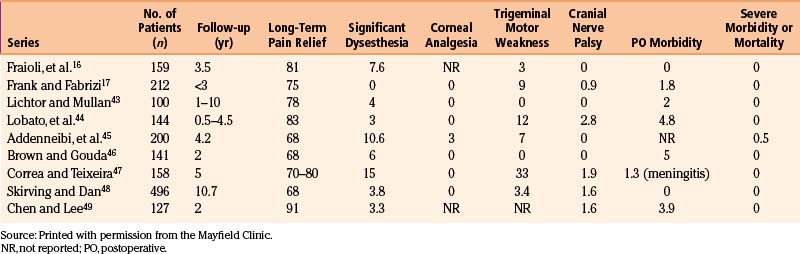
Percutaneous balloon compression has been demonstrated to preserve most small myelinated and unmyelinated fibers. Theoretically it should preserve light touch. In addition, some advocate for this procedure because patient’s cooperation is not required and therefore general anesthesia can be used. Recurrence rates remain high and occur after a short period of time. Table 124-6 summarizes the results of several large series of patients treated with this procedure.16,17,43–49 Balloon compression is a destructive procedure that can cause dysesthesia and facial numbness. Additional complications include carotid-cavernous fistula formation,43 transient blindness,50 and death.45 Some advocate that balloon compression may have a role in treating patients with pain of the first trigeminal division (V1) who require preservation of the corneal reflex. In our practice, however, similar results can be achieved by supraorbital and supratrochlear neurectomy.
Among the open intracranial procedures for trigeminal neuralgia, posterior fossa microvascular decompression and open partial rhizotomy are usually performed. Transtemporal decompression is rarely performed because of the association with high rates of recurrence and complications.51 Microvascular decompression has a high rate of immediate trigeminal neuralgia pain relief and boasts a recurrence rate equal to or better than percutaneous rhizotomy.52–60 In the most comprehensive study of microvascular decompression, Barker et al. demonstrated a 30% recurrence rate over a 20-year period (median follow-up, 6.2 years) in 1155 patients. Importantly, most postoperative recurrences occurred within the first 2 years after surgery. Ten years after the procedure, the rate of facial pain recurrence was less than 1% per year. Because of these and similar results reported in the literature and the avoidance of troublesome numbness, most advocate microvascular decompression as the procedure of choice, especially in young patients. Patient selection remains important because posterior fossa exploration is associated with higher mortality and morbidity rates than with any percutaneous technique. In considering patient treatment options, posterior fossa exploration should be considered carefully in patients who have significant risk factors for craniotomy (e.g., cardiac disease, absolute need for anticoagulation, adverse reaction to general anesthesia, etc.). Although a physiologic age over 65 was previously considered to be a contraindication for surgery, recent evidence suggests that with careful patient selection, age alone does not increase morbidity or mortality. When consulting with patients, we also mention that some patients show no evidence of compression (estimated 15% in cumulative series9). In these patients, some advocate a partial trigeminal rhizotomy at the time of surgery.
Given all of the above data, the ongoing refinements in treatments,61–64 and evidence-based review,65 our institution continues to rely primarily on percutaneous radiofrequency rhizotomy and microvascular decompression. Radiofrequency rhizotomy is the procedure of choice for most elderly patients undergoing first surgical treatment. Compared with posterior fossa exploration, all percutaneous techniques have lower incidences of hearing loss, facial palsy, intracranial complications, perioperative morbidity, and mortality. Among the percutaneous techniques, we believe radiofrequency rhizotomy affords the most selective and graded lesion, and can be easily repeated in those patients who experience recurrent facial pain. Microvascular decompression is recommended for healthy patients, those patients with isolated pain in the first ophthalmic trigeminal division or in all three trigeminal divisions, and for patients who desire no sensory deficit. In patients with recurrent pain after microvascular decompression, we opt for radiofrequency rhizotomy as the secondary technique. Stereotactic radiosurgery is an option for patients who may be taking anticoagulants or have other medical contraindications to surgery, or prefer this modality.
Summary
Percutaneous radiofrequency rhizotomy of the trigeminal nerve is a safe and elegant procedure when performed by experienced neurosurgeons. Treatment of this benign disorder demands use of a procedure that is associated with low morbidity and negligible mortality. If patients experience a recurrence, a repeat percutaneous radiofrequency rhizotomy does not pose a significant problem because the procedure is easily repeated. Therefore, higher recurrence rates associated with smaller radiofrequency lesions are acceptable to reduce the risk for denervation paresthesias and dysesthesias. Ongoing refinement in treatment protocols is comprehensive training on the art and science of these technical procedures, especially important for young neurosurgeons and others who treat facial pain. Our treatment paradigm, with its full complement of modalities, is carefully presented at professional meetings, courses, and patient education venues.
Barker F., Jannetta P., Bissonette D., et al. The long-term outcome of microvascular decompression for trigeminal neuralgia. N Engl J Med. 1996;334:1077-1083.
Broggi G., Franzini A., Lasio G., et al. Long-term results of percutaneous retrogasserian thermorhizotomy for “essential” trigeminal neuralgia: considerations in 1000 patients. Neurosurgery. 1990;26:783-787.
Gronseth G., Cruccu G., Alksne J., et al. Practice parameter: the diagnostic evaluation and treatment of trigeminal neuralgia (an evidence-based review). Report of the Quality Standards Subcommittee of the American Academy of Neurology and the European Federation of Neurological Societies. Neurology. 2008;71(15):1183-1190.
Han J.H., Kim D.G., Chung H.T., et al. Long-term outcome of gamma knife radiosurgery for treatment of typical trigeminal neuralgia. Int J Radiat Oncol Biol Phys. 2009;75(3):822-827.
Kanpolat Y., Savas A., Bekar A., Berk C. Percutaneous controlled radiofrequency trigeminal rhizotomy for the treatment of idiopathic trigeminal neuralgia: 25-year experience with 1,600 patients. Neurosurgery. 2001;48:524-532.
Lopez B.C., Hamlyn P.J., Zakrzewska J.M. Systematic review of ablative neurosurgical techniques for the treatment of trigeminal neuralgia. Neurosurgery. 2004;54:973-983.
Sindou M., Amrani F., Mertens P. Microsurgical vascular decompression in trigeminal neuralgia: comparison of 2 technical modalities and physiopathologic deductions—a study of 120 cases. Neurochirurgie. 1990;36:16-25.
Skirving D.J., Dan N.G. A 20-year review of percutaneous balloon compression of the trigeminal ganglion. J Neurosurg. 2001;94:913-917.
Taha J.M., Tew J.M.Jr. A prospective 15-year follow-up of 154 consecutive patients with trigeminal neuralgia treated by percutaneous stereo-tactic radiofrequency thermal rhizotomy. J Neurosurg. 1995;83:989-993.
Taha J.M., Tew J.M.Jr. Comparison of surgical treatments for trigeminal neuralgia: reevaluation of radiofrequency rhizotomy. Neurosurgery. 1996;38:865-871.
Tew J.M.Jr., Keller J.T., Williams D.S. Application of stereotactic principles to the treatment of trigeminal neuralgia. Appl Neurophysiol. 1978;41:146-156.
Tronnier V.M., Rasche D., Hamer J., et al. Treatment of idiopathic trigeminal neuralgia: comparison of long-term outcome after radio-frequency rhizotomy and microvascular decompression. Neurosurgery. 2001;48:1261-1267.
van Loveren H., Tew J.M., Keller J.T., Nurre M.A. A 10-year experience in the treatment of trigeminal neuralgia: a comparison of percutaneous stereotaxic rhizotomy and posterior fossa exploration. J Neurosurg. 1982;57:757-764.
Zakrzewska J., Thomas D. Patient’s assessment of outcome after three surgical procedures in the management of trigeminal neuralgia. Acta Neurochir (Wien). 1993;122:225-230.
1. Kirschner M. Elektrocoagulation des ganglion gasseri. Zentralbl Chir. 1932;47:28-41.
2. White J.C., Sweet W.H. Pain and the Neurosurgeon. Springfield, IL: Charles C. Thomas; 1969. 594–621
3. van Loveren H., Tew J.M., Keller J.T., Nurre M.A. A 10-year experience in the treatment of trigeminal neuralgia: a comparison of percutaneous stereotaxic rhizotomy and posterior fossa exploration. J Neurosurg. 1982;57:757-764.
4. Tew J.M.Jr., Keller J.T., Williams D.S. Application of stereotactic principles to the treatment of trigeminal neuralgia. Appl Neurophysiol. 1978;41:146-156.
5. Letcher F.S., Goldring S. The effect of radiofrequency current and heat on peripheral nerve action potential in the cat. J Neurosurg. 1968;29:42-47.
6. Brodkey J.S., Miyazaki Y., Ervin F.R., et al. Reversible heat lesions with radiofrequency current. J Neurosurg. 1964;21:49-53.
7. Frigyesi T., Siegried J., Groggi G. The selective vulnerability of evoked potentials in the trigeminal sensory root to graded thermocoagulation. Exp Neurol. 1975;49:11-21.
8. Smith H.P., McWhorter J.M., Chalia V.R. Radiofrequency neurolysis in a clinical model: neuropathological correlation. J Neurosurg. 1981;55:246-253.
9. Taha J.M., Tew J.M.Jr. Comparison of surgical treatments for trigeminal neuralgia: reevaluation of radiofrequency rhizotomy. Neurosurgery. 1996;38:865-871.
10. Hartel F. Uber die intracranielle injektions behandlung der trigeminus-neuralgie. Med Klin. 1914;10:582.
11. Rish B.L. Cerebrovascular accident after percutaneous thermocoagulation of the trigeminal ganglion. J Neurosurg. 1976;44:376-377.
12. Gonzalez G., Onofrio B.M., Kerr F.W. Vasodilator system of the face. J Neurosurg. 1975;42:696-703.
13. Goadsby P., Edvinsson L., Ekman R. Release of vasoactive peptides in the extracerebral circulation of humans and the cat during activation of the trigeminovascular system. Ann Neurol. 1988;23:193-196.
14. Tran Dinh Y., Thurel C., Cunin G., et al. Cerebral vasodilation after the thermocoagulation of the trigeminal ganglion in humans. Neurosurgery. 1992;31:658-663.
15. Taha J.M., Tew J.M.Jr. A prospective 15-year follow-up of 154 consecutive patients with trigeminal neuralgia treated by percutaneous stereo-tactic radiofrequency thermal rhizotomy. J Neurosurg. 1995;83:989-993.
16. Fraioli B., Esposito V., Guidetti B., et al. Treatment of trigeminal neuralgia by thermocoagulation, glycerolization, and percutaneous compression of the gasserian ganglion and/or retrogasserian rootlets: long-term results and therapeutic protocol. Neurosurgery. 1989;24:239-245.
17. Frank F., Fabrizi A. Percutaneous treatment of trigeminal neuralgia. Acta Neurochir (Wien). 1989;97:128-130.
18. Miserocchi M., Cabrini G., Motti E., et al. Percutaneous selective thermorhizotomy in the treatment of essential trigeminal neuralgia. J Neurosurg Sci. 1989;33:179-183.
19. Broggi G., Franzini A., Lasio G., et al. Long-term results of percutaneous retrogasserian thermorhizotomy for “essential” trigeminal neuralgia: considerations in 1000 patients. Neurosurgery. 1990;26:783-787.
20. Sweet W.H. Treatment of trigeminal neuralgia by percutaneous rhizotomy. In: Youmans J., editor. Neurological Surgery. Philadelphia: WB Saunders; 1990:3888-3921.
21. Ischia S., Luzzani A., Polati E., et al. Percutaneous controlled thermo-coagulation in the treatment of trigeminal neuralgia. Clin J Pain. 1990;6:96-104.
22. Nugent R.G. Surgical treatment: Radiofrequency gangliolysis and rhi-zotomy. In: Fromm G.H., Sessle B.J. Trigeminal Neuralgia: Current Concepts Regarding Pathogenesis and Treatment. Stoneham, MA: Butterworth-Heinemann; 1991:159-184.
23. Zakrzewska J., Thomas D. Patient’s assessment of outcome after three surgical procedures in the management of trigeminal neuralgia. Acta Neurochir (Wien). 1993;122:225-230.
24. Tew J.M.Jr., Taha J.M. Percutaneous rhizotomy in the treatment of intractable facial pain (trigeminal, glossopharyngeal, and vagal nerves). In: Schmidek H.H., Sweet W.H. Operative Neurosurgical Techniques. 3rd ed. Philadelphia: WB Saunders; 1995:1469-1484.
25. Oturai A.B., Jensen K., Eriksen J., Madsen F. Neurosurgery for trigeminal neuralgia: Comparison of alcohol block, neurectomy, and radio-frequency coagulation. Clin J Pain. 1996;12:311-315.
26. Spendel M.C., Deinsberger R., Lanner G. Operative treatment of trigeminal neuralgia. Stereotact Funct Neurosurg. 1997;68:187-189.
27. Mathews E.S., Scrivani S.J. Percutaneous stereotactic radiofrequency thermal rhizotomy for the treatment of trigeminal neuralgia. Mt Sinai J Med. 2000;67:288-299.
28. Kanpolat Y., Savas A., Bekar A., Berk C. Percutaneous controlled radiofrequency trigeminal rhizotomy for the treatment of idiopathic trigeminal neuralgia: 25-year experience with 1,600 patients. Neurosurgery. 2001;48:524-532.
29. Tronnier V.M., Rasche D., Hamer J., et al. Treatment of idiopathic trigeminal neuralgia: Comparison of long-term outcome after radio-frequency rhizotomy and microvascular decompression. Neurosurgery. 2001;48:1261-1267.
30. Bergenheim A., Hariz M., Laitinen L., et al. Relation between sensory disturbance and outcome after retrogasserian glycerol rhizotomy. Acta Neurochir (Wien). 1991;111:114-118.
31. Young R. Glycerol rhizolysis for the treatment of trigeminal neuralgia. J Neurosurg. 1988;69:39-45.
32. Waltz T., Dalessio D., Copeland B., et al. Percutaneous injection of glycerol for the treatment of trigeminal neuralgia. Clin J Pain. 1989;5:195-198.
33. Fujimaki T., Fukushima T., Miyazaki S. Percutaneous retrogasserian glycerol injection in the management of trigeminal neuralgia: long-term follow-up results. J Neurosurg. 1990;73:212-216.
34. Ischia S., Luzzani A., Polati E. Retrogasserian glycerol injection: a retrospective study of 112 patients. Clin J Pain. 1990;6:291-296.
35. De La Porte C., Verlooy J., Veeck G., et al. Consequences and complications of glycerol injection in the cavum of Meckel: a series of 120 consecutive injections. Stereotact Funct Neurosurg. 1990;54-55:73-75.
36. Steiger H. Prognostic factors in the treatment of trigeminal neuralgia: analysis of a differential therapeutic approach. Acta Neurochir (Wien). 1991;113:11-17.
37. Cappabianca P., Spaziante R., Graziussi G., et al. Percutaneous retro-gasserian glycerol rhizolysis for treatment of trigeminal neuralgia: technique and results in 191 patients. J Neurosurg Sci. 1995;39:37-45.
38. Jho H.D., Lunsford L.D. Percutaneous retrogasserian glycerol rhizotomy. Neurosurg Clin North Am. 1997;8:63-74.
39. Hakanson S., Linderoth B. Injection of glycerol into the gasserian cistern for treatment of trigeminal neuralgia. In: Gildenberg P., Tasker R. Textbook of Stereotactic and Functional Neurosurgery. New York: McGraw-Hill; 1998:1697-1706.
40. Jho H.D., Lunsford L.D. Percutaneous retrogasserian glycerol rhizotomy: current techniques and results. Neurosurg Clin North Am. 1997;8:63-64.
41. Erdem E., Alkan A. Peripheral glycerol injections in the treatment of idiopathic trigeminal neuralgia: retrospective analysis of 157 cases. J Oral Maxillofac Surg. 2001;59:1176-1180.
42. Sweet W.H. The treatment of trigeminal neuralgia (tic douloureux): current concepts. N Engl J Med. 1986;315:174-177.
43. Lichtor T., Mullan J. A 10-year follow-up review of percutaneous microcompression of the trigeminal ganglion. J Neurosurg. 1990;72:49-54.
44. Lobato R., Rivas J., Sarabina R., Lamas E. Percutaneous microcompression of the gasserian ganglion for trigeminal neuralgia. J Neurosurg. 1990;72:546-553.
45. Addennebi B., Mahfouf L., Nedjahi T. Long-term results of percutaneous compression of the gasserian ganglion in trigeminal neuralgia. Stereotact Funct Neurosurg. 1997;68:190-195.
46. Brown J., Gouda J. Percutaneous balloon compression of the trigeminal nerve. Neurosurg Clin North Am. 1997;8:53-62.
47. Correa C.F., Teixeira M.J. Balloon compression of the gasserian ganglion for the treatment of trigeminal neuralgia. Stereotact Funct Neurosurg. 1998;71:83-89.
48. Skirving D.J., Dan N.G. A 20-year review of percutaneous balloon compression of the trigeminal ganglion. J Neurosurg. 2001;94:913-917.
49. Chen J.F., Lee S.T. Comparison of percutaneous trigeminal ganglion compression and microvascular decompression for the management of trigeminal neuralgia. Clin Neurol Neurosurg. 2003;105:203-208.
50. Agazzi S., Chang S., Drucker M.D. Sudden blindness as a complication of percutaneous trigeminal procedures: mechanism analysis and prevention. J Neurosurg. 2009;110(4):638-641.
51. Svien H.S., Love J.G. Results of decompression operation for trigeminal neuralgia four years plus after operation. J Neurosurg. 1959;16:653-655.
52. Bederson J., Wilson C. Evaluation of microvascular decompression and partial sensory rhizotomy in 252 cases of trigeminal neuralgia. J Neurosurg. 1989;71:359-367.
53. Sindou M., Amrani F., Mertens P. Microsurgical vascular decompression in trigeminal neuralgia: Comparison of 2 technical modalities and physiopathologic deductions: a study of 120 cases. Neurochirurgie. 1990;36:16-25.
54. Klun B. Microvascular decompression and partial sensory rhizotomy in the treatment of trigeminal neuralgia: Personal experience with 220 patients. Neurosurgery. 1992;30:49-52.
55. Cutbush K., Atkinson R. Treatment of trigeminal neuralgia by posterior fossa microvascular decompression. Aust N Z J Surg. 1994;64:173-176.
56. Mendoza N., Illingworth R. Trigeminal neuralgia treated by micro-vascular decompression: a long-term follow-up study. Br J Neurosurg. 1995;9:13-19.
57. Barker F., Jannetta P., Bissonette D., et al. The long-term outcome of microvascular decompression for trigeminal neuralgia. N Engl J Med. 1996;334:1077-1083.
58. Kondo A. Follow-up results of microvascular decompression in trigem-inal neuralgia and hemifacial spasm. Neurosurgery. 1997;40:46-51.
59. Lee K.H., Chang J.W., Park Y.G., et al. Microvascular decompression and percutaneous rhizotomy in trigeminal neuralgia. Stereotact Funct Neurosurg. 1997;68:196-199.
60. Pagura J., Rabello J., De Lima W. Microvascular decompression for trigeminal neuralgia. In: Gildenberg P., Tasker R. Textbook of Stereotactic and Functional Neurosurgery. New York: McGraw-Hill; 1996:1715-1721.
61. Lopez B.C., Hamlyn P.J., Zakrzewska J.M. Systematic review of ablative neurosurgical techniques for the treatment of trigeminal neuralgia. Neurosurgery. 2004;54:973-983.
62. Dhople A.A., Adams J.R., Maggio W.W. Long-term outcomes of Gamma Knife radiosurgery for classic trigeminal neuralgia: implications of treatment and critical review of the literature. Clinical article. J Neurosurg. 2009;111(2):351-358.
63. Kondziolka D., Zorro O., Lobato-Polo J., et al. Gamma knife stereotactic radiosurgery for idiopathic trigeminal neuralgia. J Neurosurg. 2010;112:758-765.
64. Han J.H., Kim D.G., Chung H.T., et al. Long-term outcome of gamma knife radiosurgery for treatment of typical trigeminal neuralgia. Int J Radiat Oncol Biol Phys. 2009;75(3):822-827.
65. Gronseth G., Cruccu G., Alksne J., et al. Practice parameter: the diagnostic evaluation and treatment of trigeminal neuralgia (an evidence-based review): report of the Quality Standards Subcommittee of the American Academy of Neurology and the European Federation of Neurological Societies. Neurology. 2008;71(15):1183-1190.
[/level-membership-for-neurosurgery-category][not-level-membership-for-neurosurgery-category]
Chapter 124 Percutaneous Stereotactic Rhizotomy in the Treatment of Intractable Facial Pain
In this chapter, we review the most relevant data and classic papers1–8 associated with the various physiologic and ablative procedures. Using the experiences of our patients and evidence in the literature, we conclude that the percutaneous techniques, best represented by radiofrequency rhizotomy, provide the most effective and reproducible results, enduring long-term relief from pain, and the fewest side effects when compared with other ablative procedures. Considering these findings and the ongoing refinements in treatment protocols, we now focus our efforts on training in the art and science of these technical procedures, especially for young neurosurgeons and others who treat facial pain. Dedicated to this training effort, our treatment paradigm, with its full complement of modalities, is carefully highlighted in this chapter, and in courses at annual meetings of the American Association of Neurological Surgeons, other educational efforts, websites of professional organizations, and patient support groups (e.g., Trigeminal Neuralgia Association).
Indications and Patient Selection
On the basis of our experience and a review of the literature, we conclude the following. First, percutaneous techniques and posterior fossa exploration offer advantages and disadvantages. Second, radiofrequency rhizotomy is the procedure of choice when medications fail and a first surgical treatment is considered to be unsafe. Age is not a reason in itself for rejecting the idea of a craniotomy as an effective treatment because many patients 75 years and older tolerate this procedure extremely well. Third, microvascular decompression of cranial nerve V is recommended for healthy patients, those with isolated pain in the first ophthalmic trigeminal division or in all three trigeminal divisions, and patients who desire no sensory deficit.9
Cannulization, Stimulation, and Lesion Production
Using the senior author’s experience in performing more than 4000 percutaneous stereotactic radiofrequency rhizotomies, we describe the three key steps of the procedure as (1) cannulization of the foramen ovale and the trigeminal cistern, (2) stimulation for pain reproduction and determination of intensity threshold, and (3) generation of an effective partial sensory lesion. To this end, we first review the nuances related to the successful cannulization of the foramen ovale and trigeminal cistern. Secondly, we define the subtleties of stimulation that allow for superior lesion production. Finally, we provide an algorithm that allows for the generation of an effective partial sensory lesion. This three-step approach to percutaneous radiofrequency rhizotomy of the trigeminal nerve has proven safe and effective in more than 95% of patients.
Step 1: Cannulation of the Foramen Ovale
One hour before the procedure, 0.4 mg of atropine is administered intramuscularly to reduce oral secretions and prevent bradycardia. The patient is positioned supine on the fluoroscopic table with the head neutral. Next, Hartel’s three anatomic landmarks are plotted on the face: a point beneath the medial aspect of the pupil, a point 3 cm anterior to the external auditory meatus, and a point 2.5 cm lateral to the oral commissure (Fig. 124-1A and B).10 The first two points provide the rostral/caudal and medial/lateral trajectories for the penetration of the foramen ovale, and the third point is where the needle penetrates the skin of the jaw. The affected cheek is prepared with Betadine (Purdue-Frederick, Norwalk, CT). A 21-gauge spinal needle placed in the deltoid subcutaneous tissue acts as a reference and grounding electrode, or alternatively, a bovie pad can be used.
Before cannulization of the foramen, understanding the skull base anatomy and its anatomic variants is essential (Fig. 124-2). Aberrant placement of the cannula can result in unintended neurovascular injuries. Use of lateral fluoroscopic imaging will aid in avoiding the following: cannulization of the inferior orbital fissure (IOF) anterosuperiorly or the jugular foramen posteroinferiorly, or intracranial placement of the cannula through aberrant foramina (e.g., foramen of Vesalius, which lies anteromedial to the foramen ovale, or innominate canal of Arnold, which lies posterior to the foramen ovale). Pulsatile blood flow through the cannula indicates penetration of the internal carotid artery (ICA). Puncture of the ICA can occur in three locations: at the proximal C2 segment at the carotid canal, the C3 segment with the electrode passing through the cartilage of the foramen lacerum, and the cavernous (C4) segment (Fig. 124-3). This third type of penetration was described by Rish,11 who noted that an anteromedial electrode passing through the foramen ovale can penetrate the C4 segment of the ICA. If ICA penetration occurs, the cannula is withdrawn promptly, manual pressure is applied over the posterior pharyngeal space, the procedure is discontinued, and the patient is allowed 24 to 48 hours to convalesce. Ischemic complications, such as hemiparesis, and carotid-cavernous fistula have resulted from puncture of the ICA.11 Generally, arterial punctures are minimized by refraining from broad angular readjustments of the electrode and diligent attempts to avoid trajectories that are either posterolateral or posteromedial to the foramen of ovale; such trajectories jeopardize the carotid canal and foramen lacerum, respectively.
The primary goal of the cannulization step is penetration of the medial portion of the foramen ovale and placement of the electrode’s tip in the retrogasserian rootlets (Fig. 124-4). Using Hartel’s landmarks, we advocate either the direct penetration technique or the sequential palpation in which the surgeon sequentially walks the cannula down the smooth surface of the infratemporal fossa toward the superior-medial aspect of the foramen (Fig. 124-5). If the cannula enters the posterolateral aspect of the foramen, it may elude the trigeminal cistern and not contact the trigeminal ganglion within its dural investment. Additionally, as the electrode is advanced, it may not reach the maxillary or ophthalmic divisions of the rootlet.
To begin, a 9-mm airway turned sideways or a bite block is inserted into the patient’s mouth between the molars on the opposite side to prevent the patient from involuntarily biting the surgeon’s finger. The patient is anesthetized with a rapid intravenous injection of 30 to 50 mg of methohexital (Brevital) followed by a 10-ml saline flush. Once the patient is fully asleep, the surgeon inserts the indexed finger of gloved hand inside the patient’s mouth, sliding along the inferior and medial wall of the lateral pterygoid to a point where it hooks around the lateral pterygoid, to guide the cannula toward the foramen ovale. A standard 100-mm, 20-gauge cannula, with its stylet in place, is inserted into the cheek 2.5 cm lateral to the oral commissure. The cannula is aimed toward the intersection of an axial plane, passing 3 cm anterior to the external auditory meatus, and a sagittal plane, passing through the medial aspect of the pupil. Although placement is by free-hand manipulation, fluoroscopic visualization is important to assist localization. Use of the image intensifier in the lateral plane effectively localizes the needle.4 Entrance of the cannula into the foramen ovale is signaled by a wince and a brief contraction of the masseter muscle, indicating contact with the mandibular sensory and motor fibers. Before the cannula is advanced any further, a lateral fluoroscopic image is obtained to confirm proper placement in the foramen ovale (Fig. 124-6). Fluoroscopy allows targeting a point along the lateral projection of the clivus, which is 5 to 10 mm below the floor of the sella. If difficulty penetrating the foramen ovale ensues, one should pause and return to a fundamental principle—namely, the safest approach to the foramen ovale is a trajectory that begins anteromedially to the foramen. In this manner, the surgeon can sequentially palpate, using the cannula along the smooth surface of the infratemporal fossa, and enter the superior medial aspect of the foramen. Use of this technique ensures a cannula trajectory in which the electrode will enter the trigeminal cistern at an angle and then sequentially contact each of the three divisions of the trigeminal root. Furthermore, targeting the anteromedial portion of the foramen ovale reduces the risks associated with probing alternative portions of the skull base, lowers the incidence of hematoma due to venous or arterial hemorrhage, and increases the probability of entering the trigeminal cistern.
Step 2: Stimulation of the Trigeminal Nerve
Targeted stimulation begins with the manipulation of the electrode’s tip in two dimensions as viewed on lateral fluoroscopy: the relationship of the electrode tip to the profile of the clivus and the curvature of the electrode’s tip. When the tip rests at the clival level, a stimulating pulse typically elicits paresthesias in the maxillary division rootlets. Advancement beyond the clival profile moves the electrode into the territory of the ophthalmic division rootlets, while withdrawal of the needle from the level of the clivus targets the mandibular division rootlets (Fig. 124-7A). The electrode’s tip should not be advanced more than 10 mm deep to the profile of the clivus because the tip can contact the trochlear or abducens nerve in this region. Sometimes the needle must be redirected more anteromedially to bring the tip closer to the posterior clinoid process for closer contact with the ophthalmic division. If the globe moves during stimulation, the cannula is too near the cranial nerves (CNs) in the cavernous sinus or perhaps near the brain stem. Stimulus-evoked facial contractions indicate that the electrode is either too deep, inclined too low on the clivus, or the stimulation level is too high. A lesion should not be made if there is any indication of motor nerve III, IV, VI, or VII stimulation or arterial bleeding.
After this initial placement and understanding of clival relationships, the axial rotation of the curved electrode permits a secondary form of targeting. Precise anatomic localization within the sensory root is aided by this maneuverability. The curved electrode tip is a coil spring that carries a thermocouple, stimulator, and lesion-generating probe. When the electrode is fully inserted into the cannula, the curved tip extends 5 mm beyond the end of the cannula and projects 3 mm perpendicular to the long axis of the electrode. Insulation of the cannula with polytetrafluoroethylene allows only the extruded portion of the electrode (0 to 5 mm) to be conductive. Rotation of the electrode can occur through a 360-degree axis for stimulation and lesion production (Fig. 124-7A
[/not-level-membership-for-neurosurgery-category]
