The Normal Pelvic Ultrasound: How to Do It and What to See
Knowledge of the normal anatomy and techniques for scanning the female pelvis are essential for detecting pelvic disease. The complete pelvic sonogram is done in two parts. In most cases, these include the transabdominal followed by the transvaginal evaluation. Decades ago, the transabdominal pelvic ultrasound was performed using a full bladder to visualize the pelvic organs by pushing the bowel out of the way. Although on occasion filling the patient’s bladder may be helpful, the transabdominal scan is very effective even if the bladder is not completely distended. If the uterus is anteverted, it is typically well seen whether or not the bladder is full. A retroverted uterus may be difficult to visualize with an empty bladder; however, it will be seen well transvaginally. Hence it is no longer necessary to obligate patients to fill their bladders for pelvic ultrasound, assuming that the transvaginal scan is also performed. If for some reason the patient is to be scanned with a full bladder (e.g., if the patient declines the intravaginal scan), it is important not to overdistend the bladder, thus compressing the pelvic organs against the sacrum.
The pelvic scan should typically include a transvaginal component after the transabdominal scan unless contraindicated or declined by the patient. If the patient is not a candidate for the transvaginal approach, the scan can be performed transrectally (see technique that follows).
The technique for performing a transabdominal (TA) scan (
Figure II-1):
1. The uterus is imaged both longitudinally and transversely using a 3- to 8-MHz abdominal transducer. If the bladder is full, it can be used as an acoustic window because it lies just anterior to the uterus. If the bladder is not distended, gentle pressure can be applied to the abdominal wall with the transducer to push the bowel away and narrow the distance between the probe and the pelvic organs. If the uterus is large or contains fibroids, the TA approach may provide the best view and measurements of the uterus. This perspective may even improve after the bladder is emptied. It is important to image the endometrial lining as well as ensure that the fundus of the uterus has been fully imaged. Looking just above the uterus is often necessary to detect any masses in the lower abdomen, when they are too cephalad to be visualized transvaginally.
2. The adnexa are evaluated, providing slight pressure on the lower abdominal organs to improve visibility. This gentle pressure can displace the bowel and better visualize the adnexal regions. The ovaries themselves may not be identified until the transvaginal portion of the scan; however, the overall evaluation of the right and left lower quadrants often requires a TA view in patients in whom there an ovary or mass located high in the pelvis or lower abdomen.
The technique for performing the transvaginal (TV) scan (
Figure II-2):
1. Proper disinfection of the transvaginal probe is essential preceding each use, and should be performed in accordance with the standard guidelines recommended by each institution (hospital) or probe manufacturer. Following disinfection, the probe is rinsed with water to remove any residual chemicals and wiped clean. It is then inserted into a probe cover that typically contains coupling gel. Finally the tip of the probe is lubricated before its insertion into the vagina. If the scan is being
done for infertility and the patient is a candidate for insemination, it is crucial not to use a gel that may be harmful to the sperm, and water or saline can be utilized in these special circumstances.
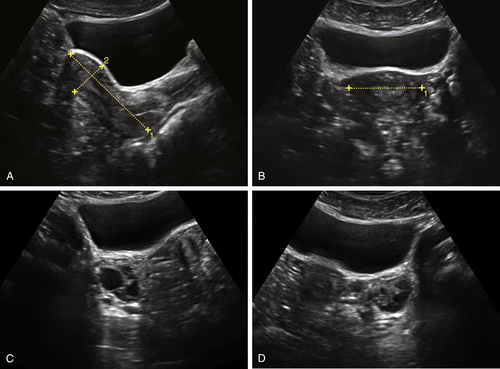
Figure II-1 Transabdominal scan (TA). A and B show a longitudinal and transverse view of the uterus seen transabdominally through a distended bladder. Calipers show the measurements of the uterus. C and D show the normal ovaries, also seen transabdominally.
2. The TV scan is typically done with an empty bladder (except for rare instances in which the bladder itself is to be evaluated); therefore, the patient should empty her bladder just before initiating the TV scan.
3. The vaginal probe can be introduced into the vagina by a physician, a sonographer, or the patient herself, whichever is most appropriate and comfortable for the patient. In certain cases, a chaperone may be necessary, especially if the physician or sonographer is male.
The technique for performing the transrectal (TR) scan (
Figure II-3):
1. After emptying her bladder, the patient is placed in the Sims position, on her side with her legs tucked toward her abdomen or maintained in a dorsolithotomy position.
2. The transvaginal transducer is prepared in the same way as for TV scan, and inserted into the rectum by the physician or sonographer. The insertion is done very slowly, with steady but gentle pressure, and under direct visualization of the rectum (sonographically), thus giving time for the sphincter to relax. One can also perform a digital rectal exam preceding the probe insertion to relax the sphincter muscle and gauge the
direction of the rectum. In the Sims position, when the cervix is visualized and approximately half of the shaft of the probe is inside the rectum, the patient is then carefully turned onto her back while trying not to dislodge the probe. With the patient supine, the pelvic landmarks become similar to those seen transvaginally, and the protocol is the same.
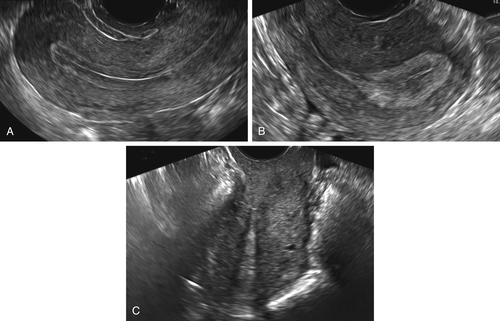
Figure II-2 Transvaginal scan (TV). A demonstrates the transvaginal view of a normal anteverted uterus seen longitudinally. B shows a similar view of a normal retroverted uterus. Note that in both cases the body of the uterus is at right angles to the ultrasound beam. C shows an axial uterus that is hard to image well transvaginally because of its vertical orientation away from the ultrasound beam.
Figure II-3 Transrectal scan. The uterus is seen longitudinally in the same orientation as if the probe were in the vagina. The scan is being done transrectally on a virginal patient.
Protocol for Intracavitary Scan
The Vagina
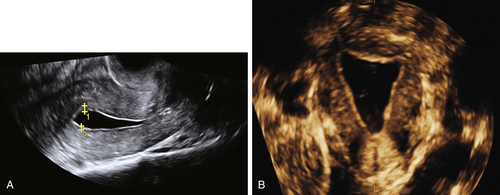
To assess the vagina, it is important to visualize the entire length of the vagina from the introitus, before placing the vaginal probe inside (
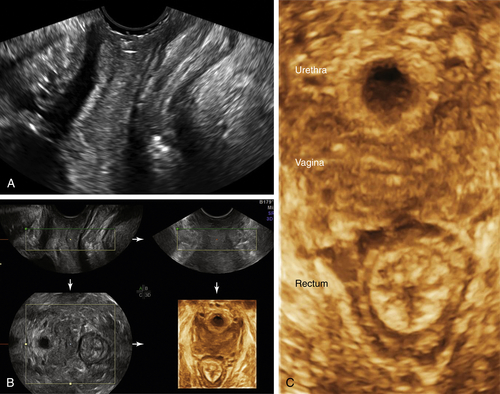
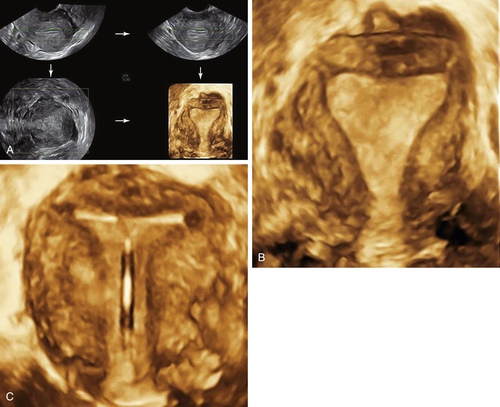
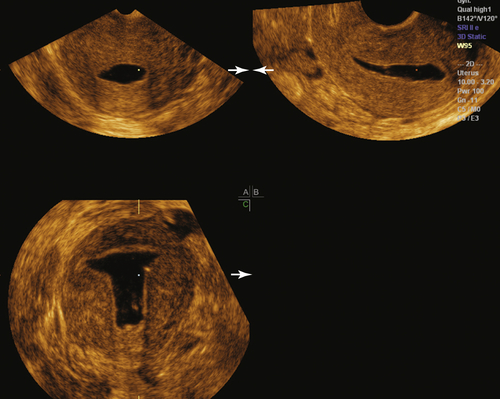
Figure II-4, A and B). Once the probe is inside the vagina, the vaginal walls and surrounding structures are no longer visible. An attempt to visualize them on the way out of the vagina is hampered by the introduction of air with the initial placement of the probe; hence if the clinical problem involves the vagina, it must be evaluated with a perineal scan before placing the probe inside. With the probe on the perineum, a 3-D volume can be acquired and reconstructed to show the floor of the pelvis, the anterior and posterior compartments of the pelvis (Figure II-4, B and C). This enables the practitioner to assess the relationships between the urethra, vagina, and rectum and any mass or cyst that may be present (see Vaginal Masses).
Figure II-4 The perineum. A shows a longitudinal scan of the floor of the pelvis looking from the introitus, down the length of the vagina. B and C show the 3-D volume acquisition with the axial reconstructed transverse view of the pelvic floor. The reconstructed view shows the urethra, vagina, and rectum in transverse section.
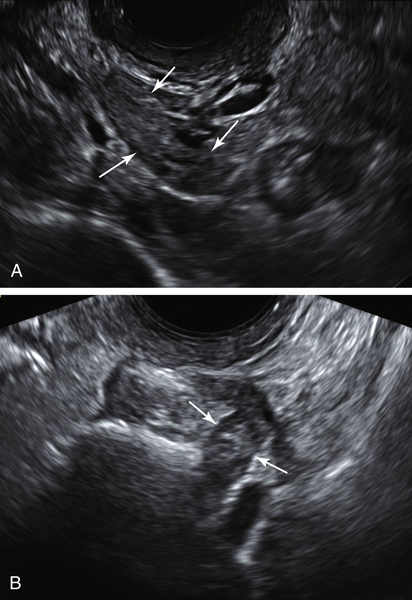
The Cervix
The appearance, size, and symmetry of the cervix are evaluated as well as the cervical canal for any polyps, fibroids or masses (
Figure II-5). Color Doppler is helpful to detect abnormal blood flow or a feeder vessel if a polyp or mass is suspected. Small cysts in the wall of the cervix are usually nabothian cysts, also referred to as cervical inclusion cysts, and typically are ignored on a sonogram. Evaluating the outer contour of the cervix is important to look for implants of endometriosis along the posterior outer surface of the cervix and in the upper portion of the rectovaginal septum (see Endometriosis).
The Uterus
As the vaginal probe is placed in the vagina, there is direct visualization of the length of the vagina down to the cervix, which is typically at right angles to the vagina (
Figures II-2 and
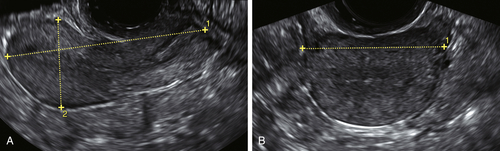
II-6). Once the cervix is located, the cul-de-sac is seen posteriorly (Figure II-7) and the rest of the uterus is visualized longitudinally. The evaluation of the uterus includes the uterine orientation, location of the endometrium, and symmetry of the myometrium. If the uterus is anteverted or retroverted, it will be seen at right angles (horizontal) to the ultrasound beam and be easily examined (see Figure II-2). If the uterus is axial, it will be oriented parallel and heading away from the ultrasound beam and be much more difficult to image (see Figure II-2). In such cases the endometrial cavity may be better seen TA. The measurements of the uterus that are done longitudinally include the uterine length from the fundus to the cervix (external os), and the width from the anterior to posterior uterine surfaces, perpendicular to the length. The width of the uterus is measured in the transverse view, with the uterus viewed in short axis. These measurements can be done either TA or TV (see Figures II-1 and II-8).
Figure II-5 The cervix. A shows a transvaginal longitudinal view of the normal cervix showing a normal endocervical canal. B demonstrates a nabothian cyst (arrow) located in the cervix of a postmenopausal patient. These are of no clinical significance and typically are not mentioned in the ultrasound report.
The texture of the myometrium is evaluated for contour changes, heterogeneity, masses, bulges, and cysts. Fibroids or other masses must be measured in at least two dimensions. It is important to determine the location of fibroids within the uterus such as whether it is submucosal, intramural, subserosal or pedunculated (see Fibroids). Postmenopausal women may have extensive calcification of the arcuate arteries, which is not
associated with any gynecological abnormalities (
Figure II-9).
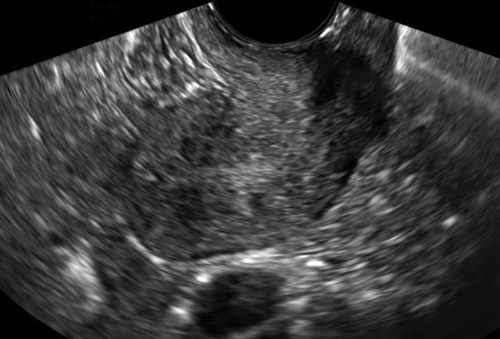
Figure II-6 Long axis view of the uterus and cervix, typical of the first landmark to visualize when performing a vaginal ultrasound.
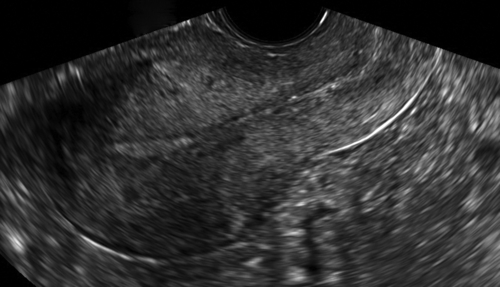
Figure II-7 Longitudinal scan though the uterus and cervix showing a small amount of free fluid (arrows) in the cul-de-sac, which is a normal finding, particularly in premenopausal patients.
Figure II-8 A and B, Measurements of the uterus done transvaginally.
The endometrium should be assessed for its appearance, thickness, and focal irregularities or disruptions (
Figure II-10). The presence of fluid in the endometrial cavity should be evaluated; if fluid is present, it should be noted whether it outlines any focal or diffuse abnormalities, defects, or masses protruding into the cavity. The endometrium should be measured in the midline on a longitudinal image where the axis of the uterus is perpendicular to the ultrasound beam (Figure II-11). Any rotation of the uterus may artificially widen this measurement; therefore, the axis of the probe should mimic the axis of the uterus. If there is fluid in the endometrial cavity, the endometrial measurement can be obtained by measuring the single width anterior and posterior portions of the endometrium separately. A small amount of anechoic fluid is not considered to be an abnormal finding, and is more commonly seen in postmenopausal patients. Regardless of what the endometrial echo measures, it is essential to evaluate the endometrium in its entirety, looking for focal abnormalities or irregularities. The endometrial echo may be normal on one side of the uterus and have a focal lesion on the other. When finding an endometrial abnormality, color Doppler can be very helpful to further delineate the lesion (see Figure II-11, C).
Figure II-9 Transverse view of the uterus in a postmenopausal patient who has multiple arcuate artery calcifications (arrows). These are not considered of clinical significance.
The appearance of the endometrium varies with the phases of the menstrual cycle. In the early proliferative phase, it is very thin, echogenic, and linear (
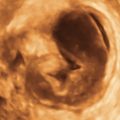
Figure II-12). During the proliferative phase, the endometrium gradually thickens. Closer to the time of ovulation (midcycle), the endometrium typically develops a characteristic trilaminar appearance with a thin linear echogenic line at the center, flanked by an echolucent rim and surrounded by an echogenic basilar layer (Figure II-13). The endometrium further thickens in the secretory or luteal phase and takes on a more homogeneous, lobular, and thickened appearance, which is normal before menstruation (Figure II-14).
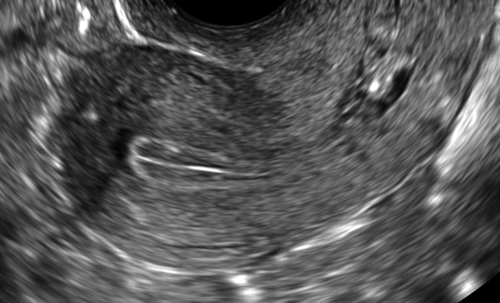
Figure II-10 A and B, The normal endometrium seen transvaginally both in longitudinal and transverse sections, showing no irregularities or focal lesions.
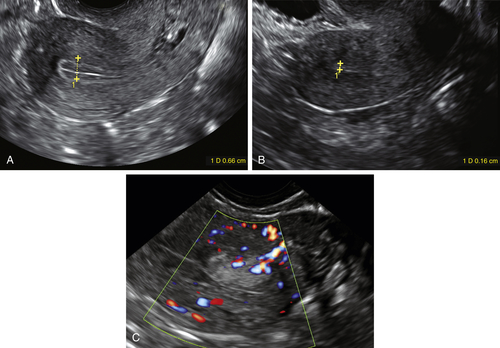
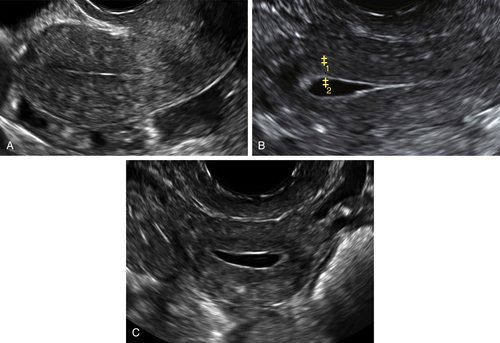
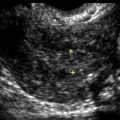
Figure II-11 The measurement of the endometrial echo is done in a midline longitudinal section of the uterus with the transverse axis of the uterus identical to the axis of the transducer to obtain the true sagittal view of the uterus. A and B show the measurements done on a premenopausal and postmenopausal patient, respectively. C shows the presence of a focal polyp with a feeder vessel demonstrated using color Doppler. The rest of the endometrium was less than 4 mm in this postmenopausal patient with bleeding.
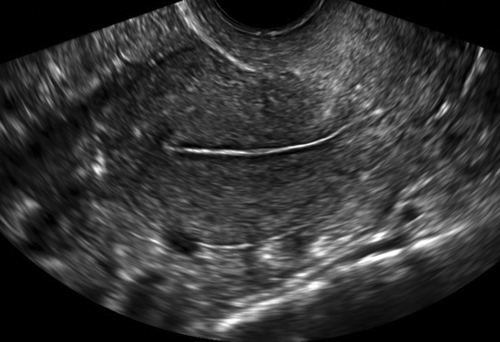
Figure II-12 Transvaginal view of a normal uterus in the early proliferative phase, showing a very thin, echogenic, and linear endometrium.
Figure II-13 Transvaginal view of the uterus in a patient who is midcycle and about to ovulate. Note the trilaminar pattern of the endometrial echo, with a thin linear echogenic line at the center surrounded by a lucent rim, which is further encircled by an echogenic basilar layer.
In patients who are not cycling, the endometrium should maintain a constant appearance and is typically thin and homogeneous (
Figure II-15). The measurement of the endometrial echo is not as important as the appearance and texture of the endometrium. The width can change dramatically during the cycle, and only measurements done in the early proliferative phase are an accurate representation of the cavity. There are no true normative data of the measurement of the endometrium in premenopausal patients, and endometrial abnormalities are detected by the presence of focal abnormalities and asymmetry. Patients who have had an endometrial ablation may have a markedly heterogeneous appearance of the myometrium and endometrial-myometrial junction, making any meaningful measurement or characterization impossible. The region of the endometrium typically looks puckered and the surrounding myometrium mottled in these patients (Figure II-16).
Figure II-14 Transvaginal view of the normal luteal phase endometrium, which has a homogeneous, lobular, and thickened sonographic appearance.
In postmenopausal patients who are
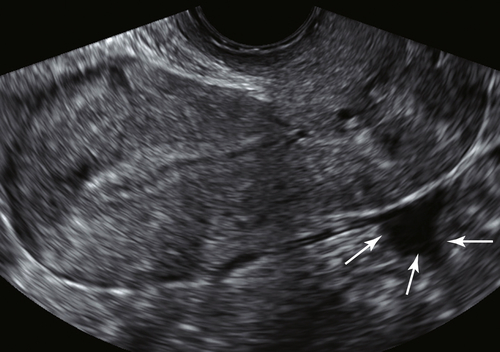
not bleeding, there are no accepted normative data for the width of the endometrium. The sonographic appearance of the endometrium and the presence of any abnormal color flow are far more important factors in detecting abnormalities of the endometrium. In postmenopausal patients who are bleeding, the width of the endometrium is useful in the initial evaluation. If it measures less than or equal to 4 mm and appears linear, echogenic, and straight, further testing is not typically indicated in a low-risk patient unless bleeding recurs (
Figure II-17). There is disagreement as to whether the upper limit of normal should be 4 or 5 mm; however, the American College of Obstetrics and Gynecology recommends that greater than 4 mm warrants further evaluation (see Endometrial Hyperplasia and the Differential Diagnosis for Thick Endometrium and also Endometrial Carcinoma). If part of the endometrium is obscured by fibroids, polyps, or adenomyosis, or if the margins are indistinct, saline infusion sonohysterography can be a useful adjunct for further evaluation (Figure II-18).
Figure II-15 Transvaginal view of the endometrium in a patient on oral contraception, showing a thin linear endometrium, which is typical of patients who are not cycling.
Figure II-16 Transvaginal view of the uterus of a patient who has undergone an endometrial ablation. Note the characteristic puckered look of the endometrium that is indistinct and unmeasurable. The surrounding myometrium is mottled and blotchy.
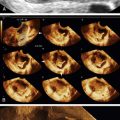
Volume imaging of the uterus (3-D) is a very helpful adjunct to 2-D ultrasound, especially when there is any perceived abnormality on standard 2-D evaluation. The coronal view of the uterus is key to detecting Müllerian duct anomalies, abnormally located IUDs, submucous fibroids, and polyps (see individual sections) (
Figure II-19). If a sonohysterogram is performed, acquiring a 3-D volume during the saline infusion is invaluable for a comprehensive evaluation of the endometrial cavity offline (Figure II-20). The patency of the fallopian tubes can also be tested by injecting air mixed with saline into the uterine cavity and watching the echogenic air bubbles travel through the tubes in real-time (hysterosalpingo- contrast sonography, or HyCoSy).
The Adnexa
To evaluate the adnexa transvaginally, it is best to begin at the level of the uterine fundus in the transverse section. One can then follow the tubo-ovarian ligament out laterally toward the ovary. In most patients the ovary is located at the end of the tubo-ovarian ligament along the pelvic side wall and iliac vessels. Patients who have had pelvic surgery, endometriosis, or pelvic inflammatory disease tend to have ovaries that are in unpredictable locations and more difficult to find because of adhesions. Postmenopausal ovaries are small, lack folliculogenesis, and thus are difficult to identify in some cases (
Figure II-21). In patients who had a hysterectomy, the ovaries are particularly hard to identify because of the lack of reference usually provided by the uterus. The practitioner can use his or her free hand to press on the patient’s lower abdomen while scanning transvaginally much like a bimanual examination. This maneuver often shifts the abdominal organs so that the ovary can appear from behind a loop of bowel. Asking the patient to perform the Valsalva maneuver will also accomplish similar results when trying to find hidden ovaries. If the uterus is enlarged by fibroids or adenomyosis, ovaries can be undetectable sonographically. In such cases one must still evaluate the adnexa carefully to rule out masses.The ovaries are measured in three dimensions (width, length, and depth), in two planes that
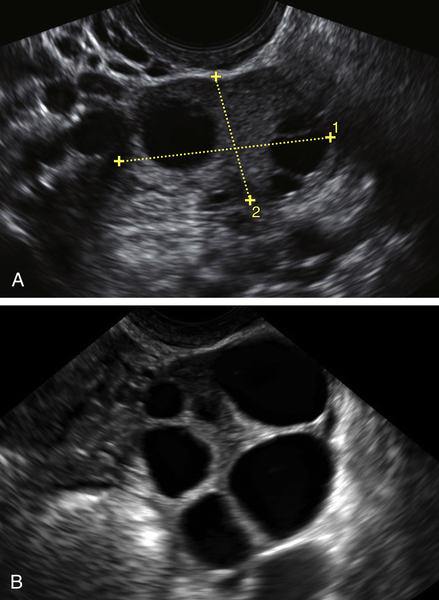
are at right angles to each other (Figure II-22). Women who are cycling typically have one or more follicles on each ovary (up to 2.5 to 3 cm in largest diameter), particularly if examined midcycle (Figure II-23; also see the section on ovarian cysts). Postmenopausal women should not normally have ovarian cysts, although a small clear cyst less than or equal to 10 mm is considered clinically insignificant.
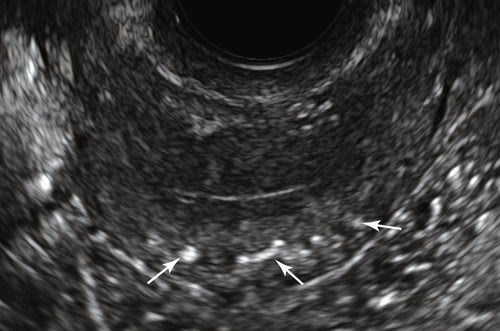
Figure II-17 A shows a transvaginal view of the typical paper-thin, echogenic endometrium in a postmenopausal patient. B and C show a small amount of fluid in the endometrial cavity of a postmenopausal patient, which is not considered clinically significant in the presence of a thin endometrium (calipers).
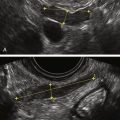
Figure II-18 A and B, Normal sonohysterogram seen both in 2-D and 3-D coronal reconstruction. Note the saline in the endometrial cavity outlining a thin and smooth lining.
Figure II-19 3-D volume acquisitions of the uterus are essential to generate the reconstructed coronal view of the uterus. A shows the multiplanar display of the volume acquisition. B shows the reconstructed coronal view of the uterus and cavity showing a normal shape. Note that even the interstitial portions of the tubes can be visualized. C shows the normal positioning of an IUD within the uterine cavity.
It is also important to evaluate the entire adnexal area, including the pelvic side wall, to identify any abnormal fluid collection or masses. The fallopian tubes are not usually seen unless abnormal or outlined by free fluid.
Color Doppler ultrasound is often helpful to determine whether an adnexal cyst or lesion is vascular. An intense circular vascular pattern indicates a corpus luteum, which is a normal finding in a cycling woman. Other masses with abundant central blood flow may be worrisome for malignancy.
The Cul-de-sac
The cul-de-sac should be evaluated for the presence of masses or free fluid behind the cervix. This is an area that is often affected by deep penetrating endometriosis in the anterior wall of the rectosigmoid (see Endometriosis). Masses in this
area may include fibroids, an enlarged ovary, a bowel lesion, or a presacral mass.
Figure II-20 Multiplanar display of the 3-D volume acquisition done during a sonohysterogram. Note that all three orthogonal views are seen simultaneously. One can navigate through the saved volume at a review station after the patient has left.
Part of the evaluation of the cul-de-sac should include testing the mobility of the uterus. The uterus can be moved slightly by gently pushing on the cervix with the vaginal probe in the vagina. If the cul-de-sac is frozen by adhesions or endometriosis, the uterus will not glide past the anterior wall of the rectosigmoid as it normally should.
Nongynecologic Organs
We must not forget that the uterus, ovaries, and fallopian tubes are not alone in the female pelvis. There are multiple loops of small and large bowel as well as the appendix, the ureters, lymph nodes, blood vessels, and sacrum. It is important to keep these organs in mind when performing pelvic ultrasound because not all masses and fluid collections are attributable to the uterus and adnexa (see related sections).
In conclusion, ultrasound is well known and accepted as the chosen method of imaging the female pelvis for practically all indications. The sonographic armamentarium at our disposal is vast and includes gray scale, 3-D volume imaging, color Doppler mapping, introduction of saline into the uterus, extended-field-of-view images, and so on. Ultrasound techniques are versatile, operator dependent, and vary with patient body habitus, previous surgery, and the anatomy of each individual patient.This differentiates sonography from other forms of cross-sectional imaging, which are standardized. Performing quality ultrasound includes deciding what images are needed, acquiring quality images, and finally interpreting them. The well-trained and experienced sonologist and/or sonographer can resolve the vast majority of gynecologic problems with ultrasound imaging.
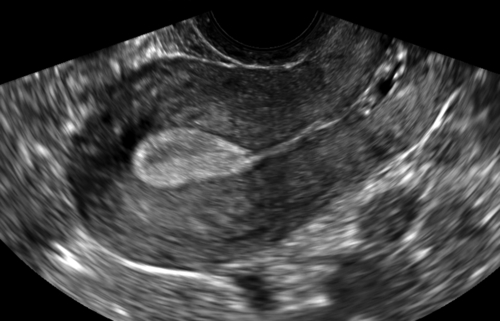
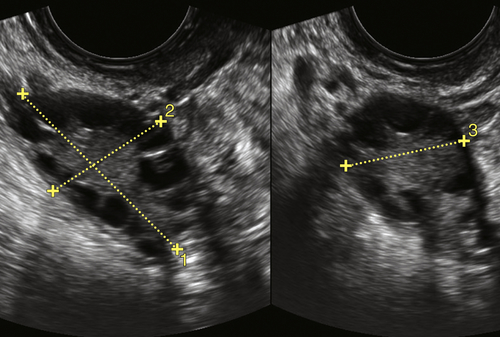
Figure II-22 Transvaginal view of a normal ovary showing the correct method of measuring the ovary.
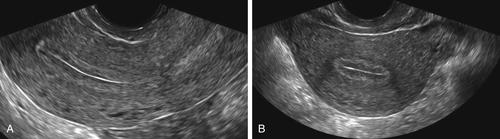
Figure II-21 A and B, Transvaginal view of the right and left ovary in a postmenopausal patient. Note the typical comma shape of the ovary, which is thin rather than fat and rounded, as seen premenopausally.
Figure II-23 Transvaginal view of a normal ovary in two different patients. A shows the normal ovary as the dominant follicle is maturing mid-cycle. B shows multiple follicles in a patient taking Clomid for the treatment of infertility.