[level-membership-for-surgery-category]
Chapter 1 Otologic Instrumentation
Sophisticated micro-otosurgical techniques mandate that the otologic surgeon and surgical team have an in-depth understanding of the operating room (OR) layout and surgical instrumentation. This chapter describes in detail different surgical procedures. The OR setup and instruments necessary for the various types of otologic procedures are described. Appendix 1 provides a comprehensive list of instruments and equipment.
OPERATING ROOM
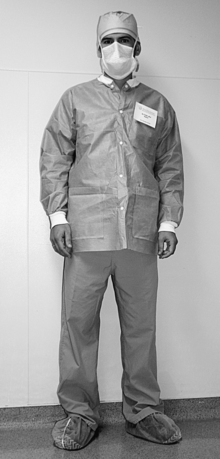
The OR for otologic surgery requires features that differ from ORs used for nonotologic surgery. The following sections elaborate on the general environment of the OR designed for ear surgery. A word about the sterile field is in order. Respecting the sterile field is vital during routine otologic surgery, and takes on special significance during neurotologic procedures. Maintaining the proper environment means limiting traffic through the OR, and keeping the number of visitors to a minimum. It is preferable for observers to be in a remote room watching the procedures on video. Individuals allowed in the OR should be experienced in sterile technique and should wear jackets over scrubs so that all skin surfaces are covered (Fig. 1-1).
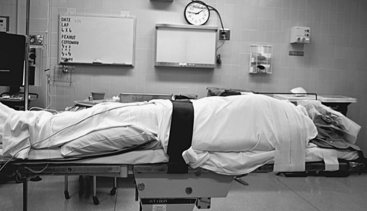
The first piece of OR equipment to be discussed is the operating table. The surgeon must be comfortable while performing microsurgery. Adequate leg room under the table can be achieved with older OR tables by placing the patient 180 degrees opposite the usual position; in other words, the patient’s head is where the feet would normally be (Fig. 1-2). Newer electric tables easily accommodate the patient and surgeon. Because most otologists spin the OR table 180 degrees after the induction of anesthesia, the new tables allow for spinning the table without unlocking it. Nonetheless, after the patient is properly positioned, the table must be firmly locked in place.
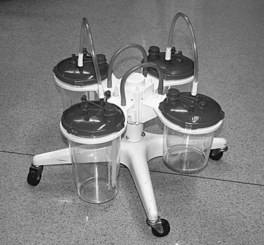
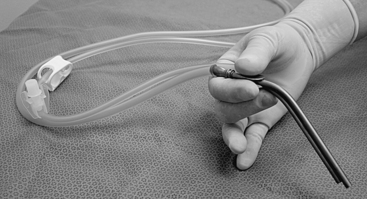
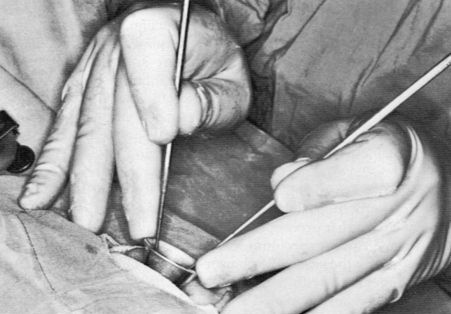
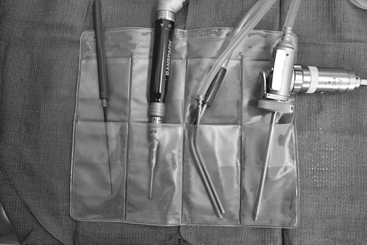
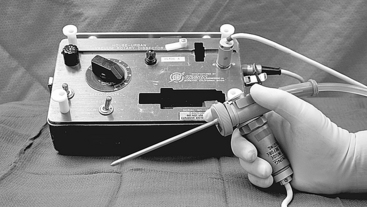
All ORs are equipped with wall suction. Standard suction devices are acceptable for otologic surgery. It is preferable, however, to use a multiple-canister suction setup, minimizing the number of times the bottles must be emptied (Fig. 1-3). Suction systems have several locations where the amount of suction can be varied, but the surgeon should also employ a control clamp on the suction tubing on the sterile field (Fig. 1-4).
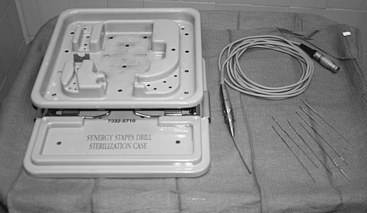
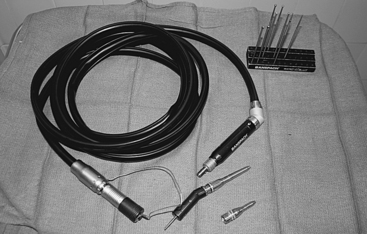
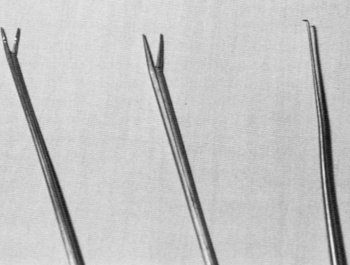
High-speed drills capable of doing most of the bone work in the temporal bone include the Fisch, Midas Rex, and Anspach drill systems. These drills generally are unsuitable for work in the middle ear, especially around the stapes footplate. For the latter purposes, a microdrill, such as the Skeeter drill or Synergy, is suitable (Fig. 1-5). Whatever drill is used in the middle ear, it must have a variable speed control and a wide array of drill bits.
Most larger otologic drills are equipped with straight and angled handpieces. Most surgeons prefer straight handpieces for early gross removal of the mastoid cortex, switching to angled handpieces for working deeper in the temporal bone. The Anspach drill system has a handpiece that can be converted from straight to angled simply by rotating the connection. A full complement of cutting and diamond burrs is mandatory. Figure 1-6 shows the Anspach drill system. Most drill systems have attachments that vary in shape, diameter, and length. It is the surgeon’s responsibility to be intimately familiar with the drill system and to have all of the attachments and burrs that might be needed.
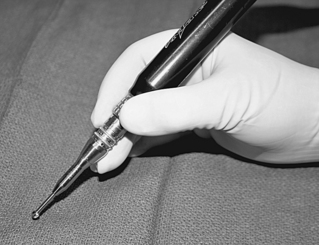
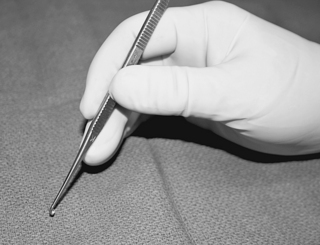
The otologic drill should be held in the hand like a pencil, with the hand resting comfortably on the sterile field. The side of the burr should be used to provide maximum contact between the bone and the flutes of the burr, affording safer and more efficient drilling (Fig. 1-7). The newer drills are remarkably reliable, but, similar to other tools, may malfunction. Drill systems require proper care and inspection before use. A backup system should be readily available.
Proper posture at the operating table is crucial. To perform microsurgical procedures, rule number one is that the surgeon must be comfortable. The surgeon should be seated comfortably in a proper chair with the back support at the correct height. Both feet should be resting comfortably on the floor. Fatigue is avoided by assuming a restful position in the chair, rather than a rigid upright posture (Fig. 1-8).

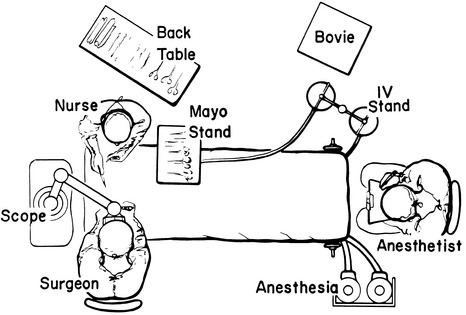
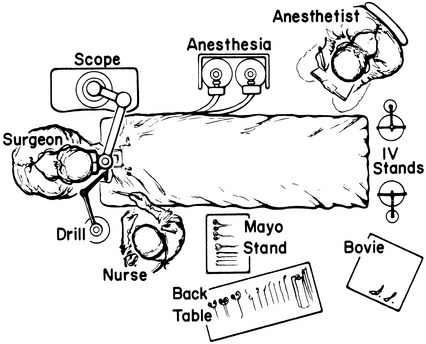
The overall OR setup for routine otologic surgery is shown in Figure 1-9. For neurotologic surgery, more space must be available for additional equipment. Middle cranial fossa procedures require some modifications to the OR setup (Fig. 1-10). Basically, the surgeon and the microscope trade places such that the surgeon is seated at the head of the table. Cooperation and careful orchestration between the surgeon, nursing personnel, and anesthesiologist are required for otologic surgery. The needs of the otologist are best served by having the anesthesiologist at the foot of the bed and the scrub nurse opposite the surgeon. Space for the facial nerve monitoring equipment and personnel is reserved.
STAPES SURGERY
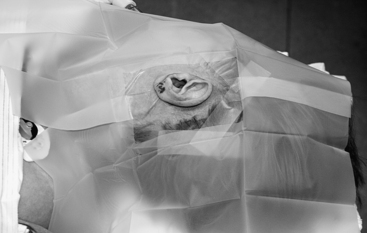
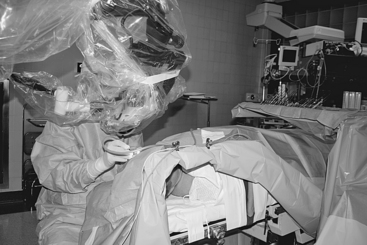
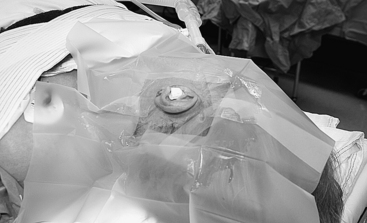
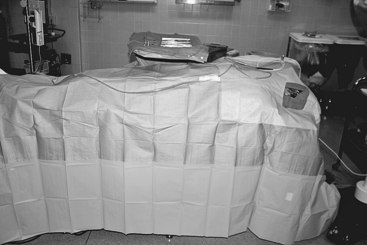
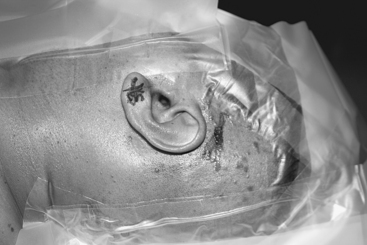
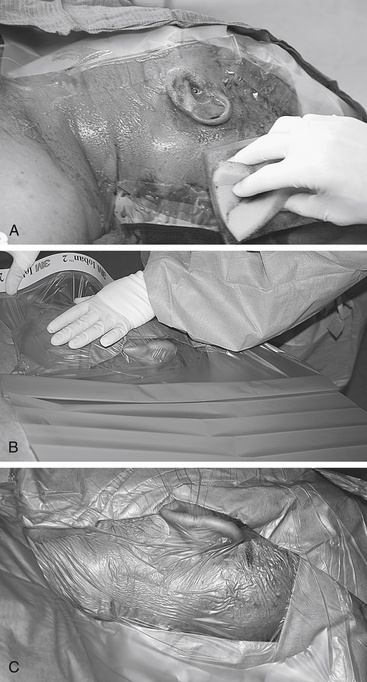
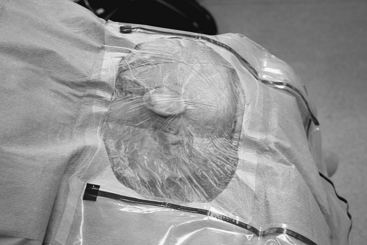
About 30 minutes before the operation, the patient is brought to the preoperative holding area. If the surgeon routinely harvests a postauricular graft, this area is now shaved. A plastic aperture drape is applied to the operative site and trimmed so as not to cover the patient’s face (Fig. 1-11). An intravenous line is started, and the patient is now ready to go to the OR. When the patient is on the OR table, the monitors are placed on the patient by the nursing or anesthesia staff. Minimal monitoring includes pulse oximetry, automatic blood pressure cuff, and electrocardiogram electrodes. The ear and plastic drape are scrubbed with an iodine-containing solution, unless the patient is allergic to iodine. A head drape is applied, and the ear is draped with sterile towels so as not to cover the patient’s face; this can be facilitated by supporting the drapes with a metal bar attached to the OR table, or by fixing the drapes to the scrub nurse’s Mayo stand (Fig. 1-12).
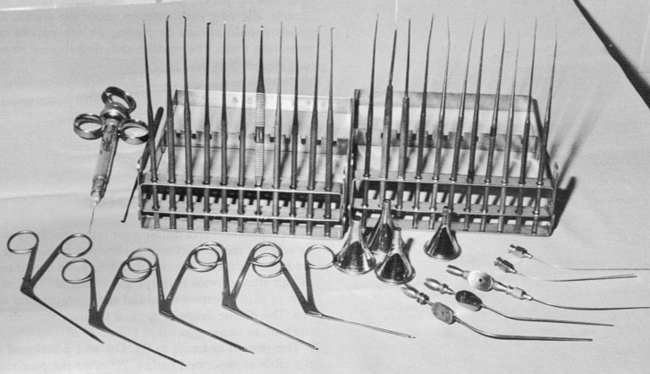
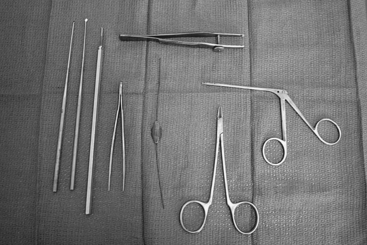
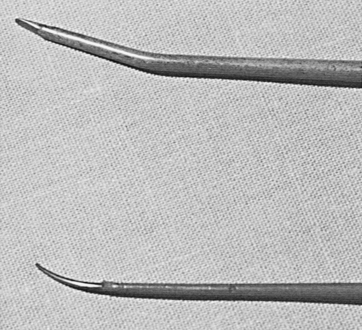
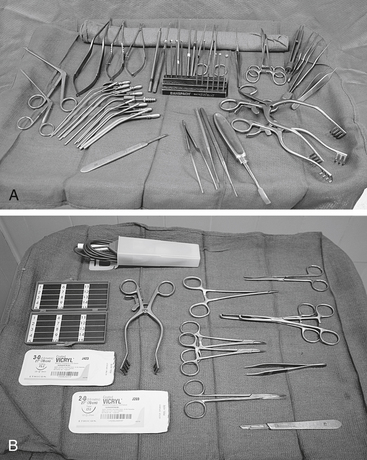
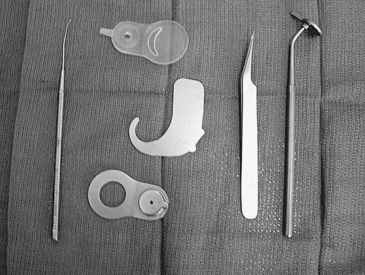
Various ear specula should be available in oval and round configurations. Sizes typically range from 4.5 to 6.5 mm (Fig. 1-13). It is desirable always to work through the largest speculum that the meatus permits, without lacerating canal skin. Some surgeons prefer to use a speculum holder for stapes and other middle ear procedures. The tympanomeatal flap is started with incisions made at the 6 and 12 o’clock positions with the No. 1, or sickle, knife. These incisions are united with the No. 2, or lancet, knife. This instrument actually undermines the vascular strip instead of cutting it. The strip is cut with the Bellucci scissors. The defined flap is elevated to the tympanic annulus with the large round knife, known as the large “weapon.” When properly identified, the annulus is elevated superiorly with the Rosen needle, and inferiorly with the annulus elevator, or gimmick. Figure 1-14 shows a typical set of stapes instruments, including suction tips.

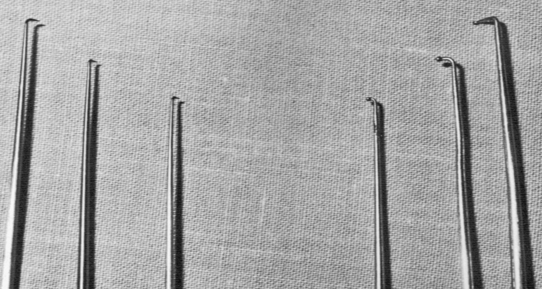
Adequate exposure usually requires removal of the bony ledge in the posterosuperior quadrant. This can be initiated with the Skeeter microdrill and completed with a stapes curette (Fig. 1-15).
For total footplate extraction, a right angle hook or excavator (Hough hoe) is used. The harvested graft is guided into place with a footplate chisel. The prosthesis is grasped with a smooth alligator or strut forceps and placed on the incus. It is positioned on the graft, or into the fenestra, with a strut guide. The wire is secured onto the incus with a crimper, or wire-closing forceps. The McGee crimper is useful, especially if followed by a fine alligator forceps for the last gentle squeeze. A small right angle hook may be necessary to fine-tune the position of the prosthesis (Fig. 1-16).
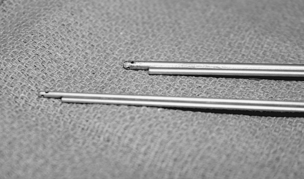
Suction tubes for stapes surgery include Nos. 3 to 7 Fr Baron suctions plus Rosen needle suction tips (18 to 24 gauge) with the House adapter (Fig. 1-17). The Rosen tips are useful when working near the oval window, with the surgeon’s thumb off the thumb port.

For all middle ear procedures, the surgeon should hold the instruments properly. The instrument should rest, like a pencil, between the index finger and thumb, allowing easy rotation around the shank. The hands should always be resting on the patient and the OR table. The middle and ring fingers should rest on the speculum so that the hand moves as a unit with the patient. Proper hand position and holding of instruments should afford the surgeon an unimpeded view (Fig. 1-18).
TYMPANOPLASTY AND TYMPANOPLASTY WITH MASTOIDECTOMY
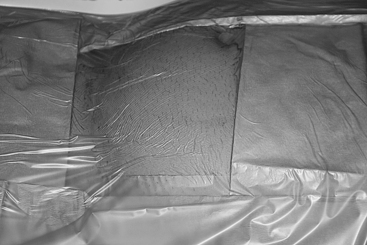
The preparation and draping for tympanoplasty with or without mastoidectomy are much the same as for stapes surgery. The major difference is the amount of hair shaved before draping. Usually, enough hair is shaved to expose about 3 to 4 cm of skin behind the postauricular sulcus. The plastic drape is applied to cover the remaining hair (Fig. 1-19).
The patient is positioned on the OR table as described earlier. Whether the procedure is performed under local or general anesthesia depends on the extent of the surgery, the surgeon’s preference, and the desire of the patient. After appropriate sedation or induction of anesthesia, the ear and plastic drape are scrubbed with the proper soap or solution. Some surgeons place a cotton ball in the meatus if a perforation exists, preferring not to allow the preparation solution to enter the middle ear. The field is draped as described earlier, the head is rotated toward the contralateral shoulder, and the table is placed in slight Trendelenburg position (Fig. 1-20). The postauricular area, canal, and tragus (if necessary) are injected with 1% lidocaine with 1:100,000 epinephrine for local and general anesthesia cases.
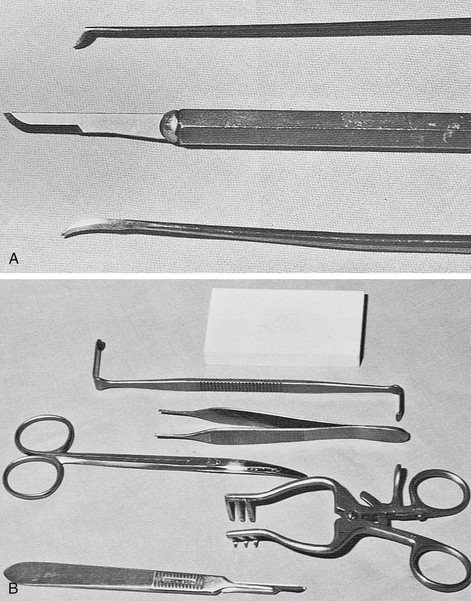
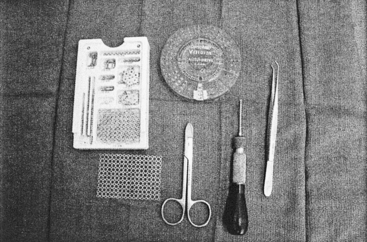
Most chronic ear procedures begin in a similar fashion. Through an ear speculum, vascular strip incisions are made with the sickle or Robinson knife and united along the annulus with the lancet knife. The vascular strip incisions are completed with a No. 64 or 67 Beaver blade. This same blade can be used to transect the anterior canal skin just medial to the bony-cartilaginous junction. The postauricular incision is made with a No. 15 Bard-Parker blade behind the sulcus. The level of the temporalis fascia is identified, and a small self-retaining (Weitlaner) retractor is inserted. The fascia is cleared of areolar tissue and incised. A generous area of fascia is undermined and removed with Metzenbaum scissors. The scrub nurse can assist by using a Senn retractor to elevate skin and soft tissues away from the fascia. The fascia is thinned on the Teflon block and dehydrated by placing it under an incandescent bulb, carefully monitoring its progress. The fascia may also be dehydrated by placing it on a large piece of Gelfoam and compressing this complex in a fascia press. Figure 1-21 shows the instruments used in the initial stages of chronic ear surgery.
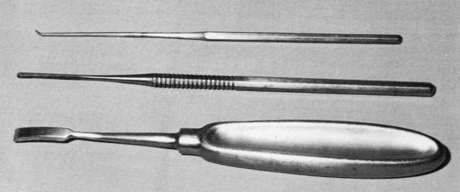
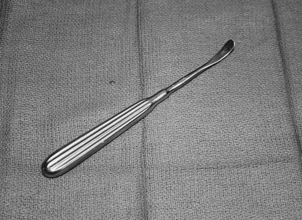
Continued postauricular exposure is obtained by incising along the linea temporalis with a knife or with the electrocautery. A perpendicular incision is made down to the mastoid tip. Soft tissues and periosteum are elevated with a Lempert elevator (Fig. 1-22), the vascular strip is identified, and a large self-retaining retractor is inserted. A very large retractor, such as an Adson cerebellar retractor with sharp prongs, is preferred.
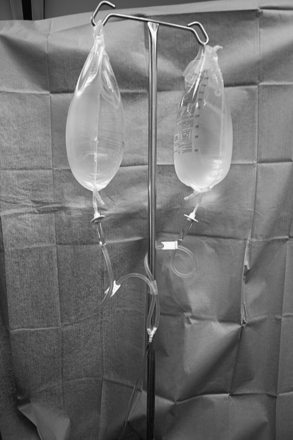
Next, under the microscope, the anterior canal skin is removed down to the level of the annulus with the large weapon. The plane between the fibrous layer of the drum remnant and the epithelium is developed with a sickle knife, and the skin is pulled free with a cup forceps. The anterior canal skin is placed in saline for later use as a free graft. The ear canal is enlarged with the drill and suction-irrigators. An angled handpiece and medium to small cutting burr are used. Irrigation through the suction-irrigators is done with a physiologic solution such as Tis-U-Wol, lactated Ringer, or saline. Two large (3000 mL) bags of irrigant are hung and connected by way of a three-way stopcock to the delivery system (Fig. 1-23).
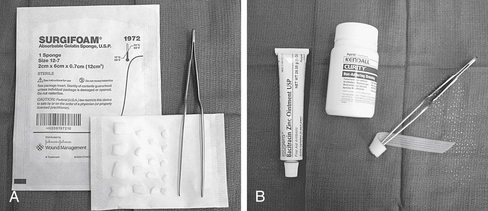
Although the setup for closing and packing after chronic ear surgery varies with the specifics of the situation, a few generalities should cover most situations encountered by the otologist. To maintain the middle ear space, silicone elastomer (Silastic) sheeting works well and is still readily available. This sheeting comes in various thicknesses, with and without reinforcement. For middle ear packing, absorbable gelatin sponge (Surgifoam) is the usual choice, soaked in saline or an antibiotic otic preparation. Surgifoam is also used to pack the EAC, although some surgeons prefer an antibiotic ointment, as described in the section on stapes surgery. For meatoplasty packing, 1-inch nonadhesive Curity packing strip or nasal packing gauze is saturated with an antibiotic ointment and rolled around the tip of a bayonet forceps; this creates a plug that conforms to the new meatus and is easily removed (Fig. 1-24).
Some additional instruments that prove to be handy in many chronic ear procedures include an ossicles holder, Crabtree dissectors, Zini mirror, right angle hooks, and the House-Dieter malleus nipper (Fig. 1-25). It is impossible to describe instruments for every conceivable situation, but the foregoing should cover most of the needs of the otologist.
ENDOLYMPHATIC SAC SURGERY
Bone over the sigmoid sinus and posterior fossa dura is thinned with diamond burrs. The retrofacial air tract is opened widely to locate the endolymphatic sac. The sac is decompressed with a diamond burr. A stapes curette can be used to remove bone over the proximal sac. The occasional bleeding that occurs over the surface of the sac or surrounding dura is best controlled with bipolar cautery. Alternatively, unipolar cautery at a very low setting can be used. The cautery tip is touched to an insulated Rosen or gimmick that is in contact with the offending vessel (Fig. 1-26). Another method used to control small areas of bleeding in endolymphatic sac and chronic ear surgery is to cover the area with pledgets of Gelfoam that have been soaked in topical thrombin.
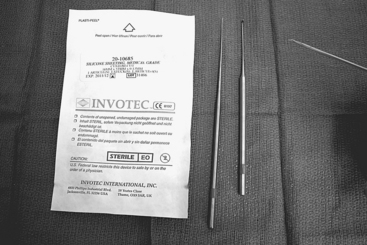
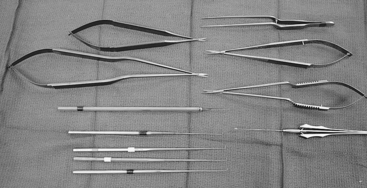
Before opening the sac, the wound is copiously irrigated with saline or bacitracin solution. Fresh towels are placed around the field. The sac is opened with a disposable Beaver ophthalmic blade (No. 59S, 5910, or 5920). The lumen is probed with a blunt hook or gimmick. The shunt tube preferred by the surgeon is now inserted. Thin Silastic sheeting (0.005 inch) can be used to fashion a shunt. Figure 1-27 shows the materials for the latter steps of endolymphatic sac surgery. As with chronic ear procedures, the wound is closed in layers, usually beginning with 2-0 chromic and finishing with 4-0 Vicryl or Dexon. A standard mastoid dressing is applied. This dressing either is prepared in the OR or is obtained as a prepackaged dressing (e.g., Glasscock dressing).
NEUROTOLOGIC PROCEDURES
This section describes the OR layout for neurotologic procedures, the only exception being middle fossa surgery, which is discussed separately. For procedures involving intracranial structures, extraordinarily meticulous attention to detail is mandatory. The preparation for neurotologic surgery may begin the evening before surgery by having the patient wash his or her hair and scalp with an antiseptic shampoo. The day of surgery, the patient is seen by the surgeon in the holding area so that the ear to be operated on is positively identified. The surgical site is shaved so that at least 6 cm of postauricular scalp is exposed. The area is sprayed with an adhesive, and the plastic drapes are applied (Fig. 1-28). At the same time, the abdomen is shaved from below the umbilicus to the inguinal ligaments, in preparation for harvesting a fat graft. The fat donor site is surrounded by plastic drapes (Fig. 1-29).
After anesthetic induction, a catheter is inserted, and arterial and central venous lines are placed when indicated. Electrodes for monitoring CN VII and VIII (and possibly other nerves) are positioned. The patient’s head is supported on towels or a “donut” as needed, and rotated toward the contralateral shoulder. The surgical sites are scrubbed, then blotted dry with a sterile towel. The areas are draped off with towels and then covered with plastic adhesive drapes (e.g., Steri-Drape, Ioban, Cranial-Incise). Some surgeons prefer to include another layer of towels around the cranial site, followed by either sheets or a disposable split sheet. It is important to have several layers of draping to prevent saturation of the drapes with fluids down to the level of the patient (Fig. 1-30).
Because the scrub nurse must handle numerous items attached to tubes and cords, it is helpful to have fastened to the field a plastic pouch into which the drill, suction, and cautery tips can be placed (Fig. 1-31). Two Mayo stands are kept near the field: one for the neurotologic instruments and the other for the fat-harvesting tools (Fig. 1-32).
With a wound free of bone dust and debris, the dura can now be opened with a No. 11 Bard-Parker scalpel blade or with the tips of Jacobson scissors. The dura can be pulled away from underlying structures by using a corkscrew-like instrument included in some neurotologic instrument sets (Fig. 1-33). The subdural space is entered, taking care not to violate the arachnoid; this helps to avoid injury to vessels before adequate exposure. The dural flap is carefully developed with Jacobson scissors. Hemostasis is controlled with bipolar cautery. The arachnoid is carefully opened with a sharp hook or the tips of the scissors, allowing the egress of cerebrospinal fluid. Figure 1-33 shows the instruments for dural and arachnoid opening. After opening the arachnoid, one should switch to fenestrated (Brackmann) suction tips (Fig. 1-34). The cerebellum and other intracranial structures should be protected with moist neurosurgical cottonoids. A variety of cottonoids should always be on the stand.
For vestibular neurectomy procedures, the plane between the cochlear and vestibular nerves can be developed with a blunt hook, or the gimmick. The nerve section itself can be completed with a sharp hook or microscissors (Fig. 1-35). The same instruments can be used to define the plane between an acoustic neuroma and the facial nerve. A sharp right angle hook palpates Bill’s bar and sections the superior vestibular nerve fibers along with the vestibulofacial fibers. After establishing the proper plane between the tumor and facial nerve, a blunt hook is used to continue the dissection, avoiding stretching of the facial nerve. Facial nerve monitoring has greatly assisted this part of the dissection. For small tumors, the previously mentioned technique might suffice for total tumor removal. Larger tumors are removed by gutting the tumor extensively, mobilizing the capsule, and removing the capsule in a piecemeal fashion; this is accomplished by morcellizing the tumor with a large crushing forceps, such as the Decker. The Urban rotary suction-dissector is used to extract the pieces (Fig. 1-36). Bayonet forceps direct the tumor into the suction port of the Urban suction-dissector. As the tumor is gutted, the capsule collapses and can be dissected from the brainstem.
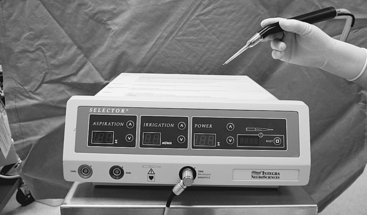
The Selector ultrasonic aspirator (Fig. 1-37) is another instrument that some surgeons prefer for gutting the tumor. Whatever tool is used, proper use of these sophisticated, potentially dangerous instruments must be learned from user manuals and appropriate training and courses.
Hemostasis is vital during neurotologic surgery, and the surgeon must have immediate access to all possible items necessary to control bleeding from whatever the source. In addition to unipolar and bipolar cautery, bone wax and precut pieces of Surgicel should be on the Mayo stand. Microfibrillar collagen (Avitene) is another preferred hemostatic agent to have available. Pledgets of Gelfoam soaked in topical thrombin are quite useful. Vascular clips and a reliable clip applicator are useful for controlling bleeding from the petrosal vein and its tributaries (Fig. 1-38).
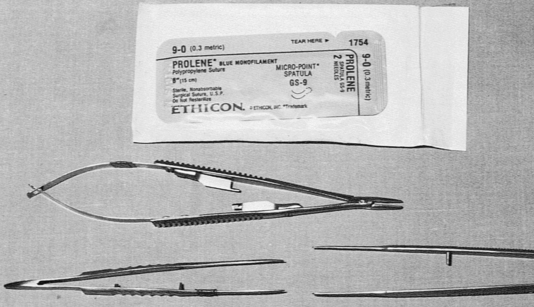
Some instruments facilitate work on or near the facial nerve. For rerouting the facial nerve, bone is removed with a drill until an eggshell thickness remains. The remaining bone is gently removed with a stapes curette. The nerve can be mobilized with a dental excavator or microraspatory. If a segment of the nerve is to be excised, as in a facial neuroma, this should be done sharply with a fresh knife blade. Likewise, before any neurorrhaphy, the ends of the nerve and graft should be freshened. A 9-0 monofilament suture is used for nerve anastomosis. Appropriate needle holders and forceps must be available (Fig. 1-39). An alternative or adjunct to suturing is to use NeuraGen nerve guides.
Also under the rubric of neurotologic surgery is cochlear implant surgery. Each presently available cochlear implant device has its own unique set of requirements and, possibly, instruments. The surgeon must have proper training and experience to perform cochlear implant procedures. He or she must have all of the necessary special equipment for electrode placement and internal receiver fixation (Fig. 1-40).
MIDDLE CRANIAL FOSSA SURGERY
Middle fossa procedures are discussed separately from other neurotologic procedures because they involve a different OR setup and some different instruments. The most obvious deviation from other procedures is the position from which the surgeon operates. The surgeon and the microscope trade locations, so that the surgeon operates from the head of the bed facing caudally (see Fig. 1-10).
As with other neurotologic procedures, middle fossa surgery is performed under general anesthesia. In the preoperative holding area, the ipsilateral scalp is shaved to a distance of 6 cm postauricularly and nearly to the midline of the head above the ear in the temporal fossa. Plastic adhesive drapes are applied, and the patient is taken to the OR. After anesthesia, the surgical site and plastic drapes are scrubbed and blotted dry. The area is covered with another plastic adhesive drape. Towels are positioned to block off the entire temporoparietal scalp, including the auricle and zygomatic arch. Sterile sheets complete the draping (Fig. 1-41). The abdomen is usually prepared as in other neurotologic surgeries.
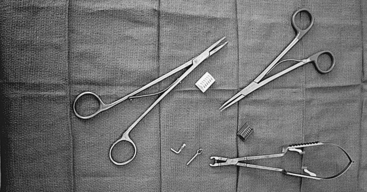
The bone flap is carefully removed from the dura with an Adson periosteal elevator, or “joker” (Fig. 1-42). The bone flap is placed in bacitracin solution. The craniotomy edges are smoothed with a rongeur, and bleeding is controlled with bone wax.
The joker is used to dissect the dura from the floor of the middle fossa. The surgeon is now ready to insert the House-Urban middle fossa retractor. The surgeon must be familiar with the mechanical workings of this device (Fig. 1-43). The retractor is locked under the bony edges of the craniotomy. The blade housing is positioned so that it allows good visualization of the field without placing excessive traction on the temporal lobe. This usually requires repositioning the retractor several times during the early stages of the dissection. Next, the retractor blade is inserted, and the extradural dissection proceeds. The blade can be tilted with the hand and advanced with the thumb, leaving the other hand free for suctioning. Bleeding can be troublesome from the floor of the middle fossa, especially near the middle meningeal artery. Bipolar cautery, bone wax, Surgicel, and other hemostatic agents should be readily available.

At the conclusion of the procedure, the defect over the IAC can be reconstructed by filling it with small pieces of muscle or abdominal fat and covering it with a small piece of the bone flap that has been cut and trimmed to an appropriate size. The field is inspected for hemostasis, and the middle fossa retractor is removed, allowing the brain to re-expand. The wound is irrigated again with bacitracin. Microplates are used to secure the bone flap in place (Fig. 1-44), and the wound is closed in layers, suturing the temporalis flap back to normal anatomic position. Some surgeons close the skin over a Penrose drain, which is removed the day after surgery. A mastoid dressing completes the closure.
CONCLUSION
This chapter has provided a detailed description of the OR environment and instrumentation for most procedures that the otologist is likely to encounter. Although these descriptions do not exhaust all possibilities, they have proved to be satisfactory for many otologists. Appendix 1 lists instruments and equipment that have been presented in the text.
APPENDIX 1 INSTRUMENTS AND EQUIPMENT FOR OTOLOGIC SURGERY
[/level-membership-for-surgery-category][not-level-membership-for-surgery-category]
Chapter 1 Otologic Instrumentation
Sophisticated micro-otosurgical techniques mandate that the otologic surgeon and surgical team have an in-depth understanding of the operating room (OR) layout and surgical instrumentation. This chapter describes in detail different surgical procedures. The OR setup and instruments necessary for the various types of otologic procedures are described. Appendix 1 provides a comprehensive list of instruments and equipment.
OPERATING ROOM
The OR for otologic surgery requires features that differ from ORs used for nonotologic surgery. The following sections elaborate on the general environment of the OR designed for ear surgery. A word about the sterile field is in order. Respecting the sterile field is vital during routine otologic surgery, and takes on special significance during neurotologic procedures. Maintaining the proper environment means limiting traffic through the OR, and keeping the number of visitors to a minimum. It is preferable for observers to be in a remote room watching the procedures on video. Individuals allowed in the OR should be experienced in sterile technique and should wear jackets over scrubs so that all skin surfaces are covered (Fig. 1-1).
The first piece of OR equipment to be discussed is the operating table. The surgeon must be comfortable while performing microsurgery. Adequate leg room under the table can be achieved with older OR tables by placing the patient 180 degrees opposite the usual position; in other words, the patient’s head is where the feet would normally be (Fig. 1-2). Newer electric tables easily accommodate the patient and surgeon. Because most otologists spin the OR table 180 degrees after the induction of anesthesia, the new tables allow for spinning the table without unlocking it. Nonetheless, after the patient is properly positioned, the table must be firmly locked in place.
All ORs are equipped with wall suction. Standard suction devices are acceptable for otologic surgery. It is preferable, however, to use a multiple-canister suction setup, minimizing the number of times the bottles must be emptied (Fig. 1-3). Suction systems have several locations where the amount of suction can be varied, but the surgeon should also employ a control clamp on the suction tubing on the sterile field (Fig. 1-4).
High-speed drills capable of doing most of the bone work in the temporal bone include the Fisch, Midas Rex, and Anspach drill systems. These drills generally are unsuitable for work in the middle ear, especially around the stapes footplate. For the latter purposes, a microdrill, such as the Skeeter drill or Synergy, is suitable (Fig. 1-5). Whatever drill is used in the middle ear, it must have a variable speed control and a wide array of drill bits.
Most larger otologic drills are equipped with straight and angled handpieces. Most surgeons prefer straight handpieces for early gross removal of the mastoid cortex, switching to angled handpieces for working deeper in the temporal bone. The Anspach drill system has a handpiece that can be converted from straight to angled simply by rotating the connection. A full complement of cutting and diamond burrs is mandatory. Figure 1-6 shows the Anspach drill system. Most drill systems have attachments that vary in shape, diameter, and length. It is the surgeon’s responsibility to be intimately familiar with the drill system and to have all of the attachments and burrs that might be needed.
The otologic drill should be held in the hand like a pencil, with the hand resting comfortably on the sterile field. The side of the burr should be used to provide maximum contact between the bone and the flutes of the burr, affording safer and more efficient drilling (Fig. 1-7). The newer drills are remarkably reliable, but, similar to other tools, may malfunction. Drill systems require proper care and inspection before use. A backup system should be readily available.
Proper posture at the operating table is crucial. To perform microsurgical procedures, rule number one is that the surgeon must be comfortable. The surgeon should be seated comfortably in a proper chair with the back support at the correct height. Both feet should be resting comfortably on the floor. Fatigue is avoided by assuming a restful position in the chair, rather than a rigid upright posture (Fig. 1-8).
The overall OR setup for routine otologic surgery is shown in Figure 1-9. For neurotologic surgery, more space must be available for additional equipment. Middle cranial fossa procedures require some modifications to the OR setup (Fig. 1-10). Basically, the surgeon and the microscope trade places such that the surgeon is seated at the head of the table. Cooperation and careful orchestration between the surgeon, nursing personnel, and anesthesiologist are required for otologic surgery. The needs of the otologist are best served by having the anesthesiologist at the foot of the bed and the scrub nurse opposite the surgeon. Space for the facial nerve monitoring equipment and personnel is reserved.
STAPES SURGERY
About 30 minutes before the operation, the patient is brought to the preoperative holding area. If the surgeon routinely harvests a postauricular graft, this area is now shaved. A plastic aperture drape is applied to the operative site and trimmed so as not to cover the patient’s face (Fig. 1-11). An intravenous line is started, and the patient is now ready to go to the OR. When the patient is on the OR table, the monitors are placed on the patient by the nursing or anesthesia staff. Minimal monitoring includes pulse oximetry, automatic blood pressure cuff, and electrocardiogram electrodes. The ear and plastic drape are scrubbed with an iodine-containing solution, unless the patient is allergic to iodine. A head drape is applied, and the ear is draped with sterile towels so as not to cover the patient’s face; this can be facilitated by supporting the drapes with a metal bar attached to the OR table, or by fixing the drapes to the scrub nurse’s Mayo stand (Fig. 1-12).
Various ear specula should be available in oval and round configurations. Sizes typically range from 4.5 to 6.5 mm (Fig. 1-13). It is desirable always to work through the largest speculum that the meatus permits, without lacerating canal skin. Some surgeons prefer to use a speculum holder for stapes and other middle ear procedures. The tympanomeatal flap is started with incisions made at the 6 and 12 o’clock positions with the No. 1, or sickle, knife. These incisions are united with the No. 2, or lancet, knife. This instrument actually undermines the vascular strip instead of cutting it. The strip is cut with the Bellucci scissors. The defined flap is elevated to the tympanic annulus with the large round knife, known as the large “weapon.” When properly identified, the annulus is elevated superiorly with the Rosen needle, and inferiorly with the annulus elevator, or gimmick. Figure 1-14 shows a typical set of stapes instruments, including suction tips.
Adequate exposure usually requires removal of the bony ledge in the posterosuperior quadrant. This can be initiated with the Skeeter microdrill and completed with a stapes curette (Fig. 1-15).
For total footplate extraction, a right angle hook or excavator (Hough hoe) is used. The harvested graft is guided into place with a footplate chisel. The prosthesis is grasped with a smooth alligator or strut forceps and placed on the incus. It is positioned on the graft, or into the fenestra, with a strut guide. The wire is secured onto the incus with a crimper, or wire-closing forceps. The McGee crimper is useful, especially if followed by a fine alligator forceps for the last gentle squeeze. A small right angle hook may be necessary to fine-tune the position of the prosthesis (Fig. 1-16).
Suction tubes for stapes surgery include Nos. 3 to 7 Fr Baron suctions plus Rosen needle suction tips (18 to 24 gauge) with the House adapter (Fig. 1-17). The Rosen tips are useful when working near the oval window, with the surgeon’s thumb off the thumb port.
For all middle ear procedures, the surgeon should hold the instruments properly. The instrument should rest, like a pencil, between the index finger and thumb, allowing easy rotation around the shank. The hands should always be resting on the patient and the OR table. The middle and ring fingers should rest on the speculum so that the hand moves as a unit with the patient. Proper hand position and holding of instruments should afford the surgeon an unimpeded view (Fig. 1-18).
TYMPANOPLASTY AND TYMPANOPLASTY WITH MASTOIDECTOMY
The preparation and draping for tympanoplasty with or without mastoidectomy are much the same as for stapes surgery. The major difference is the amount of hair shaved before draping. Usually, enough hair is shaved to expose about 3 to 4 cm of skin behind the postauricular sulcus. The plastic drape is applied to cover the remaining hair (Fig. 1-19).
The patient is positioned on the OR table as described earlier. Whether the procedure is performed under local or general anesthesia depends on the extent of the surgery, the surgeon’s preference, and the desire of the patient. After appropriate sedation or induction of anesthesia, the ear and plastic drape are scrubbed with the proper soap or solution. Some surgeons place a cotton ball in the meatus if a perforation exists, preferring not to allow the preparation solution to enter the middle ear. The field is draped as described earlier, the head is rotated toward the contralateral shoulder, and the table is placed in slight Trendelenburg position (Fig. 1-20
[/not-level-membership-for-surgery-category]
