[level-membership-for-emergency-medicine-category]18
Orthopedic Injuries, Splints, and Slings
Physical Examination and Functional Considerations
1. Begin palpation of the long bones distally, and proceed across all joints.
2. Palpable crepitus at the joint level mandates application of a splint.
3. If the patient is able to cooperate, have him or her move every joint through an active range of motion (ROM). This exercise quickly focuses the examination on the injury’s location.
4. When this is not possible, undertake passive ROM of each joint, after palpating the joint for crepitus and swelling.
5. If crepitus, swelling, deformity, or resistance to motion is noted, apply a splint.
6. If a joint is dislocated, attempt reduction after completing the neurovascular examination.
7. Reduction of the joint generally relieves much of the discomfort.
8. After reduction, assess stability of the joint by careful, controlled ROM evaluation.
9. Remember to perform serial neurovascular examinations (i.e., recheck status).
10. A joint with an associated fracture or interposed soft tissue is frequently unstable after reduction. In such circumstances, take great care while applying the splint to prevent recurrent dislocation.
11. Report to the definitive care physician the details of the reduction maneuver, including orientation of the pull, amount of force involved, sedation, residual instability of the joint, and prereduction and postreduction neurovascular status.
Circulatory Function
1. Injury to the major vessels supplying a limb can occur with penetrating or blunt trauma.
2. A fracture can produce injury to vessels by direct laceration (rarely) or by stretching, which produces intimal flaps. These flaps can immediately occlude the distal blood flow or lead to delayed occlusion. For this reason, repeated examination of circulatory function is mandatory before and during transport.
3. Assess color and warmth of the skin in the extremity distal to the injury. Distal pallor and asymmetric regional hypothermia may identify a vascular injury.
4. In the upper extremity, the brachial, radial, and ulnar pulses should be palpated. In the lower extremity, the femoral, popliteal, posterior tibial, and deep peroneal pulses should be palpated. If blood loss and hypothermia make pulses difficult to assess, temperature and color of the distal extremity become keys to diagnosis.
5. Any suspected major arterial injury mandates immediate evacuation after splinting.
Nerve Function
1. Nerve function may be impossible to assess in an unconscious or uncooperative patient.
2. Whenever possible, it is important to establish the status of nerve function to the distal extremity after the patient’s condition is stabilized.
3. Periodically compare the initial findings with additional examinations during transport of the patient. Deteriorating neurologic findings guide the speed of evacuation and any ameliorating maneuvers, such as further fracture reduction or splint modification. These decisions may greatly affect the final outcome of the patient.
4. Carefully document the sensory examination of the peripheral nerves with regard to light touch and pinprick.
5. Assess muscle function by observing active function and grading the strength of each muscle group against resistance.
Evacuation Decisions See Box 18-1.
1. Musculoskeletal injuries that warrant immediate evacuation to a definitive care center include any suspected cervical, thoracic, lumbar spine, pelvic, or femur injury.
2. A patient who has a suspected pelvic injury with instability, significant suspected blood loss, or injury to the sacral plexus should receive immediate emergency evacuation on a backboard (if possible) or modified immobilization (see Figs. 57-17 to 57-20).
3. All open fractures require definitive debridement and care within 18 hours to prevent the development of infection. Emergency evacuation is imperative. If evacuation time exceeds 8 hours, in addition to antibiotic administration and splinting, irrigation and debridement in the field should be attempted. Antibiotic options are listed in Box 18-2.
4. A patient with a suspected compartment syndrome must be evacuated on an emergent basis.
5. A joint dislocation involving the hip or knee warrants immediate evacuation, even if relocated, because of the associated risk for vascular injury or post-traumatic osteonecrosis of the femoral head (in the case of the hip).
6. A laceration involving a tendon or nerve warrants prompt evacuation to a center where an experienced surgeon is available.
7. In all but the most remote wilderness expeditions, arrangements should be made to promptly evacuate the patient when treatment or significance of the injury is uncertain.
Special Considerations with Open Fracture
1. An injury that includes disruption of the skin and a broken bone is an open fracture and is at risk for bacterial contamination. Assume that any deep wound over a known fracture represents an open fracture. If soil or foreign body contamination is severe, the patient is at risk for osteomyelitis and sepsis.
2. If medical care is realistically less than 8 hours away and the bone (limb) is not severely angulated or malpositioned, treat the injury with a compression dressing, splint, transport, and administer a broad-spectrum antibiotic.
3. If the delay will be more than 8 hours before definitive medical care, irrigation of the open wound is beneficial and may help prevent serious soft tissue and bone infection.
a. The water used for irrigation does not have to be sterile. Clean tap water or water disinfected for drinking can greatly diminish the bacterial burden.
b. Use a syringe from the medical kit as an irrigating tool (see Fig. 20-1).
c. Attach an 18-gauge needle (or irrigation tip) to the syringe.
d. Irrigate the wound copiously with the pressurized stream of water. For a large wound, more than a liter of water may be necessary.
4. Once the wound has been cleaned and irrigated, cover it with a sterile compression dressing.
5. A dilute solution of 10% povidone-iodine solution can be applied as a brief rinse over the visible bone ends. Realign any angulated or malpositioned fractures, and apply the required traction. It is less likely that major contamination will occur when the bone fragments slip back into the soft tissue envelope during reduction.
6. Administer a broad-spectrum antibiotic (see Box 18-2), and splint the extremity. If evacuation time exceeds 8 hours, the incidence of osteomyelitis is high.
Special Considerations with Amputation
1. In the wilderness environment, the amputation patient requires immediate evacuation.
2. Control hemorrhage by direct pressure. A tourniquet is usually not indicated. If a tourniquet is applied as a lifesaving measure, document the time and date of application and be prepared to sacrifice the limb. Check at reasonable intervals (e.g., once an hour) to see if pressure alone will control bleeding.
3. Without cooling, an amputated part remains potentially viable for only 4 to 6 hours; with cooling, viability may be extended to 18 hours.
4. Cleanse the amputated part with water, wrap it in a moistened sterile gauze or towel, place it in a plastic bag, and transport it on ice or snow, if available. Do not transport it in direct contact with ice or ice water.
5. Make sure the amputated part accompanies the patient throughout the evacuation process.
Special Considerations with Compartment Syndrome
Signs and Symptoms
1. Complaints by the conscious patient of severe pain that seem out of proportion to the injury
2. Extremely tight feel to the muscle compartment, with applied pressure increasing the pain
3. In the cooperative patient, decreased sensation to light touch and pinprick in the areas supplied by the nerve or nerves traversing the compartment, usually noted on the dorsum of the foot in the first web space, caused by pressure affecting the deep peroneal nerve in the anterior compartment of the leg
4. Most reliable signs: pain, tightness to palpation, and pain on passive stretch
5. Never wait for hypoesthesia, absence of a pulse, presence of pallor, or slow capillary refill to make the diagnosis. Even late in the course, there is usually a pulse and normal capillary refill (unless there is an underlying arterial injury).
Treatment
1. Expedite emergency evacuation. The patient must be definitively treated in the first 6 to 8 hours after onset of this condition to optimize return of function to the involved limb. Be sure that there are no tight bandages, dressings, or splints that can exacerbate the condition. Do not elevate the limb; try to keep it at the level of the heart. Elevation reduces mean arterial pressure in the limb, which can reduce blood flow.
2. Perform emergency fasciotomy to relieve the pressure, which, if untreated, can produce nerve and muscle cell death within 12 hours. An experienced physician or surgeon can perform limited fasciotomies in the field if evacuation will take more than 8 hours. Antibiotics should be started (see Box 18-2) if a fasciotomy is performed in the field.
Splinting
Improvisation: General Guidelines
1. When working with a complex improvised system, test your creation on an uninjured person (i.e., “work out the kinks”) before you use it on the patient.
2. Remember to include improvisation construction materials, including a knife, tape, parachute cord or line, safety pins, wire, and plastic cable ties, in your survival kit.
3. Maintain a creative approach to obtaining improvisational materials. Much of the patient’s gear can be harvested to provide necessary items. A backpack can usually be dismantled to obtain foam pads, straps, etc.
4. Practice constructing certain items before you must do this in an actual rescue setting.
5. Be sure to use adequate padding and check underneath both prefabricated and improvised splints frequently for skin irritation.
6. Cover open wounds with sterile or the cleanest possible dressings.
Extremity Splints
1. Splint the fracture before the patient is moved unless the patient’s life is in immediate danger. In general, make sure the splint incorporates the joints above and below the fracture. If possible, fashion the splint on the uninjured extremity and then transfer it to the injured one.
2. Skis, poles, canoe and kayak paddles, ice axes, and snow anchors can be used as improvised splints. Airbags used as flotation for kayaks and canoes can be converted into pneumatic splints for arm and ankle injuries. The Minicell or Ethafoam pillars found in most kayaks can be removed and carved into pieces to provide upper and lower extremity splints. A life jacket can be molded into a cylinder splint for knee immobilization or into a pillow splint for the ankle. The flexible aluminum stays found in internal-frame backpacks can be molded into an upper extremity splint. Other improvised splinting materials include sticks or tree limbs; rolled-up magazines, books, or newspapers; tent poles; and dirt-filled garbage bags or fanny packs.
3. Ideally a splint should immobilize the fractured bone in a functional position. In general, functional position means that the leg should be straight or slightly bent at the knee, the ankle and elbow bent at 90 degrees, the wrist straight, and the fingers flexed in a curve as if one were attempting to hold a can of soda or a baseball. The “soda can” position is appropriate for initial management and transport; however, for long-term splinting, apply a hand splint with the metacarpophalangeal (MCP) joints flexed at 90 degrees and the interphalangeal joints extended (the “intrinsic positive” position). This position places the collateral ligaments at maximum length and helps prevent joint contractures.
4. Secure the splint in place with strips of clothing, belts, duct tape, pieces of rope or webbing, pack straps, elasticized roller wraps, or gauze bandages.
Ensolite (Closed-Cell Foam) Pads
SAM Splint
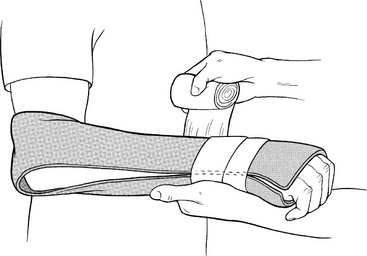
Introduced in 1985, the versatile SAM splint (Fig. 18-1) has largely filled the niche formerly occupied by military-style ladder splints and wire mesh splints. It is constructed of a thin sheet of malleable aluminum sandwiched between two thin layers of closed-cell foam, weighs approximately 128 g ( oz), and can be easily rolled into a tight cylinder. Initially the splint has no rigidity, but after structural U-shaped bends are placed along the axis of the splint, it becomes quite rigid.
Triangular Bandage
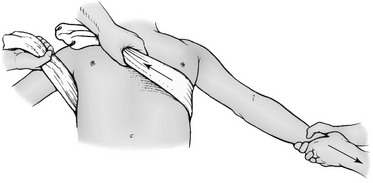
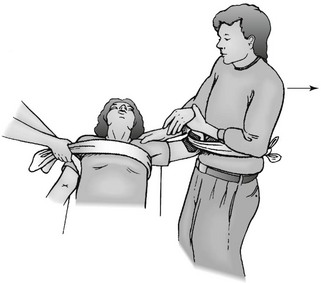
1. Typically used to construct a sling and swath bandage for shoulder and arm immobilization, a good substitute for this bulky item can be made with two or three safety pins. Pinning the shirtsleeve of the injured arm to the chest portion of the shirt effectively immobilizes the extremity against the body (Fig. 18-2, A).
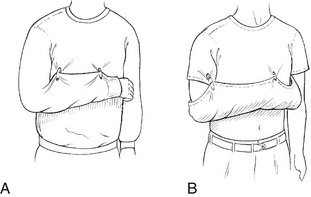
2. If the patient is wearing a short-sleeved shirt, fold the bottom of the shirt up and over the arm to create a pouch. This can be pinned to the sleeve and chest section of the shirt to secure the arm (Fig. 18-2, B).
3. Triangular bandages are useful for securing splints and constructing pressure wraps. Common items such as socks, shirts, belts, pack straps, webbing, shoelaces, fanny packs, and underwear can easily be used as substitutes.
Disorders
Cervical, Thoracic, Lumbar, and Sacral Spine
Spinal cord injuries are rare but may result in long-term disability. Complete spinal immobilization in the wilderness setting may not always be practical but should always be considered if there is concern for possible spinal injury. Spinal stabilization is first accomplished by manual techniques, and then with mechanical devices (see Figs. 57-17 to 57-20).
Signs and Symptoms
Treatment
1. Consider spinal immobilization for severe pain or tenderness, traumatic mechanism of injury, altered mental status, distracting injury, unreliable examination, neurologic complaints, head injury, or extremes of age.
2. Use commercial cervical collars if available for cervical spine immobilization.
3. Cervical spine immobilization can be improvised using towel rolls, backpack material, clothing, sandbags, fanny packs, SAM splints, water bottles, and shovels (see Figs. 57-18 and 57-21).
4. A full-length backboard is best for accomplishing immobilization of the thoracolumbar spine.
5. Thoracolumbar immobilization can be improvised using commercial or improvised rescue litters and carriers (see Chapter 57).
6. Maintain spinal alignment during patient movement with “logrolling” and manual cervical spine immobilization.
Upper Extremity Fractures
Signs and Symptoms
1. Complaints of shoulder pain, which may be poorly localized and exacerbated by arm or shoulder motion
2. Crepitus at the clavicle confirms the diagnosis
3. Although rare, associated pneumothorax, because the cupola of the lung is punctured
4. Shortness of breath and deep pain on inspiration
5. Associated injury to the brachial plexus, axillary artery, or subclavian vessels
Treatment
1. Localize the pain by gentle palpation to identify the area of maximum tenderness.
2. Auscultate the chest for equal breath sounds if a stethoscope is available.
3. Perform a thorough neurovascular examination of the adjacent extremity.
4. Examine the skin carefully for disruption because of the subcutaneous location of the bone.
5. If there is a significant open wound, suspected pneumothorax, or an injury to a nerve or vascular structure, arrange for evacuation.
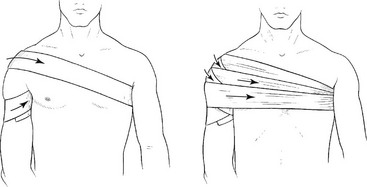
6. Most midclavicle fractures are improved by applying a sling or figure-8 type of support, easily improvised with a shirt jacket or cravat. A figure-8 support works by pulling the shoulder girdle back, applying longitudinal traction to the clavicle so that the bony fragments are somewhat realigned. Figure-8 straps are poorly tolerated by some patients and, if applied too tightly, can cause nerve injury. Figure-8 supports may also worsen distal clavicle fractures and should not be used if a distal fracture is suspected. Usually a simple sling with swath is adequate.
7. Judicious use of ice or snow packs, if available, and analgesics should be used. Elevation may provide added relief during rest. Elevate the patient’s upper body and head by 10 to 30 degrees when supine. This is a general rule for any shoulder injury. Supine positioning is generally poorly tolerated by patients after shoulder injuries.
Humerus
Signs and Symptoms
1. Fracture of the proximal humerus, often caused by a high-velocity fall onto an abducted, externally rotated arm or by a direct blow to the anterior shoulder
a. Difficult to differentiate from a shoulder dislocation in the acute phase. If there is crepitus or if the upper arm is rotated while palpating the proximal humerus and they do not move as a unit, the humerus is fractured
b. Severe pain around the shoulder and with any arm motion
c. Anterior fullness in the area of the proximal humerus, suggesting associated anterior humeral head dislocation
2. Fracture of the distal humerus
a. More frequently extra-articular in children and intra-articular in adults, with the child generally sustaining a supracondylar fracture with an extension moment across the elbow in a fall from a height
b. Peak age of incidence 4 to 8 years, although this can also occur in an adult
3. Radial nerve damage (rare unless the fracture occurs in the mid to distal one-third of the humerus)
a. The radial nerve courses around the posterior aspect of the humerus and is occasionally traumatized when the humeral shaft is injured
b. Numbness over the dorsum of the hand and inability to extend the wrist or fingers
c. Usually caused by contusion or traction injury to the nerve and not to complete disruption
Treatment
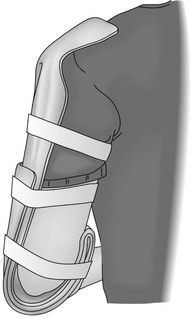
1. When a fracture of the humeral shaft is suspected, firmly apply an appropriate splint of fiberglass, wood, or other improvised material with an elastic bandage on the medial and lateral sides of the humerus. Construct the splint so that it reaches proximal to the level of the fracture (Fig. 18-3).
2. Have the patient use a sling and swath for comfort.
a. With suspected proximal humeral injury, use the uninjured side as a reference and palpate the anterior aspect of the injured shoulder firmly while rotating the arm. Palpable crepitus with arm motion confirms the diagnosis. It is unlikely that a combined fracture and dislocation can be reduced in the field. Treat this as a fracture, with splinting of the extremity to the torso with a sling or a sling and swath.
b. Arrange for urgent evacuation for any associated significant distal nerve or vascular injury.
3. For an adult with pain, crepitus, deformity, and swelling after a fall, apply a splint and immobilize the arm to the torso. Be sure to apply the splint with the elbow at 45 to 90 degrees of flexion, depending on the patient’s comfort. A splint on the inner and outer surface of the arm that is molded to curve around the elbow provides satisfactory stabilization. Arrange for prompt evacuation if there is an open fracture or neurovascular deficit.
4. With radial nerve injury, there is a high incidence of spontaneous recovery of function. However, if the patient complains of arm pain associated with deformity and crepitus, carefully check the sensory and motor function of the radial nerve as part of the overall neurovascular examination.
Radius
Signs and Symptoms
1. Radial shaft fracture: usually a history of a fall with angular or axial loading of the forearm
a. Pain, deformity, and crepitus over the radial shaft after a fall or direct blow, with any arm motion exacerbating the pain
b. Possibly associated with dislocation of the distal radioulnar joint (Galeazzi’s fracture); tenderness, swelling, and deformity in the wrist
c. If associated with fracture of the ulna, possibly marked forearm instability or tenderness, crepitus, and deformity in the elbow and wrist
2. Radial head fracture: generally occurs in a young to middle-aged adult who falls onto an outstretched hand
a. Pain around the elbow with loss of full extension
b. Tenderness at the radial head on the lateral side of the elbow, and pain with passive rotation of the forearm
c. With a more severe, comminuted radial head fracture: pain and crepitus with attempts at motion; ROM severely limited
d. Frequently, hemarthrosis of the elbow
e. Swelling is noted as fullness posterior to the radial head and anterior to the tip of the olecranon.
3. Fracture of the distal metaphyseal radius: generally associated with a fall onto the outstretched hand from a significant height
Treatment
1. Carefully examine the wrist and elbow, looking for tenderness, swelling, deformity, and crepitus.
2. Once a shaft fracture of the radius or radius and ulna is suspected, splint the wrist, forearm, and elbow in the position of function.
3. For a radial head fracture, move the elbow through gentle ROM and then place it in a posterior splint at 90 degrees of flexion with neutral pronation and supination.
a. On a prolonged expedition when definitive care cannot be reached, remove the splint at 5 days and perform intermittent active ROM exercises; then reapply the splint for comfort.
b. With a nondisplaced or minimally displaced radial head fracture, early ROM prevents permanent loss of elbow motion.
c. If hemarthrosis has occurred, proper equipment is available, and you are confident about the diagnosis, aspirate the hemarthrosis and instill 5 to 10 mL of lidocaine to facilitate pain relief. This must be done under sterile conditions by a skilled individual.
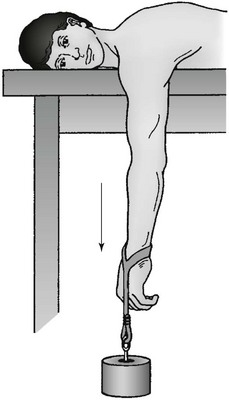
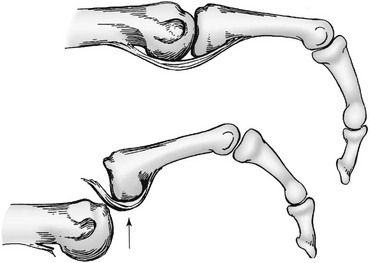
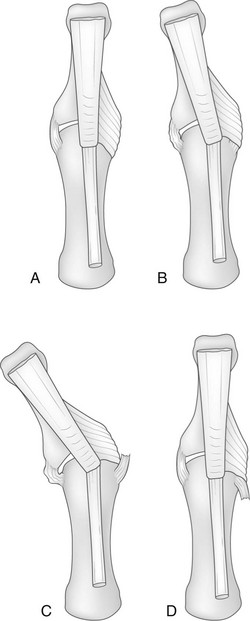
4. For a distal radius fracture with significant deformity at the wrist (Colles’ fracture), apply longitudinal traction after appropriate sedation (Fig. 18-4). In certain circumstances with a Colles’ fracture, simple longitudinal traction will not work because the fracture is locked dorsally. To reduce, reproduce the injury deforming force to unlock the fracture (Fig. 18-5). That is, increase the volar angulation (hyperextend the wrist) at the fracture site, then pull distal traction, reducing the distal fragment volarly with your thumb.
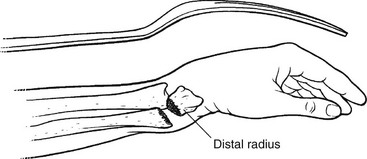
FIGURE 18-4 Colles’ fracture (“dinner fork deformity”).
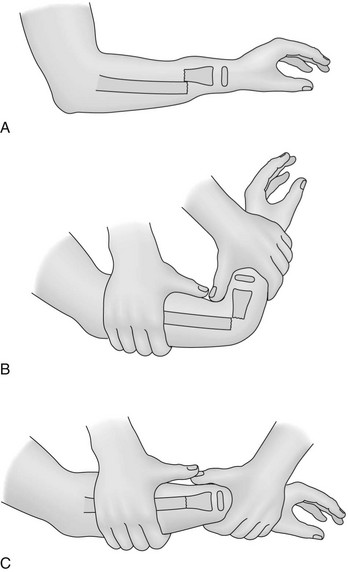
a. Next, apply a splint that immobilizes the wrist and elbow. A U-shaped (“sugar-tong”) splint, used in conjunction with a sling to limit rotation, is adequate for transport (see Fig. 18-1).
b. With an open fracture, significant neurologic deficits, or abnormal circulatory examination, apply the splints promptly and initiate evacuation. Keep the limb elevated above the heart during transport to minimize swelling.
Ulna
Signs and Symptoms
1. Ulna shaft fracture: when patient attempts to brace a fall with the forearm
a. Most often associated with fracture of the radial shaft at the same level
b. When isolated, most often occurs as a result of a direct blow, the so-called nightstick fracture
c. Can be associated with dislocation of the radial head (Monteggia’s fracture), affecting elbow function
2. Fracture of the proximal ulna (olecranon): result of a fall onto the posterior elbow or from an avulsion after violent asymmetric contraction of the triceps
a. Inability to extend the elbow actively against gravity if the triceps is dissociated from the forearm with a complete fracture of the olecranon
b. On initial examination: pain, significant swelling, and ecchymosis; palpable gap in the olecranon, with possible open fracture
c. With severe trauma, associated with intra-articular fracture of the distal humerus
Treatment
1. For ulna shaft fracture, apply a long-arm splint in the position of function. If the fracture is open, arrange for prompt evacuation.
2. For fracture of the proximal ulna, after the distal neurovascular examination and shoulder and wrist assessment, apply a splint in the position of function. A posterior splint at 90 degrees usually works well. If there is an open fracture, absent pulse, severe swelling, or neurologic deficit, arrange for immediate evacuation.
Wrist and Hand
Signs and Symptoms
1. Wrist fracture: history of significant rotational or high axial loading forces, such as those occurring with a fall onto the hand
a. Pain at first, then swelling of the wrist
b. Significant pain with any use of the hand or with rotation of the forearm
2. Carpal bone fracture: precise diagnosis impossible without radiographs
Treatment
1. Swelling can become severe. Remove all jewelry as soon as possible to prevent constriction as tissue swells.
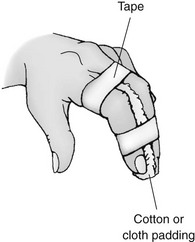
2. Make a temporary hand splint with the hand in the position of function, with the wrist straight and the fingers flexed in a curve as if holding a beverage can.
3. Apply a long-term hand splint with the MCP joints flexed 90 degrees and the interphalangeal joints extended, creating the “intrinsic positive position.”
4. This position places the collateral ligaments at maximum length and prevents later joint contracture. For an open fracture or one accompanied by median nerve dysfunction, arrange for prompt evacuation.
5. For carpal bone fracture/wrist dislocation, reduce the fracture by grasping the hand in a handshake fashion and pulling with axial traction. Apply a short-arm splint.
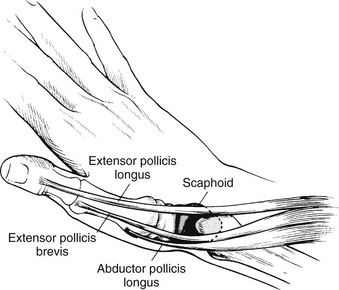
6. For suspected scaphoid fracture, if appropriate splinting materials are available, apply a thumb spica splint, immobilizing both the radius and the first metacarpal bone (thumb).
a. Encourage the patient to follow up with an orthopedist as soon as practical.
b. Lack of appropriate immobilization can result in nonunion and/or avascular necrosis, which can develop into severe osteoarthritis and chronic pain.
7. For fracture of the hook of the hamate bone, use a short-arm splint, which also suffices for other suspected carpal injuries, until definitive treatment can be obtained.
8. Wrist fractures with significant swelling or fractures that have not been anatomically reduced can induce traumatic carpal tunnel syndrome. If there is evidence of median nerve paresthesias, urgent carpal tunnel release may be essential.
Metacarpal
Signs and Symptoms
1. Fracture of the metacarpal base or shaft: result of a crush injury or an axial load when a rock or other immovable object is struck; produces tenderness, crepitus, and deformity
2. Fracture of the metacarpal neck: result of the same mechanism as for the metacarpal base or shaft
Treatment
1. For fracture of the metacarpal base or shaft, apply a short-arm splint (e.g., gutter splint, volar splint, U-splint) extending to the proximal interphalangeal (PIP) joint.
2. For possible fracture of the metacarpal neck, check for rotation of the metacarpal by observing the orientation of the fingernails as the MCP and interphalangeal joints are flexed to 90 degrees.
a. Make sure that the fingernails are parallel to one another and perpendicular to the orientation of the palm.
b. Ensure that the terminal portions of each digit point to the scaphoid tubercle.
3. For fracture of the metacarpal neck, if malalignment or significant shortening is noted, attempt rotation and reduction with traction on the involved digit.
a. For a fractured metacarpal shaft or neck, immobilize by applying an aluminum splint (or stick) to the volar surface and taping the involved digit to the adjacent digit with the MCP joint positioned at 45 to 90 degrees.
b. If splinting material is available, apply a radial or ulnar gutter splint, with the MCP joint positioned at 45 to 90 degrees. The splint should extend to the end of the fingers.
4. For suspected fracture of the base of the thumb metacarpal, immobilize the thumb and wrist in a thumb spica splint.
5. For open metacarpal fracture, clean the wound, debride as needed, and give presumptive antibiotic therapy for 48 hours or until definitive care can be obtained (see Box 18-2).
Phalanx
Treatment
1. Reduce the fracture by applying traction and correcting the deformity.
2. Immobilize the fracture by taping the injured digit to a volar splint.
3. Cleanse any nail bed fracture or crush site with soap, and then place a sterile dressing and protective volar splint. If the nail bed contains a large or poorly approximated laceration, suture repair may be necessary to preserve future functional nail growth.
Upper Extremity Dislocations
Signs and Symptoms
1. Generally injured by a fall onto an abducted shoulder
a. Direction of dislocation with the medial head of the clavicle anterior to the manubrium of the sternum
b. Direct blow to the sternum also possibly causes this injury, along with rib fracture(s)
2. Pain in the sternum region, frequently accompanied by difficulty taking a deep breath
3. With posterior dislocation, significant pressure placed on the esophagus and superior vena cava
Treatment
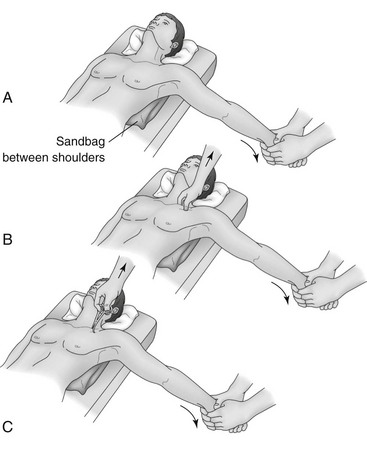
1. Attempt reduction as soon as possible.
a. Place a large roll of clothing or other firm objects between the scapulae, and position the patient on a firm surface.
b. Apply sharp, firm pressure directed posteriorly to both shoulders.
c. Repeat this maneuver several times with a larger object placed between the scapulae if reduction attempts are initially unsuccessful.
2. With a posterior dislocation, if the patient transcends into extremis, grasp the midshaft clavicle with a towel clip or pliers and forcefully pull it out of the thoracic cavity. Posterior dislocation mandates evacuation (Fig. 18-7).
Acromioclavicular Joint Separation
Signs and Symptoms
1. Injured by a blow on top of the shoulder
2. First-degree injury (sprain of the acromioclavicular [AC] ligaments): to the capsule between the acromion and the clavicle; no superior migration of the clavicle seen
3. Second-degree injury (complete tear of the AC ligaments and sprain of the coracoclavicular [CC] ligaments): complete capsular disruption, with the CC ligaments remaining intact; superior migration of the clavicle relative to the acromion of one-half the diameter of the clavicle
4. Third-degree injury (tear of both the AC and CC ligaments): total disruption of the joint capsule and the CC ligaments, which allows superior migration of the clavicle of up to 2 cm (approximately 1 inch) (Fig. 18-8). It appears as if the clavicle is superiorly migrated, but actually the scapula (including the glenoid and humeral head) is depressed and the clavicle is in normal position.
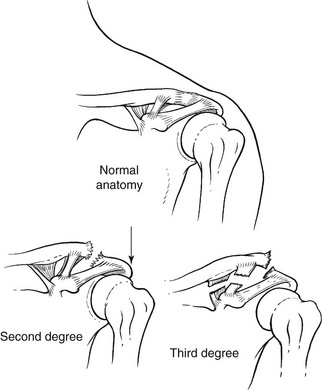
FIGURE 18-8 Acromioclavicular joint injury.
5. Type IV is a tear of both the AC and CC ligaments with the distal clavicle displaced posteriorly into the trapezius muscle (surgical indication).
6. Type V is a tear of both ligaments with the distal clavicle displaced superiorly into the muscle (surgical indication).
7. Type VI is a tear of both ligaments with the distal clavicle displaced inferior to the coracoid process (surgical indication and extremely rare).
8. Differentiating between type III and type IV to VI injuries: In a type III the distal clavicle is easily reducible with palpation, but in types IV to VI the clavicle is not reducible.
9. If a separation of type IV or greater is suspected, there is a high incidence of associated injuries (i.e., clavicular fractures, scapular fractures, pneumothorax).
Treatment
1. Because using the arm increases pain, place the arm on the affected side in a sling.
2. As long as the individual can tolerate the discomfort associated with the injury, evacuation is not mandatory. Always rule out more severe associated injuries such as rib fractures and pneumothorax.
3. Apply ice packs, and administer appropriate analgesics.
4. Elevate the upper torso to provide additional relief during rest.
Glenohumeral Joint (Shoulder) Dislocation
Signs and Symptoms
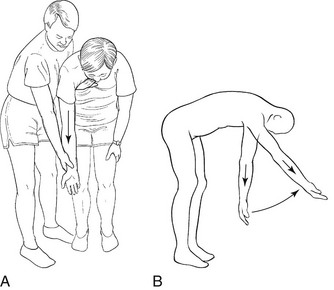
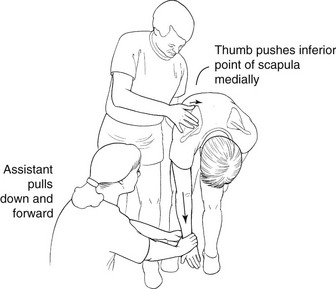
1. Generally dislocated anteriorly, or anteriorly and inferiorly; mechanism of injury usually a blow to the arm in the abducted and externally rotated position (e.g., during “high-bracing” in kayaking or other paddle sports, in which extreme abduction and external rotation occur)
2. Recurrent anterior shoulder instability, seen in 30% to 50% of individuals and often easier to reduce than a first-time dislocation
3. Holding the extremity away from the body, unable to bring the arm across the chest
a. Shoulder that appears square because of anterior, medial, and inferior displacement of the humeral head into a subcoracoid position
4. Possible loss of sensation over the mid-deltoid region with axillary nerve injury in 20% of dislocations
Treatment
1. Do a thorough motor, sensory, and vascular examination of the involved extremity.
2. Carefully assess the axillary and musculocutaneous nerves because they are the nerves most often injured in this dislocation.
3. If within 30 to 60 minutes of definitive medical care, transport the patient with support for the dislocated joint.
4. If skilled individuals are present or if definitive medical care is distant, early reduction of the dislocation can greatly improve the patient’s discomfort and enable the patient to function more actively during evacuation (Box 18-3).
a. The key element is rapid initiation because the longer a shoulder remains dislocated, the more difficult the eventual reduction.
b. Common to all methods of shoulder reduction are the following: relaxation of muscle spasm, reassurance of the patient, and a method of traction to pass the humeral head over the anterior edge of the glenoid.
c. In some remote settings, it may be easier to apply a method of reduction that can be carried out with the patient either standing or sitting. This requires access to a flat, comfortable area on which to place the patient in the supine or prone position.
5. After any shoulder reduction, remember to monitor circulation and motor-sensory function to the wrist and hand.
6. Narcotic or benzodiazepine premedication may be helpful if muscle spasm has developed.
7. If the shoulder cannot be reduced after three vigorous attempts, arrange for evacuation. For a difficult reduction, consider administration of 15 to 20 mL of a local anesthetic into the shoulder joint. This injection should only be attempted in a sterile fashion by someone skilled at shoulder injection.
8. After relocation, to prevent a recurrent dislocation, splint the patient’s arm across the chest with a sling or swath or by safety-pinning the sleeve of the arm across the chest. If circumstances require further limited use of the arm (e.g., ski pole use, kayak paddling), partially stabilize the shoulder by wrapping an elastic wrap around the torso and upper arm to limit abduction and external rotation (Fig. 18-14).
9. Any patient with a first-time dislocation or severe postreduction pain requires evacuation and formal evaluation.
Posterior Shoulder Dislocation
Signs and Symptoms
1. Occurs in less than 5% of shoulder dislocations; caused by a direct blow to the anterior shoulder or may result from marked internal rotation associated with a grand mal seizure
2. Significant pain and loss of shoulder motion, with external rotation often completely lost; greater range of motion is more common than with anterior dislocation; diagnosis often missed owing to this motion and the lack of obvious deformity
3. Using palpation, can usually detect posterior fullness not appreciated on the uninjured (comparison) side
Elbow
Treatment
1. After careful examination of the distal sensory, motor, and circulatory status, perform reduction.
a. With countertraction on the upper arm, apply linear traction with the elbow slightly flexed and the forearm in the original degree of pronation or supination (Fig. 18-15).
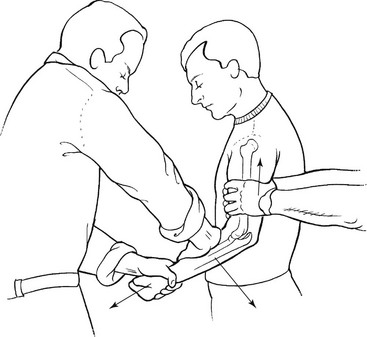
FIGURE 18-15 Reduction of dislocated elbow.
b. Premedication with an opiate or benzodiazepine can be extremely helpful.
c. Reduction (which can be a painful maneuver) leads to nearly complete relief of pain and restoration of normal surface anatomy.
2. After reduction, apply a posterior splint with the elbow in 90 degrees of flexion and the forearm in neutral position.
Wrist
Treatment
1. Carefully assess distal neurovascular function, emphasizing median nerve function.
2. For wrist dislocation or fracture, perform a reduction maneuver.
3. Grasp the patient’s hand as for a handshake, place countertraction on the upper arm, and apply linear traction. Note that significant force is required, and premedication, if available, may be extremely helpful.
4. If reduction is unsuccessful after three vigorous attempts or if there is median nerve dysfunction, arrange for evacuation.
5. Apply a short-arm (U or volar) splint if reduction is successful (see Fig. 18-1).
6. Elevate the arm as much as possible until the definitive care center can be reached.
Metacarpophalangeal Joint
Signs and Symptoms
1. Finger shortened, deviated to the ulnar side, and positioned in extension
2. Metacarpal head possibly prominent in the palm
3. The thumb MCP joint typically injured
4. Injury to the ulnar collateral ligament of this joint (“skier’s thumb”) a result of a valgus stress, such as when an individual falls holding an object (e.g., pole) in the first web space
Treatment
1. Dorsal dislocation may be irreducible if the head of the metacarpal becomes trapped between the volar ligaments (Fig. 18-16).
2. Reduction depends on the degree of disruption of supporting structures such as the volar plate and collateral ligaments. Thus this dislocation frequently requires open reduction in an operating room setting.
3. Most dorsal dislocations are easily reduced.
a. First, the proximal phalanx is hyperextended 90 degrees on the metacarpal.
b. Then the base of the proximal phalanx is pushed into flexion, maintaining contact at all times with the metacarpal head to prevent entrapment of the volar plate in the joint (see Fig. 18-16).
c. Straight longitudinal traction is avoided.
d. The wrist and interphalangeal joints are flexed to relax the flexor tendons.
4. The joint usually reduces easily with a palpable and audible clunk.
5. If reduction of a digital MCP joint dislocation is successful, apply a volar splint with the joint held in 90 degrees of flexion and interphalangeal joints in full extension.
6. If reduction is unsuccessful, splint the joint in the position of comfort and arrange for definitive treatment as soon as possible.
Thumb Metacarpophalangeal Joint:
1. The thumb MCP joint is the most commonly injured.
2. Dislocations are reduced as already described.
3. Injury to the ulnar collateral ligament of this joint (skier’s or gamekeeper’s thumb) results from a valgus stress, as may occur when an individual falls holding an object in the first web space.
4. The patient complains of tenderness over the ulnar aspect of the MCP joint.
5. There may be instability to radial stress with the joint held in 30 degrees of flexion, an indication for surgical repair.
6. Often the adductor aponeurosis becomes interposed between the ligament and its bony attachment, resulting in a Stener lesion (Fig. 18-17).
7. In the field, a thumb spica splint is applied (Fig. 18-18).
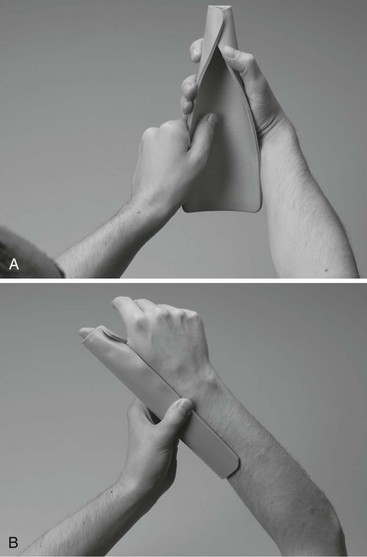
FIGURE 18-18 Padded aluminum thumb spica.
8. If splinting material is not available, the thumb is taped until definitive care can be obtained (Fig. 18-19).

9. When possible, place an ulnar collateral ligament tear in a thumb spica splint (Fig. 18-20). Instability often requires a lateral stress radiograph for definitive diagnosis and is an indication for surgical repair. Arrange for definitive care within 10 days of the injury.
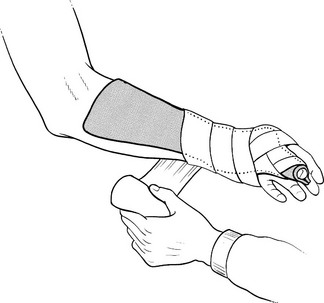
FIGURE 18-20 SAM thumb splint.
Proximal Interphalangeal Joint
PIP joint dislocation is common and occurs with axial loading of a finger.
Treatment
1. Reduction of dorsal PIP dislocations is performed as described for dorsal MCP dislocation (Fig. 18-21).
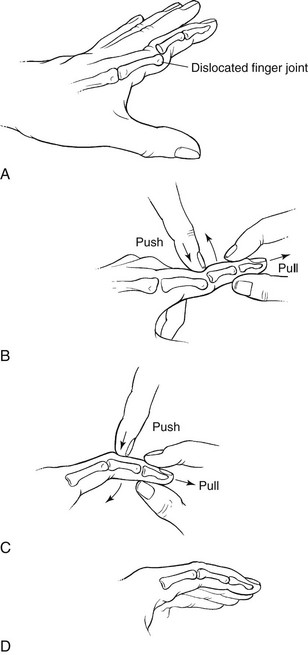
FIGURE 18-21 Traction method of joint reduction.
2. Straight longitudinal traction is avoided to prevent entrapment of the volar plate into the joint.
3. After reduction, do the following:
a. The finger is taped to an adjacent finger to avoid hyperextension and allow early motion (Fig. 18-22).
b. Alternatively, apply a volar splint and tape the finger to the splint in slight flexion.
4. Initiate early motion of the joint to regain full extension.
5. Keep the distal interphalangeal (DIP) joint free for active ROM. The active ROM of the DIP encourages the lateral bands to stay dorsal and thus help prevent a boutonnière deformity. Be careful not to hyperextend the PIP, especially with significant swelling, to avoid serious dorsal wound breakdowns.
6. With either volar or distal dislocation, arrange for definitive care as soon as possible.
Distal Interphalangeal Joint
The DIP joint is less frequently injured than the PIP joint.
Signs and Symptoms
1. Volar dislocation or subluxation, resulting in disruption of the terminal extensor mechanism (mallet deformity)
2. Occasionally, when an object is firmly grasped and then pulled away, rupture of the flexor profundus tendon (jersey finger)
3. DIP joint dislocation: active extension of the DIP joint absent
4. Rupture of the flexor profundus tendon: active flexion of the DIP joint absent
Treatment
a. Obtain reduction with traction; then examine the joint for full active extension.
b. Splint the joint in 0 degrees of extension for 3 weeks.
c. Radiographic examination must be performed to rule out an intra-articular fracture.
2. For rupture of the flexor profundus tendon, splint the digit in flexion and instruct the patient to see an upper extremity surgeon within 7 days.
Pelvis Fractures
Signs and Symptoms
1. On clinical examination, simple fracture is seen as an area of tenderness not associated with detectable instability.
2. Diagnosis of an unstable pelvis fracture is based on instability of the pelvis associated with posterior pain, swelling, ecchymosis, and motion on examination.
3. To palpate, place hands on each iliac crest. Press outward and then inward to determine whether the pelvis is unstable. An unstable pelvis “gives” with this type of compression or distraction force. This test should only be performed once to establish the diagnosis but not repeated, to prevent unnecessary neurovascular injury.
4. In addition, look for leg-length discrepancy, which can be a sign of a vertically unstable pelvis fracture.
5. Flank, gluteal, perianal, and scrotal swelling with ecchymosis are additional signs of an unstable pelvis fracture.
6. Pelvic hemorrhage may occur rapidly, so identify the injury without delay. Monitor hemodynamic changes.
7. Unstable fractures are associated with a high incidence of significant hemorrhage, neurologic injury, and mortality. Hemorrhage, gastrointestinal, genitourinary, and neurologic injuries contribute to mortality. An open pelvis fracture (displacement of the pelvic ring) has a mortality rate of up to 50%.
8. Anterior-posterior compression injury presents as anterior instability, along with a palpable ramus fracture or gapping of the pubic symphysis (“diastasis”).
9. Pelvis fracture may be associated with bladder, prostate, and urethral injury.
Treatment
1. The key factor in initial management of a pelvis fracture is identification of instability to the pelvic ring. If you find this, arrange for immediate evacuation with the patient on a backboard, taking care to minimize leg and torso motion.
2. Be aware that the patient is usually most comfortable with the hips and knees in slight flexion. Pad the patient generously with blankets or sleeping bags.
3. Attempt to stabilize the pelvis:
a. Use a SAM sling, or improvise a similar device (Fig. 18-23).
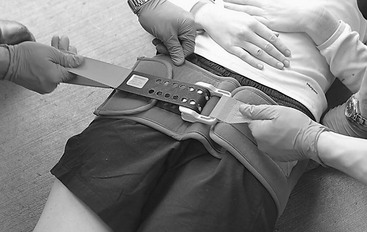
FIGURE 18-23 SAM sling.
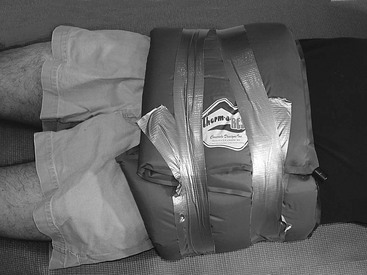
b. Wrap an inflatable mattress around the patient’s hips and pelvis, securing it with tape or rolled elastic wrap, and then inflating to a firm, but not rigid, pressure (Fig. 18-24).
c. If an inflatable mattress or SAM sling is not available, tie a garment securely around the pelvis. A bedsheet or jacket wrapped snugly around the pelvis of an individual with a suspected unstable pelvic fracture may provide stability and accomplish adequate tamponade of bleeding from the fracture.
d. A standard SAM splint unrolled inside the jacket sling may increase an improvised sling’s efficacy.
e. The applied sling belt or similar contrivance should be left in place until definitive care is available.
4. Be aware that an unstable pelvis fracture can cause significant hemorrhage. If available, arrange for intravenous (IV) fluid volume replacement. If possible, start two 16-gauge IV catheters in the upper extremities. Do not use the lower extremities because if there is venous disruption in the pelvis, the fluid may extravasate.
Lower Extremity Fractures
Most hip fractures occur in the femoral neck or intertrochanteric region.
Signs and Symptoms
1. In the absence of head or spinal cord injury, pain around the proximal thigh
2. With some proximal femur fractures, little local reaction in terms of swelling or deformity around the hip region to aid in diagnosis
3. Significant pain from any movement of the affected limb
4. Affected limb often noticeably shortened and externally rotated
5. Patient can rapidly lose 2 units of blood into the proximal thigh
Treatment
1. After doing a careful sensory, motor, and circulatory examination, realign the limb into anatomic position.
2. Light traction with a Kendrick, Thomas, Sager, or improvised splint should be considered for transport. Traction should be avoided, however, if a pelvic fracture cannot be ruled out.
3. If a traction splint is not available, transport the patient on a backboard, with the limbs strapped together and padding placed between them.
4. Because evidence indicates that emergency treatment of a fracture of the femoral neck decreases the risk for post-traumatic necrosis, arrange for rapid evacuation of any patient in whom this injury is suspected.
Femoral Shaft
Treatment
1. This may be an open injury; remove the patient’s clothing at the injured site to complete the examination. If you find an open wound, arrange for rapid evacuation.
2. Be aware that there may also be an associated femoral neck fracture.
3. After completing a neurovascular examination, place the limb in a commercial or improvised traction device. Box 18-4 lists general principles of traction, Box 18-5 outlines femoral traction systems and discusses the ankle hitch and rigid support, and Box 18-6 lists traction mechanisms, anchors, and method for securing and padding. A number of commercial traction splints are available including the Hare, Klippel, Sager, Thomas, Trac 3, Reel, Slishman, and Kendrick. The Kendrick and Slishman devices are well-suited for wilderness use because of their minimal weight, low volume, and portability.
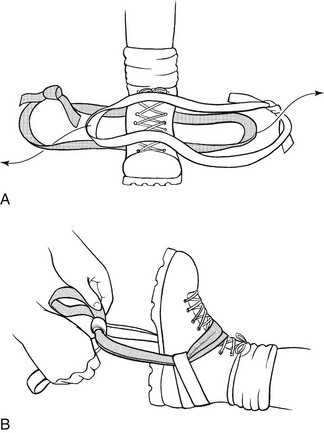
FIGURE 18-25 Double-runner ankle hitch.
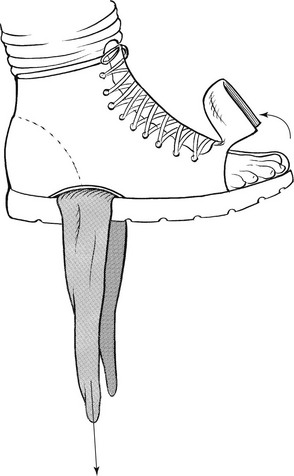
FIGURE 18-26 Traction using cut boot and cravat.
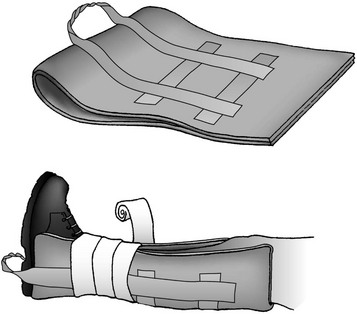
FIGURE 18-27 Buck’s traction.
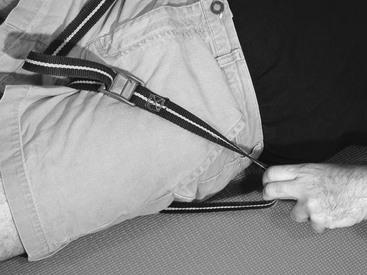
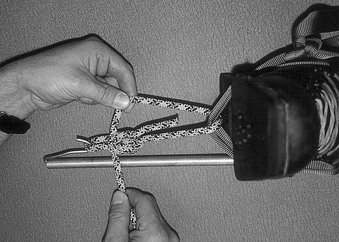
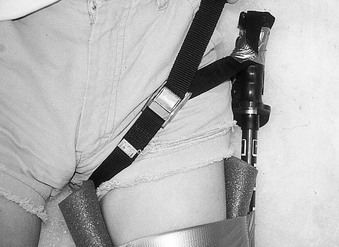
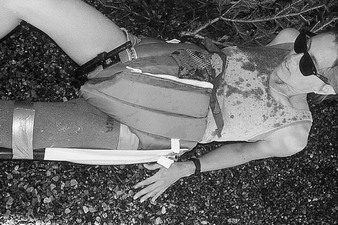
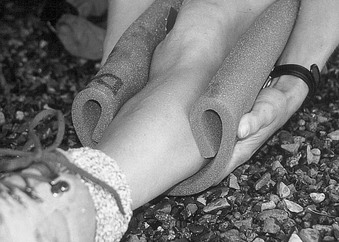
FIGURE 18-32 Folding Ensolite padding often provides better visualization of extremity than does a circumferential wrap.
4. In austere or disaster environments where definitive care is provided in resource-limited settings, it may be reasonable for a physician or surgeon with proper training to place a distal femoral or proximal tibial traction (Steinmann) pin under sterile conditions with local anesthesia (Fig. 18-33).
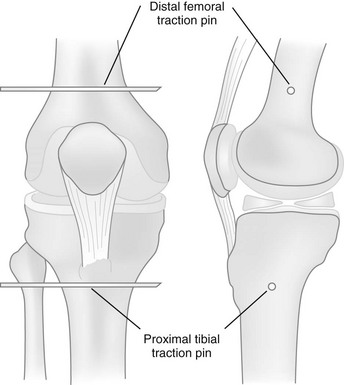
a. The femoral pin is the method of choice for acetabular or proximal femur fractures and is placed from medial to lateral, and proximal to the femoral epicondyle to avoid the neurovascular bundle.
b. The tibial traction pin is the method of choice for mid or distal femur fractures and is placed from lateral to medial, 2 cm (0.8 inch) posterior and 1 cm (0.4 inch) distal to the tibial tubercle in order to avoid the common peroneal nerve.
c. Once placed, up to 20% of the patient’s body weight can be applied as traction to the pin.
Distal Femur and Patella
Signs and Symptoms
Treatment
1. After initial examination of nerve and vessel function, realign the limb into anatomic position.
2. Apply a splint to the realigned limb for transportation.
3. With an open wound in the region of the fracture or an abnormal nerve or vascular examination, arrange for immediate evacuation.
Rigid Support: This can be fabricated as a unilateral support, similar to the Sager traction splint or Kendrick traction device, or as a bilateral support, such as the Thomas half ring or Hare traction splint. Unilateral supports tend to be easier to apply than bilateral support.
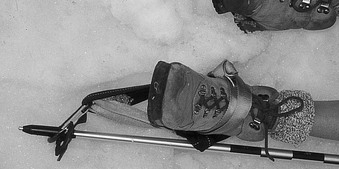
Double Ski Pole System: This is fashioned like a Thomas half ring, with the interlocked pole straps slipped under the proximal thigh to form the ischial support. Some mountain guides carry a prefabricated, drilled ski pole section or aluminum bar that can be used to stabilize the distal end of this system (Fig. 18-34).

Single Ski Pole System: Use a single ski pole either between the legs, which is ideal for bilateral femoral fractures, or lateral to the injured leg. The ultimate rigid support is an adjustable telescoping ski pole used laterally. You can elongate the pole to the appropriate length for each patient, making the splint very compact for litter work or helicopter evacuation (Fig. 18-35).
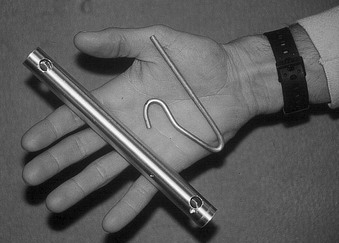
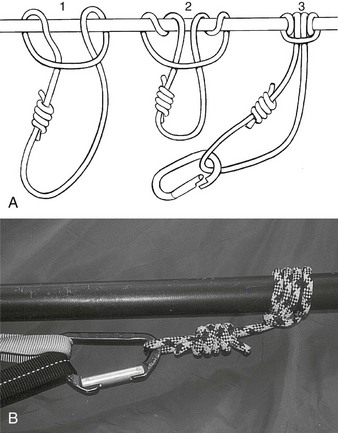
Tent Pole System: Fit conventional sectioned tent poles together to create the ideal length for rigid support. Because of their flexibility, make sure the tent poles are well secured to the leg to prevent them from flexing out of position. Place a blanket pin or bent tent stake (Fig. 18-36) in the end of the pole to provide an anchor for the traction system. Alternatively, use a Prusik knot to secure the system to the end of the tent pole (Fig. 18-37).
Miscellaneous: You can use any suitable object, such as a canoe paddle, two ice axes taped together at the handles, or a straight tree limb, to fashion a rigid support. Although skis immediately come to mind as a suitable rigid component, they are often too cumbersome. Because of their length, skis may extend far beyond the patient’s feet or require placement into the axilla, which is unnecessary and inhibits the patient’s mobility (e.g., sitting up during transport). Prefabricated canvas pockets, available through the National Ski Patrol System, provide a ski tip and tail attachment grommet for use with the ski system.
Tibia and Fibula
Signs and Symptoms
1. Pain, swelling, and deformity obvious on initial examination
2. With a tibial plateau fracture, hemarthrosis quickly noted with significant swelling around the knee
3. Because of anatomic tethering of the popliteal artery by the fascia of the soleus complex, arterial injury possible, especially when associated with a knee dislocation
Treatment
1. When this injury is suspected, the entire limb must be inspected for distal sensory, motor, and circulatory function before realignment. Check distal pulses and capillary refill and for signs of compartment syndrome. Neurovascular checks should be performed every hour.
2. Apply a posterior splint, U splint, or combination, made from fiberglass, plaster, or improvised materials.
3. Use a custom-made or improvised metal splint (e.g., SAM splint) that can be held in place with elastic bandages or tape. If SAM splints are used, at least two splints are necessary for the medial and lateral component and preferably a third for the posterior section (Fig. 18-38). A foam sleeping pad stabilized with rigid tent poles, ski pole sections, wooden branches, etc., may also be used.
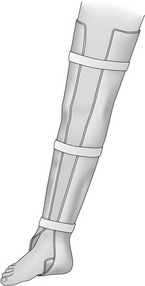
4. Always pad the leg sufficiently before splinting.
5. An air splint also provides adequate immobilization of the tibiofibular fracture.
6. Hold the ankle in neutral position.
7. Strap the injured leg to the noninjured leg to reduce rotational forces during transport.
8. If materials are limited, fashion a crude splint by strapping the injured leg to the noninjured leg with a well-padded tree limb or walking stick placed between them for support.
9. Transport any patient with an unstable lower extremity fracture or dislocation with the limb elevated.
Ankle
Treatment
1. Palpate along the medial and lateral malleoli to confirm the clinical suspicion.
2. After the shoe is removed to inspect the skin for open wounds, perform a neurovascular examination.
3. With rotational deformity in the ankle, realign the ankle with gentle traction before applying a posterior splint with the ankle in neutral position.
4. Apply a U-shaped blanket roll or pillow splint.
5. During transport, elevate the limb above the level of the heart, with the patient supine on a backboard if possible.
Talus and Calcaneus
Signs and Symptoms
1. Fracture of the calcaneus and talus during a fall or jump from a significant height when the patient lands on his or her feet
2. With calcaneus fracture, significant heel pain, deformity, and crepitus immediately evident after the boot is removed
3. Severe swelling within a couple of hours
4. Examine patient for possible lumbar spine fractures
5. With talus fracture, it may be impossible to differentiate clinically from ankle fracture:
a. Occurs when the foot is forced into maximum dorsiflexion
b. Tenderness and swelling distal to or at the level of the malleoli
6. With ankle fracture, tenderness and deformity at the level of the malleoli
7. Fractures of other tarsal bones, although exceedingly rare, defined by localizing the tenderness to a specific site
Metatarsal
Signs and Symptoms
Treatment
1. For metatarsal base fracture, place the foot in a well-padded posterior splint and elevate.
2. Do not allow a patient with a suspected midfoot fracture/dislocation to ambulate because swelling will intensify and further injury to the midfoot may result. Beware of compartment syndrome with midfoot or Lisfranc’s fracture/dislocation.
3. For metatarsal shaft fracture, manage temporarily by having the patient wear a stiff-soled boot or orthotic insert. If fracture instability or extreme pain is present, apply a short-leg splint and allow no further weight bearing.
Lower Extremity Dislocations
Signs and Symptoms
1. With posterior dislocation, severe pain around the hip
2. Affected limb apparently shortened, adducted, and internally rotated, with any hip motion increasing the pain
3. Not clinically possible to determine presence of an associated acetabular fracture
4. With rare case of anterior dislocation, limb abducted and flexed and severely externally rotated. Anterior dislocation is generally produced by wide abduction of the hip from a significant force
Treatment
1. Place the patient in a supine position, and perform a complete survey of all organ systems. Examine the distal limb carefully for associated fracture(s), and perform a careful sensory and motor examination.
2. When the patient is any distance from definitive care, attempt closed reduction.
a. Place the patient on a flat, hard surface.
b. Provide analgesia with a narcotic, benzodiazepine, or both.
c. Have an assistant stabilize the pelvis by placing both palms on the anterior iliac crests. Bend the patient’s knee, and apply upward linear traction in line with the thigh (with an anterior dislocation) and with the hip flexed 30 degrees (with a posterior dislocation) (Fig. 18-39). If an assistant is available, try pulling a lateral force on the proximal thigh during longitudinal traction.
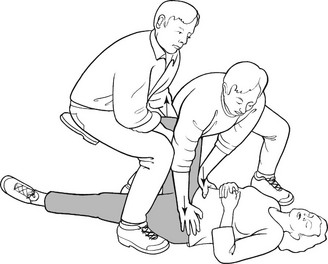
FIGURE 18-39 Reduction of dislocated hip.
3. If this maneuver fails to reduce the hip, expedite evacuation because a direct relationship exists between the time to reduction and the incidence of osteonecrosis of the femoral head.
Knee
Treatment
1. When this injury is suspected, perform a careful neurovascular screening examination. Intact distal pulses do not definitively rule out arterial injury.
2. After the initial examination, apply linear traction to the lower limb to reduce the knee. This is generally successful regardless of the direction of dislocation.
3. Immediate evacuation is indicated.
4. Emergency angiography may be indicated.
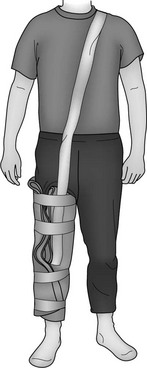
5. Apply a splint to the limb, and transport the patient on a backboard if possible. If the patient must walk with assistance, immobilize the knee with a splint and apply suspenders to maintain splint position (Fig. 18-40).
6. Be vigilant for an arterial injury or compartment syndrome. If either is suspected, arrange for emergency evacuation.
Patella Dislocation
Treatment
1. The patella lies lateral to the articular distal femur. Although neurovascular injury rarely occurs in association with this injury, conduct a screening examination.
2. Reduce the patella by simply straightening the knee.
3. If this is not successful, apply gentle pressure to the patella to push it back up onto the distal femoral articular groove.
4. Apply a knee splint with the joint in extension. Encourage the patient to avoid weight bearing, but if this is not possible, be aware that further damage is unlikely.
5. Keep the patient’s knee in extension until definitive care can be obtained (see Fig. 18-40).
6. Radiography is ultimately required to rule out osteochondral fracture, which is frequently associated with an acute injury.
Ankle
Treatment
1. Align the ankle joint by grasping the patient’s posterior heel, applying traction with the knee bent (to relax the gastrocnemius-soleus complex), and bringing the foot into alignment with the distal tibia.
2. After this maneuver, reexamine the foot, dress any wounds, and apply a posterior splint or wrap splint (Fig. 18-41). Note that a U-shaped blanket roll or pillow splint can also be applied.
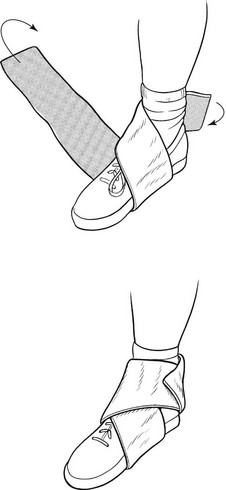
FIGURE 18-41 SAM splint on ankle.
Hindfoot
Treatment
1. Attempt a reduction if it will be more than 3 hours until the patient can be transported to a definitive care center.
2. If no other injuries are apparent, give the patient a sedative during reduction.
3. Medial dislocation is reduced more easily than lateral dislocation, in which the posterior tibial tendon frequently becomes displaced onto the lateral neck of the talus, blocking the reduction. In either case, the maneuver is the same.
a. Grasp the heel with the patient’s knee flexed (relaxing the gastrocnemius-soleus complex), and apply linear traction to bring the heel over the ankle joint.
b. Be aware that this maneuver is generally successful for medial dislocation, but lateral dislocation often requires open reduction.
4. After you attempt reduction, apply a posterior splint, U-shaped blanket roll, or pillow splint.
5. Make sure the limb is elevated.
6. Even if the reduction is successful, do not allow the patient to bear weight until definitive care is obtained.
Midfoot
Signs and Symptoms
1. Forefoot generally displaced laterally relative to the midfoot when the injury is initially unstable; more often the foot is normally aligned
2. Significant swelling with tenderness at the base of the second and fifth metatarsals
3. Instability and crepitus, with dorsoplantar-oriented force frequent
Treatment
1. After the neurovascular examination, stress the forefoot by stabilizing the heel and applying a varus and valgus directed force. If the forefoot is unstable and associated with significant swelling, pain, or crepitus, consider a midfoot dislocation to be present.
2. Apply a short-leg (posterior or U-shaped) splint.
Metatarsophalangeal and Interphalangeal Joints
Treatment
1. Because this may be an open fracture, perform a careful inspection of the foot.
2. Relocate the toe by applying linear traction with the patient supine and using the weight of the foot as countertraction.
3. Also, consider reduction of an interphalangeal joint by applying linear traction with gentle manipulation.
4. Once reduced, tape the injured toe to the adjacent toe for 1 to 3 weeks.
5. Have the patient wear a protective boot with a stiff sole and deep toe box.
[/level-membership-for-emergency-medicine-category][not-level-membership-for-emergency-medicine-category]18
Orthopedic Injuries, Splints, and Slings
Physical Examination and Functional Considerations
1. Begin palpation of the long bones distally, and proceed across all joints.
2. Palpable crepitus at the joint level mandates application of a splint.
3. If the patient is able to cooperate, have him or her move every joint through an active range of motion (ROM). This exercise quickly focuses the examination on the injury’s location.
4. When this is not possible, undertake passive ROM of each joint, after palpating the joint for crepitus and swelling.
5. If crepitus, swelling, deformity, or resistance to motion is noted, apply a splint.
6. If a joint is dislocated, attempt reduction after completing the neurovascular examination.
7. Reduction of the joint generally relieves much of the discomfort.
8. After reduction, assess stability of the joint by careful, controlled ROM evaluation.
9. Remember to perform serial neurovascular examinations (i.e., recheck status).
10. A joint with an associated fracture or interposed soft tissue is frequently unstable after reduction. In such circumstances, take great care while applying the splint to prevent recurrent dislocation.
11. Report to the definitive care physician the details of the reduction maneuver, including orientation of the pull, amount of force involved, sedation, residual instability of the joint, and prereduction and postreduction neurovascular status.
Circulatory Function
1. Injury to the major vessels supplying a limb can occur with penetrating or blunt trauma.
2. A fracture can produce injury to vessels by direct laceration (rarely) or by stretching, which produces intimal flaps. These flaps can immediately occlude the distal blood flow or lead to delayed occlusion. For this reason, repeated examination of circulatory function is mandatory before and during transport.
3. Assess color and warmth of the skin in the extremity distal to the injury. Distal pallor and asymmetric regional hypothermia may identify a vascular injury.
4. In the upper extremity, the brachial, radial, and ulnar pulses should be palpated. In the lower extremity, the femoral, popliteal, posterior tibial, and deep peroneal pulses should be palpated. If blood loss and hypothermia make pulses difficult to assess, temperature and color of the distal extremity become keys to diagnosis.
5. Any suspected major arterial injury mandates immediate evacuation after splinting.
Nerve Function
1. Nerve function may be impossible to assess in an unconscious or uncooperative patient.
2. Whenever possible, it is important to establish the status of nerve function to the distal extremity after the patient’s condition is stabilized.
3. Periodically compare the initial findings with additional examinations during transport of the patient. Deteriorating neurologic findings guide the speed of evacuation and any ameliorating maneuvers, such as further fracture reduction or splint modification. These decisions may greatly affect the final outcome of the patient.
4. Carefully document the sensory examination of the peripheral nerves with regard to light touch and pinprick.
5. Assess muscle function by observing active function and grading the strength of each muscle group against resistance.
Evacuation Decisions See Box 18-1.
1. Musculoskeletal injuries that warrant immediate evacuation to a definitive care center include any suspected cervical, thoracic, lumbar spine, pelvic, or femur injury.
2. A patient who has a suspected pelvic injury with instability, significant suspected blood loss, or injury to the sacral plexus should receive immediate emergency evacuation on a backboard (if possible) or modified immobilization (see Figs. 57-17 to 57-20).
3. All open fractures require definitive debridement and care within 18 hours to prevent the development of infection. Emergency evacuation is imperative. If evacuation time exceeds 8 hours, in addition to antibiotic administration and splinting, irrigation and debridement in the field should be attempted. Antibiotic options are listed in Box 18-2.
4. A patient with a suspected compartment syndrome must be evacuated on an emergent basis.
5. A joint dislocation involving the hip or knee warrants immediate evacuation, even if relocated, because of the associated risk for vascular injury or post-traumatic osteonecrosis of the femoral head (in the case of the hip).
6. A laceration involving a tendon or nerve warrants prompt evacuation to a center where an experienced surgeon is available.
7. In all but the most remote wilderness expeditions, arrangements should be made to promptly evacuate the patient when treatment or significance of the injury is uncertain.
Special Considerations with Open Fracture
1. An injury that includes disruption of the skin and a broken bone is an open fracture and is at risk for bacterial contamination. Assume that any deep wound over a known fracture represents an open fracture. If soil or foreign body contamination is severe, the patient is at risk for osteomyelitis and sepsis.
2. If medical care is realistically less than 8 hours away and the bone (limb) is not severely angulated or malpositioned, treat the injury with a compression dressing, splint, transport, and administer a broad-spectrum antibiotic.
3. If the delay will be more than 8 hours before definitive medical care, irrigation of the open wound is beneficial and may help prevent serious soft tissue and bone infection.
a. The water used for irrigation does not have to be sterile. Clean tap water or water disinfected for drinking can greatly diminish the bacterial burden.
b. Use a syringe from the medical kit as an irrigating tool (see Fig. 20-1).
c. Attach an 18-gauge needle (or irrigation tip) to the syringe.
d. Irrigate the wound copiously with the pressurized stream of water. For a large wound, more than a liter of water may be necessary.
4. Once the wound has been cleaned and irrigated, cover it with a sterile compression dressing.
5. A dilute solution of 10% povidone-iodine solution can be applied as a brief rinse over the visible bone ends. Realign any angulated or malpositioned fractures, and apply the required traction. It is less likely that major contamination will occur when the bone fragments slip back into the soft tissue envelope during reduction.
6. Administer a broad-spectrum antibiotic (see Box 18-2), and splint the extremity. If evacuation time exceeds 8 hours, the incidence of osteomyelitis is high.
Special Considerations with Amputation
1. In the wilderness environment, the amputation patient requires immediate evacuation.
2. Control hemorrhage by direct pressure. A tourniquet is usually not indicated. If a tourniquet is applied as a lifesaving measure, document the time and date of application and be prepared to sacrifice the limb. Check at reasonable intervals (e.g., once an hour) to see if pressure alone will control bleeding.
3. Without cooling, an amputated part remains potentially viable for only 4 to 6 hours; with cooling, viability may be extended to 18 hours.
4. Cleanse the amputated part with water, wrap it in a moistened sterile gauze or towel, place it in a plastic bag, and transport it on ice or snow, if available. Do not transport it in direct contact with ice or ice water.
5. Make sure the amputated part accompanies the patient throughout the evacuation process.
Special Considerations with Compartment Syndrome
Signs and Symptoms
1. Complaints by the conscious patient of severe pain that seem out of proportion to the injury
2. Extremely tight feel to the muscle compartment, with applied pressure increasing the pain
3. In the cooperative patient, decreased sensation to light touch and pinprick in the areas supplied by the nerve or nerves traversing the compartment, usually noted on the dorsum of the foot in the first web space, caused by pressure affecting the deep peroneal nerve in the anterior compartment of the leg
4. Most reliable signs: pain, tightness to palpation, and pain on passive stretch
5. Never wait for hypoesthesia, absence of a pulse, presence of pallor, or slow capillary refill to make the diagnosis. Even late in the course, there is usually a pulse and normal capillary refill (unless there is an underlying arterial injury).
Treatment
1. Expedite emergency evacuation. The patient must be definitively treated in the first 6 to 8 hours after onset of this condition to optimize return of function to the involved limb. Be sure that there are no tight bandages, dressings, or splints that can exacerbate the condition. Do not elevate the limb; try to keep it at the level of the heart. Elevation reduces mean arterial pressure in the limb, which can reduce blood flow.
2. Perform emergency fasciotomy to relieve the pressure, which, if untreated, can produce nerve and muscle cell death within 12 hours. An experienced physician or surgeon can perform limited fasciotomies in the field if evacuation will take more than 8 hours. Antibiotics should be started (see Box 18-2) if a fasciotomy is performed in the field.
Splinting
Improvisation: General Guidelines
1. When working with a complex improvised system, test your creation on an uninjured person (i.e., “work out the kinks”) before you use it on the patient.
2. Remember to include improvisation construction materials, including a knife, tape, parachute cord or line, safety pins, wire, and plastic cable ties, in your survival kit.
3. Maintain a creative approach to obtaining improvisational materials. Much of the patient’s gear can be harvested to provide necessary items. A backpack can usually be dismantled to obtain foam pads, straps, etc.
4. Practice constructing certain items before you must do this in an actual rescue setting.
5. Be sure to use adequate padding and check underneath both prefabricated and improvised splints frequently for skin irritation.
6. Cover open wounds with sterile or the cleanest possible dressings.
Extremity Splints
1. Splint the fracture before the patient is moved unless the patient’s life is in immediate danger. In general, make sure the splint incorporates the joints above and below the fracture. If possible, fashion the splint on the uninjured extremity and then transfer it to the injured one.
2. Skis, poles, canoe and kayak paddles, ice axes, and snow anchors can be used as improvised splints. Airbags used as flotation for kayaks and canoes can be converted into pneumatic splints for arm and ankle injuries. The Minicell or Ethafoam pillars found in most kayaks can be removed and carved into pieces to provide upper and lower extremity splints. A life jacket can be molded into a cylinder splint for knee immobilization or into a pillow splint for the ankle. The flexible aluminum stays found in internal-frame backpacks can be molded into an upper extremity splint. Other improvised splinting materials include sticks or tree limbs; rolled-up magazines, books, or newspapers; tent poles; and dirt-filled garbage bags or fanny packs.
3. Ideally a splint should immobilize the fractured bone in a functional position. In general, functional position means that the leg should be straight or slightly bent at the knee, the ankle and elbow bent at 90 degrees, the wrist straight, and the fingers flexed in a curve as if one were attempting to hold a can of soda or a baseball. The “soda can” position is appropriate for initial management and transport; however, for long-term splinting, apply a hand splint with the metacarpophalangeal (MCP) joints flexed at 90 degrees and the interphalangeal joints extended (the “intrinsic positive” position). This position places the collateral ligaments at maximum length and helps prevent joint contractures.
4. Secure the splint in place with strips of clothing, belts, duct tape, pieces of rope or webbing, pack straps, elasticized roller wraps, or gauze bandages.
Ensolite (Closed-Cell Foam) Pads
SAM Splint
Introduced in 1985, the versatile SAM splint (Fig. 18-1) has largely filled the niche formerly occupied by military-style ladder splints and wire mesh splints. It is constructed of a thin sheet of malleable aluminum sandwiched between two thin layers of closed-cell foam, weighs approximately 128 g ( oz), and can be easily rolled into a tight cylinder. Initially the splint has no rigidity, but after structural U-shaped bends are placed along the axis of the splint, it becomes quite rigid.
Triangular Bandage
1. Typically used to construct a sling and swath bandage for shoulder and arm immobilization, a good substitute for this bulky item can be made with two or three safety pins. Pinning the shirtsleeve of the injured arm to the chest portion of the shirt effectively immobilizes the extremity against the body (Fig. 18-2, A).
2. If the patient is wearing a short-sleeved shirt, fold the bottom of the shirt up and over the arm to create a pouch. This can be pinned to the sleeve and chest section of the shirt to secure the arm (Fig. 18-2, B).
3. Triangular bandages are useful for securing splints and constructing pressure wraps. Common items such as socks, shirts, belts, pack straps, webbing, shoelaces, fanny packs, and underwear can easily be used as substitutes.
Disorders
Cervical, Thoracic, Lumbar, and Sacral Spine
Spinal cord injuries are rare but may result in long-term disability. Complete spinal immobilization in the wilderness setting may not always be practical but should always be considered if there is concern for possible spinal injury. Spinal stabilization is first accomplished by manual techniques, and then with mechanical devices (see Figs. 57-17 to 57-20).
Signs and Symptoms
Treatment
1. Consider spinal immobilization for severe pain or tenderness, traumatic mechanism of injury, altered mental status, distracting injury, unreliable examination, neurologic complaints, head injury, or extremes of age.
2. Use commercial cervical collars if available for cervical spine immobilization.
3. Cervical spine immobilization can be improvised using towel rolls, backpack material, clothing, sandbags, fanny packs, SAM splints, water bottles, and shovels (see Figs. 57-18 and 57-21).
4. A full-length backboard is best for accomplishing immobilization of the thoracolumbar spine.
5. Thoracolumbar immobilization can be improvised using commercial or improvised rescue litters and carriers (see Chapter 57).
6. Maintain spinal alignment during patient movement with “logrolling” and manual cervical spine immobilization.
Upper Extremity Fractures
Signs and Symptoms
1. Complaints of shoulder pain, which may be poorly localized and exacerbated by arm or shoulder motion
2. Crepitus at the clavicle confirms the diagnosis
3. Although rare, associated pneumothorax, because the cupola of the lung is punctured
4. Shortness of breath and deep pain on inspiration
5. Associated injury to the brachial plexus, axillary artery, or subclavian vessels
Treatment
1. Localize the pain by gentle palpation to identify the area of maximum tenderness.
2. Auscultate the chest for equal breath sounds if a stethoscope is available.
3. Perform a thorough neurovascular examination of the adjacent extremity.
4. Examine the skin carefully for disruption because of the subcutaneous location of the bone.
5. If there is a significant open wound, suspected pneumothorax, or an injury to a nerve or vascular structure, arrange for evacuation.
6. Most midclavicle fractures are improved by applying a sling or figure-8 type of support, easily improvised with a shirt jacket or cravat. A figure-8 support works by pulling the shoulder girdle back, applying longitudinal traction to the clavicle so that the bony fragments are somewhat realigned. Figure-8 straps are poorly tolerated by some patients and, if applied too tightly, can cause nerve injury. Figure-8 supports may also worsen distal clavicle fractures and should not be used if a distal fracture is suspected. Usually a simple sling with swath is adequate.
7. Judicious use of ice or snow packs, if available, and analgesics should be used. Elevation may provide added relief during rest. Elevate the patient’s upper body and head by 10 to 30 degrees when supine. This is a general rule for any shoulder injury. Supine positioning is generally poorly tolerated by patients after shoulder injuries.
Humerus
Signs and Symptoms
1. Fracture of the proximal humerus, often caused by a high-velocity fall onto an abducted, externally rotated arm or by a direct blow to the anterior shoulder
a. Difficult to differentiate from a shoulder dislocation in the acute phase. If there is crepitus or if the upper arm is rotated while palpating the proximal humerus and they do not move as a unit, the humerus is fractured
b. Severe pain around the shoulder and with any arm motion
c. Anterior fullness in the area of the proximal humerus, suggesting associated anterior humeral head dislocation
2. Fracture of the distal humerus
a. More frequently extra-articular in children and intra-articular in adults, with the child generally sustaining a supracondylar fracture with an extension moment across the elbow in a fall from a height
b. Peak age of incidence 4 to 8 years, although this can also occur in an adult
3. Radial nerve damage (rare unless the fracture occurs in the mid to distal one-third of the humerus)
a. The radial nerve courses around the posterior aspect of the humerus and is occasionally traumatized when the humeral shaft is injured
b. Numbness over the dorsum of the hand and inability to extend the wrist or fingers
c. Usually caused by contusion or traction injury to the nerve and not to complete disruption
Treatment
1. When a fracture of the humeral shaft is suspected, firmly apply an appropriate splint of fiberglass, wood, or other improvised material with an elastic bandage on the medial and lateral sides of the humerus. Construct the splint so that it reaches proximal to the level of the fracture (Fig. 18-3).
2. Have the patient use a sling and swath for comfort.
a. With suspected proximal humeral injury, use the uninjured side as a reference and palpate the anterior aspect of the injured shoulder firmly while rotating the arm. Palpable crepitus with arm motion confirms the diagnosis. It is unlikely that a combined fracture and dislocation can be reduced in the field. Treat this as a fracture, with splinting of the extremity to the torso with a sling or a sling and swath.
b. Arrange for urgent evacuation for any associated significant distal nerve or vascular injury.
3. For an adult with pain, crepitus, deformity, and swelling after a fall, apply a splint and immobilize the arm to the torso. Be sure to apply the splint with the elbow at 45 to 90 degrees of flexion, depending on the patient’s comfort. A splint on the inner and outer surface of the arm that is molded to curve around the elbow provides satisfactory stabilization. Arrange for prompt evacuation if there is an open fracture or neurovascular deficit.
4. With radial nerve injury, there is a high incidence of spontaneous recovery of function. However, if the patient complains of arm pain associated with deformity and crepitus, carefully check the sensory and motor function of the radial nerve as part of the overall neurovascular examination.
Radius
Signs and Symptoms
1. Radial shaft fracture: usually a history of a fall with angular or axial loading of the forearm
a. Pain, deformity, and crepitus over the radial shaft after a fall or direct blow, with any arm motion exacerbating the pain
b. Possibly associated with dislocation of the distal radioulnar joint (Galeazzi’s fracture); tenderness, swelling, and deformity in the wrist
c. If associated with fracture of the ulna, possibly marked forearm instability or tenderness, crepitus, and deformity in the elbow and wrist
2. Radial head fracture: generally occurs in a young to middle-aged adult who falls onto an outstretched hand
a. Pain around the elbow with loss of full extension
b. Tenderness at the radial head on the lateral side of the elbow, and pain with passive rotation of the forearm
c. With a more severe, comminuted radial head fracture: pain and crepitus with attempts at motion; ROM severely limited
d. Frequently, hemarthrosis of the elbow
e. Swelling is noted as fullness posterior to the radial head and anterior to the tip of the olecranon.
3. Fracture of the distal metaphyseal radius: generally associated with a fall onto the outstretched hand from a significant height
Treatment
1. Carefully examine the wrist and elbow, looking for tenderness, swelling, deformity, and crepitus.
2. Once a shaft fracture of the radius or radius and ulna is suspected, splint the wrist, forearm, and elbow in the position of function.
3. For a radial head fracture, move the elbow through gentle ROM and then place it in a posterior splint at 90 degrees of flexion with neutral pronation and supination.
a. On a prolonged expedition when definitive care cannot be reached, remove the splint at 5 days and perform intermittent active ROM exercises; then reapply the splint for comfort.
b. With a nondisplaced or minimally displaced radial head fracture, early ROM prevents permanent loss of elbow motion.
c. If hemarthrosis has occurred, proper equipment is available, and you are confident about the diagnosis, aspirate the hemarthrosis and instill 5 to 10 mL of lidocaine to facilitate pain relief. This must be done under sterile conditions by a skilled individual.
4. For a distal radius fracture with significant deformity at the wrist (Colles’ fracture), apply longitudinal traction after appropriate sedation (Fig. 18-4). In certain circumstances with a Colles’ fracture, simple longitudinal traction will not work because the fracture is locked dorsally. To reduce, reproduce the injury deforming force to unlock the fracture (Fig. 18-5). That is, increase the volar angulation (hyperextend the wrist) at the fracture site, then pull distal traction, reducing the distal fragment volarly with your thumb.
FIGURE 18-4 Colles’ fracture (“dinner fork deformity”).
a. Next, apply a splint that immobilizes the wrist and elbow. A U-shaped (“sugar-tong”) splint, used in conjunction with a sling to limit rotation, is adequate for transport (see Fig. 18-1).
b. With an open fracture, significant neurologic deficits, or abnormal circulatory examination, apply the splints promptly and initiate evacuation. Keep the limb elevated above the heart during transport to minimize swelling.
Ulna
Signs and Symptoms
1. Ulna shaft fracture: when patient attempts to brace a fall with the forearm
a. Most often associated with fracture of the radial shaft at the same level
b. When isolated, most often occurs as a result of a direct blow, the so-called nightstick fracture
c. Can be associated with dislocation of the radial head (Monteggia’s fracture), affecting elbow function
2. Fracture of the proximal ulna (olecranon): result of a fall onto the posterior elbow or from an avulsion after violent asymmetric contraction of the triceps
a. Inability to extend the elbow actively against gravity if the triceps is dissociated from the forearm with a complete fracture of the olecranon
b. On initial examination: pain, significant swelling, and ecchymosis; palpable gap in the olecranon, with possible open fracture
c. With severe trauma, associated with intra-articular fracture of the distal humerus
Treatment
1. For ulna shaft fracture, apply a long-arm splint in the position of function. If the fracture is open, arrange for prompt evacuation.
2. For fracture of the proximal ulna, after the distal neurovascular examination and shoulder and wrist assessment, apply a splint in the position of function. A posterior splint at 90 degrees usually works well. If there is an open fracture, absent pulse, severe swelling, or neurologic deficit, arrange for immediate evacuation.
Wrist and Hand
Signs and Symptoms
1. Wrist fracture: history of significant rotational or high axial loading forces, such as those occurring with a fall onto the hand
a. Pain at first, then swelling of the wrist
b. Significant pain with any use of the hand or with rotation of the forearm
2. Carpal bone fracture: precise diagnosis impossible without radiographs
Treatment
1. Swelling can become severe. Remove all jewelry as soon as possible to prevent constriction as tissue swells.
2. Make a temporary hand splint with the hand in the position of function, with the wrist straight and the fingers flexed in a curve as if holding a beverage can.
3. Apply a long-term hand splint with the MCP joints flexed 90 degrees and the interphalangeal joints extended, creating the “intrinsic positive position.”
4. This position places the collateral ligaments at maximum length and prevents later joint contracture. For an open fracture or one accompanied by median nerve dysfunction, arrange for prompt evacuation.
5. For carpal bone fracture/wrist dislocation, reduce the fracture by grasping the hand in a handshake fashion and pulling with axial traction. Apply a short-arm splint.
6. For suspected scaphoid fracture, if appropriate splinting materials are available, apply a thumb spica splint, immobilizing both the radius and the first metacarpal bone (thumb).
a. Encourage the patient to follow up with an orthopedist as soon as practical.
b. Lack of appropriate immobilization can result in nonunion and/or avascular necrosis, which can develop into severe osteoarthritis and chronic pain.
7. For fracture of the hook of the hamate bone, use a short-arm splint, which also suffices for other suspected carpal injuries, until definitive treatment can be obtained.
8. Wrist fractures with significant swelling or fractures that have not been anatomically reduced can induce traumatic carpal tunnel syndrome. If there is evidence of median nerve paresthesias, urgent carpal tunnel release may be essential.
Metacarpal
Signs and Symptoms
1. Fracture of the metacarpal base or shaft: result of a crush injury or an axial load when a rock or other immovable object is struck; produces tenderness, crepitus, and deformity
2. Fracture of the metacarpal neck: result of the same mechanism as for the metacarpal base or shaft
[/not-level-membership-for-emergency-medicine-category]
