Orthopaedics and trauma
upper limb
The anterior (deltopectoral) approach to the shoulder
Decompression of the ulnar nerve (cubital tunnel)
Decompression of the extensor pollicis brevis and abductor pollicis longus tendons
Ganglion of the dorsum of the wrist
Median nerve decompression in the carpal tunnel
Approaches to the hand and fingers
Release of trigger finger or thumb
Percutaneous fasciotomy for Dupuytren’s contracture
THE ANTERIOR (DELTOPECTORAL) APPROACH TO THE SHOULDER
Appraise
1. The glenohumeral joint may be exposed through anterior, posterior or transacromial approaches, but most procedures can be carried out satisfactorily through the anterior approach (Fig. 31.1).
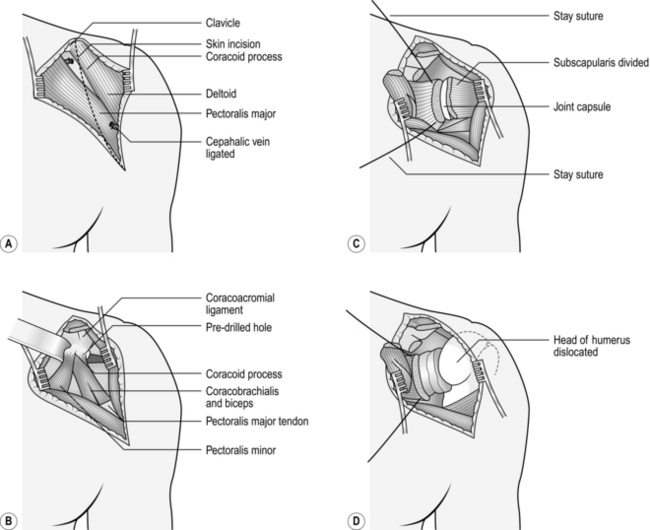
2. This is a straightforward approach through muscle planes and is truly ‘extensile’ in the manner described by Henry. It is particularly suited for exposure of the upper humerus for internal fixation or draining a potentially infected joint.
Prepare
1. Operate under a general anaesthetic.
2. Place the patient supine on the operating table in a semi-reclining (beach chair) position with a long narrow sandbag between the shoulder blades or alternatively with the head supported in a neurosurgical head ring.
3. Have your unscrubbed assistant elevate the arm.
4. Clean the skin from the scapula posteriorly, round the axilla and over the chest wall to the midline anteriorly, and from the angle of the jaw to the costal margin and down the arm to the elbow.
5. Towel the head separately (see Chapter 20).
6. Carefully tuck a large drape, backed by a waterproof sheet, between the table and the trunk. Cover the trunk with another large sheet, the upper edge of which reaches the lower margin of the head towels. Wrap the arm in a medium-sized towel, from the fingertips to the midpoint of the upper arm, and secure this towel firmly with an open-weave bandage or stockinette.
7. Cover the exposed skin with a transparent adhesive skin drape, taking care to seal the axilla.
Access
1. Incise the skin and subcutaneous fat in an arc from the clavicle above, downwards over the tip of the coracoid process to the anterior axillary fold following the anterior border of the deltoid muscle. Raise the flaps of skin and fat medially and laterally to expose the deltopectoral groove running obliquely across the wound (Fig. 31.1A).
2. Identify the cephalic vein in the deltopectoral groove and incise the investing fascia throughout the length of the vein.
KEY POINTS
Cephalic vein


3. It is not necessary to remove the ligated segment of vein, but cauterize its tributaries as you encounter them.
4. Separate the deltoid from the pectoralis major by blunt dissection and retract the muscles with a large self-retaining retractor, exposing the coracoid process and the underlying short head of biceps and coracobrachialis (Fig. 31.1B).
5. In a simple operation for drainage of the joint it is not necessary to divide the coracoid process, but be willing to do so if you require more extensive exposure.
6. Retract the bulk of the coracobrachialis and short head of biceps medially, so exposing the underlying subscapularis. It is possible to extend the approach distally along the lateral border of the biceps, so exposing the entire humeral shaft (see below).
7. Externally rotate the arm and identify the lower border of the subscapularis by seeing the branches of the anterior circumflex humeral vessels lying on its surface. Divide these between ligatures.
8. Identify the upper margin of the subscapularis and place stay sutures at the upper and lower margins at the musculotendinous junction. Divide the muscle just lateral to the stay sutures (Fig. 31.1C).
9. The underlying capsule is usually adherent to the deep surface and is frequently divided at the same time, opening the joint as the subscapularis is retracted medially.
10. If necessary, now dislocate the head of the humerus by external rotation and extension of the arm.
APPROACHES TO THE UPPER ARM
ANTEROLATERAL APPROACH


Prepare
1. Have 2 units of cross-matched blood available.
2. Operate under general anaesthesia.
3. Place the patient supine on the operating table with a large arm table in place.
4. An unscrubbed assistant elevates the arm so that it can be cleaned from the neck to the wrist.
5. Place a small triangular towel or split sheet in the axilla and take it over the tip of the shoulder. Fasten with a towel clip.
6. Place a waterproof sheet and covering towel over the arm board and tuck under the trunk.
7. Place a large sheet over the trunk and head.
8. Wrap the forearm and hand in a small towel and bandage firmly to the forearm with an open-weave bandage or stockinette.
9. Cover the exposed upper arm with a large transparent adhesive drape.
Access
1. Palpate the moveable mass of the biceps muscle overlying the fixed mass of the brachialis.
2. Make a longitudinal skin incision along the lateral border of the biceps from the deltoid above to the elbow below. Note that the upper part of the incision takes in the inferior limit of the anterior approach to the shoulder. Once again this is an extensile approach.
3. In the proximal part of the wound retract the deltoid laterally and the biceps and cephalic vein medially, dividing the lateral tributaries to expose the shaft of the humerus.
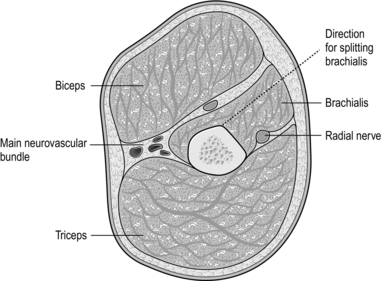
4. Distal to the insertion of the deltoid expose the brachialis muscle and split it longitudinally down to bone with the scalpel directed obliquely towards the midline of the humerus anteriorly (Fig. 31.2).


5. If necessary, extend the wound proximally by incising the skin in the line of the deltopectoral groove to the clavicle.
6. Detach the deltoid from its origin to the clavicle as far laterally as the acromioclavicular joint with the cutting diathermy. Leave sufficient tissue attached to the clavicle to take the sutures when closing.
7. Turn back the detached deltoid laterally to expose the tendon of pectoralis major. This may then be cut to allow retraction of the muscle medially, exposing the long and short heads of the biceps and the neurovascular bundle.
8. The anterior surface of the lower third of the humerus can be exposed by extending the skin incision distally along the lateral border of the biceps, curling medially and then distally again, to cross the elbow crease in the midline of the forearm (Fig. 31.3).
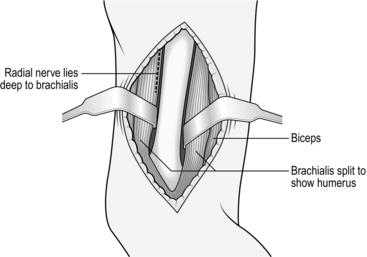
Fig. 31.3 The distal exposure of the humerus.
9. Split the brachialis as far as the elbow joint and flex the elbow to open the wound.
APPROACHES TO THE ELBOW
Appraise
1. The elbow joint may be exposed from the anterior, posterior, medial or lateral aspects.
2. Avoid the anterior approach except for very special circumstances.
3. The posterior approach gives access to the whole of the lower end of the humerus, while the medial and lateral approaches give a more limited access to the corresponding side of the joint, which is sufficient for more limited procedures.


POSTEROLATERAL APPROACH (Fig. 31.4)
Prepare
1. With the patient under general anaesthetic, apply a pneumatic tourniquet high on the upper arm.
2. Position and prepare the arm as if the humerus were to be exposed, leaving 12 cm of skin exposed above and below the tip of the olecranon.
3. Have an assistant flex the elbow and hold the arm across the chest or on a side table.
Access

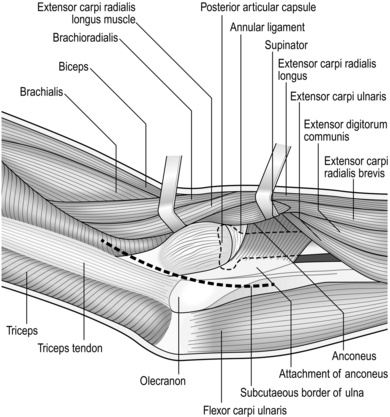
1. Begin the skin incision 3 cm proximal to the tip of the olecranon and continue distally between the olecranon and the lateral epicondyle down to the subcutaneous border of the ulna.
2. Divide the subcutaneous tissue and cut the deep fascia between the ulna and the anconeus and the extensor carpi ulnaris muscles (the Kocher interval).
3. Strip the anconeus from the ulna subperiosteally. Retract it laterally to expose the capsule covering the radial head and in the distal part of the wound the supinator muscle.
4. Incise the capsule over the radial head, so entering the joint. Extend this down to the annular ligament if you require greater access.
5. If necessary, irrigate the joint with physiological saline.
SUPRACONDYLAR FRACTURES


CONSERVATIVE TREATMENT
1. This fracture can be treated conservatively by manipulation or olecranon traction in children.
2. Take anteroposterior radiographs of both elbows in a comparable position, usually acutely flexed, after closed reduction.
3. Draw a line along the epiphyseal surface of the lower humeral metaphysis and measure the angle between this and a line perpendicular to the long axis of the humerus. Compare this angle (Baumann’s angle) on the two sides (Fig. 31.5).
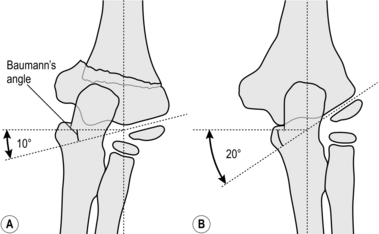
4. Residual varus (Latin: = bent, towards the midline) or valgus (Latin: = originally meant bow-legged; now means bent away from the midline) tilt of more than 10° requires operative correction.
5. Circulatory impairment, either before or after closed reduction, demands immediate exploration of the brachial artery if the circulation cannot be restored by allowing the elbow to extend. Unless you are experienced, seek advice if at all possible (see Chapter 23).
POSTERIOR APPROACH
This gives the widest access to the lower end of the humerus and the elbow joint.
Prepare
1. With the patient under general anaesthetic, apply a pneumatic tourniquet high on the upper arm.
2. Position and prepare the arm as if exposing the humerus, leaving 12 cm of skin exposed above and below the tip of the olecranon.
3. Have an assistant flex the elbow and hold the arm across the chest.
Access
1. Start the skin incision in the midline 10 cm proximal to the tip of the olecranon and extend it distally in a gentle curve to pass just lateral to the tip of the olecranon, ending 5 cm distal to it over the subcutaneous border of the ulna.
2. Dissect the skin and subcutaneous tissues medially and laterally as far as the epicondyles and hold the edges apart with a self-retaining retractor.
3. Identify but do not disturb the ulnar nerve as it lies in its groove on the posterior surface of the medial epicondyle.
4. Identify the attachment of the central portion of the triceps tendon to the olecranon. Turn down a tongue-shaped flap, 7 cm long, based on the olecranon attachment by incising the tendon and the underlying muscle down to the bone (Fig. 31.6).
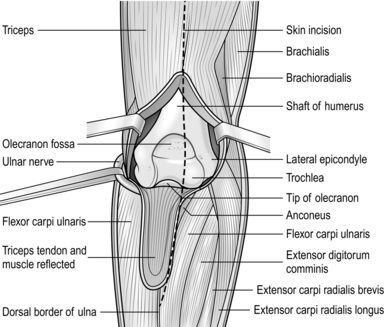
Fig. 31.6 Posterior approach to the elbow joint.
5. Sweep the residual attachments of the triceps muscle medially and laterally off the posterior surface of the condyles in continuity with the common flexor and extensor attachments, so exposing the distal humerus.
Action
1. Drill a 1-mm Kirschner wire (K-wire) through the fracture surface of the distal fragment at approximately 45° to the long axis of the humerus, so that it emerges through the medial epicondyle and the overlying skin. Take care to avoid the ulnar nerve.
2. Withdraw the wire until only 1–2 mm protrudes from the fracture.
3. Reduce the fracture under direct vision, freeing any interposed soft tissue.
4. Flex the elbow to 90° and drill the K-wire back across the fracture to engage the lateral cortex of the shaft of the humerus (Fig. 31.7).
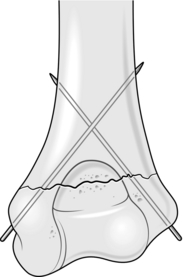
5. Through a small stab wound over the lateral condyle, drill a second wire across the fracture site to engage the medial cortex of the shaft.
6. Occasionally, a third wire needs to be introduced from either the medial or lateral side, if the fixation is not stable.
7. Confirm the accuracy of the reduction and the position of the wires by X-rays to check the accuracy of the reduction. Do not accept any position that is less than perfect.
8. If satisfactory, cut the wires leaving the ends just beneath the skin.

DECOMPRESSION OF THE ULNAR NERVE (CUBITAL TUNNEL)
Appraise
1. Decompression of the ulnar nerve may be carried out for relieving ulnar neuritis or nerve entrapment. In most cases simple in situ decompression is sufficient but occasionally the nerve needs to be transposed anteriorly to the medial epicondyle if it is unstable, to gain length to repair the nerve following injury, or as part of another procedure (e.g. internal fixation of a distal humeral fracture).
2. If operating for a compression neuropathy, it is advisable to obtain preoperative nerve-conduction studies.
Action
1. Position the patient supine, with a tourniquet applied to the upper arm as high as possible.

2. Attach an arm table to the side of the operating table. If the shoulder is stiff, place the patient in a lateral position or, alternatively, prone with the arm behind the back in a ‘half-Nelson’ position.
3. Use a medial approach (Fig. 31.8), regardless of the position of the patient.
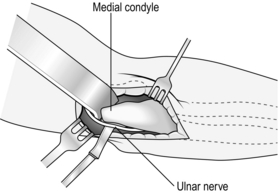
Fig. 31.8 Medial approach to the elbow joint.
4. Flex the elbow to a right angle. Begin the skin incision 3 cm proximal to the medial epicondyle and carry it just anterior to the epicondyle for a further 3 cm.
5. Identify the ulnar nerve in the groove on the posterior aspect of the medial epicondyle. It is usually easier to find the nerve at the proximal end of the incision. Incise the investing fascia in the line of the nerve, preserving its blood supply.
6. Do not be too assiduous in mobilizing the nerve, as excessive dissection can result in late scarring and predispose to recurrent compression.
7. Follow the nerve proximally up to the medial intermuscular septum, where there may be a tight band, which if present should be released.
8. It is important to decompress the nerve distally as it passes between the two heads of the flexor carpi ulnaris. Several short small articular branches may be divided, but preserve the branch to the flexor carpi ulnaris. This is usually sufficient in the majority of cases of ulnar neuritis, so that transposition is not necessary.
9. If the nerve is unstable (dislocatable) or if additional length is required, then transpose it anteriorly and proceed as follows (submuscular transposition).
10. Divide the common flexor origin anterior to the ulnar nerve, leaving a cuff of tissue attached to the bone for later re-attachment.
11. Place the nerve deep to the common flexor muscle mass and ensure there are no kinks in its course.
APPROACHES TO THE FOREARM
POSTERIOR APPROACH TO THE ULNA (Fig. 31.9)
Prepare
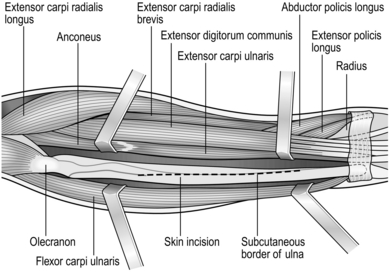
Fig. 31.9 Exposure of the shaft of the ulna.
1. The patient, under general anaesthesia, lies supine. Have a large arm table attached to the operating table.
2. Apply a pneumatic tourniquet around the upper arm.
3. Prepare the skin from above the elbow to the fingertips.
4. Cover the arm board with a waterproof sheet and towel.
5. Drape off the arm just proximal to the elbow with a triangular towel.
6. Cover the head and trunk with a large sheet.
7. Cover the fingers and hand with stockinette that can be extended up to the tourniquet if necessary.
8. Pass the arm through a large sheet with a hole in the centre.
Action
1. Much of the ulna, like the tibia, is immediately subcutaneous, so exposure is generally simple, straightforward and safe. Incise the skin along the subcutaneous border of the ulnar over that part of the forearm to be exposed.
2. Divide the common aponeurosis, which attaches to the bone the flexor carpi ulnaris and flexor digitorum profundus medially, and the extensor carpi ulnaris laterally.
3. Separate the muscles from the bone with a periosteal elevator to expose the shaft of the ulna.
THE ANTERIOR (HENRY) APPROACH TO THE SHAFT OF THE RADIUS (Fig. 31.10)

Access
1. Incise the skin, beginning at the radial styloid in the interval between the brachioradialis and the flexor carpi radialis muscles, and extend this proximally in a straight line as far as the lateral side of the biceps tendon, to expose the whole radial shaft. More limited exposure to any part of the radius is gained by using an appropriate part of this incision.
2. Starting at the distal end of the incision, identify and protect the sensory branch of the radial nerve as it lies beneath the brachioradialis.
3. Mobilize the flexor carpi radialis and the radial artery and vein. Retract them medially to expose the flexor digitorum superficialis, flexor pollicis longus and pronator quadratus in the floor of the wound.
4. Pronate the forearm and elevate the flexor pollicis longus and pronator quadratus subperiosteally from the outer edge of the radius. Strip them medially to expose the distal two-thirds of the anterior aspect of the radius.
5. To expose the proximal third of the radius, supinate the forearm and extend the incision proximally. Divide and tie the large superficial vein crossing the middle part of the wound.
6. Expose the biceps tendon and divide the deep fascia on its lateral side with blunt-nosed scissors.
7. Retract the belly of the brachioradialis and the long and short radial extensors of the wrist laterally, and the flexors medially, to expose the radial artery. Divide and carefully ligate the fan-shaped leash of vessels passing laterally from the artery (Fig. 31.11).
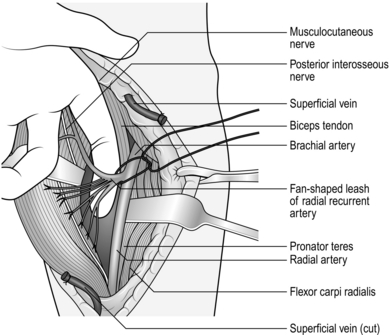
8. Flex the elbow to 90° to expose the belly of the supinator.
9. Cut down to the tuberosity of the radius immediately lateral to the attachment of the biceps tendon.


10. Pronate the forearm to expose the lateral aspect of the radius.
APPROACHES TO THE WRIST
ANTERIOR (VOLAR-RADIAL) APPROACH (Fig. 31.12)

Access
1. Incise the skin in line with the tendon of the flexor carpi radialis as far as the midpoint of the transverse palmar crease. If necessary, cross the wrist crease either transversely in the skin crease for 1 cm or with a small zigzag incision.
2. Retract the skin edges with skin hooks, exposing the sheath of the flexor carpi radialis (FCR) and the median nerve.
3. Incise the FCR tendon sheath and retract the tendon along with the radial artery to the radial side and the flexor pollicis longus and median nerve to the ulnar side. Insert a small self–retaining retractor into the interval, so exposing the pronator quadratus.
4. The pronator quadratus lies in the floor of the wound. Identify the distal border (the white line), which is just proximal to the volar lip of the radius and then carefully elevate this from its radial border to expose the lower end of the radius and the radiocarpal joint.
5. This provides a good exposure of the distal radius for open reduction and internal fixation of a fracture and application of a volar plate.
POSTERIOR (DORSAL) APPROACH
Access
2. Make a straight incision 10 cm long on the dorsum of the wrist centred on Lister’s tubercle (the bony prominence on the dorsum of the distal radius).
3. Retract the skin edges with skin hooks and expose the extensor retinaculum. Divide this along the line of the sheath of the extensor carpi ulnaris tendon (ECU) and turn it towards the radial side of the wound to sequentially expose the extensor tendons in their respective compartments (Fig. 31.13).
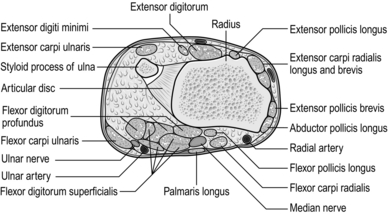
Fig. 31.13 Cross-section through the distal end of the right radius and the styloid process of the right ulna.
4. Continue elevating the extensor retinaculum as far as Lister’s tubercle. This provides access to the distal and radio-ulnar joint, radiocarpal joint and carpal bones.
LATERAL APPROACH (Fig. 31.14)
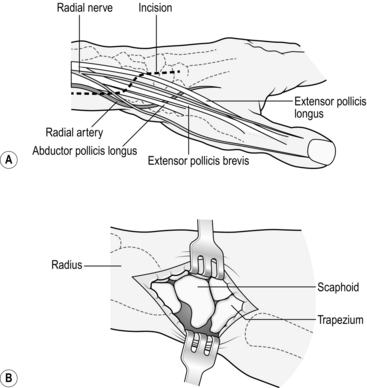
Access
1. Make a longitudinal oblique incision 5 cm long centred on the tip of the radial styloid.
2. Extend the incision in a palmar direction towards the tendons of the extensor pollicis brevis and abductor pollicis longus and then proximally, parallel to the radius. Curve the distal limb towards the extensor pollicis longus and then parallel to it.


3. Retract extensor pollicis brevis and abductor pollicis longus, the radial artery and the dorsal branch of the radial nerve towards the palm. The tubercle of the scaphoid and the lateral capsule of the wrist joint are exposed distally and the lower end of the lateral aspect of the radius proximally.
DECOMPRESSION OF THE EXTENSOR POLLICIS BREVIS AND ABDUCTOR POLLICIS LONGUS TENDONS
Action
1. Use the lateral (radial) incision, taking great care to avoid damage to the superficial branches of the radial nerve.
2. Divide the extensor retinaculum covering the tendons on the lateral aspect of the radius – first extensor compartment.
3. Open the tendon sheaths of the abductor pollicis longus and extensor pollicis brevis in the line of the tendon and lift each tendon in turn from its bed with a small, blunt tendon hook. It is not unusual to find an accessory tendon lying in a third compartment; if you miss this it will cause persistent symptoms.
4. Remove as much of the inflamed synovium as possible from the surface of the tendon using a small pair of curved scissors or fine bone nibbler.
GANGLION OF THE DORSUM OF THE WRIST
Appraise
1. A simple ganglion is the result of cystic degeneration of fibrous tissue. They commonly arise from a synovial joint or less frequently from a tendon sheath (pearl seed ganglion).
2. The commonest site is on the dorsal aspect of the wrist in the midline at the level of the radio-carpal joint where they nearly always originate from the scapholunate joint.
3. Recurrence is common unless you carefully remove the neck of the ganglion.
4. Simple needle puncture (19G) under local anaesthetic provides rapid resolution but the ganglion frequently recurs, although often not to the same extent. This technique often buys time and if repeated (up to three times) may make surgery unnecessary.
5. There is an increasing vogue to resect the ganglion arthroscopically, which results in less scarring and minimizes the risk of stiffness and recurrence.
Prepare
1. As for anterior approach to the wrist. The operation can be performed under local anaesthetic, but this does not permit the use of a tourniquet.
2. My preference, therefore, is to perform the operation under either a regional block or general anaesthetic, which allows a tourniquet to be used and permits a better exposure of the neck of the ganglion, so theoretically reducing the risk of recurrence.
Action
1. Make a transverse incision in a skin crease over the apex of the swelling.
2. Deepen it carefully until you see the bluish-grey surface of the ganglion.
3. Carefully dissect around the ganglion with small curved scissors.
4. Do not grasp the cyst with toothed forceps, to avoid puncturing it.
5. The swelling is often multilocular and passes between the tendons. Carefully identify its attachment to the capsule of the joint.
6. Trace the ganglion down to its origin and remove the small portion of the capsule (or tendon sheath) to which the ganglion is attached, as well as the ganglion itself.
MEDIAN NERVE DECOMPRESSION IN THE CARPAL TUNNEL
Appraise
1. Decompress the median nerve if conservative treatment with night splints, steroid injections and diuretics fails to relieve the symptoms of carpal tunnel syndrome, or if abnormal neurological signs are present, especially wasting of the thenar muscles, loss of sensation and dexterity. Look in particular for wasting and weakness of the thenar muscles and dryness of the skin over the radial two-thirds of the hand.
2. I advise preoperative nerve conduction studies prior to surgical decompression.
3. Combine decompression with flexor tendon synovectomy in rheumatoid arthritis when the proliferating synovium is the cause of nerve compression.
Action

1. Deepen the incision down through the longitudinal fibres of the palmar aponeurosis to expose the transverse fibres of the flexor retinaculum.
2. Insert a small self-retaining retractor (West’s). This not only facilitates the exposure but acts as an excellent haemostat. It may need to be adjusted 3-4 times as you deepen the incision.
3. Incise the flexor retinaculum longitudinally with a scalpel to expose the median nerve. Pass a McDonald dissector deep to the retinaculum to protect the nerve while the remaining transverse fibres are divided.
4. Ensure that the proximal part of the retinaculum has been adequately released where it disappears under the skin at the proximal end of the wound, by passing a dissector along the surface of the median nerve. This is a common site of inadequate decompression, which can result in persistent symptoms.
5. Take care not to damage the transverse palmar arch at the distal end of the incision.
6. If there is an associated hypertrophic synovitis affecting the flexor tendons, as in rheumatoid disease, perform a flexor synovectomy by stripping the synovium with a fine pair of bone nibblers.
APPROACHES TO THE HAND AND FINGERS
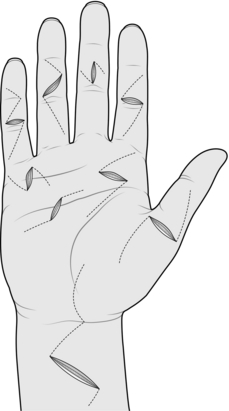
PALMAR APPROACH (Fig. 31.15)
Appraise
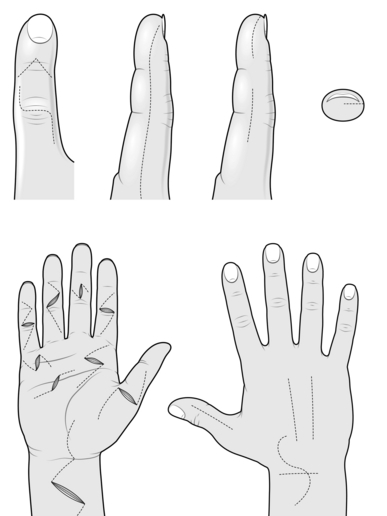
Fig. 31.15 Skin incisions in the hand and fingers.
KEY POINTS
Palmar skin creases
 Incisions may be made anywhere in the palm of the hand provided that they do not cross the skin creases at right-angles.
 Cross skin creases obliquely (Brunner incisions) or, as far as possible, parallel to, but not within, the creases (Fig. 31.15).
 Take the creases into account with any pre-existing lacerations or injuries.
Prepare
1. Use a general anaesthetic or regional block.
2. Attach the arm table to the operating table.
3. Apply a pneumatic tourniquet to the upper arm.
4. Have an unscrubbed assistant grasp the forearm immediately below the elbow while you clean the skin from the assistant’s forearm to the patient’s fingertips.
5. Place the towels as if the operation were to be on the wrist.
6. Place the hand on the hand table in a supinated position and secure the fingers and thumb with a ‘lead hand’.
Action
1. As a rule, avoid making longitudinal incisions which may result in a late scar contracture. Mark the line of the proposed incision with a skin marker. Then incise the skin and subcutaneous tissue obliquely, crossing the skin creases at their apices (Brunner incision). Extend the incision proximally and distally over the structure to be exposed.
2. Carefully dissect the skin and subcutaneous tissue from the underlying fascia. Retract the edges with skin hooks or 2/0 nylon stay sutures attached to clips.
3. Expose the deeper structures with incisions made according to anatomical considerations and not necessarily following the skin incisions.
DORSAL APPROACH TO THE HAND
Appraise
1. The direction and placement of incisions on the dorsum of the hand are not so critical as those on the palm. They may be longitudinal, sinuous or transverse, whichever is most appropriate (see Fig. 31.15).
2. Take care, though, to preserve the veins, which are predominantly dorsal. If you damage them you risk causing excessive swelling of the fingers.
MID-LATERAL INCISIONS ON THE DIGITS
Appraise
You may create a mid-lateral incision (Fig. 31.17) on either the radial or ulnar side of the digit, giving access not only to the corresponding side but also to the palmar and dorsal aspects of the fingers or thumb. In general, incisions on the radial side are more convenient.
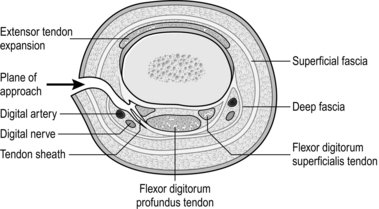
Access
1. Flex the interphalangeal joints to 45°.
2. Incise the skin longitudinally on the radial side of the digit from the apex of the proximal interphalangeal joint skin crease to the apex of the distal interphalangeal skin crease.
3. Extend the incisions proximally or distally in the same lateral line as required.
4. Carefully deepen the incision towards the shaft of the phalanx between the dorsal and palmar neurovascular bundles, which are in the respective flaps.
5. Deepen the wound towards the anterior or posterior aspect of the phalanges as required.
RELEASE OF TRIGGER FINGER OR THUMB (Fig. 31.18)
Prepare
2. A tourniquet is desirable for this operation.
3. It may be possible to perform this procedure using a local anaesthetic infiltration, provided that you are reasonably quick and that the patient can tolerate the discomfort of the tourniquet for the 5–7 minutes of the operation.
4. If you are performing the operation under pure local anaesthesia, delay inflating the tourniquet until the skin is prepared and drapes are in place.

Action
1. Make a transverse or short oblique incision in the skin over the thickened tendon sheath 1.5 cm long. This is usually just distal to the distal palmar crease.


2. Deepen the incision down through the palmar fascia using blunt dissection to avoid damaging the digital nerves and vessels.
3. You immediately encounter the flexor tendon sheath. Incise the thickened portion of the A1 pulley longitudinally.
4. Deliver both flexor tendons into the wound with a tendon hook and ensure that they both move freely. If there is any residual tightness it may be necessary to excise a small portion of the sheath.
PERCUTANEOUS FASCIOTOMY FOR DUPUYTREN’S CONTRACTURE
Action
1. Make a single stab incision in the palm over the mature cord using a 21 or 23 G needle. At this level there is virtually no danger of damaging the digital nerves and vessels which lie deep to the transverse fibres of the palmar aponeurosis.
2. Use the needle effectively as a mini scalpel, sweeping gently back and forth through the thickened cord whilst gently maintaining some slight extension on the finger. You should be able to feel a grating sensation as you gradually cut through the cord until it suddenly gives way, often with a satisfying ‘pop’, which may surprise the patient.
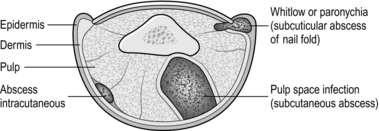
PYOGENIC INFECTIONS OF THE HAND (Fig. 31.19)
Appraise
1. Pyogenic infections of the hand are common and often present with cellulitis alone. Most resolve with antibiotics, elevation and rest.
2. Incise and drain as soon as an abscess develops or you detect the presence of pus, either visually or because of increasing pain and tenderness.
3. Open subcuticular, intracutaneous and subcutaneous infections where they are most superficial.
4. Take a swab for bacteriological analysis.
5. Local anaesthetic is not always necessary and many abscesses can be incised using a freezing spray of ethyl chloride, or no anaesthetic at all.
6. Web and palmar space infections are rare. Very little swelling is obvious in the palm, but the back of the hand is oedematous and pain is severe.
7. Tendon sheath infections cause swelling and tenderness along the line of the sheath, and the finger cannot be extended passively because of excruciating pain.
Action
Superficial infections
1. Accurately localize the tenderest point with the tip of an orange stick before inducing anaesthesia.
2. Prepare the hand for a palmar approach but do not exsanguinate the limb.
3. When the infection is superficial, make a cruciate incision over the tenderest point and cut away the corners of the skin to saucerize the lesion. Take a swab for bacteriological analysis.
4. If pus extends under the nail, remove only that portion of the nail that has been raised from the nail bed.
5. Incise in the line of the skin crease over the tenderest part when a web or palmar space is infected. Do not incise the web itself.
6. Carefully explore between the deeper structures (Fig. 31.20) by blunt dissection and follow the track to the abscess cavity.

7. Insert a small latex drain.
8. Cut back the skin edges to ensure adequate drainage but do not insert a drain.
Tendon sheath infections
1. Drain tendon sheath infections through transverse incisions at either end of the sheath (Fig. 31.21).
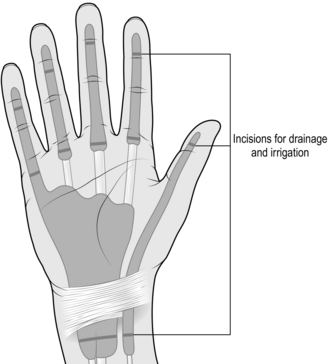
Fig. 31.21 Drainage of tendon sheath infections.
2. Irrigate the sheath with antibiotic solution through a fine ureteric catheter until the effluent is clear.
3. Leave the catheter in place for subsequent irrigation if necessary. Local anaesthetic can also be instilled for postoperative pain relief.


Aftercare
1. Place the corner of a gauze dressing in the wound to keep it open.
2. Apply Tubigrip to the fingers or a fluffed-up pressure dressing to the palm as appropriate and immobilize the hand with a plaster-of-Paris back slab with the fingers in semiflexion.
3. Elevate the hand and re-dress it daily so long as the wound is draining and then leave the dressings until epithelialization is complete.
OPERATIONS ON THE NAILS
EVACUATION OF A SUBUNGUAL HAEMATOMA
Appraise
1. The diagnosis is usually obvious, generally the result of a crushing injury to the fingertip.
2. It is frequently associated with a fracture of the distal phalanx, which in theory renders this an open fracture, so you should prescribe antibiotics.
3. Check that the nail is not dislocated from the nail bed; if it is, it should be reduced.