Orthopaedics and trauma
lower limb
APPROACHES TO THE HIP AND PROXIMAL FEMUR
1. The hip joint is deeply placed and relatively inaccessible.
2. It may be exposed by several routes that are variations of the anterior, posterior and lateral approaches, which themselves afford good access for most purposes.
3. The anterolateral approach is an extensile approach and provides adequate access for drainage of a potentially septic hip, as well as more complex procedures such as total hip arthroplasty.
4. The lateral approach is usually used for open reduction and internal fixation of femoral fractures.
ANTEROLATERAL APPROACH
Prepare
1. Order 2 units of cross-matched blood.
2. A general anaesthetic is preferable, especially in a child. However, if the general condition of the patient precludes it, use an epidural or spinal anaesthetic.
3. Place the patient supine on the operating table with a sandbag under the buttock of the side to be operated on.
4. Have an unscrubbed assistant elevate the leg.
5. Clean the skin distally from the umbilicus to the knee, including the anterior abdominal wall, perineum and as much of the buttock as possible.
6. Place a waterproof sheet under the affected leg and over the opposite leg, tucking it under the buttock.
7. Place a large drape over the waterproof sheet so that the whole of the unaffected leg and foot and the lower part of the operating table are covered. Pull the top edge firmly into the groin to exclude the genitalia from the field.
8. If possible, use a split sheet to shut off the groin. If this is not possible, fold a medium-sized towel corner-to-corner and place the centre of the long side firmly in the groin. Take one corner under the leg and the other over the iliac crest, and clip the corners together onto the skin at the posterior end of the iliac crest.
9. With the scrubbed assistant, hold a medium towel outstretched by the corners under the leg from the lower third of the thigh to beyond the foot. Direct that the leg be lowered carefully into it and turn the bottom end over the foot before carefully wrapping the lower thigh, leg and foot in the towel. Bandage the towel firmly on to the leg with an open-weave bandage or stockinette.
10. Cover the patient’s head and trunk with a large drape.
11. Place the leg through the hole in a large split sheet. Pull the sheet firmly into the groin and around the buttock but leaving the anterolateral aspect of the thigh exposed from the iliac crest distally.
12. Cover the exposed skin with a large adhesive drape wrapped around the thigh.
Access (Fig. 32.1)
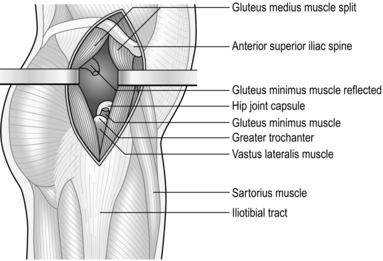
1. Make a straight incision extending from the anterior superior iliac spine directed towards the tip of the greater trochanter. This follows the junction between the gluteus medius and the tensor fascia lata.
2. Incise the fascia overlying the interval between the two muscles and develop the plane proximally towards the anterior superior iliac spine. Insert a self-retaining retractor, such as the Norfolk and Norwich type, between the two.

3. It should now be possible to see the tendon of the gluteus minimus and the capsule of the hip joint.
4. Retract the gluteus minimus posteriorly and incise the capsule of the hip joint, draining any accumulated intra-articular fluid. Send a sample for bacteriological analysis.
LATERAL APPROACH TO THE PROXIMAL FEMUR
1. This exposure may be carried proximally to expose the hip joint if required.
2. Use the distal part of the approach alone for access to the proximal part of the femur and the femoral neck, when treating fractures in this region.
Prepare
1. Cross-match 2 units of blood.
2. Operate with a general anaesthetic if possible, or with epidural or spinal anaesthesia.
3. If you are operating for fixation of a femoral neck fracture, place the patient supine on the orthopaedic operating table with a radiolucent perineal post to allow access for an image intensifier or portable X-ray machine. Operative fixation of femoral neck fractures is, however, beyond the scope of this chapter.
4. Straightforward exposure of the femur is usually carried out with the patient in the lateral position. A traction table and X-ray control are not necessary.
5. Clean the skin from the level of the umbilicus to the knee, including the perineum and buttock and the circumference of the thigh.
6. Hang a large drape over the sound side from the groin to beyond the toes.
7. Hang another large drape over the affected leg from the mid-thigh to beyond the toes.
8. Cover the trunk above the iliac crest with a third large sheet.
9. Cover the remaining part of the thigh with two small towels, leaving only a rectangle of skin 30 cm long by 20 cm wide exposed on the lateral side of the thigh. The anterior superior iliac spine is situated at the top corner of this rectangle.
10. Hold the towels in place with a transparent adhesive drape.
Access (Fig. 32.2)
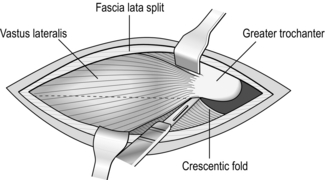
Fig. 32.2 Cutting down on to the femoral shaft.
1. Palpate the posterosuperior corner of the greater trochanter and make a straight longitudinal incision from that point for 15 cm distally, through the skin and subcutaneous fat.
2. Split the fascia lata longitudinally, posterior to the insertion of the tensor fascia lata muscle, in the line of the incision. Insert a self-retaining retractor to expose the vastus lateralis.
3. Identify the aponeurotic attachment of the vastus lateralis to the anterolateral surfaces of the femur, just below the greater trochanter.
4. Identify the posterior attachment of the vastus lateralis. Insert two Trethowan bone spikes and lift the body of the vastus lateralis forwards, releasing it from its attachment to the linea aspera (Latin: asper = rough), cauterizing vessels as you go.
5. Reflect the muscle subperiosteally from the anterolateral aspect of the femur and strip the muscle from the anterior and lateral aspects of the femur with a periosteal elevator. Insert the tip of your index finger between the vastus lateralis and the anterior surface of the femur and palpate the lesser trochanter on the posteromedial aspect of the bone.
6. Pass a Lane’s lever carefully around the femoral shaft with the tip absolutely in contact with the bone, so that it lies between the lesser trochanter and the femoral neck. This exposes the anterior and lateral surface of the upper femoral shaft and the base of the femoral neck.
7. Strip the posterior portion of the muscle from the bone in similar fashion and insert a second Lane’s lever around the underside of the femoral shaft.
APPROACHES TO THE UPPER LEG
1. The femoral shaft may be approached from the anterior, medial or lateral aspects.
2. The posterolateral approach is the most convenient and most commonly used.
POSTEROLATERAL APPROACH (Fig. 32.3)
Prepare
1. Have 2 units of cross-matched blood available.
3. For operations on the distal two-thirds of the thigh, it may be possible to use a tourniquet but this may compromise the exposure.
4. Place the patient supine on the operating table with a sandbag under the buttock of the affected side.
5. Elevate the leg and clean the skin from the iliac crest and buttock – or the tourniquet, when used, to the upper tibia.
6. Place a large sheet across the operating table and over the sound leg, and pull the upper edge firmly into the groin to cover the genitalia.
7. Place the long edge of the ‘shut-off’ towel in the groin, or immediately below the tourniquet, and pull it firmly round the thigh; fasten it with a towel clip on the lateral side.
8. Place a medium-sized drape on the table with its upper edge at the level of the knee joint and carefully lower the leg on to the towel.
9. Fold the distal edge of the towel proximally over the foot and then wrap the towel around the leg.
10. Bandage the towel firmly to the leg with an open-weave bandage or stockinette.
11. Cover the trunk with a large sheet and clip it to the underlying sheet on either side of the thigh.
12. Pass the leg through the hole in a split sheet. Clip the margins of the split to the skin at the upper limit of the operating field.
13. Wrap a large transparent adhesive drape round the thigh to cover the exposed skin.
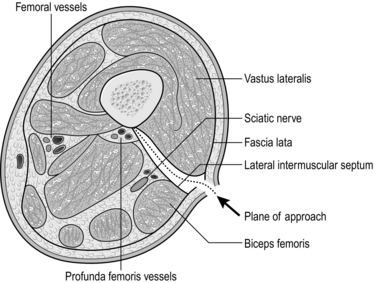
Access
1. Palpate the tendon of the biceps femoris at the level of the lateral femoral condyle and also the posterior margin of the greater trochanter.
2. Incise the skin along the whole or part of the line joining these two points to gain access to the appropriate part of the thigh.
3. Incise the fascia lata in the line of the incision and locate the lateral intermuscular septum immediately anterior to the biceps femoris.
4. Insert a finger between the septum and the bulk of the vastus lateralis lying anteriorly and continue the dissection down to the bone in this plane with a knife.
5. Ligate the perforating branches of the profunda femoris vessels as you encounter them.
APPROACHES TO THE KNEE
1. Most operations on the knee joint are carried out from the front, but many do not require a full and formal exposure of the whole joint, and a more limited exposure is adequate.
2. The posterior approach is used to gain access to the popliteal fossa and occasionally to the posterior part of the knee joint.
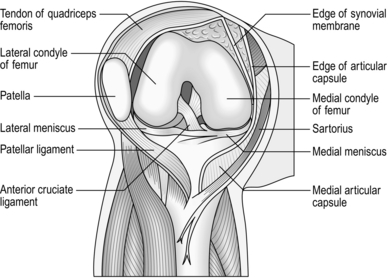
ANTERIOR APPROACH (Fig. 32.4)
Prepare
Access
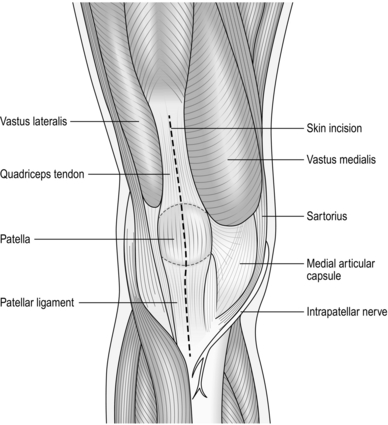
1. Make a straight incision 15 cm long in the midline, extending proximally from the upper margin of the tibial tubercle.
2. Deepen the incision to expose the patellar ligament, the anterior surface of the patella and the quadriceps tendon, and the distal fibres of the rectus femoris (Fig. 32.4).
3. Reflect the skin and subcutaneous fat as a single layer medially, to expose the junction of the quadriceps tendon and the vastus medialis, the medial border of the patella and the patellar ligament.
4. Make an incision along the medial edge of the quadriceps tendon and through the capsule along the medial margin of the patella and medial edge of the patellar ligament into the joint.
5. If required, evert the patella, retract it laterally, and flex the knee at the same time (Fig. 32.5). Extend the incision proximally into the rectus femoris if this proves to be difficult.
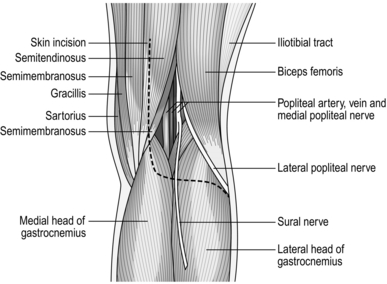
POSTERIOR APPROACH (Fig. 32.6)
Appraise
1. Use this approach to gain access to the popliteal fossa.
2. Use it to gain access to the posterior compartment of the knee joint, for example to repair the torn posterior cruciate ligament or to expose the popliteal vessels.
3. Use the medial or lateral part of the full approach for more limited exposure.
Access
1. Start the skin incision 7 cm proximal to the medial femoral condyle and extend it distally to the transverse skin crease; then curve it laterally and distally again, along the medial side of the head of the fibula.
2. Reflect the skin and subcutaneous tissue to expose the popliteal fascia.
3. Identify the posterior cutaneous nerve of the calf (Latin: sural = calf), lying beneath the fascia between the two heads of the gastrocnemius muscle.
4. Incise the fascia and trace the nerve proximally to its origin from the posterior tibial nerve.
5. Trace the posterior tibial nerve distally and identify its branches to the calf muscles; then trace it proximally to the apex of the popliteal fossa where it joins the common peroneal nerve.
6. Follow the common peroneal (Greek: perone = fibula) nerve distally along the medial border of the biceps tendon.
7. Expose the popliteal artery and vein lying anteriorly and medially to the posterior tibial nerve. Gently retract them to expose the superior lateral and superior medial genicular vessels passing beneath the muscles just proximal to the origin of the two heads of the gastrocnemius.
8. If you require access to the knee, then retract the semitendinosus medially and expose the attachment of the medial head of the gastrocnemius to the joint capsule, incising it longitudinally at this point.
9. Retract the gastrocnemius laterally, using it to protect the nerves and vessels, and enter the posteromedial compartment of the joint.
10. Approach the posterolateral compartment between the tendon of the biceps femoris and the lateral head of the gastrocnemius.
SIMPLE KNEE ARTHROTOMY
Access
1. It is easier to use an anterolateral incision for ease of access. Incise the skin on the lateral side of the knee from the lateral margin of the patella, downwards and slightly backwards to a point 1 cm below the articular margin of the tibia.
2. Incise the capsule in the line of the incision.
3. Pick up the synovium with forceps and nick it with a knife. In the presence of an effusion it bulges forwards into the wound.
4. Obtain a specimen for bacteriology and irrigate the joint.
Closure
1. Retract the edges of the capsule and pick up each end of the synovium with fine curved artery forceps.
2. Close the synovium with a continuous 2/0 absorbable synthetic suture on a round-bodied needle.
3. Extend the knee and close the capsule with 0 interrupted absorbable synthetic sutures.
4. Close the subcutaneous tissue and skin.
5. Apply a compression bandage from the ankle to the lower thigh. Extend the bandage to the upper thigh after removing the tourniquet.
Aftercare
1. Begin static quadriceps exercises immediately the patient recovers from the anaesthetic and progress to straight leg raising exercises as soon as possible. Allow weight-bearing as tolerated by the patient.
2. Remove the sutures at 7–10 days.
3. Bandage the knee so long as there is any tendency to swell, usually 3–4 weeks, and continue quadriceps exercises until the bulk of the muscle recovers.
ARTHROSCOPY OF THE KNEE
Appraise
1. The arthroscopic technique is now the treatment of choice for the treatment of meniscal tears and for retrieval of loose bodies from the knee.
2. Knee arthroscopy may also be employed in the treatment of chondral lesions and for washout and synovectomy of septic arthritis.
3. Reconstruction of the anterior cruciate ligament and of the posterior cruciate ligament may also be assisted by arthroscopy.
Prepare
1. Check that the necessary equipment and instruments are available and functioning. These include:
 A 4.5-mm arthroscope with 30 degree angle of view


 Sterile isosmotic irrigation fluid
 Arthroscopy instruments including trocar, probe and punches.
2. Operate under general anaesthesia and infiltrate the proposed arthroscopy portals with local anaesthetic and adrenaline (epinephrine) to minimize postoperative pain and bleeding.
3. Examine the knee under anaesthetic. Determine if there is any effusion. Note any fixed flexion deformity and determine the limit of flexion.
4. Apply a thigh tourniquet and exsanguinate the limb.
5. Prepare and drape the skin as if the distal femoral shaft were being exposed, leaving skin exposed from the tibial tuberosity to the tourniquet.
Action
1. Flex the knee to 90 degrees.
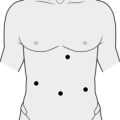
2. Make an anterolateral portal for introduction of the arthroscope. Employing an initial landmark, 1.5 cm lateral to the patella tendon and 1.5 cm proximal to the level of the lateral tibial plateau, create a stab incision of approximately 1 cm running horizontally away from the patella tendon.
3. Using a blunt introducer pass the trocar through the portal, aiming towards the intercondylar notch.
4. Remove the introducer and replace with the arthroscope. Visualize the compartments of the knee. Whilst directing the arthroscope to visualize the anteromedial wall, make a further incision to create another portal. Take care not to damage the meniscus.
5. The second portal may be used to pass the probe, punches or other instruments into the cavity of the knee. This portal may also be employed to introduce a further trocar for the drainage of fluid in the case of washout of a septic arthritis.
6. When negotiating instruments about the knee, take care not to damage the chondral surfaces.
7. After addressing any pathology, express excess irrigation fluid from the knee.
Aftercare
1. Observe for any compartment syndrome, which may arise from extravasation of irrigation fluid into the tissues of the calf.
2. Reduce the dressing after 24–48 hours.
3. Allow mobilization as pain allows (unless the particular intervention undertaken requires further protection of weight-bearing or limitation of knee range of movement).
APPROACHES TO THE LOWER LEG
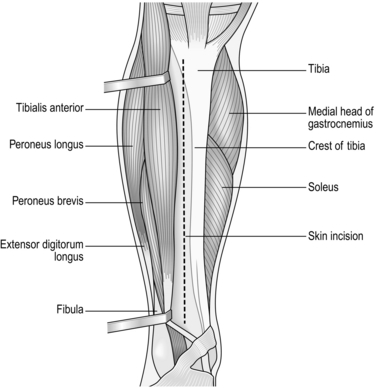
ANTERIOR APPROACH (Fig. 32.7)
Prepare
1. Cross-match 2 units of blood.
3. Exsanguinate the leg and apply a pneumatic tourniquet to the thigh.
4. Place the patient supine on the operating table.
5. The unscrubbed assistant grasps the calf and elevates the leg.
6. Clean the skin from the ankle proximally.
7. Have a scrubbed assistant apply a stockinette to the foot and continue to support the leg while it is further prepared as far as the tourniquet.
8. Place a large sheet across the operating table and over the sound leg.
9. Place the shut-off towel or split sheet immediately distal to the tourniquet.
TIBIAL COMPARTMENT FASCIOTOMY
Appraise
1. Decompression of the fascial compartments of the leg may be indicated in the following circumstances:
 After extensive closed soft-tissue injuries of the lower leg
 After proximal vascular reconstruction following arterial injury


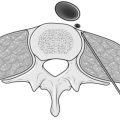
2. To measure the compartment pressure, you require a slit catheter (14G intravenous cannula), a length of plastic manometer tubing connected to a pressure transducer (a sphygmomanometer suffices if necessary). Prepare and sterilize the skin. Instil 2 ml of 1% lidocaine into the skin and insert the catheter into the anterior compartment. When it is satisfactorily positioned withdraw the trocar. Inject a small quantity of saline into the catheter to fill the dead space. Prefill the manometer tubing with saline and connect this via a three-way tap to the slit catheter and the pressure monitor, ensuring that there are no air bubbles in the system. Now connect the three-way tap to the pressure recorder and measure the compartment pressure.
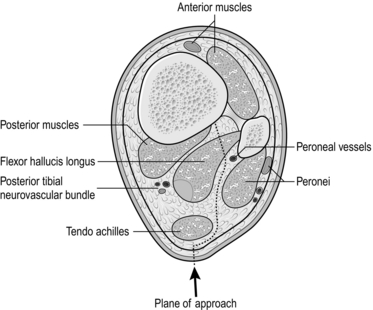
Access
1. The anterior and lateral compartments can be decompressed through a full-length longitudinal anterolateral skin incision lateral to the crest of the mid-tibia extending from the level of the tibial tuberosity to just proximal to the ankle.
2. Incise the fascia covering the tibialis anterior muscle and extend the incision in the fascia subcutaneously both proximally and distally, so completely decompressing the anterior muscle group. By slightly undermining the skin it is also possible to decompress the lateral compartment, avoiding damage to the superficial peroneal nerve. In cases of exertional compartment syndrome only, it may be possible to perform a limited decompression through a short skin incision and then extend the fascial incision with a Smillie meniscectomy knife.
3. The superficial and deep posterior compartments can be decompressed in a similar fashion using a single longitudinal posteromedial incision made just medial to the posteromedial border of the tibia.
4. Incise the deep fascia and extend the incision proximally to the level of the tibial tuberosity and distally to a point 5 cm proximal to the medial malleolus, using the same technique.

FASCIOTOMY OF THE FOOT
Appraise
1. Decompression of the fascial compartments of the foot may be indicated after trauma to the foot with crush injury, fracture or midfoot dislocation.
2. In the responsive patient, symptoms of compartment syndrome include swelling, pain out of proportion to the antecedent injury and pain on dorsiflexion of the toes.
Action
1. Incise medially with a longitudinal incision through the skin, starting approximately 2 cm distal to the tip of the medial malleolus and extending to the distal shaft of the 1st metatarsal.
2. Taking care to retract the medial neurovascular structures, employ blunt dissection to decompress the compartments on the plantar aspect of the lesser metatarsals.
3. Consider also two further incisions on the dorsum of the foot. Longitudinal incisions lateral to the 4th metatarsal and medial to the 2nd metatarsal with further blunt dissection should ensure decompression of the interosseous, lateral and central compartments.
APPROACHES TO THE ANKLE
1. Operations on the ankle joint itself can usually be accomplished through an anterior approach.
2. Separate incisions are required to gain access to the malleoli and to the posterior aspect of the joint.
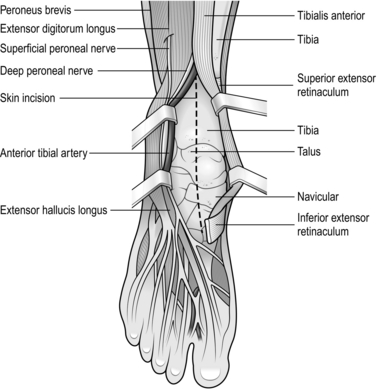
ANTERIOR APPROACH (Fig. 32.8)
Appraise
Use this approach to gain access to the ankle joint itself and for arthrodesis or arthroplasty.
Prepare
2. Exsanguinate the leg and apply a pneumatic tourniquet to the thigh.
3. Have an unscrubbed assistant hold the leg just below the knee joint and elevate it.
4. Clean the skin from the assistant’s hands to the tip of the toes, paying particular attention to the skin between them.
5. Grasp the foot in a stockinette and then drape the limb as described above.
Access
1. Make an incision in the skin 10 cm long in the midline, centred over the middle of the ankle joint.
2. Incise the superficial fascia, avoiding the superficial peroneal nerve, which crosses the wound diagonally. Retract it laterally.
3. Incise the deep fascia and the extensor retinaculum and identify the anterior tibial artery and the deep peroneal nerve between the tendons of the tibialis anterior and extensor hallucis longus.
4. Retract the neurovascular bundle, extensor hallucis longus and extensor digitorum laterally and the tibialis anterior medially.
5. A pad of fat frequently obscures the anterior capsule of the ankle joint. Excise it.
6. Incise the joint capsule longitudinally and open the ankle joint.

POSTERIOR APPROACH (Fig. 32.9)
Prepare
2. Exsanguinate the leg and apply a pneumatic tourniquet to the thigh.
3. Place the patient prone on the operating table with the foot hanging over the end.
4. Have an unscrubbed assistant hold the leg just distal to the flexed knee.
5. Clean the leg from the toes to the assistant’s hands.
6. Grasp the foot in a stockinette and then drape the limb as described above.
7. Extend the knee and cover the trunk and thighs with a large sheet.
Access
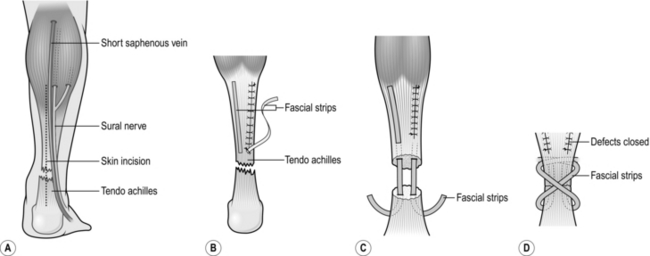
1. Make an incision 15–20 cm long in the midline of the calf, ending at the calcaneum.
2. Expose the lateral side of the Achilles tendon, retracting the sural nerve and short saphenous vein laterally with the skin flap.
3. Deepen the incision through the fascia into a fat-filled space crossed by a branch of the peroneal artery; identify, doubly ligate and divide it.
4. Locate the peroneus brevis laterally and the flexor hallucis longus medially. Separate these muscles proximally, dividing part of the fibular attachment of the flexor hallucis longus if necessary, taking care to preserve the peroneal vessels running down the back of the fibula.
5. Retract the peroneus brevis laterally and the flexor hallucis longus medially to expose the posterior aspect of the ankle joint and the distal tibia.
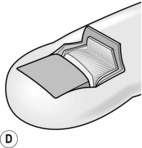
REPAIR OF RUPTURED ACHILLES TENDON (Fig. 32.10)
Appraise
Ruptures of the Achilles tendon are frequently missed.
KEY POINTS
Decisions
 There is a debate as to whether surgical repair of ruptured Achilles tendon is preferable to plaster immobilization.

 Surgical repair may be preferable in young patients with sporting aspirations.
 If you decide on operation do not delay.
 If the diagnosis is delayed, wait to allow swelling and bruising to subside.

Action
1. Incise the skin in the midline from the mid-calf to the proximal transverse skin crease. Never use curved or flapped incisions (Fig. 32.10).
2. Carefully elevate the skin for 2 cm on either side of the midline and retract the skin gently with skin hooks.
3. Identify and retract the sural nerve and the short saphenous vein laterally.
4. Open the paratenon and expose the ends of the ruptured tendon, which are usually very ragged, like a shaving brush.
5. Plantar-flex the foot and insert an absorbable size 0 core suture in a modified Kessler pattern, as described in Chapter 30 for tendon suture or use an endogenous fascial strip technique (Fig 32.10). Pull the suture tight to close the gap in the tendon.
6. Insert a 4/0 running suture around the ragged ends of the repaired tendon and then suture the paratenon.
Aftercare
1. Apply a padded compression dressing with the ankle in full plantar flexion.
2. Apply a plaster-of-Paris slab to the front of the ankle from the upper tibia of the toes and bandage it in place. Elevate the leg.
3. Remove the drain and inspect the wound after 24–36 hours.
4. The skin overlying the tendo achilles has a tendency to heal badly and to slough. Avoid pressure over the wound by nursing the patient on the side.
5. Change the plaster at 10–14 days and inspect the wound. By this stage the skin should have healed; apply a below-knee plaster with the foot in full plantar flexion. Allow up, non-weight-bearing.
6. At 2 weeks, replaster the leg with the foot in 50% plantar flexion and again 2 weeks later with the foot in neutral position. Encourage full weight-bearing at this stage. Remove the plaster after a further 2 weeks and encourage ankle mobility.
7. Do not allow full sporting activities for at least 3 months after the repair.
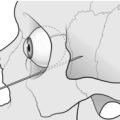
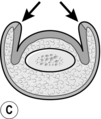
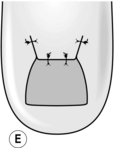
RADICAL RESECTION OF THE NAIL BED (ZADEK’S OPERATION) (Fig. 32.11)
Action
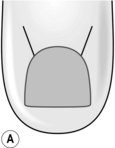
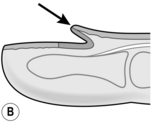
1. Remove the nail, if present, by separating it from the underlying nail bed with a McDonald elevator.
2. Make two incisions, 1 cm long, extending proximally from each corner of the nail to the transverse skin crease just distal to the interphalangeal joint.
3. Lift the skin and subcutaneous tissue as a flap and dissect this proximally.
4. Carry the dissection under the edges of the skin incisions on either side of the terminal phalanx to the midlateral line to complete the clearance of the germinal matrix of the nail.
5. Cut across the nail bed transversely at the site of the lunula (Latin: diminutive of luna = moon; the opaque whitish half-moon at the root of the nail) and join this transverse incision to the dissections under the nail folds.
6. Remove the block of nail bed from the surface of the proximal phalanx as far back as the insertion of the extensor tendon.
7. Check that you have not left behind any fragments of germinal matrix.
Antrum, R.N. Radical excision of the nail fold for ingrowing toenails. J Bone Joint Surg Br. 1984; 6B:63–65.
Henry, A.K. Extensile Exposure Applied to Limb Surgery, 2nd ed. Edinburgh: E&S Livingstone; 1957.
Müller, M.E., Allgower, M., Schneider, R., et al. Manual of Internal Fixation. Techniques Recommended by the AO Group, 2nd ed. Berlin: Springer-Verlag; 1979.
Nistor, L. Surgical and non-surgical treatment of Achilles tendon rupture. J Bone Joint Surg Am. 1981; 63A:394–399.
Rorabeck, C.H., Bourne, R.B., Fowler, P.J. The surgical treatment of exertional compartment syndrome in athletes. J Bone Joint Surg Am. 1983; 65A:1245–1251.
Zadik, F.R. Obliteration of the nail bed of the great toe without shortening the terminal phalanx. J Bone Joint Surg Br. 1950; 32B:66–67.