Orthopaedics and trauma
general principles
PREOPERATIVE PREPARATION
Appraise
1. Most elective orthopaedic operations are carried out on otherwise healthy patients, but always assess the patient’s fitness for operation beforehand. When operating for trauma, ensure that the patient is adequately resuscitated.
2. Postpone elective operations until any concomitant illness such as a chest or urinary infection or hypertension has been corrected. This is especially so if one is contemplating implanting a prosthetic device (e.g. a total joint replacement).
3. Correct blood loss and dehydration before emergency operations.
4. Antibiotics. It is recommended practice usually to administer an antibiotic intravenously at the time of induction of anaesthesia, followed up by two further doses at 8-hourly intervals, making three doses in all. The choice of antibiotic depends upon the nature of the operation, the likely infecting organism and the patient’s potential sensitivity. It is usual to use a broad-spectrum antibiotic (e.g. cefradine 500 mg t.d.s.) or an agent that has a potent anti-staphylococcal activity.


5. Anticoagulation. The routine use of prophylactic anticoagulants for major orthopaedic operations, particularly on the hip joint, is controversial. The current consensus from the British Orthopaedic Association1 is that, while chemical agents (e.g. heparin and warfarin) may reduce the incidence of deep venous thrombosis, death from other causes may be increased and there is no reduction in the rate of fatal pulmonary embolism. Anticoagulant therapy itself may also lead to excessive intra- or postoperative bleeding complications and ultimately jeopardize a total joint replacement. However, where there is a previous history of thromboembolic disease it is advisable to give heparin 5000 IU subcutaneously twice daily. If the patient is already fully anticoagulated, aim to reduce the international normalized ratio (INR) to <2 over the perioperative period, maintaining the patient on intravenous heparin infusion and reverting to oral anticoagulation when the patient is mobile – hopefully within 24–48 hours.
6. Anaesthesia. General anaesthetic is appropriate for most orthopaedic procedures, especially for prolonged operations when a tourniquet is used. Under some circumstances (e.g. a patient with rheumatoid arthritis), it may be preferable to operate under a regional block (spinal, epidural, axillary). Some procedures (e.g. carpal tunnel decompression) may be performed using a local anaesthetic wound infiltration. In addition, local anaesthetic is a useful adjunct in postoperative pain relief. In our opinion Bier’s block, while theoretically safe, provides an unsatisfactory operative field for anything but the simplest of procedures.
TOURNIQUETS
Appraise
 Most orthopaedic operations on the limbs, especially the hand, are facilitated if performed in a bloodless field using a pneumatic tourniquet. It has been said that attempting to operate on a hand without a tourniquet is akin to trying to repair a watch at the bottom of an inkwell!


Action
1. Apply a pneumatic tourniquet of appropriate size over a few turns of orthopaedic wool around the proximal part of the upper arm or thigh.
2. Exsanguinate the limb either by elevation (Bier’s method) or with a soft rubber exsanguinator (Rhys-Davies). If the latter is not available, use an Esmarch bandage, but take particular care if the skin is friable, as in a patient with rheumatoid disease. A stockinette applied over the skin prior to exsanguination reduces the likelihood of shear stresses and potential skin damage.
3. Secure the cuff and inflate until the pressure just exceeds the systolic blood pressure for tourniquets on the upper limb, and to twice the systolic blood pressure for tourniquets on the lower limb. In practice, 200 mmHg is appropriate for the upper limb and 350 mmHg for the leg. Higher pressures are unnecessary and may cause soft-tissue damage by direct compression, especially in thin patients. Never allow the pressure to exceed 250 mmHg in the arm or 450 mmHg in the leg.
4. If the tourniquet is accidentally deflated or slips during the operation, allowing partial or complete return of the circulation, deflate the cuff completely, re-position and re-fasten it and elevate the limb before re-inflating the cuff.
KEY POINTS
Precautions with tourniquets
 Record the time of inflation of the tourniquet and the duration of its application, which must be kept to a minimum by careful planning of the operation.
 Exsanguination after preparing the skin can save 5 minutes or more of ischaemic time.
 60–90 minutes is usually regarded as a safe period for an arm.
 Up to 3 hours is acceptable, but not desirable, for the leg.

5. We prefer to release the tourniquet and achieve satisfactory haemostasis before closing the wound. Some surgeons, however, prefer to close and dress the wound prior to tourniquet release. Under these circumstances a drain is usually necessary and any plaster must be split.
Aftercare
1. On completion of the operation always ensure that the circulation has returned to the limb. Locate and mark the position of the peripheral pulses to facilitate subsequent postoperative observations.
2. Reduce the likelihood of swelling by applying bulky cotton wool and crepe bandage dressing for at least 24 hours after the operation. Encourage and supervise active exercises. A good orthopaedic maxim is ‘Don’t just lie there – do something!’
SKIN PREPARATION
Elective surgery
1. There should be no break or superficial infection in the skin of a limb or the area of the trunk that is to be operated on. If necessary, postpone the operation until any wound has healed or infection has been eradicated.
2. Instruct the patient to bathe or shower within 12 hours of the operation using an antiseptic soap. Preoperative shaving is a matter of personal preference, but should be performed as late as possible and by an expert. Poor preoperative shaving may result in multiple skin nicks, which in turn become colonized with bacteria, increasing the risk of postoperative infection.
3. Mark the limb or digit to be operated on with an indelible marker. Give instructions to re-mark it if the mark is accidentally erased before the operation.
4. Prepare the skin with either iodine or chlorhexidine in spirit or aqueous solution. Iodine solutions are more effective skin antiseptics but are also the most irritant. Avoid pooling of alcohol-based solutions beneath a tourniquet or diathermy pad, with an attendant risk of explosion.
Emergency surgery
1. Prepare the skin in the anaesthetic room after induction of anaesthesia.
2. Cover open wounds with a sterile dressing held in place by an assistant.
3. Clean the surrounding skin with a soft nail brush and warm cetrimide (Savlon) solution, removing ingrained dirt and debris.
4. Remove the dressing and clean the wound itself in similar fashion to remove all dirt and debris, controlling bleeding by local digital pressure.
5. Irrigate the wound with copious volumes of physiological saline. A pulsed lavage system may be extremely helpful in this regard.
6. Complete the cleansing and irrigation of the wound in the theatre as part of the definitive surgical treatment.
OPEN WOUNDS
1. Resuscitate the patient, if necessary, according to ATLS (advanced trauma life support) principles and guidelines before dealing with an open wound.
2. Take a culture swab from the wound and send it for culture and sensitivities. This may be useful in the management of later infection.


3. If possible take a Polaroid or digital photograph of the wound prior to the dressing being applied, to give you (or the treating surgeons) an idea of the extent and configuration of the underlying wound and to avoid disturbing the dressings unnecessarily.
4. Stop the bleeding by applying local pressure. Elevate the limb if necessary. Do not attempt blind clamping of any bleeding vessels, to avoid damaging adjacent structures.
Appraise
1. Determine how the wound was sustained and whether it is recent and clean or long-standing and dirty, and if it is superficial or deep. The longer the period since the injury and the deeper and dirtier the wound, the greater the need for antibiotics and tetanus prophylaxis.
2. Consider what structures may have been damaged and test for the integrity of arteries, nerves, tendons and bones.
3. Make an initial assessment of skin loss or damage and look for exit wounds following penetrating injuries.
4. An X-ray will show the extent of bone damage and the presence of radio-opaque foreign bodies (remember that not all foreign bodies are radio-opaque).
5. Always request X-rays of the skull, lateral cervical spine, chest and anteroposterior views of the pelvis in multiply injured patients, but do not let this delay treatment.
6. Depending on the extent of the wound, carry out further assessment and treatment without anaesthesia or with regional or general anaesthetic. Avoid local infiltration anaesthesia.
Prepare
1. Give a broad-spectrum antibiotic, unless the wound is clean, superficial and recent in origin.
2. If the wound is dirty, deep and more than 6 hours old, give 1 g of benzylpenicillin, and 0.5 ml of tetanus toxoid intramuscularly if the patient has been actively immunized in the past 10 years.
3. If the patient has not been actively immunized, give 1 vial (250 units) of human tetanus immunoglobulin in addition to the toxoid. Ensure that further toxoid is given 6 weeks and 6 months later.
4. Clean the wound and prepare the skin, as described above.
Assess
1. Gently explore the wound, examining the skin, subcutaneous tissues and deeper structures. Follow the track of a penetrating wound with a finger or a probe to determine its direction and to judge the possibility of damage to vessels, nerves, tendons, bone and muscle. If you suspect muscle damage, slit open the investing fascia and take swabs for an anaerobic bacterial culture. Decide into which category the wound falls, since this determines the subsequent management.
2. Simple clean wounds have no tissue loss, although all wounds are contaminated with microorganisms, which may already be dividing. In clean wounds seen within 8 hours of injury, the bacteria will not yet have invaded the tissues.
3. Simple contaminated wounds have no tissue loss. However, they may be heavily contaminated and if you see them more than 8 hours after the injury, they can be assumed to be infected. Late wounds show signs of bacterial invasion, with pus and slough covering the raw surfaces, and redness and swelling of the surrounding skin. Although there is no loss of tissue from the injury, the infection will result in later soft-tissue destruction.
4. Complicated contaminated wounds result when tissue destruction (e.g. loss of skin, muscle or damage to blood vessels, nerves or bone) has occurred, or foreign bodies are present in the wound. Recently acquired low-velocity missile wounds fall into this category since there is insufficient kinetic energy to carry particles of clothing and dirt into the wound.
5. Complicated dirty wounds are seen after heavy contamination in the presence of tissue destruction or implantation of foreign material, especially if the wound is not seen until more than 12 hours have elapsed.
6. High-velocity missile wounds deserve to be placed in a category of their own. For instance, when a bullet from a high-powered rifle strikes the body it is likely to lose its high kinetic energy to the soft tissues as it passes through, resulting in extensive cavitation. Although the entry and exit wounds may be small, structures within the wound are often severely damaged. Muscle is particularly susceptible to the passage of high-velocity missiles and becomes devitalized. It takes on a ‘mushy’ appearance and consistency and fails to contract when pinched or to bleed when cut. If the bullet breaks into fragments or hits bone, breaking it into fragments, the spreading particles of bullet and bone also behave as high-energy particles. The whole effect is of an internal explosion. In addition, the high-velocity missile carries foreign material (bacteria and clothing) deeply into the tissues, causing heavy contamination.
7. Open fractures can be classified in a variety of ways. Probably the most widely accepted is the Gustilo classification, which is particularly useful in discussing soft-tissue reconstruction:


Action
1. Stop all bleeding. Pick up small vessels with fine artery forceps and cauterize or ligate them with fine absorbable sutures. Control damage of major arteries and veins with pressure, tapes or non-crushing clamps, so as to permit later repair.
2. Irrigate clean simple wounds with copious volumes of sterile saline solution without drainage. Do not attempt to repair cleanly divided muscle with stitches but simply suture the investing fascia. Close the skin accurately.
KEY POINTS
Infected wounds


3. Complicated contaminated wounds can be partially repaired after excising the devitalized tissue. Once bone stability has been achieved, damaged segments of major arteries and veins should be repaired by an experienced surgeon, using grafts where appropriate. Loosely appose the ends of divided nerves with one or two stitches in the perineurium, so that they can be readily identified and repaired later when the wound is healed and all signs of inflammation have disappeared. Similarly, identify and appose the ends of divided tendons in preparation for definitive repair at a later date. Do not remove small fragments of bone that retain a periosteal attachment or large fragments whether they are attached or unattached. Excise devitalized muscle, especially the major muscle masses of the thigh and buttock. Remove foreign material when possible. Some penetrating low-velocity missiles are better left if they lie deeply, provided damage to important structures has been excluded. Remove superficial shotgun pellets. Low-velocity missile tracks do not normally require to be laid open or excised, but do not close the wound. Excise damaged skin when the deep flap can be easily closed, if necessary by making a relaxing incision or applying a skin graft. Do not lightly excise specialized skin from the hands; instead leave doubtful skin and excise it later, if necessary, on expert advice.
4. Stabilize any associated fracture. It may be possible merely to immobilize the limb in a plaster cast, cutting a window into it so that the wound can be dressed. An open fracture, however, is not an absolute contraindication to surgical stabilization using the appropriate device (plates and screws, intramedullary nails), but such should be undertaken only by an experienced trauma or orthopaedic surgeon. In an emergency situation it is preferable to use temporary skeletal traction and external fixator.
5. Complicated dirty wounds require similar treatment of damaged tissues such as nerves and tendons, but do not attempt to repair damaged structures other than major blood vessels. Pack the wound and change the dressing daily until there is no sign of infection, then close the skin by suture or by skin grafting.
6. Lay open high-velocity missile wounds extensively. Foreign matter, including missile fragments, dirt and clothing, is carried deeply into the wound, so contamination is inevitable. Explore and excise the track, since the tissue along the track is devitalized, lay open the investing fascia over disrupted muscle to evacuate the muscle haematoma and excise the pulped muscle, leaving healthy contractile muscle that bleeds when cut. This leaves a cavity in the track of the missile.
7. Mark divided nerves and tendons for definitive treatment later. Excise the skin edges and pack the wound with saline-soaked gauze. Treat any associated fracture as described above. Change the packs daily until infection is controlled and all dead tissue has been excised. Only then can skin closure be completed and the repair of damaged structures be planned.
EXTERNAL FIXATION
The Ilizarov and similar circular frames are beyond the scope of this chapter, but in an emergency you should be familiar with the principles involved, and the techniques of applying a simple unilateral frame. Such a frame is constructed from one or more rigid bars which are aligned parallel to the limb and to which the threaded pins that are drilled into the fragments of bone are attached. In the more sophisticated devices (Orthofix, AO, Monotube, Hoffman) this is done by clamping the pins to universal joints, which allow the position of the fragments to be adjusted before the clamps are finally tightened. In the simplest form, here described, the pins are held to the bar with acrylic cement (Denham type; Fig. 30.1).
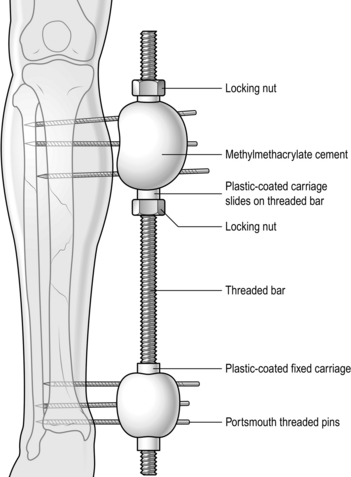
Fig. 30.1 The Denham external fixator.
Action
1. Make a stab wound through healthy skin proximal to the fracture site, bearing in mind the possible need for subsequent skin flaps.
2. Drill a hole through both cortices of the bone, approximately at right-angles to the bone, with a sharp 3.6-mm drill. Take care in drilling the bone that the drill bit does not overheat, which may in turn cause local bone necrosis leading to the formation of ring sequestra with subsequent loosening and infection of the pins. Measure the depth of the distal cortex from the skin surface.
3. Insert a threaded Schantz pin into the drill hole so that both cortices are penetrated.
4. If possible, insert two more pins approximately 3–4 cm apart into the proximal fragment and three pins into the distal fragment in similar fashion. Biomechanically, the stability of the fixator is enhanced if there are three pins in each of the major fragments, with the nearest pin being close to the fracture line.
5. Loosen the locking nuts that hold the carriages on to the rigid bar and hold the bar parallel to the limb and 4–5 cm away from the skin.
6. Place one carriage opposite the protruding ends of each set of three pins and adjust the locking nuts to hold the carriages in position.
7. Fix the pins to the carriages with two mixes of acrylic cement for each carriage, moulding the cement around the pins and the carriage, maintaining the position until it is set.
8. Remove any temporary reduction device and carry out the final adjustment on the locking nuts to compress the bone ends together.
Aftercare
1. Keep the pin tracks clean and free of scabs and incrustations by daily cleaning with sterile saline or a mild antiseptic solution. A rigorous regime will minimize the risk of pin-tract infection and premature pin loosening.
2. An external fixator is essentially only a temporary measure before definitive treatment can be carried out. It is seldom used as the sole method of fracture management and should, therefore, be removed at a time when the wound is healthy, at which time it may be possible to definitively stabilize the fracture.
3. Fixator removal is simple. Cut the pins with a hacksaw or bolt cutters and then unscrew them. The acrylic cement can be removed from the carriages, which may be used again.
OPEN (COMPOUND) FRACTURES
Action
1. Explore and reassess the wound.
2. Expose and assess the fracture. Remove only small and completely unattached fragments of bone. Retain any bone that has a remaining periosteal attachment, as this bone is potentially still viable.
3. Free the bone ends from any adjacent fascia and muscle through which they may have buttonholed.
4. Wash away any blood clot and other debris.
5. Strip the periosteum for 1–2 mm only from the bone ends to allow accurate reduction without the interposition of soft tissues.
6. Using a combination of traction, bone clamps, levers and hooks, reduce the major fragments into an anatomical position. If necessary, extend the original wound to improve access.
7. If the fracture is stable, immobilize in a plaster cast after definitive treatment of the wound. Leave a window in the cast to permit wound inspection and changes of dressings.
8. Apply an external fixator when the wound is contaminated or there is extensive skin loss.


SKELETAL TRACTION
Appraise
1. Temporary skeletal traction can be applied using skin traction, and, indeed, this is the method of choice when using a Thomas splint for immobilization of a femoral fracture as a first aid measure. For prolonged treatment insert a traction pin through the tibia or calcaneus. Other sites such as the olecranon or metacarpals are occasionally used.
2. Skeletal traction is a simple and safe method of immobilizing a limb after injury or operation. It may be seen as a temporary measure, as definitive treatment, or as a supplement to treatment. With the more widespread use of increasingly sophisticated internal fixation devices, skeletal traction is less frequently employed as a definitive method of treating long-bone fractures. Skeletal traction requires careful supervision and adjustments to remain effective.
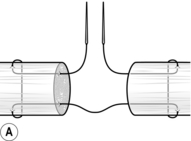
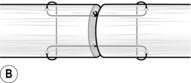
3. There are two types of pin in common usage (Fig. 30.2). Each has a triangular or square butt, which inserts into a chuck, and a trocar point. The Steinmann pin is uniform throughout but the Denham pin has a short length of screw thread wider than the main shaft near its centre, which screws into one cortex of the bone and minimizes sideways slip during traction.


Prepare
1. Clean the skin and drape the limb, leaving about 10 cm exposed on either side of the site of entry.
2. Anaesthetize the skin, subcutaneous tissue and periosteum on both sides of the bone at site of entry and exit of the pin with 1% lidocaine.
3. Make sure that the pin selected fits the sockets in the stirrup.
Action
1. To insert the pin through the upper tibia, make a 5-mm stab incision in the skin on the lateral side of the bone 2.5 cm posterior to the summit of the tibial tuberosity; this avoids damage to the common peroneal nerve when a medial approach is used. If the tibial plateau is fractured, make the nick and insert the pin 2.5–5 cm distally.
2. To insert the pin through the calcaneus, make a 5-mm stab incision in the skin on the lateral side of the heel 2.5 cm distal to the tip of the lateral malleolus.
3. Introduce the point of the pin through the nick at right-angles to the long axis of the limb and parallel to the floor, with the limb in the anatomical position. Avoid obliquity in either plane.
KEY POINTS
Care inserting pins


4. Incise the skin over the exit point and gently push the pin through until equal lengths are protruding on either side. When using the Denham pin the threaded section should be screwed into the cortex a further 6–8 mm so that the thread engages the bone.
5. Make sure that the skin is not distorted where the pin passes through. Make tiny relieving incisions if necessary.
6. Dress the punctures with small squares of gauze soaked in tincture of benzoin.
7. Attach traction cords or a traction stirrup to the pin. Three types of stirrup are available (Fig. 30.3):
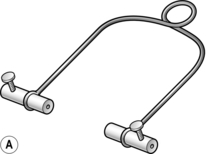
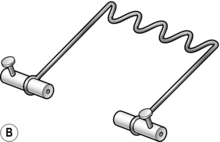

Fig. 30.3 Traction loops: (A) the Bohler stirrup; (B) the Nissen stirrup; (C) the Tulloch-Brown ‘U’ loop.


8. Put guards on the ends of the pin.
9. Attach a length of cord to the centre of the stirrup, through which the traction will be applied.
Aftercare
1. Keep the pin tracks clean and free of scabbing and incrustation as described above.
2. Continually monitor the position of the fracture and adjust the traction as necessary so as to maintain an accurate reduction.
3. Monitor the condition of the patient as the enforced prolonged period of recumbence predisposes them to chest infection and pressure sores.
SIMPLE SKELETAL TRACTION
1. Simple skeletal traction over a pulley fixed to the end of the bed usually suffices for relatively stable fractures (e.g. of the tibial plateau).
2. Unstable fractures need the support of a splint. Support the calf on two or three pillows with the point of the heel clear of the bed. Have the traction string horizontal and apply sufficient traction weights so as to reduce the fracture and restore alignment and length of the bone. Usually 4–5 kg is sufficient, depending upon the weight of the patient.
HAMILTON RUSSELL TRACTION
Action
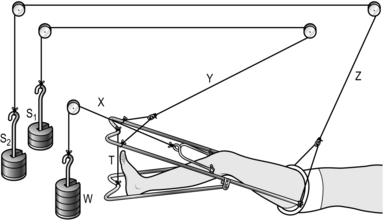
1. Set up the apparatus as in Figure 30.4, passing the cord through the pulleys as indicated. The sections of string ‘x’ and ‘y’ must be parallel to the horizontal and the section ‘z’ must lead in a cephalic direction. Support the calf either on two ordinary pillows or on slings of Domette bandage attached to the ‘U’-loop with safety pins.
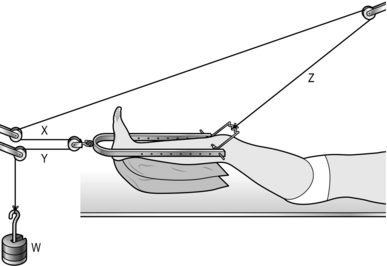
Fig. 30.4 Hamilton Russell skeletal traction.
2. Attach between 2 and 5 kg of weight to the end of the cord and make sure that it is clear of the floor. Remember that the effective traction is doubled as a result of the pulley arrangement.
3. Keep the point of the heel clear of the bed to avoid pressure sores.
4. Place a foot rest between the bars of the loop to maintain the foot at a right-angle to the leg.
5. A separate cord running from the Nissen stirrup through the more proximal pulley can be attached to a handle, so facilitating knee flexion exercises.
SLIDING SKELETAL TRACTION
Action
1. Set up the apparatus as shown in the diagram in Figure 30.5. Apply 4–8 kg of weight for traction (‘W’).
2. The splint should have a Pearson’s or equivalent knee attachment so that the knee may be flexed (20° for shaft fractures and 40° or more for supracondylar fractures). Tie the distal end of this attachment to that of the main splint with traction cord. Only the cord ‘X’ is concerned with traction. Cords ‘Y’ and ‘Z’ and weights ‘S1’ and ‘S2’ merely suspend the splint to aid nursing.
3. Support the limb from the sides of the splint with Domette bandage held in place with safety pins. Pad the underside of the limb with sheets of cotton wool.
CALCANEAL TRACTION
1. Use calcaneal traction with the leg supported on a Bohler-Braun frame in the conservative treatment of unstable fractures of the tibia.
2. It may be combined with a padded plaster cast to provide more lateral stability.
3. Set up the apparatus as shown in the diagram in Figure 30.6.
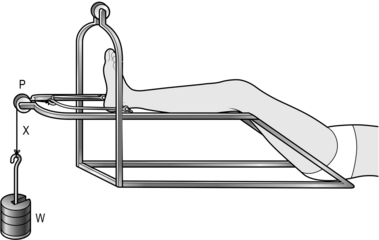
4. Apply 2–4 kg of weight (W’). Support the calf and thigh from the side-bars of the frame with slings of Domette bandage. Pad under the limb with cotton wool.
SKULL TRACTION
Appraise
1. Skull traction is often employed to immobilize the cervical spine after injury (fracture, subluxation or dislocation) and sometimes after operations on the neck.
2. The traction is applied through skull tongs inserted under local anaesthetic prior to the administration of any general anaesthetic. The anaesthetist then has the benefit of the added security of the traction.
3. The common devices available for skull traction are either the Crutchfield tongs or a Cone skull caliper. I have found the Cone caliper easier to apply and less likely to slip than the Crutchfield device.
Access
1. The patient lies supine with the head carefully supported so as to avoid sudden and unexpected movement.
2. Establish the insertion point for the caliper, which is at the point of maximal diameter of the skull in a line running across the vertex of the skull from one mastoid process to the other. In practice, this is usually 2–3 cm above the top of the ear.
3. Shave a small area of the scalp at the proposed insertion points and moisten the surrounding hair to keep it flat.
4. Place a waterproof layer and sterile towel under the head and drape off the bared area. Prepare the skin with a suitable antiseptic agent. Leave the face of the conscious patient uncovered.
5. Infiltrate the scalp down to the pericranium with 5 ml of 1% lidocaine and 1:200 000 adrenaline (epinephrine) on each side, anaesthetizing an area about 1.5 cm in diameter.
6. Open the Cone calipers to their fullest extent and place the points symmetrically on either side of the midline of the scalp. Mark the position of the points with a skin marker.
7. Make a stab incision down to the pericranium on either side. Bring the caliper back into position and introduce the pin through the conical end of the caliper.
8. The caliper is then tightened such that the tips of the cones abut the outer table of the skull. The pins are then tightened down through the outer table to a predetermined depth.
PERIPHERAL NERVE REPAIR
1. Complete disruption of a peripheral nerve may be associated with both open and closed injuries and recovery will not take place unless continuity is re-established surgically.
2. Peripheral nerve repair (Fig. 30.7) is a specialist technique but, faced with it in the field, you should be aware of the principles. If you feel unable to attempt a primary repair then mark the nerve ends with a non-absorbable suture to assist their location at the time of the definitive operation.

Appraise
1. Always assume that a peripheral nerve injury in the presence of an open wound is the result of a complete division of the nerve fibres (neurotmesis). You must therefore identify the nerve when the wound is treated and satisfy yourself as to its integrity. If it is divided, either mark or appose the ends in their correct orientation for secondary repair later.
2. Some form of magnification is essential in repairing a peripheral nerve. While an operating microscope may not be available, simple magnifying loupes will usually suffice.
3. It is entirely acceptable to treat a peripheral nerve injury conservatively in the absence of an open wound. A neuropraxia (block to conduction of nerve impulses without disruption of the axon or its supporting cells) will usually recover spontaneously in days or weeks, and an axonotmesis (the axon undergoes Wallerian degeneration) in the time it takes for the axons to regenerate. This is calculated by measuring the distance from the site of injury (e.g. a fracture) to the point at which the motor nerve enters the first muscle innervated distal to the lesion. Axons regenerate at a rate of 1 mm/day and so it will take approximately 90 days, for example, for re-innervation of the brachioradialis to occur following an injury to the radial nerve at the distal end of the spiral groove of the humerus. Electro-physiological studies (EMG, nerve conduction) may give some pointers as to the likely nerve lesion and will help in documenting recovery.
4. If recovery fails to occur in the predicted time and if the nerve conduction studies show no improvement, then explore the course of the nerve and treat any lesion appropriately.


Prepare
Access
1. Clean and explore the wound.
2. If there is a previous wound that has healed, excise the previous scar if necessary, and extend the wound proximally and distally along the course of the nerve.
3. If there was no wound, make an incision 15 cm long along the course of the nerve centred at the site of injury. Use a ‘lazy-S’ incision if the incision crosses the flexor crease of a joint.
4. Always begin by exposing the nerve in normal tissue on either side of the site of injury and then work towards the site of the injury, carefully dissecting along the course of the nerve. In the case of an open wound there may be extensive scar tissue and adhesions.
Assess
1. Decide whether repair is possible or not.
2. If repair is possible but beyond your competence, what action should you take?
KEY POINTS
Repair not possible, or beyond your competence?
 Free the ends of the nerve from the surrounding soft tissues and place a marker suture of 4/0 nylon or other non-absorbable material through the perineurium 2–3 cm proximally and distally from the site of injury to facilitate later alignment of the ends.
 If possible, appose the ends now, with two or three stitches for ease of later identification.

Action
1. If this is a delayed repair there may be fibrous scar tissue at the cut ends, or joining the ends.
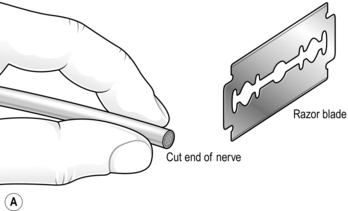
2. If necessary, cut transversely across fibrous scar tissue that may be joining the ends together.
3. Hold one end of the nerve firmly, using a special nerve-holding clamp (a finger and thumb will suffice in extremis) and carefully cut thin slices of tissue from the exposed end with a sharp razor blade at right-angles to the long axis of the nerve until all the scar tissue has been excised and the nerve bundles can be seen pouting from the cut surface (Fig. 30.7A).
4. Repeat the procedure on the other end of the nerve. It may be necessary to resect a centimetre or more from each end of the nerve because of the intraneural fibrosis (neuroma) caused by the initial injury.
5. If this is a primary closure, place the nerve ends in their correct rotational orientation. If this is delayed closure, similarly identify the correct rotational alignment.
6. Mobilize the nerve from the surrounding soft tissues proximally and distally as far as is necessary to bring the ends together without tension, carefully preserving and dissecting out the main branches. Flex a neighbouring joint if necessary. If it proves impossible to appose the nerve ends then an interposition graft may be necessary.
7. Release the tourniquet and achieve perfect haemostasis.
8. Ensure again that the ends of the nerve are correctly orientated.
9. Place an 8/0 nylon stitch through the perineurium on one side of the nerve. Cut the suture 3 cm from the knot and hold the ends in a small bulldog clip (Fig. 30.7B).
10. Place a second suture directly opposite the first and place another bulldog clip on the ends. These act as stay sutures and facilitate rotation of the nerve while placing further sutures.
11. Place further sutures through the perineurium, 1.5 mm or so apart, around the circumference of the nerve.
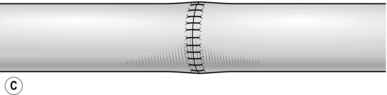
12. After completing the repair of the superficial surface, turn the nerve over by passing one bulldog clip suture under and the other over the nerve.
13. Complete the repair. Cut the first pair of sutures and turn the nerve back to the correct position (Fig. 30.7C).
14. Close the soft tissues and skin without altering the position of the limb if there is any danger of putting tension on the suture line.
15. Apply a padded plaster without increasing the tension on the repair.
16. Remove plaster and skin sutures after 3 weeks and gently mobilize the limb. If joints were flexed to avoid tension they must only be extended gradually over the next 3 weeks, if necessary by applying serial plasters at weekly intervals, or by incorporating a hinge with a locking device to allow flexion but no more than the set amount of joint extension.
TENDON SUTURE

ASSESS
1. Examine the wound. As with nerve injuries, if it is in the vicinity of a tendon and there is no distal action, assume that the tendon is divided until it is shown to be intact on clinical examination.
2. If no action is demonstrated or if there is doubt, explore the wound.
Action
3. Explore the wound and extend it if necessary in order to identify any divided tendons.
4. If the wound is suitable for primary closure then proceed to repair the tendons. If not, delay the repair until the wound is healed and is no longer indurated, maintaining full mobility of the joints in the meantime by physiotherapy.
5. When several tendons are divided (e.g. at the wrist), make sure that the cut ends are correctly paired. It is not unheard of to suture the proximal end of one tendon to the distal end of another or even to the cut end of a nerve!
6. Draw the cut ends together after picking up the paratenon round each end of the tendon with fine mosquito forceps, flexing neighbouring joints if necessary.
7. Secure the cut ends of the tendon by passing one needle into an exposed tendon end and bring it out of the side of the tendon about 1.5 cm from the cut end. Now pass this needle transversely through the tendon 3–4 mm nearer to the cut end. Re-insert this needle on the other side of the tendon to create a mirror image and bring it out through the cut end (Fig. 30.8A).
8. Freshen the ends of the tendon by cutting them with a no. 15 blade.
9. Use a 3/0 braided non-absorbable (Ethibond) suture with a 15-mm straight needle at both ends, using a modified Kessler core stitch (Fig. 30.8A). Repeat this process using the second needle on the other tendon end.
10. Make a half-hitch and approximate the tendon ends till they just meet. Complete the knot with at least six throws. Cut the knot flush; this should now have been buried within the tendon (Fig. 30.8B).
11. Complete the repair with a simple running suture of 6/0 monofilament nylon with a small curved needle. It is helpful to begin the running stitch on the posterior face, leaving the cut end of the suture long with which to turn the tendon through 180° for ease of access. The final repair must be smooth, with no bunching at the repair site.
12. Release the tourniquet and secure haemostasis.
13. Close the wound with suction drainage if necessary.
14. Apply a padded plaster so that the suture line is not under tension and remove after 3 weeks in the upper limb and 6 weeks in the lower limb.
BIOPSY
OPEN BIOPSY

Action
1. Apply a pneumatic tourniquet if possible. In the case of possible infection, do not exsanguinate the limb.
2. Incise the skin over the most superficial aspect of the lesion, taking care to place the incision in such a way that it will be excised if later surgery is required.
3. Incise the deep fascia and split the muscle in the line of its fibres until the margin of the lesion or the bone is reached.
4. Take a wedge-shaped piece of tissue from the margin of the lesion approximately 1 cm long by 0.5 cm thick and 0.5 cm deep. Place it in formal saline unless specific staining techniques are required. Consult the pathologist beforehand if in doubt.
5. Take a further similar specimen for immediate culture.
6. If pus is present, aspirate as much as possible and take a swab for culture.
7. Take a further specimen for microscopic examination and a further specimen for culture from a different part of the lesion if it is large enough.
8. If the lesion is in bone, remove the specimen with a sharp osteotome and include the periosteum.
9. If the lesion is not obvious, drill a Kirschner wire or a thin twist drill into the suspected site and examine the area under the image intensifier, or take plain X-rays in two planes at right-angles. Note the relationship of the lesion to the marker before taking the specimens.
10. Examine radiologically once more to ensure that the specimen has indeed been removed from the lesion.
11. Label each specimen immediately and accurately.
12. Release the tourniquet and secure haemostasis.
13. Close the wound and apply a pressure dressing.
14. Ensure that the specimens are sent to the pathological laboratory.
DRAINAGE OF ACUTE OSTEOMYELITIS
Appraise
1. Assume that any unwell infant or child with an area of local bone tenderness has osteomyelitis until proved otherwise and treat as such. For drainage of joints in the case of septic arthritis, see the appropriate chapter.
2. If an abscess is present on initial clinical examination, or if pain, temperature, local swelling and tenderness fail to improve within 12 hours of starting antibiotic therapy, undertake operative treatment immediately.
3. Do not wait until there is radiological (X-ray) evidence of infection. It is then too late. However, an isotope bone scan may be helpful in determining the site of infection. Magnetic resonance imaging (MRI) can show the extent of the problem.
Prepare
1. Take blood for culture, haemoglobin, ESR (erythrocyte sedimentation rate), CRP (C-reactive protein), WBC (white blood cell count) and differential white cell count.
2. Give cloxacillin 100–200 mg/kg of body weight daily in divided doses intravenously until there is clinical improvement, usually apparent within 24 hours. If the patient is intolerant of penicillins give cefradine 100 mg/kg of body weight daily.
3. Change antibiotic as necessary when sensitivities are known, as a result of blood culture or operation. Otherwise continue with oral flucloxacillin 50–100 mg/kg, when there is clinical improvement.
4. If operation proves to be necessary (see above), perform it under a general anaesthetic. Mark the tenderest point on the limb before premedication.
Action

1. Prepare the skin and apply the drapes.
2. Centre the skin incision over the tenderest point on the bone and extend proximally and distally for 2.5–3 cm.
3. Incise the deep fascia and retract the soft tissues until the periosteum is exposed.
4. Pus may already have escaped into the soft tissues, but, if not, incise the periosteum and take specimens for culture. Excise obvious dead tissue.
5. If frank pus is not visible, swab the bone surface.
6. Drill a single hole with a 2-mm twist drill, 5 mm proximal to the epiphyseal line, which is easily identified under the periosteum. If pus emerges, drill a second and, if necessary, a third hole 5 mm proximal to the preceding hole. Usually, a single drill hole is sufficient to ensure that there is no pus in the medullary cavity.
7. Irrigate the wound with saline and insert a suction drain through normal skin. Plan to remove the drain after 24 hours or when drainage ceases.
8. Close the skin and apply a padded back splint so that the limb is immobilized and the wound can be inspected. Remove the slab when the wound is healed.
CHRONIC OSTEOMYELITIS
Action
1. Under general anaesthetic apply a tourniquet to the elevated limb, but do not exsanguinate it.
2. Prepare the skin and apply the drapes.
3. It is helpful to identify the extent of the sinus by injecting methylthioninium chloride (methylene blue) solution into its opening until it oozes from the sinus. Remove excess dye with a swab.
4. Centre the skin incision on the mouth of the sinus and excise it. Extend the incision in the direction of any sequestrum, excising any previous scars.
5. Carefully dissect around the track of the sinus down to the bone. The sinus track is usually visible through the surrounding cuff of normal tissue. Excise the sinus track.
6. The entrance of the sinus into the bone will be stained blue. Strip the periosteum proximally and distally to expose any dead underlying bone, which has a white appearance.
7. Remove dead bone with an osteotome and/or bone nibblers and open the medullary cavity.
8. Remove the sequestrum if present, and unroof the part of the cavity stained blue. Curette out all granulation tissue that has been stained by the dye.
9. Irrigate the cavity thoroughly with a mixture of half-strength hydrogen peroxide and alcoholic Betadine and then physiological saline.
10. Place one or more chains of gentamicin-impregnated methyl methacrylate beads into the cavity so that it is completely filled. The chains must not be kinked or intertwined, which would make their subsequent removal difficult. Leave the last bead of each chain protruding above skin level to facilitate later removal.
11. Place a perforated drain under the skin before closure, and connect it to a non-evacuated suction bottle.
12. Close the skin, leaving the terminal bead of each chain protruding from the wound, and dress the wound.
Aftercare
1. Remove the drain after 24–48 hours, or when the discharge ceases.
2. Remove beads by gentle traction on the protruding bead after 10–14 days. An anaesthetic is not usually required.
3. If the chain breaks, leave the beads in situ and remove them subsequently under a general anaesthetic or sedation when the wound is well healed.
COSTO-TRANSVERSECTOMY FOR TUBERCULOUS ABSCESSES IN CHILDREN
Appraise
1. Suspect TB spine in a patient with progressive debility and gradual onset of paraplegia. An abscess may be palpable externally, depending on its size and the vertebrae involved.
2. The procedure must be performed as soon as is practical following the diagnosis and can be followed by a remarkable improvement in neurology.
Assess
1. Absolute indications for surgery include:
 Severe, rapid onset paraplegia
 Onset of paraplegia during conservative (antibiotic) treatment
 Progressive paraplegia despite appropriate treatment
 Complete loss of motor power for one month despite appropriate treatment

2. Relative indications for surgery include:


3. Plain radiology may show erosion of a rib and adjacent thoracic vertebra. There may also be radiological soft tissue evidence of a collection.
4. CT scanning, if available, will confirm the level and extent of the lesion.
Action
2. Make a mid-line dorsal incision over the length of three spinous processes with any kyphos at the apex.
3. Using a periosteal elevator (Cobb, Bristow) reflect the periosteum laterally from the spinous processes to expose the transverse processes.
4. Resect the transverse process at its base using a bone nibbler.
5. Reflect the periosteum from the affected rib, exposing the medial 5 cm, which is then resected using a small bone cutter. Carefully trim and bevel the proximal end of the remaining bone, taking care not to puncture the pleura.
6. Following removal of the rib the abscess should drain and all its contents should be evacuated using a sucker and copious irrigation. If it does not drain spontaneously simply use a finger to perforate the cavity, break down any loculi and evacuate any necrotic material.
7. Occasionally it may be necessary to resect a second rib.
8. Instil antibiotic powder into the cavity.
9. It may be necessary to insert a chest drain if the pleura is damaged.
ACUTE SEPTIC (PYOGENIC) ARTHRITIS
Appraise
1. In all cases of acute arthralgia, especially in children who are systemically unwell, suspect septic arthritis.
2. If possible, attempt to aspirate the joint (it may be difficult to aspirate a hip) when the signs and symptoms of infection are present in association with a leucocytosis or a raised ESR. A negative aspiration, however, does not exclude infection.
Action
1. Insert a wide-bore needle attached to a syringe into the joint through the site of easiest access, maximum tenderness or fluctuation. Do not pass needles through an area of cellulitis because of the risk of infecting a sterile effusion.
2. Aspirate any fluid present for culture, cell counts, Gram stain and an immediate microscopy. If the aspirate is free from pus and no organisms are seen on the smear, treat by antibiotics and immobilization alone, until the results of cultures and all cell counts are available. Do not be confused by a report of ‘pus cells’ being present – these are merely inflammatory cells and are themselves diagnostic of infection.
3. Open the joint in all doubtful cases involving the hip, if the aspirate is obvious pus, if organisms are visible on the smear or are subsequently grown and if the cell counts exceed 100 000/mm3.
4. Make an incision 2.5–3.5 cm long at the site of aspiration and approach the joint, if possible through a standard approach (see sections on individual joints).
5. Make a cruciate incision in the capsule and irrigate the joint thoroughly with physiological saline, removing all pus, fibrin or other debris.
Aftercare
1. Immobilize the joint in a stable position in a padded plaster with access to the wound, or skin traction for the hip.
2. Change the antibiotic if necessary when the cultures of the blood or aspirate are available. Change from intravenous to oral administration after 24–48 hours in the light of clinical improvement.
3. Remove the suction drain after 24–48 hours or when drainage ceases.
Brown, K.L.B., Cruess, R.L. Bone and cartilage transplantation in orthopaedic surgery. J Bone Joint Surg Am. 1982; 64A:270–279.
Dixon, R.A. Nerve repair. Br J Hosp Med. 1978; 20:295–305.
Gelberman, R.H., Berg, J.S.V., Lundborg, G.N., et al. Flexor tendon healing and restoration of the gliding surface. J Bone Joint Surg Am. 1983; 65A:70–79.
Johnson, K.D., Cadambi, A., Seibert, G.B. Incidence of adult respiratory distress syndrome in patients with multiple musculoskeletal injuries: effect of early operative stabilization of fractures. J Trauma. 1985; 25:375–384.
Klenerman, L., Miswas, M., Hughland, G.H., et al. Systemic and local effects of the application of a tourniquet. J Bone Joint Surg Am. 1980; 62B:385–388.
Lowbury, E.J.L., Lillie, H.A., Bull, J.P. Disinfection of the skin of operative sites. Br Med J. 1960; 2:1039–1044.
Müller, M.E., Allgower, M., Schneider, R., et al. Manual of Internal Fixation. Techniques Recommended by the AO Group, 2nd ed. Berlin: Springer-Verlag; 1979.
Nade, S. Clinical implications of cell function in osteogenesis. Ann R Coll Surg Engl. 1979; 61:189–194.
Nade, S. Acute haematogenous osteomyelitis in infancy and childhood. J Bone Joint Surg Am. 1983; 65B:109–120.
Nade, S. Acute septic arthritis in infancy and childhood. J Bone Joint Surg Am. 1983; 65B:234–242.
Patzakis, M.K., Gustilo, R.V., Chapman, M.W. Management of open fractures and complications. In: Frankel, V.H., eds. Instructional Course Lectures. American Academy of Orthopaedic Surgeons, vol. 31. St Louis: Mosby; 1982:62–88.
Seddon, H. Surgical Disorders of the Peripheral Nerves, 2nd ed. Edinburgh: Churchill Livingstone; 1975.
Shipley, J.A., van Meerdervoort, H.F., van den, Endej. Gentamicin polymethyl methacrylate beads in the treatment of chronic bone sepsis. S Afr Med J. 1981; 59:905–907.
Stewart, J.D.M., Hallet, J.P. Traction and Orthopaedic Appliances. Edinburgh: Churchill Livingstone; 1983.