Ophthalmology
INTRODUCTION

Prepare
1. Many of the procedures described in this chapter can be carried out with small instruments available in a general surgical theatre.
2. Ideally, however, a selection of special instruments will render these eye operations easier to perform:


PROTECTING THE EYE
Assess
1. Take particular care when there is exposure of the cornea and there is risk of corneal ulceration. This is present when there is a seventh nerve palsy, trauma including burns causing eyelid damage, proptosis or herpes zoster ophthalmicus in which the cornea may also be anaesthetic, or in the unconscious patient.
2. When the problem is likely to be temporary, it may simply be necessary to apply copious artificial tear drops and ointment until recovery occurs.
3. When the problem is likely to be longstanding, arrange to cover the cornea with the eyelid, either by keeping the lid over the eye with paraffin gauze or an eye-covering gel, or by dropping the lid with botulinum toxin (see below).
4. Alternatively, suture the eyelids together with a tarsorrhaphy.
TARSORRHAPHY
Appraise
1. Stitching the lids together may be done either centrally, which of course obscures vision, or laterally, where the protection given is due to the shortening and consequent narrowing of the palpebral fissure.
2. Central tarsorrhaphy is advised where there is inability to close the lids (lagophthalmos) and there is drying of the cornea, or when ulceration is actually present. It is indicated also when severe or protracted ulceration occurs for other reasons, for example in an anaesthetic cornea.
3. In ectropion of the lower lid, in particular that occurring in facial palsy, a lateral tarsorrhaphy suffices.
4. A bandage soft contact lens may be useful in a non-healing corneal ulcer; if it is not available, copious lubricants and daily observation are required.
5. Temporary protection of the cornea can be achieved by inducing a ptosis. Inject 100 pg of botulinum A toxin into the levator palpebrae superioris through the upper lid, entering above the tarsal plate. Keep close to the orbital roof to avoid injecting the toxin into the superior rectus muscle, which would cause diplopia.
6. Superglue closure is dangerous because of the risk of the hardened glue rubbing on the cornea.
Action
1. In all cases, use local anaesthesia with tetracaine (amethocaine) 1% drops to the conjunctiva and 1% lidocaine with adrenaline (epinephrine) infiltration into the lid substance, both subcutaneously and subconjunctivally.
2. In tarsorrhaphy proper, raw surfaces of the lid margins are prepared. The easiest way to do this is simply to divide the lid into anterior and posterior layers through the ‘grey line’ (Fig. 42.1A). This is the midline of the edge of the lid between the roots of the eyelashes in front and the mouths of the meibomian glands behind. The trouble is that in many patients it does not exist as a defined line, and when preparing the lid it is important to keep away from the roots of the lashes as this could distort them and lead to their growing inwards.
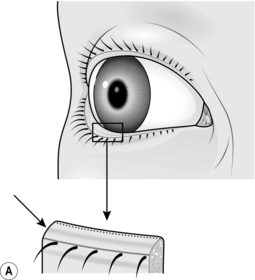
3. Start with the lower lid. Hold it up vertically with toothed forceps while an assistant holds it up with similar forceps some way along. Sink the blade (no. 15BP) of a scalpel in about 3–4 mm through the grey line in the plane of the lid, and take the cut the required length along the lid. If the initial stretch of lid grasped by yourself and your assistant is not long enough, both of you move along and continue the incision. Deal similarly with the upper lid opposite the raw area in the lower. In a lateral tarsorrhaphy make sure the two raw areas are continuous round the outer canthus.
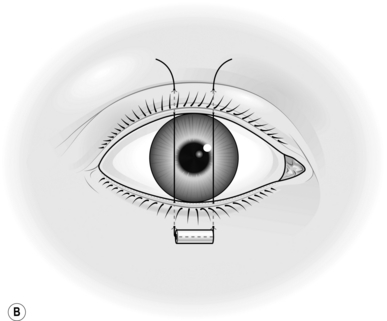
4. Now insert the sutures (Fig. 42.1B). Use double-armed 4/0 black silk and pass the needle through the bore of a 3-mm length of rubber tube so as to prevent it cutting out. Grasp the edge of the lower lid with one blade of the toothed forceps in the raw area in the lid margin, the other in the substance of the lid 3–4 mm from the margin. Enter the needle through the skin 4 mm from the lid margin and come out in the raw area. Now grasp the upper lid similarly and pass this needle through the raw area and out on the skin 4 mm from the lid margin. Repeat this procedure with the other needle, entering the skin of the lower lid about 4 mm laterally or medially from the entry of the first.
5. Now pass one needle through a second similar piece of rubber tube and either tie it or, according to the length of lid closure required, put in as many more of these mattress sutures as are indicated.
6. Before tying, wipe away any clot from the raw edge of the lids. Do not buckle the lids when tying; moderately firm apposition is all that is needed as postoperative swelling will add further tension.
7. Put on antibiotic ointment and bandage the eye over paraffin gauze or non-adherent dressing and a pad only if bleeding has been excessive. Uncover the next day. Inspect again in a week and remove the sutures after 2 weeks.
EYELID INJURIES
1. Lacerations heal well, but there are important points to remember.
2. If the lid margin is involved, try to appose the edges as accurately as possible. Use 6/0 Vicryl for the skin but try to insert a suture of 6/0 silk through the lid margin itself. Enter the needle on one side through the grey line 2–3 mm from the cut edge, emerging in the latter a similar distance down the cut and then in reverse through the other edge. After tying the suture, leave the ends 3 cm long and strap them down, then check that they do not abrade the cornea. Use the skin sutures to tie over the long ends of the lid margin sutures to keep them out of the eye.
3. If the lids are widely split, suture the tarsal plate before tackling the skin. Do this with interrupted 6/0 absorbable stitches. Insert the sutures at 2-mm intervals, placing the knots anteriorly in the substance of the lid, not facing backwards where they will be uncomfortable and again may abrade the cornea.
4. In cases where the inner third of the lower lid is lacerated, or there is a deep horizontal cut of the upper lid, call in the experts immediately. Restoration of continuity of a possibly divided lower lacrimal canaliculus or levator repair is too specialized a procedure to be covered here. Simply suture the tarsal plate, orbicularis and skin, then refer for later surgery.
5. Massive loss of the substance of the lids may give rise to an immediate problem of ocular (particularly corneal) protection. A protective contact lens may be indicated. Immediate plastic procedures may be advisable, if possible, finishing with some form of tarsorrhaphy or even a purse-string conjunctival flap to protect the cornea. This creates a moist chamber. This entails making a circular incision around the ocular conjunctiva well away from the limbus, mobilizing the ocular conjunctiva off the sclera, then inserting a purse-string suture around the margin, drawing it together to form a closed chamber protecting the cornea.
INJURIES OF THE GLOBE
LACERATIONS
Appraise
1. Conjunctiva. Leave small cuts (less than 5 mm) alone. Suture larger ones under local anaesthesia with interrupted 8/0 synthetic absorbable sutures at 4-mm intervals, removing any prolapsed Tenon’s capsule, if excessive, or burying it.
2. Cornea and sclera. Insert a speculum, and find and remove foreign bodies. Glass from windscreens is especially difficult. Put a drop of fluorescein in the eye; it may help to show small particles as well as corneal epithelial loss.
KEY POINT
Foreign bodies
 For removal of metal foreign bodies, see page 650, but always X-ray a lacerated eyeball as a matter of routine.
3. If obvious foreign bodies are present in the anterior chamber, only, attempt to remove them with the finest small-bladed forceps under high magnification after re-forming the anterior chamber with Viscoelastic. Do this only during a procedure for a lacerated cornea. There is no substitute for Viscoelastic, so do not attempt to re-form the anterior chamber if none is available.
4. Try to preserve iris and ciliary body if practical to do so, lens and vitreous, if coming out of the would will need to be removed. If the iris cannot be replaced then, pick it up with iris forceps etc. Pick them up with iris forceps and withdraw a little in an attempt to free them from an incarcerated position in the wound. Make a cut with De Wecker scissors to remove the tissue, flush with the plane of the globe at the site of the penetration. Gently replace any intraocular tissue remaining in the wound, using an iris repositor. In an emergency, leave alone incarcerated material that is not prolapsed externally, particularly if the anterior chamber is not lost.
Closure
1. Wound closure varies in difficulty. Insert sutures into clean lacerations of less than 5 mm only if aqueous humour is leaking.
2. As a general surgeon, you may not wish to undertake direct corneal or scleral suture. If you do undertake it, however, remember that, although the stitches should be almost full thickness, they must not penetrate into the eyeball (Fig. 42.2). Use magnification, if it is available, to ensure this.
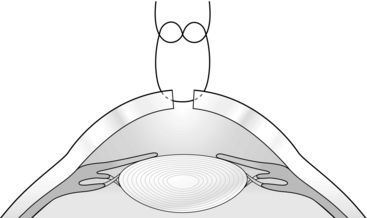
Fig. 42.2 Corneal and scleral sutures.

3. Enter and emerge about 1–1.5 mm from the wound edge. Grasp each edge lightly with the finest-toothed forceps you have, such as Jayles, St Martin’s, or finer. Use 9/0 or 10/0 nylon and keep the sutures in a line perpendicular to the wound. In suturing scleral wounds it may be necessary to dissect the conjunctiva back from the edge.
4. It may, however, be unwise to attempt direct suture, either because you lack experience or because the wound is too irregular. In such cases, and particularly if the anterior chamber is shallow or absent, prefer to cover the wound with a conjunctival flap. In a corneal wound, for example, carry out a partial peritomy. Thus if, for example, the wound is in the 4 o’clock meridian, cut the conjunctiva at the limbus (Latin: = border; between the sclera and the cornea) from 1 o’clock to 7 o’clock in the lower left half of the globe (Fig. 42.3). If it is possible to choose the origin and direction of the flap, remember that the upper and temporal conjunctiva is the loosest and easiest to mobilize. Undermine the conjunctiva so freed back, for at least 15 mm. Insert one needle of a double-armed 8/0 absorbable suture in the paralimbal connective tissue at 8 o’clock and, using a second suture, do the same at 12 o’clock.
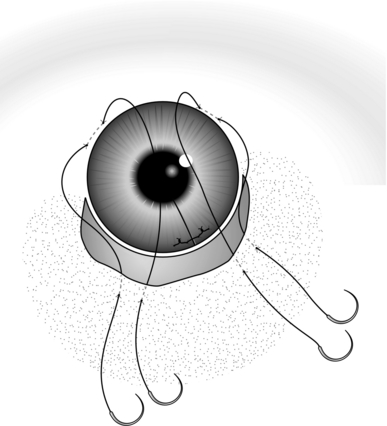
Fig. 42.3 Conjunctival flap.
5. To insert these sutures, try to get a reasonable bite without going right through the sclera into the eye. Aim for a 2-mm track, parallel to and 1 mm from the limbus. To steady the eye use fine-toothed forceps such as Jayles, to grasp the episcleral tissue close to the point of suture insertion.
6. Now put the two arms of one suture through the edge of the freed conjunctiva at an appropriate place and repeat this with the other suture. Figure 42.3 indicates suitable insertion points. Tie each suture while an assistant, using two pairs of plain forceps, draws the edge of the flap well over the site of the penetration. If the penetration is central, it should still be possible to cover it in this way.
7. Finally, give a subconjunctival injection of cefuroxime 125 mg in 1 ml of water. Give the injection by passing the needle tangentially through the conjunctiva in a horizontal direction 1 cm back from the limbus, into the quadrant opposite to that of the penetrating injury.
BLUNT INJURIES
EVACUATION OF HYPHAEMA
Appraise
1. Hyphaema (bleeding into the anterior chamber) is invariably treated conservatively initially, with bed rest and topical steroids to reduce the risk of further bleeding, such as dexamethasone (Maxidex) 0.1% four times a day. Patients with sickle cell disease or trait may have severe hyphaemata, which is very slow to resolve.
2. Removal of the blood from the anterior chamber is very rarely indicated. Undertake it only when:


Action
1. Anaesthetize the eye with topical 4% benoxinate (oxybubicaine), tetracaine (amethocaine) drops given at 5-minute intervals. A general anaesthetic is unnecessary.
2. Insert an eye speculum. Have available a disposable or diamond knife, otherwise use a Bard-Parker scalpel with a no. 11 blade.
3. Grasp the medial rectus muscle with a 2-in-3 forceps and gently lift the eye ceiling-wards, to fix its position. Hold the knife like a pencil and steady your hand by placing your fourth and fifth fingers on the patient’s temple. Pass the tip of the blade through the cornea 2 mm inside the limbus (corneoscleral junction) with the plane parallel to the presumed plane of the iris, which you cannot see.

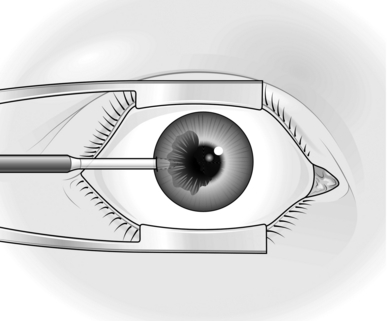

4. You cannot see the tip of the knife once it is within the anterior chamber because it disappears in blood. Do not push on any further than 2 mm once this happens. Withdraw the knife gently but rapidly in its own plane. If you withdraw it correctly, nothing escapes from the anterior chamber even if the ocular tension is very high.
5. Now press gently on the posterior (peripheral) lip of the incision and some blood-stained aqueous should escape. Do not press for longer than a second at a time initially, since a rapid drop in intraocular pressure may re-start the bleeding. Repeat intermittent pressure until you note some clearing of the anterior chamber. Do not persist until all blood has been evacuated.
6. Inject subconjunctival cefuroxime, remove the speculum and cover the eye with a plastic shield.
7. Very little blood may appear if the anterior chamber contains a solid clot. A larger incision is then needed.
8. Paracentesis is also a standard emergency procedure for arrest of the retinal circulation (central retinal artery occlusion). Carry it out within 2–3 hours of the onset. This condition justifies a much more rapid evacuation of the clear normal aqueous humour.
RUPTURED GLOBE
Appraise
1. A totally disrupted eyeball may require enucleation, either immediately or within a few days of the injury, and the same applies to badly lacerated and collapsed eyes. It is usually better, from a psychological point of view, to suture the eye as best you can then discuss removal of the eye, if it is not viable, with the patient over the next few days.
2. Take the decision for enucleation, bearing in mind the possibility of the dreaded complication of sympathetic ophthalmia. Months, or even years later, the unaffected eye and the affected eye develop panuveitis with sight-threatening sequelae including glaucoma and cataract.
3. Smaller posterior ruptures with some preservation of function may be diagnosed by the finding of a deep anterior chamber and chemosis (Greek: cheme – a yawning; the swelling around the cornea from oedema of the conjunctiva) resulting from loss of the vitreous humour. An ophthalmic surgeon might explore the eye. You should manage the rupture conservatively.
FOREIGN BODIES
Appraise
Intraocular foreign bodies


1. A foreign body is easily missed when the entry wound is small and the initial disturbance minimal. Metallic foreign bodies must be removed within a week because of the risk of the metallic ions causing toxicity to the retina. Copper is particularly dangerous.
2. If there is a history of something going into the eye, especially while hammering and chiselling, and you cannot detect a foreign body on superficial inspection, promptly order an X-ray of the orbit.
3. Most small intraocular foreign bodies are sterile. Be willing to wait if this allows more favourable conditions for treatment.
4. A large foreign body may cause a penetrating injury that requires to be dealt with in itself.
Subtarsal foreign bodies
1. Remove these by everting the upper eyelid after instilling proxymetacaine, tetracaine (amethocaine) or oxybuprocaine. Have a cotton-wool swab to hand before starting. Ask the patient to look down and keep doing so. Grasp the upper lid lashes with the thumb and forefinger of one hand and pull the lid down and forwards. With an orange stick, press the upper edge of the tarsal plate downwards (some 4 mm from the lid margin) and then lift the lashes so as to rotate the lid over the orange stick, which pushes the tarsal plate down and under the lid margin at the same time.
2. Once the eyelid is everted, keep hold of the lashes and press them against the eyebrow, instructing the patient meanwhile to keep looking down. Remove the orange stick and use your freed hand to remove the foreign body with the cotton-wool swab. Return the lid to its normal position by withdrawing both hands and asking the patient to look up.
Corneal foreign bodies
1. If you suspect the foreign body to be deep within the cornea, manipulation may push it into the anterior chamber. Unless you are expert, with available equipment, avoid tackling it.
2. Superficial corneal foreign bodies can be removed after anaesthetizing the cornea. Make sure you have a good light focused on the cornea and magnification.
3. Corneal foreign bodies are best removed with a green (19 G) disposable needle. Insert the needle tangentially to the cornea to get behind the foreign body. Do not insert the needle directly at the foreign body, but enter the cornea a little to the side. Lever the foreign body out. If any rust is left behind, attempt to pick it out, but do not persist too long. Rust that is slight and milk-chocolate in colour will disappear itself. Remove as much dark rust as is easily possible. You may be able to remove more after a few days of softening up.
4. Insert chloramphenicol antibiotic ointment into the conjunctival sac then pad the eye. Put in atropine drops only if the foreign body was very hard to remove. Monitor the patient daily, if possible, until the conjuntiva has healed and no longer stains with fluorescein. If daily monitoring is not possible, advise the patient to use chloramphenicol ointment three times a day until symptoms resolve.
BURNS
1. Chemical burns. Immediately concentrate on removing any matter mechanically and, in particular, copiously irrigate the eye using any harmless fluid you have at hand. Keep irrigating for at least 20 minutes. Do not hunt for specific antidotes. If the cornea is affected, apply antibiotic/steroid ointments such as Maxitrol (containing dexamethasone 0.1%, neomycin sulphate 0.35%, hypromellose 0.5%, polymyxin B sulphate 6000 IU) drops, or Sofradex (containing dexamethasone 0.05%, framycetin sulphate 0.5% and gramicidin 0.005%) drops, and atropine 1%. Keep the conjunctival fornices patent to prevent symblepharon (adhesion of the eyelids to the eyeball), by twice-daily passing a glass rod between the lids and the eyeball after anaesthetizing the eyeball with oxybuprocaine 0.4% (Benoxinate) or tetracaine (amethocaine) hydrochloride 0.5% drops. Always admit patients with lime burns for observation as the effects may be delayed and you may need to institute half-hourly drops including vitamin C in high dosage. Also encourage the patient to eat citrus fruits, since vitamin C is an antioxidant and a cofactor in collagen synthesis.
2. Thermal burns. Treat those affecting the lids as skin burns elsewhere, but problems of ocular protection may arise. If there is loss of skin following a thermal burn, the ocular surface may also be severely damaged by the injury. If there is exposure of the cornea, apply lubricants such as hypromellose 1.0% and try to produce a moist chamber. In the longer term it will be necessary to reconstruct the lids using tissue from elsewhere, such as skin from behind the ear and hard palate grafts to recreate the tarsal plate.
INFECTIONS AROUND THE EYE
PYOGENIC INFECTIONS
Appraise
 Infections may occur in the lids. A stye is an infection of a sebaceous gland of the lid, and resolves without treatment in 36 hours.


2. Infection of the eyelid, preseptal cellulitis, requires prompt treatment with systemic oral antibiotics such as amoxicillin. Review the patient daily, and admit for intravenous antibiotics if it deteriorates. Incise an abscess. Distinguish preseptal cellulitis from orbital cellulitis, which is a life-threatening illness. In preseptal cellulitis, even if the lid is swollen the eye is not proptosed and is fully mobile, with a normal or near normal visual acuity.
3. Infection of the orbit, orbital cellulitis, usually spreads from a sinus infection. It is usually associated with fever, reduced visual acuity on the affected side, proptosis and gross eyelid swelling and reduced eye movements. The patient needs to be admitted, the organism isolated and treatment started with intravenous antibiotics.
4. Infections of the eyeball itself may be localized, as for example a pyogenic corneal ulcer, or widely disseminated, as when a metastatic infection lodges in the choroid, spreading thence to the vitreous and all parts of the eye:
 A corneal ulcer may perforate and require a conjunctival flap to cover it and help it to heal. It may also be accompanied by pus in the anterior chamber (hypopyon); if this is unresponsive to intensive local and systemic antibiotics, you may need to perform paracentesis to obtain a specimen for microscopy and culture. Application of superglue to the thin cornea may provide emergency treatment of corneal perforation. Anaesthetize the eye first with amethocaine. Apply 2–3 drops of superglue to the perforation after drying the cornea with a sterile swab. Cover the eye with a bandage contact lens.

Action
1. Whenever possible, incise lid abscesses from the inner aspect. Anaesthetize the lid (see Tarsorrhaphy, above). Evert the lid (Fig. 42.5) and incise it at right-angles to its margin, through the tarsal plate.
2. If incision is needed for abscesses of the eyelid or lacrimal ducts, it should be done directly over the site of where the abscess is pointing.
REMOVING AN EYE
Appraise
1. The main indications for removal of an eye are irreparable injury with loss of sight, total or near total, severe pain in an already blind eye, or neoplasms such as a choroidal malignant melanoma that is too large for local irradiation or laser treatment.
2. There are two surgical approaches: enucleation and evisceration. In the former, the eyeball is removed from within Tenon’s capsule – the sheet of connective tissue beneath the conjunctiva that covers both the eye and the insertion into it of the ocular muscles. In evisceration, the eyeball is not removed as a whole but the structural wall – the sclera – is left in situ, the contents being removed; access is obtained by removing the cornea.
3. Evisceration is often reserved for blind eyes with obvious gross intraocular infection but with no evidence of malignancy. Mobility of the prosthetic eye is better following evisceration than following enucleation.
ENUCLEATION
Action
1. Sit at the head of the table and put in an eye speculum to separate the lids. Most specula are sprung. There should be adequate access.
2. Carry out a peritomy (incision of the conjunctiva around the rim of the cornea) by first opening the conjunctiva close to the edge of the cornea. Pick up a fold at 6 o’clock on the corneal dial (Fig. 42.6A) with plain forceps (Moorfields) and cut it with sharp-pointed scissors.
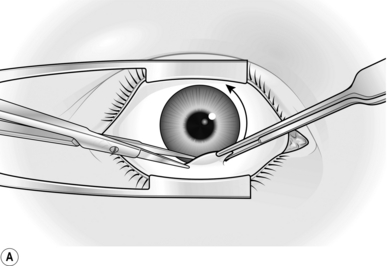
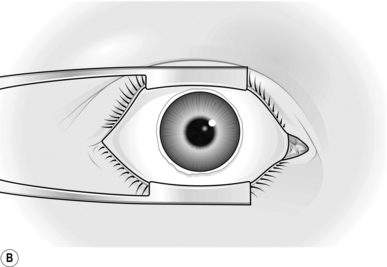
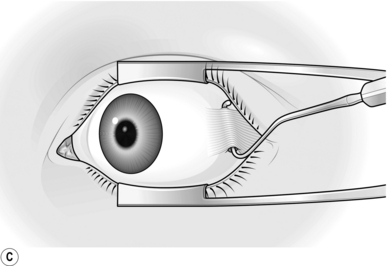
Fig. 42.6 Enucleation: (A) opening the conjunctiva; (B) conjunctiva freed; (C) tenting Tenon’s capsule.
3. Undermine both away from the cornea and towards the left (if you are right-handed), keeping close to the cornea. Cut the conjunctiva close to this edge, undermine some more and proceed snipping right round the cornea. The conjunctiva should now be free from the globe (Fig. 42.6B) and sufficiently undermined backwards for you to explore and open Tenon’s capsule.
4. This is best done in the lower nasal quadrant, below the medial rectus muscle. If Tenon’s capsule is thick you may not be able to see the muscles at all at this stage. If you have opened the correct part of Tenon’s capsule you will expose the sclera. This is a lustrous grey-white colour, and you should satisfy yourself that you are really down to it by cutting away any other loose fascial planes (e.g. episcleral tissue) that can be picked up.

5. Next expose and cut off the extraocular muscles, starting with the medial rectus. Take a muscle hook and pass it upwards through the opening in Tenon’s capsule, with its blunt point against the sclera deep to this muscle. Test that you have caught the muscle by pulling the hook anteriorly, when it will be stopped short at the insertion and will then move the whole eye. With the point above the level of the muscle, rotate the hook so as to tent Tenon’s capsule (Fig. 42.6C).
6. Cut down on this and then brush back Tenon’s fascia with a small swab so as to expose a length of the muscle tendon. Cut this off with blunt-nosed scissors, 3–5 mm behind the insertion, in order to leave a stump of muscle.
7. Through the gap in Tenon’s capsule above the medial rectus, pass a hook laterally to engage the superior rectus and cut this off, using the same steps described for the medial rectus; then carry on round to the lateral and the inferior recti. Cut off the tendons of the superior, lateral and inferior recti flush with the globe instead of leaving a stump attached to the globe as was done with the medial rectus.
8. If you have any idea where the inferior and superior oblique muscles are, and they can be found, divide them. Usually, however, no formal search need be made for them as they can be dealt with as the globe is removed.
9. Once the rectus muscles have been dissected from the globe, test whether the globe rotates freely by grasping the stump of the medial rectus. If it does not do so, explore backwards beneath Tenon’s fascia with blunt-nosed scissors and divide any structures that resist the rotation.
10. Next, dislocate the globe forwards. Loosen the eye speculum and, holding it so as to keep it about 25 mm apart, press it back towards the apex of the orbit (i.e. towards the floor). The eyeball should now come forwards with something of a jerk; its equator will be in front of the plane of the speculum. Now slightly close the speculum and tighten its screw so that the globe is kept in its forward dislocated position. This stretches its remaining attachments, making it easier to divide them.
11. Divide the optic nerve. Any short, but tough, blunt-nosed scissors, preferably slightly curved, will do. First rotate the globe outwards by grasping the stump of the medial rectus with 2-in-3 fixation forceps. Probe the region of the optic nerve, which you cannot yet see, by passing the points of closed scissors from the nasal side to where it should be. Move the scissor tips up and down to feel the cordlike structure. Do this two or three times to make sure of its location. Now withdraw the scissors about 5 mm, open the blades widely enough to flank the nerve, then advance the blades to engage it, making sure you are far enough in to section the nerve with one cut.

12. While the scissors are in position embracing the nerve, dip them about 15 degrees so that the tips of the blades go slightly deeper into the orbit. In this position close the blades, boldly cutting through the nerve.
13. The globe now comes forwards very easily. Trim away from it any remaining attachments such as the oblique muscles and posterior ciliary vessels, allowing you to remove it completely.
14. Bleeding is usually brisk at this stage so proceed immediately to pack the socket with gauze wrung out in hot saline. Keep two or three fingers’ pressure on this for 1 minute. Inspect it then and reapply a fresh pack and pressure until bleeding stops. Direct haemostasis is virtually never needed. While applying pressure, inspect the enucleated eye for completeness of removal, especially in the region of the optic nerve. In the most unsophisticated enucleation, simply put on some antibiotic powder, line the conjunctival sac with tulle gras, cover the lids similarly and apply a pressure dressing – two eyepads and a crepe bandage. Fold the deeper pad double.
Orbital implants
Modify your technique as follows:
1. Insert sutures into each of the rectus muscles before cutting them off the globe. If you intend to use an implant to which the muscles will actually be attached, use 6/0 synthetic absorbable sutures. If the implant is simply a ball (glass or plastic) then use 4/0 black silk.
2. The sutures should be ‘whipped’ or tied so as to give a better grip of the tendons (Fig. 42.7).
3. In all cases where an implant is to be used, dissect back under Tenon’s capsule to make a definite layer that can be sutured over the front of the implant. The capsule, described by the Parisian surgeon in 1806, is the connective tissue sheath of the eyeball.
4. If a ball is to be used, after removing the eye and securing reasonable haemostasis, put the implant in and lift up the muscles by their silk sutures. Then sew a purse-string suture of 6/0 absorbable to close Tenon’s capsule over the ball and include the muscle tendons in the purse string. Remove the black silk sutures. Finally, close the conjunctiva as a separate layer with 6/0 or 8/0 synthetic absorbable sutures.
5. If the muscles are to be attached to the implant, do this and then pull Tenon’s capsule forwards to cover it. Dissect it well enough to avoid much tension. Sew up Tenon’s capsule using a continuous 6/0 absorbable suture for both, starting with Tenon’s right to left and then coming through to the conjunctiva proceeding left to right.

6. The best cosmesis is obtained by suturing the muscles to a hydoxyapatite orbital implant covered in polyglactin 910 mesh or a Vicryl ball implant covered in Mersilene mesh.
EVISCERATION
Appraise
1. If the vital internal structures of the eye are destroyed by infection, with loss of vision, evisceration (removal of the soft contents from within the sclera), is indicated rather than enucleation, since mobility is better following evisceration.
2. If you have any suspicion of an intraocular tumour, however, choose enucleation to avoid any potential spread of the tumour.
Action
1. Insert a speculum to separate the eyelids.
2. Cut off the cornea. This may be difficult if the eye is very soft, following, for example, perforation of an infected corneal ulcer. Steady the eye by grasping the insertion of a rectus muscle with toothed forceps. Now cut through the periphery of the cornea circumferentially over a 5-mm length by progressively deepening a scalpel incision. Use the belly of a Bard-Parker no. 15 blade or ophthalmic blade.
3. Once you have entered the anterior chamber, cut right round the edge of the cornea with corneal scissors, if they are available; alternatively, use any narrow-bladed, blunt-nosed scissors.
4. Having topped the eye, scoop out all its contents – lens, iris and retina as well as the humours. It is important to do this thoroughly. A special scoop is available, but a large and not-too-sharp curette is adequate. End by wrapping gauze round it to wipe away all the remnants of the uvea. Inspect the cavity to make sure that all that is left is sclera. Recent practice is to sever the optic nerve, split the posterior sclera and insert the implant behind the scleral remnant to reduce the risk of extrusion – a technique for the specialist.
5. Finally, pack the socket with paraffin gauze, apply a pad and bandage. Dress in 48 hours. No suture is required.
ACUTE ANGLE-CLOSURE GLAUCOMA
Appraise
1. Acute glaucoma produces sudden pain, loss of vision, headache, nausea and vomiting. It may be preceded by episodes of seeing haloes in the evenings. The eye appears red, with a swollen conjunctiva and the pupil may be mid-dilated and unresponsive to light. The corneal reflex is often cloudy or glassy in appearance.
2. Surgical intervention is infrequently necessarily indicated because of the availability of effective medications. Treat acute angle-closure glaucoma with miotics such as pilocarpine 2 or 4% 1 drop every hour, the beta-blocker timolol maleate 0.5% (Timoptol-LA) twice daily, dexamethasone 0.1% (Maxidex) four times a day. Oral acetazolamide (Diamox) 500 mg may be given orally twice daily; it may be administered intravenously if the patient has severe nausea and vomiting. When ophthalmological facilities are available, a YAG laser is used to produce a peripheral iridotomy.
3. In primary acute closed-angle glaucoma the pressure can usually be lowered adequately, if temporarily, by acetazolamide (Diamox), 500 mg intravenously, miotic drops and osmotic agents. For this reason, classic iridectomy for glaucoma is hardly ever employed as an emergency procedure. In ophthalmic units laser iridectomy is performed several hours or days after the acute attack has been controlled and the eye is ‘quiet’, the pressure having been controlled with miotics such as pilocarpine 4%.
4. Chronic open-angle glaucoma is usually asymptomatic in the early stages: the pressure is only moderately raised and loss of vision takes place years after the onset of the condition. It is usually treated medically by pressure-lowering eye drops where such drops are available; if unobtainable, it is treated surgically by a specialist.
Relief of pain
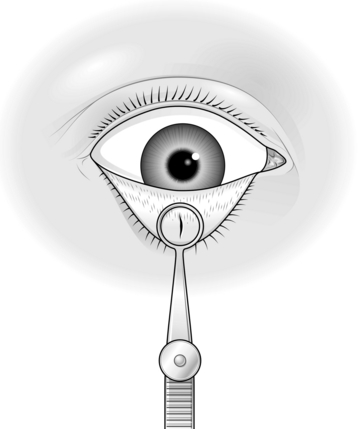
1. Intractable glaucoma with severe pain is one example of the blind, painful eye, and for this sort of glaucoma some relief may be given by a retrobulbar alcohol injection if removal of the eye is impracticable.
Retrobulbar alcohol injection
1. Put 1.5 ml of 1% lidocaine with 1:200 000 adrenaline (epinephrine) in a 2-ml syringe and fit a retrobulbar needle or a 40-mm 23G or 25G needle.
2. Clean the skin of the lower lid after determining the site of entry of the needle, which should be the lower outer angle of the bony orbit.
3. With the patient lying down, ask him or her to keep the eyes open and to look straight ahead.
4. Insert the needle through the skin in the intended direction, which is backwards, and slightly medially and upwards (Fig. 42.8), towards the opposite superoparietal area. There is a tendency to avoid getting too close to the globe for fear of penetrating it; but, if you keep too far away, you will miss the muscle cone, which you want to penetrate through Tenon’s capsule between the lateral and inferior recti.
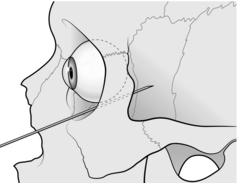
Fig. 42.8 Retrobulbar alcohol injection.
5. Inject very slightly as you go in. You will probably feel resistance when Tenon’s is about to be penetrated and you may see the eye roll slightly down and out at this point. Be resolute and push on; the eye will resume its former position. Inject the bulk of the local anaesthetic. When it has had time to work there will be some relief of pain.
6. Now leave the needle in place and detach the syringe. Draw up 1 ml of 75% alcohol and after an interval of 1 minute inject this through the retrobulbar needle still in situ. Withdraw needle and syringe.
7. Warn the patient that relief may not be very long-lasting (it does, however, often last months), and also warn of the possibility of ptosis of the upper lid, which again may not be permanent.
NEOPLASMS
Appraise
The most common important ocular neoplasms affect the lids and the uveal tract.
Small benign lesions of the lid
These can be removed by cautery or a variety of methods of excision under local anaesthetic.
Larger benign and malignant lesions of the lid
1. Carefully decide upon the surgical approach after noting the size of the lesion and its position in relation to the lid margins. You need to remove at least 3 mm beyond the visible margin of the lesion of a malignant lesion, to allow for possible microscopic extension. Where available, malignant eyelid lesions should be ideally removed using Mohs techniques.
2. For larger lesions away from the lid margin, you may excise the lesion and arrange a local skin flap. Alternatively, insert a free graft of skin from the contralateral upper lid. As you distend the skin with the preoperative anaesthetic injection of 2% lidocaine with added adrenaline (epinephrine) to reduce bleeding, you can ensure that the graft is of adequate size, and also that you can close the donor site.
3. For lesions of the lid margin, employ a pentagonal excision, provided that the gap can be simply closed by direct suture. If this will cause too much tension, facilitate closure by making an outer canthal incision, dividing the lateral canthal tendon mobilizing the lid and gaining horizontal laxity. This allows the lateral portion of the lid to be easily approximated. This is also helpful when shortening the lower lid for senile ectropion. Local anaesthesia is all that is required.
4. Make the excised pentagon at least 2 cm in height with the tarsal edges vertical, the apex being angled. Closure is in two layers, as described in the section on lid injuries.
5. Major reconstructive surgery of the eyelids is beyond the scope of this section. Intraocular malignancies are again a matter for the specialist, but the general principle applies that, for lesions of any size (which to the non-specialist means any degree of obviousness), enucleation is indicated.
Collin, J.R.O. A Manual of Systematic Eyelid Surgery. Edinburgh: Churchill Livingstone; 2006.
Leatherbarrow, B. Oculoplastic Surgery. London: Martin Dunitz; 2011.
Tyers, A.G., Collin, J.R.O. Colour Atlas of Ophthalmic Plastic Surgery. Edinburgh: Elsevier Health Sciences; 2008.
Spaeth, G.L., Ophthalmic Surgery: Principles and Practice. Saunders, Edinburgh, 2003. www.eyetext.net