Chapter 6 Open Flank Hernia Repair 
1 Clinical Anatomy
 Flank hernias can be divided broadly by etiology into those that are congenital in nature and those that are acquired, often after previous surgery or trauma. Congenital, or lumbar hernias, are less common than the acquired type and can be subclassified into superior triangle (Grynfeltt) or inferior triangle (Petit) defects. Acquired flank hernias can develop after previous operations such as iliac bone harvest, trauma, retroperitoneal aortic surgery, or nephrectomy. The anatomic proximity of flank hernias to bony prominences and major neurovascular structures presents a challenge in the durable repair of these hernias. Specifically, the proximity of these lesions with the iliac crest and twelfth rib can often limit the amount of tissue present for adequate mesh-tissue overlap.
2 Preoperative Considerations
 When considering surgical repair of flank hernias, it is important to perform a computed tomography (CT) scan of the abdomen and pelvis. First and foremost, this will distinguish a true hernia from a pseudohernia (e.g., abdominal wall laxity from denervation after division of the lower thoracic nerves). In addition, a CT scan is not only essential to understanding the patient’s specific anatomy but also for delineating the presence of previous mesh repairs. It also will show the structure of remaining bone, because there may be alterations secondary to previous operations in this area. This information is important for planning the appropriate location for prosthetic deployment and any fixation or overlap issues that might arise.

3 Operative Steps
1 Patient Positioning
 The patient is positioned in the full lateral decubitus position on a beanbag as seen in Figure 6-1. A roll is placed in the axilla and the table is flexed to maximize the space between the lower border of the costal margin and the anterior superior iliac spine to optimize exposure. The beanbag is then engaged for support and padding. The patient should be secured to the table with padded tape to allow for full rotation of the bed during the operation.
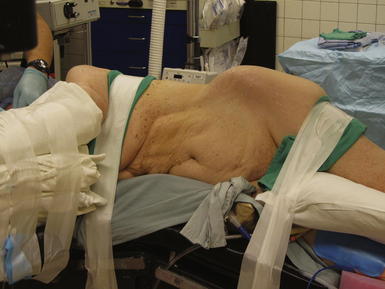
2 Operative Steps
 The following anatomic landmarks are prepped into the sterile field: costal margin and pelvic brim including the anterior superior iliac spine, inguinal ligament, pubic tubercle, and umbilicus. The midline should be accessible as well if added exposure and mesh overlap are necessary. The incision should be made preferably 3 cm above the iliac crest. As many flank hernias are related to previous surgical interventions, the incision site will often be dictated by the site of the previous incision.
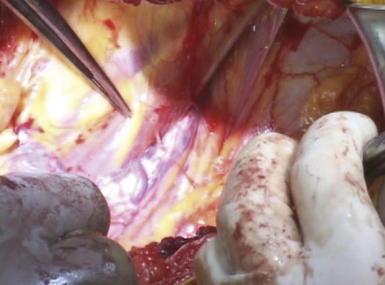
 If possible, an attempt is made to avoid entry into the peritoneum. In many circumstances, reduction of the hernia sac will lead to an inadvertent entry into the abdominal cavity. In this circumstance, the edges of the hernia sac are left attached to the surrounding peritoneum, and the defect in the peritoneum will be closed at the completion of the dissection. After division of the transversus abdominis muscle, the preperitoneal fat is encountered. This plane is easier to identify laterally than medially. Care is taken to confirm entry into the preperitoneal/retroperitoneal plane because this is the location to deploy the prosthetic and optimize overlap. A Kittner dissector is useful to bluntly extend the preperitoneal dissection in all directions. Often the hernia sac is attenuated and cannot be separated from the subcutaneous tissues safely. In these circumstances, we typically enter the abdominal cavity and perform a complete adhesiolysis. Subsequently, the preperitoneal space can be accessed at the border of the defect directly.
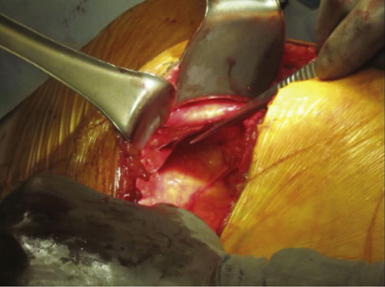
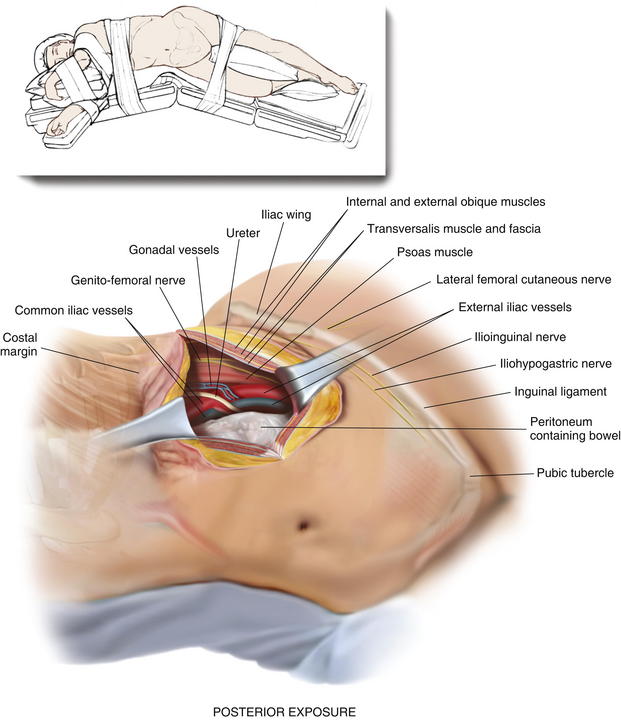
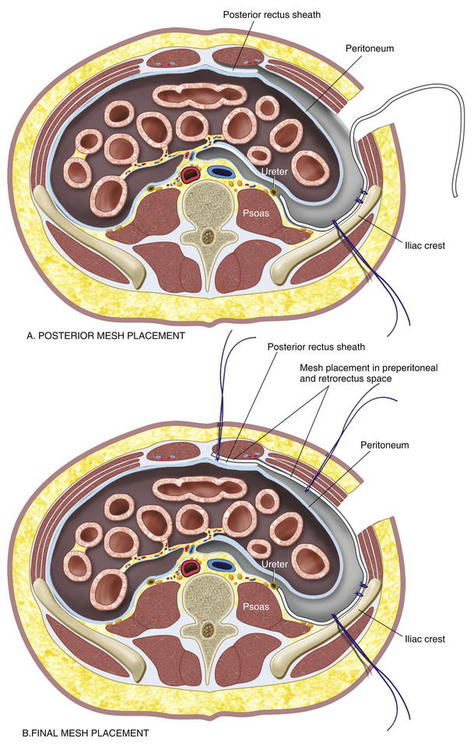
 Establishing an area of overlap for mesh placement is essential in the repair of a flank hernia. Superiorly, the dissection and overlap one can achieve can be limited by the costal margin. However, the preperitoneal plane can be developed, separating the peritoneum off the diaphragm obtaining 8 to 10 cm of overlap underneath the ribs in the cephalad direction as illustrated in Figure 6-2 and Figure 6-3. Posteriorly, the psoas muscle and spine form an anatomic boundary. In this area, care is taken to identify and avoid injury to the ureter, gonadal vessels, and iliac vessels as shown in Figure 6-4 and Figure 6-5. Additionally, the genitofemoral, ilioinguinal, iliohypogastric, and lateral femoral cutaneous nerves are identified and avoided when securing the prosthetic. Medially, the peritoneum can be adhered densely to the posterior rectus sheath. We prefer to transition the dissection plane into the posterior rectus sheath just medial to the linea semilunaris (Fig. 6-6). This allows the dissection to be carried all the way to the linea alba. Inferiorly, the Cooper ligament and the pelvis are exposed by sweeping away the bladder. Care should be taken to avoid injuring the spermatic cord structures as they are often encountered at this point.
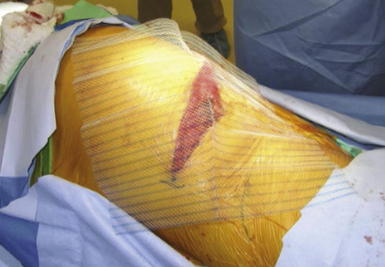
 If the peritoneum was entered during the hernia sac reduction or during the preperitoneal dissection, it is closed with a #2-0 absorbable braided suture. If this layer is not completely excluded, bowel can herniate through with a high strangulation risk or an internal hernia. The hernia sac may be used to provide additional coverage of the viscera in larger defects. If primary closure of this plane is not possible, the remaining defects may be buttressed using omentum or with a piece of vicryl mesh. An adequately sized piece of mesh (Fig. 6-7) is used to cover the entire retroperitoneal space from the Cooper ligament to the psoas muscle, under the costal margin, and to the midline. Since the mesh is placed extraperitoneally, an unprotected macroporous synthetic mesh is used.
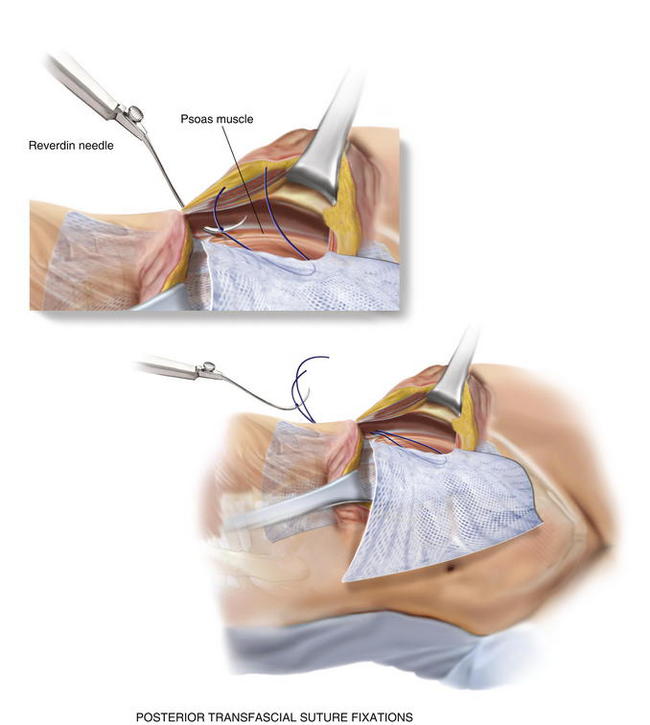
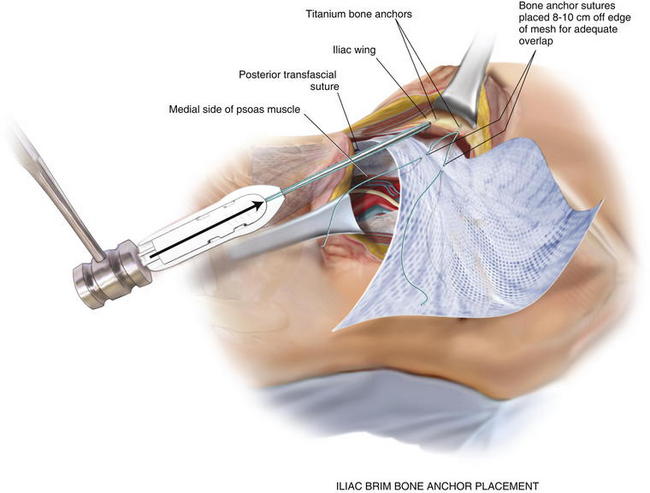
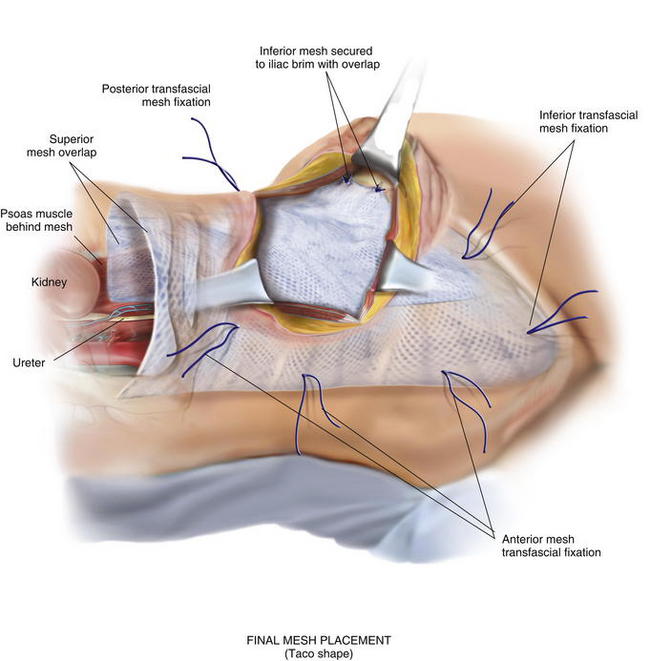
 The mesh is placed into the preperitoneal space, folded in a “taco” configuration The mesh is initially fixed posteriorly (Fig. 6-8, A). The suture is placed off the edge of the mesh to allow the mesh to drape over the psoas muscle to the ureter. The sutures can now be passed with the Reverdin needle inferior to the lateral border of the psoas muscle to avoid major vascular injury. Inferiorly, the mesh is fixated to the iliac crest in the following fashion, illustrated in Figure 6-8, B and Figure 6-9. A surgical cordless drill is used to preplace the number of designated holes in the iliac crest. Mitek bone anchors (Mitek Surgical Products, Westwood, MA), which contain titanium anchors with double #2 braided polyester sutures, are placed into the tracts. Each arm of the bone anchor suture is passed through the mesh and tied, securing the mesh to the iliac crest. These sutures are not placed at the edge of the mesh. Instead the suture is placed 8 to 10 cm off the edge of the mesh. This allows the mesh to drape past the iliac crest for adequate overlap. A total of 8 to 10 fixation sutures are then placed The remaining transfascial sutures for mesh fixation are placed using a #1 polypropylene suture passed through the mesh and the needle removed. Once in place, the mesh is pulled to recreate normal physiologic tension. We recommend the circumferential fixation begin posteriorly, then medially, then inferiorly, and finally superiorly. After the inferior edge of the mesh is fixated, the flex in the table is removed and the patient is allowed to return to neutral position. It is important to return the anatomic position to allow appropriate tensioning of the mesh and avoid buckling. It is also critical to not overstretch the mesh excessively tight to limit lateral movements and stretching to the contralateral side. The cross sectional images in Figure 6-6 illustrate the location of mesh placement. At the completion of the mesh fixation, the boundaries of the fascial defect should be relatively reapproximated before closure, as seen in Figure 6-8, C and Figure 6-10. The fascia of the lateral abdominal wall is closed using a #1 absorbable monofilament suture in a figure of eight fashion.
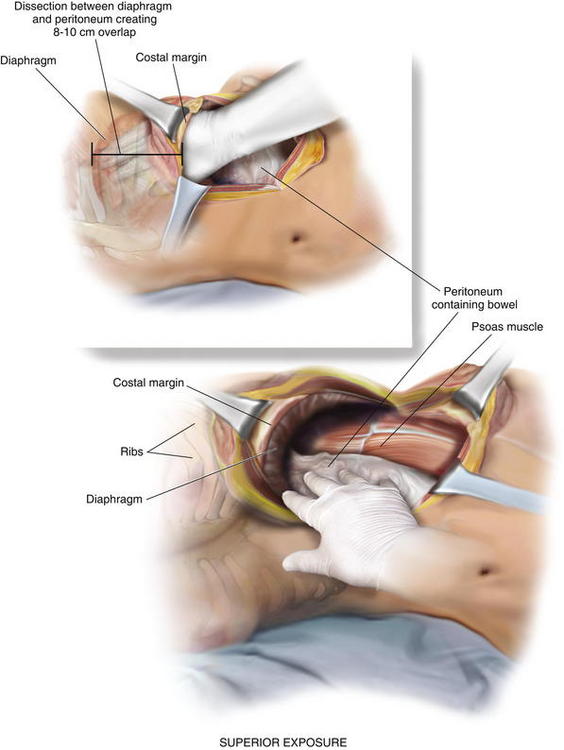

4 Postoperative Care
 Abdominal distention should be avoided following this repair. If an extensive lysis of adhesions was required, oral intake should be delayed until there is evidence bowel function has returned. Patients should be kept in an abdominal binder following this operation for 6 weeks. Antibiotics are continued for 24 hours unless otherwise indicated. A drain is typically placed intraoperatively and removed within 3 days postoperatively.
5 Pearls and Pitfalls


Carbonell A.M., Kercher K.W., Sigmon L., Matthews B.D., Sing R.F., Kneisl J.S., Heniford B.T. A novel technique of lumbar hernia repair using bone anchor fixation. Hernia. 2005;9(1):22.
Heniford B.T., Iannitti D.A., Gagner M. Laparoscopic inferior and superior lumbar hernia repair. Arch Surg. 1997;132:1141.
Stumpf M., Conze J., Prescher A., Junge K., Krones C.J., Klinge U., Schumpelick V. The lateral incisional hernia: anatomic considerations for a standardized retromuscular sublay repair. Hernia. 2009;13(3):293.
Yee J.A., Harold K.L., Cobb W.S., Carbonell A.M. “Bone anchor mesh fixation for complex laparoscopic ventral hernia repair.”. Surgical Innovation. 2008;15(4):292.
