[level-membership-for-orthopaedics-category]
New Approaches in Total Hip Replacement
The Anterior Approach for Miniinvasive Total Hip Arthroplasty
Lisa Maxey and Joel M. Matta
Surgical Technique
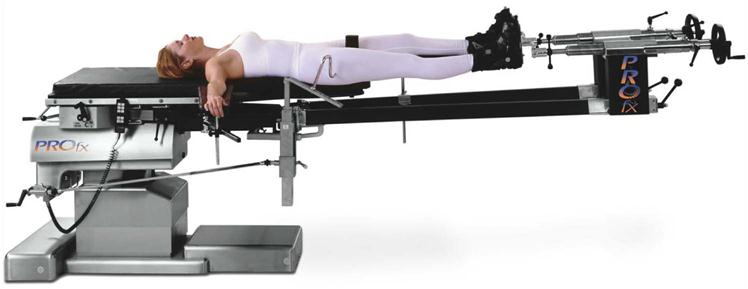
After administration of general or regional anesthesia, both feet are placed in the boots. The patient is placed in the supine position on the PROfx or HANA table, a perineal post is placed, and the boots are attached to the table (Fig. 19-1). The hip that will not be operated on is placed in neutral or mild internal rotation (to maximize offset), neutral extension, and slight abduction and will serve as a radiographic reference for the operated side. Avoiding external rotation (ER) of the hip to be operated on will make the external landmarks of the hip more reliable and enhance the landmark of the natural bulge of the tensor fascia lata muscle.
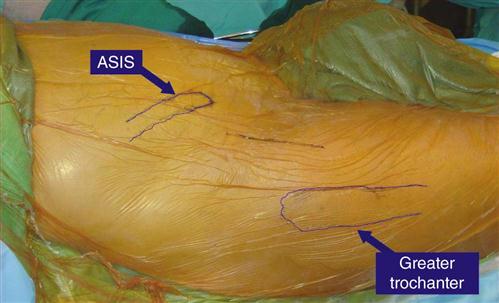
The typical team consists of the surgeon, an assistant, an anesthesiologist, a scrub nurse, a circulating nurse table operator, and a radiograph technician. Although the incision is normally small (8 to 10 cm), the author prefers to drape a relatively wide area. The normal incision starts 2 to 3 cm posterior and 1 to 2 cm distal to the anterosuperior iliac spine. This straight incision extends in a distal and slightly posterior direction to a point 1 to 3 cm anterior to the greater trochanter. On thinner people the bulge of the tensor fascia lata muscle marks the center of the line of the incision. After incision of the skin and subcutaneous tissue, the tensor can be seen through the translucent fascia lata. The author places a vinyl circumferential skin retractor (Protractor) undermining slightly the fat layer off the underlying fascia. The fascial lata should be incised in line with the skin incision over the tensor where the fascia lata is translucent and anterior to the denser tissue of the iliotibial tract. The fascial incision should be continued slightly distal and proximal beyond the ends of the skin incision (Fig. 19-2).
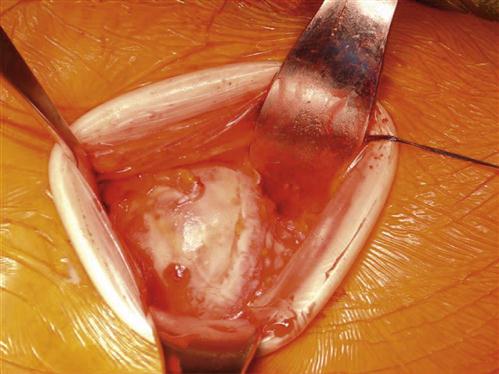
The surgeon should lift the fascia lata off the medial portion of the tensor and follow the interval medial to the tensor in a posterior and proximal direction. Dissection by feel is most efficient at this point, and the lateral hip capsule can be easily palpated just distal to the anteroinferior iliac spine. A cobra retractor should be placed along the lateral hip capsule to retract the tensor and gluteus minimus laterally, and the sartorius and rectus femoris muscles should be retracted medially with a Hibbs retractor. The reflected head of the rectus that follows the lateral acetabular rim will be visible. A small periosteal elevator placed just distal to the reflected head and directed medial and distal elevates the iliopsoas and rectus femoris muscles from the anterior capsule. The elevator opens the path for a second cobra retractor placed on the medial hip capsule. Using this technique, a view of 180° of the circumference of the hip capsule is obtained within a few minutes (Fig. 19-3).

The medial and lateral retraction of the cobras brings the lateral femoral circumflex vessels into view as they cross the distal portion of the wound. These vessels are clamped, cauterized, and transected. Further distal splitting of the aponeurosis that overlies the anterior capsule and vastus lateralis muscle (and at times excision of a fat pad) enhances exposure of the capsule and the origin of the vastus lateralis. The anterior capsule may be either excised or opened as flaps and repaired as part of the closure. (The author prefers to retain the capsule in most cases.) The surgeon should open the capsule with an incision that parallels the anterolateral femoral neck. The proximal portion of this incision crosses the anterior rim of the acetabulum and the reflected capsular origin of the rectus femoris. The distal portion exposes the lateral shoulder of the femoral neck at its junction with the anterior greater trochanter. The junction of the capsule and the origin of the vastus lateralis muscle identify the intertrochanteric line. The distal anterior capsule should be detached from the femur at the anterior intertrochanteric line and suture tags placed on the anterior and lateral capsule at the distal portion of the incision that separates them. The cobra retractors should be placed intracapsular medial and lateral to the neck. Exposure of the base of the neck is facilitated by a Hibbs retractor that retracts the vastus and distal tensor.
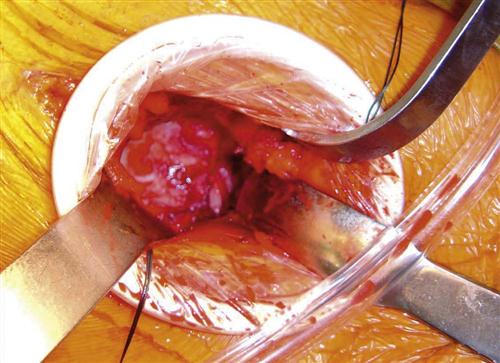
A narrow Hohmann retractor is now placed on the anterolateral acetabular rim. With this exposure, the anterolateral labrum (and often associated osteophytes) is excised. Distal traction on the extremity will create a small gap between the femoral head and the roof of the acetabulum. A femoral head skid is placed into this gap and then placed in a more medial position. The traction is partially released. The patient’s hip should be externally rotated about 20°, and a femoral head corkscrew should be inserted into the head in a vertical direction. As the extremity and hip are externally rotated and leverage is applied to the skid and corkscrew, the hip should be dislocated anteriorly and the femur externally rotated 90° (Fig. 19-4).
After dislocation, the surgeon should place the tip of a narrow Hohmann retractor distal to the lesser trochanter and beneath the vastus lateralis origin. The capsule should be detached from the medial neck and the lesser trochanter, and the medial posterior neck exposed. The patient’s hip is then internally rotated and reduced, the cobra retractors are replaced around the medial and lateral neck, and the vastus origin and distal tensor are retracted with a Hibbs. The surgeon cuts the femoral neck with a reciprocating saw at the desired level and angle as indicated by the preoperative plan (Fig. 19-5). The neck cut is completed with an osteotome that divides the lateral neck from the medial greater trochanter and is directed posterior and slightly medial to avoid the posterior greater trochanter. The head is extracted with the corkscrew. Light traction will distract the neck osteotomy and facilitate this extraction.

Throughout the procedure the surgeon will find that the tensor fascia lata muscle is potentially vulnerable to injury. If an initial injury to the muscle fibers is avoided, then the muscle seems to hold up well through the procedure. On the other hand, an early laceration to the surface of the tensor seems to hurt its capability of resisting further damage.
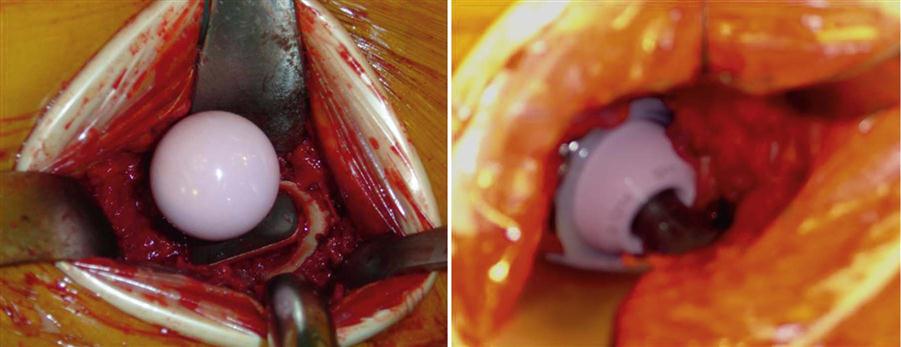
The acetabulum is now visualized and prepared. ER of the femur of about 45° usually facilitates acetabular exposure (Fig. 19-6). Light traction also limits femoral interference. The author prefers to use a bent Hohmann retractor above the distal anterior rim of the acetabulum to retract the anterior muscles. The surgeon should take care to place the tip of this retractor on bone and not into the anterior soft tissues. The author places a cobra retractor with the tip on the mid posterior rim. The labrum is then excised circumferentially. A transverse release of a prominent band of inferior capsule will facilitate later placement of the acetabular liner. The author usually begins reaming under direct vision and later checks with the image intensifier to confirm depth of reaming and adequate circumference. The indicators of torque and acetabular appearance are also used. The author then inserts the acetabular prosthesis. Most experienced surgeons can easily recognize a properly positioned cup on a radiograph (40° to 45° abduction and 15° to 25° anteversion), and good position can be achieved consistently with the image technique. The liner is inserted in the normal fashion (prior excision of labrum and the inferior capsule release will facilitate this). An osteotome or rongeur should be used to excise projecting osteophytes. The radiograph is the final judge as to whether computer guidance led to the correct result.
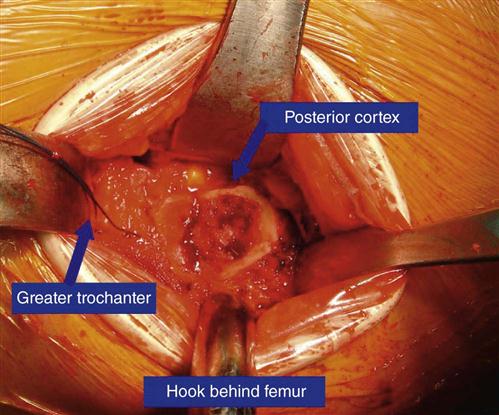
After acetabular insertion, the gross traction control on the leg spar is released and the femur is internally rotated to neutral. The vastus ridge is palpated, and the femoral hook placed just distal to this and around the posterior femur. The femur is then externally rotated 90° and the hip hyperextended and adducted.
For proximal femoral exposure, the author uses a long-handled cobra with the tip on the posterior femoral neck and places the tip of a trochanteric retractor over the tip of the trochanter. The femoral hook now raises the proximal femur until the tissues come under moderate tension.
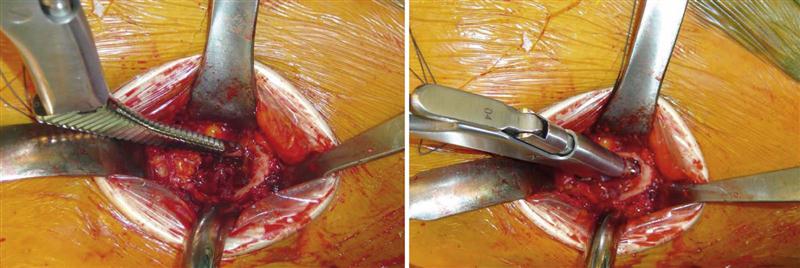
After this initial maneuver, the posterior ridge of the greater trochanter may lie posterior to the posterior rim of the acetabulum. The femur needs to be mobile enough so that lateral and anterior displacement brings the posterior edge of the trochanter lateral and anterior to the posterior rim of the acetabulum. The lateral capsular flap and its tag suture will be clearly visible distal to the trochanteric retractor and attaching to the remnant of the lateral neck. Detachment of this flap from the base of the neck in an anterior to posterior direction facilitates visualization of the medial greater trochanter and enhances femoral mobility (Fig. 19-7). The surgeon should use a rongeur to excise the remnant of the lateral neck.
It should be remembered that the obturator internus and piriformis tendons insert on the anterior superior greater trochanter. After release of the lateral capsule, the surgeon should place the tip of the trochanteric retractor closer to the upper border of the trochanter to retract the gluteus minimus muscle and piriformis, and obturator internus tendons. Depending on the requirements for femoral mobility, the surgeon may choose to release one or more of the short external rotator tendons and the obturator internus tendon, particularly when it cannot be flipped over the posterior tip of the trochanter. However, the author prefers to preserve all tendon attachments and strives in particular to preserve the attachment of the obturator externus tendon, because its medial pull on the proximal femur is an important active restraint against dislocation.
In general, prostheses with less prominence in the proximal lateral area will be easier to insert, will allow preservation of the rotator attachments, and will present a lower risk of trochanteric fracture. However, the instrumentation required most determines the applicability of a stem to the anterior approach. The tip of the first broach enters the neck near the posterior medial cortex (Fig. 19-8). When the broaching is complete, a trial reduction is made, with the neck length estimated from the preoperative template.
During trial phase I, the surgeon should check for hip stability in extension and ER with the traction released. The surgeon should also check for impingement with osteophytes and excise appropriately. The author of this chapter feels that it is best to rely on the radiograph for length and offset decisions rather than soft tissue tension and intraoperative stability.
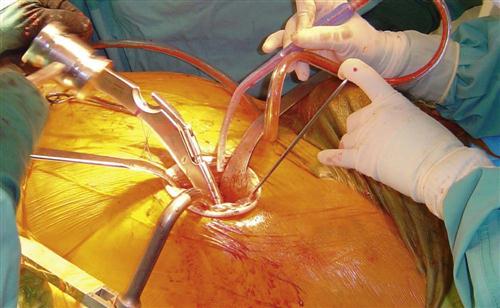
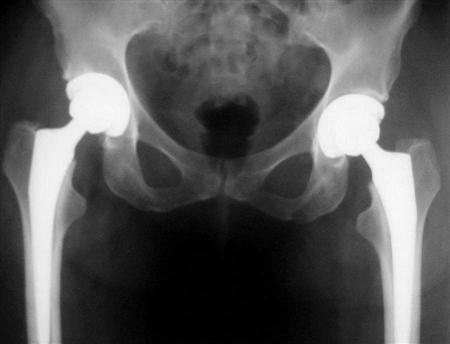
After the decision is made for the femoral prosthesis, the femoral hook is replaced behind the proximal femur, traction is applied to distract the head, and the hip is dislocated with ER. The femur is then placed into the preparation position (i.e., 90° ER, hyperextension, adduction, proximal elevation). The femoral prosthesis is then inserted in the normal fashion. The appropriate-length permanent head can be placed at this time (Figs. 19-9 and 19-10). With the hip flexed to neutral, the acetabulum is visualized before reduction to ensure that it is clear of bone or cement fragments. Another transparency printed with the image intensifier confirms leg length and offset and serves as the immediate postoperative radiograph. Before discharge, radiographs are obtained in the radiology department (Fig. 19-11).
A check is made for bleeding and the wound is irrigated. The closure is simple. The anterior and lateral capsular tag sutures are tied together, and further capsular closure is performed if desired. The fascia lata is closed with a running suture, followed by subcutaneous tissue and skin.
After surgery the patient does not follow antidislocation precautions. The patient is encouraged to weight bear immediately, use the hip, and discard external support as symptoms permit.
From November 1996 to April 2005, the author of this chapter performed 657 primary anterior total hip arthroplasties (THAs), including 67 bilateral THAs. This series of 657 anterior approaches is unselected and consecutive. The surgeries were performed on a Judet or Tasserit table until 2003. Beginning in 2003 the PROfx table became available and is now preferred. The average patient age is 66 and ranges from 29 to 91. The average operative time is 1.2 hours. Average blood loss is 345 mL. The median hospital time is 4 days, and the mode is 3 days. Two early anterior dislocations and one posterior dislocation occurred that were reduced closed and did not recur or require revision. The median time to doing some ambulation without external support is 8 days. The median time for doing all ambulation without external support is 15 days. It is the author’s impression that pain is reduced and the recovery rate greatly enhanced. (See the THA slide show at www.hipandpelvis.com for more detailed statistics.1)
Rehabilitation after Anterior Total Hip Arthroplasty
With this procedure tendon attachments, such as the obturator externus, rotator attachments, and gluteus medius, have been preserved. In fact, all the muscle attachments are preserved. The obturator externus has a medial pull on the proximal femur and is an important active contractor against hip dislocation. With the preservation of these muscle attachments and other soft tissues, total hip precautions are not required. Pain is reduced and the recovery rate is enhanced. Weight bearing is immediately encouraged, and assistive devices are discarded when possible.
The rehabilitation process is similar to most total hip replacement regimens. However, the patient will progress through the process more quickly and with a lower risk of hip dislocation.
In the hospital bed, mobility, transfer training, and gait training are done during the initial treatments. The patient is instructed in ankle pumps. Isometrics such as hip abduction, hip adduction, quadriceps sets, and gluteus sets can also be started immediately. In addition, heel slides are encouraged with assistance, then without any assistance. The patient then progresses to active range of motion for hip abduction, adduction, and straight leg raises. Patients can be taught pelvic tilts and knee to chest (using the unaffected lower extremity) for low back discomfort. Heel cord stretches can be done carefully with the leg slightly back and a wedge under the forefoot. Closed-chain exercises like minisquats, step-ups, and heel raises are begun when the patient can safely perform them.
General Comments Regarding Hip Replacement
The first very successful hip prosthesis was designed and implanted in the 1960s by John Charnley of England. Charnley’s design used a one-piece metal stem with a 22-mm diameter head that was cemented into the proximal femur. The acetabular component was made entirely of polyethylene and cemented into the acetabulum. Follow-up studies of the Charnley prosthesis and other similar cemented designs have shown sufficient longevity that the majority of prostheses in surviving patients are still functioning 20 years after implantation. Despite the great success of these hip prostheses, it is recognized that the failure rate increases over time. The mode of failure is typically loosening of the secure bond between the prosthesis and the bone and bone loss associated with this process.
Because of the recognized limits to longevity of these early designs, continued work to improve the design has been conducted, and thereby longevity of hip prostheses has been achieved. Currently the U.S. Food and Drug Administration (the federal agency regulating hip prostheses) has over 750 approved designs for hip prostheses on file. The majority of new designs, however, have proven to be not as good as Charnley’s hip. In addition, some new designs have been shown to equal the longevity of the Charnley hip but have not proven superior to it.
What is the significance of this history for today’s hip replacement patient? Just because a hip prosthesis is the latest design does not mean it is better; in fact, it could be worse. Time gives us the answers. We need to continue to look for prostheses with improved longevity; however, a quantum improvement may not be just around the corner, and the current expected longevity may be with us for some time to come.
What has changed? The acetabulum is now almost always implanted without cement. The results of the uncemented acetabulum appear equal to cement, and clinicians hope that the longevity will prove better over time. Some designs of uncemented femoral stems have also shown good longevity comparable with the best-proven cemented stems. It is widely felt that the bearing surfaces have been improved, which means that this surface wears at a slower rate. Although metal against extremely high-density polyethylene is the best-proven bearing, evidence also supports the use of metal-on-metal and ceramic bearings.
Today, development of hip replacement surgery is not limited to efforts to improve the prostheses. Improvements also include surgical approaches that limit the surgical trauma to the soft tissue, thereby accelerating recovery and limiting the possibility of dislocation. The author applauds this trend because it is the basis of the anterior approach for hip replacement described herein.
Possible complications of hip replacement surgery include infection, injury to nerves and blood vessels, fracture of the femur or acetabulum, hip dislocation, and need for revision surgery. Patients should remember that recovery means not only recovery from the surgical procedure but also time to recover from the condition they were in before surgery.
[/level-membership-for-orthopaedics-category][not-level-membership-for-orthopaedics-category]
New Approaches in Total Hip Replacement
The Anterior Approach for Miniinvasive Total Hip Arthroplasty
Lisa Maxey and Joel M. Matta
Surgical Technique
After administration of general or regional anesthesia, both feet are placed in the boots. The patient is placed in the supine position on the PROfx or HANA table, a perineal post is placed, and the boots are attached to the table (Fig. 19-1). The hip that will not be operated on is placed in neutral or mild internal rotation (to maximize offset), neutral extension, and slight abduction and will serve as a radiographic reference for the operated side. Avoiding external rotation (ER) of the hip to be operated on will make the external landmarks of the hip more reliable and enhance the landmark of the natural bulge of the tensor fascia lata muscle.
The typical team consists of the surgeon, an assistant, an anesthesiologist, a scrub nurse, a circulating nurse table operator, and a radiograph technician. Although the incision is normally small (8 to 10 cm), the author prefers to drape a relatively wide area. The normal incision starts 2 to 3 cm posterior and 1 to 2 cm distal to the anterosuperior iliac spine. This straight incision extends in a distal and slightly posterior direction to a point 1 to 3 cm anterior to the greater trochanter. On thinner people the bulge of the tensor fascia lata muscle marks the center of the line of the incision. After incision of the skin and subcutaneous tissue, the tensor can be seen through the translucent fascia lata. The author places a vinyl circumferential skin retractor (Protractor) undermining slightly the fat layer off the underlying fascia. The fascial lata should be incised in line with the skin incision over the tensor where the fascia lata is translucent and anterior to the denser tissue of the iliotibial tract. The fascial incision should be continued slightly distal and proximal beyond the ends of the skin incision (Fig. 19-2).
The surgeon should lift the fascia lata off the medial portion of the tensor and follow the interval medial to the tensor in a posterior and proximal direction. Dissection by feel is most efficient at this point, and the lateral hip capsule can be easily palpated just distal to the anteroinferior iliac spine. A cobra retractor should be placed along the lateral hip capsule to retract the tensor and gluteus minimus laterally, and the sartorius and rectus femoris muscles should be retracted medially with a Hibbs retractor. The reflected head of the rectus that follows the lateral acetabular rim will be visible. A small periosteal elevator placed just distal to the reflected head and directed medial and distal elevates the iliopsoas and rectus femoris muscles from the anterior capsule. The elevator opens the path for a second cobra retractor placed on the medial hip capsule. Using this technique, a view of 180° of the circumference of the hip capsule is obtained within a few minutes (Fig. 19-3).
The medial and lateral retraction of the cobras brings the lateral femoral circumflex vessels into view as they cross the distal portion of the wound. These vessels are clamped, cauterized, and transected. Further distal splitting of the aponeurosis that overlies the anterior capsule and vastus lateralis muscle (and at times excision of a fat pad) enhances exposure of the capsule and the origin of the vastus lateralis. The anterior capsule may be either excised or opened as flaps and repaired as part of the closure. (The author prefers to retain the capsule in most cases.) The surgeon should open the capsule with an incision that parallels the anterolateral femoral neck. The proximal portion of this incision crosses the anterior rim of the acetabulum and the reflected capsular origin of the rectus femoris. The distal portion exposes the lateral shoulder of the femoral neck at its junction with the anterior greater trochanter. The junction of the capsule and the origin of the vastus lateralis muscle identify the intertrochanteric line. The distal anterior capsule should be detached from the femur at the anterior intertrochanteric line and suture tags placed on the anterior and lateral capsule at the distal portion of the incision that separates them. The cobra retractors should be placed intracapsular medial and lateral to the neck. Exposure of the base of the neck is facilitated by a Hibbs retractor that retracts the vastus and distal tensor.
A narrow Hohmann retractor is now placed on the anterolateral acetabular rim. With this exposure, the anterolateral labrum (and often associated osteophytes) is excised. Distal traction on the extremity will create a small gap between the femoral head and the roof of the acetabulum. A femoral head skid is placed into this gap and then placed in a more medial position. The traction is partially released. The patient’s hip should be externally rotated about 20°, and a femoral head corkscrew should be inserted into the head in a vertical direction. As the extremity and hip are externally rotated and leverage is applied to the skid and corkscrew, the hip should be dislocated anteriorly and the femur externally rotated 90° (Fig. 19-4).
After dislocation, the surgeon should place the tip of a narrow Hohmann retractor distal to the lesser trochanter and beneath the vastus lateralis origin. The capsule should be detached from the medial neck and the lesser trochanter, and the medial posterior neck exposed. The patient’s hip is then internally rotated and reduced, the cobra retractors are replaced around the medial and lateral neck, and the vastus origin and distal tensor are retracted with a Hibbs. The surgeon cuts the femoral neck with a reciprocating saw at the desired level and angle as indicated by the preoperative plan (Fig. 19-5). The neck cut is completed with an osteotome that divides the lateral neck from the medial greater trochanter and is directed posterior and slightly medial to avoid the posterior greater trochanter. The head is extracted with the corkscrew. Light traction will distract the neck osteotomy and facilitate this extraction.
[/not-level-membership-for-orthopaedics-category]
