18 Nail Procedures
Nails serve an important function to protect the ends of our fingers and toes, to increase mechanical traction, and to enhance fine touch. Nails also serve important social functions such as scratching, grooming, and to serve as aesthetic adornments (Figure 18-1).
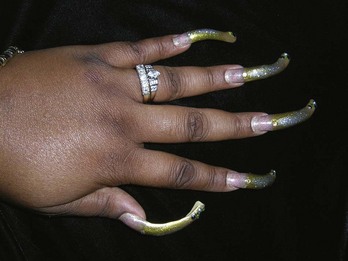
FIGURE 18-1 Nails serve important social functions including being aesthetic adornments.
(Copyright Richard P. Usatine, MD.)
Nails can be traumatized, infected, or become dysmorphic secondary to cutaneous or systemic disease. Skin cancers can form under or around nails. This chapter covers the various types of specialized surgical procedures and biopsies performed on the nail and the nail unit.
Anatomy Of The Nail Unit
What we call the “nail” is actually the nail plate that sits on the nail bed and is surrounded by the nail folds. The nail plate is made of keratin and is produced by the nail matrix found below the proximal nail fold. Figure 18-2 shows the detailed anatomy of a nail.
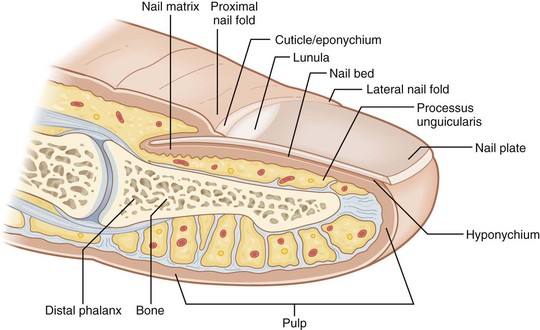
FIGURE 18-2 Detailed anatomy of the nail unit.
(Modified from Vidimos A, Ammirati C, Poblete-Lopez C. Dermatologic Surgery. London: Saunders; 2008.)
Nail Procedures
Nail procedures include the following:
Some common nail conditions that require nail procedures include the following:
Equipment
Equipment Needed for Nail Plate Removal (Figure 18-3)
Additional Equipment Needed for Other Nail Surgeries
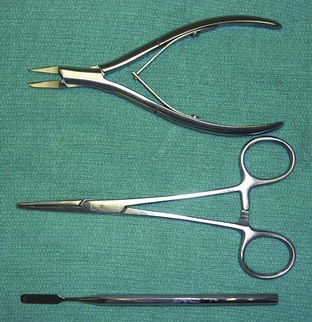
FIGURE 18-3 Instruments for nail surgery: nail splitter, straight hemostat, and nail elevator.
(Copyright Richard P. Usatine, MD.)
Nail Procedures: Common Steps
Local anesthesia is most effective with a digital block, wing block, or both (Figure 18-4). These blocks are explained fully in Chapter 3, Anesthesia. Neither of them is difficult to perform. In my experience asking patients who have had both blocks, the digital block is somewhat less painful than the wing block. The wing block has the benefit of producing local hemostasis because it distends the tissues near the area of surgery and epinephrine may be used so additional hemostasis is obtained.
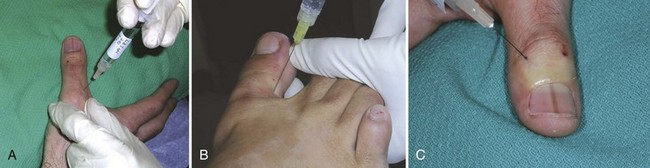
FIGURE 18-4 (A) Digital block of the thumb using 2% lidocaine without epinephrine. (B) Digital block of the large toe with needle pointed toward the web space. (C) Wing block using lidocaine with half-strength epinephrine. This was accomplished by mixing 2% lidocaine with 1% lidocaine including epinephrine in a one-to-one mixture.
(Copyright Richard P. Usatine, MD.)
A digital block may be performed with 1% or 2% lidocaine (no epinephrine). I prefer 2% lidocaine. Because there is not much room for a large volume of anesthesia, a more concentrated solution has the advantage of delivering more anesthetic in less volume. I use 3 to 4 mL to avoid too much volume and pressure. The anesthesia may be given at the base of the digit or in the web space (Figures 18-4A and B).
A wing block can be performed using epinephrine if the patient has no vascular diseases that would contraindicate its use. I mix 2% lidocaine without epinephrine with 1% lidocaine with epinephrine 1 : 1 to produce 1.5% lidocaine and  strength epinephrine. The onset of anesthesia is fast and it provides better hemostasis at the site of surgery (Figure 18-4C). As always, make sure that good anesthesia has been obtained before starting the procedure. If a tourniquet is used, the wing block can be performed with lidocaine only.
Povidone-iodine (Betadine), chlorhexidine (Hibiclens), or chlorhexidine-alcohol may be used to clean the surgical site for all procedures that follow. New data on surgical scrubs indicates that chlorhexidine-based scrubs are most effective in decreasing postop infection rates.1
Use of Glove for Tourniquet and Sterile Field
A tourniquet is not needed for nail plate removal surgeries (partial or complete). It is worth using a tourniquet for nail matrix biopsies to allow for better visualization during the biopsy. Even this procedure does not require a tourniquet but may be less vascular and easier to perform if a tourniquet is used.

FIGURE 18-5 A sterile surgical glove is used to provide a tourniquet for nail surgery and a sterile field.
(Copyright Richard P. Usatine, MD.)
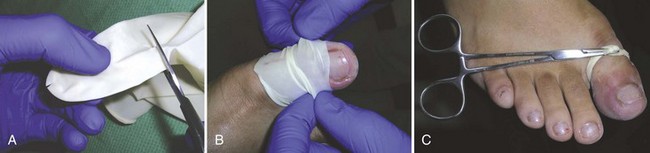
FIGURE 18-6 Creating a tourniquet from a latex glove. (A) Make a small snip at the end of one finger and then cut off the finger of that glove. (B) Roll the finger on to the digit allowing the digit to expand the small hole at the end of the “finger.” This should fit snugly. (C) Grasp the glove material with a hemostat and turn it around to tighten the tourniquet.
(Copyright Richard P. Usatine, MD.)
Partial Nail Plate Excision
The most common indication for partial nail plate excision is an ingrown nail (especially the large toenail). An ingrown nail (onychocryptosis) occurs when the nail plate is too large for the nail bed (Figures 18-7 and 18-8). The nail plate puts pressure on the lateral nail fold and does not fit properly in the lateral nail groove. The treatment for this is to make the nail plate less wide on the involved side. The best way to prevent this from recurring is to ablate the nail matrix on the involved side using chemical or electrosurgical destruction.
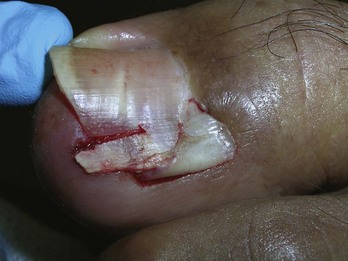
FIGURE 18-7 Partial nail plate excision to treat an ingrown toenail.
(Copyright Richard P. Usatine, MD.)
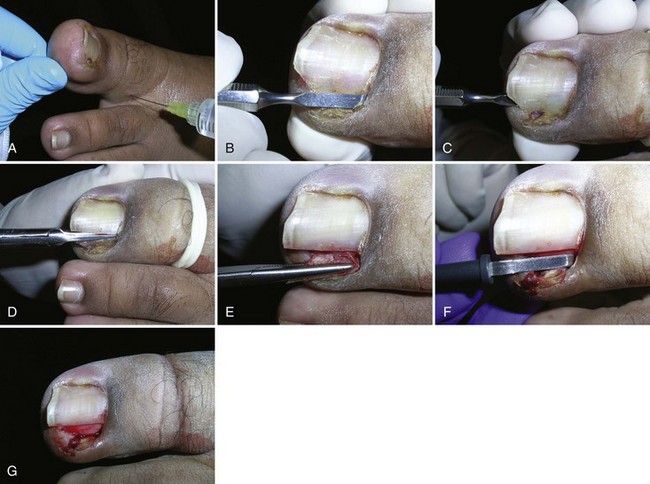
FIGURE 18-8 (A) Digital block. (B) Nail elevator used to free the nail fold from nail plate. (C) Nail elevator separating the nail plate from the nail bed. (D) Nail splitter cutting nail plate. (E) Hemostat twisting out nail segment to be removed. (F) Electrosurgery to destroy nail matrix. (G) Final result with tourniquet removed.
(Copyright Richard P. Usatine, MD.)
Ingrown Toenail Removal Procedure Steps
Destruction Of Nail Matrix
Chemical
Chemical matrixectomy is performed mainly by phenol (full-strength 88%) or 10% sodium hydroxide. In a comparison study of the use of chemical matrixectomy for the treatment of ingrown toenails, the overall success rates were 95% for both phenol and sodium hydroxide.4 A 1-minute application of 10% sodium hydroxide was used and the details for the phenol application were not specified. The sodium hydroxide group had more pain in the first 2 days postoperatively, but all patients became pain free after that. The incidence and duration of drainage and peripheral tissue destruction was higher in the phenol group. The mean period for complete recovery was 11 days in the sodium hydroxide group and 18 days in the phenol group.4
In a Cochrane systematic review of surgical treatments for ingrown toenails, nail avulsion with the use of phenol is more effective at preventing symptomatic recurrence than nail avulsion without the use of phenol.5 Unfortunately, the use of phenol does increase the risk of postoperative infection (by 5 times) compared with simple nail avulsion.5
Phenol Application
Bleeding is stopped by applying a tourniquet for 3 to 4 minutes and phenol is vigorously rubbed into the matrix and grooves for 2 to 3 minutes (Figure 18-9). The matrix area must be bloodless before the phenol is applied or the phenol will not work as well. The application is best done with a cotton-tipped applicator (CTA) with a small cotton tip. During each 1-minute application the cotton tip should be rotated over the matrix. For each subsequent 1-minute application a new CTA should be chosen. Some authors suggest neutralizing the phenol after application with alcohol or saline, while others state that this is unnecessary as long as the phenol is wiped away from any normal tissue. Be very careful handling phenol because it is very caustic to normal tissues. This same method is used for the sodium hydroxide except only a single 1-minute application is needed.
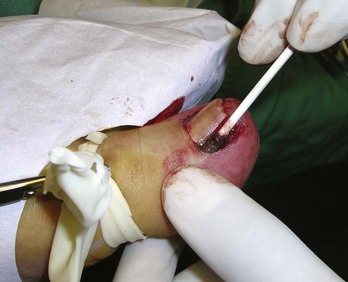
FIGURE 18-9 Applying phenol to a CTA destroys a portion of the nail matrix, which prevents a recurrent ingrown toenail.
(Copyright Richard P. Usatine, MD.)
One study found that partial nail avulsion with phenolization gave better results than partial avulsion with matrix excision.6 Local antibiotics applied to the surgical site did not reduce signs of infection or recurrence. The use of phenol did not produce more signs of infection than matrix excision.6
One way to purchase phenol now is as Phenol EZ Swabs. These come in a package with phenol in a sealed ampule and dedicated swab sticks. It is more expensive per patient but does reduce the possibility of a phenol spill from an open bottle.
Physical Matrixectomy (Electrodestruction)
Another matrixectomy method involves the use of electrofulguration. This can be performed with a standard electrode or a special matrixectomy electrode that has a Teflon-coated top and a metallic bottom. The Teflon prevents damage to the upper nail fold. This matrixectomy electrode is produced by Ellman and is made to be used with their radio-frequency electrosurgical units (Figure 18-10). However, a standard electrosurgery disposable electrode can be used with a Hyfrecator or similar electrosurgical unit and the tip may be placed close to the matrix so that most of the electrical energy reaches the matrix but not the upper nail fold.
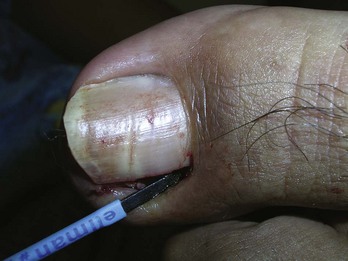
FIGURE 18-10 Performing a physical matrixectomy using a special electrode with a Teflon-coated top and a metallic bottom. The Teflon prevents damage to the upper nailfold, while the metal bottom conducts the radio-frequency to destroy the matrix in that region.
(Copyright Richard P. Usatine, MD.)
The best method for electrodestruction in this procedure is fulguration in which the electrical energy sparks to the matrix. The matrixectomy electrode should be used in the electrocoagulation setting (16 to 20 on hemo using the dual-frequency Surgitron). The electrode should be kept slightly above the matrix so that the spark of electricity can be seen and heard. Some authors recommend curetting the nail matrix before using electrosurgery (a 3-mm round skin curette can be used or a special nail curette).3 Unfortunately, we were unable to find any published clinical studies on electrodestruction as a method of matrixectomy.
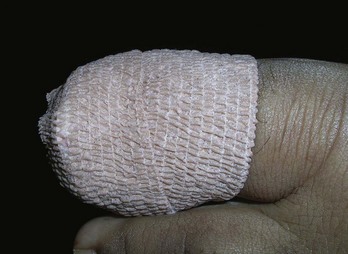
Wound Dressings
There are many ways to dress the remaining wound. Place a dab of petrolatum or antibiotic ointment on the site and cover it with gauze. A light pressure dressing may be applied, especially if there was a significant amount of bleeding (Figure 18-11).
Full Nail Plate Removal (Nail Avulsion)
Patients with severely hyperkeratotic nails that cannot be easily clipped may request a full nail plate removal. While a warm bath or the application of 40% urea may make it easier to clip such nails, some patients will want them removed completely. The nail matrix should be permanently destroyed if the patient does not want the nail to regrow. This may be performed with phenol or electrodestruction.
Procedure Steps
Distal Nail Avulsion

Proximal Nail Evulsion
Some experts claim that proximal nail evulsion causes less trauma to the nail bed than a distal nail avulsion.3 The proximal nail avulsion is especially helpful when thick subungual hyperkeratosis is present or when the distal groove has disappeared.3

FIGURE 18-13 Comparison of the distal and proximal approaches to complete nail avulsion. (A1) Nail elevator used to free the proximal nail fold from nail plate. (A2) Nail elevator inserted distally to separate the nail plate from the nail bed. (B1) Nail elevator used to free the proximal nail fold from nail plate and then rotated upward. (B2) Nail elevator has slipped under the proximal nail plate and is lifting it from the nail bed.
(Adapted from Robinson J, Hanke CW, Siegel D, Fratila A. Surgery of the Skin. London: Mosby; 2010, Figure 46-4.)
Biopsies To Diagnose Pigmented Nail Changes
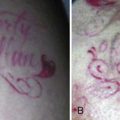
Hyperpigmentation of the nail plate has many benign causes such as racial (ethnic) melanonychia and melanocytic hyperplasia (Figure 18-14A). However, it is crucial for clinicians not to miss a case of nail melanoma (acral lentiginous melanoma) (Figures 18-14B and C). Squamous cell carcinomas and glomus tumors are other neoplasms that may also involve the nail unit. Longitudinal melanonychia is a pigmented band that occurs in the nail plate from the proximal to the distal aspect. Racial melanonychia is the most common cause of longitudinal melanonychia. Other common benign causes are benign melanocytic hyperplasia, nevi, trauma, fungal, and medications.
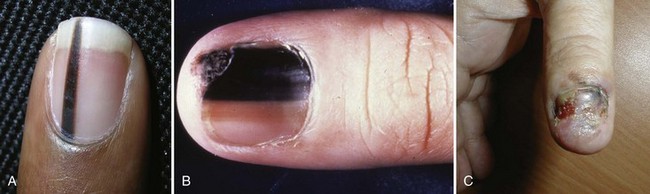
FIGURE 18-14 Nail tumors that call for biopsies. (A) New longitudinal melanonychia that was shown to be a benign nevus with biopsy. (B) A wide band of longitudinal melanonychia caused by a subungual melanoma. (C) Acral lentiginous melanoma showing nail destruction and a positive Hutchinson sign
(A: Copyright Richard P. Usatine, MD; B: Courtesy of the Skin Cancer Foundation, New York, NY; C: Courtesy of Dr. Dubin, www.skinatlas.com.)
We next describe four biopsy techniques to be used to diagnose nail melanoma and other malignancies that can occur in the nail unit. The easiest biopsy to perform is a 3-mm punch biopsy of the nail matrix at the origin of the pigmented band. Occasionally a shave biopsy is preferred if the pigmented band is wide. When the pigment is in the lateral nail and nail fold, a lateral longitudinal excision may be needed.7
Box 18-1 summarizes when longitudinal melanonychia should be biopsied. Hutchinson’s sign is the extension of pigmentation to the skin adjacent to the nail plate involving the nail folds or the tip of the digit. This is an important indicator for nail melanoma and warrants a biopsy. In one study, dermoscopic features of nail melanoma were significantly associated with a brown coloration of the background and the presence of irregular longitudinal lines (in their color, spacing, thickness, and parallelism).8 Box 18-2 gives the details of the ABCDEF mnemonic system for detecting nail melanoma.9
Box 18-1 Longitudinal Melanonychia
Box 18-2 ABCDEF Mnemonic System for Detecting Nail Melanoma
The ABCDEF mnemonic system9 was developed to detect nail melanoma. Use this system to determine the need for a nail biopsy.
Before starting a biopsy it is helpful to know if the nail plate pigment is coming from the proximal or distal matrix. The proximal matrix generates pigment on top of the nail plate, whereas the distal matrix generates pigment on the bottom or ventral portion of the nail plate. Look at the edge of the nail with a good source of light and magnification before starting a biopsy. The use of a dermatoscope with clear gel applied directly to the edge of the nail is an excellent method for determining the location of the pigment and the origin of the pigment band (Figure 18-15).
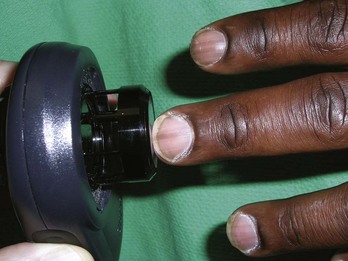
FIGURE 18-15 Dermoscopy on the edge of the nail plate with longitudinal melanonychia to determine whether the pigment is being produced in the proximal or distal nail matrix.
(Copyright Richard P. Usatine, MD.)
Punch Biopsy of the Nail Matrix
A 3-mm punch biopsy of the nail matrix is done at the origin of the pigmented band.
Procedure Steps

FIGURE 18-16 Punch biopsy of the nail matrix. (A) Nail elevator is separating the proximal nail fold from the nail plate. (B) No. 15 scalpel cutting incisions at the junction of the proximal and lateral nail folds bilaterally. Nail elevator used to protect the tissues below the nail fold. (C) Nail fold reflected back using skin hooks to see the matrix. (D) A 3-mm punch placed over the origin of the pigmented band. (E) The cut is through the nail plate and down to the bone. Friable matrix tissue is seen in the end of the biopsy instrument. The VisiPunch makes it easier to see and remove any adherent tissue. (F) In case any tissue remains in the punch site, fine-tipped scissors are used to gently lift the specimen and cut it off at the base. (G) The first incision edge has been approximated with 5-0 polypropylene.
(Copyright Richard P. Usatine, MD.)
Shave Biopsy of the Nail Matrix
The shave biopsy of the nail matrix7 provides adequate samples of wider bands and is less invasive than a transversely oriented matrix excision. The reflected proximal nail plate readheres to the nail bed postoperatively and grows out with the nail unit. Despite wide matrix biopsies, long-term dystrophy is minimal.7
The shave biopsy is not recommended for tumors that grossly involve the nail unit, those associated with nail plate destruction, those with extensive pigmentation of the proximal or lateral nail folds, or those that in any way have a high preoperative likelihood of invasive melanoma.7 A shave biopsy may not provide accurate depth for deeply invasive melanomas. In this case, a full-thickness elliptical nail matrix biopsy is most helpful.
Procedure Steps
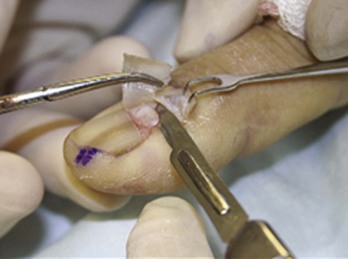
FIGURE 18-17 Shave biopsy of the nail matrix. No. 15 scalpel blade glides parallel to the epithelium after scoring 1- to 2-mm margins around origin of pigmented band.
(From Jellinek N. Nail matrix biopsy of longitudinal melanonychia: diagnostic algorithm including the matrix shave biopsy. J Am Acad Dermatol. 2007;56:803–810.)
Full-Thickness Nail Matrix Biopsy
A full-thickness nail matrix biopsy procedure (Figure 18-18) is performed just as the shave biopsy above except that the tissue is excised using a small elliptical excision. This elliptical defect is closed with 5-0 absorbable sutures and the repair is the same as described for the shave biopsy above.
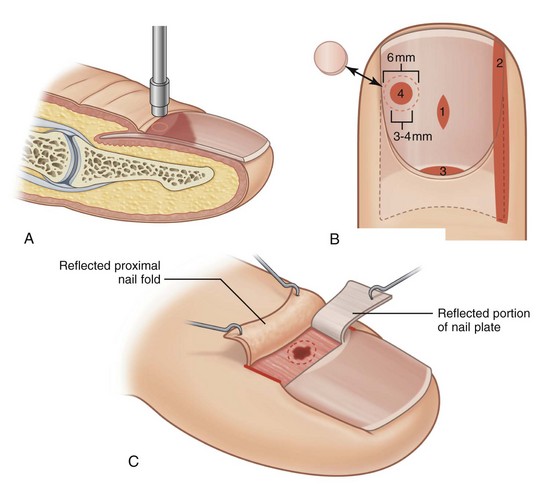
FIGURE 18-18 Types of nail biopsies. (A) Punch biopsy of the nail plate. (B) Nail bed biopsies: (1) Fusiform nail bed biopsy. (2) Lateral longitudinal biopsy of nail bed. (3) Matrix biopsy. (4) Punch biopsy of nail bed through nail plate using a 6 mm punch to remove nail plate and then a 3 to 4 mm punch for the underlying nail bed. Some surgeons choose to replace the nail disk at the end of the operation. (C) Matrix biopsy with the proximal nail fold reflected.
(Adapted from Robinson J, Hanke CW, Siegel D, Fratila A. Surgery of the Skin. London: Mosby; 2010, Figure 46-3.)
Lateral Longitudinal Excision
A lateral longitudinal excision7 (Figure 18-19) is a more technically difficult procedure and is used when there is a lateral pigment band or tumor on the edge of the nail unit. This is also a good procedure for the treatment of SCC in situ of the lateral nail fold.
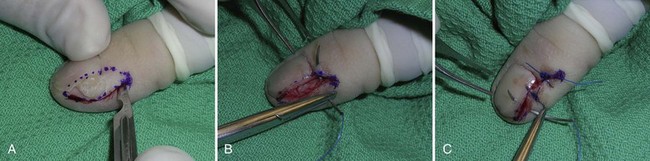
FIGURE 18-19 Lateral longitudinal excision of a nail fold tumor. (A) An ellipse is cut around the tumor including a portion of the nail plate. The ellipse is cut down to the bone. (B) Suturing is performed with 4-0 Prolene on a large plastics needle. Note the depth of the incision. (C) The needle can be passed through the nail as it is sharp and sturdy.
(Copyright Richard P. Usatine, MD.)
Procedure Steps
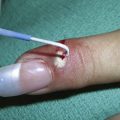
Subungual Hematoma Evacuation
Subungual hematomas form when a nail is subjected to significant trauma. The pressure of the hematoma can be exquisitely painful and the patient’s pain can be relieved by draining the hematoma through the intact nail. Depending on the mechanism of trauma and the physical exam, an x-ray of the distal digit may be indicated to investigate for fractures.
Procedure Steps
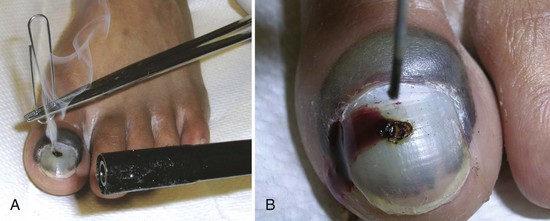
FIGURE 18-20 Subungual hematoma evacuation. (A) A paperclip was held in a hemostat and heated to pierce the patient’s nail plate. With minimal pressure the hot point melted through the nail plate. (B) The hot paperclip formed a painless hole in the nail plate and the blood drained out spontaneously. This relieved the pressure and gave the patient immediate pain relief.
(Copyright Richard P. Usatine, MD.)
Treating Other Types Of Lesions
Pincer nails occur when the lateral nail plates dig into the soft tissue of the digits (Figure 18-21). This can eventually lead to pain and discomfort. Partial nail plate excisions bilaterally with destruction of the lateral matrix horn will often give patients relief from this condition (Figure 18-22). In more severe cases, exophytes and dorsal hyperostosis of the distal phalanx may need to be imaged and treated surgically.10
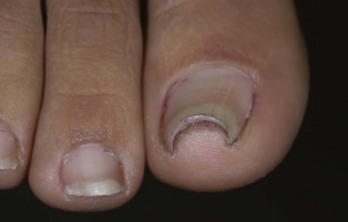
FIGURE 18-21 Pincer nail. This older man wanted surgery to decrease the pain of this condition.
(Copyright Richard P. Usatine, MD.)
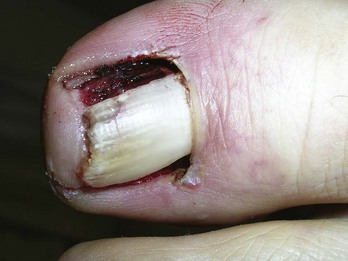
FIGURE 18-22 One simple method to treat a pincer nail involves partial nail plate removals on both sides along with matrixectomy to prevent regrowth.
(Copyright Richard P. Usatine, MD.)
Onychogryphosis occurs when a nail plate becomes thickened and curved like a ram’s horn (Figure 18-23). While a warm bath or the application of 40% urea cream may make it easier to clip this nail, some patients will want it removed completely. For this condition the proximal nail evulsion procedure is best, and the nail matrix should be permanently destroyed if the patient does not want the nail to regrow. This may be performed using phenol or electrodestruction.
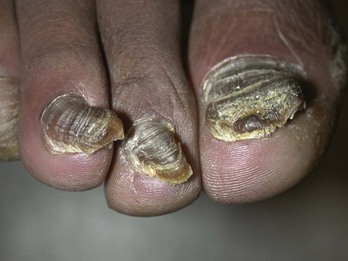
FIGURE 18-23 Ram’s horn nails in an older man. Also known as onychogryphosis. Some patients choose to have a complete nail evulsion with destruction of the matrix to prevent regrowth.
(Copyright Richard P. Usatine, MD.)
Complications
The most common complications of nail surgery are pain that may be prolonged, infections and permanent nail deformities. In particular, nail matrix biopsy may result in a split nail deformity. Patients should be informed of the risk of permanent nail deformity prior to surgery. Other less common complications include pyogenic granuloma at the surgery site or persistent pain.11
Aftercare
To prevent some of the pain and throbbing that can occur after any nail surgery, explain to patients to keep their hand or foot elevated once anesthesia wears off or periodically raise the limb during the day. Oral pain medications may be needed.
If the patient is having trouble with footwear, the diabetic foot shoes with Velcro on top are a good choice while the toe is healing.
After 24 to 48 hours of keeping the digit dry, the patient should begin soaking the digit in warm, soapy water three times a day. Then have the patient apply clean petrolatum or an antibiotic ointment and a clean bandage. This should be continued for 1 to 2 weeks after surgery.
Some amount of pain, redness, and drainage is normal. However, if these signs and symptoms worsen over time, this may be an infection requiring oral antibiotics.
Coding And Billing Pearls
The CPT codes shown in Box 18-3 are used when billing for nail procedures. When treating an ingrown toenail, the partial removal of the nail plate is coded using CPT 11730. If a partial matrixectomy (chemical or physical) is performed as well, a CPT code of 11750 is added. This is not only good medical practice for recurring ingrown toenails but also results in greater compensation.
Box 18-3 CPT Codes for Nail Procedures
Debridement of a nail is a procedure that is intended to remove excessive material (e.g., to significantly reduce nail thickness/bulk) or excessive curvature from a clinically and significantly thickened dystrophic or diseased nail. Although podiatrists may be more likely to do this procedure, the code is independent of the clinician performing the procedure.
Conclusion
Many types of nail problems require surgical intervention. We have covered the most common nail problems in this chapter. With good anesthetic techniques, surgery of the nail may be performed in the office setting.
Resources
1. Darouiche RO, Wall MJJr, Itani KM, et al. Chlorhexidine-alcohol versus povidone-iodine for surgical-site antisepsis. N Engl J Med. 2010;362:18-26.
2. Flatt AE. Tourniquet time in hand surgery. AMA Arch Surg. 1972;104:190-192.
3. Robinson J, Hanke C, Siegel D, Fratila A. Surgery of the Skin—Procedural Dermatology, 2nd ed. Philadelphia: Mosby/Elsevier; 2010.
4. Bostanci S, Kocyigit P, Gurgey E. Comparison of phenol and sodium hydroxide chemical matricectomies for the treatment of ingrowing toenails. Dermatol Surg. 2007;33:680-685.
5. Rounding C, Bloomfield S. Surgical treatments for ingrowing toenails. Cochrane Database Syst Rev. 2005; CD001541.
6. Bos AM, van Tilburg MW, van Sorge AA, Klinkenbijl JH. Randomized clinical trial of surgical technique and local antibiotics for ingrowing toenail. Br J Surg. 2007;94:292-296.
7. Jellinek N. Nail matrix biopsy of longitudinal melanonychia: diagnostic algorithm including the matrix shave biopsy. J Am Acad Dermatol. 2007;56:803-810.
8. Ronger S, Touzet S, Ligeron C, et al. Dermoscopic examination of nail pigmentation. Arch Dermatol. 2002;138:1327-1333.
9. Levit EK, Kagen MH, Scher RK, et al. The ABC rule for clinical detection of subungual melanoma. J Am Acad Dermatol. 2000;42:269-274.
10. Baran R, Haneke E, Richert B. Pincer nails: definition and surgical treatment. Dermatol Surg. 2001;27:261-266.
11. Moossavi M, Scher RK. Complications of nail surgery: a review of the literature. Dermatol Surg. 2001;27:225-228.