Chapter 10 Modified Minimally Invasive Component Separation 
1 Clinical Anatomy
 One of the goals of minimally invasive component separation (MICS) is to avoid dissecting the subcutaneous tissue overlying the anterior rectus sheath and the vessels that penetrate the rectus abdominis muscle, thereby minimizing subcutaneous dead space and improving vascularity to the overlying skin. The inferior epigastric vessels penetrate the inferior lateral aspect of the rectus abdominis muscle and travel through the muscle, branching off into myocutaneous perforating vessels that provide vascular supply to the overlying abdominal skin and subcutaneous tissue.
2 Preoperative Considerations
 Each patient’s risk for perioperative wound complications, infection, and hernia recurrence must be considered.
 Realistic expectations of the potential outcomes must be clearly defined and discussed with each patient; topics should include the anticipated surgical outcome, possible complications, risk of recurrence, length of hospital stay, need for drainage catheters, and commitment to restrictions on activity.

2 Musculofascial Considerations
 The surgeon must consider the size and location of the defect, particularly in difficult hernia repairs in the epigastric or low suprapubic area where the possibility of medializing musculofascial tissue is limited by a lack of tissue laxity. Previous surgeries and previously placed mesh materials that have failed also must be considered. Violation of the rectus complex with stomas, stomal site hernias, port site hernias, and/or indwelling catheters also must be considered but generally are not contraindications to MICS.
3 Intraperitoneal (Visceral) Considerations


4 Skin Considerations


5 Defect Considerations
 Potential bacterial contamination, including infected mesh, contamination of the surgical field, inadvertent enterotomy, existing ostomy, and/or active open-wound infection, must be considered before MICS. To reduce the risk of infection, the surgeon should aggressively debride devitalized tissue, give perioperative therapeutic antibiotics, employ pulsatile lavage, reduce subcutaneous dead space, and drain subcutaneous space with closed-suction drainage catheters.

3 Operative Steps
 After making a midline incision for laparotomy, the surgeon performs adhesion lysis to mobilize all the adhesions from the dorsal aspect of the abdominal wall. The surgeon incises the musculofascia exactly at the midline of the abdomen without violating the rectus complex. The surgeon then incises the midline defect superiorly and inferiorly to combine all areas of midline herniation into a single defect. In patients who have had previous surgeries, the surgeon should palpate intraperitoneally any areas of unopened midline incisions to identify sites possibly subject to future herniation. At this time, any planned or unplanned intraperitoneal or intrapelvic surgeries should be performed before MICS.
 The surgeon dissects preperitoneal fat from the posterior sheath of the rectus abdominis muscle complex to facilitate the direct placement of implantable surgical mesh to the posterior rectus sheath. The majority of the preperitoneal fat pad is generally located in the central portion of the abdominal wall near the linea alba and is more extensive, thicker, and wider near the costal margin and the pubis than in the central, periumbilical area. Dissecting the preperitoneal fat pad flap at least 5 cm in the most cranial and caudal aspects of the defect facilitates mesh implantation. Patients with numerous previous surgeries and patients with a very thin body habitus may not have a well-defined preperitoneal fat layer. After adhesion lysis and preperitoneal flap dissection has been completed, the surgeon should place a moist, radiopaque-tagged towel or sponge on the intraperitoneal viscera to help protect it from inadvertent trauma and dissection.

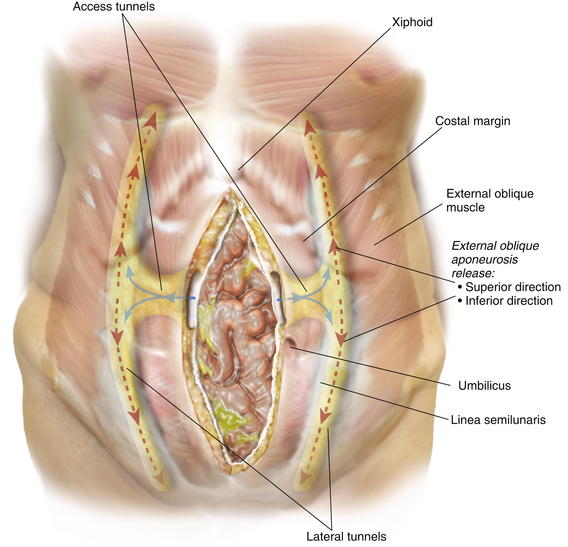
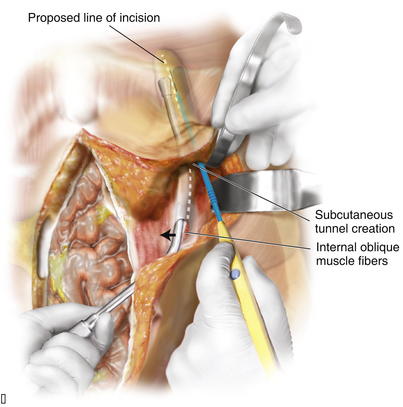
 Depending on the length of the defect and body habitus of the patient, the surgeon accesses the semilunar line through one or two narrow tunnel incisions between the anterior rectus fascia and subcutaneous tissue. The hernia sac, which typically extends laterally towards the semilunar line, is often used to initiate tunnel access. Generally, a single tunnel incision is used in the supraumbilical area centered between the umbilicus and the costal margin. A narrow Deaver retractor is used to elevate the subcutaneous tissue, and electrocautery is used to dissect an approximately 4-cm-wide tunnel laterally to approximately 2 cm lateral to the semilunar line (Fig. 10-1). These lateral access tunnels allow creation of vertically oriented subcutaneous lateral tunnels over the anticipated external oblique aponeurosis release sites (depicted in Fig. 10-1) later in the procedure.
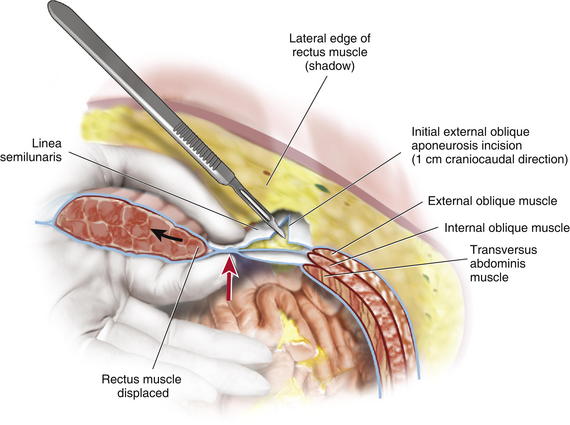
 It is imperative to identify the semilunar line to ensure that the appropriate plane is entered for the component separation release. Palpation is used to identify the edge of the rectus muscle, lateral edge of the rectus sheath, and transition of oblique musculature to aponeurosis, which serve as landmarks (Fig. 10-2). The presence of a fat pad between the internal and external oblique aponeuroses is a good indication of being in the correct plane. The optimal location of the release of the external oblique muscle is through its aponeurosis medial to the muscle body and lateral to its insertion into the rectus sheath complex, that is, generally 1.5 cm lateral to the lateral edge of the rectus complex. The area is marked with a pen and incised with a scalpel or electrocautery for 1 cm in the craniocaudal direction (see Fig. 10-2). In the event that the incision enters the rectus sheath (revealing the rectus abdominis muscle), the incision is closed and a new incision is made more laterally.
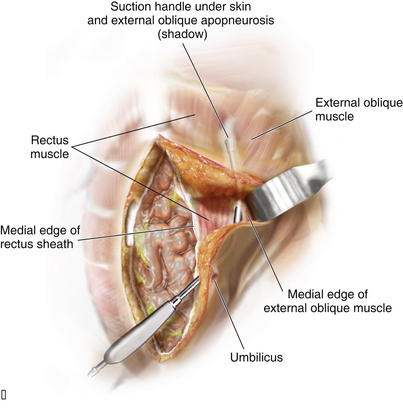
 Blunt dissection between the internal and external oblique aponeuroses and muscle is performed through the 1-cm vertical incision in the external oblique aponeurosis. The surgeon uses a blunt-tip, metal Yankauer suction handle (not connected to suction) to start the dissection between the internal and external oblique aponeuroses inferiorly and superiorly to the initial external oblique aponeurosis incision (Fig. 10-3). This should slide easily just lateral to the rectus complex superiorly over the costal margin (shown) and inferiorly toward the pubis (not shown). This sweeping blunt dissection provides separation between the internal and external oblique aponeuroses for a safe separation of the external oblique aponeurosis in a minimally invasive fashion without inadvertent injury to the underlying internal oblique structure muscular aponeurosis. The surgeon then inserts the suction handle inferiorly between the internal and external oblique aponeuroses and positions the handle against the rectus abdominis muscle complex and uses the suction handle as a palpable guide to create vertical, 3-cm-wide, subcutaneous tunnels (Fig. 10-4, A). Using a narrow Deaver retractor and electrocautery, dissection over the external oblique aponeurosis release site is performed inferiorly and superiorly (see Fig. 10-4). The external oblique aponeurosis is then freed anteriorly and posteriorly and can be easily transected without injuring the overlying subcutaneous tissue or underlying oblique muscle or aponeurosis.
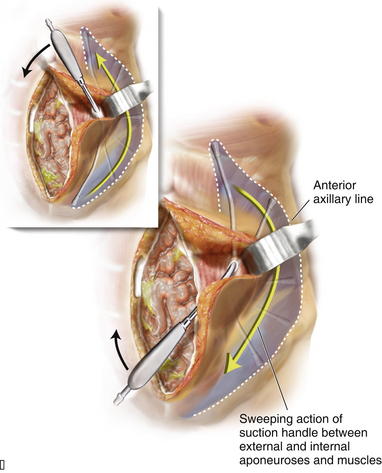
 The external oblique aponeurosis incision can be performed inferiorly and superiorly to the initial external oblique aponeurosis incision through the initial lateral tunnel incision. The blunt tip suction handle is again used as a guide to avoid inadvertently entering the rectus complex medially (Fig. 10-4, B). The surgeon uses scissors to release the inferior half of the external oblique aponeurosis, which extends towards the pubis. The same technique is applied superiorly to fully release the aponeurosis of the external abdominal oblique muscle; however, electrocautery becomes necessary as more muscle and less aponeurosis are present at and above the costal margin. The release is continued cranially to 8-12 cm cranial to the costal margin. Electrocautery for hemostasis and dissection is often required for the considerable interdigitation between the external oblique muscular aponeurosis and the underlying musculature at and above the costal margin. After the external oblique aponeurosis is completely released, the internal oblique muscle should be clearly visible.
 Sharp and electrocautery dissection between the internal and external oblique muscles should be completed through the initial lateral tunnel incision. Narrow Deaver retractors and a headlight or lighted retractor are helpful in performing this maneuver. The lateral extent of the dissection between the internal and external oblique muscles continues laterally to the anterior axillary line to facilitate maximal medialization of the rectus complex. The surgeon must avoid injuring the underlying internal oblique muscle and aponeurosis, which can cause potential weakness or herniation.


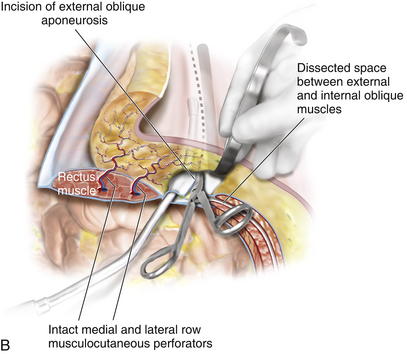
 The surgeon then performs a circumferential, interrupted #1 polypropylene suture inlay inset through the full thickness of the musculofascia, through the mesh, and then back out through the musculofascia. In Figure 10-5 the separation of the internal and external oblique muscles laterally and the completed external oblique aponeurosis release are shown with the discontinued external oblique aponeurosis on both sides. The rectus complex on both sides is now able to be medialized toward the midline. Bioprosthetic mesh is being inset with interrupted monofilament sutures. Suture knots are oriented ventral to the musculofascia. The distance between the entry and exit of a suture through the fascia should be at least 1.5 cm to avoid suture pull-through and sutures should be placed at approximately 2-cm intervals on the musculofascia during the inset. The most superior suture is placed first, often through or around the xiphoid process, and the remainder of the costal margin inset is performed with all sutures placed on hemostats and left untied. Next, the most inferior suture is placed to provide midline orientation and establish the appropriate physiologic tension of the inlay mesh. The remaining sutures are then placed in the appropriate positions to enable primary fascial closure (reinforced repair) or placement of bridging mesh (bridged repair) as previously determined. The surgeon must identify the inferior epigastric vessels as they penetrate the rectus muscles to avoid inadvertently occluding them with a suture and thereby compromising the vascularity of the rectus complex and overlying skin.
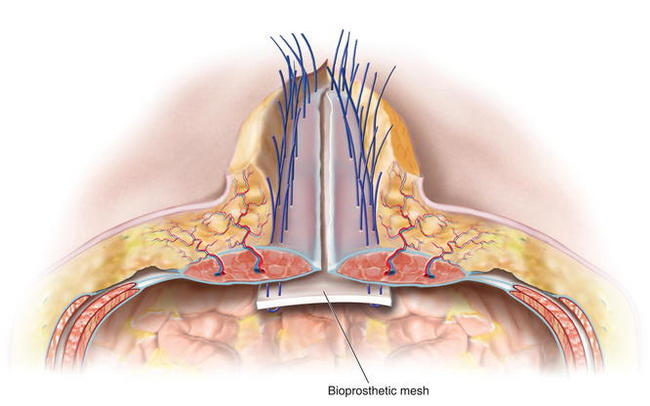
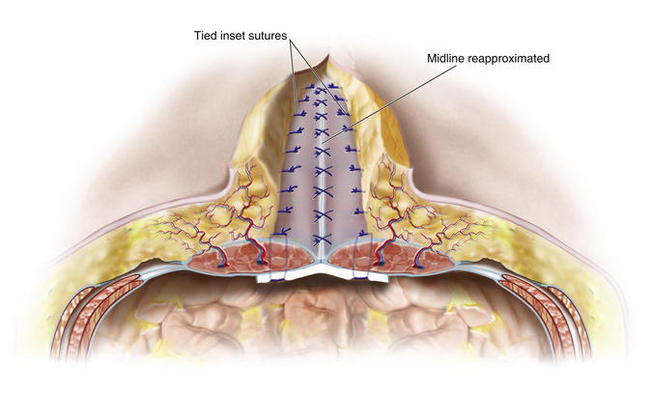
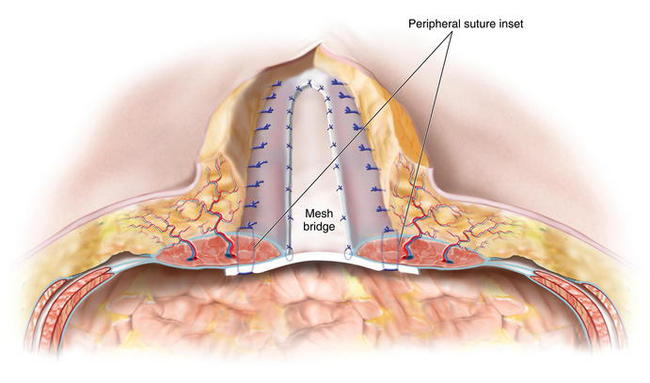
 When complete primary fascial closure is planned, the surgeon reapproximates the fascial edges in the midline with either a running or interrupted long-term monofilament resorbable suture (Fig. 10-6). The vascularity of the rectus muscle is then assessed to ensure that it has not become congested or devascularized after inset placement. In areas where bridging is required and primary fascial reapproximation at the midline is not possible, the surgeon should use resorbable sutures to carefully tack the fascial edges to the surface of the mesh without injuring the underlying intraperitoneal structures (Fig. 10-7). To protect from inadvertent injury to intraperitoneal sutures while placing these central sutures, it is helpful to have left several peripheral inset sutures untied and placed on hemostats. A wide malleable retractor (not shown in Fig. 10-7) can be inserted through this area and placed just under the bioprosthetic mesh to protect the bowel during central inset suture placement. The few untied inset sutures are then tied.
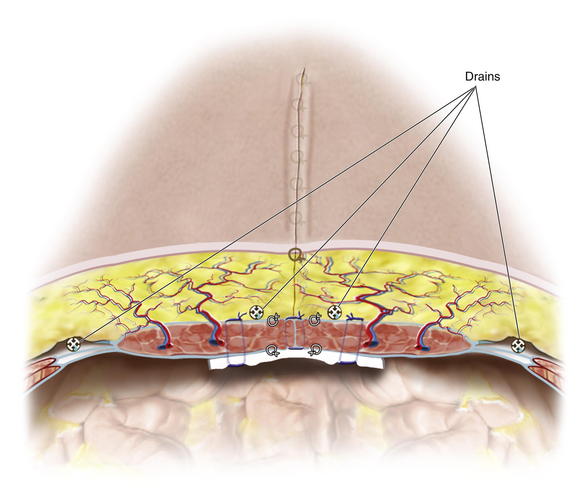
 Large-bore, round, channeled, closed-suction drainage catheters are placed with the drains exiting the suprapubic area. One drain is placed laterally in each MICS donor site, and depending on the volume of subcutaneous space, two to five drains are placed centrally in the subcutaneous space.
 Generally, 3 to 5 interrupted 3-0 resorbable sutures are placed in a vertical line between drainage catheter channels to quilt the elevated skin flaps from Scarpa fascia to the musculofascial repair to eliminate dead space and reduce shear. Figure 10-8 shows a completed closure in three-dimensional cross section, indicating location of drainage catheters inset sutures, and quilting sutures. This technique has minimized the need for extensive skin flap elevation and preserved the rectus perforator vascularity to the overlying skin.
4 Postoperative Care


5 Pearls/Pitfalls
 Surgeons must actively manage patients’ expectations before patients undergo MICS. Patients must understand that MICS is a complex procedure, that indwelling drainage catheters will be present after surgery, that the umbilicus may be resected, that they may experience pain after surgery, that they must restrict their activity after surgery, and that complications can occur.


Baumann DP, Butler CE: Abdominal wall wounds. In Marsh J, Perlyn C, editors: Decision-Making in Plastic Surgery. St. Louis, MO: Quality Medical Publishing, In Press.
Breuing K., Butler C.E., Ferzoco S., Franz M., Hultman C.S., Kilbridge J.F., Rosen M., Silverman R.P., Vargo D. Incisional ventral hernias: review of the literature and recommendations regarding the grading and technique of repair. Surgery. Epub ahead of print. March 19, 2010. In Press
Butler C.E. Ciné Clinic I: Plastic Surgery: Minimally invasive component separation with inlay bioprosthetic mesh (MICSIB). October 13. American College of Surgeons 94th Annual Clinical Congress, San Francisco, CA, 2008.
Butler C.E., Langstein H.N., Kronowitz S.J. Pelvic, abdominal, and chest wall reconstruction with AlloDerm in patients at increased risk for mesh-related complications. Plast Reconstr Surg. 2005;116:1263-1275.
Campbell K, Butler CE. Minimally Invasive Component Separation with Inlay Bioprosthetic Mesh (MICSIB) for Complex Abdominal Wall Reconstruction. Plast Reconstr Surg. In Press.
