[level-membership-for-cardiothoracic-surgery-category]
CHAPTER 30 Minimally Invasive Surgery for Atrial Fibrillation
Approach to Video-Assisted Thoracic Surgery for Atrial Fibrillation
Key Points
♦ Patients who choose a minimally invasive surgical approach to correcting atrial fibrillation usually are otherwise in good health. There is no room for error, and the mortality rate must be zero.
Video-Assisted Surgery for Atrial Fibrillation
Step 1. Setup
Step 2. Patient Positioning and Port Placement
♦ Place the patient in the left lateral decubitus position at 45 to 60 degrees, with the right arm on an LPS Arm Support (Allen Medical, Acton, Maine).
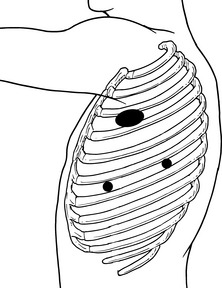
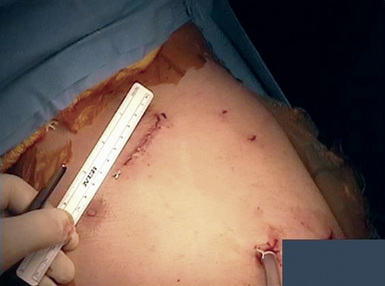
♦ Document the external anatomy after reviewing the internal anatomy using the chest radiograph. Outline the scapula, mid-axillary line, and a line from the xyphoid posteriorly (Figure 30-1).
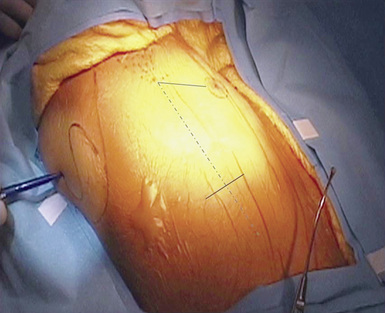
♦ First port placement


♦ Large working port placement
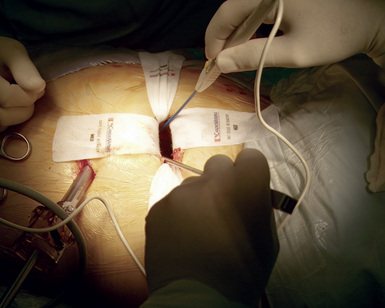
 For the muscle-sparing technique, if the third intercostal space is used, only the intercostal muscles need to be divided. If the fourth intercostal space is used, divide the serratus anterior in the direction of the muscle fibers. Avoid cutting the pectoralis muscle by retracting it anteriorly (Figure 30-3).

 For the muscle-sparing technique, if the third intercostal space is used, only the intercostal muscles need to be divided. If the fourth intercostal space is used, divide the serratus anterior in the direction of the muscle fibers. Avoid cutting the pectoralis muscle by retracting it anteriorly (Figure 30-3).

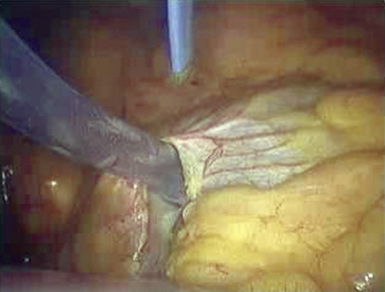
Step 3. Pericardial Opening
♦ Open the pericardium a few centimeters anterior and parallel to the right phrenic nerve; a plastic sucker may be used to insulate the heart from the electrocautery (Figure 30-4).
♦ Visualize the phrenic nerve during pericardial opening and throughout the procedure to avoid contact, traction, compression, or electrocautery injury to the phrenic nerve.
♦ Place one or two pericardial stay sutures in the lateral-cut pericardial edge, and anchor them as far posteriorly as possible with CardioVations suture snares through separate stab sites. Place a superior pericardial stay suture adjacent to the superior vena cava and right pulmonary artery to improve direct visualization and access.
♦ Place an inferior pericardial stay suture adjacent to the inferior aspect of the inferior pulmonary artery to provide optimal access for opening the oblique sinus. If necessary, place an additional stay suture adjacent to the bifurcation of the right pulmonary veins.
♦ At this stage, verify adequate visualization directly through the incision and endoscope. Ensure that all of the relevant anatomic (superior vena cava, right superior pulmonary vein, right inferior pulmonary vein, inferior vena cava, and right pulmonary artery) structures can be clearly visualized.
Step 4. Encircling the Pulmonary Veins
♦ With a pediatric long Wolf or Yankauer suction (Scanlan International, St. Paul, Minn), bluntly develop a space just inferior to the inferior pulmonary vein and lateral to the inferior vena cava into the oblique sinus. Confirm that the suction device can fall freely into the oblique sinus through this opening.
♦ Use the endoscope to check the access angle for the Wolf Lumitip dissector (AtriCure, West Chester, Ohio). A sponge stick can be used to gently retract the heart medially as needed for access and visualization.
♦ Create a second working port (10 mm) 5 cm medially or laterally to the endoscope port for dissector use. This allows the dissector to be lined up for direct in-line access with the appropriate port.
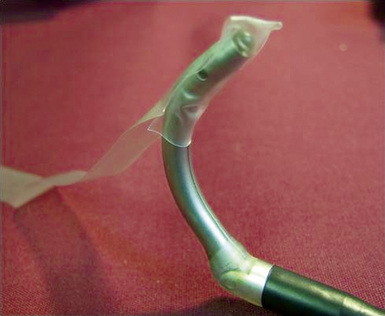
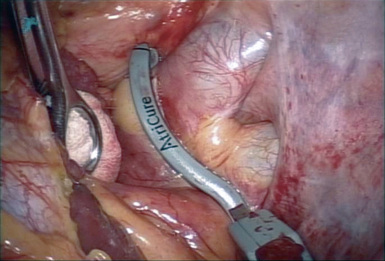
♦ The GlidePath (AtriCure) is attached to the dissector by inserting the dissector tip into the GlidePath hood (Figure 30-5). The Wolf Lumitip dissector with GlidePath is introduced with no articulation through the port site into the pericardial space. Use caution not to direct the tip of the dissector toward the heart when introduced.
♦ Bluntly retract the superior vena cava medially with an endoscopic kittner to help gain exposure and visualization of the superior aspect of the right pulmonary artery. Feed the dissector tip into the oblique sinus just above the inferior vena cava (see Figure 30-5). Advance the distal end of the dissector tip posteriorly, and sweep it medially into position behind the right pulmonary veins, articulate the lighted dissector and grasp the plastic GlidePath and remove the Wolf dissector.
Step 5. Baseline Electrophysiology Testing
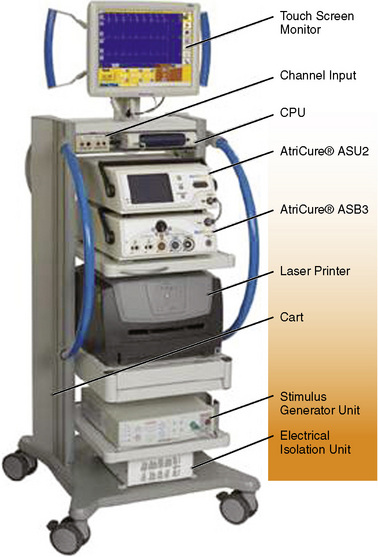
♦ Use the AtriCure pen and the AtriCure ORLab (Figure 30-6) to document sensing over the right atrium and the pulmonary veins.
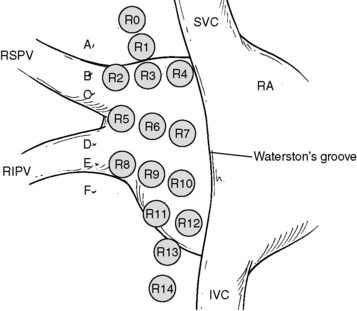
♦ With the AtriCure pen, perform high-frequency stimulation of the fat pad areas over Waterston’s groove. They are stimulated in a grid pattern (Figure 30-7) with the AtriCure system (Figure 30-8).
Step 6. Isolating the Pulmonary Veins
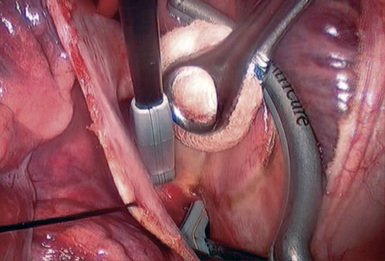
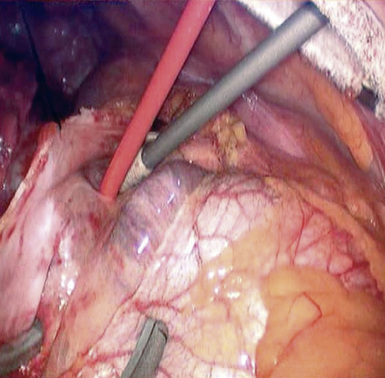
♦ Advance the lower jaw of the Isolator (AtriCure) clamp into the oblique sinus. Advance the Isolator lower jaw until its posterior tip is visible superior to the superior pulmonary vein, making sure to apply adequate tension to the red rubber catheter to help lead the lower jaw into place (Figure 30-9).
♦ Create transmural and contiguous lesions on the antrum to electrically isolate the pulmonary veins from the remainder of the heart.
♦ After completing the ablation, place the AtriCure pen on the previously recorded locations of the superior pulmonary vein, inferior pulmonary vein, and the bifurcation of the right ventricles. Record the electrocardiogram (ECG).
Step 7. Directed Partial Denervation of the Heart
Video-Assisted Surgery for Atrial Fibrillation on the Left Side
Step 2. Ligament of Marshall
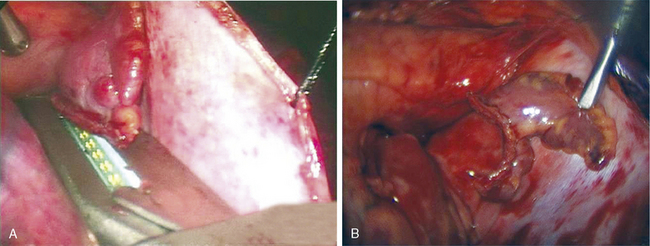
♦ The ligament of Marshall is the remnant of the embryologic left superior vena cava, and it runs from the underside of the left pulmonary artery to the roof of the left atrium (Figure 30-10).

Step 3. Removal of the Left Atrial Appendage
♦ Use an EZ 45 stapler (Ethicon Endosurgery, Cincinnati, Ohio) with a thick tissue load (e.g., green load, staple height of 4.8 mm) to excise the LAA (Figure 30-12).
[/level-membership-for-cardiothoracic-surgery-category][not-level-membership-for-cardiothoracic-surgery-category]
CHAPTER 30 Minimally Invasive Surgery for Atrial Fibrillation
Approach to Video-Assisted Thoracic Surgery for Atrial Fibrillation
Key Points
♦ Patients who choose a minimally invasive surgical approach to correcting atrial fibrillation usually are otherwise in good health. There is no room for error, and the mortality rate must be zero.
Video-Assisted Surgery for Atrial Fibrillation
Step 1. Setup
Step 2. Patient Positioning and Port Placement
♦ Place the patient in the left lateral decubitus position at 45 to 60 degrees, with the right arm on an LPS Arm Support (Allen Medical, Acton, Maine).
♦ Document the external anatomy after reviewing the internal anatomy using the chest radiograph. Outline the scapula, mid-axillary line, and a line from the xyphoid posteriorly (Figure 30-1).
♦ First port placement
♦ Large working port placement
For the muscle-sparing technique, if the third intercostal space is used, only the intercostal muscles need to be divided. If the fourth intercostal space is used, divide the serratus anterior in the direction of the muscle fibers. Avoid cutting the pectoralis muscle by retracting it anteriorly (Figure 30-3).
For the muscle-sparing technique, if the third intercostal space is used, only the intercostal muscles need to be divided. If the fourth intercostal space is used, divide the serratus anterior in the direction of the muscle fibers. Avoid cutting the pectoralis muscle by retracting it anteriorly (Figure 30-3).