[level-membership-for-orthopaedics-category]
CHAPTER 17 Minimally Invasive Surgery
Medial Fixed-Bearing Onlay Unicompartmental Knee Arthroplasty


Introduction
Unicompartmental knee arthroplasty (UKA) has gained popularity in the past decade. The concept of unicondylar knee replacement was introduced in the 1970s by Marmor. He reported pain relief in 86.6% of his patients at an average of 11 years of follow-up with this prosthesis.1 However, Insall and Aglietti2 and Laskin3 reported high failure rates of 26% and 20%, respectively, especially with medial compartment arthroplasty. Most of the failures in subsequent reviews have been attributed to inappropriate patient selection, technical errors, and poor implant design.1 O’Rourke et al.4 recently reported a survivorship of 96% at 5 years and 84% at 20 years of follow-up with the Marmor prosthesis. Over the years, refinement in the surgical technique and improved implant designs and instrumentation have led to the resurgence of interest in UKA. The purported advantages of UKA over proximal tibial osteotomy are better pain relief, quicker return to function, fewer complications, and better long-term results. Furthermore, compared to a total knee arthroplasty (TKA), UKA has a more physiologic gait and better range of motion as the cruciate ligaments, contralateral menisci, and other structures are preserved.5 Also, the recovery is faster6 and it can be easily revised to a TKA with minimum morbidity if required for failure.
Since 2002, the senior author has been using a reproducible and accurate minimally invasive surgical technique (modified slightly from that described by Gesell and Tria7), with a cemented modular fixed-bearing Miller-Galante (MG) implant (Zimmer, Warsaw, IN), which is described in detail in this chapter. Naudie et al.8 reported a 94% survivorship at 5 years and 90% at 10 years with the MG prosthesis. Argenson et al.9 also found survivorship of 97% at 5.5 years of follow-up with the same implant. Berger et al.10,11 reported Jorge Galante’s MG survivorship of 98% at 10 years and 95.7% at 13 years of follow-up. Minimally invasive surgery (MIS) has evolved over the years from more traditional UKA with the use of better instrumentation and modified surgical technique. MIS philosophy does not mean a small skin incision but aims at bone-sparing technique and preservation of all possible soft tissues. Also, during arthrotomy and surgery the quadriceps tendon is not incised and the patella is not averted, thereby preserving the integrity of the quadriceps mechanism.12 MIS allows for a faster, less painful recovery, shorter hospital stay, and better cosmesis. Attempts to perform MIS surgery with a careless surgical technique can lead to component malposition, malalignment, and significant soft tissue damage. Coon12 found that short-term results of MIS UKA were comparable to that of traditional UKA. Pandit et al.6 also found survival rates of 97.3% at 7 years with MIS technique. Since failures if they occur are more common early on, Pandit et al. believed that results of MIS should be comparable to the traditional UKA in the long term.
Preoperative Evaluation
One of the most important requirements for a successful outcome of UKA is patient selection. Kozinn and Scott13 summarized their patient selection criteria in their UKA review paper from 1989. Those that we consider most important are as follows.
The ideal candidate for unicondylar knee arthroplasty is a low-demand, thin patient (>55 years of age) with isolated medial unicompartmental disease. The range of motion of the knee joint should be greater than 90° and a flexion contracture, if present, should be 5° or less. The valgus deformity should be less than 15°, and varus less than 10° should be passively correctable to neutral. There should be no rest pain or evidence of inflammatory arthropathy. There should not be diffuse pain or significant involvement of other knee compartments. The lateral compartment should have full-thickness joint space on the anteroposterior radiograph and also well-preserved meniscus and articular cartilage. Patellofemoral pain is a relative contraindication. The knee should be stable without any insufficiency of the cruciate or collateral ligaments. Medial or lateral subluxation or posterior tibial bone loss is suggestive of crucial ligament insufficiency. Patients with osteonecrosis of a single femoral condyle should not have extensive metaphyseal-diaphyseal involvement. Ideally the patient should be able to pinpoint the medial compartment as the source of pain, which worsens significantly with weight bearing (the so-called one-finger test).14
Surgical Technique for Medial Fixed-Bearing Onlay UKA
Approach
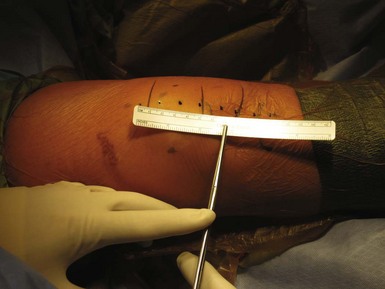
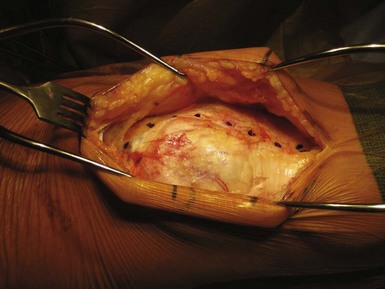
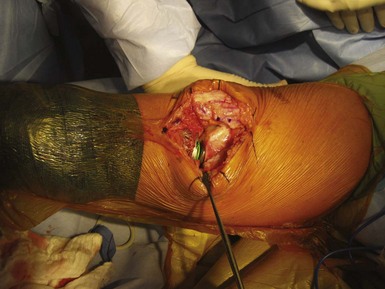
The skin incision (Fig. 17–1) is slightly medial to the midline, extending from the superior edge of the patella to the medial aspect of the tibial tubercle. The incision is approximately 10 cm long depending on patient size and adipose tissue, and can be extended to avoid applying too much tension to skin during retraction. A “mobile window” is created by releasing adipose tissue from the retinaculum approximately 2 cm circumferentially around the incision. A medial parapatellar arthrotomy (Fig. 17–2) is performed from a level 1 fingerbreadth above the superior pole of patella to a point approximately 15 mm distally to the tibial joint line. The arthrotomy does not damage the vastus medialis muscle. Also, the technique does not require eversion or dislocation of the patella, thus preserving the suprapatellar pouch. This may reduce postoperative pain and allow faster quadriceps control, since disruption of the extensor mechanism is minimal.
Femoral Preparation
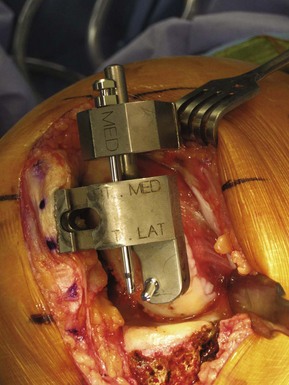
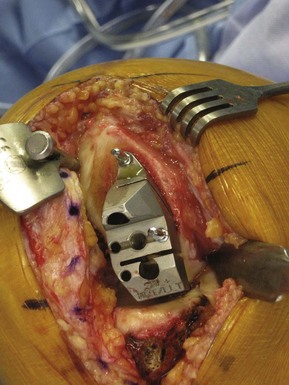
We use the intramedullary technique for femoral preparation. The site for inserting the intramedullary guide is 1 cm anterior to the origin of the posterior cruciate ligament and just anterior to the femoral intercondylar notch. With the knee flexed approximately 30°, a starting point is made with the punch. An 8-mm drill is used to make the path for the femoral intramedullary guide. The femoral canal is suctioned to remove the fat to decrease the chances of fat embolism. A fringe benefit of this hole is that it can be used for a patellar retractor later and for the entire case. The medial distal femoral resection guide (Fig. 17–3), which is attached to an intramedullary rod, is placed according to the side being operated. A shorter rod is used if the patient has altered femoral anatomy or a long-stemmed hip prosthesis. The guide is placed flush with the femoral condyle (which helps in making sure that proper thickness of bone is resected) and fixed in place if needed. The guide is stabilized with holding pins and the distal cutting adjustable valgus guide placed. The valgus angle is determined by evaluating the mechanical on preoperative standing radiographs. This usually corresponds to a 4° valgus cut on the distal femur. The distal femoral resection is deep enough only to match the depth of the femoral prosthesis. Medial osteophytes can be removed at this stage. Also, the surface may be rasped to remove any bony prominences to make it completely flat, which is important for subsequent jig placement.
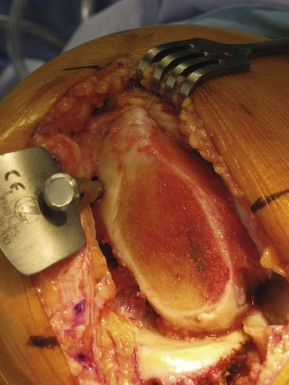
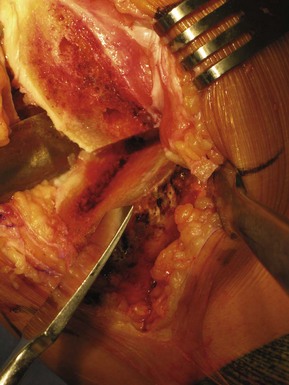
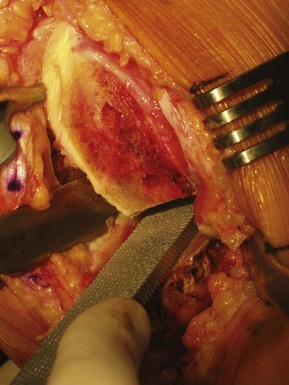
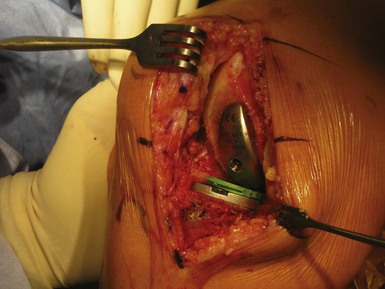
Next, the intramedullary patellar retractor (Fig. 17–4) is inserted (upon removal of the medial distal femoral resection guide), which allows for better exposure and prevention of patellar damage during the procedure. The femoral finishing guide (Fig. 17–5) is applied next to the distal femoral cut surface. Sizing and correct placement of this guide is one of the most crucial steps of the surgery. The size of the femoral component should be such that it leaves 1–2 mm of exposed subchondral bone on the anteromedial edge of the cut surface. The implant should be big enough to cover almost all of the condyle, but small enough to prevent patellar impingement. The guide rests on the posterior condyle and should be flush against the bone, or the accuracy of the cuts and subsequent component placement may be compromised. The femoral guide, properly rotated, is stabilized with holding pins and the anterior and posterior femoral posts are drilled and then chamfer and posterior condylar cuts made. An anterior femoral holding peg may be used to stabilize the guide while drilling the posterior post. After the cuts are made, posterior osteophytes are removed with a curved osteotome (Fig. 17–6) and curette to prevent impingement in deep flexion. The surfaces must be smoothed out of any bony irregularities. The femoral guide should be placed parallel to the long axis of the tibia at 90° of flexion and full extension. It is important to align the femoral component so as to later avoid edge loading on the polyethylene insert. The femoral component is generally smaller than the femoral condyle and, if in between sizes, the smaller of the two should be chosen. Attention is now paid to the tibial side.
Tibial Preparation
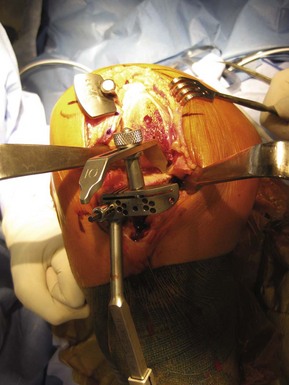
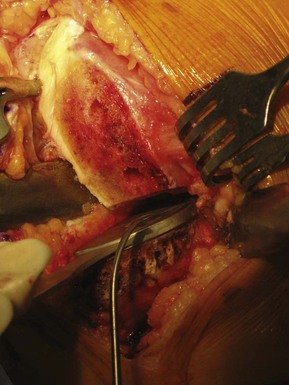
The tibial preparation is done using an extramedullary guide. Intramedullary instrumentation requires patellar eversion and wider exposure, which is difficult with MIS technique. The distal portion of the tibial alignment rod is positioned at the center of the ankle mortise (over the anterior tibial tendon) and held with the spring. The longitudinal axis of the rod is aligned parallel to the long axis of the tibia. Proximally the guide is fixed with the rod centered at the tibial spine. Care should be taken while draping to avoid heavy drapes around the ankle to help in alignment for the tibial cut. The posterior slope of the tibial cut is set to match the patient’s posterior tibial slope.15 A 2-mm depth gauge is used to take the tibial cut from the deepest defect in the tibia. By applying it a little loose (with regard to knob tightness), a 3- or 4-mm resection can be taken to avoid overstuffing the medial compartment. The tibial resection guide (Fig. 17–7) is fixed with guide pins and all of the knobs are tightened once the position has been confirmed. A retractor is placed medially to protect the medial collateral ligament and another in the intercondylar notch to protect the lateral structures. The front-to-back conservative vertical cut into the tibial spine is made with a reciprocating saw (preserving the attachment of the ACL) on the tibial surface. At the same time the cut is made as close to the ACL attachment as possible to get a broad tibial cortical support for the tibial baseplate. Also, care is taken to make the cut in proper rotation without damaging the posterior cruciate ligament. It is also critically important to avoid any anterior or posterior tibial bony cortical extension of the vertical cut and to avoid undercutting of the tibial spine.
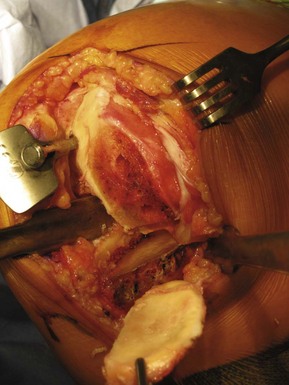
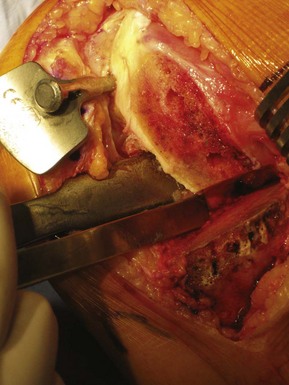
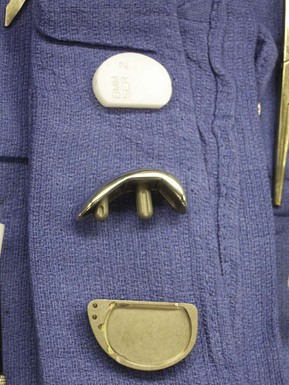
After the cut, the tibial resected surface (shaped like a “half-lollipop”) is removed (Fig. 17–8). Any irregularities of the tibia are smoothened with a rasp (Fig. 17–9). The osteophytes tenting the medial collateral ligament are removed, and removal of the medial meniscus may be easiest at this stage. The tibia sizer is used to determine the best tibial size for covering the tibial surface in both anteroposterior and mediolateral dimensions (Fig. 17–10). Also, the resected tibial surface can be used for estimating the size of the tibial baseplate. The largest possible tibial size is chosen, making sure that there is minimal to no overhang and the implant rests on strong cortical bone. An undersized tibial component has higher chances of subsidence, especially if the tibial resection is deeper than anticipated. A quarter-inch osteotome is used to make a starting slot for the central fin of the tibial baseplate (Fig. 17–11). The trial tray is then impacted into place and secured. The tibial post holes are prepared with the tibial peg drill to complete the tibial preparation.
Trial Reduction
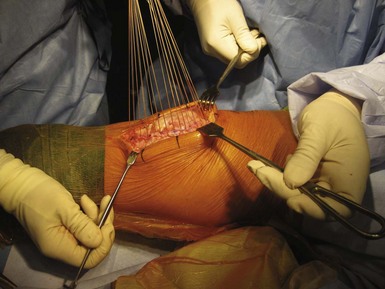
The provisional femoral component is put in with the help of a T-handle inserter with the leg in deep flexion and patellar retractor in place. Trial reduction is performed with the tibial provisional insert that will get the patient to about 2–3° of varus (usually an 8-mm insert when a small tibial resection has been made), and the knee is checked for the range of motion and ligament balance through the range of motion (Figs. 17–12 and 17–13). This can be checked with a plastic tongue depressor that is 2 mm thick on one side and 3 mm thick on the other. The 2-mm end should fit between the femoral component and tibial insert easily at 0° and 90° of flexion, while the 3-mm side is very tight. Ideally there should be 2 mm of laxity in 90° of flexion and in full extension. The femoral component should be centered over the tibial component in flexion and extension and does not follow the anatomic femoral condyle orientation. If required, it should be reoriented.
Final Components and Cementing
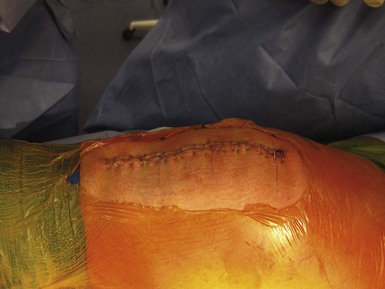
The trial components are removed and the knee joint is irrigated with pulse lavage to remove all the bony debris and blood clots. The raw bony surfaces are dried with sponges. If required, drill holes are made in the sclerotic tibial or femoral surface to achieve a better cement-bone bonding. The tibial component is cemented first. We prefer a type of cement that is viscous and workable immediately upon mixing. The cement is applied more on the anterior surface than the posterior, and the posterior portion of the tibial component is placed to engage the tibia prior to the anterior portion of the tibial component contacting the tibia so as to encourage cement to leave the interface anteriorly. A sterile gauze sponge can be placed behind the tibia to aid in removal of any posterior excess cement, but care must be taken not to incarcerate the gauze within the interface. The tibial baseplate is then impacted with the help of a tibial impactor to fully seat the implant on the tibial cut surface. The posteriorly placed gauze is removed at this point and a curved nerve root retractor is used to remove cement from the posterior aspect of the tibia if there is any. The femoral component is then inserted in deep flexion with the patella retractor in place. The leg is then brought into slight midflexion to clear the patella and then repositioned again in deep flexion to complete the femoral component insertion. A trial polyethylene insert is put in and the leg straightened, allowing the cement to harden. The alignment is checked again to verify that it is not overcorrected. At the end of the cementing, the trial insert is removed and all the extra cement is meticulously removed from the joint despite the limited exposure afforded by this technique. The original polyethylene articular insert is finally put in (Figs. 17–14 and 17–15). The joint is thoroughly lavaged to remove any bony debris and loose bodies. The incision is closed in three layers (Figs. 17–16 and 17–17). A sterile dressing is applied and the limb bandaged loosely with an Ace bandage as the tourniquet is taken down.

1 Marmor L. Unicompartmental knee arthroplasty: ten- to 13-year follow-up study. Clin Orthop Relat Res. 1988;226:14-20.
2 Insall JN, Aglietti P. A five to seven-year follow-up of unicondylar arthroplasty. J Bone Joint Surg [Am]. 1980;62:1329-1337.
3 Laskin RS. Unicompartmental tibiofemoral resurfacing arthroplasty. J Bone Joint Surg [Am]. 1978;60:182-185.
4 O’Rourke MR, Gardner JJ, Callaghan JJ, et al. The John Insall Award. Unicompartmental knee replacement: a minimum twenty-one-year follow-up, end-result study. Clin Orthop Relat Res. 2005;440:27-37.
5 Andriacchi TP, Galante JO, Fermier RW. The influence of total knee replacement design on walking and stair-climbing. J Bone Joint Surg [Am]. 1982;64:1328-1335.
6 Pandit H, Jenkins C, Barker K, et al. The Oxford medial unicompartmental knee replacement using a minimally-invasive approach. J Bone Joint Surg [Br]. 2006;88:54-60.
7 Gesell MW, Tria AJJr. MIS unicondylar knee arthroplasty: surgical approach and early results. Clin Orthop Relat Res. 2004;428:53-60.
8 Naudie D, Guerin J, Parker DA, et al. Medial unicompartmental knee arthroplasty with the Miller-Galante prosthesis. J Bone Joint Surg [Am]. 2004;86:1931-1935.
9 Argenson JA, Chevrol-Benkeddache Y, Aubaniac JM. Modern unicompartmental knee arthroplasty with cement: a three to ten year follow-up study. J Bone Joint Surg [Am]. 2002;84:2235-2239.
10 Berger RA, Nedeff DD, Barden RM, et al. Unicompartmental knee arthroplasty: clinical experience at 6- to 10-year followup. Clin Orthop Relat Res. 1999;367:50-60.
11 Berger RA, Meneghini RM, Jacobs JJ, et al. Results of unicompartmental knee arthroplasty at a minimum of ten years of follow-up. J Bone Joint Surg [Am]. 2005;87:999-1006.
12 Coon TM. Minimally invasive unicompartmental knee arthroplasty using the quad-sparing instrumentation. Operative Techniques Orthop. 2006;16:195-206.
13 Kozinn SC, Scott R. Unicondylar knee arthroplasty. J Bone Joint Surg [Am]. 1989;71:145-150.
14 Bert JM. Unicompartmental knee replacement. Orthop Clin North Am. 2005;36:513-522.
15 Hernigou P, Deschamps G. Posterior slope of the tibial implant and the outcome of unicompartmental knee arthroplasty. J Bone Joint Surg [Am]. 2004;86:506-511.
[/level-membership-for-orthopaedics-category][not-level-membership-for-orthopaedics-category]
CHAPTER 17 Minimally Invasive Surgery
Medial Fixed-Bearing Onlay Unicompartmental Knee Arthroplasty
Introduction
Unicompartmental knee arthroplasty (UKA) has gained popularity in the past decade. The concept of unicondylar knee replacement was introduced in the 1970s by Marmor. He reported pain relief in 86.6% of his patients at an average of 11 years of follow-up with this prosthesis.1 However, Insall and Aglietti2 and Laskin3 reported high failure rates of 26% and 20%, respectively, especially with medial compartment arthroplasty. Most of the failures in subsequent reviews have been attributed to inappropriate patient selection, technical errors, and poor implant design.1 O’Rourke et al.4 recently reported a survivorship of 96% at 5 years and 84% at 20 years of follow-up with the Marmor prosthesis. Over the years, refinement in the surgical technique and improved implant designs and instrumentation have led to the resurgence of interest in UKA. The purported advantages of UKA over proximal tibial osteotomy are better pain relief, quicker return to function, fewer complications, and better long-term results. Furthermore, compared to a total knee arthroplasty (TKA), UKA has a more physiologic gait and better range of motion as the cruciate ligaments, contralateral menisci, and other structures are preserved.5 Also, the recovery is faster6 and it can be easily revised to a TKA with minimum morbidity if required for failure.
Since 2002, the senior author has been using a reproducible and accurate minimally invasive surgical technique (modified slightly from that described by Gesell and Tria7), with a cemented modular fixed-bearing Miller-Galante (MG) implant (Zimmer, Warsaw, IN), which is described in detail in this chapter. Naudie et al.8 reported a 94% survivorship at 5 years and 90% at 10 years with the MG prosthesis. Argenson et al.9 also found survivorship of 97% at 5.5 years of follow-up with the same implant. Berger et al.10,11 reported Jorge Galante’s MG survivorship of 98% at 10 years and 95.7% at 13 years of follow-up. Minimally invasive surgery (MIS) has evolved over the years from more traditional UKA with the use of better instrumentation and modified surgical technique. MIS philosophy does not mean a small skin incision but aims at bone-sparing technique and preservation of all possible soft tissues. Also, during arthrotomy and surgery the quadriceps tendon is not incised and the patella is not averted, thereby preserving the integrity of the quadriceps mechanism.12 MIS allows for a faster, less painful recovery, shorter hospital stay, and better cosmesis. Attempts to perform MIS surgery with a careless surgical technique can lead to component malposition, malalignment, and significant soft tissue damage. Coon12 found that short-term results of MIS UKA were comparable to that of traditional UKA. Pandit et al.6 also found survival rates of 97.3% at 7 years with MIS technique. Since failures if they occur are more common early on, Pandit et al. believed that results of MIS should be comparable to the traditional UKA in the long term.
Preoperative Evaluation
One of the most important requirements for a successful outcome of UKA is patient selection. Kozinn and Scott13 summarized their patient selection criteria in their UKA review paper from 1989. Those that we consider most important are as follows.
The ideal candidate for unicondylar knee arthroplasty is a low-demand, thin patient (>55 years of age) with isolated medial unicompartmental disease. The range of motion of the knee joint should be greater than 90° and a flexion contracture, if present, should be 5° or less. The valgus deformity should be less than 15°, and varus less than 10° should be passively correctable to neutral. There should be no rest pain or evidence of inflammatory arthropathy. There should not be diffuse pain or significant involvement of other knee compartments. The lateral compartment should have full-thickness joint space on the anteroposterior radiograph and also well-preserved meniscus and articular cartilage. Patellofemoral pain is a relative contraindication. The knee should be stable without any insufficiency of the cruciate or collateral ligaments. Medial or lateral subluxation or posterior tibial bone loss is suggestive of crucial ligament insufficiency. Patients with osteonecrosis of a single femoral condyle should not have extensive metaphyseal-diaphyseal involvement. Ideally the patient should be able to pinpoint the medial compartment as the source of pain, which worsens significantly with weight bearing (the so-called one-finger test).14
Surgical Technique for Medial Fixed-Bearing Onlay UKA
Approach
The skin incision (Fig. 17–1) is slightly medial to the midline, extending from the superior edge of the patella to the medial aspect of the tibial tubercle. The incision is approximately 10 cm long depending on patient size and adipose tissue, and can be extended to avoid applying too much tension to skin during retraction. A “mobile window” is created by releasing adipose tissue from the retinaculum approximately 2 cm circumferentially around the incision. A medial parapatellar arthrotomy (Fig. 17–2) is performed from a level 1 fingerbreadth above the superior pole of patella to a point approximately 15 mm distally to the tibial joint line. The arthrotomy does not damage the vastus medialis muscle. Also, the technique does not require eversion or dislocation of the patella, thus preserving the suprapatellar pouch. This may reduce postoperative pain and allow faster quadriceps control, since disruption of the extensor mechanism is minimal.
[/not-level-membership-for-orthopaedics-category]
