[level-membership-for-orthopaedics-category]
Chapter 9. Methods of managing trauma
Fractures
The principles of fracture management are:
1. Reduction of the fracture.
2. Immobilization of the fracture fragments long enough to allow union.
3. Rehabilitation of the soft tissues and joints.
Methods of reduction are:
1. Traction.
2. External splints/braces.
3. External fixation.
4. Internal fixation.
Some fractures, when seen, are not displaced and therefore do not require reduction. Others, however, will require reduction in order to keep the bones in the correct position.
Traction
Pulling on a broken limb draws the bones into line, just as a string of beads straightens when it is pulled at each end. Muscular contraction will shorten any limb unless there is a bone to hold its ends apart and the traction must therefore be strong enough to overcome the muscle power, but not so strong that it holds the ends apart (Fig. 9.1).
 |
| Fig. 9.1
Traction. Traction should be sufficient to pull the bones out to length and overcome local muscle contraction.
|
Traction can be applied to the limb in a variety of ways.
Skeletal traction
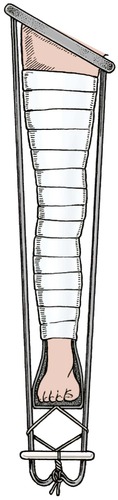
Traction is applied to pins passed through the bone. Although metal pins passing straight through a limb may look unkind, they are more comfortable than skin traction, and allow substantial loads to be applied accurately to the bone itself. The commonest sites for the insertion of skeletal pins are the upper end of the tibia, the calcaneum, the distal femur or the olecranon, but traction can also be applied to the skull, pelvis and many other sites.
Two types of pin are in common use (Fig. 9.2). A Steinmann pin has a trocar point and smooth sides. Although easy to insert, it can slip sideways after being in position for a week or more, which is both uncomfortable and unhygienic. Threaded pins, such as a Denham pin, have threads which grip the bone and prevent lateral slippage. Although slightly harder to insert, they are better in the long term.
 |
| Fig. 9.2
Types of pin for traction: (a) Steinmann pin; (b) Denham pin with threads standing proud of the pin shaft.
|
Skeletal traction is easy to set up and manage, provided attention is paid to the following points:
1. The pins should be drilled through the bone with a hand drill or T handle.
2. If the pin is inserted using local anaesthesia, the skin and periosteum must be carefully infiltrated at the points of entry and exit.
3. Never try to hammer the pin through the bone – this does not work and breaks the bone.
4. Keep the point of entry clean to avoid infection of the pin track but do not wind a bandage round the pin like a cleat: this causes skin necrosis.
5. Check whether the pin is threaded or smooth before removing it; smooth pins can be removed with a straight pull but a threaded pin must be unscrewed.
6. If the pin area is painful and the bone is tender to percussion, suspect a pin track infection.
Skin traction
Skin traction is applied by means of adhesive strapping stuck directly onto the skin and has many practical problems. The skin beneath the strapping becomes sweaty and rashes are common. The weight is applied to the bone indirectly via the soft tissues and these can be disrupted if too much weight is applied. The usual upper limit is 5 kg (12 lb). For these reasons, skin traction is really only suitable for children and as a temporary measure in adults until definitive treatment is instituted.
The mechanics of traction
The mechanics of traction are straightforward. Every force has an equal and opposite force; traction is no exception. The ‘opposite’ force to traction can be applied in three ways, described below.
Fixed traction with a splint. In the simplest form of fixed traction, the limb is rested on a splint such as the Thomas splint, originally devised by Hugh Owen Thomas (p. 125) for applying fixed traction to the lower limb, and still widely used (Fig. 9.3). The lower end of the splint has a ‘V’ shape to hold traction cord applied to the patient’s limb either by skin traction or, as a first aid measure, by tying the patient’s boot to the splint. The limb is then stretched with a Spanish windlass (nowadays usually made of two wooden tongue depressors) and the counter pressure taken by a padded leather ring at the upper end of the splint under the ischial tuberosity. The Thomas splint is ideal for transporting patients because it is self-contained and does not need pulleys or weights.
 |
| Fig. 9.3
Fixed traction with Thomas splint using a Spanish windlass.
|
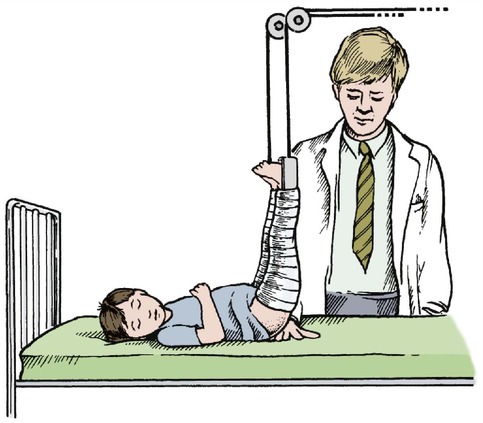
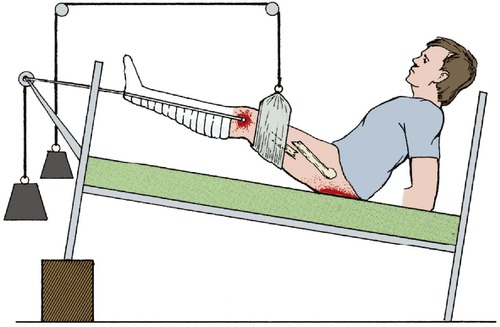
Fixed traction using gravity. The fundamental principle of this type of traction is to string the patient up by the injured limb and leave them hanging until the bone has joined. Gallows traction for a child under the age of 3 with fractured femur is a good example of this. Children tolerate the position surprisingly well for the 2–3 weeks necessary for the fracture to unite at this age (Fig. 9.4).
 |
| Fig. 9.4
Gallows traction. The weight of the child should be enough to hold the limb out to length. A hand can be slipped between the buttocks and sheet.
|
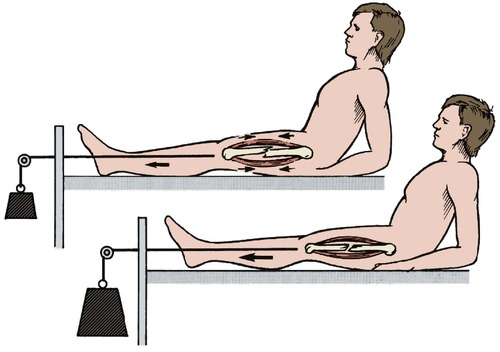
Gravity can also be applied to the limb by fixing the patient’s leg to the foot of the bed, which is then raised so that the patient slides down towards the pillow (Fig. 9.5).
 |
| Fig. 9.5
(a) Fixed traction – the weight of the patient provides traction; (b) sliding traction – the weight of the patient still applies traction but his own weight is counterbalanced by a weight attached to a cord running over a pulley.
|
A similar principle is used in a hanging cast for fractures of the humerus in which a cast is applied to the forearm and suspended by a collar and cuff so that the combined weight of the arm and cast pull the humerus into line (Fig. 9.6). The arm must hang; a sling supporting the elbow prevents the traction reaching the fracture site.
 |
| Fig. 9.6
Hanging cast. The weight of the arm and cast pulls the humeral fragments into line.
|
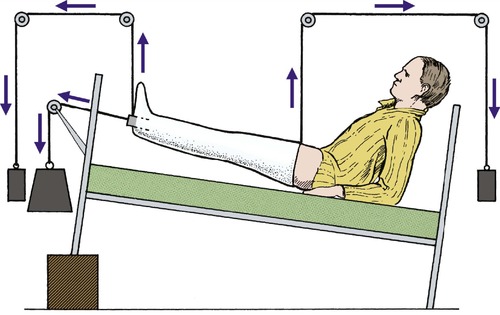
Sliding traction. Suspending the patient and tying the feet to the end of the bed restricts the patient’s mobility and makes nursing difficult. This can be overcome by weights and pulleys but the system is complicated and needs regular adjustment.
At its simplest, sliding traction is little different from fixed traction, except that the patient can move freely in the bed, but more complex arrangements are possible. Hamilton–Russell traction uses a single cord to apply a horizontal force that is twice the vertical force because the cord, on its horizontal run, runs through a three-pulley system which gives it a velocity ratio of 2. This means that a 1 kg weight will exert a 1 kg upwards pull, but a 2 kg longitudinal pull (Fig. 9.7).
 |
| Fig. 9.7
Hamilton–Russell traction. The longitudinal traction has a velocity ratio of 2 and the vertical traction a velocity ratio of 1. The resultant force is 2.24 times the mass of the weight applied at an angle of 27° to the horizontal.
|
Balanced traction. It is uncomfortable to leave a broken limb lying on a bed so that the fragments rub against each other whenever the patient turns over (Fig. 9.8). Greater comfort can be achieved by resting the limb on a splint which is then suspended so that the limb is, in effect, in a gravity-free field.
 |
| Fig. 9.8
Balanced sliding traction. One weight applies longitudinal traction and others are applied to the upper and lower ends of the limb so that it ‘floats’ in a gravity-free field.
|
In the most complicated arrangements this is done by resting the leg on a Thomas splint with a weight and pulley attached to each corner. If the weights are correctly adjusted the patient can be lifted almost with a fingertip, which makes nursing easier and avoids pressure sores. None of these weights act on the fracture, which must be controlled by a longitudinal force.
Although there are many advantages in complex systems of balanced traction, they are difficult to maintain and a simple system is often better.
Types of traction
• Skin or skeletal.
• Fixed or sliding.
• Fixed traction – may use splint or gravity.
• Sliding traction – may be balanced or not balanced.
External splints/slings/braces
Any device that holds a fracture steady is a splint and those that set hard around the limb are casts. A cast will hold a limb straight and still but cannot hold it out to length; casts are therefore unsuitable for fractures in which the limb is shortened.
To maintain the alignment of a bone, the plaster is not just wrapped around the leg and allowed to set; pressure must be applied to the cast while it sets so that the bones are held accurately by three-point pressure (Fig. 9.9).
 |
| Fig. 9.9
Three-point pressure. The fracture line is closed by pressure at three points.
|
Use
Splints do not provide rigid fixation. If applied immediately after the fracture they will become loose as the swelling of trauma subsides and muscles waste. The position of the fracture must be checked regularly and the position reviewed.
If the fracture slips there are several options:
1. The position may be accepted (Fig. 9.10).
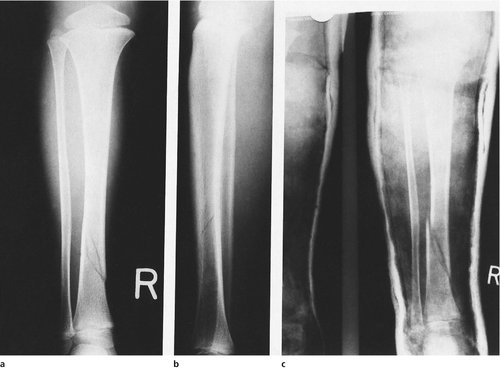 |
| Fig. 9.10
Loss of fracture position: (a), (b) a spiral fracture of the tibia with minimal displacement on the day of injury; (c) the position 10 days later. The fragments have moved but the position is still acceptable.
|
2. The fracture may be manipulated again.
3. It may be necessary to abandon conservative treatment.
Materials
All casting bandages consist of a solid element covering a fibrous material. The solid part gives rigidity and the flexible part prevents it cracking. Reinforced concrete contains steel rods for similar reasons.
The original casting material was developed by the ancient Egyptians, who are said to have treated fractures by resting the injured limb in boxes containing Nile mud and straw which set hard and was broken away when the fracture had united. An Arab surgeon was the first to describe the use of plaster to treat fractures in ad 970, but it was not until the early part of the 20th century that plaster was widely used in Europe.
Plaster of Paris
The best known casting material is plaster of Paris, a high quality gypsum that originally came from Montmartre. Plaster of Paris bandages consist of a tough open-weave fabric coated with hemihydrated calcium sulphate powder. Book muslin or crinoline were originally used as the fabric. When dipped in water the plaster becomes hard with crystalline hydrated calcium sulphate. The chemical reaction involved is exothermic and the plaster therefore becomes warm as it sets:

Plaster of Paris is light, comparatively soft, porous so that the limb can ‘breathe’, easy to remove and has stood the test of time. Its greatest disadvantages are that it disintegrates when wet and that 24–48 h are needed for it to harden enough to take the patient’s weight.
Modern materials, including resins and fibreglass, are now used frequently. They are lightweight and easy to apply. Unfortunately, they are not as easy to mould as plaster of Paris and removal can be more difficult. Patients do, however, prefer them.
Applying a plaster correctly takes much practice, but the following points are particularly important (Fig. 9.11):
1. Padding. Apply light padding of soft wool or cotton over bony areas to avoid pressure sores, preferably over a thin layer of stockinette so that the padding will not roll up inside the cast and cause uncomfortable ridges.
2. Water temperature. The hotter the water, the faster the plaster sets. Cold water gives more time to apply the cast and so is recommended for beginners.
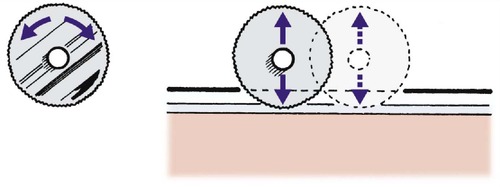
3. Dipping. When dipping a plaster bandage, hold it lightly so that water can penetrate to its centre. Hold it under the water until the bubbles stop and then drain it until the drips stop (Fig. 9.12). Do not wring it out like a dishcloth.
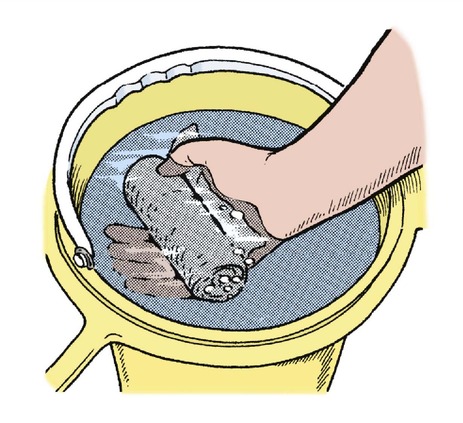 |
| Fig. 9.12
Dipping plaster bandage. The plaster is held loosely under the water and not gripped. The end of the bandage is separated from the rest of the roll.
|
 |
| Fig. 9.11
Applying a padded plaster. Stockinette is first placed over the arm and plaster wool is rolled gently over the stockinette.
|
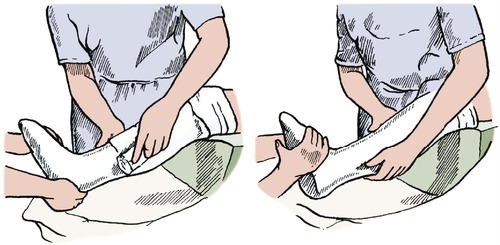 |
| Fig. 9.13
Applying the plaster. The plaster bandage is rolled gently and carefully around the limb.
|
5. The ‘100–90 trick’. If a joint has to be held flexed to 90°, flex it 10° more, apply the plaster and then put the limb in the correct position (Fig. 9.14). This avoids hard wrinkles in the plaster, which can cause pressure sores at the flexure crease.
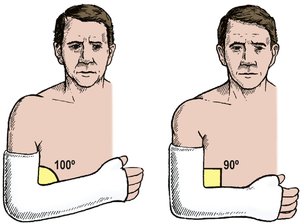 |
| Fig. 9.14
The ‘100–90’ trick. The plaster is applied at 100° and then straightened to 90° to avoid pressure at a joint.
|
6. Splitting the cast. If the plaster is applied soon after injury, or at operation, split the cast and padding down to skin so that it can be spread or removed quickly in case of limb swelling.
Once the plaster is applied and set, check the following:
1. Edges. Check that the edges are not too sharp and do not press on the skin. If they do, bend the edges but do not cut the edge off because this loosens the plaster and makes the problem worse (Fig. 9.15).
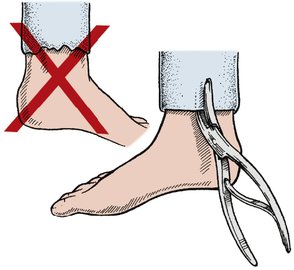 |
| Fig. 9.15
Tight plasters. The edge should not be trimmed – this leaves a sharp ragged edge. Plaster benders should be used to ease the cast.
|
2. Circulation. Check that the peripheral circulation is good, that toes and fingers will extend fully and have normal sensibility, colour and circulation. If they do not, the plaster may need splitting or removing.
3. Advice. Tell the patient that if the limb is painful, numb, cold or discoloured, help should be sought at once.
Removing a plaster also needs care:
1. Saws. If an oscillating saw is used to cut the plaster it must only be pressed ‘up and down’, not dragged along the length of the cast (Fig. 9.16). The saw blade can cause a nasty scratch if dragged along the skin and a blunt blade can burn. Before using the saw, test the blade on the skin of your own forearm; this will reassure the patient and remind you that the instrument is potentially dangerous.
 |
| Fig. 9.16
Removing a cast with a power saw. The round blade oscillates. The plaster is cut by up and down movements at right-angles to the plaster.
|
2. Shears. If plaster shears are used, particularly on an unconscious patient, be certain that the shears cut plaster only and do not bruise skin (Fig. 9.17). It is distressingly easy to break the skin, especially in older patients.
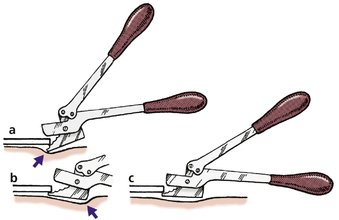 |
| Fig. 9.17
Removing the cast with shears: (a) the tip of the shears is digging into the patient’s skin; (b) the heel of the shears is digging into the patient’s skin; (c) the blade of the shears is parallel with the skin and the plaster can be removed safely.
|
3. Advice. Warn the patient that the limb will be stiff and that much hard work will be needed to restore normal function. If this is not done the patient will be disappointed and may lose confidence.
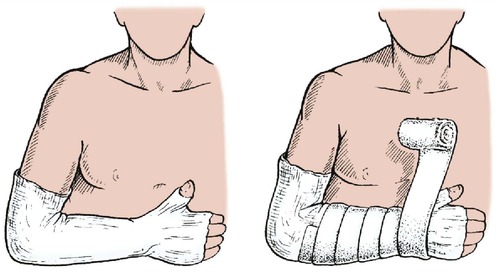
Slings
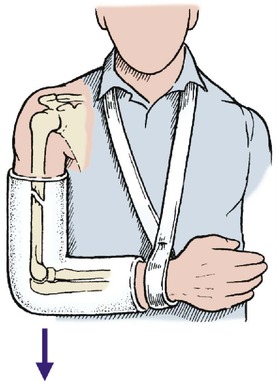
Slings are used to support an injured arm or shoulder. There are four main types (Fig. 9.18):
• Broad arm sling. Made out of a triangular bandage, this sling supports the forearm and elbow and takes the weight of the upper arm.
• Collar and cuff. A collar and cuff does not support the elbow and allows the upper arm to hang free. This sling is used for fractures of the humerus and other injuries in which the weight of the limb will maintain alignment.
• High sling. A high sling holds the hand well up and is useful for hand injuries but the position is uncomfortable if there is soft tissue swelling at the elbow. Ulnar nerve damage can occur.
• Sling and swathe. A sling and swathe, or body bandage, is worn under the clothes. This arrangement prevents any movement of the arm and is useful after shoulder operations.
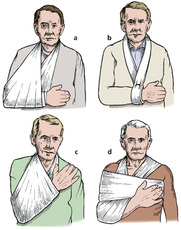 |
| Fig. 9.18
Four types of sling: (a) a simple triangular bandage; (b) collar and cuff; (c) high sling; (d) swathe and body bandage.
|
Cast braces
Cast braces are applied very closely to the limb and fitted with hinges to allow joint movement, which is important for articular cartilage nutrition (Fig. 9.19). With a cast brace patients are able to bear full weight upon their injured limbs much sooner than with conventional splints but they are difficult to apply and require special attention to detail. For the femur, for example, the cast should fit snugly around the upper part of the thigh so that the fascial sheath of the muscle can act as a hydraulic chamber to maintain length, and the hinges must be applied accurately or they will not function.
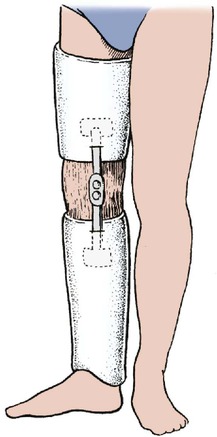 |
| Fig. 9.19
A cast brace allowing movement of the knee.
|
External fixation
Fractures that cannot be held reduced on traction or in a cast need to be fixed, either internally or externally. Internal fixation should not be used if the wound is severely contaminated or if there is skin loss, because of the risk of infection. External fixation must be used instead.
An external fixator is nothing more than a scaffold, or gantry, attached to threaded pins set in the bone fragments (Fig. 9.20a). At its simplest, external fixation can be applied by means of a bar secured to pins with the same acrylic cement used to fix joint prostheses, but many systems incorporating ingenious universal joints are now in general use. An older technique of external fixation was to incorporate pins into the patient’s plaster but the cast did not grip the pins tightly enough to hold the fragments in position.
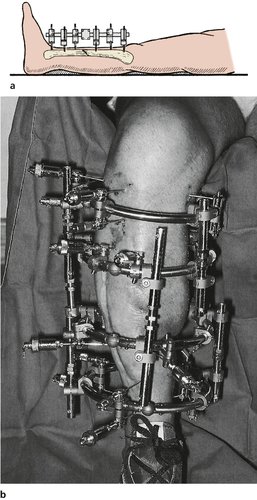 |
| Fig. 9.20
(a) External fixation of the tibia; (b) an external ring fixator in position.
|
External fixation is used not only for long bone fractures but also for maxillofacial fractures and spinal surgery, where halopelvic traction supports the spine with bars linking the skull and pelvis.
External fixation has two great advantages:
1. It can be used in patients with skin loss or infection.
2. The position of the fragments can be easily adjusted.
Some types of external fixator provide such rigid fixation that they shield the fracture from stress and actually delay union. Other designs allow a little movement to avoid this problem, called dynamization.
More recently, ‘ring fixators’ have become increasingly popular (Fig. 9.20b). These utilize smooth, narrow transfixing pins attached to a circular ring. These rings can be positioned adjacent to a joint or over the diaphyseal region of the bone. The design of the systems can be complex, but accurate reduction of fractures is possible. They are particularly useful in the treatment of angular deformities and non-unions or malunions.
Internal fixation
Bone fragments can be reassembled and held in perfect position with screws, plates, wires and nails (Fig. 9.21). Although perfect anatomical reduction is important, it is not so important that every fracture must be internally fixed; it is better to have a workable limb than a perfect radiograph.
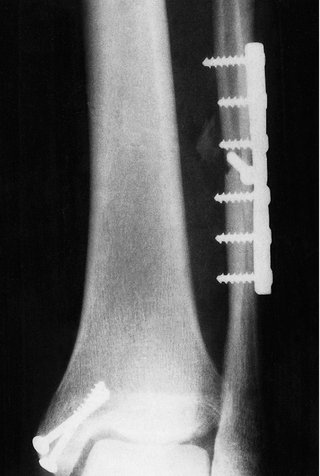 |
| Fig. 9.21
Internal fixation of a fracture dislocation at the ankle using plate and screws.
|
The main indications for internal fixation are:
1. Fractures that cannot be controlled in any other way.
2. Patients with fractures of more than one bone.
3. Fractures in which the blood supply to the limb is jeopardized and the vessels must be protected.
4. Intra-articular, displaced fractures.
The disadvantages of internal fixation are:
1. The risk of infection at the time of operation.
2. The additional trauma of operation. A wide exposure is needed to apply screws and plates and this must devitalize some of the bone and the soft tissue. There is no virtue in replacing a healthy fracture in almost perfect position with a bone that is anatomically perfect but dead.
Screws
Bone screws are different from wood screws and metal screws. Wood is a fibrous material and a wood screw is designed to cut its own thread as it is driven into a prepared hole. Because wood is fibrous and slightly soft, the tapered shank of the screw does not split the wood unless the original hole is too small. A metal screw, on the other hand, cannot find its own way through metal and must have its thread cut with a tap before it is inserted. Bone is different from wood or metal and different types of screw are used.
Two types of bone screws are commonly used but others are available for special applications (Fig. 9.22):
1. Cortical screws: a hole is first drilled at a chosen angle and tapped to take the screw. Self-tapping screws are also available but cut a less precise thread.
2. Cancellous screws, which have a wide thread, almost like a corkscrew, and grip soft cancellous bone.
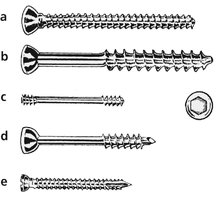 |
| Fig. 9.22
Five types of screw: (a) cortical screw; (b) cancellous screw; (c) Herbert scaphoid screw – note the different pitch of the threads at each end; (d) malleolar screw with pointed tip; (e) self-tapping screw – note the flutes at the tip.
|
Screws are used to compress plates against bone, or bone fragments against each other. When used to hold bone fragments together, the screw must grip only the fragment nearer the tip of the screw. If the thread engages both fragments it will hold them apart instead of pressing them together. To avoid this problem and achieve compression, either the fragment nearer the head of the screw can be overdrilled, so that the screw does not grip the bone, or a lag screw (Fig. 6.16) can be used.
Plates
Plates are used not only to hold bones in the correct position but also to compress the two bone ends together. These compression plates should always be applied on the tension side of the fracture. The tension side of a fracture is the one on which the deformity puts the soft tissue under tension. Compression can be applied in three ways:
1. First the plate is fixed to one fragment. The two ends are then pulled together with a small screw clamp, the second fragment is fixed to the plate and the clamp removed.
2. The two screws furthest from the fracture can be applied, leaving a slight gap between the plate and the bone. As the remaining screws are inserted, the gap is obliterated and there is a gradual reduction in the stress riser effect.
3. Dynamic compression plates (DCPs) can be used. DCPs are designed so that the shoulder of the screw presses against the edge of the screw hole and applies pressure at the fracture site (Fig. 9.23).
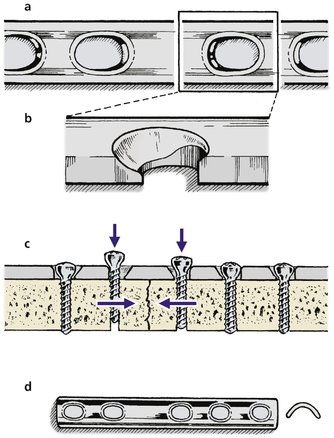 |
| Fig. 9.23
Bone plates. (a)–(c) A dynamic compression plate (DCP). The holes are shaped so that the undersurface of the head presses against the plate and applies compression to the fracture site. (d) A semitubular plate.
|
Locking plates are used to hold the bone fragments closely together. This may not be a rigid fixation, and indeed may allow a little movement of the bone ends. These fractures therefore heal with abundant callus. The advantage of this type of plate is that the screw mechanism allows strong fixation of the plate/screws to the bone; which can be particularly useful in the porotic fractures of the elderly or in cancellous bone. Newer plates are specifically designed for different anatomical sites (e.g. proximal tibia, distal tibia). The multiple bone fragments may be held individually to the plate. These can also be inserted through smaller incisions.
The disadvantages of plates are as follows:
1. Wide exposure is often needed to give access to the fracture.
2. The plate may be so large that it is difficult to close the skin over it.
3. The plate is so rigid that it causes a stress riser at each end, where fractures can occur. This can be reduced, but not eliminated, by putting the end screw through one cortex only so that there is a gradual reduction in the stress riser effect.
5. Because of points 3 and 4, plates should be removed from the femur and tibia, even though this means another operation and the risk of fracture through one of the screw holes immediately after the plate has been removed.
Intramedullary nails
Intramedullary nails are used for fractures not only of the middle but also of the juxta-articular position of the bone. These implants have been designed to allow cross-screw function. These screws therefore hold the bone position and prevent shortening or rotation (Fig. 9.24).
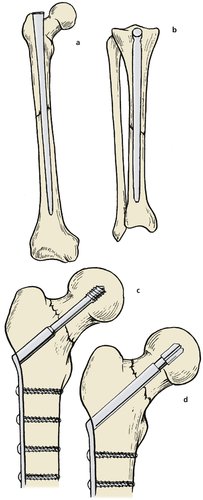 |
| Fig. 9.24
Types of internal fixation: (a), (b) intramedullary nails; (c) compression nail for fixation of the femoral neck; (d) sliding nail fixation of the femoral neck.
|
Intramedullary nails have some disadvantages:
1. Because the medullary cavity varies in width and is narrowest at the centre of the bone, the shaft may need to be reamed carefully to produce a precisely machined channel to take the nail. If such a channel cannot be created, the nail, when inserted, may break the bone.
2. Although nails hold length and alignment, they are less effective for controlling rotation unless cross-screws through the nail and bone are used.
3. There is a risk of devitalizing the bone by exposing the bone and reaming the medullary cavity of each fragment. Because of this, it is preferable to insert intramedullary nails by a closed technique using an image intensifier.
Locking nails
It is possible to insert an intermedullary nail and fix the fragments of bone to the nail itself (Fig. 9.25). These nails are extremely useful for segmental fractures of the long bones, especially the femur, because they maintain length and rotation as well as alignment. In some ways they serve the same purpose as external fixators, except that they are enclosed in the bone.
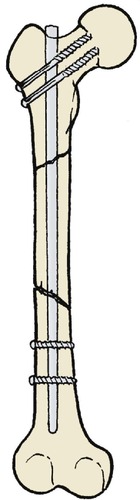 |
| Fig. 9.25
Locking nail for a segmental fracture. Screws are passed through the bone/nail above and below the fracture to hold the bone out to length.
|
In order to reduce the damage to the blood supply along the endosteal border, nails have now been designed to be inserted without the need to ream the canal. These often solid nails are guided across the fracture site and held in position with locking screws.
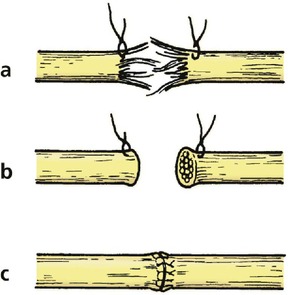
Wires
Wires can be used to fix fractures in three ways (Fig. 9.26):
1. Tension band wiring, in which the wire is applied as a loop to the outer side of the fracture so that it comes under tension when the joint is flexed. The technique is particularly useful for fractures of the patella and olecranon.
2. Cerclage wiring, useful in spiral fractures with minimal displacement. The technique requires very little surgical exposure.
3. Direct fixation. The wire holds the two fragments together like a skewer.
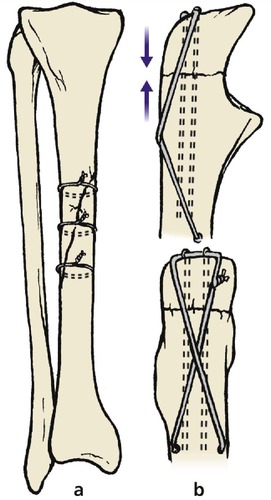 |
| Fig. 9.26
Wire fixation of fractures: (a) cerclage wiring of the tibia; (b) tension band wiring of the olecranon.
|
Wires have the following disadvantages:
1. Tension band wiring can slip; the wires may break; the wire is palpable under the skin and sometimes has to be removed.
2. Cerclage wiring does not provide rigid fixation and the wire can ‘strangle’ the bone, causing the tips of the fragments to break off, or even the whole bone to break transversely.
3. There is no rotational stability.
Nail-plates
Some fractures, particularly the extracapsular trochanteric fracture of the femur, can be treated with a nail and plate. These are now more commonly fixed with a screw and plate arrangement that allows the screw to slide within a barrel connected to the plate.
The screwnail grips the proximal fragment and the plate is screwed firmly to the femoral shaft (Fig. 9.27; p. 134). The nail has now been changed to a screw, which is easier and more precise to insert.
 |
| Fig. 9.27
A nail-plate. An obsolete design which was not strong enough to take the patient’s full weight. This nail bent because the fracture did not unite.
|
Selecting treatment
Selecting the right way to treat a fracture is not always easy. Some are wildly unstable and always need to be internally fixed, but some do so well with conservative management that operation need not be considered.
The selection of treatment must take into account the state of the skin, the age of the patient, the degree of bone displacement and the likelihood of the patient cooperating with treatment.
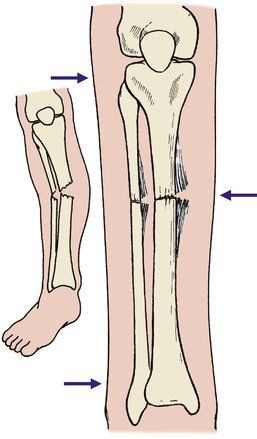
Multiple fractures need special thought (Fig. 9.28).
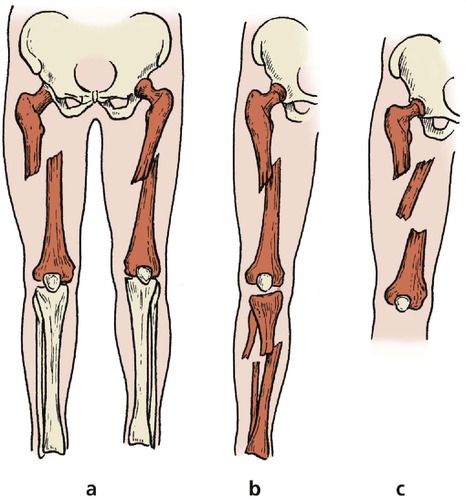 |
| Fig. 9.28
Multiple fractures: (a) fractures of the same bone in both limbs; (b) fractures of both bones in one limb; (c) segmental fracture with two fractures of the same bone.
|
1. Fractures involving both bones of one limb. It is difficult to apply traction to both bones in the same limb and it is usually better to fix both bones. If this is not possible, fix one bone and treat the other conservatively.
2. Fractures of the same bone in both limbs. These are more easily managed if at least one fracture is fixed internally so that it can be left free of traction.
3. Segmental fractures, in which one bone is broken in more than one place. These are almost impossible to control unless all fractures are fixed.
When these features are considered together with the state of the skin, associated soft tissue injury and the fitness of the patient, the management of fractures is not as straightforward and mechanical as some people think.
Complications of treatment
Complications of traction
• Over-distraction.
• Loss of position.
• Pressure sores.
• Pin track infection.
Traction is not an ‘easy option’. If patients are put on traction and left unattended until the fracture has united, problems are bound to occur. Setting up traction requires great attention to detail, and to maintain it requires even more. In orthopaedic hospitals with many patients on traction, there is usually a ‘traction sister’ responsible for checking all the traction in the hospital daily and ensuring that complications are avoided (Fig. 9.29).
 |
| Fig. 9.29
Complications of traction. Pin track infection, loss of position, pressure sores.
|
Over-distraction
Pulling too hard on a fracture may cause circulatory embarrassment, stretched or damaged nerves, and hold the fragments apart so that they do not join. The amount of weight applied to a fracture must be carefully adjusted, particularly in the first 10 days, so that the bones are out to length but are not over-distracted.
Loss of position
The position of the bones must be carefully checked to be sure that they have not slipped or angulated overlapped. The fracture should be examined radiologically with portable X-rays at the patient’s bedside until the callus formation has held the bone in the correct position.
Pressure sores
The skin is very vulnerable to pressure sores in the usual pressure areas and under the splint where the thigh ring or cords press the patient (Fig. 9.30). These need careful observation.
 |
| Fig. 9.30
Pressure from a traction cord on the skin is likely to cause a pressure sore.
|
Pin track infection
Although the pins of skeletal traction and external fixation are usually trouble-free, infection can occur where the pin passes through the skin and progress along the pin track. If this occurs, the skin is painful around the pin and the bone will be tender to gentle percussion. The infection should be treated by cleaning the skin carefully and giving antibiotics. This treatment should be continued until the pin is removed.
Complications of casts
• Circulatory embarrassment.
• Pressure sores.
• Undiagnosed wound infection.
• Joint stiffness.
Circulatory embarrassment
Casts are rigid boxes and limbs cannot expand inside them (Fig. 9.31). Swelling in a cast causes a similar problem to a compartment syndrome (p. 112). The blood supply to the limb is impaired, sometimes enough to cause gangrene needing amputation but more often the muscle bellies become ischaemic and heal by fibrosis, which causes a disabling contracture (p. 203).
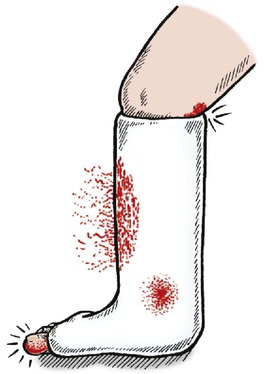 |
| Fig. 9.31
Complications of plaster. Swelling of soft tissues, smell from infection, blood-staining and pressure on skin in flexure crease.
|
Deformities of the toes (long flexor or long extensor muscle contractures) or finger deformities following forearm fractures are the commonest examples.
To avoid this complication, every patient with a cast is reviewed 24 h after it is applied and checked to make certain that none of the following signs are present:
1. Swelling of the digits.
2. Loss of extension of the fingers or toes.
3. Diminished sensibility.
4. Cool or dusky skin.
If any of these signs is present or there is any doubt about the circulation, the cast should be split down to the skin or removed completely. It is not enough to split the outer layer of the cast: bandages and dressings can constrict a limb, particularly if blood has made them hard.
Special vigilance is needed if there is bleeding under the cast. To tell if bleeding is continuing, draw round the edge of the stain with a felt-tip pen and mark the line with the date and time. If the bloodstain is expanding, the plaster should be removed.
Pressure sores
A tight spot inside a cast can cause a pressure sore and any doubtful area should be inspected by ‘windowing’ the plaster or removing it. If a plaster is windowed, the window must be replaced and bandaged into position so that the underlying soft tissue does not swell and protrude through the hole in the plaster.
Infection
It is hard to be certain if there is infection under a plaster, but smell is a good guide. Do not feel embarrassed to sniff a plaster, especially one that is stained.
Patients should be discouraged from poking rulers and straightened-out wire coat hangers down the cast to scratch the skin.
Joint stiffness
The purpose of a cast is to immobilize the fracture but the neighbouring joints are also immobilized. Some patients feel they must hold the rest of the limb stiff as well and this can lead to permanent loss of motion. Patients must be urged to move every joint that is not immobilized as vigorously as possible, particularly the hand and fingers.
Patients with Colles’ fracture, for example, have a tendency to leave the arm resting unused in a sling until the cast is removed, by which time there will be severe stiffness of the fingers, elbow and shoulder requiring many months of physiotherapy to restore movement.
Complications of internal fixation
• Infection.
• Skin necrosis.
• Neurovascular damage.
Infection
Infection of open fractures has already been mentioned (p. 97). Infection of closed fractures treated by internal fixation is even more serious because it is the direct result of treatment and probably introduced at operation.
Meticulous technique and prophylactic antibiotics minimize the incidence of infection but it still occurs and must be treated energetically, with removal of the implants if necessary.
Skin breakdown
Surgical exposure of the fracture involves cutting and mobilizing injured skin, which may not heal. The implants are often bulky and this can make skin closure difficult, especially if there is soft tissue swelling. If the wound breaks down, exposing both the implant and the fracture, an infected non-union is likely. This complication can lead to amputation.
Neurological and vascular damage
In some fractures exposing the fracture may involve mobilizing or retracting nerves and vessels. The swelling and bleeding of the fracture make these difficult to identify and vulnerable to injury at the time of operation.
Soft tissue injuries
Skin
Immediate primary closure
Wounds can only be closed directly by sutures, clips or adhesive tape if there is negligible skin loss, the wound is clean, and the edges come together easily without tension. The edges of the laceration must be brought neatly together, particularly if the wound will show.
Facial injuries should, ideally, be sutured by a plastic surgeon. The wounds should not be excised or debrided, especially those of the eyelids or lips, and lacerations of the lips, eyelids and nostrils must be treated by an experienced surgeon. Special care must be taken if there is the possibility of damage to the parotid or lacrymal ducts or the facial nerve.
All facial wounds should be closed as carefully as possible with fine sutures of 6/0 nylon or 5/0 absorbable material that are removed after 2 or 3 days. Wounds on the face should not be closed with deep sutures of heavy material.
Crushed tissues
If a laceration on a crushed digit or limb is sutured, the stitches will be put under a great strain and the soft tissue swelling may cause tissue necrosis (Fig. 9.32). Wounds on crushed limbs are best treated by elevation.
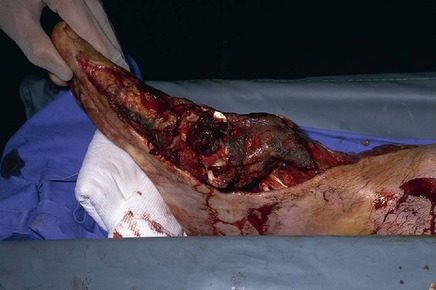 |
| Fig. 9.32
Extensive soft tissue injury with degloving caused by a lorry wheel passing over the limb.
|
When the swelling has subsided, perhaps after 7–10 days, the wound can be closed with sutures if necessary. Although inexperienced surgeons or casualty officers will be tempted to close meticulously all the wounds that they see, in the case of a crushed finger or limb this can only lead to disaster.
Wound debridement
Wound debridement means the radical excision of all debris, foreign material, dead muscle and dead skin margins to leave a wound that is completely free of all contaminated tissue and foreign material. Nothing but healthy, living tissue should be visible at the conclusion of the procedure, but nerves and blood vessels should be preserved. General anaesthesia is usually needed. To close the wound of an open fracture in the accident department under local anaesthetic is tempting, but complete debridement is almost impossible under local anaesthesia and should never be done.
High speed road traffic accidents are the commonest cause of wounds needing debridement, and tissue contaminated by road surface is difficult to clean. Bone ends that have been scraped along the tarmac have grit and dirt deeply embedded and this must be carefully removed. Skin that has been scraped along the road needs thorough scrubbing under general anaesthetic to remove all particles of dirt because any particles that remain will tattoo the skin. Never close a contaminated wound.
Delayed primary suture
In contaminated wounds immediate primary closure is not possible because of the risk of infection and delayed primary suture is necessary (Fig. 9.33). This is an established technique, derived from military surgery, and requires at least two operations:
1. The wound is debrided thoroughly and packed lightly with paraffin gauze.
2. Between 2 and 5 days later the gauze and dressings are removed and the wound closed with sutures.
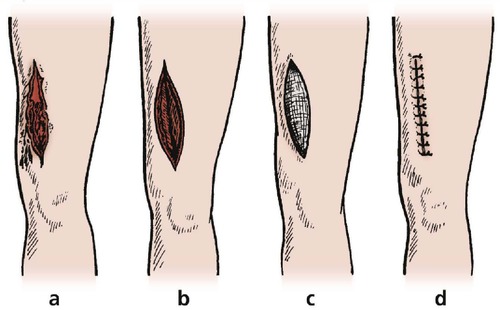 |
| Fig. 9.33
Delayed primary suture: (a) contaminated wound; (b) the wound has been excised; (c) the wound packed; (d) the wound closed.
|
Delayed secondary closure
If the defect is too large or too deep to be closed by delayed primary suture, delayed secondary closure with a split skin graft or flap may be required.
Closing skin defects
Methods of closing skin defects
• Relaxing incisions.
• Split skin grafts.
• Whole thickness grafts.
• Skin flaps.
• Foreign skin (xenograft).
• Free flaps.
The wound of a compound fracture must be thoroughly debrided and never closed by primary suture.
Wounds cannot be closed with sutures, clips or tape if there is any skin loss; one of the following methods must be used instead:
Relaxing incisions
In some circumstances a wound can be closed after a relaxing incision is made elsewhere to take tension off the skin in the wound area.
Split skin grafts
Split skin (partial thickness) grafts from intact areas can be applied directly to the defect. These grafts take well but the grafted area is of poor quality.
Whole thickness grafts
Full thickness grafts produce a supple grafted area, but take less reliably and leave a scar at the donor site. They are best for small defects.
Skin flaps
Flaps of skin, muscle, fascia or a combination of these can be mobilized locally or at a distance and used to cover large defects. Mobilizing the flap is difficult and is best done by plastic surgeons.
Foreign skin (xenografts)
Foreign skin, e.g. pig skin, can be used as a temporary biological dressing if there is very extensive skin loss. Xenografts are shed 1–2 weeks after application but the resulting defect is usually clean and may be grafted directly or closed by direct primary suture.
Free flaps
Free flaps of skin can be taken and their vessels anastomosed by microsurgery to vessels in the denuded area. These grafts are very successful when a good blood supply is achieved but the operation is tedious, and if the graft becomes necrotic an alternative solution must be found.
Gunshot wounds
Gunshot wounds have a bad prognosis with a high incidence of gangrene and anaerobic infection. Three types of injury are seen: (1) low velocity injuries; (2) high velocity injuries; and (3) shotgun wounds.
Low velocity injuries are caused by a heavy bullet travelling at low speed, e.g. the bullet from a Colt 45 of ‘Western’ fame, which could knock a man off his horse. These missiles travel at about 200 m/s and cause little soft tissue damage as long as they remain stable. If the bullet is unstable and cartwheels through soft tissue, more damage is done.
High velocity injuries are caused by missiles such as rifle bullets travelling at around 1000 m/s. They are more serious than low-velocity injuries, partly because of foreign material in the wound and partly because missiles travelling at this speed do not drill a clean hole through a limb but create a cavity behind them, which sucks soil, clothing and other harmful material into the limb. The cavitation opens up tissue planes and provides ready access for infection. The effect is rather like a small explosion within the limb.
Shotgun injuries are untidy and cause widespread soft tissue damage. Clothing, pellets and the wad from the cartridge are driven into the soft tissues by the blast and careful debridement is needed. It is unnecessary, and usually impossible, to remove all the pellets.
In civilian practice, gunshot wounds are becoming more common and must be treated by thorough debridement and delayed primary suture in the same way as battle injuries.
High speed road traffic accidents present a different problem because there is little foreign material and no cavitation from the projectile. Immediate closure is possible provided that the wound is meticulously debrided and all grit, dirt and contaminated soft tissue have been removed.
A gunshot wound is different; it must never be closed and debridement must be very thorough, taking special care to remove fragments of clothing, soil and wadding from the wound.
Compartment syndromes
Compartment syndromes must be treated promptly and are dealt with on p. 112.
Nerves
Nerve injuries may be treated by one of the following (Fig. 9.34):
• Immediate primary suture.
• Secondary suture.
• Cable grafts.
 |
| Fig. 9.34
Secondary repair of nerve: (a) the damaged nerve ends are tagged; (b) the nerve ends are trimmed at 10 days; (c) the nerve is repaired with sutures through the epineurium.
|
Immediate primary suture
Because of the way in which nerves are injured (p. 42), few nerve lesions are suitable for immediate repair. Clean-cut lacerations, such as those caused by a hand going through a plate glass window, are suitable and should be repaired as carefully as possible using an operating microscope.
Secondary suture
Unless conditions are ideal, i.e. a clean and recent cut treated by an experienced surgeon in a well equipped operating theatre, nerve injuries are better treated by secondary repair, which involves two operations. At the first, the wound is cleaned and debrided, the nerve ends identified and tagged with a suture for recognition later, and the wound closed.
Sutures are then placed in the thickened epineurium at the end of the nerve.
Cable grafting
Long defects in nerves caused by crushing or tearing must either be left untreated or bridged with a graft made of a less important nerve, such as the saphenous or sural nerve in the calf (Fig. 9.35). The results are not as good as primary suture but may be better than nothing.
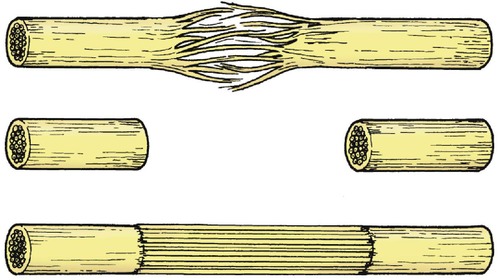 |
| Fig. 9.35
Cable grafting. The damaged area is excised and replaced with several lengths of a smaller nerve.
|
Blood vessels
Cut arteries can be resutured accurately but those that are torn or crushed can be repaired only by excising the damaged segment and eliminating the gap by shortening the limb, rerouting the artery, or inserting a graft.
Veins present greater difficulty because their walls are thinner and the flow within them is so slow that clotting occurs.
Replantation of limbs
Severed limbs can be reattached to the body, although the operation is technically difficult and takes a long time.
The vascular repair is straightforward and must be adequate for the limb to be viable. Soft tissues, including muscle, skin and tendons, can be reconstructed and bones can be put back together by internal fixation. The finished limb may look very like the original but, despite initial success, the limb may have to be amputated later.
The reason for such disappointment is the inadequacy of the nerve repair (p. 141). Nerves cannot be repaired accurately and the limb may be both numb and paralysed. A prosthetic limb has more practical value to the patient than an insensitive and paralysed arm, which may be little more than a living paperweight, or a lower limb that functions, at best, as a rather heavy, unwieldy and unstable pillar.
Despite these gloomy observations, replanted limbs do sometimes work effectively and the techniques of operation are continually improving.
Case reports
These three case studies represent different methods of management of femoral shaft fractures.
Case A
A 5-year-old child was playing on a trampoline in his garden when he fell awkwardly, sustaining a closed fracture of the mid shaft of the right femur. The leg was externally rotated and the limb was shortened.
He was taken to the accident and emergency department, where it was noted that there was normal distal neurovascular supply; appropriate analgesics were given. The patient was managed by the orthopaedic team with balanced skin traction and was kept in hospital for a period of 3 weeks. During this time the position of the fracture was monitored using radiographs and the traction was adjusted accordingly to allow correction of the rotation and shortening of the limb.
At 3 weeks the patient’s limb was immobilized in a hip spica cast after it was shown that there was abundant callus around the fracture. The patient was discharged from the hospital on crutches, non weight-bearing.
Case B
A 23-year-old motorcyclist was involved in a high energy road traffic accident and sustained an open comminuted fracture of the mid shaft of the right femur. At presentation it was clear that there was a 10 cm contaminated wound on the lateral side of the thigh and, indeed, a portion of the femur could be seen in the depth of the wound.
The patient was subsequently returned to theatre on two further occasions when the wound was again debrided; it was finally closed after 4 days. The patient elected to remain with the external fixator (although an intramedullary nail was offered) and this was held in situ until the femur had healed at 3 months.
Case C
A 76-year-old lady was doing her weekly shopping when she caught her right foot on a manhole cover and fell, twisting the leg underneath her as she fell. She sustained a closed spiral supracondylar fracture of the distal right femur. There was marked angulation and displacement of the fracture fragments.
After haemodynamic stabilization and ensuring there were no other injuries while she was in the accident and emergency department, she was subsequently transferred to the care of the orthopaedic surgeons and was operated on that same evening. The femoral fracture was fixed using a locking plate, which allowed reduction of the fracture fragments and stable fixation using a plate fixed to the lateral surface of the femur.
Summary
These three femoral fractures represent very typical practice in most hospitals. Those patients with skeletal immaturity are often treated conservatively because of fear of damaging the growing physis with any surgery. Traction is a perfectly acceptable method of management as long as it is monitored carefully and the position of the fracture is maintained throughout.
Open fractures need to be treated aggressively because of the risk of potential contamination and subsequent infection. The second patient was operated on early and returned to the operating theatre on a number of occasions to ensure that all potentially necrotic tissue was removed. External stabilization of the femur allows control of the fracture fragments while soft tissue management is undertaken. Definitive fixation with a nail or plate can then be used.
Low energy injuries in the elderly can often result in quite significant fractures. Stabilization in this case was with a plate to hold the fracture fragments securely in position. Immobilization for long periods of time in traction in this group of patients is fraught with potential problems and subsequent complications. Similarly, the use of an external fixator would be unnecessary in a closed, low energy injury without soft tissue contamination.
[/level-membership-for-orthopaedics-category][not-level-membership-for-orthopaedics-category]
Chapter 9. Methods of managing trauma
Fractures
The principles of fracture management are:
1. Reduction of the fracture.
2. Immobilization of the fracture fragments long enough to allow union.
3. Rehabilitation of the soft tissues and joints.
Methods of reduction are:
1. Traction.
2. External splints/braces.
3. External fixation.
4. Internal fixation.
Some fractures, when seen, are not displaced and therefore do not require reduction. Others, however, will require reduction in order to keep the bones in the correct position.
Traction
Pulling on a broken limb draws the bones into line, just as a string of beads straightens when it is pulled at each end. Muscular contraction will shorten any limb unless there is a bone to hold its ends apart and the traction must therefore be strong enough to overcome the muscle power, but not so strong that it holds the ends apart (Fig. 9.1).
|
|
| Fig. 9.1
Traction. Traction should be sufficient to pull the bones out to length and overcome local muscle contraction.
|
Traction can be applied to the limb in a variety of ways.
Skeletal traction
Traction is applied to pins passed through the bone. Although metal pins passing straight through a limb may look unkind, they are more comfortable than skin traction, and allow substantial loads to be applied accurately to the bone itself. The commonest sites for the insertion of skeletal pins are the upper end of the tibia, the calcaneum, the distal femur or the olecranon, but traction can also be applied to the skull, pelvis and many other sites.
Two types of pin are in common use (Fig. 9.2). A Steinmann pin has a trocar point and smooth sides. Although easy to insert, it can slip sideways after being in position for a week or more, which is both uncomfortable and unhygienic. Threaded pins, such as a Denham pin, have threads which grip the bone and prevent lateral slippage. Although slightly harder to insert, they are better in the long term.
|
|
| Fig. 9.2
Types of pin for traction: (a) Steinmann pin; (b) Denham pin with threads standing proud of the pin shaft.
|
Skeletal traction is easy to set up and manage, provided attention is paid to the following points:
1. The pins should be drilled through the bone with a hand drill or T handle.
2. If the pin is inserted using local anaesthesia, the skin and periosteum must be carefully infiltrated at the points of entry and exit.
3. Never try to hammer the pin through the bone – this does not work and breaks the bone.
4. Keep the point of entry clean to avoid infection of the pin track but do not wind a bandage round the pin like a cleat: this causes skin necrosis.
5. Check whether the pin is threaded or smooth before removing it; smooth pins can be removed with a straight pull but a threaded pin must be unscrewed.
6. If the pin area is painful and the bone is tender to percussion, suspect a pin track infection.
Skin traction
Skin traction is applied by means of adhesive strapping stuck directly onto the skin and has many practical problems. The skin beneath the strapping becomes sweaty and rashes are common. The weight is applied to the bone indirectly via the soft tissues and these can be disrupted if too much weight is applied. The usual upper limit is 5 kg (12 lb). For these reasons, skin traction is really only suitable for children and as a temporary measure in adults until definitive treatment is instituted.
The mechanics of traction
The mechanics of traction are straightforward. Every force has an equal and opposite force; traction is no exception. The ‘opposite’ force to traction can be applied in three ways, described below.
Fixed traction with a splint. In the simplest form of fixed traction, the limb is rested on a splint such as the Thomas splint, originally devised by Hugh Owen Thomas (p. 125) for applying fixed traction to the lower limb, and still widely used (Fig. 9.3). The lower end of the splint has a ‘V’ shape to hold traction cord applied to the patient’s limb either by skin traction or, as a first aid measure, by tying the patient’s boot to the splint. The limb is then stretched with a Spanish windlass (nowadays usually made of two wooden tongue depressors) and the counter pressure taken by a padded leather ring at the upper end of the splint under the ischial tuberosity. The Thomas splint is ideal for transporting patients because it is self-contained and does not need pulleys or weights.
|
|
| Fig. 9.3
Fixed traction with Thomas splint using a Spanish windlass.
|
Fixed traction using gravity. The fundamental principle of this type of traction is to string the patient up by the injured limb and leave them hanging until the bone has joined. Gallows traction for a child under the age of 3 with fractured femur is a good example of this. Children tolerate the position surprisingly well for the 2–3 weeks necessary for the fracture to unite at this age (Fig. 9.4).
|
|
| Fig. 9.4
Gallows traction. The weight of the child should be enough to hold the limb out to length. A hand can be slipped between the buttocks and sheet.
|
Gravity can also be applied to the limb by fixing the patient’s leg to the foot of the bed, which is then raised so that the patient slides down towards the pillow (Fig. 9.5).
|
|
| Fig. 9.5
(a) Fixed traction – the weight of the patient provides traction; (b) sliding traction – the weight of the patient still applies traction but his own weight is counterbalanced by a weight attached to a cord running over a pulley.
|
A similar principle is used in a hanging cast for fractures of the humerus in which a cast is applied to the forearm and suspended by a collar and cuff so that the combined weight of the arm and cast pull the humerus into line (Fig. 9.6). The arm must hang; a sling supporting the elbow prevents the traction reaching the fracture site.
|
|
| Fig. 9.6
Hanging cast. The weight of the arm and cast pulls the humeral fragments into line.
|
Sliding traction. Suspending the patient and tying the feet to the end of the bed restricts the patient’s mobility and makes nursing difficult. This can be overcome by weights and pulleys but the system is complicated and needs regular adjustment.
At its simplest, sliding traction is little different from fixed traction, except that the patient can move freely in the bed, but more complex arrangements are possible. Hamilton–Russell traction uses a single cord to apply a horizontal force that is twice the vertical force because the cord, on its horizontal run, runs through a three-pulley system which gives it a velocity ratio of 2. This means that a 1 kg weight will exert a 1 kg upwards pull, but a 2 kg longitudinal pull (Fig. 9.7).
|
|
| Fig. 9.7
Hamilton–Russell traction. The longitudinal traction has a velocity ratio of 2 and the vertical traction a velocity ratio of 1. The resultant force is 2.24 times the mass of the weight applied at an angle of 27° to the horizontal.
|
Balanced traction. It is uncomfortable to leave a broken limb lying on a bed so that the fragments rub against each other whenever the patient turns over (Fig. 9.8). Greater comfort can be achieved by resting the limb on a splint which is then suspended so that the limb is, in effect, in a gravity-free field.
|
|
| Fig. 9.8
Balanced sliding traction. One weight applies longitudinal traction and others are applied to the upper and lower ends of the limb so that it ‘floats’ in a gravity-free field.
|
In the most complicated arrangements this is done by resting the leg on a Thomas splint with a weight and pulley attached to each corner. If the weights are correctly adjusted the patient can be lifted almost with a fingertip, which makes nursing easier and avoids pressure sores. None of these weights act on the fracture, which must be controlled by a longitudinal force.
Although there are many advantages in complex systems of balanced traction, they are difficult to maintain and a simple system is often better.
Types of traction
• Skin or skeletal.
• Fixed or sliding.
• Fixed traction – may use splint or gravity.
• Sliding traction – may be balanced or not balanced.
External splints/slings/braces
Any device that holds a fracture steady is a splint and those that set hard around the limb are casts. A cast will hold a limb straight and still but cannot hold it out to length; casts are therefore unsuitable for fractures in which the limb is shortened.
To maintain the alignment of a bone, the plaster is not just wrapped around the leg and allowed to set; pressure must be applied to the cast while it sets so that the bones are held accurately by three-point pressure (Fig. 9.9).
|
|
| Fig. 9.9
Three-point pressure. The fracture line is closed by pressure at three points.
|
Use
Splints do not provide rigid fixation. If applied immediately after the fracture they will become loose as the swelling of trauma subsides and muscles waste. The position of the fracture must be checked regularly and the position reviewed.
If the fracture slips there are several options:
1. The position may be accepted (Fig. 9.10).
|
|
| Fig. 9.10
Loss of fracture position: (a), (b) a spiral fracture of the tibia with minimal displacement on the day of injury; (c) the position 10 days later. The fragments have moved but the position is still acceptable.
|
2. The fracture may be manipulated again.
3. It may be necessary to abandon conservative treatment.
Materials
All casting bandages consist of a solid element covering a fibrous material. The solid part gives rigidity and the flexible part prevents it cracking. Reinforced concrete contains steel rods for similar reasons.
The original casting material was developed by the ancient Egyptians, who are said to have treated fractures by resting the injured limb in boxes containing Nile mud and straw which set hard and was broken away when the fracture had united. An Arab surgeon was the first to describe the use of plaster to treat fractures in ad 970, but it was not until the early part of the 20th century that plaster was widely used in Europe.
Plaster of Paris
The best known casting material is plaster of Paris, a high quality gypsum that originally came from Montmartre. Plaster of Paris bandages consist of a tough open-weave fabric coated with hemihydrated calcium sulphate powder. Book muslin or crinoline were originally used as the fabric. When dipped in water the plaster becomes hard with crystalline hydrated calcium sulphate. The chemical reaction involved is exothermic and the plaster therefore becomes warm as it sets:
Plaster of Paris is light, comparatively soft, porous so that the limb can ‘breathe’, easy to remove and has stood the test of time. Its greatest disadvantages are that it disintegrates when wet and that 24–48 h are needed for it to harden enough to take the patient’s weight.
Modern materials, including resins and fibreglass, are now used frequently. They are lightweight and easy to apply. Unfortunately, they are not as easy to mould as plaster of Paris and removal can be more difficult. Patients do, however, prefer them.
Applying a plaster correctly takes much practice, but the following points are particularly important (Fig. 9.11):
1. Padding. Apply light padding of soft wool or cotton over bony areas to avoid pressure sores, preferably over a thin layer of stockinette so that the padding will not roll up inside the cast and cause uncomfortable ridges.
2. Water temperature. The hotter the water, the faster the plaster sets. Cold water gives more time to apply the cast and so is recommended for beginners.
3. Dipping. When dipping a plaster bandage, hold it lightly so that water can penetrate to its centre. Hold it under the water until the bubbles stop and then drain it until the drips stop (Fig. 9.12). Do not wring it out like a dishcloth.
|
|
| Fig. 9.12
Dipping plaster bandage. The plaster is held loosely under the water and not gripped. The end of the bandage is separated from the rest of the roll.
|
|
|
| Fig. 9.11
Applying a padded plaster. Stockinette is first placed over the arm and plaster wool is rolled gently over the stockinette.
|
|
|
| Fig. 9.13
Applying the plaster. The plaster bandage is rolled gently and carefully around the limb.
|
5. The ‘100–90 trick’. If a joint has to be held flexed to 90°, flex it 10° more, apply the plaster and then put the limb in the correct position (Fig. 9.14). This avoids hard wrinkles in the plaster, which can cause pressure sores at the flexure crease.
|
|
| Fig. 9.14
The ‘100–90’ trick. The plaster is applied at 100° and then straightened to 90° to avoid pressure at a joint.
|
6. Splitting the cast. If the plaster is applied soon after injury, or at operation, split the cast and padding down to skin so that it can be spread or removed quickly in case of limb swelling.
Once the plaster is applied and set, check the following:
1. Edges. Check that the edges are not too sharp and do not press on the skin. If they do, bend the edges but do not cut the edge off because this loosens the plaster and makes the problem worse (Fig. 9.15).
|
|
| Fig. 9.15
Tight plasters. The edge should not be trimmed – this leaves a sharp ragged edge. Plaster benders should be used to ease the cast.
|
2. Circulation. Check that the peripheral circulation is good, that toes and fingers will extend fully and have normal sensibility, colour and circulation. If they do not, the plaster may need splitting or removing.
3. Advice. Tell the patient that if the limb is painful, numb, cold or discoloured, help should be sought at once.
Removing a plaster also needs care:
1. Saws. If an oscillating saw is used to cut the plaster it must only be pressed ‘up and down’, not dragged along the length of the cast (Fig. 9.16). The saw blade can cause a nasty scratch if dragged along the skin and a blunt blade can burn. Before using the saw, test the blade on the skin of your own forearm; this will reassure the patient and remind you that the instrument is potentially dangerous.
|
|
| Fig. 9.16
Removing a cast with a power saw. The round blade oscillates. The plaster is cut by up and down movements at right-angles to the plaster.
|
2. Shears. If plaster shears are used, particularly on an unconscious patient, be certain that the shears cut plaster only and do not bruise skin (Fig. 9.17). It is distressingly easy to break the skin, especially in older patients.
|
|
| Fig. 9.17
Removing the cast with shears: (a) the tip of the shears is digging into the patient’s skin; (b) the heel of the shears is digging into the patient’s skin; (c) the blade of the shears is parallel with the skin and the plaster can be removed safely.
|
3. Advice
Buy Membership for Orthopaedics Category to continue reading. Learn more here
[/not-level-membership-for-orthopaedics-category]
