CHAPTER 10 Medial Unicompartmental Knee Arthroplasty
Fixed-Bearing Techniques


Introduction
The potential advantage of unicompartmental knee arthroplasty (UKA) over tricompartmental replacement is the preservation of the bone stock in the remaining compartment and the preservation of the ligaments. This concept requires an accurate and reproducible surgical technique. The most important evolution in UKA during the last decade is minimally invasive surgery, which can be defined as the ability to implant the components without an incision in the quadriceps tendon or the vastus medialis and without everting the patella.1,2 When performing UKA, surgeons must bear in mind that proper implant positioning should not be compromised by using too small an incision.
Success of the procedure will be related not only to proper surgical technique but also to proper patient selection.1–5 The indications for UKA are painful osteoarthritis or osteonecrosis limited to one compartment of the knee associated with significant loss of joint space on the radiographs on a stable knee.5–9 Age and weight still represent debatable issues for the indication of UKA as the procedure is often presented as an alternative to either osteotomy or total knee arthroplasty (TKA).5–9 Obesity itself is consequently not a contraindication. We do use the “SAW” concept (stability, alignment, and wear) to confirm the indication of UKA. Therefore, the knee should be stable and aligned and cartilage wear should be limited to one compartment of the knee. These criteria are checked preoperatively, and the physical examination should ensure that the knee is stable in the anteroposterior and sagittal planes and that the range of knee flexion is greater than 100° with a full knee extension. The patellofemoral joint should be clinically asymptomatic to confirm that wear is limited to one compartment.
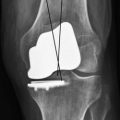
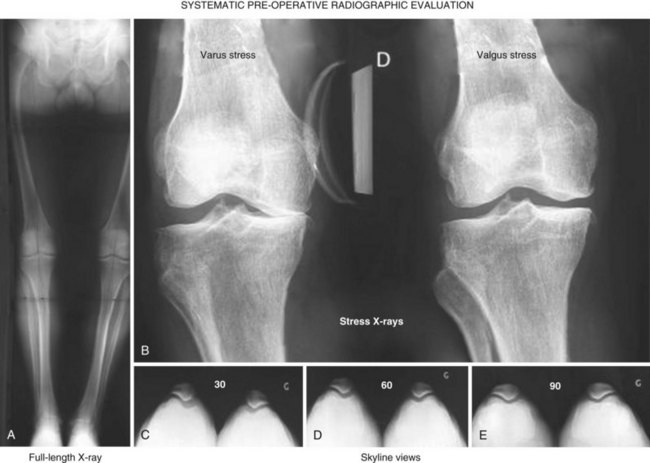
To complete the physical examination, a systematic radiologic analysis should include anteroposterior and mediolateral views of the knee, full-length radiographs, stress radiographs,10 and skyline views (Fig. 10–1). The radiographic analysis should ensure that there is no patellofemoral loss of joint space on skyline views at 30°, 60°, and 90° of flexion; the presence of full-thickness articular cartilage in the nonaffected compartment; and full correction of the deformity to neutral on stress radiographs performed with the patient supine using a dedicated knee stress system. The angle between the mechanical axis of the femur and the anatomic axis of the femur, as well as the mechanical axis of the lower limb, should be calculated on the full-length radiograph. A varus or valgus deformation of the lower limb greater than 15° may represent a contraindication for UKA as the correction of such deformation may require soft tissue release, which should not be performed when doing UKA.11,12 When there is a question regarding the status of the anterior cruciate ligament (ACL) following the clinical examination, magnetic resonance imaging may be useful to confirm that the ACL is intact. This step, including patient selection and confirmation of the indication, represents probably the most important step and is really a basic warranty to the success of the procedure.
Setup and Equipment
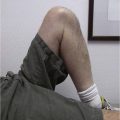
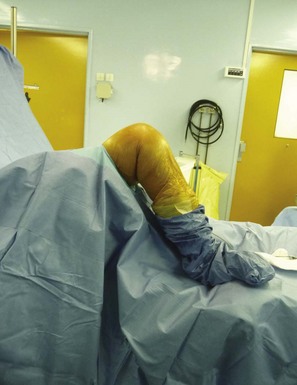
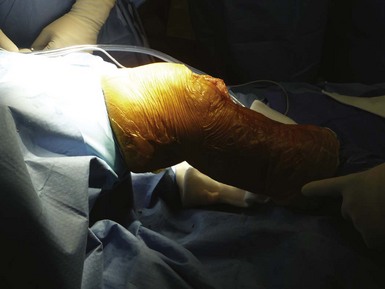
The procedure can be performed under general or epidural anesthesia. We do use a tourniquet inflated at the proximal part of the thigh. We perform the procedure on a routine operating table using two leg holders, one below the foot and one against the thigh at the level of the tourniquet (Fig. 10–2). The leg holder below the foot should be positioned to maintain the knee flexed at 90° when the foot is resting on the leg holder and the knee flexed at 110° when the foot is placed below the leg holder.
Approach
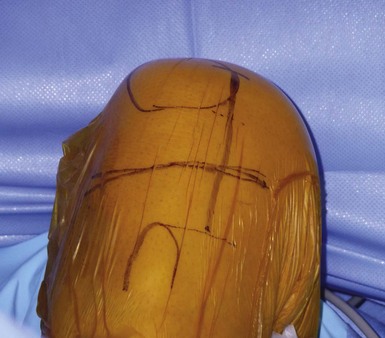
It is important to maintain proper visualization throughout the procedure to optimize implant positioning even when using a minimally invasive technique. Therefore, the length of the skin incision varies from 8 to 10 cm depending on skin elasticity and patient morphotype. Sufficient visualization is required throughout the procedure and can be achieved by frequent extension-flexion manipulations to preferentially visualize either the femoral side or the tibial side. The upper limit of the incision is the superior pole of the patella, and the incision extends distally either toward the medial side of the tibial tuberosity for a medial UKA or toward the lateral side of the tibial tuberosity for a lateral UKA, ending 2 cm under the joint line previously located (Fig. 10–3). The proximal part of the incision is more essential for the procedure, and two thirds of the incision should be located above the joint line. For the medial UKA, a medial parapatellar approach is performed, extended proximally 1 or 2 cm in the quadriceps tendon. Once the synovial cavity is opened, the part of the fat pad in the way of the condyle is excised to properly visualize the condyle, the ACL and the corresponding tibial side of the tibial plateau. It is important to note that the principles of ligament balancing existing in TKA cannot be applied to UKA because the collateral ligaments should not be released in UKA. To protect the collateral ligament and safely perform the cuts, a dedicated curved, thin Hohmann retractor is placed on the medial or lateral side of the incision.
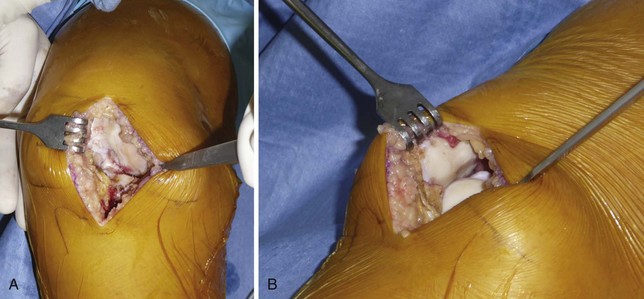
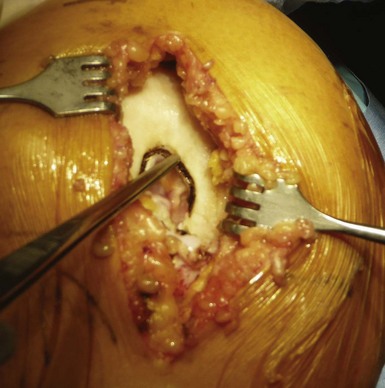
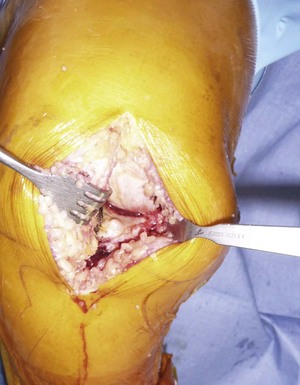
Before proceeding to the bone cuts, the first step is to bring the knee to 60° of flexion to evaluate the joint by checking the resistance of the ACL with an appropriate hook and evaluating the state of both the opposite tibiofemoral joint and the patellofemoral joint (Fig. 10–4). The osteophytes are then removed on the medial femoral condyle, after which a relative lengthening of the medial collateral ligament and capsule is performed, allowing passive correction of the deformity. Then, osteophytes located in the intercondylar notch should also carefully be removed to avoid late impingement with the ACL on the notch (Fig. 10–5). This point is very important to preserve the ACL and avoid any so-called Marie-Antoinette effect related to the osteophytes developed in the intercondylar notch, which have a guillotine-like effect on the ACL.
Technical Description
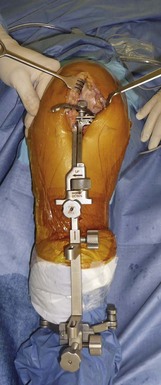
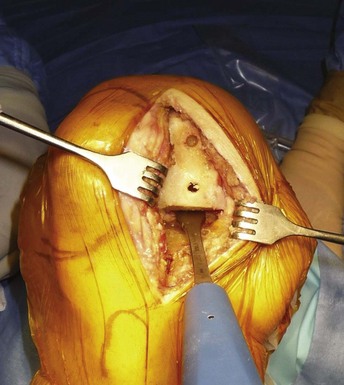
It is important to bear in mind that in UKA the proper tension of the ligaments will be restored while filling the gap left by the worn cartilage with the unicompartmental components; therefore, UKA is a so-called surfacing procedure. The tibial cut is made using an extramedullary rod (Fig. 10–6). The guide is placed distally around the ankle with the axis of the guide lying slightly medial to the center of the ankle joint. The proximal part of the guide is resting on the anterior tibia pointing toward the axis of the tibial spines; with modern instrumentation, it is possible to have the cutting part of the guide resting only on the upper tibia (medial or lateral) to be resected. The diaphyseal part of the guide is parallel to the anterior tibial crest, and the anteroposterior position of the guide is adjusted distally to reproduce the natural upper tibial slope, usually between 5° and 7° of posterior slope. The amount of resection is decided after using a 4-mm probe located on the deepest part of the affected plateau, and particular care should be taken to properly define the level of the cut. A good anatomic landmark at this step is the deepest part of the deep layer of the medial collateral ligament. When the angel wing–shaped probe is inserted into the tibial guide, the tip of the probe should be at this level (Fig. 10–7). An insufficient cut on the tibia will lead to an overcorrection of the deformity, and cutting the tibia too low may lead to a tibial plateau fracture. To complete the tibial cut, the sagittal tibial cut can be done using one of the sagittal marks provided by the guide or made as a freehand cut. When the cut is made freehand, the cut should be aligned close to the tibial spine eminence, with the anterior starting point determined after checking the alignment of the edge of the femoral condyle on the tibial plateau when the knee is brought from flexion close to full extension (Fig. 10–8). At this step, once again, particular care should be taken to protect the ACL using a retractor or a pickle retractor.
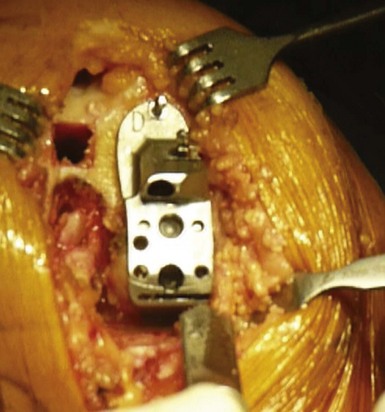
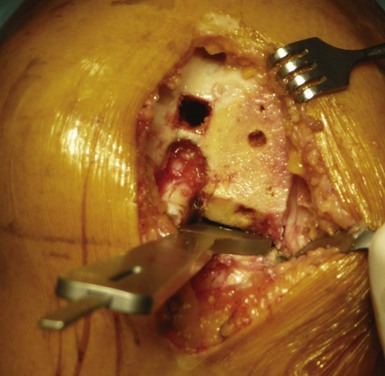
The drilling of the femoral medullary canal through a short incision often requires bringing the knee to 60° of flexion. In fact, in flexion, the tension from the patella on the intramedullary guide might induce incorrect alignment. Once the guide has been properly introduced, the distal femoral cut can be made by marking the angle between the anatomic and mechanical axis previously calculated on the full weight-bearing view. This angle is usually 4–6°. The amount of bone resected from the distal femur corresponds exactly, millimeter for millimeter, to the femoral prosthesis. The remainder of the femoral cuts (posterior cut and chamfers) will then be completed using the appropriate cutting block. The size of the femoral implant should be determined using the cutting block when this femoral finishing guide is positioned on the distal femoral cut, searching for the best compromise between an anatomically centered position on the femoral condyle and a long axis perpendicular to the resected tibial plateau (Fig. 10–9). The top of this finishing guide should be localized at least 1–2 mm above the deepest layer of the cartilage to avoid a potential notch between the femoral implant and the patella. To control the mediolateral position of the femoral cutting guide, which determines the position of the final implant, the use of tibial referencing based on the previously made tibial cut is probably the best landmark. Because the divergence of the medial condyle is different from one knee to another, checking the mediolateral position of the guide on the femoral condyle is also recommended. Once the posterior cut has been made and the cutting guide removed, removal of any posterior osteophytes is necessary using a curved osteotome to increase the range of flexion and avoid any posterior impingement with the polyethylene liner in high flexion (Fig. 10–10).
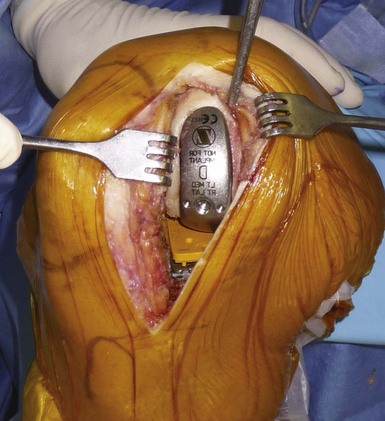
The size of the tibial tray should now be determined, managing the best compromise between maximal tibial coverage and overhang, which might induce pain. The anteroposterior size of the tibial plateau sometimes differs from the mediolateral one, especially for female knees, thus different sizing trials are necessary to find the best compromise (Fig. 10–11). It is important to keep the depth of the tibial cut as conservative as possible to take advantage of the strength of the tibial cortex and the increased area of contact proximally. The knee is then brought into maximal flexion and externally rotated.
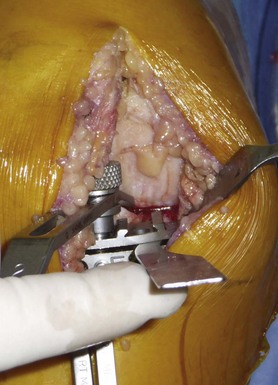
The final preparation of the tibia is completed with the appropriate guide, with the underlying keel impacted in the subchondral bone. Using a minimal incision, it is important to locate carefully the posterior margin of the tibial plateau to position the keel correctly in the anteroposterior direction. It is useful to precut the future location of the keel using a small osteotome. The flexion-extension gaps should be tested with the trial components in place and inserting a trial polyethylene liner (Fig. 10–12). Common causes of impingement are residual bone eminence, incorrect position of the tibial or femoral component, or an oblique tibial cut. Once this has been verified, it is important to check for 2 mm of protective laxity at close to full extension to avoid any overcorrection of the deformity, which could lead to progression of osteoarthritis in the unreplaced compartment. Important residual varus deformity should also be avoided, as recently reported, to minimize the risk of polyethylene wear when using flat polyethylene inserts. The ideal correction as measured on the postoperative full weight-bearing view will probably consist of a tibiofemoral axis crossing the knee between the tibial spines and the lateral third of the tibial plateau for a medial UKA, as outlined by Kennedy et al. in their classification.10
We cement all components for better fixation because long-term results suggest loosening is not a common mode of failure with modern cemented fixed-bearing, metal-backed components. When cementing the components, it is important to avoid leaving any cement at the posterior aspect of the knee, and a 90° curved probe is useful to remove any posterior cement when using a minimal incision. Once the femoral implant has been cemented, bringing the knee close to extension helps remove any posterior cement, with the polyethylene liner inserted last. While the cement is curing, the knee should be maintained at 20° of flexion and not in full extension to avoid lift-off of the posterior aspect of the tibial plateau during this step (Fig. 10–13). Patellar tracking should be checked before closing; the absence of patellar eversion during the procedure is helpful for that step. The tourniquet is released before closure to adequately perform hemostasis. In our practice, one intra-articular drain is left for 36 hours.12
Special Considerations
Postsurgical Follow-Up
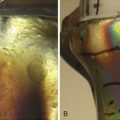
Postoperatively, immediate weight bearing is recommended after the removal of the femoral nerve block catheter (left 12 hours postoperatively), protected by two crutches for 1 or 2 weeks. We recommend manual range-of-motion physiotherapy starting the day after surgery. Deep vein thrombosis prevention is managed using mechanical devices and low-molecular-weight heparin for 3 weeks postoperatively.12 At 2 months, clinical and radiologic evaluation of the patient is performed. Pain-free full range of motion is usually acquired between 2 and 6 months, and during this period, we ask the patient to walk, swim, or ride a bike as often and as much as he or she can. Patients are allowed to go back to their previous sports activities at 6 months when they are performing low-impact activities and after 1 year when they are performing high-impact activities. Patients are followed yearly for 5 years and every 2 years after 5 years.15 As polyethylene wear remains one of the first causes of failure after fixed-bearing UKA, this follow-up is particularly important. In fact, isolated polyethylene exchange can be successfully performed when the metal back has not been torn by the femoral compartment, and a regular patient follow-up may help to detect early polyethylene wear that may require a polyethylene exchange.12
Tips and Pearls
1 Argenson JN, Parratte S, Flecher X, Aubaniac JM. Unicompartmental knee arthroplasty: technique through a mini-incision. Clin Orthop Relat Res. 2007;464:32-36.
2 Repicci JA, Hartman JF. Minimally invasive unicondylar knee arthroplasty for the treatment of unicompartmental osteoarthritis: an outpatient arthritic bypass procedure. Orthop Clin North Am. 2004;35:201-216.
3 Argenson JN, Chevrol-Benkeddache Y, Aubaniac JM. Modern unicompartmental knee arthroplasty with cement: a three to ten-year follow-up study. J Bone Joint Surg [Am]. 2002;84:2235-2239.
4 Argenson JN, Parratte S. The unicompartmental knee: design and technical considerations in minimizing wear. Clin Orthop Relat Res. 2006;452:137-142.
5 Berger RA, Meneghini RM, Jacobs JJ, et al. Results of unicompartmental knee arthroplasty at a minimum of ten years of follow-up. J Bone Joint Surg [Am]. 2005;87:999-1006.
6 Cartier P, Cheaib S. Unicondylar knee arthroplasty: 2-10 years of follow-up evaluation. J Arthroplasty. 1987;2:157-162.
7 Goodfellow J, O’Connor J, Murray DW. The Oxford meniscal unicompartmental knee. J Knee Surg. 2002;15:240-246.
8 Insall J, Walker P. Unicondylar knee replacement. Clin Orthop Relat Res. 1976;120:83-85.
9 Gibson PH, Goodfellow JW. Stress radiography in degenerative arthritis of the knee. J Bone Joint Surg [Br]. 1986;68:608-609.
10 Kennedy WR, White RP. Unicompartmental arthroplasty of the knee: postoperative alignment and its influence on overall results. Clin Orthop Relat Res. 1987;221:278-285.
11 Price AJ, O’Connor JJ, Murray DW, et al. A history of Oxford unicompartmental knee arthroplasty. Orthopedics. 2007;30(5 Suppl):7-10.
12 Argenson JN, Parratte S, Bertani A, et al. Long-term results with a lateral unicondylar replacement. Clin Orthop Relat Res. 2008;466:2686-2693.
13 Parratte S, Argenson JN, Dumas J, Aubaniac JM. Unicompartmental knee arthroplasty for avascular osteonecrosis. Clin Orthop Relat Res. 2007;464:37-42.
14 Parratte S, Argenson JN, Pearce O, et al. Medial unicompartmental knee replacement in the under-50s. J Bone Joint Surg [Br]. 2009;91:351-356.
15 Scott RD, Cobb AG, McQueary FG, Thornhill TS. Unicompartmental knee arthroplasty: eight- to 12-year follow-up evaluation with survivorship analysis. Clin Orthop Relat Res. 1991;271:96-100.