Mechanical Ventilation of the Newborn
I Indications for Mechanical Ventilation of the Newborn Generally Fall into the Following Categories
A Severe oxygenation deficit from
B Ventilatory failure with elevated Pco2 and significant respiratory acidosis
C Congenital anomalies (see Chapter 27)
D Need for surfactant administration (modified from the AARC Practice Guidelines on Surfactant Administration, 1994)
II Goals of Mechanical Ventilation
A Provide adequate ventilation
B Provide adequate oxygenation
III Complications of Mechanical Ventilation in the Newborn
A Ventilator-induced lung disease
G Abdominal distention (gastric air)
A Manual ventilation (BMV) of the neonate
a. Non–self-inflating bag connected to an oxygen source
b. Self-inflating bag with oxygen reservoir and PEEP device connected to an oxygen source
2. Position mask on infant’s face
a. Cover nares, mouth, and tip of chin with mask
b. Avoid contact with infant’s eyes
c. Hold mask with thumb and index or middle finger on the rim of the mask
d. Keep infant’s chin forward with fourth and fifth fingers
e. Position head midline with neck slightly extended to optimize airway position
f. Apply gentle downward pressure to mask to create seal
g. Squeeze bag, and observe chest movement
h. If no chest movement reassess the following
i. Ventilate at a rate of approximately 30 to 50 breaths/min
A Unlike the adult airway cuffed ETTs are generally not needed to provide mechanical ventilation to neonates.
B The cricoid cartilage is the narrowest point in the neonatal airway.
C Appropriately sized uncuffed ETTs are adequate to provide mechanical ventilation and reduce airway complications associated with cuffed tubes.
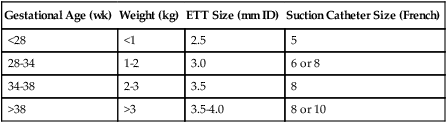
D Approximate ETT sizes for gestational ages and weights are listed in Table 28-1.
TABLE 28-1
ETT and Suction Catheter Sizes for Various Gestational Ages and Weights
| Gestational Age (wk) | Weight (kg) | ETT Size (mm ID) | Suction Catheter Size (French) |
| <28 | <1 | 2.5 | 5 |
| 28-34 | 1-2 | 3.0 | 6 or 8 |
| 34-38 | 2-3 | 3.5 | 8 |
| >38 | >3 | 3.5-4.0 | 8 or 10 |
1. Laryngoscope with bulbs and batteries
3. Size-appropriate ETTs (see Table 28-1)
5. Resuscitation bag and size-appropriate mask
6. Suction canister and suction regulator
1. Establish adequate Spo2 with oxygen, or use BMV if apneic.
2. Position infant on a flat surface with head midline and neck slightly extended.
3. Turn on laryngoscope light, and hold laryngoscope in left hand.
4. Slide the laryngoscope blade over the right side of the tongue.
5. Advance the blade to the tip of the vallecula.
6. Lift the tongue out of the way to expose the pharyngeal area.
8. Suction if necessary to improve view of larynx.
9. Hold the ETT in your right hand, and insert it through the vocal cords as they open.
10. Insert tube until vocal cord guide on ETT is at the level of the vocal cords.
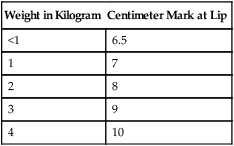
a. Estimated distance to insert ETT according to gestational age and weight is outlined in Table 28-2.
TABLE 28-2
Approximate Distance from Infant’s Lip to Tip of a Properly Inserted Oral ETT
| Weight in Kilogram | Centimeter Mark at Lip |
| <1 | 6.5 |
| 1 | 7 |
| 2 | 8 |
| 3 | 9 |
| 4 | 10 |
11. Stabilize the tube with one hand, and remove laryngoscope.
12. If stylet was used withdraw it from the tube, keeping a firm hold on the ETT.
13. Note landmark on tube associated with infant’s lip or nare if nasal tube is used.
1. Deliver positive pressure breath.
3. Auscultate the chest, and confirm bilateral breath sounds.
4. Auscultate over stomach to ensure no air entry.
5. Obtain chest radiograph to evaluate ETT position.
6. Position head midline in neutral position before chest radiograph.
7. Chest radiograph should indicate ETT approximately 1 cm above the carina.
VI Types of Neonatal Mechanical Ventilators
A The condition necessitating mechanical ventilation and the goals of support should be considered when selecting the type of ventilator, ventilator mode, and settings.
B Neonatal ventilators are generally classified as conventional or high frequency.
C Approaches to conventional and high frequency ventilation are outlined below. (A detailed description of high frequency ventilation is presented in Chapter 42.)
D Neonatal conventional ventilation
1. Neonates requiring mechanical ventilation are most often ventilated using pressure-limited ventilation.
2. Pressure-limited ventilation is accomplished by setting a peak inspiratory pressure (PIP) that the ventilator targets during each mechanical breath.
3. Pressure-limited ventilation can be accomplished using any of the following modes.
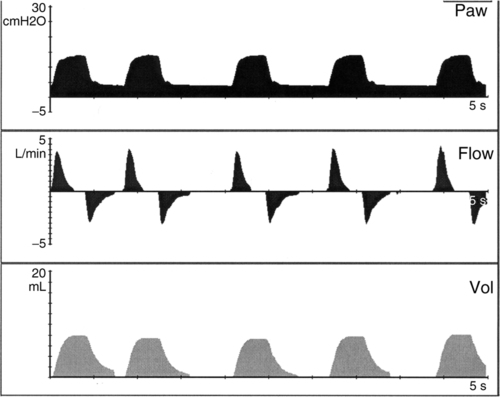
a. Synchronized intermittent mandatory ventilation (SIMV) (Figure 28-1)
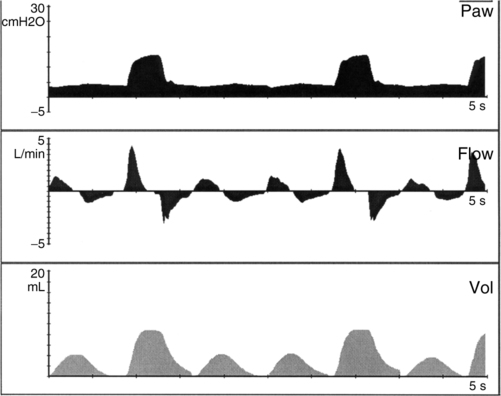
(1) Mandatory mechanical rate is set (range generally 15 to 40 breaths/min).
(2) Minimum PEEP is set (3 to 8 cm H2O).
(3) Every mechanical breath starts from the preset PEEP level to a preset inspiratory pressure (generally between 15 and 25 cm H2O). Total peak pressure should be less than 30 cm H2O.
(4) The difference between PEEP and the inspiratory pressure target should result in a Vt of 5 to 7 ml/kg.
(5) Inspiratory time is operator controlled on all mandatory breaths (normally set between 0.3 and 0.5 second).
(6) Continuous flow of gas is available for all nonmechanical (spontaneous) breaths (normally set between 6 and 10 L/min).
(7) Spontaneous breaths are not supported with positive pressure >PEEP level.
(8) Pressure support may be applied during spontaneous breaths.
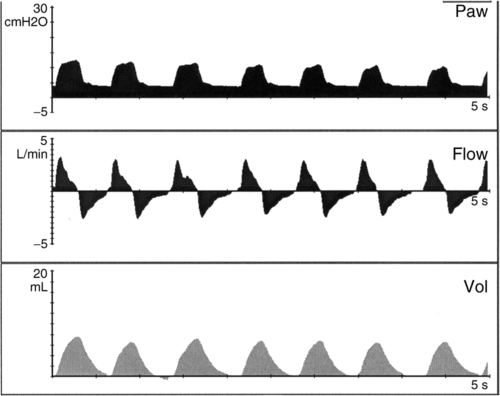
b. Assist control (AC) (Figure 28-2)
(1) Minimum mandatory mechanical rate is set (range, 20 to 40 breaths/min).
(2) Minimum PEEP is set (3 to 8 cm H2O).
(3) Every patient effort triggers a pressure-targeted breath.
(4) The difference between PEEP and the pressure target should result in a Vt of 5 to 7 ml/kg.
(5) Inspiratory time is operator controlled for all breaths (0.3 to 0.5 second).
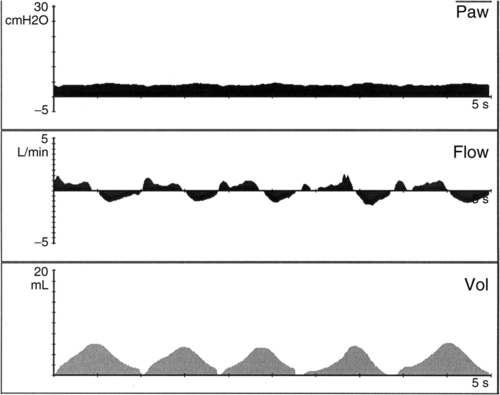
c. Pressure support (PS) (Figure 28-3)

(2) Rate controlled by patient.
(3) Minimum PEEP is set (3 to 8 cm H2O).
(4) Spontaneous efforts supported with preset pressure (15 to 25 cm H2O).
(5) Inspiratory time determined by patient inspiratory flow rate or limited by system default to prevent prolonged inspiration (defaults are ventilator specific and are usually a set maximum time).
d. Volume guarantee (Figure 28-4)
(1) Specific exhaled Vt is targeted on all positive pressure breaths.
(2) Peak pressure (PIP) varies breath to breath to maintain target Vt.
(3) Preset maximum pressure limit should be <30 cm H2O.
(4) Peak pressure equals the minimum pressure to deliver selected Vt.
(5) Oxygen concentrations vary from 21% to 100%.
(6) May be used in conjunction with SIMV, AC, or pressure support ventilation (PSV).
E Additional variables affecting neonatal conventional ventilation
1. Inspiratory trigger is the mechanism that causes the initiation of a mechanical breath and may be a result of time, flow, or pressure.
a. Time triggering refers to the breath being delivered as a result of a specific set time interval. A set rate of 20 breaths/min would require a time-triggered breath to occur every 3 seconds.
b. Flow triggering indicates that a mechanical breath is delivered when patient effort is sensed by a change in inspiratory flow. Amount of flow change needed to trigger a breath is operator set and is referred to as the inspiratory sensitivity (0.2 to 0.6 liters per minute [lpm]).
c. Pressure triggering indicates that a mechanical breath is delivered when patient effort is sensed by a decrease in pressure less than baseline (PEEP) pressure. Amount of pressure change needed to trigger a breath is operator set and is referred to as the inspiratory sensitivity (1 cm H2O).
2. Expiratory trigger is the mechanism responsible for cycling a mechanical breath from the inspiratory phase to the expiratory phase and may be a result of time, flow, or pressure.
a. Time cycling refers to the change from inspiration to expiration as a result of time. If the inspiratory time is set for 0.5 second, expiration begins at the end of the 0.5-second period.
b. Flow cycling refers to expiration occurring either as a result of a preset decrease of peak flow or an operator-selected decrease in peak flow and is referred to as the expiratory sensitivity.
c. Pressure cycling refers to expiration being initiated as a result of the system sensing a pressure more than the desired set peak pressure. An example may be when a patient coughs during a delivered breath.
3. Inspiratory time is from triggering of inspiration to the beginning of expiration
F High frequency ventilators are considered nonconventional ventilators and offer an alternative approach to ventilate neonates. Currently used high frequency ventilators are categorized as oscillators and flow or jet ventilators (see Chapter 42).
1. High frequency oscillatory ventilation (HFOV)
a. For neonates frequency set in hertz generally ranges from 10 to 15.
c. The higher the rate, the smaller the Vt.
d. Ventilation also is affected by changes in pressure amplitude (range, 10 to 45); the higher the pressure amplitude, the larger the Vt.
e. Lung volume is adjusted with mean airway pressure (MAP; range, 10 to 20).
f. Continuous gas flow allows spontaneous respirations at set MAP.
VII Initiating Ventilatory Support
A When initiating mechanical ventilation to a neonate the pathology and gestational age of the neonate need to be considered.
B Either conventional or high frequency ventilation (HFV) can be used as long as the ventilator is adjusted for the specific needs of the infant.
C Avoiding damage to the lung from positive pressure ventilation is a concern for all gestational ages.
D Careful attention to recruiting and maintaining appropriate lung volume is essential.
E Of particular concern for the preterm neonate is retinal damage associated with hyperoxia. Oxygen should be adjusted with specific lower Spo2 (88% to 93%) maintained to avoid retinal damage.
F In contrast infants at risk for pulmonary hypertension (e.g., MAS, CDH, and sepsis) need higher Spo2 (>95%) to avoid constriction of the pulmonary vasculature and pulmonary hypertension leading to an increase in shunting across the ductus arteriosus.
G Other factors considered when initiating mechanical ventilation
H Typical blood gases and saturation goals
I Preductal and postductal saturations
1. Term or near-term infants (>34 weeks’ gestational age) at risk for pulmonary hypertension (primary disease, MAS, and sepsis) or suspected of having persistent pulmonary hypertension of the newborn (PPHN) should be monitored for differences in preductal and postductal saturations.
a. Preductal saturation monitoring is performed on the right upper extremity.
b. Postductal saturation monitoring is performed on left upper or lower extremities.
2. Postductal saturation 5% less than preductal saturation may indicate significant pulmonary hypertension. If present
a. Administer oxygen to maintain Spo2 >98%.
b. Maintain ventilator support to normalize Pco2 and pH.
(1) Confirm pulmonary hypertension.
(2) Determine whether the PDA is essential because of congenital heart disease (see Chapter 27).
d. Establish adequate lung volume, and avoid hyperinflation.
e. Support blood pressure to maintain adequate mean arterial blood pressure.
f. Low systemic blood pressure contributes to decreased oxygen delivery.
g. Consider administering inhaled nitric oxide (iNO; see Section IX, Inhaled Nitric Oxide).
J Initiating conventional ventilation
1. Infants with hyperinflation (e.g., CLD, PIE)
a. Pressure target to achieve a Vt of 5 to 6 ml/kg.
c. Ventilatory rate to achieve desired Pco2: typically 25 to 40 breaths/min (monitor for adequate expiratory time)
d. FIO2 to achieve desired Spo2
e. Inspiratory time: 0.25 to 0.4 second
f. Continuous flow: 5 to 10 lpm
g. Inspiratory trigger is set at minimum level without causing autocycling.
2. If hyperinflation is more prominent on one side, position neonate with the more affected side dependent to direct volume to less inflated lung.
3. Reassess lung volume with chest radiography.
4. Infants with low lung volume, term or preterm infants (e.g., respiratory distress syndrome [RDS], pneumonia).
a. Pressure target to achieve Vt of 6 to 8 ml/kg.
b. PEEP: 5 to 8 cm H2O (consider current lung volume on chest radiography).
c. Rate to achieve desired Pco2, typically 40 to 50 breaths/min.
d. FIO2 to achieve desired Spo2
e. Inspiratory time: 0.3 to 0.5 second (consider total rate)
f. Continuous flow: 5 to 10 lpm
g. Inspiratory trigger is set at minimum level without causing autocycling.
1. Estimate required MAP for oxygenation during manual ventilation, and increase by 2 cm H2O when HFOV started.
2. Set pressure amplitude (ΔP) at 10 to 15 cm H2O, and increase until visible chest wiggle is noted.
4. Set FIO2 to achieve desired Spo2.
5. Set continuous flow at 15 to 20 lpm.
6. Set percentage of inspiratory time at 33%.
7. Obtain blood gas within 1 hour of initiating support.
8. Assess lung volume on chest radiograph. Aim for nine rib expansion on chest radiograph.
1. Use in conjunction with a conventional ventilator and ETT with jet port.
2. Set jet rate at 400 to 500 cycles/min with an inspiratory time of 0.02 second.
3. Use relatively low conventional ventilator rates (<10 breaths/min) with an inspiratory time of 0.4 second.
4. Set jet pressure target lower than conventional ventilator pressure target.
M Maintaining ventilator support in neonates requires careful attention to the following.
1. Cardiac monitoring with alarms set for high and low heart rates
2. Set ventilator-disconnect alarm. Brief disconnection from the ventilator may result in significant hypoxia, bradycardia, and rapid derecruitment of lung volumes or accidental delivery of higher than needed oxygen concentrations.
3. Continuous monitoring of Spo2 to ensure Spo2 is in target range.
a. Once an appropriate Vt has been achieved (5 to 7 ml/kg) adjustment of FIO2 and PEEP should be made to achieve the targeted Spo2.
4. Frequent assessment of chest movement/chest wiggle with HFV
a. Rate and Vt are the primary parameters adjusted to optimize Pco2 on conventional ventilators.
b. Adjust rate or amplitude on HFV to affect Pco2 level (with HFV a lower rate results in a higher Vt).
c. Assess breath sounds on conventional ventilation; less appropriate for HFV.
5. Frequently monitor patient/ventilator synchrony.
a. Monitor patient’s ability to trigger mechanical breaths and cycle to expiration.
b. Observe for ventilator autotriggering.
c. Observe for adequate and appropriate inspiratory and expiratory times.
6. Ensure adequate humidification as addressed in Section VII, N, Assessing Humidification During Mechanical Ventilation.
8. Assess patient’s secretions: amount, color, and consistency.
N Assessing humidification during mechanical ventilation
1. Evidence of condensation throughout the ventilator circuit is essential to reduce risks of humidity deficits and obstructed airways. This is necessary even with a heated wire ventilator circuit.
2. Greater risk of ETT obstruction in neonates secondary to smaller ETT (2.5 to 4.0 mm, inner diameter [ID]) sizes than in adults.
3. Airway temperature should be monitored and maintained at ≥36° C.
4. Heated wire ventilator circuits reduce circuit rainout and decrease risk of inadvertently instilling condensate into the infant’s airway.
O Suctioning mechanically ventilated neonates
1. Routine/scheduled suctioning should be discouraged.
2. Suctioning should be performed when clinically indicated, such as
3. Appropriately sized suction catheters should be used; French size approximately two times the ETT ID.
4. Suction should not exceed 70 to 100 mm Hg negative pressure.
5. Suction time should not exceed 10 seconds.
6. Catheter should be measured and inserted to no more than 0.5 cm beyond the ETT.
7. Complications of suctioning include
8. Increasing FIO2 by approximately 0.2 before suctioning may decrease some of the risks associated with suctioning.
P Assessment for exogenous surfactant administration (Modified from AARC Practice Guidelines for Surfactant Administration)
1. Preterm infants (<34 weeks’ gestation) with evidence of RDS or infants with meconium aspiration should be considered for exogenous surfactant.
2. The presence of two or more of the conditions outlined in Box 28-1 can be used as indications for exogenous surfactant.
3. Potential complications of surfactant administration are outlined in Box 28-2.
4. Guidelines for administering surfactant (specific brand may call for some modifications in these suggested guidelines)
a. Confirm appropriate ETT position before instilling surfactant.
b. Allow surfactant to reach room temperature before administering.
d. Divide total dose into four aliquots, and administer two aliquots to each side.
e. Advance catheter to the tip of the ETT, and instill each aliquot directly into the ETT.
f. Between each aliquot remove the catheter and allow the ventilator to disperse the surfactant into the lung.
g. Monitor saturations during administration.
h. Adjust ventilator support to maintain adequate minute volume during procedure (increased rate, increased pressure) and to avoid lung derecruitment.
i. Monitor changes in lung compliance after surfactant administration.
j. Adjust ventilator pressure to avoid hyperinflation, hyperventilation, and hyperoxia after surfactant delivery.
k. Endotracheal suctioning should be avoided for a minimum of 1 hour after surfactant administration unless clinically indicated.
l. Reassess ventilator settings and oxygen requirement for potential additional doses.
m. Consider administering second dose if ventilator and oxygen requirement remain significant (e.g., FIO2 > 0.3 and MAP > 8).
VIII Special Considerations for the Infant with Congenital Cardiac Disease (see Chapter 27)
A Infants with certain cardiac lesions depend on maintaining a PDA for survival.
B Low blood oxygen levels can be essential for these infants.
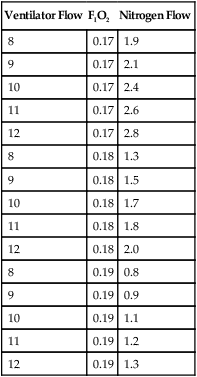
1. If sufficiently low Spo2 cannot be maintained with room air, subatmospheric oxygen concentrations (≥17% O2) may be needed.
2. Set continuous flow ventilator to room air.
3. Add precise flow of nitrogen to continuous flow to reduce FIO2 to desired range (generally 17% to 19%).
4. Table 28-3 outlines nitrogen and air-flow rates to obtain specific concentrations of inspired oxygen.
TABLE 28-3
Flow Rate of Nitrogen and Air Needed to Deliver Subatmospheric Oxygen Concentrations
| Ventilator Flow | FIO2 | Nitrogen Flow |
| 8 | 0.17 | 1.9 |
| 9 | 0.17 | 2.1 |
| 10 | 0.17 | 2.4 |
| 11 | 0.17 | 2.6 |
| 12 | 0.17 | 2.8 |
| 8 | 0.18 | 1.3 |
| 9 | 0.18 | 1.5 |
| 10 | 0.18 | 1.7 |
| 11 | 0.18 | 1.8 |
| 12 | 0.18 | 2.0 |
| 8 | 0.19 | 0.8 |
| 9 | 0.19 | 0.9 |
| 10 | 0.19 | 1.1 |
| 11 | 0.19 | 1.2 |
| 12 | 0.19 | 1.3 |
5. Analyze inspired gas concentration continuously.
IX Inhaled Nitric Oxide (see Chapter 34)
1. Concentrations >20 ppm have not been shown to be more effective in reducing pulmonary hypertension than 20 ppm.
2. May be administered with conventional or high frequency ventilators.
B Note preductal and postductal saturations before initiating iNO, and monitor changes after starting iNO.
C Obtain arterial blood gas after iNO initiated.
D Wean iNO when clinically indicated (sample iNO weaning protocol in Figure 28-6).
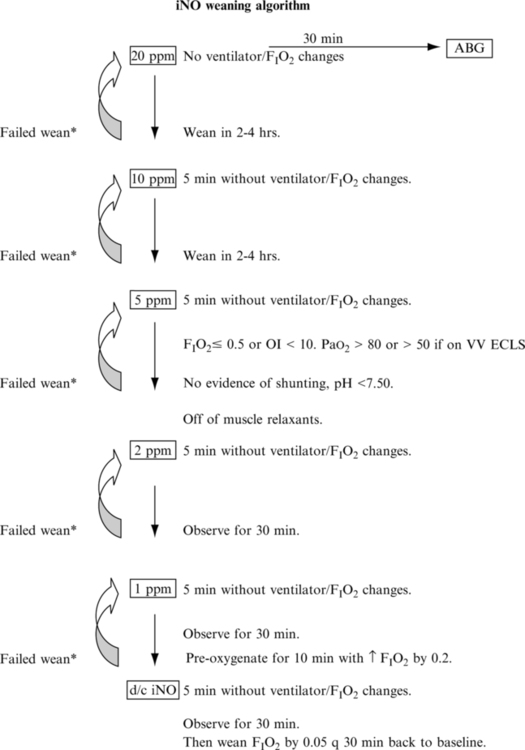
E Avoid interrupting iNO administration once gas is initiated.
F Connect resuscitation bag to iNO system to avoid interrupting iNO administration if manual ventilation becomes necessary.
A Assessment for weaning generally should begin as soon as the goals for instituting mechanical ventilation have been achieved, provided no new indications for maintaining support have occurred and the infant’s ability to breathe is not impeded by any pharmacologic agents.
1. Maintain adequate oxygenation.
3. Maintain adequate lung volume.
C Weaning from SIMV pressure ventilation
1. Decrease FIO2 in increments of 5% to 10% as long as Spo2 is in desired range.
2. If PEEP is >5 cm H2O decrease by 1- to 2-cm H2O increments to a low of 5 cm H2O once FIO2 ≤ 0.3.
3. Adjust pressure to maintain Vt 5 to 7 ml/kg.
4. If Pco2 is in desired range decrease set rate by 3 to 5 breaths/min, and assess infant’s ability to maintain adequate minute ventilation.
D Weaning from assist control pressure ventilation
1. Decrease FIO2 in increments of 5% to 10% as long as Spo2 is in desired range.
2. If PEEP > 5 cm H2O decrease by 1- to 2-cm H2O increments to a low of 5 cm H2O once FIO2 ≤ 0.3.
3. Adjust pressure to maintain Vt 5 to 7 ml/kg.
4. Adjust set rate to approximately 15 breaths/min to assess for prolonged periodic breathing and the infant’s ability to maintain adequate minute ventilation.
1. Wean O2 5% to 10% as long as desired Spo2 is maintained.
2. Decrease MAP 1 to 2 cm H2O if O2 concentration is <50%, and monitor for decreased Spo2 after change.
3. Decrease δP in 2- to 5-cm H2O increments as long as chest “wiggle” is maintained.
F Weaning from PSV and pressure support volume guarantee (PSVG)
1. Wean PS in increments of 2 cm H2O to a minimum of approximately 5 cm H2O above PEEP ensuring Vt of 5 to 7 ml/kg.
2. PSVG pressure will automatically wean. Pressure is automatically reduced as compliance improves, maintaining the set delivered Vt.
1. Before extubation consider the following.
2. No significant apnea spells
4. Pharmacologic support not affecting respiratory drive.
5. Spo2 maintained in desired range with FIO2 ≤0.4
6. PEEP: ≤6 cm H2O with good lung volume
7. Mandatory rate: <20 breaths/min
1. Establish desired Spo2, and provide appropriate support to maintain goal.
2. Continuously assess infant’s respiratory rate and pattern of breathing.
3. Note signs of respiratory distress.
4. Initiate nasal CPAP postextubation particularly in preterm infants to help maintain lung volume and decrease FIO2 requirements.
a. Select CPAP prongs appropriate for infant’s nares.
b. Maintain vented oral or nasal gastric tube to avoid gastric distention.
5. Infants with more stable lung volumes may extubate to nasal cannulas.
XI Extracorporeal Life Support
A When adequate oxygenation and ventilation cannot be accomplished using the previously described methods, extracorporeal membrane oxygenation may be an option.
B Indications for extracorporeal life support (ELSO) in neonates
1. Inadequate oxygenation/ventilation despite use of conventional ventilation or HFV and nitric oxide
a. Oxygenation index (OI = [MAP × FIO2]/Pao2) > 0.4 on two or more consecutive blood gases at least 30 minutes apart
b. Pco2 > 65 with pH < 7.25 despite attempts to optimize ventilation
2. Evidence of barotrauma with applied support
a. Persistent air leak through chest tubes
b. Increasing air leaks, reaccumulating pneumothorax, and pneumomediastinum
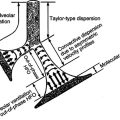
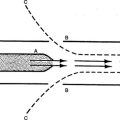
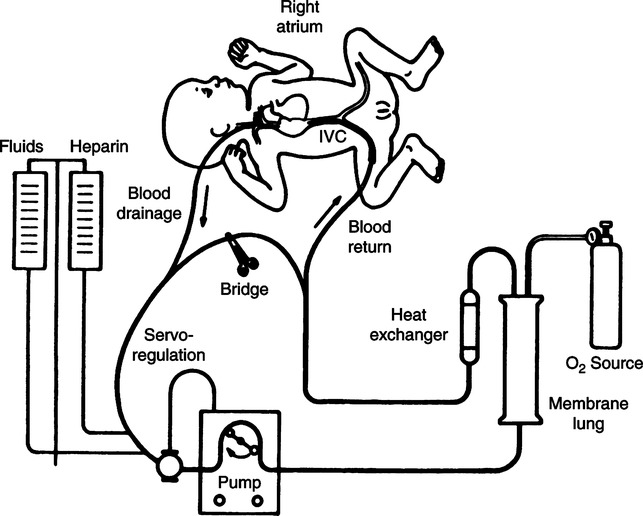
1. Extracorporeal support consists of vascular cannula(s), a circuit, pump, an oxygenator, heat exchanger, and an oxygen source (Figure 28-7).
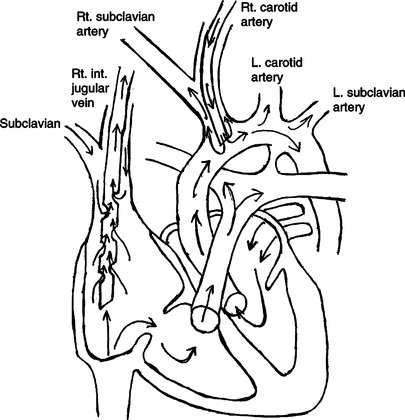
2. Venoarterial (VA) ECLS requires cannulation of two vessels, usually the right common carotid artery and the right internal jugular vein (Figure 28-8).
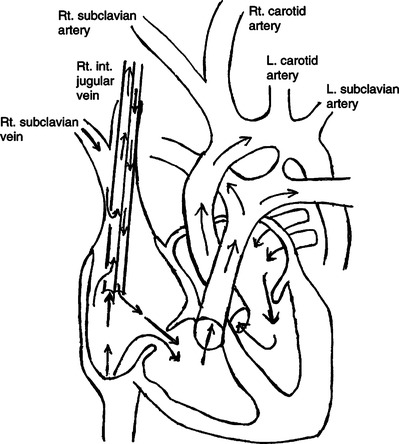
3. Venovenous (VV) ECLS requires cannulation of a single vessel, the right internal jugular vein, with a double-lumen cannula (Figure 28-9).
4. With both types of support blood is drained from the right atrium to the extracorporeal circuit.
5. A pump propels the drained blood through an oxygenator.
6. The oxygenator consists of a two-sided membrane.
7. Desaturated (venous) blood flows along one side of the membrane.
8. Gas with a higher partial pressure of oxygen flows along the opposite side of the membrane.
9. The difference in partial pressure results in oxygen diffusing into the venous blood.
10. Similarly the venous blood has a higher partial pressure of carbon dioxide than the gas side of the membrane, resulting in carbon dioxide diffusing into the gas side of the membrane, where it is eliminated to the atmosphere.
11. Fully saturated blood with the desired carbon dioxide level exits the membrane oxygenator.
12. The blood is warmed to the desired temperature as it flows through a blood warmer before returning to the infant.
13. During VA support the blood is returned to the infant’s arterial circulation through the arterial cannula.
14. During VV support the oxygenated blood is returned through a second lumen of the venous cannula to the infant’s right heart, and with adequate cardiac function the oxygenated blood is delivered to the arterial circulation.
15. Systemic anticoagulation is necessary to reduce the potential formation of clots on the artificial surfaces of the circuit, oxygenator, and cannulas.
D Ventilator management during ECLS
1. ECLS allows significant reduction in the inspired concentration of oxygen.
2. Set rate can be minimized (6 to 10 breaths/min) as CO2 is eliminated through the oxygenator.
3. PIP is minimized to slightly more than PEEP level to allow lung rest.
4. PEEP is maintained at 8 to 15 cm H2O to keep the lungs from total collapse.
1. Lung rest occurs while the underlying condition is reversed.
2. Changes in the native lung on chest radiographs and improvement in blood gases without increases in ECLS support are indications for weaning from ECLS.
3. Ventilator support is increased as ECLS support is decreased.
4. ECLS support is discontinued when gas exchange can be accomplished by FIO2 and ventilator pressures less likely to cause lung damage.
5. Cannulated vessels are either ligated or repaired at decannulation.
6. Systemic anticoagulation is discontinued.
7. Major risks of ECLS are outlined in Box 28-3.
8. Mechanical ventilation is weaned as the infant’s condition improves.