Managing Ureteral Injury During Pelvic Surgery
Michael Maggio  Emanuel C. Trabuco
  John B. Gebhart
Injury to the lower urinary tract will occur in approximately 1% to 2% of women undergoing major gynecologic surgery. Although the risk of injury increases with increasing difficulty of the primary operation (e.g., large uterus, excessive bleeding, prolapse procedures, malignancy, endometriosis), more than 50% of injuries occur during uncomplicated procedures. Furthermore, in the absence of cystoscopy, most injuries are undetected during the primary operation, leading to increased morbidity and costs associated with diagnostic procedures, prolonged hospital stay, reoperations, return visits, and delay in diagnosis (e.g., ileus, urosepsis, fistula formation). The incidence of ureteral injury following gynecologic surgery ranges from 0.2% to 11.0%, depending on the type of study (historical vs. prospective) and the definition of injury (kinking from suspension vs. transaction/crush injury). Intraoperative techniques to avoid ureteral injury and the ability to ensure ureteral patency at the time of surgery should be in the realm of every gynecologic surgeon. During vaginal or laparoscopic surgery, cystoscopy after the administration of indigo carmine can be utilized to visualize the spill of blue dye from the ureteral orifices (see section on cystoscopy). During open abdominal surgery, advertent cystotomy with visualization of the ureteral orifices is an option that will avoid repositioning of the patient required for cystoscopy (see Chapter 88). Ureteral catheters can be placed at the time of cystoscopy to help avoid ureteral injury in selected cases (Figs. 91–1 and 91–2). Ureteral anatomy can be variable depending on the anatomy of the patient, as well as the anatomic distortion that can occur when the pelvic abnormality is addressed. Also, overzealous or inappropriate use of an energy source can result in ureteral injury (Figs. 91–3 through 91–5). The surgical procedure utilized to address an intraoperative or postoperative ureteral injury depends on the extent and location of the injury.
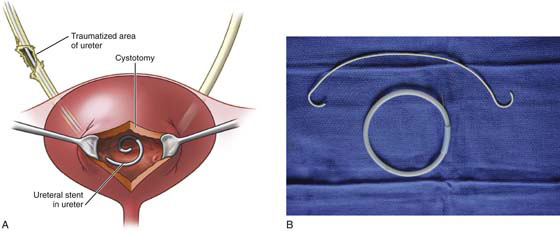
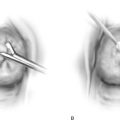
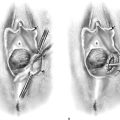
FIGURE 91–1 A. Schematic representation of a distal right ureteral serosal injury. Injuries of this type can be handled by retrograde stenting of the affected ureter via bladder dome cystotomy. B. 6 French × 26-cm double J stent and wire. The wire is used to make the stent rigid during placement.
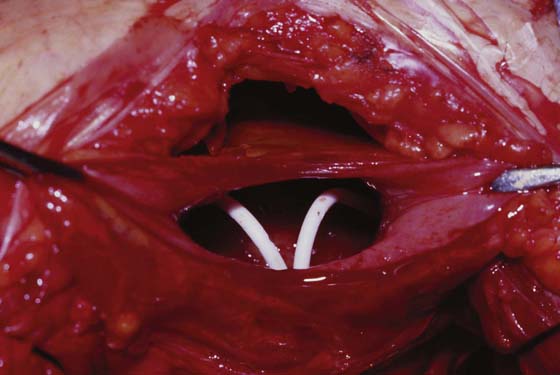
FIGURE 91–2 Photograph of bladder dome cystotomy with two retrograde placed double J ureteral stents.
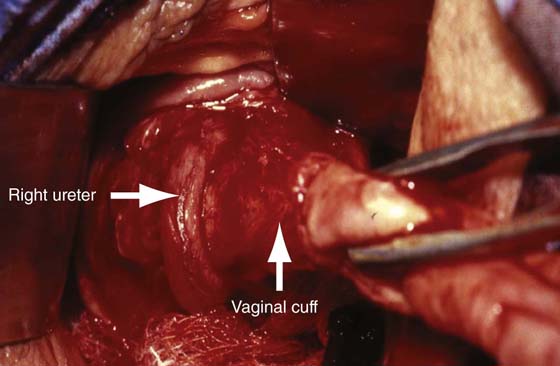
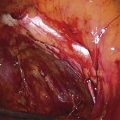
FIGURE 91–3 Photograph of the right distal ureter entering the bladder (left arrow). The photo illustrates the close proximity of the ureter to the vaginal cuff during a posthysterectomy vault prolapse repair. Failure to identify the ureter before securing the uterosacral and cardinal remnant pedicles (right arrow) would have led to injury.
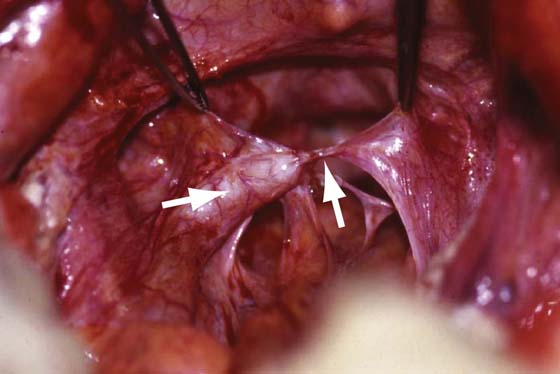
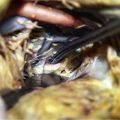
FIGURE 91–4 Photograph of left ureteral obstruction following uterosacral vault suspension. Note the dilated proximal ureter (left arrow) and the offending suture (right arrow).
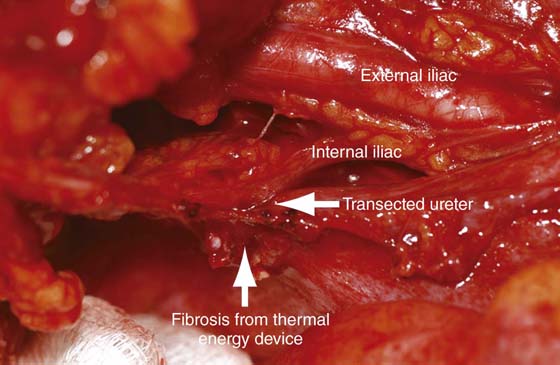
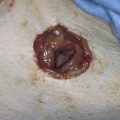
FIGURE 91–5 Photograph of a transected ureter due to inaccurate placement of a thermal energy device at the time of radical hysterectomy.
Ureterotomy and Catheterization
Excessive fibrosis or anatomic distortion of the ureter at times can be encountered intraoperatively. In these situations, it may be beneficial to perform a ureterotomy and pass a stent antegrade into the bladder or retrograde into the kidney. The procedure is performed as follows. Dissection of the ureter should be minimized to prevent ischemic injury by interrupting the blood supply to the ureter and the periureteral tissue. Stay sutures can be placed laterally before the incision is made, and a hook blade can be used for the ureterotomy. The authors prefer a longitudinal incision. The ureter then can be catheterized to ensure patency or determine the level of obstruction, or even to assist in dissection lower down near the bladder. Closure is accomplished with interrupted 4-0 or 5-0 absorbable sutures. Closure should include only the adventitia and superficial incorporation of the ureteral musculature. A double J stent is placed before closure, and a drain is left in place and removed after drainage subsides (Fig. 91–6).
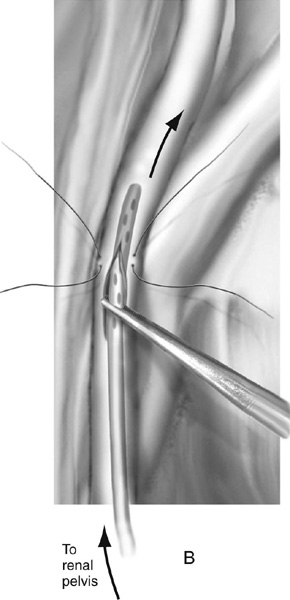
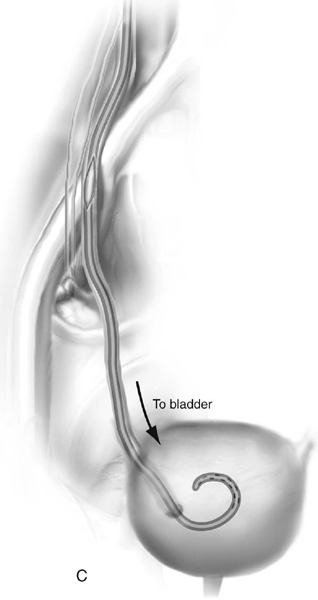
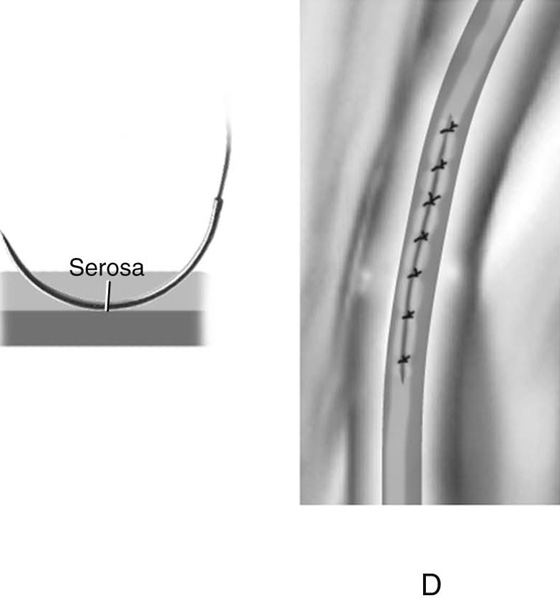
FIGURE 91–6 Technique of ureterotomy. A. Stay sutures are placed laterally to facilitate traction on the ureter. A hook blade is used to make a longitudinal incision in the ureter. B. A double J stent is passed antegrade into the kidney and (C) retrograde into the bladder. D. Ureterotomy is closed with interrupted 4-0 or 5-0 absorbable sutures. Closure should include only the adventitia and a superficial incorporation of the ureteral musculature.
Ureteroureterostomy
An end-to-end anastomosis of a lacerated or partially transected ureter is usually indicated when the lesion or injury is located above where the ureter crosses the iliac vessels. Most injuries below this area are best treated by ureteral implantation (see description of ureteroneocystostomy). Ureteral damage should not be viewed as an isolated anatomic problem. The danger of infection in the retroperitoneum, urinary extravasation, or the development of lymphoceles and possible damage from ureteral denudation and disturbance of the ureter’s blood supply all must be appreciated. To perform an end-to-end anastomosis, the ureter should be mobilized to ensure a tension-free anastomosis, and damaged tissue needs to be resected. Both proximal and distal margins of the transected ureter are spatulated, and an end-to-end anastomosis is accomplished with interrupted sutures (Figs. 91–7 and 91–8). A double J stent is placed before the anastomosis is completed and is removed approximately 4 to 6 weeks after the repair. Periureteral drainage is accomplished with a Jackson-Pratt or a Penrose drain exiting from a separate stab wound in the skin.
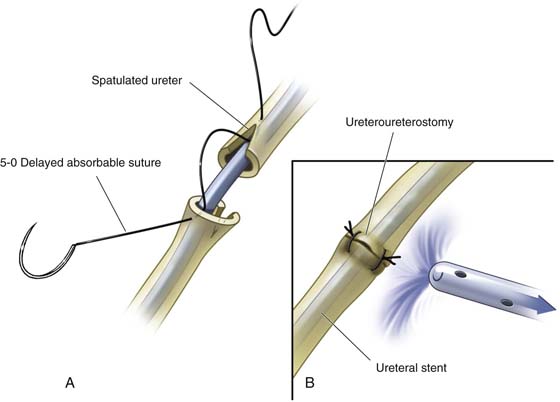
FIGURE 91–7 Schematic of abdominal ureteroureterostomy. A. Spatulation performed before anastomosis to increase surface area at the anastomosis. B. Completed anastomosis with protecting drain.
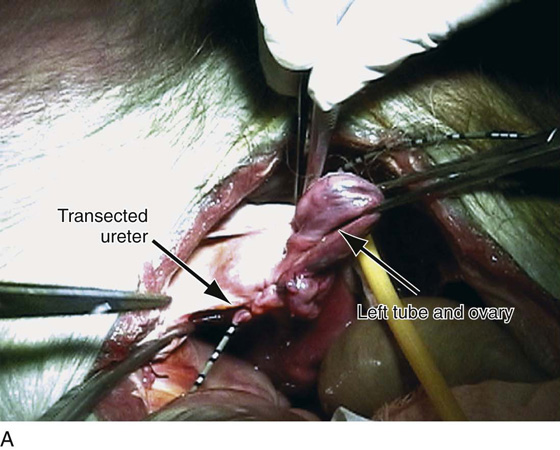
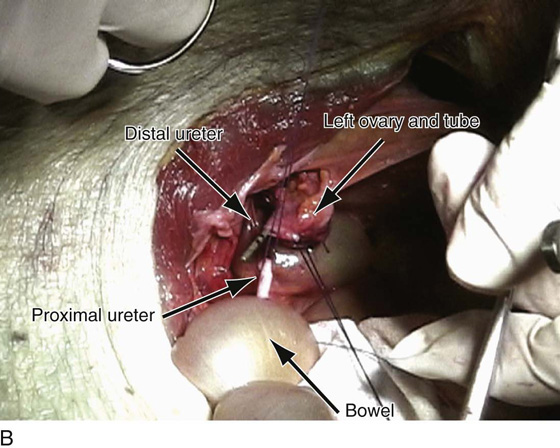
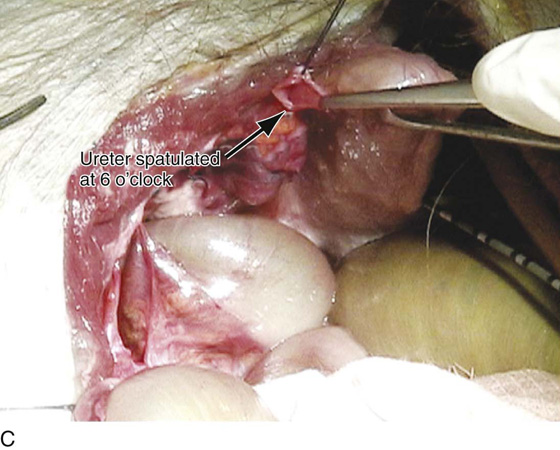
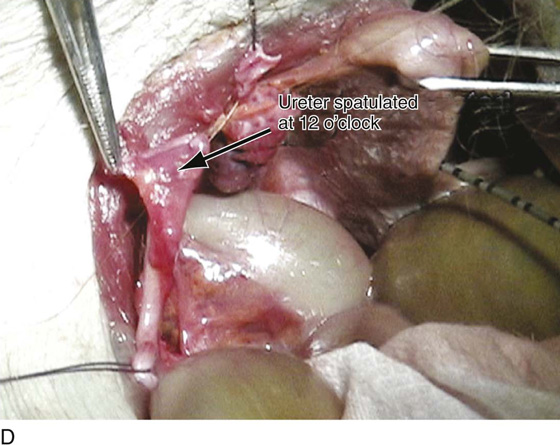

FIGURE 91–8 Cadaveric dissection demonstrates the technique of ureteroureterostomy. A. Note the ureter has been transected and a ureteral stent has been passed through the transected distal end of the ureter. B. The proximal end of the ureter has been completely mobilized; note that the two ends of the ureter easily come together with minimal to no tension. C. In preparation for the end-to-end reanastomosis, the distal end of the ureter has been spatulated at 6 o’clock. D. The proximal end of the ureter has been spatulated at 12 o’clock. E. Reanastomosis of the ureters is shown here. The sutures are passed as demonstrated in Figs. 91–7). Fine absorbable sutures are used for the reanastomosis and are taken at right angles to each cut end and passed into the angle of the spatulated incisions on the opposing ureteral cut end. The suture at 6 o’clock has been passed and tied.
Ureteroneocystostomy
Distal ureteral injuries requiring reimplantation can be approached with a combined intravesical and extravesical repair. The main goals of any reimplantation are to ensure a tension-free anastomosis and to create an adequate submucosal tunnel to maintain the antireflux mechanism. The bladder is approached retroperitoneally (Fig. 91–9), and a midline cystotomy is made. Stay sutures are placed lateral to the midline cystotomy in the region of the dome for cephalad traction. Lateral and caudal traction of the bladder exposes the trigonal area (Fig. 91–10). The ureter is mobilized as far down as possible (Fig. 91–11). The ureter is then transected in preparation for reimplantation (Fig. 91–12). Once adequate ureteral length is ensured, a site is identified for the new location of the ureteral orifice, preferably near the trigone. A submucosal tunnel is created utilizing a right-angle clamp or tenotomy scissors for an approximate length of 15 to 20 mm (Fig. 91–13). The transected ureter is then brought through the bladder wall musculature and under the submucosal tunnel (Fig. 91–14). It is sutured circumferentially at the site of the neoureteral orifice (Figs. 91–15 and 91–16). The first stitch placed at the 6-o’clock position should be a full-thickness stitch incorporating bladder muscularis and mucosa with the ureteral wall. The remaining circumferential stitches are placed from the ureteral cuff to the bladder mucosa (see Fig. 91–16). The anastomosis can be accomplished with interrupted 4-0 or 5-0 absorbable sutures. A double J stent is then placed across the anastomosis before the bladder is closed and is left in place for 4 to 6 weeks (Fig. 91–17). Fig. 91–18 reviews the entire technique of ureteroneocystostomy.
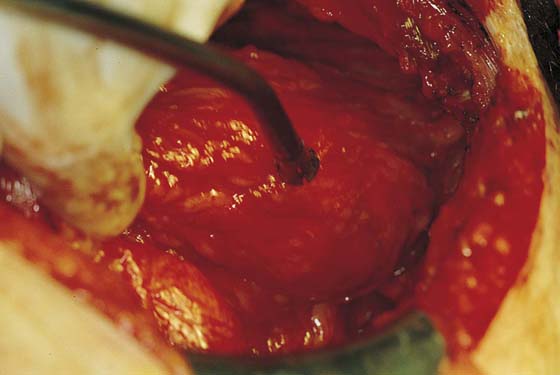
FIGURE 91–9 The bladder has been mobilized away from the pubic bone in preparation for cystotomy.
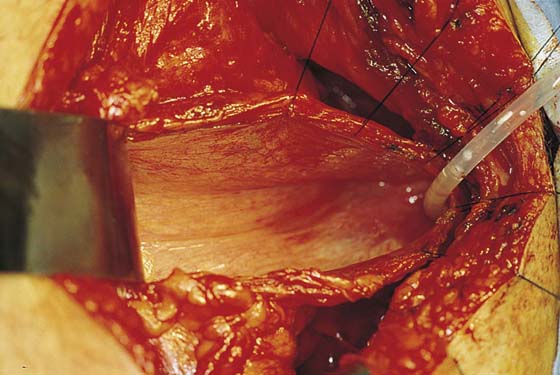
FIGURE 91–10 A high cystotomy has been made, and the trigone is exposed.
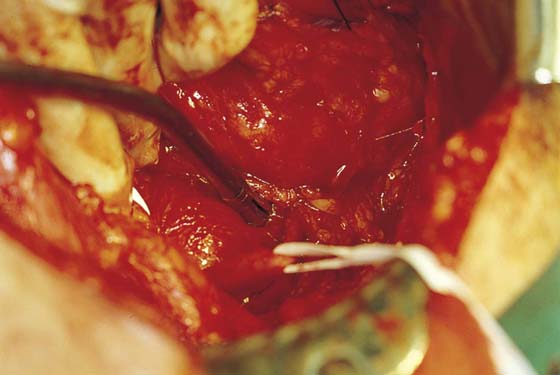
FIGURE 91–11 Umbilical tape is placed around the lower portion of right ureter to assist in mobilization.
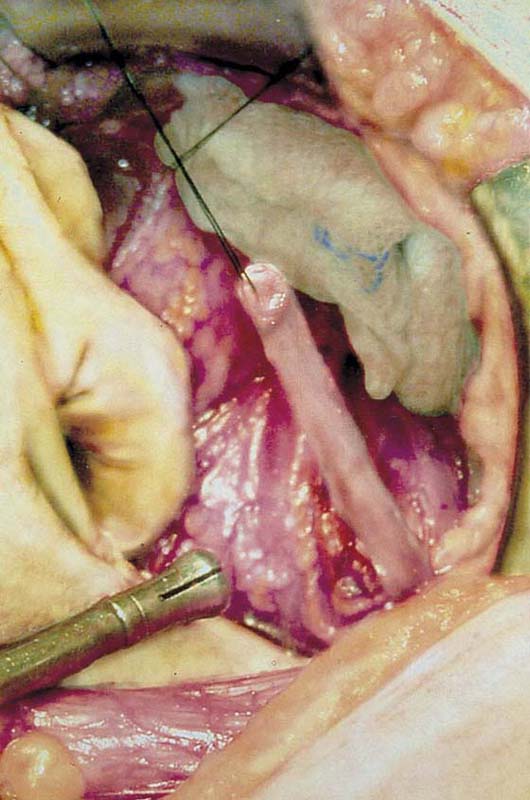
FIGURE 91–12 The ureter has been transected in preparation for reimplantation.
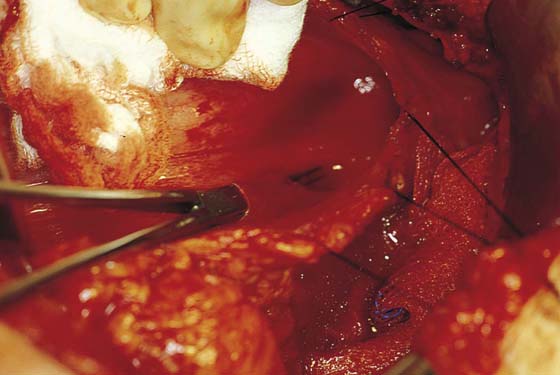
FIGURE 91–13 A submucosal tunnel is created for a distance of 15 to 20 mm.
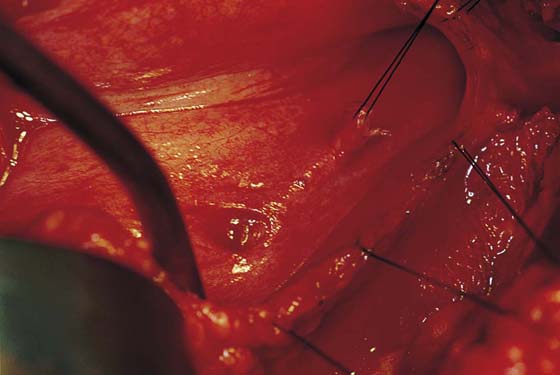
FIGURE 91–14 The transected ureter is brought through the bladder wall musculature and under the submucosal tunnel.
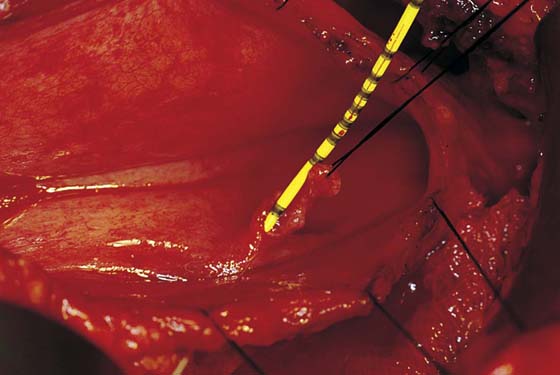
FIGURE 91–15 A ureteral stent is placed to facilitate suturing of the ureter into the bladder.
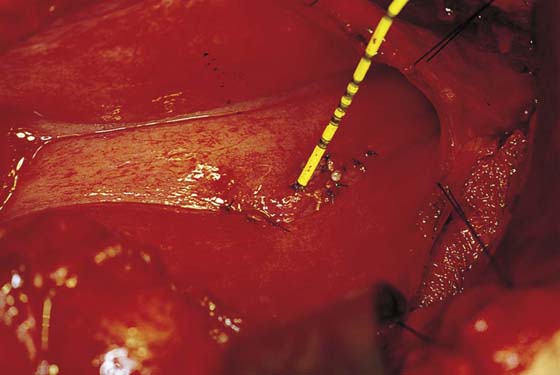
FIGURE 91–16 The ureter has been circumferentially sutured into the bladder using 4-0 or 5-0 absorbable sutures.
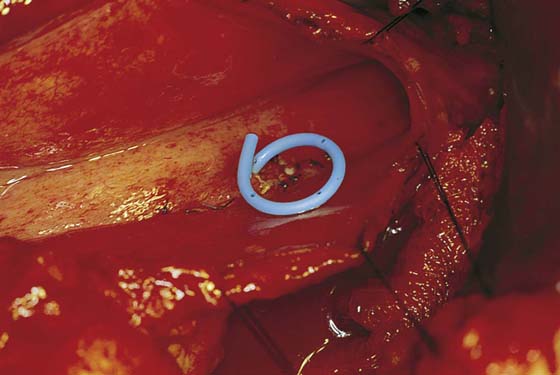
FIGURE 91–17 A double J stent is placed across the anastomosis before the bladder is closed.
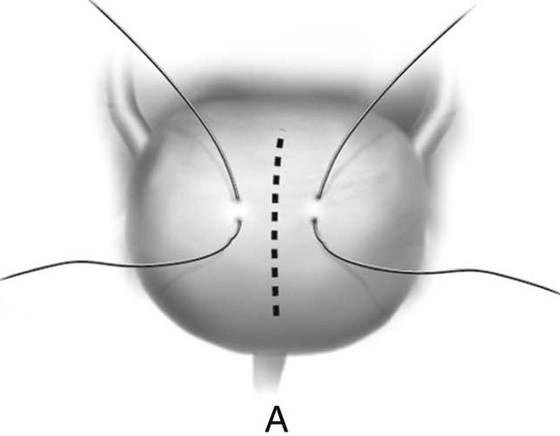
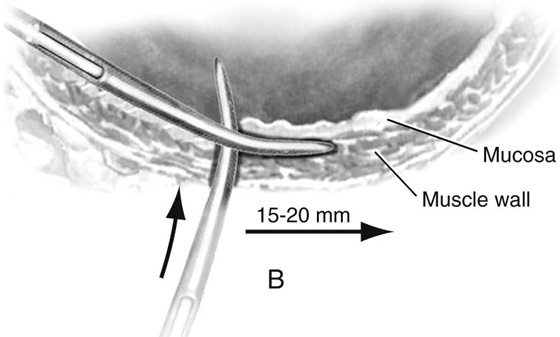
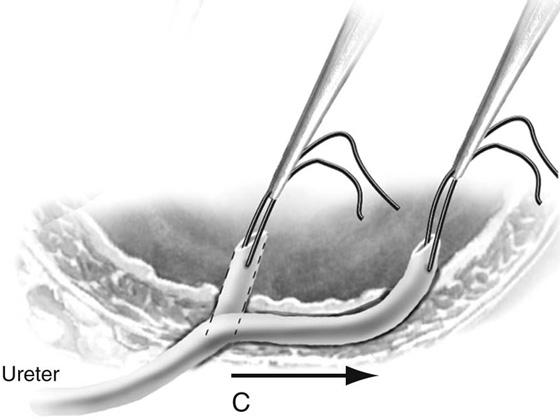
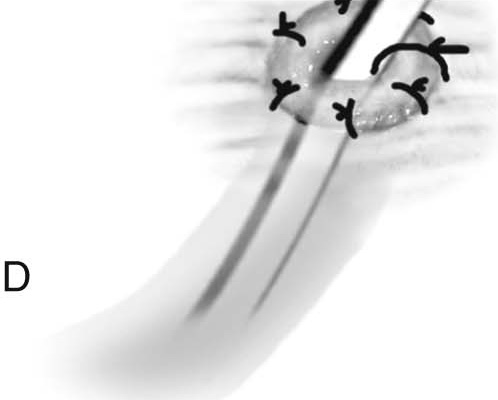
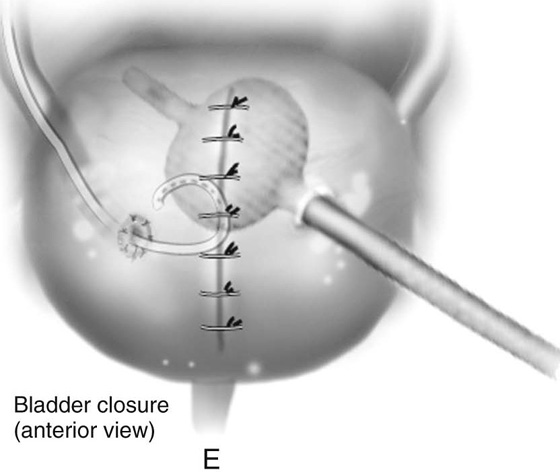
FIGURE 91–18 Technique of ureteroneocystostomy. A. Stay sutures are placed, and a high cystotomy is made. B. A submucosal tunnel is created. C. The ureter is passed through the tunnel. D. The ureter is fixed to the bladder with 4-0 or 5-0 interrupted, absorbable sutures. E. A double J stent is placed, and the bladder is closed.
Ureteroneocystostomy With Bladder Extension
A psoas hitch is a relatively easy technique utilized to gain length for a successful ureteroneocystostomy (Fig. 91–19). The technique is based on the fact that distortion of the bladder does not usually interfere with function and gains the surgeon between 3 and 5 cm of additional length. Relative contraindications to this procedure are a contracted scarred bladder and previous pelvic surgery in which the blood supply to the bladder has been compromised. The anterior parietal peritoneum from the lower abdominal wall is incised, and the bladder is displaced posteriorly off the symphysis pubis. If additional length is needed, the parietal peritoneum can be divided laterally above the bladder. This approach thus completely mobilizes one entire side of the bladder. Through an anterior and vertical incision in the bladder, a finger can be placed into the dome of the bladder to elevate the bladder to the anterior surface of the ipsilateral iliopsoas muscle. Superior and middle vesical arteries can be ligated on the contralateral side to gain additional mobility of the bladder. The ureter can be reimplanted into the dome of the bladder, creating an antirefluxing submucosal tunnel. In older patients, in whom reflux may not be as much of a concern, a direct anastomosis to the dome can be performed. It is extremely important that the reimplantation be done without tension or angulation of the ureter. The reimplantation should be stented with a double J stent. The bladder mucosa is closed as previously described.
The Boari-Ocherblad Flap
The Boari-Ocherblad flap is utilized to gain additional length to bridge a gap between the ureter and the bladder. In this situation, a flap of bladder is mobilized and tubularized (Figs. 91–20 and 91–21). The length of the flap depends on the particular deficit length between the posterior lateral wall of the bladder and the proposed site of the ureteroneocystostomy. The ureter is tunneled in the submucosal portion of the flap, which is then tubularized around the ureter. If adequate length does not allow for creation of a submucosal tunnel, the ureter can be anastomosed end to end to the tubularized Boari-Ocherblad flap. The anastomosis is then stented with a double J stent.
When ureteral injury occurs, the technique used to correct the injury depends on the location of the injury. Fig. 91–22 reviews available surgical options based on the level of the ureteral injury.
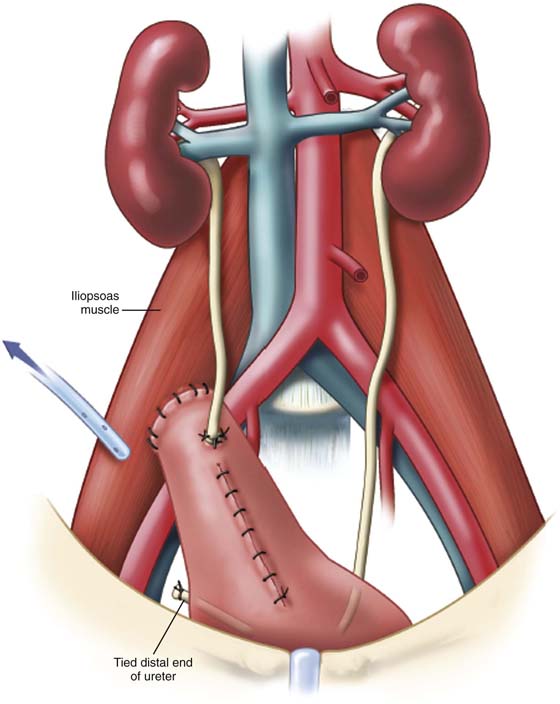
FIGURE 91–19 Schematic representation of a completed psoas hitch. Note that reimplantation of the ureter is completed before the bladder is secured to the psoas muscle.
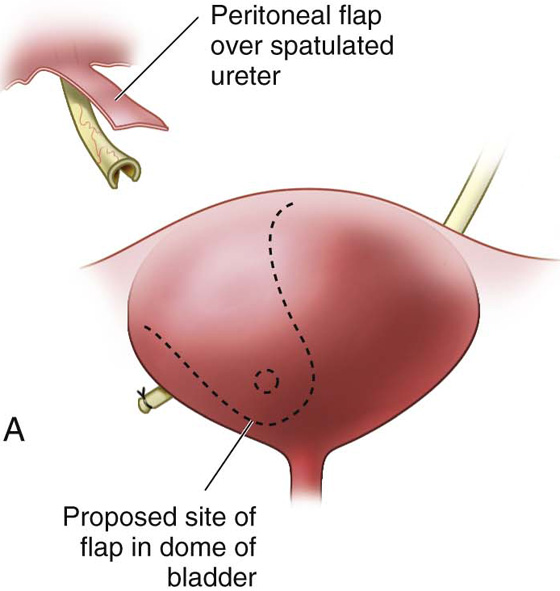
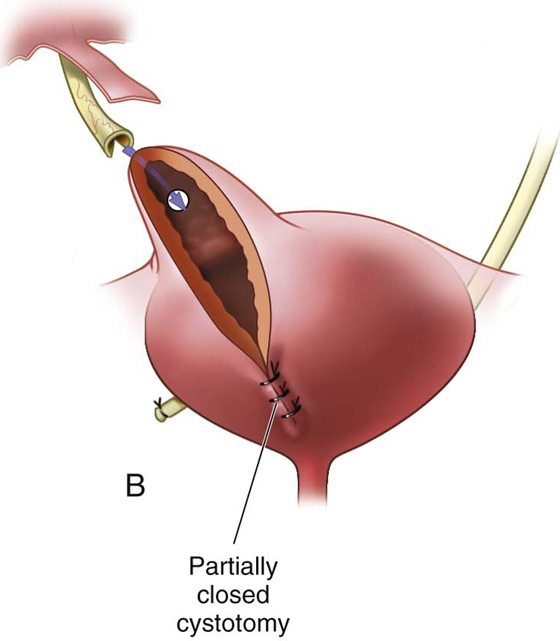
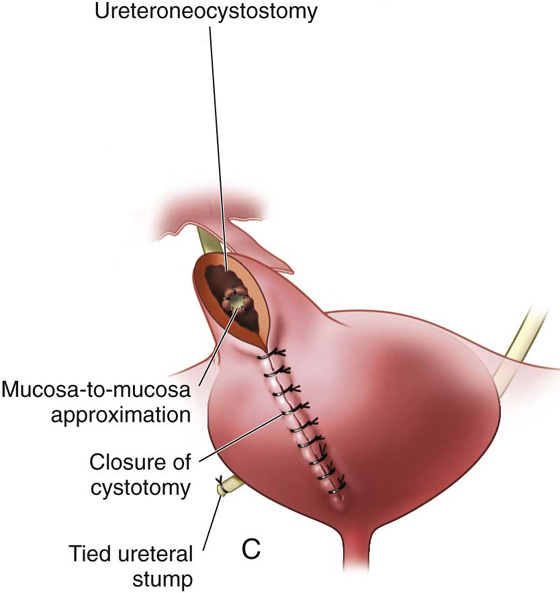
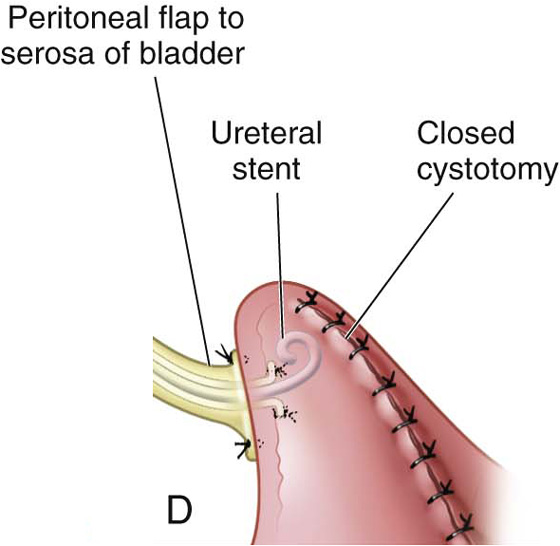
FIGURE 91–20 Schematic overview of Boari bladder flap. A. Outline of oblique bladder incision used to construct the bladder bridge. Note the broad base (roughly 2 times the diameter of the apex) and the outlined (dashed circle) future site of ureteral implantation. B. Site of future ureteral implantation. C. End-to-side ureteral anastomosis completed, and double J ureteral stent placed. D. Cystotomy closure completed and (not shown) psoas hitch performed to keep anastomosis off tension.
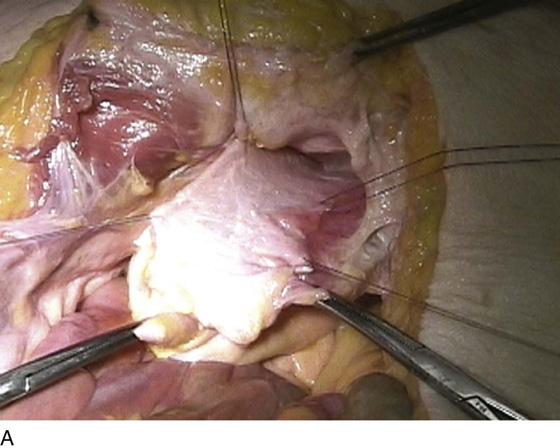
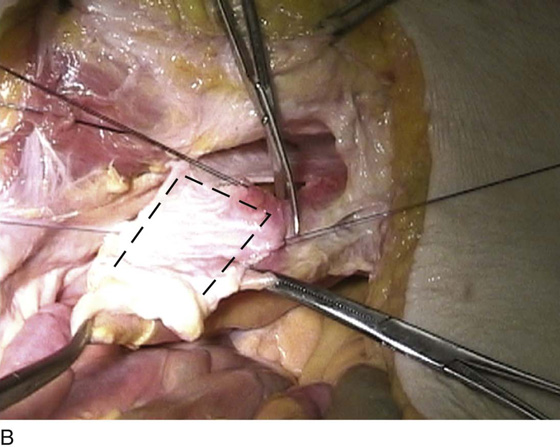
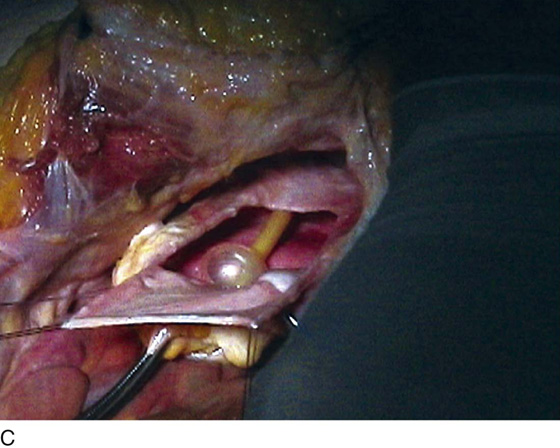
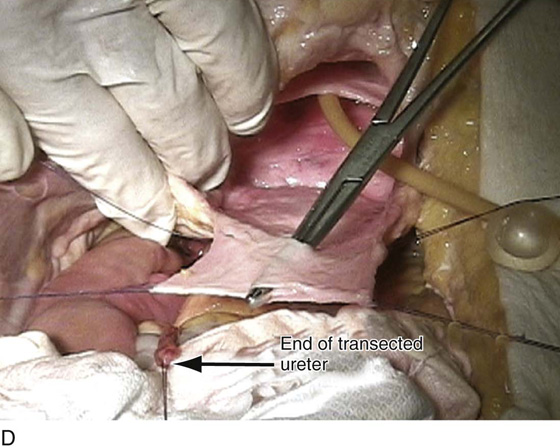
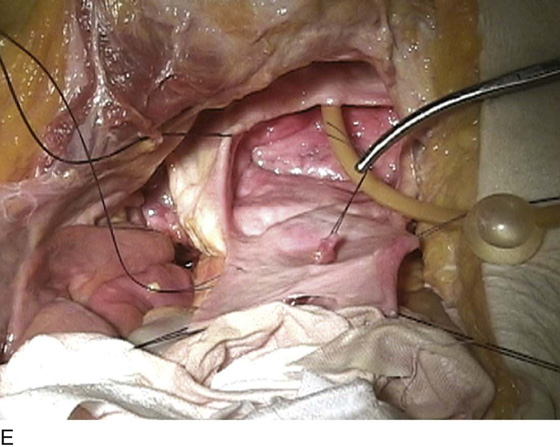
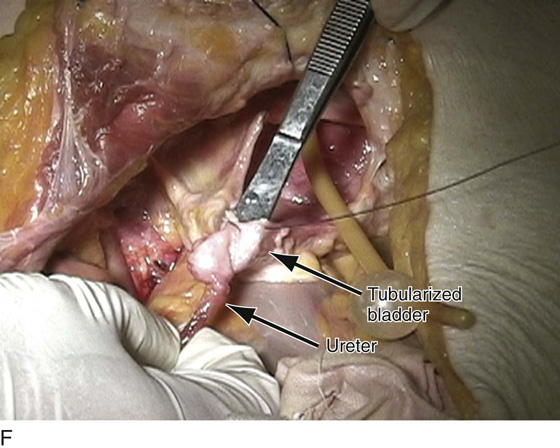
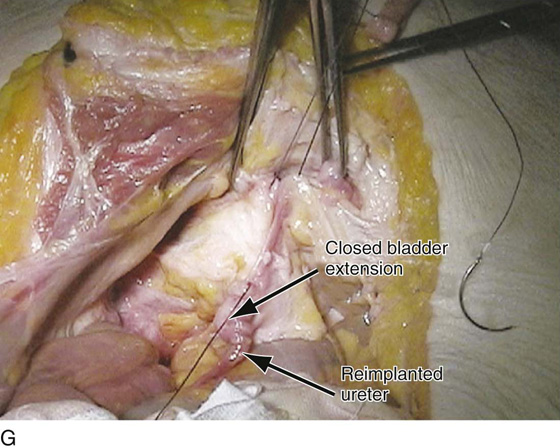
FIGURE 91–21 Cadaveric dissection demonstrates the technique of creation of a Boari flap. A. Area of the bladder is identified and tagged with stay sutures. B. An anterior U-shaped incision is made in the anterior extraperitoneal portion of the bladder, as demonstrated by the dashed line. C. The flap is reflected in a cephalad direction. D. A submucosal tunnel is created. E. The ureter is brought through the submucosal tunnel, spatulated, and sutured to the wall of the Boari flap. F. The flap is tubularized over the implant, thus closing the bladder extension. G. The remainder of the bladder is closed, completing the repair.
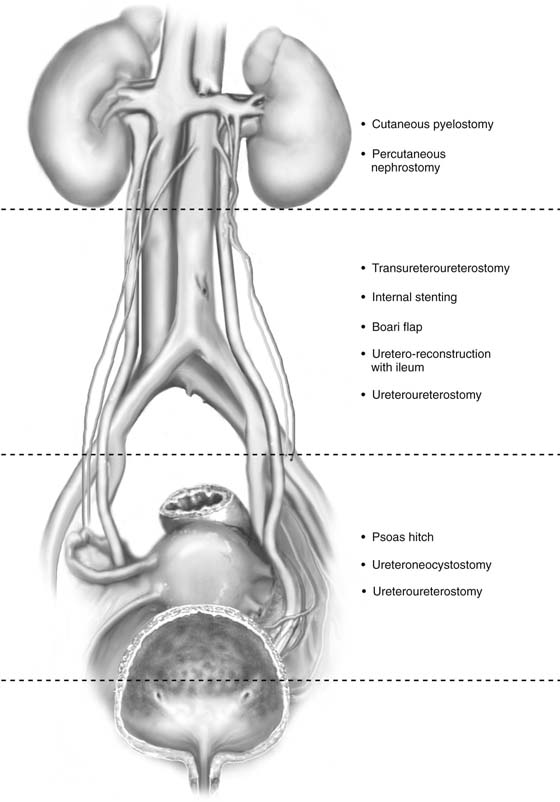
FIGURE 91–22 Illustration showing the entire length of the ureter. The various operations performed for ureteral injury are listed according to the anatomic level of injury.