Lower urinary tract
SUPRAPUBIC CATHETER INSERTION
Appraise
1. Suprapubic catheterization is indicated in both emergency and elective settings. A suprapubic catheter (SPC) may be required to drain a bladder in acute urinary retention when urethral catheterization is not possible, e.g. in the presence of a urethral stricture, or to divert urine following injury to the lower urinary tract such as from a pelvic fracture.
2. An SPC may also be used to divert urine following complex reconstructive urological surgery.
3. SPCs are the preferred option for long-term catheterization. By bringing out the catheter through a clean part of the anatomy it is easier to maintain hygiene around the catheter site. Changing an SPC is a clean and technically easy procedure. The risk of infection is reduced, although not completely eliminated. An SPC leaves the genitals free for sexual activity.
Anatomical considerations
1. The bladder lies in the anterior part of the pelvic cavity behind the fat -filled retropubic space. As the bladder fills, it rises above the pubic crests and comes into contact with the lower part of the anterior abdominal wall.
2. The distended bladder intervenes between the parietal peritoneum and the abdominal wall and access can be gained without breaching the peritoneum.
3. The layers of the anterior abdominal wall are firstly the skin and subcutaneous fat. Scarpa’s fascia is the next layer. It is well defined and can be thick in obese patients. Deep to Scarpa’s fascia, in the midline, below the level of the umbilicus, the rectus sheath forms a single fibrous layer which passes anterior to the rectus abdominis muscles. The posterior surface of the rectus muscles is in direct contact with the transversalis fascia, beneath which is the extra-peritoneal fat.
Action
1. There are three types of suprapubic catheter – one where the catheter is introduced over its own needle (the Bonanno™ catheter); the second relies on a Seldinger technique of placing a guide-wire, dilating the track and then introducing the catheter; the third type is introduced via a trocar and cannula placed blindly.
2. The Bonanno™ catheter (BD Biosciences) is a fine-bore catheter tube that can be used as a temporary method of draining the bladder. Due to the narrow calibre of the catheter it is prone to blocking and is not suitable for medium or long-term use.
3. Foley balloon catheters are preferred for suprapubic drainage and are generally available in kits for insertion. Prepare the patient’s abdomen in the supine position. Place the drapes to ensure that the midline of the abdomen is identifiable.
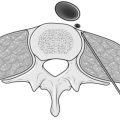
4. Locate the site for insertion, two finger-widths above the pubic symphysis in the midline. Use ultrasound to localize the bladder, if available. Infuse local anaesthetic into the skin and the subcutaneous tissues. Continue to advance the needle through all the layers of the anterior abdominal wall until urine is aspirated.
5. Introduction of a suprapubic catheter can only be safely performed following aspiration of urine.
6. Place a 1-cm incision at the site of injection using a blade and deepen it through the subcutaneous fat.
7. Insertion of an SPC using the Seldinger method is considered to be the safest method due to the higher degree of control and accuracy of placement.
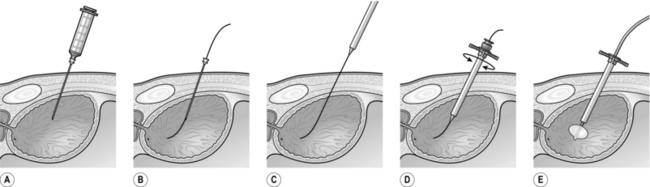
8. Attach a long 18-gauge needle to a syringe for deep local anaesthetic infiltration and aspiration of urine from the bladder (Fig 37.1A). Once aspiration is confirmed, detach the syringe leaving the needle in place with its tip still in the bladder. Insert the floppy tip of a guide-wire through the long needle into the bladder (Fig 37.1B). Remove the needle over the guide-wire. Feed the stiff end of the guide-wire through the aperture in the tip of the trocar (Fig 37.1C) and advance the trocar along the guide-wire into the bladder (Fig 37.1D). Remove the trocar leaving the sheath in situ. Introduce a Foley catheter through the sheath and inflate the balloon (Fig 37.1E).
9. If using a blind trocar, push the trocar in its sheath through the skin incision angled at 90o to the skin. Apply constant pressure with rotational movements as you advance the trocar. A sudden loss of resistance will indicate penetration of the rectus sheath. This does not indicate access to the bladder. The trocar will need to be advanced further to enter the bladder.
10. Confirm access to the bladder by withdrawing the trocar from its sheath to observe a flow of urine. If no urine is seen, replace the trocar in the sheath and advance further until urine is obtained. Insert the catheter quickly through the sheath into the bladder and inflate the balloon. Remove the sheath and secure the catheter with a non-absorbable suture.
11. Where suprapubic catheterization is required electively for long-term catheterization, perform this under direct vision by filling the bladder with a flexible or rigid cystoscope. The cystoscope is used to watch the safe placement of the instruments from within the bladder.


CYSTOSCOPY
Appraise
1. There are very few indications for you, as a general surgeon, to cystoscope a patient.
2. However, you may be forced to pass an instrument, usually a rigid one, in order to relieve clot retention. The procedure is very similar to passing a metal urethral dilator (see below).
3. If you are a junior doctor working on a urological firm you will be expected to undertake this procedure safely as a core skill.
Action
1. Use general anaesthesia when possible.
2. Place the patient in the lithotomy position.
3. Clean and appropriately drape the patient.
4. Check the cystoscope for lighting and irrigation.
5. Insert the lubricated cystoscope under direct vision, using a 0o or 12o rod lens telescope, with the irrigation running. In a male patient, stretch the penis and hold it straight at an angle of about 45o to the horizontal. Slowly advance the scope, visualizing the whole urethra. As you approach the external sphincter lower your hands so the scope is approaching the horizontal. Carefully advance the scope through the sphincter. You will see the verumontanum (a small raised structure in the 6 o’clock position). At this point, do not advance any further; drop your hands further so the scope is now pointing upwards and you can see the two lobes of the prostate. When the scope is pointing upwards at about 45o, advance the scope into the bladder.
6. There is no justification for passing the cystoscope blindly. This is particularly important immediately following prostatectomy, when ‘blind’ passage of the cystoscope can be extremely difficult and its tip may undermine the trigone.
7. Inspect the bladder using a methodical approach to ensure that it is inspected in its entirety. You may need to exchange the telescope for a 30o or 70o lens for complete inspection.
8. When the bladder is full of clot, it is often necessary to pass the larger 27 F resectoscope sheath in order to evacuate the clots effectively. Use a visual obturator to insert the resectoscope under vision using the principles described above for passing the cystoscope. If the visual obturator is not available and you have to insert the resectoscope sheath ‘blind’, obtain a preliminary view of the urethral anatomy with the cystoscope to help you know where you are going. Clots can be evacuated from the bladder using an Ellik’s evacuator.
OPERATIONS FOR URETHRAL STRICTURES
Appraise
1. Urethral strictures commonly cause symptoms of bladder outflow obstruction and are the most common cause of urinary obstruction in young and middle aged men.
2. Any injury to the epithelium lining the urethra or to the underlying corpus spongiosum which results in healing by scar formation may cause a urethral stricture.
3. The aetiology may be infective (Chlamydia, gonococcal), traumatic (usually blunt or iatrogenic), inflammatory (e.g. lichen sclerosus et atrophicus), ischaemic (secondary to distraction injury) or idiopathic.
4. Traumatic strictures may occur after straddle injuries, kicks to the perineum or pelvic fractures. Iatrogenic trauma is a common aetiology and any form of urethral instrumentation resulting in urethral epithelial damage may subsequently result in stricture formation. This can range from minor instrumentation such as urethral catheterization to bladder neck strictures resulting from transurethral resection of the prostate.
5. Strictures have a high recurrence rate following endoscopic treatment. Recurrence is more common with longer and denser strictures.
URETHRAL DILATATION
Action
1. Choose a dilating instrument to suit the site of the stricture. Use generous amounts of lubricating gel.
2. For distal or meatal strictures, use short female dilating instruments, for example Canny Ryall dilators.
3. For more proximal strictures, use curved Clutton dilators. With the patient in lithotomy, hold the penis vertically. Introduce the dilator, point the penis towards the patient’s head and slowly advance the dilator. Push the curve of the dilator against the bulbar urethra and lower your hands. As you do this, the dilator will slide into the bladder. To confirm that you are in the bladder, rotate the dilator; if it rotates easily then you are in the right place.
OPTICAL URETHROTOMY
1. Use an optical urethrotome.
2. Pass the instrument to the level of the stricture. Pass a guide-wire via the side channel through the stricture into the bladder to define the direction of the stricture.
3. Extend the cutting blade from the urethrotome sheath through the stricture. Aim to incise the stricture in the 12 o’clock position. Advance the blade through the stricture, lower your hands to apply upward pressure and pull the blade back through the stricture.
4. Repeat this action if necessary in the same position until the stricture opens up. The incision must be full thickness through the depth of the scar.
5. Advance the urethrotome sheath through the stricture into the bladder and remove the inner working element to leave the outer sheath in place. Advance a urinary catheter through the outer sheath and inflate the catheter balloon before removing the sheath.
6. Leave a urethral catheter in situ after the urethrotomy for 24–72 hours.
URETHROPLASTY
1. For recurrent strictures, excision of the diseased urethra will provide a better long-term outcome than optical urethrotomy.
2. Urethroplasty is a specialist urological operation performed through a perineal incision. An anastamotic urethroplasty involves excision of the strictured segment, mobilization of the urethra and primary anastamosis of the two cut ends of the urethra.
3. Free graft urethroplasty involves excision of the stricture, laying a tissue graft and tubularization over a catheter. Buccal mucosa is currently the favoured tissue for grafting.
PROSTATECTOMY FOR BENIGN PROSTATIC ENLARGEMENT
Appraise
1. Prostatectomies are usually performed to treat bladder outflow obstruction secondary to benign prostatic enlargement (BPE). The majority of prostatectomies are carried out endoscopically (transurethral resection of prostate – TURP). Where the prostate volume is estimated to be above 100 cc, an open retropubic or transvesical prostatectomy is preferred. Recently, laser vapourization of the prostate or laser enucleation have become popular. Holmium laser enucleation can be used to treat very large (> 100 cc) glands, avoiding the need for open surgery.
2. Indications for prostatectomy are: failed medical management of BPE, chronic urinary retention, high pressure retention with renal impairment, recurrent haematuria secondary to BPE, recurrent urinary tract infections or bladder stone formation due to outflow obstruction. TURP is sometimes performed to manage lower urinary tract symptoms (LUTS) in patients with prostate cancer.
3. Consider long-term catheterization as an alternative to surgery where patients have a poor performance status or where severe dementia or Parkinson’s disease would render the patient susceptible to postoperative incontinence.
4. Beware of patients with severe storage LUTS which may be due to detrusor over-activity. These symptoms may not improve with bladder outlet surgery. Preoperative urodynamic assessment may be valuable in patients with mixed storage and voiding symptoms to confirm whether there is evidence of obstruction or concomitant detrusor over-activity.
5. Do not approach clinically malignant prostates through the open route.
6. Very small prostates, often amounting only to a tight unrelaxing bladder neck, are far better approached transurethrally. The operation of choice may be a bladder neck incision.
7. When obtaining consent from a patient for prostatectomy, warn him of the risk of retrograde ejaculation (70–80% for TURP), erectile dysfunction (10–15% for TURP) and permanent incontinence (1% for TURP). Tell the patient he may experience residual urinary symptoms or temporary urinary incontinence (3% for TURP). There is around a 4% incidence of postoperative urethral stricture or bladder neck contracture, which may require further surgery. Bleeding and infection should also be mentioned as perioperative complications as well as TUR syndrome if monopolar glycine resection is being used.
RETROPUBIC PROSTATECTOMY
Prepare
1. Perform a preliminary cystoscopy to establish that the gland is suitable for enucleation and that there is no urethral or bladder pathology.
2. Place the patient in the supine position.
3. Position yourself on the left side of the patient; clean the lower abdomen, genitalia and upper thighs. Apply drapes so that you have access to the genitalia.
Access
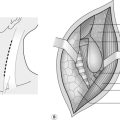
1. Make either a 10 cm Pfannenstiel incision or an infraumbilical lower midline incision.
3. Incise the rectus sheath in the direction of your skin incision, exposing the muscle belly.
4. Grasp the midline of cut edges of the rectus sheath with long artery forceps, and with finger dissection free the rectus sheath from both muscles. Use scissors for the linea alba; carry this incision downwards to the symphysis and upwards for about 6 cm, exposing the rectus muscles (Fig. 37.2).
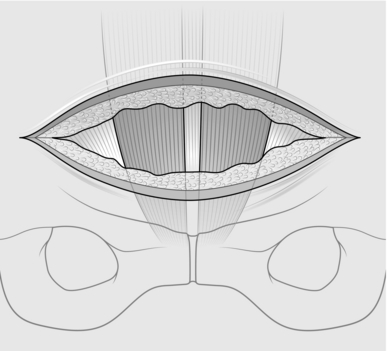
Fig. 37.2 Exposure of rectus muscle.
5. Gently dissect with scissors between the rectus muscles, developing the longitudinal gap between them.
6. Retract the rectus muscles laterally and develop the prevesical space with the peritoneum swept superiorly.
7. Sweep your right index finger beneath the symphysis to clean the retropubic space. Position a long-bladed Millin self-retaining retractor that depresses the bladder while holding the wound open.
Action
1. With diathermy forceps, coagulate all the veins coursing across the prostatic capsule. After this, clean the capsule of fatty tissue.
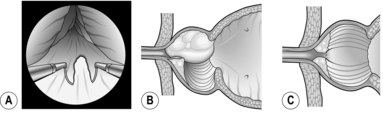
2. Have your assistant depress the lower part of the bladder downwards and backwards with a sponge in a sponge-holder, exposing the upper border of the prostate gland (Fig. 37.3A).
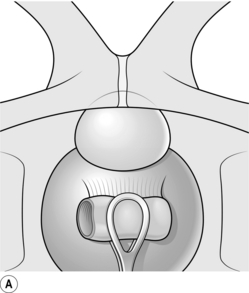
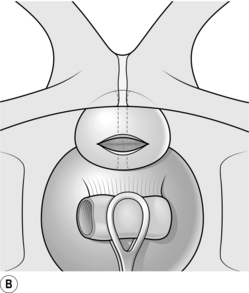
3. Place a stay suture in the upper border of the capsule and a second stay suture just distal to the first.
4. Make a 2-cm transverse incision through the capsule of the prostate between the two stay sutures using cutting diathermy (Fig. 37.3B). The capsule may be up to 0.5 cm thick, and there are vessels within it that need to be coagulated. The two lobes of the prostate bulge into view. Insert long dissecting scissors between the two lobes into the prostatic urethra and open them longitudinally. Remove the retractor and other instruments.
5. Insert your right index finger into the prostatic urethra. You feel it gripped between the two lobes. Push your finger downwards until it reaches the back of the prostatic urethra and curl it laterally towards yourself. You will be able to break into a plane between the urethra and the left lobe of the ‘adenomatous’ gland. Extend this plane to the apex of the prostate and backwards to the bladder neck (Fig. 37.4).

Fig. 37.4 Enucleation of prostatic adenomas.
6. Next, come back to the apex (distal end) of the prostate. With your index finger under the lobe and your thumb on the outside of the capsule, you can nip through the apex and so free it. Continue to work your index finger round the front and lateral border, so freeing the lobe completely except for that part attached to the bladder neck.
7. Repeat the process on the opposite lobe. Use the index finger of each hand to facilitate enucleation of the gland.
8. Dislocate the two lobes out of the capsule and nip them off at the bladder neck, using thumb and forefinger.
9. Insert a bladder neck spreader (e.g. the Badenoch spreader) into the bladder. Get an assistant to hold it in position (Fig. 37.5). This reveals the bladder neck, and middle lobe if present, both of which must be totally excised. Pack a swab into the prostatic cavity to prevent the field from being obscured by blood, and likewise into the bladder to stop the bladder urothelium folding upwards.
Fig. 37.5 Bladder neck retractor in position.
10. The bladder neck can now be grasped with long-toothed forceps and excised with a diathermy point. Do not be tempted to excise just a small ‘V’.
11. Insert a wide-bore (24 F) three-way irrigating catheter.
12. Close the prostatic capsule using a continuous 2/0 absorbable suture. Start the sutures from both ends of the incision in the prostatic capsule using two different lengths of the suture and meet in the middle tying the two together. Complete the closure by tying the 2 stay sutures together.
13. Wash out the bladder to ensure your suture line is watertight.
14. Use a wide-bore drain placed in the retropubic space.
15. Close the rectus sheath with a 2/0 or 0/0 PDS suture and select a skin closure that you are familiar with.
16. Finally wash the bladder out again and ensure that your irrigation is running freely.
TRANSURETHRAL RESECTION OF PROSTATE
Prepare
1. Place the patient with his legs in the lithotomy position.
2. You may wish to perform a digital rectal examination of the prostate to assess the size before embarking on endoscopic resection, although this information should have been obtained preoperatively.
3. If you are using monopolar resecting equipment place a diathermy pad on the patient’s skin and ensure that the irrigation fluid is glycine 1.5%. For bipolar equipment use saline for resection.
Action
1. First perform a cystoscopy to assess the urethra, sphincter, prostatic urethra, prostatic lobes and verumontanum. A systematic inspection of the bladder is essential, paying particular attention to the position of the ureteric orifices in relation to the bladder neck.
2. Introduce the resectoscope sheath into the bladder with a visual obturator. Once in the bladder, replace the obturator with the working element of the resectoscope with resecting loop attached.
3. Ensure the diathermy cables are connected and the inflow and outflow for bladder irrigation are both open.
4. Start by placing the tip of the resectoscope at the verumontanum. This is the landmark for the external urethral sphincter and will be the most distal extent of your resection to prevent sphincter damage.
5. Resection usually begins in the 6 o’clock position of the median lobe. Extend the resecting loop and apply the cutting diathermy pedal as you retract the loop (Fig 37.6A). Repeat this to create a channel between the two lateral lobes from the bladder neck to the verumontanum. Resect the adenomatous tissue, which appears granular and ‘bread-like’. Stop when you reach the capsule, which is a smooth fibrous layer. At the bladder neck stop resecting when you see the circular muscle fibres (Fig 37.6B).
6. Next resect the lateral lobes starting at either the 10 or 2 o’clock position. Resect in one position to the level of the capsule and move your resection towards the 6 o’clock position. Achieve haemostasis using coagulation diathermy. Apply a methodical approach to achieve a smooth resection (Fig 37.6C).
7. Check your position in relation to the verumontanum regularly to avoid excessive resection near the sphincter.
8. Place the tip of the scope at the verumontanum and look up towards the bladder. If the resection is complete you will be able to see into the bladder from here with an unobstructed view.
9. Evacuate the prostate chips using an Ellik device. Inspect the bladder carefully to ensure that all chips are removed.
10. Re-inspect the prostatic bed for further bleeding before inserting a three-way catheter using a catheter introducer in the same way as introducing a curved metal urethral dilator (above).
FORMATION OF ILEAL CONDUIT
Appraise
1. An ileal conduit is a form of urinary diversion where the ureters are anastomosed to a segment of small bowel, which is fashioned as a stoma to the skin of the anterior abdominal wall (Fig. 37.7).
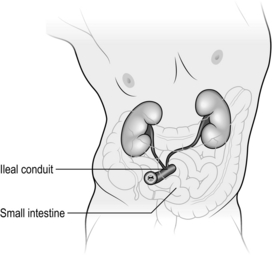
Fig. 37.7 Ileal conduit formation.
2. Other forms of urinary diversion exist which can be continent or incontinent; the ileal conduit is the most common diversion procedure.
3. Urinary diversion is required when the bladder is removed either for malignant disease (radical cystectomy) or for benign disease (simple cystectomy). It can also be carried out leaving the native bladder in situ, for example for severe lower urinary tract symptoms or to palliate symptoms in patients with locally advanced bladder malignancy.
Action
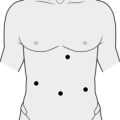
1. Mark a stoma site preoperatively by assessing the patient in the supine, seated and standing positions to avoid the appliance being located in a skin fold.
2. A lower midline abdominal incision is usually used for cystectomy. This allows adequate access to the bladder and pelvic organs as well as the bowel.
3. The posterior peritoneum is incised on both sides and the large bowel reflected to expose the iliac vessels.
4. Identify the ureters by locating the bifurcation of the common iliac arteries where the ureters cross over the vessels. Dissect the ureters distally to the vesico-ureteric junctions and divide them close to the bladder. Clip or tie the cut ends to allow dilatation of the ureters. When dissecting the ureters, leave adequate peri-ureteric tissue to preserve its blood supply.
5. Prepare a segment of distal small bowel by firstly locating the ileo-caecal junction and, using a tape measure, select a 15-cm length of ileum 20 cm from the ileo-caecal valve. When selecting the bowel, trans-illuminate the small bowel mesentery to identify a length of ileum that can be isolated on a pedicle without compromising the blood supply.
6. Apply non-crushing bowel clamps at the boundaries of the isolated loop and divide the bowel. Place a stay suture at the distal end of the bowel segment to allow ante-peristaltic orientation of the conduit. Flush the conduit bowel segment with sterile water. Re-establish bowel continuity by joining the free ends of the small bowel with either a hand-sewn or stapled anastomosis.
7. Prepare the distal ends of the ureters for the ureteric-bowel anastomosis. Pass the left ureter through an opening created in the sigmoid mesentery to swing it to the right side of the abdomen. For a Wallace anastomosis, the distal ends of the ureters are spatulated with a 2-cm longitudinal incision. The ureters can be joined using a 66 or 69 technique with a fine absorbable suture. The joined ureters can then be anastomosed to the proximal end of the ileal segment. Alternatively, the ureters can be anastomosed separately in an end-to-side Bricker anastomosis. Ureteric catheters should be fed to the kidney on each side and passed through the loop of bowel and out of the stoma.
8. Create a stoma by excising a plug of skin at the predetermined site and dissect down to the rectus fascia. Make a cruciate incision in the fascia and bluntly dissect through the peritoneum. Pass the distal end of the small-bowel conduit through the aperture, taking care not to displace the ureteric catheters. Pull the bowel 2–3 cm above the level of the skin in order to facilitate the fashioning of a spout. The stoma is anchored to the rectus fascia with four sutures applied between each of the four leaves of the cruciate incision and the bowel serosa. Absorbable sutures are used to create the stoma by everting the bowel to form a spout.
TRAUMATIC RUPTURE OF THE BLADDER
Appraise
1. Extraperitoneal rupture can follow blunt trauma to the lower abdomen when the bladder is full. It can be diagnosed by a cystogram, using aqueous contrast medium, which may also demonstrate associated urethral injury.
2. Extraperitoneal bladder rupture can be treated conservatively by inserting a urethral catheter, giving broad-spectrum antibiotics and monitoring the patient.
3. Operative repair of the bladder is indicated if there is a failure to drain urine through the catheter, increasing lower abdominal distension or evidence of intra-peritoneal rupture.
4. Rupture of the bladder into the peritoneal cavity is an unusual injury in isolation, though it may occur as a complication of transurethral surgery to a bladder lesion. If it results from external trauma, there are commonly associated injuries that need attention.
Action
1. Expose the bladder intra- and extraperitoneally. This enables you to perform an exploratory laparotomy at the same time.
2. Clean the peritoneal cavity using saline lavage.
3. Open the bladder anteriorly to detect other bladder injuries that may have escaped notice.
4. Close the bladder incision and injuries in two layers using an absorbable suture. Drain the bladder urethrally if there is no urethral injury, and suprapubically if there is any doubt.
5. Before closure of the abdomen instil 100–200 ml of sterile saline into the bladder via the catheter to test your bladder closure and check for other sites of bladder injury.
RUPTURE OF THE POSTERIOR URETHRA
Appraise
1. Injuries to the urethra that result from pelvic trauma require expert attention if the patient is to avoid lifelong disability.
2. If the patient cannot pass urine following lower abdominal or pelvic trauma, the differential diagnosis lies between bladder rupture and posterior urethral injury.
3. Urethral injury is more likely if there is significant bony deformity of the pelvis.
4. Stabilize the urinary tract by inserting a suprapubic catheter while life-threatening injuries receive attention.
5. The operative management of posterior urethral rupture is often complex and beyond the scope of this book, so seek expert urological advice.
Blandy, J. Cystoscopy. In: Blandy J., ed. Operative Urology. 2nd ed. Oxford: Blackwell Scientific; 1986:6–9.
Blandy, J. Dilatation of a stricture. In: Blandy J., ed. Operative Urology. 2nd ed. Oxford: Blackwell Scientific; 1986:216–219.
Blandy, J. Suprapubic cystostomy. In: Blandy J., ed. Operative Urology. 2nd ed. Oxford: Blackwell Scientific; 1986:117–120.
Blandy, J., Fowler, C. Bladder: trauma. In: Blandy J., Fowler C., eds. Urology. 2nd ed. Oxford: Blackwell Scientific; 1996:265–271.
Blandy, J., Fowler, C. Urethra and penis: trauma. In: Blandy J., Fowler C., eds. Urology. 2nd ed. Oxford: Blackwell Scientific; 1996:460–471.
Chapple, C., Barbagli, G., Jordan, G., et al. Consensus statement on urethral trauma [review]. BJU Int. 2004; 93:1195–2002.
May, F., Hartung, R. Surgical atlas: transurethral resection of prostate. BJU Surgery Illustrated. 2006; 98:921–934.
Millin, R. Retropubic prostatectomy: new extravesical technique. Report on 20 cases. Lancet. 1945; ii:693.
Nesbit, R.M.Transurethral Prostatectomy. Springfield: Charles C Thomas, 1943.
Renvall, S., Nurmi, M., Aho, A. Rupture of the urinary bladder: a potentially serious condition. Scand J Urol Nephrol. 1989; 23:185.
Webster, G.D., Mathes, G.L., Selli, C. Prostatomembranous urethral injuries: a review of literature and a rational approach to their management. J Urol. 1983; 130:898.