[level-membership-for-plastic-reconstructive-surgery-category]
Chapter 6 Limited scar brachioplasty
• Good for many, but not all, cases of brachial dermatolipodystrophy in non-massive weight loss patients. The vertical height from the mid-humerus to the most dependent portion of the mid-upper arm (with the arm at 90° to the body) should be no greater than 10 cm. For excessive upper dermatolipodystrophy, the traditional method should be used.
• The tailor tack method should always be used intraoperatively to confirm the accuracy of the preoperative markings. This should be done after any liposuction, if necessary, is performed. Corrections or modifications can be made at this time. The tailor tack closure should always be checked with the patient in the upright position and the arm at a 90° angle to the lateral chest.
• A superficial plane should be used for the resection of the involved area, taking only a thin layer of fat with the resected specimen.
• The elbows should not be raised above the level of the shoulders until 3 weeks postoperatively.
• During the preoperative marking, the transverse axis width of the incision (in the axillary fold) should stop at 1.5–2 cm medial to the visible portion of the axillary crease on the anterior and posterior shoulder. This helps in preventing the final scar from extending into visible areas.
• Undesirable anterior axillary and post-axillary fullness can also be corrected during this procedure.
• 12% of patients need some form of revisional surgery performed at 1 year or later. The most common reason is for scar correction.
Introduction
There is an ever increasing demand, mainly in women, for correction of brachial dermatolipodystrophy. Most patients, however, are not willing to accept the traditional brachioplasty scar that extends, in various configurations, from the axilla, running along the inner arm to the elbow. Following the seminal paper by Pollock,1 which described his technique for the treatment of hidradenitis suppurativa by excision of the involved axillary area followed by direct closure, I began to adapt this approach for esthetic brachioplasty. I now have 25 years of experience with this approach. There have been numerous refinements over the years.1–8 The minimal incision brachioplasty (MIB) technique is the preferred approach for most patients that I see, save for those with excessively dependent dermatolipodystrophy of the upper arms (as commonly seen in massive weight loss patients). In all other cases, it provides predictably good results that are equal to those achieved in comparable patients with the traditional approach. I am most frequently asked how simply tightening the skin of the axilla, in the minimal incision approach, can replicate the result achieved when the customary extended incision method is employed. This is best demonstrated by referring to the mechanics of the classic bamboo finger trap (Fig. 6.1), which when pulled on just one end circumferentially tightens the entire length of the tube.

Surgical Technique
Markings
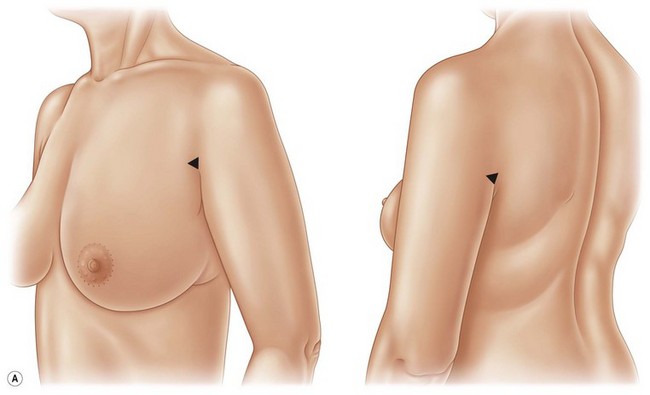
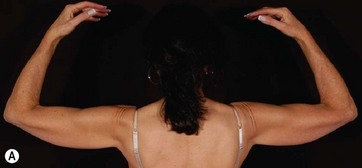
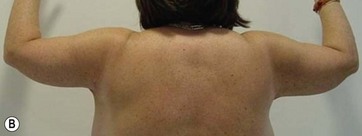
1. Marking is performed in the preoperative holding area with the patient in the upright position. With arms against sides, mark the anterior and posterior shoulders at the junction of the axilla with the shoulder. The final scar should not be visible beyond these markings (Fig. 6.2A).
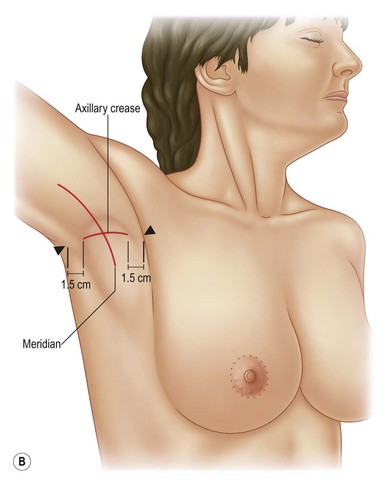
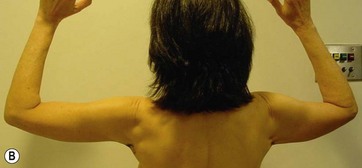
2. Mark longitudinal axis from central inner arm, through center of axilla, to the midlateral chest area (Fig. 6.2B).
3. Mark the transverse axis from anterior shoulder to posterior shoulder in the axillary crease or fold. This line should stop 1.5–2 cm medial to the anterior and posterior axillary crease–shoulder junction. This helps avoid a scar that will extend into a visible area of the shoulder (Fig. 6.2B).
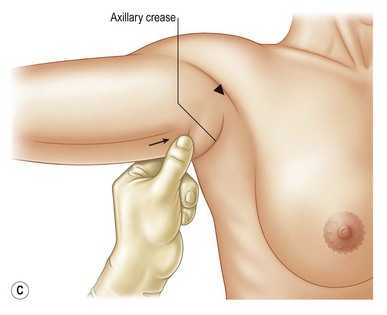
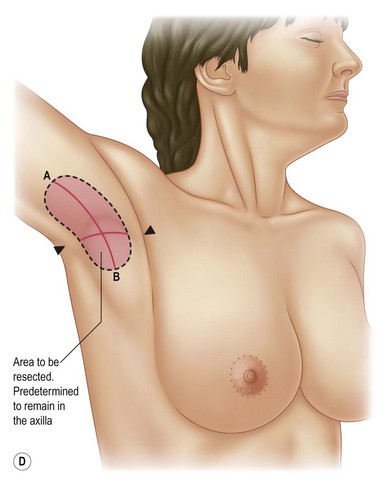
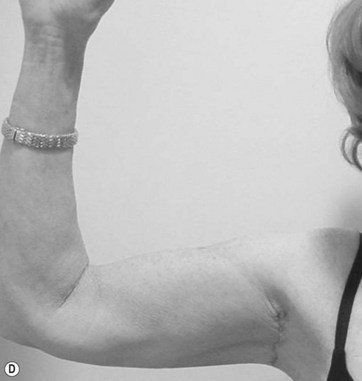
4. Determine the longitudinal length of excision using the pinch technique. First, move the skin of the triceps towards the transverse axis line until the arm has a pleasing contour. Then move the lateral chest skin towards the transverse axillary line. It is important to advance the lateral chest skin towards the transverse axillary crease to fix and stabilize the upper arm correction (Fig. 6.2C, D).
5. Mark areas that require liposuction. These should include, if indicated, the area of lipodystrophy of the upper outer breast/anterior axillary area as well as the posterior shoulder/axillary area. Both of these areas of lipodystrophy – which patients frequently point out as being of concern – can be easily corrected during the MIB procedure by liposuction and the subsequent axillary skin tightening.
The Procedure
1. Place patient on operating room table with arms outstretched.
2. Circumferentially prep arms and chest and apply appropriate draping.
3. Infiltrate tumescent solution into the areas to be liposuctioned (approximately 1 : 1).
4. Infiltrate dilute local anesthesia (1% Xylocaine plain 50 ml and 0.25% Marcaine 50 ml, 1 ml 1 : 1000 epinephrine (adrenaline) plus 150 ml normal saline) into areas of planned surgical resection.
5. Carry out liposuction on both upper arms.
6. Use the tailor tack method to check the accuracy of the preoperative markings. It is important to check the tailor tack closure with the patient in the upright position and the arm at 90° to the lateral chest. Make any revisions necessary in the initial preoperative markings. At this time also check for any abnormal folds or rotations in the skin of the arm. Adjust the tailor tack suture placements to correct these as well. After necessary adjustments have been made, remark the planned surgical site (Fig. 6.3A).
7. Remove the tailor tack sutures or Adairs, and with the patient in the recumbent position, excise the involved area with just a thin layer of fat attached (Fig. 6.3B).
8. Clean area with 5% Betadine and mark out the area of the axillary crease (Fig. 6.3C).
10. Concealing the scar: In many cases the closure of the surgical site can cause the final scar to extend into the visible portions of the anterior or posterior shoulder, or both. This should be addressed at the time of closure using the purse string technique:
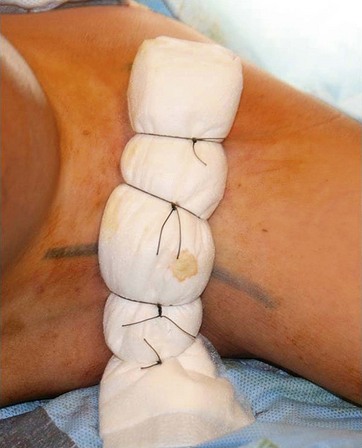
11. Selective use of bolster dressing. In those cases where it is felt that the axillary fold may be difficult to recreate or there is obvious tension, use a bolster dressing made from a rolled up ABD pad.
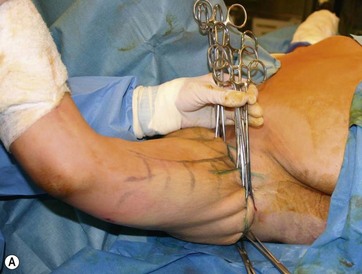
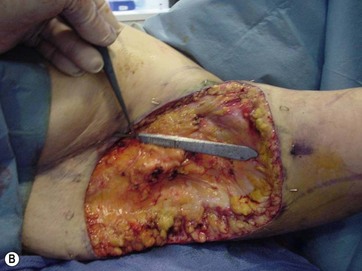
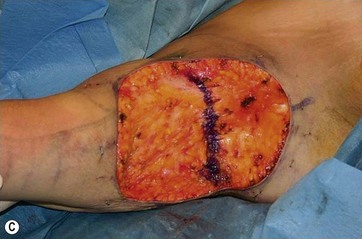
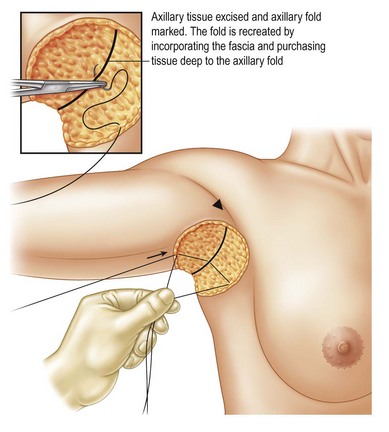
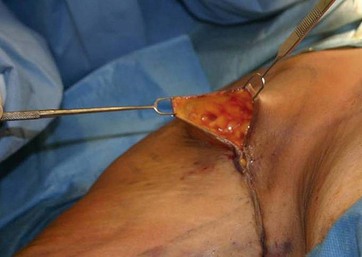
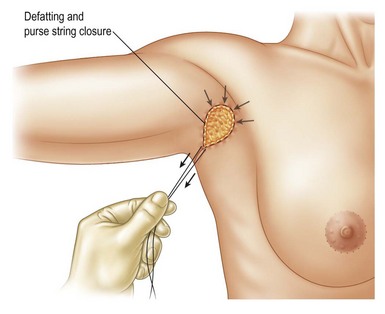
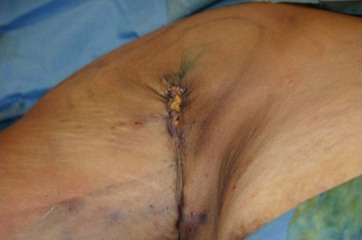
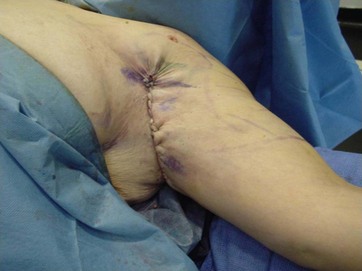
FIG. 6.8 View of final closure with purse string correction of elongated anterior axillary incision.
Prior to beginning closure of the wound, place four #1 retention sutures, placed 3 cm from the wound edges. These sutures should pass carefully through the base of the wound. After the final closure, these sutures will be used to snug the bolster dressing in place. The bolster is normally left in place from 2 to 4 days. No drains are used. Bacitracin and gauze are placed on the surgical sites. No arm wraps or surgical arm garments are used (Fig. 6.9).
Optimizing Outcomes
1. Patient selection. Ideal candidates have skin laxity that can be well corrected by axillary skin excision alone. Patients with excessive skin laxity should be counseled about a standard brachioplasty.
2. Careful preoperative markings.
3. Always employ the tailor tack method prior to surgical excision and check it in the upright position with the arm at 90° to the lateral chest. Any abnormal folds of the upper arm skin can also be addressed at this time.
4. Do not be timid in executing the correction. Remember you will check the accuracy of your preoperative markings with the tailor tack method.
5. If the axillary fold is not well defined or in more fatty arms, a bolster dressing should be considered. It may be necessary to defat the area of the axillary fold for better definition using direct excision or liposuction.
Postoperative Care
1. No surgical dressings or garments.
2. Encourage patients to limit arm motion as much as possible.
3. Wash surgical area 24 hours after surgery unless bolster dressing is in place. In those cases, area should be kept dry until bolster is removed, normally in 2 to 4 days.
4. Use Purell® or similar waterless sanitizer or rubbing alcohol four times a day on incision sites.
5. Do not raise elbows above level of shoulders for 3 weeks.
6. After 3 weeks, begin active (no passive therapy) elevation of arms.
Conclusion
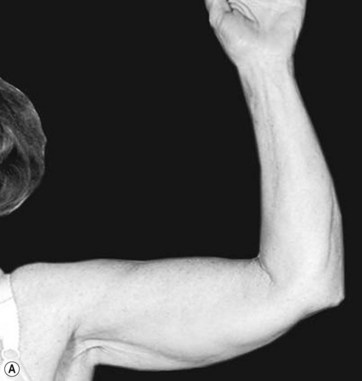
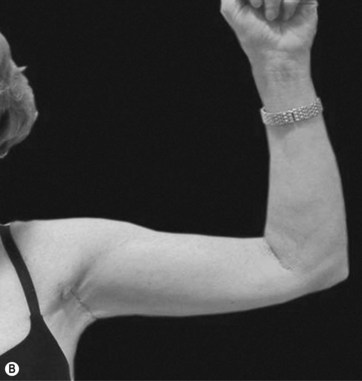
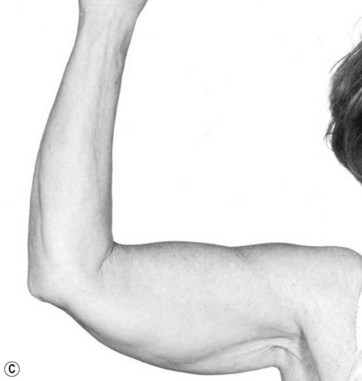
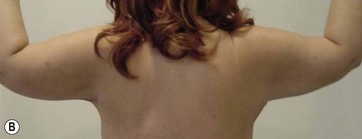
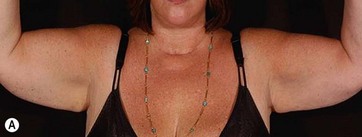
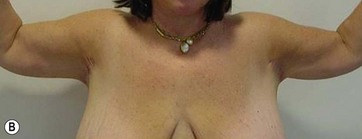
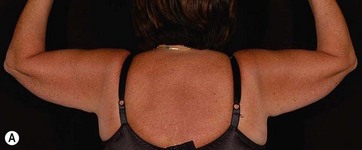
The minimal incision transaxillary brachioplasty should be the procedure of choice for all those patients requesting recontouring and rejuvenation of the upper arm who do not have excessively dependent dermatolipodystrophy. Please refer to Figs 6.10–6.14 for a representative selection of before and after surgery results. It is a simple procedure that delivers predictably good results, comparable to those results achieved with the traditional approach, while confining the scar to the axillary area.
1 Pollock WJ, Virnelli FR, Ryn RF. Axillary hidradenitis suppurativa: a simple and effective surgical technique. Plast Reconstr Surg. 1972;49:22–27.
2 Correa-Iturraspe M, Fernandez JC. Dermolipectomia braquial. Prensa Med Argent. 1954;41:2432.
3 Teimourian B, Malekzadeh S. Rejuvenation of the upper arm. Plast Reconstr Surg. 1998;102:545–551. discussion 552–3
4 Abraham DL. Minibrachioplasty: minimizing scars while maximizing results. Aesth Surg J. 2003;114:1631–1638.
5 Richards ME. Reassessing minimal incision brachioplasty. Aesth Surg J. 2004;25:175–179.
6 Richards ME. Minimal incision brachioplasty: a first choice option in arm reduction surgery. Aesth Surg J. 2001;21:301–310.
7 Trussler AP, Rohrich RJ. Limited incision medial brachioplasty: technical refinements in upper arm contouring. Plast Reconstr Surg. 2008;121:305–307.
8 Reed LS, Hyman JB. Minimal incision brachioplasty: refining transaxillary arm rejuvenation. Aesth Surg J. 2007;27(4):433–441.
[/level-membership-for-plastic-reconstructive-surgery-category][not-level-membership-for-plastic-reconstructive-surgery-category]
Chapter 6 Limited scar brachioplasty
• Good for many, but not all, cases of brachial dermatolipodystrophy in non-massive weight loss patients. The vertical height from the mid-humerus to the most dependent portion of the mid-upper arm (with the arm at 90° to the body) should be no greater than 10 cm. For excessive upper dermatolipodystrophy, the traditional method should be used.
• The tailor tack method should always be used intraoperatively to confirm the accuracy of the preoperative markings. This should be done after any liposuction, if necessary, is performed. Corrections or modifications can be made at this time. The tailor tack closure should always be checked with the patient in the upright position and the arm at a 90° angle to the lateral chest.
• A superficial plane should be used for the resection of the involved area, taking only a thin layer of fat with the resected specimen.
• The elbows should not be raised above the level of the shoulders until 3 weeks postoperatively.
• During the preoperative marking, the transverse axis width of the incision (in the axillary fold) should stop at 1.5–2 cm medial to the visible portion of the axillary crease on the anterior and posterior shoulder. This helps in preventing the final scar from extending into visible areas.
• Undesirable anterior axillary and post-axillary fullness can also be corrected during this procedure.
• 12% of patients need some form of revisional surgery performed at 1 year or later. The most common reason is for scar correction.
Introduction
There is an ever increasing demand, mainly in women, for correction of brachial dermatolipodystrophy. Most patients, however, are not willing to accept the traditional brachioplasty scar that extends, in various configurations, from the axilla, running along the inner arm to the elbow. Following the seminal paper by Pollock,1 which described his technique for the treatment of hidradenitis suppurativa by excision of the involved axillary area followed by direct closure, I began to adapt this approach for esthetic brachioplasty. I now have 25 years of experience with this approach. There have been numerous refinements over the years.1–8 The minimal incision brachioplasty (MIB) technique is the preferred approach for most patients that I see, save for those with excessively dependent dermatolipodystrophy of the upper arms (as commonly seen in massive weight loss patients). In all other cases, it provides predictably good results that are equal to those achieved in comparable patients with the traditional approach. I am most frequently asked how simply tightening the skin of the axilla, in the minimal incision approach, can replicate the result achieved when the customary extended incision method is employed. This is best demonstrated by referring to the mechanics of the classic bamboo finger trap (Fig. 6.1), which when pulled on just one end circumferentially tightens the entire length of the tube.
Surgical Technique
Markings
1. Marking is performed in the preoperative holding area with the patient in the upright position. With arms against sides, mark the anterior and posterior shoulders at the junction of the axilla with the shoulder. The final scar should not be visible beyond these markings (Fig. 6.2A).
2. Mark longitudinal axis from central inner arm, through center of axilla, to the midlateral chest area (Fig. 6.2B).
3. Mark the transverse axis from anterior shoulder to posterior shoulder in the axillary crease or fold. This line should stop 1.5–2 cm medial to the anterior and posterior axillary crease–shoulder junction. This helps avoid a scar that will extend into a visible area of the shoulder (Fig. 6.2B).
4. Determine the longitudinal length of excision using the pinch technique. First, move the skin of the triceps towards the transverse axis line until the arm has a pleasing contour. Then move the lateral chest skin towards the transverse axillary line. It is important to advance the lateral chest skin towards the transverse axillary crease to fix and stabilize the upper arm correction (Fig. 6.2C, D).
5. Mark areas that require liposuction. These should include, if indicated, the area of lipodystrophy of the upper outer breast/anterior axillary area as well as the posterior shoulder/axillary area. Both of these areas of lipodystrophy – which patients frequently point out as being of concern – can be easily corrected during the MIB procedure by liposuction and the subsequent axillary skin tightening.
