[level-membership-for-cardiothoracic-surgery-category]
CHAPTER 16 Left Upper Lobe Apical Trisegmentectomy—Video 16-1
 Video-Assisted Left Upper Lobe Apical Trisegmentectomy
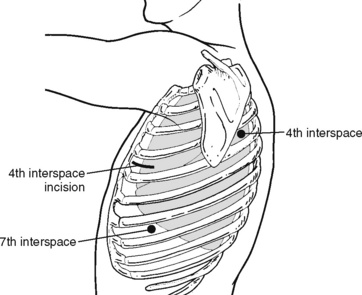
Step 1. Port Placement (Figure 16-1)
♦ Place the camera port in the seventh intercostal space in the anterior axillary line; it can be modified depending on heart size.
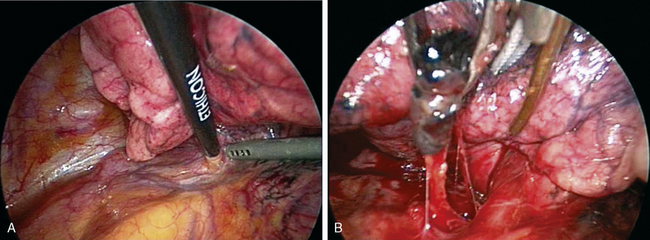
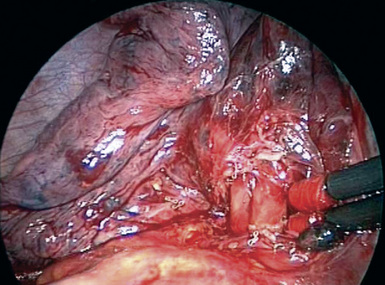
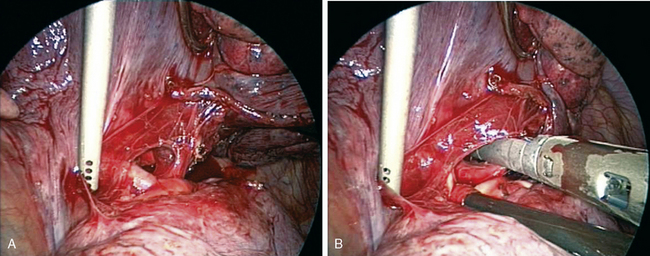
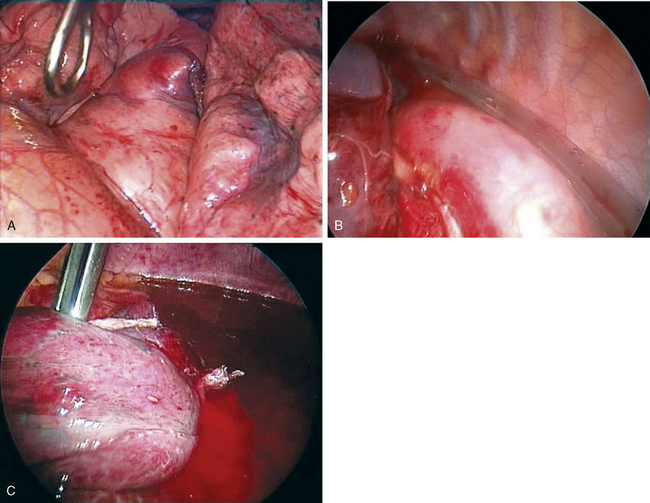
Step 2. Dissect Anterior Hilum and Aortopulmonary Window (Figure 16-2)
♦ Place the thoracoscope in the camera port with the side arm to the left to look at anterior hilar structures.
♦ Open the mediastinal pleura over the anterior hilum with an endokittner and the suction irrigator. This defines the venous drainage from the upper division of the left upper lobe (LUL). Dissect superiorly to the level of the aortopulmonary window.
♦ Removal of the level 5 nodes facilitates exposure of the vessels and prepares the superior and posterior aspect of the anterior trunk for subsequent transection.
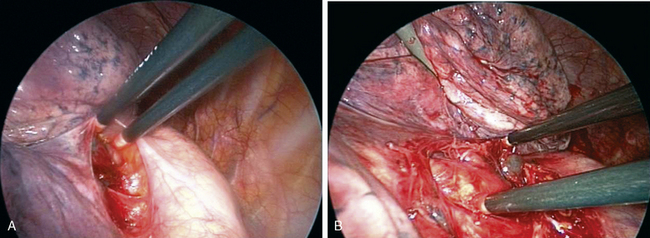
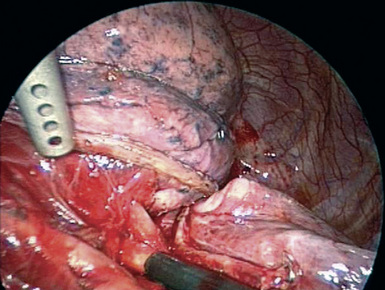
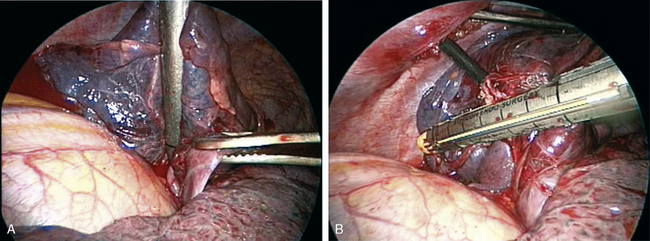
Step 3. Open Posterior Mediastinal Pleura (Figure 16-3)
♦ Open the posterior mediastinal pleura using blunt dissection with endokittners through the posterior port. Continue opening the pleural superiorly until the dissection connects with the posterior pleural opening with the anterior pleural dissection from steps 1 and 2.
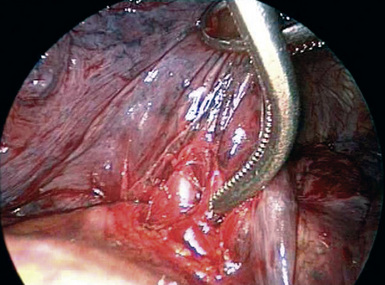
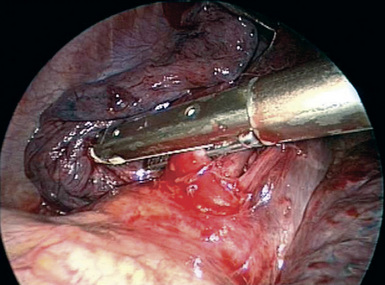
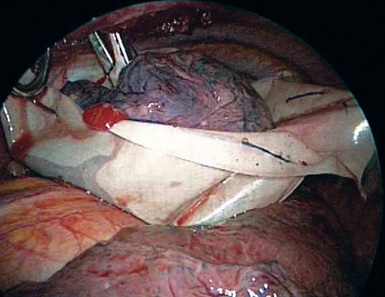
Step 4. Tumor Palpation (Figure 16-4)
♦ Exposure: Move the lung toward the access port with a ringed forceps placed through the posterior port.
♦ Carefully palpate and examine the tumor to be certain a sublobar resection constitutes optimal cancer treatment. This is done by corroborating the tumor size (T1, ideally less than 2 cm) and confirming that tumor is far enough away from the lingula so that the margins will be adequate if a trisegmentectomy is performed.

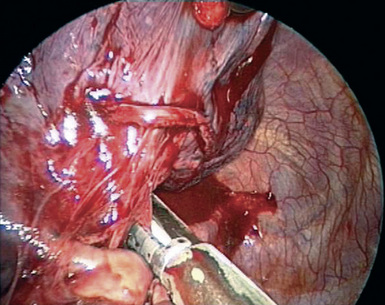
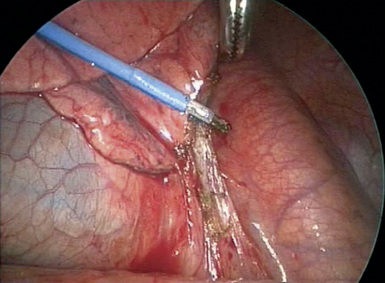
Step 5. Upper Pulmonary Vein (Figure 16-5)
Step 6. Proximal Artery Dissection (Figure 16-6)
♦ Exposure: Retract the lung posteriorly and slightly inferiorly with ringed forceps through the posterior port.
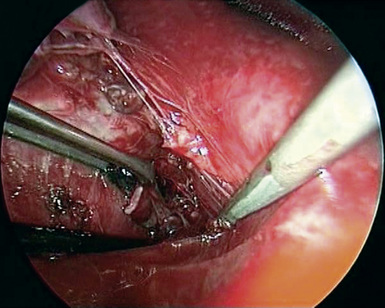
Step 7. Dissection of the Pulmonary Artery in the Fissure (Figure 16-7)
♦ Exposure: Gently retract the lung superiorly and slightly anteriorly with the ringed forceps through the posterior port.
♦ Identify the pulmonary artery in the fissure. Usually, this is easiest where the artery turns inferiorly to form the basilar trunk near the distal end of the fissure. Often, there is a lymph node sitting superficially over the artery at this point.
♦ Use two endokittners through the access incision to bluntly open the pleura over the artery in this location to establish the plane over the artery. When the proper plane is obtained, the white and glistening artery can be seen. Create a tunnel along the artery, extending it posteriorly toward the proximal pulmonary artery where it enters the fissure. The pulmonary artery was previously identified in this posterior location during steps 1 through 3. Divide the fissure with the endostapler to expose the upper lobe pulmonary artery branches.
Step 8. Upper Division Pulmonary Vein Division (Figure 16-8)
♦ Before placing the stapler, use an endokittner through the posterior port to confirm that the stapler will pass at an appropriate angle and without undue tension.
Step 9. Pulmonary Artery Division (Figure 16-9)
♦ Exposure: Retract the lung posteriorly and inferiorly through the posterior port using a ringed forceps.
♦ Divide the first and second branches of the pulmonary artery with the endovascular stapler placed through the camera port. Again test the angle of the proposed stapler placement using an endokittner.

Step 10. Posterior Artery Division (Figure 16-10)
♦ Exposure: Retract the lung anteriorly and apically with a ringed forceps through the access incision.
Step 11. Bronchus Division (Figure 16-11)
♦ Exposure: Retract the lung toward the anterior chest wall with a ringed forceps through the access incision to gain as much length on the bronchus as possible, and put it under some mild tension in the vertical plane.
♦ Identify the upper division bronchus in the fissure, and sweep all peribronchial tissue up onto the bronchus with endokittners. This helps to identify the carina between the upper division bronchus and the lingular bronchus.
♦ Dissect the anterior aspect of the bronchus. Retract the lung posteriorly with a ring forceps through the posterior port to bluntly dissect the same area from the anterior perspective using endokittners introduced through the access port. This helps to ensure that there is no tissue to impede the stapler.
♦ Use an endobronchial stapler (blue or green load cartridge, 30 to 45 mm) placed through the posterior port to divide the upper division bronchus. Staple height is chosen based on the size of the segmental bronchus. If small, use a blue load; if bigger, use a green load. The same type of decision making is used for the length of the staples.
Step 12. Complete the Fissure Between the Upper Division and the Lingula (Figure 16-12)
♦ Exposure: Retract the lung toward the anterior chest wall and slightly posteriorly with a ringed forceps through the posterior port.
♦ Divide the lung anteriorly between the stump of the upper division vein and lingular vein by placing the stapler (45- to 60-mm, gold or blue cartridge) through the access port while retracting the lung toward the anterior chest wall and slight posteriorly with a ring forceps placed through the posterior port. Occasionally, ring forceps are placed next to the stapler through the access port to aid in straightening the lung for stapled division.
♦ Divide the lung posteriorly between the divided posterior segmental artery and the intact lingular artery by placing the stapler (45- to 60-mm, gold or blue cartridge) through the posterior port while retracting the lung with a ring forceps placed through the access port. Place the camera in the camera port with the side arm to the right.
♦ Finish the fissure from anterior to posterior with a stapler (45- to 60-mm, gold or blue cartridge) through the posterior port. Retract the lung anteriorly toward the anterior chest wall and slightly posteriorly with a ring forceps placed through the access port. Be careful to keep the divided upper division bronchus up with the specimen and to avoid encroaching on the lingular bronchus. Before firing the stapler, the anesthesiologist should inflate the left lung to be sure the lingula inflates adequately. Place the camera through the camera port with the side arm to the left.
Step 14. Inferior Pulmonary Ligament Takedown (Figure 16-14)
Step 16. Lung Inflation, Air Leak Check, and Placement of a Chest Tube (Figure 16-16)
♦ Place the thoracoscope through the camera incision with the side arm to the left or right side, depending on the best view.
♦ Reinflate the left lung to be sure that the lingula expands well and is positioned normally. Test the bronchial stump by instilling irrigation fluid with the suction irrigator and using a dental pledget to hold the lung down so the bronchial stump can be visualized. Place a single 24-French chest tube through the camera port posteriorly to the apex, and close remaining incisions.
[/level-membership-for-cardiothoracic-surgery-category][not-level-membership-for-cardiothoracic-surgery-category]
CHAPTER 16 Left Upper Lobe Apical Trisegmentectomy—Video 16-1
Video-Assisted Left Upper Lobe Apical Trisegmentectomy
Step 1. Port Placement (Figure 16-1)
♦ Place the camera port in the seventh intercostal space in the anterior axillary line; it can be modified depending on heart size.
Step 2. Dissect Anterior Hilum and Aortopulmonary Window (Figure 16-2)
♦ Place the thoracoscope in the camera port with the side arm to the left to look at anterior hilar structures.
♦ Open the mediastinal pleura over the anterior hilum with an endokittner and the suction irrigator. This defines the venous drainage from the upper division of the left upper lobe (LUL). Dissect superiorly to the level of the aortopulmonary window.
♦ Removal of the level 5 nodes facilitates exposure of the vessels and prepares the superior and posterior aspect of the anterior trunk for subsequent transection.
Step 3. Open Posterior Mediastinal Pleura (Figure 16-3)
♦ Open the posterior mediastinal pleura using blunt dissection with endokittners through the posterior port. Continue opening the pleural superiorly until the dissection connects with the posterior pleural opening with the anterior pleural dissection from steps 1 and 2.
Step 4. Tumor Palpation (Figure 16-4)
♦ Exposure: Move the lung toward the access port with a ringed forceps placed through the posterior port.
♦ Carefully palpate and examine the tumor to be certain a sublobar resection constitutes optimal cancer treatment. This is done by corroborating the tumor size (T1, ideally less than 2 cm) and confirming that tumor is far enough away from the lingula so that the margins will be adequate if a trisegmentectomy is performed.
Step 5. Upper Pulmonary Vein (Figure 16-5)
♦ Mobilize the upper division pulmonary vein with the endokittner and scissors or right-angle clamp. Carefully identify and preserve the lingular vein or veins. In some instances, it is necessary to divide a middle central vein, although it drains the upper division and lingula.
Buy Membership for Cardiothoracic Surgery Category to continue reading. Learn more here
[/not-level-membership-for-cardiothoracic-surgery-category]
