[level-membership-for-cardiothoracic-surgery-category]
CHAPTER 22 Left-Sided Mediastinal Lymph Node Dissection—Video 22
Approach to Video-Assisted Left-Sided Mediastinal Lymph Node Dissection
Key Points
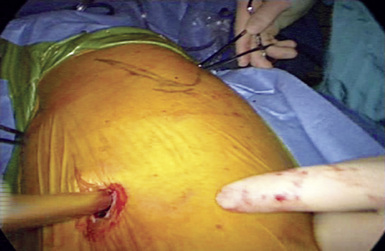
♦ Carry out lymph node dissection through the standard VATS port sites using a 5- or 10-mm, 30-degree thoracoscope (Figure 22-1).
♦ With small ringed forceps, grasp the lymph nodes, which are friable and tend to disintegrate if only parts of them are grabbed. Alternatively, use a long Allis clamp to grasp the lymph nodes during the dissection.
♦ Dissect with standard electrocautery or an ultrasonic dissector. A partially covered Teflon-coated electrocautery can be used to avoid injury to surrounding structures. In some areas, adjacent structures may be at risk for injury during lymph node removal:


♦ Bleeding from torn lymph nodes and bronchial arteries should be controlled with precise visualization and electrocautery. The errant use of “scorched earth” electrocautery is ill advised and is likely to lead to injury of adjacent structures. A small amount of surgical cellulose can be used to tamponade the bleeding, which promotes hemostasis and permits better visualization and control of any nodal vessels.
 Video-Assisted Left-Sided Mediastinal Lymph Node Dissection (Video 22)
Step 1. Station 9 Nodes
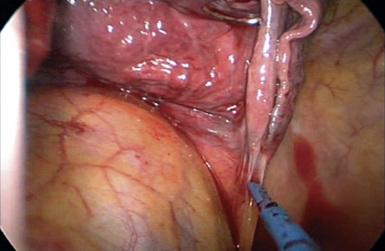
♦ Retract the left lower lobe cephalad through the access incision or posterior port (Figure 22-2). A ringed forceps placed alongside the camera (through the same port) pushes the diaphragm down if it is impairing visualization of the pulmonary ligament.
♦ Divide the inferior pulmonary ligament with electrocautery through the access incision or inferior port (Figure 22-3).
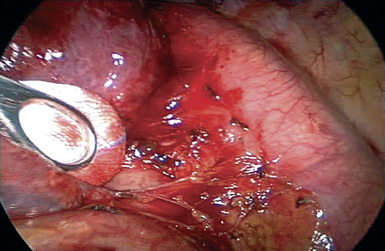
♦ Station 9 lymph nodes become apparent as the ligament is divided and include nodes adjacent to the inferior pulmonary vein (Figure 22-4).
♦ The dissection is performed close to the lymph nodes to avoid injury to the esophagus and inferior pulmonary vein.

Step 2. Station 5 and 6 Nodes
♦ The lymph node dissection for stations 5 and 6 may be performed after the lung resection. Alternatively, resection before the lobectomy can expose and define the anatomy of the vessels and facilitate the dissection of the vessels for the lobectomy (see Chapter 11).
♦ Station 5 lymph nodes are located in the subaortic space between the aorta and the left main pulmonary artery.
♦ Station 6 lymph nodes are the para-aortic lymph nodes and are located on the left side of the ascending aorta and aortic arch.
♦ Occasionally, large station 5 and 6 lymph nodes obscure the view of the left upper lobe pulmonary arterial branches and require removal during the parenchymal resection.
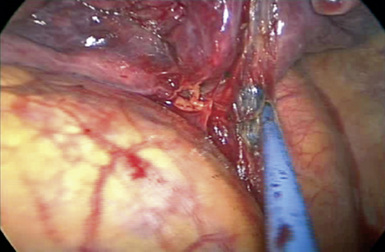
♦ Retract the lung inferiorly through the posterior port, and perform the dissection through the access incision.
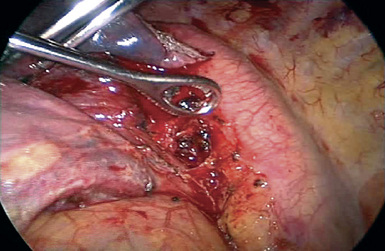
♦ Grasp the edge of the pleura, near the left main pulmonary artery, and dissect the underlying lymph nodes away from the soft tissue for removal (Figure 22-5).

Step 3. Station 7 and 10 Nodes
♦ Gently retract the aorta and esophagus posteriorly with an endokittner placed through the posterior port to open up the subcarinal space.
♦ With electrocautery, open the pleura on the posterior hilum along the inferior border of the left lower lobe bronchus and left main bronchus.
♦ Place a second ringed forceps through the access incision to retract the left main bronchus anteriorly.
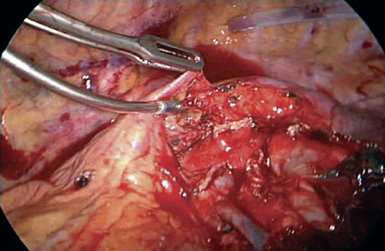
♦ Visualize the station 7 lymph nodes in the subcarinal space between the aorta and the left main bronchus (Figure 22-8).
♦ Grasp the nodes with a ringed forceps through the access incision or posterior port, and divide the surrounding soft tissue attachments with electrocautery.
[/level-membership-for-cardiothoracic-surgery-category][not-level-membership-for-cardiothoracic-surgery-category]
CHAPTER 22 Left-Sided Mediastinal Lymph Node Dissection—Video 22
Approach to Video-Assisted Left-Sided Mediastinal Lymph Node Dissection
Key Points
♦ Carry out lymph node dissection through the standard VATS port sites using a 5- or 10-mm, 30-degree thoracoscope (Figure 22-1).
♦ With small ringed forceps, grasp the lymph nodes, which are friable and tend to disintegrate if only parts of them are grabbed. Alternatively, use a long Allis clamp to grasp the lymph nodes during the dissection.
♦ Dissect with standard electrocautery or an ultrasonic dissector. A partially covered Teflon-coated electrocautery can be used to avoid injury to surrounding structures. In some areas, adjacent structures may be at risk for injury during lymph node removal:
Buy Membership for Cardiothoracic Surgery Category to continue reading. Learn more here
[/not-level-membership-for-cardiothoracic-surgery-category]
