CHAPTER 20 Lateral and Posterior Approaches to Lumbosacral Spine
Minimally Invasive Lateral Approach to Spine
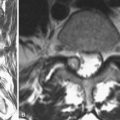
The concept of minimally invasive spine surgery is attractive to patients and surgeons. Decreased postoperative pain, shorter hospital stay, and quicker return to activities support the use of minimally invasive techniques when achievable. One technique is the lateral access to the spine.1,2 This technique can be used for multilevel interbody fusions to correct kyphoscoliosis, for interbody support when treating adjacent segment degeneration or multilevel fusions, or to drain a psoas abscess (Fig. 20–1). With this approach, access to the spine from T7 down to L4-5 is possible. L4-5 is often difficult to reach, however, because of a high-riding iliac crest, and the means to access L5-S1 laterally has not been developed.
Technique
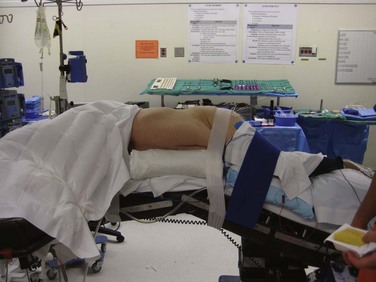
After the patient has been intubated and prophylactic antibiotics have been given, the patient is placed in the lateral decubitus position. When correcting a kyphoscoliosis, it is easier to perform the lateral approach on the side of the concavity. The table should be flexed to increase the distance between the iliac crest and the rib cage, and the patient should be secured with tape over the greater trochanter and chest wall (Fig. 20–2). The leg on top should also be flexed to relax the psoas. A cross-table anteroposterior radiograph should be taken, and the table should be rotated to place the patient in a true anteroposterior position. A corresponding lateral fluoroscopic image should also be taken to verify that access to the disc space is possible. Minor adjustments should be made to the table to obtain a true lateral image.
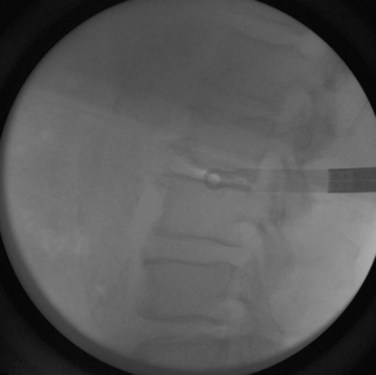
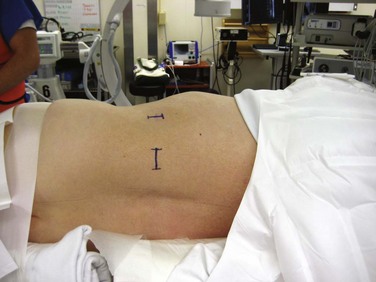
After the patient has been prepared and draped, the lateral image is obtained first. A radiopaque marker is placed over the center of the affected disc space (Fig. 20–3). When this point has been identified, a mark is made. Through this mark, a small incision is made for insertion of the dilators and an expandable retractor, which provides access to the lateral spine. A second mark is made posterior to this first mark at the border between the erector spinae muscles and the abdominal oblique muscles. At this second mark, a transverse incision about 2 cm long is made to accommodate the surgeon’s index finger (Fig. 20–4). Finger dissection is used down to the lumbodorsal fascia. A clamp, or scissors, can be used to spread the fascia and muscle fibers and provide entry into the retroperitoneal space.
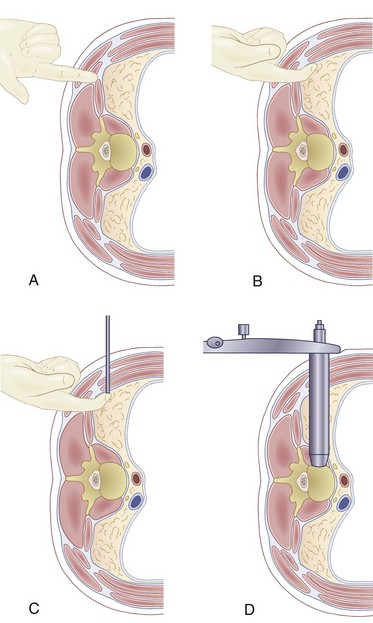
When an opening is created, the index finger is used to sweep the peritoneum anteriorly and to palpate the psoas muscle (Fig. 20–5A and B). The surgeon uses the index finger to sweep inferiorly to feel the inner table of the iliac crest (if in the lower lumbar spine) to verify that he or she is in the abdominal cavity. When the psoas is identified, the index finger is swept up to the previously made direct lateral mark. A 2-cm incision is made; the external and internal oblique muscles and the transverses abdominis muscles are split, and dilators are placed through this opening. The index finger, which is already in the retroperitoneal space, guides the initial dilator onto the psoas (Fig. 20–5C). The fibers of the psoas are split with the dilator using neurologic monitoring as a safety measure, if desired. A lateral radiograph should be obtained to verify the central position of the dilator at the desired disc space. After the position of the initial dilator is secured by placing a Kirschner wire through the dilator and into the disc space, larger dilators are used to spread the psoas under neurologic monitoring, and then an expandable retractor is placed over the dilators (Fig. 20–5D).
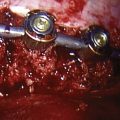
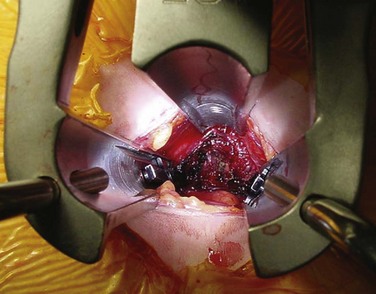
After the retractor is secured to the table, the dilators are removed to provide lateral access to the disc (Fig. 20–6). A neurologic monitoring probe can be used to check for any nerves that may be crossing the working window of the retractor. If a nerve is detected, the Kirschner wire should be repositioned away from the nerve, and the psoas should be redilated. If this fails, conversion to another means of interbody fusion should be considered because repeated positioning of the retractor, or pressure on the nerve, could result in postoperative paresthesias or palsies.
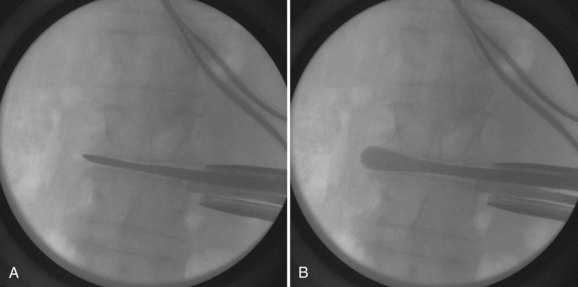
Anteroposterior and lateral radiographs should be taken at this point to verify that the retractor is docked on the disc space and that the retractor is positioned over the center of the disc. When appropriate positioning has been confirmed, the retractor should be secured in place. A lateral discectomy is performed in standard fashion with shavers, curets, and rasps. A Cobb elevator should be used to release the contralateral anulus (Fig. 20–7). Releasing the contralateral anulus loosens the spine in the coronal plane and aids in the correction of coronal plane deformities. Sizers and trials are used to determine the optimal implant size. The implant is filled with the surgeon’s graft or fusion enhancer of choice and impacted across. The wound is closed in layers. No drains are typically necessary.
Posterior Approach to Lumbar Spine
The posterior approach through a midline longitudinal incision is the most common approach to the lumbar spine.3 It provides direct access to the spinous processes, laminae, facets, and even pedicles and lateral aspects of the vertebral bodies at all levels of the lumbar spine. The pedicle starting holes and transverse processes can be reached by dissecting and retracting the paraspinal muscles laterally. Through this approach, it is possible to perform most of the spine procedures currently practiced today, including microdiscectomies, laminectomies, and most fusion procedures. The posterior aspect of the vertebral body and disc space over the lower lumbar levels can be reached after laminectomy by retracting the dura, but the exposure is limited.
Technique
A midline incision is made between the spinous processes of the levels to be exposed, and the erector spinae and multifidus muscles are dissected from the bony elements (spinous processes, interspinous ligaments, laminae, facet joints, and transverse processes) as needed for the levels that must be visualized, using electrocautery or sharp dissection (Fig. 20–8). The paraspinal muscles should be elevated subperiosteally to minimize blood loss. Care should be taken not to injure the facet joint capsules and interspinous ligaments in areas where motion would be expected after the operation. If the transverse processes must be reached, dissection is continued down the lateral side of the facet joints and onto the transverse process itself. The vessels supplying the paraspinal muscles segmentally are close to the facet joints and the pars interarticularis. If these vessels are cut, they can bleed vigorously. Cauterization is necessary to stop these bleeders. The posterior primary rami of the lumbar nerves run with these vessels.
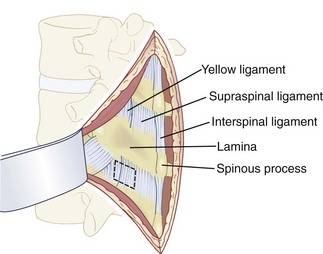
FIGURE 20–8 Dorsal subperiosteal exposure of lumbar spine.
(From Benzel E: Spine Surgery: Techniques, Complication Avoidance, and Management. Philadelphia, Churchill Livingstone, 2004.)
To perform a decompression or a discectomy, it may be necessary to remove the ligamentum flavum. The superficial ligamentum flavum blends laterally into the facet joint capsule. A forward angled or small straight curet is used to detach the superficial and deep layers of the ligamentum flavum from the caudal edge of the cephalad lamina. The surgeon sweeps the curet medial to lateral and advances the curet with each successive sweep to detach the ligamentum flavum from the lamina. The ligamentum flavum typically inserts over the caudal 50% of the undersurface of the lamina. A small, angled elevator is placed under the ligamentum flavum to lift it off the dura and protect the latter. A Kerrison rongeur, pituitary rongeur, or knife can be used to remove the ligamentum flavum. The epidural fat, dura, nerve root, and epidural veins can be seen after the ligamentum flavum has been removed (Fig. 20–9).
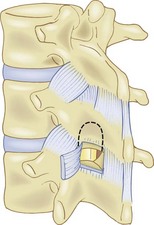
FIGURE 20–9 Removal of ligamentum flavum.
(From Benzel E: Spine Surgery: Techniques, Complication Avoidance, and Management. Philadelphia, Churchill Livingstone, 2004.)
The key to intracanal anatomy is the pedicle. The disc space is just cephalad to the pedicle, and the intervertebral foramen above the pedicle accommodates the exiting nerve root. The traversing nerve root lies just medial to the pedicle and exits the intervertebral foramen caudally. The disc space can be found by retracting the traversing nerve root medially and exploring the space above the pedicle (Fig. 20–10). The surgeon can use a Penfield No. 4 dissector to feel for the disc space. It should be a raised, white, soft structure.
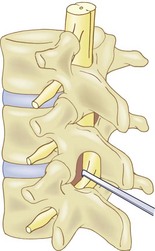
FIGURE 20–10 Exposure of lumbar disc by retracting thecal sac medially.
(From Benzel E: Spine Surgery: Techniques, Complication Avoidance, and Management. Philadelphia, Churchill Livingstone, 2004.)
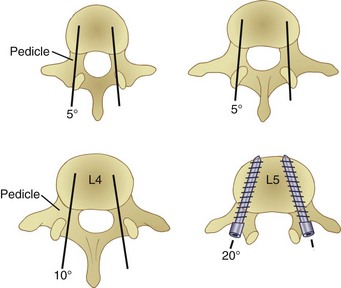
With the advent of pedicle screw fixation for the lumbar vertebrae, there are now several additional anatomic relationships that are important at the level of the posterior bony elements.4 The location of the pedicles is identified by anatomic landmarks and by radiography or image intensification fluoroscopy in the operating room.
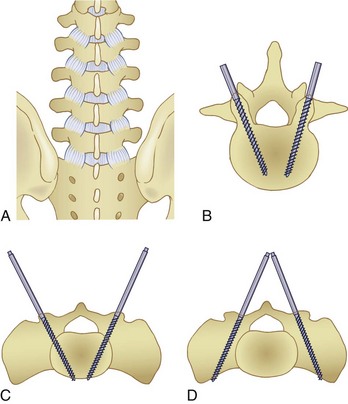
In the lumbar region, the center of the pedicles is usually at the inferolateral edge of the facet joint, on an imaginary transverse line bisecting the transverse processes (Fig. 20–11). If there is severe facet arthrosis, the lateral edge of the facet joint may be lateral to the true pedicle entry site, however. In these cases, the surgeon should also refer to the pars interarticularis. The lateral border of the pars typically corresponds to the medial border of the pedicle. In the lumbar region from this point, one may use a pedicle finder, with a 20-degree medial inclination at L5, 10-degree inclination at L4, 5-degree inclination at L3 and L2, and no inclination at L1 (Fig. 20–12). One may follow the progress of the pedicle finder by feeling inside the pedicle with a pedicle feeler and by checking with the image intensifier or by radiographs. In the lateral view, the probe or marker should be parallel to the disc space.
Posterolateral Approach to Lumbar Vertebral Bodies
The posterolateral approach provides direct access to the transverse processes and the mammillary processes of the facets through a longitudinal paraspinal incision, retracting the erector spinae muscles medially.5,6 This area provides an excellent bed for posterolateral lumbosacral fusion even in the face of preexisting pseudarthrosis, laminar defects, or spondylolisthesis. This approach is the basis for minimally invasive transforaminal lumbar interbody fusions.
Technique
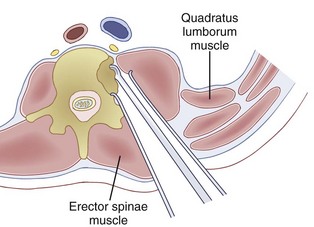
A longitudinal paramedian incision is made at the lateral border of the erector spinae muscles (approximately two fingerbreadths from midline) centered over the level of interest. The incision is extended to the lumbar fascia, and the erector spinae muscles are identified. The interval between the erector spinae muscles and the multifidus is found after opening the fascia, and dissection proceeds between these muscles down to the facet joints and the transverse processes of the vertebrae (Fig. 20–13). The paraspinal muscles are retracted medially, the transverse process at the desired level is tagged with a radiopaque marker, and radiographs are obtained to confirm the vertebral level. For a minimally invasive transforaminal interbody fusion, this exposure is adequate to perform a decompression and fusion.
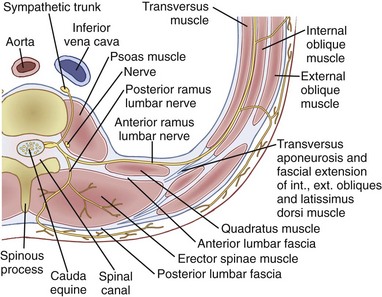
FIGURE 20–13 Cross section of lumbar spine and paraspinal structures at level of L3.
(From Herkowitz H, Eismont FJ, Garfin SR, et al [eds]: Rothman-Simeone The Spine, 4th ed. Philadelphia, WB Saunders, 1999.)
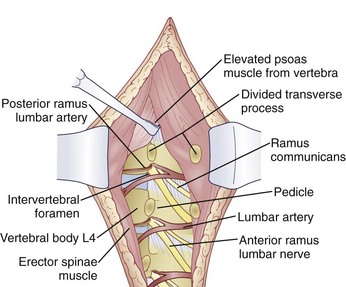
If access to the vertebral body is desired, the dissection can be carried further anteriorly. The transverse process is divided with an osteotome and is retracted laterally with its musculotendinous attachments. The vertebral pedicle is palpated, and the lumbar nerves are identified and protected as they leave the foramina above and below the pedicle (Fig. 20–14). The psoas muscle is carefully separated from the vertebra using a periosteal elevator. The lumbar vessels lie on the waist or mid-portion of the vertebral body posterior to the psoas muscle and should be separated from the body during this portion of the dissection. The vessels may be clamped and cauterized if necessary. An opening may be made in the lateral aspect of the vertebral body anterior to the pedicle, using a curet or drill (Fig. 20–15).
Pearls
Key Points
1 Ozgur BM, Aryan HE, Pimenta L, Taylor WR. Extreme Lateral Interbody Fusion (XLIF): a novel surgical technique for anterior lumbar interbody fusion. Spine J. 2006;6:435-443.
A good technique paper on the lateral approach to the spine.
2 Regan JJ, Yuan H, McCullen G. Minimally invasive approaches to the spine. Instr Course Lect. 1997;46:127-141.
A good review on the evolution of minimally invasive approaches to the spine.
3 Birch BD, Desai RD, McCormick PC. Surgical approaches to the thoracolumbar spine. Neurosurg Clin N Am. 1997;8:471-485.
A good general review of posterior approaches to the lumbar spine.
4 Stambough JL. Posterior instrumentation for thoracolumbar trauma. Clin Orthop Relat Res. 1997;35:73-88.
A good review on the placement of pedicle screws in the lumbar spine.
5 Schmidt MH, Larson SJ, Maiman DJ. The lateral extracavitary approach to the thoracic and lumbar spine. Neurosurg Clin N Am. 2004;15:437-441.
A good technique paper on the extracavitary approach to the thoracic and lumbar spine.
6 Shen FH, Marks I, Shaffrey C, et al. The use of an expandable cage for corpectomy reconstruction of vertebral body tumors through a posterior extracavitary approach: a multicenter consecutive case series of prospectively followed patients. Spine J. 2008;8:329-339.
A good review on reconstruction of the vertebral body using cages.
1 Ozgur BM, Aryan HE, Pimenta L, et al. Extreme lateral interbody fusion (XLIF): A novel surgical technique for anterior lumbar interbody fusion. Spine J. 2006;6:435-443.
2 Regan JJ, Yuan H, McCullen G. Minimally invasive approaches to the spine. Instr Course Lect. 1997;46:127-141.
3 Birch BD, Desai RD, McCormick PC. Surgical approaches to the thoracolumbar spine. Neurosurg Clin N Am. 1997;8:471-485.
4 Stambough JL. Posterior instrumentation for thoracolumbar trauma. Clin Orthop Relat Res. 1997;335:73-88.
5 Schmidt MH, Larson SJ, Maiman DJ. The lateral extracavitary approach to the thoracic and lumbar spine. Neurosurg Clin N Am. 2004;15:437-441.
6 Shen FH, Marks I, Shaffrey C, et al. The use of an expandable cage for corpectomy reconstruction of vertebral body tumors through a posterior extracavitary approach: A multicenter consecutive case series of prospectively followed patients. Spine J. 2008;8:329-339.