Chapter 2 Laparoscopic Ventral Hernia Repair—Standard 
1 Surgical Anatomy
 The laparoscopic repair of ventral hernia borrows from the open technique espoused by Rives and Stoppa. It maintains the tenets of large mesh overlap with transabdominal fixation of the prosthetic. In a standard laparoscopic ventral herniorrhaphy, the biomaterial is placed intraabdominally in juxtaposition to the underlying viscera; therefore, a tissue-separating mesh is required. Traditionally, the hernia defect is bridged with mesh; however, some authors have described reapproximating the midline by closing the defect with transabdominal sutures.
 In a laparoscopic ventral hernia repair, the mesh is placed in an insufflated abdominal cavity. Ideally, there is a slight degree of tension on the mesh at the completion of the repair. The mesh does not lie flush against the underside of the abdominal wall. Rather, it transects the abdominal space, so that when the abdominal cavity is desufflated, the mesh will not occupy the hernia sac (Fig. 2-1).
 There has been a lot of debate in the literature regarding the approach for ventral herniorrhaphy. Length of stay, postoperative pain, and operative times are essentially similar between the open and laparoscopic techniques in experienced hands. However, the laparoscopic technique consistently demonstrates significant reductions in wound and mesh infections. For this reason alone, the laparoscopic repair of ventral hernias should be the preferred approach when applicable.
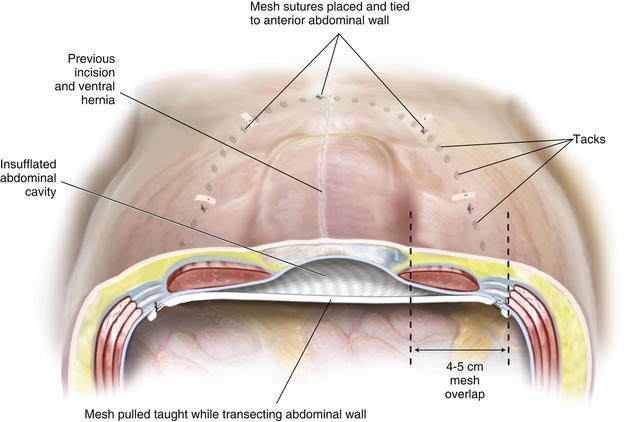
2 Preoperative Considerations


3 Operative Steps
1 Patient Positioning
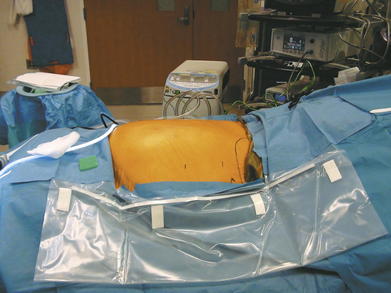
 For the majority of patients with defects in the midline, supine positioning with the arms tucked works well. The pressure points at the elbow and wrist should be padded (Fig. 2-2). For larger patients, the arm sleds may be required. In patients with defects off the midline or lumbar defects, a bump may be placed under the hip on the side of the hernia, or a true lateral position may be necessary with the aid of a bean bag.

2 Gaining Abdominal Access
 Abdominal entry can be the most difficult step in the patient who has undergone multiple abdominal operations. Selecting the location for entry can be challenging because many of these patients have had numerous abdominal incisions. The upper quadrant at the tip of the eleventh rib is generally a safe place to gain access even in such cases. The side of entry should avoid previous incisions. For example, in the patient with an open cholecystectomy incision, the left upper quadrant should be chosen.
 Once initial entry into the abdominal cavity is achieved, at least one and preferably two additional trocars are placed laterally on the side of entry. Typically one can be placed above the initial site once pneumoperitoneum has been initiated, and an additional one can be inserted inferiorly with care not to be too close to the iliac crest. Two trocars are placed on the opposite side to provide additional viewing perspective for adhesiolysis and aid in retraction (Fig. 2-3).
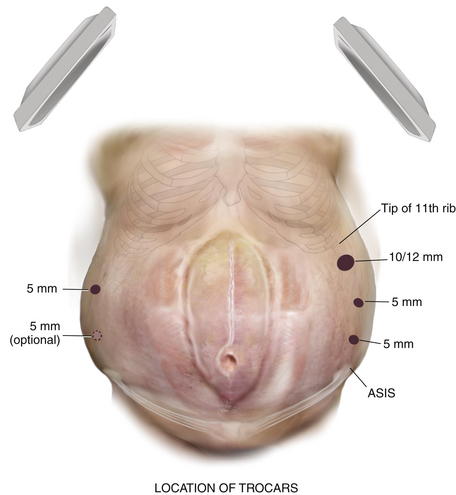
3 Adhesiolysis
 The Achilles’ heel of the laparoscopic ventral hernia repair is the lysis of adhesions. This step can be the most time consuming and usually determines the length and complexity of the case.
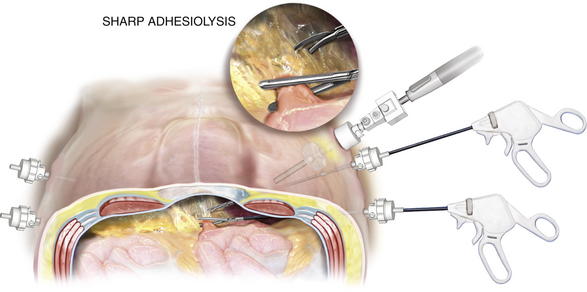
 Energy sources should be avoided during adhesiolysis. Ultrasonic energy sources or bipolar coagulating shears should not be used. Thermal injuries seal at the time of dissection and may not be apparent for 3 to 5 days postoperatively. Sharp, cold, endoscopic scissor dissection should dominate the dissection. Blunt bowel graspers are crucial to aid in retraction of the viscera and can be used to provide gentle blunt dissection as well. Typically, during lysis of adhesions, the outer rind of adhesions may be sharply cut, giving way to a “cotton candy” appearance to the loose areolar tissue that comprises most of the adhesions (Fig. 2-4). Blunt dissection with gentle, short sweeps is very effective in this situation.
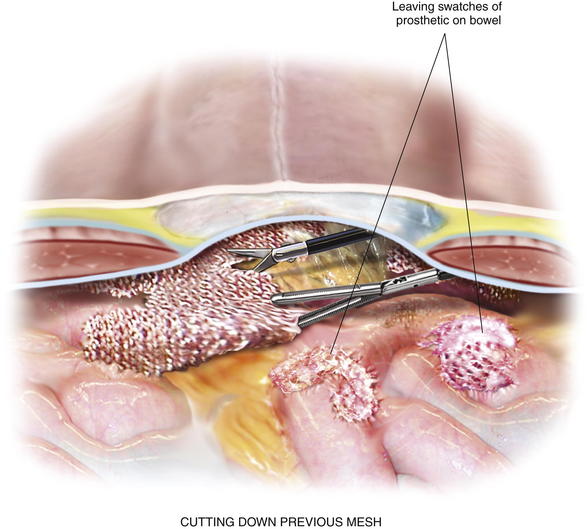
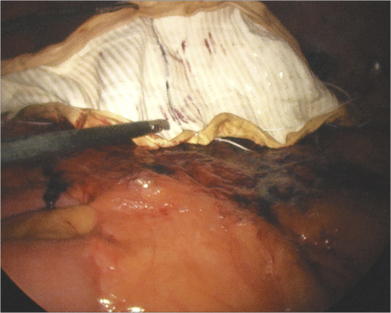
 Previous intraabdominal mesh can pose a real hazard to performing adhesiolysis. If the previous mesh contains a polypropylene or polyester component that becomes directly exposed to the bowel, there is not a plane of dissection. Attempts to mobilize the bowel off the adherent mesh will result in an enterotomy. In this situation, the mesh should be cut down off of the abdominal wall, leaving a swatch of prosthetic attached to the bowel (Fig. 2-5). Certainly, conversion to open is mandatory, if there is any concern for a bowel injury. Some cases of intense adhesion formation to the prosthetic may require a bowel resection.


4 Sizing the Hernia Defect
 Measuring the defect is a critical step in the procedure. Many times, particularly following a lengthy adhesiolysis, this step may not be given much attention. A durable repair relies on adequate mesh overlap with proper placement, which are both directly a result of accurately measuring the defect.

 Measure the defect internally under pneumoperitoneum. A plastic metric ruler is cut in half lengthwise and introduced via a 5-mm trocar. Two Maryland graspers manipulate the ruler and measure the defect between the spinal needles in the abdomen (Fig. 2-6). If the defect is longer than the ruler, insert another spinal needle along the axis of the defect within the length of the ruler. The sum of the two is the true measurement.
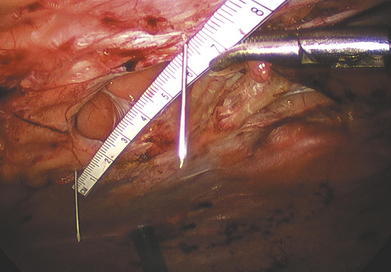
5 Mesh Introduction and Orientation
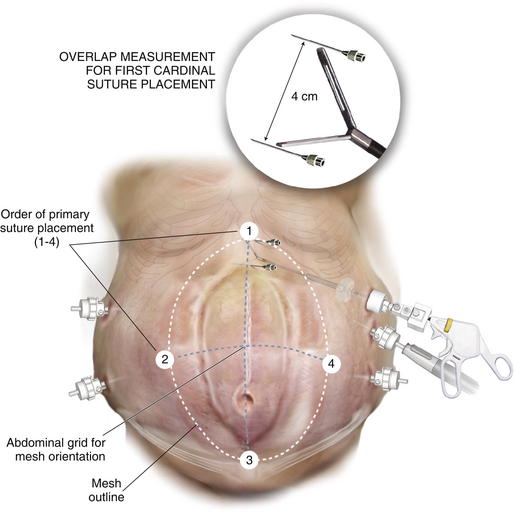
 Not all hernia defects are perfectly circular, nor are they located exactly in the midline of the abdomen. In order to ensure that the mesh will be centered reliably over the defect every time, it is necessary to draw a grid of the x- and y-axes of the hernia defect on the external abdominal wall (Fig. 2-7).
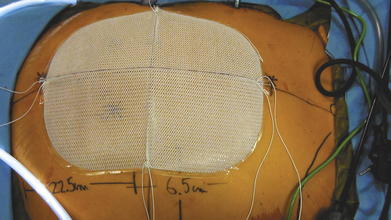
 With a ruler outside the abdomen, measure the distance halfway between the most superior and most inferior spinal needle. This determines the x-axis, the horizontal midpoint of the hernia. Half the horizontal distance between the lateral most spinal needles marks the y-axis, or the vertical midpoint. Draw both axes on the skin with a permanent marker to grid the abdomen and mark the center of the hernia defect. Once the mesh is brought into the abdomen, any attempt to retrieve one of the vertical or lateral cardinal sutures should be done along the corresponding x- or y-axis line. This will align the mesh over the defect and ensure the most accurate placement to achieve desired overlap (Fig. 2-8).

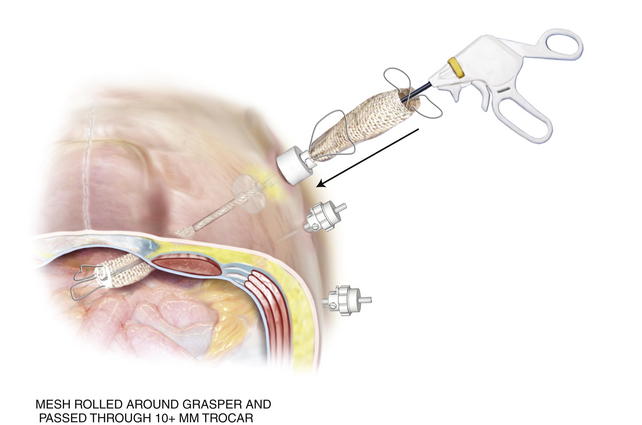
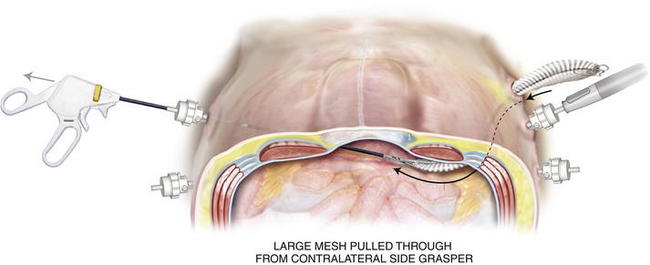
 Once rolled, ePTFE mesh can be compressed and twisted to expunge air. Other tissue-separating meshes are soaked in saline and their slick texture makes them easier to introduce through a trocar. The rolled mesh may be passed directly through a 12-mm or 15-mm trocar (Fig. 2-9). Very large pieces of mesh can be dragged into the abdomen by passing a heavy grasper across the abdomen through a 5-mm trocar and out the contralateral side trocar. The cap of the trocar is removed, and the mesh is pulled into the abdominal cavity (Fig. 2-10). Every effort should be made to introduce the mesh through the trocar. This maneuver avoids contact with the patient’s skin.
 Once inside the abdominal cavity, the mesh is unfurled. A grasper holds one end of the rolled mesh while the Maryland grasper uncoils the mesh (Fig. 2-11). It is important to maintain the proper orientation of the mesh. It may be helpful with larger pieces to mark a line across the horizontal axis of the mesh before insertion to ensure that the line runs from side-to-side.
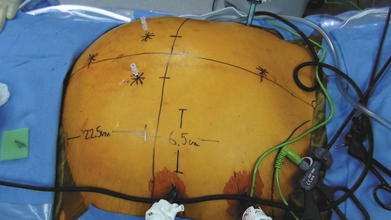
6 Securing the Mesh
 After unrolling the mesh, retrieve the cardinal suture at the vertical site where there is the least amount adjustment first. For example, if the defect is in the lower abdomen, the inferior suture should be placed initially to avoid having to move its location caudally towards the bladder when stretching the mesh. Likewise, if the defect approximates the xiphoid, the superior suture is placed first. Mark the edge of the defect at the site of cardinal suture placement with the spinal needle. An additional spinal needle is “walked out” the axis line for a distance of 5-cm to ensure overlap (Fig. 2-12). This measured spot is injected with local anesthesia, and a stab incision is made through which the suture passer is introduced. The suture passer retrieves each tail of the initial cardinal suture through the same small incision but at a different angle to achieve a separate fascial bite. Tag both suture tails but leave them untied.
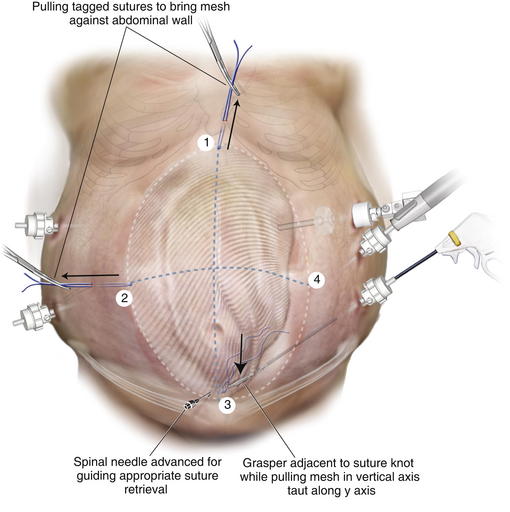
 The assistant pulls on the tagged sutures to bring the mesh against the abdominal wall. The surgeon pulls the site in the vertical axis that is free along the y-axis. Advance a spinal needle through the abdominal wall along the axis. This guides where the suture will be retrieved, ensuring the mesh will be taut (Fig. 2-13). During this maneuver, avoid grasping the suture or the knot as this can weaken it. Measuring the overlap at this point is unnecessary because most prosthetic meshes stretch.
 The three cardinal sutures are pulled up to approximate the mesh to the underside of the abdominal wall. If the mesh appears to be centered over the defect and is taut, the sutures are secured.
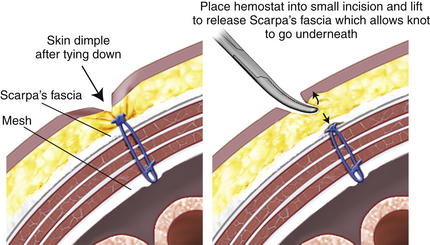
 The mesh at the final suture site is grasped adjacent to the knot and stretched along the x-axis. A spinal needle passed along the x-axis marks the spot for final cardinal suture retrieval, just as was done when placing the third suture. The suture passer retrieves the suture tails, and they are secured. Placing a hemostat into the small skin incision and lifting it allows the knot to fall below Scarpa fascia and not dimple the skin (Fig. 2-14).
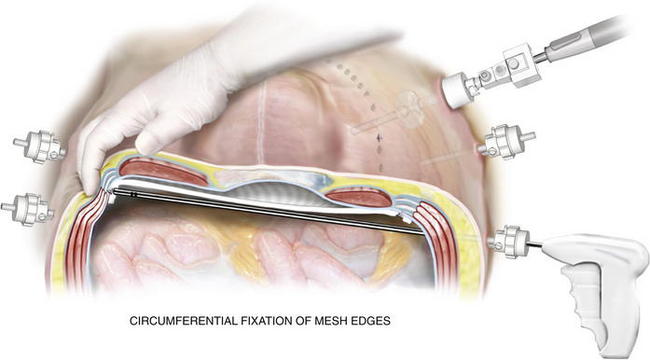
 Once the mesh is secured and overlap ensured, a tacking device is used to fixate the edges of the mesh circumferentially (Fig. 2-15). The purpose of the tacks is not to provide strength to the repair, but rather, to prevent bowel or mesenteric fat from creeping over the top of the mesh, exposing it to the ingrowth side. Fixation devices are both permanent and absorbable.
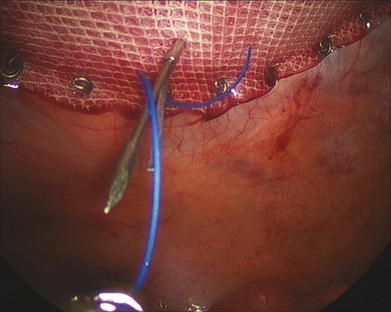
 The strength of the repair is the transabdominal fixation that the permanent sutures provide. After tack fixation at the periphery of the mesh, additional permanent, monofilament sutures are placed every 5 to 7 cm around the circumference of the mesh (Fig. 2-16). Large defects require more frequent sutures; smaller, “Swiss cheese”–type defects may need fewer.

4 Postoperative Care
1 Perioperative Concerns
 Appropriate pain management is vital in the immediate postoperative period. Apart from the 2- to 3-cm umbilical defect or trocar-site hernia, all patients undergoing laparoscopic ventral herniorrhaphy are admitted. Patient-controlled analgesia is very effective, especially in the first 24 to 48 hours after surgery. Scheduled intravenous ketorolac is a useful adjunct.
 Hospitalization in the immediate postoperative period also allows the surgeon to monitor for any signs of missed enterotomy. There should always be an index of suspicion, particularly in difficult cases. Any unexplained tachycardia, leukocytosis, or persistent fever should be evaluated to rule out the presence of a bowel injury. Plane abdominal films or computed tomography can be used; however, if there is any concern, the patient should be returned to the operating room for diagnostic laparoscopy or laparotomy.
2 Long-term Issues
 Nearly all patients undergoing laparoscopic ventral hernia repair develop some degree of seroma at the previous hernia site. Patients should be educated about this possibility in the preoperative evaluation. Seromas rarely, if ever, require drainage or aspiration. The risk of contaminating the mesh with drainage should be weighed against the benefits of relieving the fluid. Indications for aspiration include failure to resolve after 6 months, significant patient discomfort, or pressure on the skin causing excoriation or necrosis.

 Follow-up in patients after laparoscopic ventral hernia repair has historically been very poor in the literature. The postoperative schedule should include appointments at 2 weeks, 6 weeks, 6 months, 1 year, and yearly thereafter. Ideally, hernia patients should be examined at least up to 1 year for complications of seroma, persistent pain, and recurrence.
5 Pearls/Pitfalls


Carbonell A.M., Harold K.L., Mahmutovic A.J., et al. Local injection for the treatment of suture site pain after laparoscopic ventral hernia repair. Am Surg. 2003;69:688-691.
Cobb W.S., Kercher K.W., Heniford B.T. Laparoscopic repair of incisional hernia. Surg Clin N Am. 2005;85(1):91-103.
Heniford B.T., Park A., Ramshaw B.J., Voeller G. Laparoscopic repair of ventral hernias: nine years’ experience with 850 consecutive hernias. Ann Surg. 2003;238:391-399.
Novitsky Y.W., Paton B.L., Heniford B.T. Laparoscopic ventral hernia repair. In: Koltun W., editor. Operative techniques in general surgery: techniques of laparoscopic hernia repair. New York: Elsevier, Inc; 2006:4-9. Chapter 3
Rosen M.J. Polyester-based mesh for ventral hernia repair: is it safe? Am J Surg. 2009;197:353-359.
Stoppa R.E. The treatment of complicated groin and incisional hernias. World J Surg. 1989;13:545-554.
