[level-membership-for-emergency-medicine-category]20
Lacerations, Abrasions, and Dressings
Definition: Laceration
General Treatment
The goals of wilderness wound management are to control bleeding, minimize infection, promote healing, and decrease the need for evacuation. Five specific steps should be followed: examination, anesthesia, cleaning and debridement, wound closure or packing, and bandaging (Box 20-1).
Box 20-1 First-Aid Supplies for Wound and Abrasion Care
10- to 15-mL irrigation syringe with an 18-gauge catheter tip
30 mL (1 fl oz) povidone–iodine solution USP 10% (Betadine)
Wound closure strips  × 4 inches
Polysporin, mupirocin, bacitracin, or other antiseptic ointment
Nonadherent sterile dressing (Aquaphor, Xeroform, Adaptic, Telfa)
Examination
1. For an extremity injury, evaluate and keep a record of distal neurovascular function before administering local anesthesia.
a. For wrist and hand lacerations, palpate the radial and ulnar pulses.
b. Compare capillary refill, color, and temperature of each digit to the corresponding digit on the uninjured extremity.
c. Assess sensation of the radial and ulnar aspects of each finger to sharp pain and two-point discrimination.
2. Explore the wound in a well-lighted environment to assess for tendon, muscle, or nerve injury; also look for foreign material. Test the motor function of each joint against resistance by isolating the joint and asking the patient to flex and extend the digit against resistance. A tendon that is 75% lacerated can still function, but its function may be decreased when it is offered resistance and is more painful during movement compared with the uninjured finger on the opposite hand.
Anesthesia
1. Mix equal parts of 4% lidocaine, 0.1% epinephrine, and 0.5% tetracaine (LET). Soak a 2 × 2 inch sterile gauze pad with this mixture. Place the pad directly into and around the wound for 7 to 10 minutes. The maximum dose of the solution is 2 to 5 mL for adults.
2. Use LET with caution on highly permeable tissue such as mucous membranes. Note that LET should be stored in a light-resistant container and is stable for 6 months when refrigerated and 4 weeks stored at room temperature. It should be discarded if the solution becomes discolored or cloudy.
Local Anesthesia
1. Infiltrate the wound with 1% lidocaine (Xylocaine) or 0.25% bupivacaine (Marcaine) using a 25-gauge (or smaller) needle and syringe.
2. The adult dose of lidocaine should not exceed 4 mg/kg (28 mL of a 1% solution in a 70-kg [154-lb] adult).
3. Buffering lidocaine reduces the pain of local anesthetic infiltration. To buffer, add 1 mL of sodium bicarbonate (1 mEq/mL solution) to 10 mL 1% lidocaine. Once buffered, the shelf life of the product is greatly reduced; discard the solution after 24 hours.
4. Alternative anesthetic strategies include the following:
a. Diphenhydramine (Benadryl) has anesthetic properties similar to, but less potent than, those of lidocaine. Dilute a 50-mg (1-mL) vial in a syringe with 4 mL normal saline (NS) solution to produce a 1% solution. Perform local infiltration as usual.
b. Use NS solution alone as the injected agent. This may provide enough anesthesia to suture a small wound.
c. Place ice directly over the wound to provide a short period of decreased pain sensation.
Cleaning and Debridement
1. Perform wound cleansing to remove as much bacteria, dirt, and damaged tissue as possible. The best method is to irrigate with a high-pressure liquid stream. See the following procedure.
2. Make sure the irrigating solution is clean and nontoxic to the tissues. Sterile NS solution, disinfected potable water, and 1% povidone–iodine solution (not “scrub”) are all suitable for irrigation. The quantity of irrigation fluid should be at least 400 mL.
3. In addition to a vigorous soap-and-water scrub, use benzalkonium chloride to cleanse wounds inflicted by animals suspected of being rabid (see Chapters 42 and 43).
Irrigation Method
1. Draw the irrigation solution into a 10- to 15-mL syringe, and attach an 18-gauge catheter tip.
2. Hold the syringe so the catheter tip is 2.5 to 5 cm (1 to 2 inches) above the wound and perpendicular to the skin surface. Push down forcefully on the plunger while prying open the edges of the wound with your fingers, and squirt the solution into the wound (Fig. 20-1, A). Be careful to avoid being splashed by the irrigant after it hits the skin. If you are not carrying a splash shield, such as ZeroWet, put on a pair of sunglasses or goggles to protect your eyes from the spray or place the catheter through the bottom of an upside down plastic or Styrofoam cup.
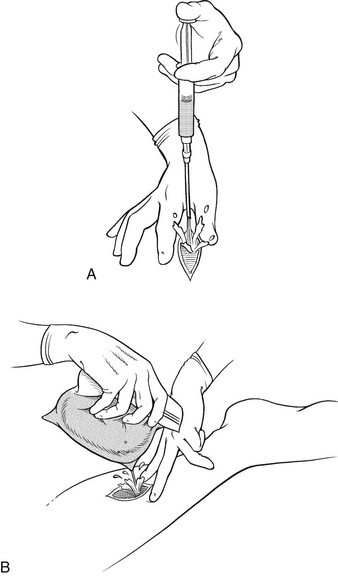
FIGURE 20-1 Wound irrigation. A, Syringe. B, Plastic bag.
3. Repeat this procedure until you have irrigated the wound with at least 400 mL of solution.
4. Remove any residual debris or devitalized tissue with a tweezers, scissors, knife, or any other sharp object. Any dirt left in a wound increases the likelihood of infection.
5. If the wound edges are macerated, crushed, or necrotic, perform sharp debridement.
6. Improvised wound irrigation can be performed with a puncturable container to hold water such as a sandwich or garbage bag and a safety pin or 18-gauge needle. Fill the bag with irrigation solution and puncture the bottom of the bag with the safety pin. Enlarge the hole if necessary by puncturing it a second time. Hold the bag just above the wound and squeeze the top firmly to begin irrigating (Fig. 20-1,B). Understand that the pressure generated by this method is far less than that delivered by a syringe and catheter.
High-Risk Wounds
Treatment
1. Irrigate and debride the wound, then pack it open with saline- or water-moistened gauze dressings.
2. Cover the packed wound with a conforming bandage, and splint the extremity in an elevated position.
3. Only if the wound is considered high risk, start the patient on an immediate course of oral antibiotic therapy. Options include amoxicillin/clavulanate 500 mg q6h; cephalexin 500 mg q6h; or penicillin 500 mg combined with dicloxacillin 500 mg q6h. For specific antibiotic recommendations for animal or human bites, see Chapter 42 and Appendix J.
4. Change the packing at least once a day.
5. The wound may be closed with sutures, staples, or tape after 4 to 5 days if there is no sign of infection (delayed primary closure).
Low-Risk Wounds
1. Wound taping: Wound closure tape strips are stronger, longer, stickier, and more porous than are butterfly bandages.
a. Achieve hemostasis, and dry the wound edges.
b. Clip off hair near the wound with a scissors so that tape will adhere better. Hair farther from the wound edge can be closely clipped or lightly shaved. Avoid shaving hair directly adjacent to the wound edge because shaving abrades the skin and increases the potential for infection.
c. Apply a thin layer of tincture of benzoin evenly along both sides of the wound, and allow it to dry (Fig. 20-2, A) so that it is tacky, not slippery.
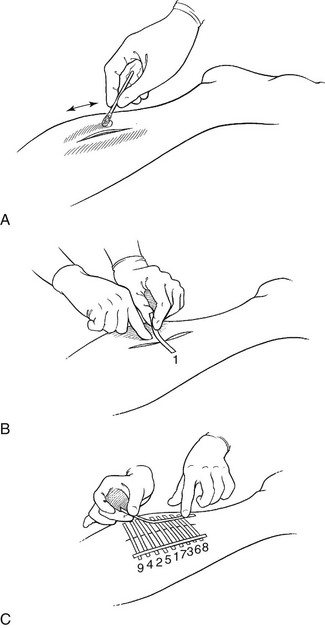
FIGURE 20-2 A to C, Wound taping.
d. Secure one-half of the tape to one side of the wound. Oppose the other wound edge with a finger while using the free end of the tape as a handle to help pull the wound closed (Fig. 20-2, B). Avoid squeezing the wound edges tightly together. They should just touch. Attach the other end of the tape to the skin.
e. Allow the tape to overlap the wound edge by 2 to 3 cm ( to
to  inches) on each side, and space the strips 2 to 3 mm apart to allow drainage.
f. Place cross-stays of tape perpendicular to and over the tape ends to prevent them from peeling off (Fig. 20-2, C).
g. Note that wound closure strips can be improvised from duct tape or other self-adhering tape. Cut 1-cm ( -inch) strips, and then punch tiny holes along the length of the tape with a safety pin to allow drainage.
2. Improvised wound tape: If no tape is available, glue strips of cloth or nylon from your clothes, pack, or tent to the skin with a “superglue.”
a. Cut 1-cm ( -inch) strips of material, and then punch tiny holes along the length of the material with a safety pin to allow drainage.
b. Place a drop of glue on the end of material only and hold it on the skin until it dries.
c. Pull the wound closed, and glue the other end of the material to the skin on the other side of the wound.
d. Avoid getting any glue in the wound. The glue is generally safe on intact skin but should not be used on the face.
e. Expect the strips to fall off after about 3 days. The strips can be reapplied with fresh glue.
3. Improvised tape/suture closure: Another method of wound closure using tape, which may be more appropriate for a longer wound:
a. Cut two strips of adhesive tape 2.5 cm (1 inch) longer than the wound.
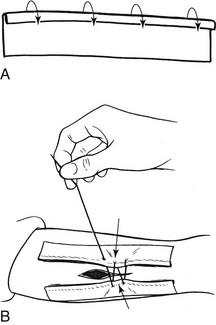
b. Fold a sufficient width of each strip of tape over lengthwise (sticky to sticky) to create a long, thin nonsticky edge on each piece (Fig. 20-3, A).
c. Enhance tape adherence to skin by applying a thin layer of benzoin to the skin on either side of the wound.
d. Attach one strip of the tape on each side of the wound, 0.6 to 1.3 cm ( to
to  inch) from the wound, with the folded (nonsticky) edge toward the wound.
e. Using a needle and thread, sew the folded edges together, cinching them tightly enough to bring the wound edges closer together (Fig. 20-3, B).
3. Hair-tying a scalp laceration (assumes the patient has enough hair):
a. Take a piece of heavy suture material (0-silk works best), dental floss, sewing thread, or thin string, and lay it on top of and in the long axis of the wound (Fig. 20-4, A).

b. Twirl a few strands of hair on each side of the wound, and then cross them over the wound in opposite directions and pull tightly so that the force pulls the wound edges together.
c. Have an assistant tie the strands of hair together with the material while you hold the wound closed. A square knot works best. Repeat this technique as many times as needed, along the length of the wound, to close the laceration (Fig. 20-4, B).
d. If the tied knots will not hold, then pull the twirled strands of hair from opposite sides of the wound together and apply a drop of superglue to the intersection—this junction functions as would a knot.
4. Gluing: Dermabond (2-octyl cyanoacrylate) is approved by the U.S. Food and Drug Administration as a topical skin adhesive to repair skin lacerations. It is packaged for a single-use application. Tissue glue is ideal for backcountry use because it precludes the need for topical anesthesia, is easy to use, reduces the risk for needlestick injury, and takes up less room in a backpack than does a conventional suture kit. When applied to the skin surface, tissue glue provides strong tissue support and peels off in 4 to 5 days without leaving evidence of its presence.
a. Irrigate the wound with copious amounts of disinfected water.
b. Control any bleeding with direct pressure.
c. Once hemostasis is obtained, approximate the wound edges using fingers or forceps. Dry the wound, or allow it to dry.
d. Paint the tissue glue over the apposed wound edges using a very light brushing motion of the applicator tip. Avoid excessive pressure of the applicator on the tissue because this could separate the skin edges and push glue into the wound. Apply multiple thin layers (at least three), allowing the glue to dry between each application (about 2 minutes).
e. Glue can be loosened from human skin with petrolatum jelly or removed from unwanted (nonhuman) surfaces with acetone.
f. Petroleum-based ointments and salves including antibiotic ointments should not be used on the wound after gluing because these substances can weaken the polymerized film and cause wound dehiscence.
5. Skin staples: Skin staples and sutures are best for large gaping cuts, wounds that are under tension or that cross a joint, or any other wounds that are difficult to keep closed with tape.
a. Skin stapling is a relatively fast technique for closing wounds and is ideal for use in the wilderness, when evacuation to a medical facility is not readily available.
b. Staples are as strong as sutures, produce less inflammatory response, and have less chance of seeding a wound infection.
c. When used appropriately, staples yield an excellent cosmetic outcome.
d. Staples should not be used on the feet, hands, or face or if the laceration extends into tendons or muscles.
e. Staples are left in place for the same length of time as are sutures in similar anatomic sites.
f. Staple removal requires a special device that is provided by each manufacturer.
Stapling Technique
1. Stapling devices have evolved significantly in the past several years. A good choice for backcountry use is the 3M Precise Disposable Skin Stapler with 25 staples.
2. Squeeze the stapler partway until it clicks and you feel resistance. The two points of the staple should now be protruding out from the stapler (Fig. 20-5, A).
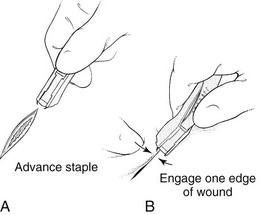
FIGURE 20-5 A and B, Wound stapling.
3. Grab one edge of the cut with one of the staples and use it as a hook to pull the wound closed. Use your index finger on the other hand to push the other wound edge in until the wound edges just meet (Fig. 20-5, B). Hold the stapler upright at a 90-degree angle to the wound, and make sure that the stapler is positioned evenly over the cut so that it does not overlap one wound edge more than the other. Press the stapler firmly against the skin. Gently and evenly squeeze the stapler with your thumb to advance the staple into the tissue.
4. Once the staple is seated, relax your thumb pressure fully on the stapler and back out the stapler to disengage it.
Wound Ointment Dressing and Bandaging
1. The best dressing is one that does not stick to the wound. Representative dressings are Aquaphor, Xeroform, Adaptic, and Telfa.
2. Apply an antiseptic ointment such as bacitracin or mupirocin to the surface of the wound before bandaging unless the wound was closed with glue. Honey applied topically on cutaneous wounds has been found to reduce infection and promote wound healing and is a reasonable substitute for a commercial ointment. The antimicrobial properties of honey are attributed to its hypertonicity, low pH, a thermolabile substance called inhibine, and enzymes such as catalase. Inhibines in honey include hydrogen peroxide, flavonoids, and phenolic acids.
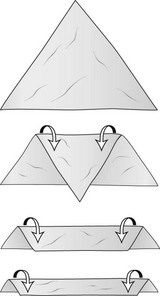
3. A bandage is a rolled gauze elastic wrap that secures a dressing in place. A triangular bandage, which is often used to create a sling, can be folded two to three times into a strap, called a cravat (Fig. 20-6). Cravat dressings are useful for applying pressure to a wound that is bleeding in order to promote hemostasis.
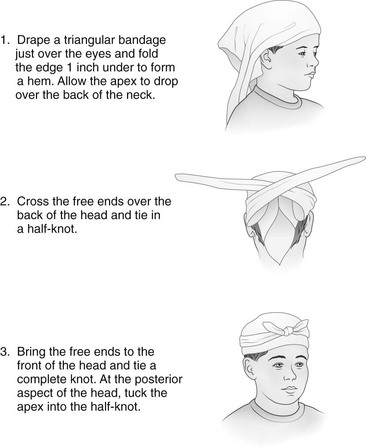
a. Scalp bandaging: Scalp wounds often require a dressing placed over hair, making adhesion very difficult. The dressing can be secured with a triangular bandage in a method that allows for considerable tension should pressure be necessary to stop bleeding (Fig. 20-7).
b. Face and ear bandaging: A wound to the face or the pinna of the ear may require a compression dressing. If so, gauze should be placed both anterior and posterior to the ear to allow it to maintain its natural curvature. A cravat is used to secure the dressing (see Fig. 23-13). This method may be used for wounds anywhere along the side of the head or under the chin.
Definition: Abrasion
General Treatment (see Box 20-1)
1. Apply a topical anesthetic, such as 2% to 4% lidocaine or viscous lidocaine jelly, over the wound and let it sit for 5 to 10 minutes, or wipe the area with a lidocaine-containing cleansing pad.
2. Vigorously scrub the abrasion with a surgical brush or cleansing pad until all foreign material is removed.
3. Use tweezers to pick out any embedded particles. Irrigate the abrasion with NS solution or water.
4. Apply a thin layer of topical antiseptic ointment, aloe vera gel, or honey to the abrasion.
5. Cover with a nonadherent protective dressing, and secure it in place with a bandage. Spenco 2nd Skin works well because it soothes and cools the wound while providing an ideal healing environment. The dressing can also be secured with a woven or nonwoven adhesive knit bandage and left in place for several days, as long as there is no sign of infection.
[/level-membership-for-emergency-medicine-category][not-level-membership-for-emergency-medicine-category]20
Lacerations, Abrasions, and Dressings
Definition: Laceration
General Treatment
The goals of wilderness wound management are to control bleeding, minimize infection, promote healing, and decrease the need for evacuation. Five specific steps should be followed: examination, anesthesia, cleaning and debridement, wound closure or packing, and bandaging (Box 20-1).
Box 20-1 First-Aid Supplies for Wound and Abrasion Care
10- to 15-mL irrigation syringe with an 18-gauge catheter tip
30 mL (1 fl oz) povidone–iodine solution USP 10% (Betadine)
Wound closure strips × 4 inches
Polysporin, mupirocin, bacitracin, or other antiseptic ointment
Nonadherent sterile dressing (Aquaphor, Xeroform, Adaptic, Telfa)
Examination
1. For an extremity injury, evaluate and keep a record of distal neurovascular function before administering local anesthesia.
a. For wrist and hand lacerations, palpate the radial and ulnar pulses.
b. Compare capillary refill, color, and temperature of each digit to the corresponding digit on the uninjured extremity.
c. Assess sensation of the radial and ulnar aspects of each finger to sharp pain and two-point discrimination.
2. Explore the wound in a well-lighted environment to assess for tendon, muscle, or nerve injury; also look for foreign material. Test the motor function of each joint against resistance by isolating the joint and asking the patient to flex and extend the digit against resistance. A tendon that is 75% lacerated can still function, but its function may be decreased when it is offered resistance and is more painful during movement compared with the uninjured finger on the opposite hand.
Anesthesia
1. Mix equal parts of 4% lidocaine, 0.1% epinephrine, and 0.5% tetracaine (LET). Soak a 2 × 2 inch sterile gauze pad with this mixture. Place the pad directly into and around the wound for 7 to 10 minutes. The maximum dose of the solution is 2 to 5 mL for adults.
2. Use LET with caution on highly permeable tissue such as mucous membranes. Note that LET should be stored in a light-resistant container and is stable for 6 months when refrigerated and 4 weeks stored at room temperature. It should be discarded if the solution becomes discolored or cloudy.
Local Anesthesia
1. Infiltrate the wound with 1% lidocaine (Xylocaine) or 0.25% bupivacaine (Marcaine) using a 25-gauge (or smaller) needle and syringe.
2. The adult dose of lidocaine should not exceed 4 mg/kg (28 mL of a 1% solution in a 70-kg [154-lb] adult).
3. Buffering lidocaine reduces the pain of local anesthetic infiltration. To buffer, add 1 mL of sodium bicarbonate (1 mEq/mL solution) to 10 mL 1% lidocaine. Once buffered, the shelf life of the product is greatly reduced; discard the solution after 24 hours.
4. Alternative anesthetic strategies include the following:
a. Diphenhydramine (Benadryl) has anesthetic properties similar to, but less potent than, those of lidocaine. Dilute a 50-mg (1-mL) vial in a syringe with 4 mL normal saline (NS) solution to produce a 1% solution. Perform local infiltration as usual.
b. Use NS solution alone as the injected agent. This may provide enough anesthesia to suture a small wound.
c. Place ice directly over the wound to provide a short period of decreased pain sensation.
Cleaning and Debridement
1. Perform wound cleansing to remove as much bacteria, dirt, and damaged tissue as possible. The best method is to irrigate with a high-pressure liquid stream. See the following procedure.
2. Make sure the irrigating solution is clean and nontoxic to the tissues. Sterile NS solution, disinfected potable water, and 1% povidone–iodine solution (not “scrub”) are all suitable for irrigation. The quantity of irrigation fluid should be at least 400 mL.
3. In addition to a vigorous soap-and-water scrub, use benzalkonium chloride to cleanse wounds inflicted by animals suspected of being rabid (see Chapters 42 and 43).
Irrigation Method
1. Draw the irrigation solution into a 10- to 15-mL syringe, and attach an 18-gauge catheter tip.
2. Hold the syringe so the catheter tip is 2.5 to 5 cm (1 to 2 inches) above the wound and perpendicular to the skin surface. Push down forcefully on the plunger while prying open the edges of the wound with your fingers, and squirt the solution into the wound (Fig. 20-1, A). Be careful to avoid being splashed by the irrigant after it hits the skin. If you are not carrying a splash shield, such as ZeroWet, put on a pair of sunglasses or goggles to protect your eyes from the spray or place the catheter through the bottom of an upside down plastic or Styrofoam cup.
FIGURE 20-1 Wound irrigation. A, Syringe. B, Plastic bag.
3. Repeat this procedure until you have irrigated the wound with at least 400 mL of solution.
4. Remove any residual debris or devitalized tissue with a tweezers, scissors, knife, or any other sharp object. Any dirt left in a wound increases the likelihood of infection.
5. If the wound edges are macerated, crushed, or necrotic, perform sharp debridement.
[/not-level-membership-for-emergency-medicine-category]
