Knots
Practice before You Really Need to Use Them
1. Stopper knot—a knot tied at the end of a rope to keep something from slipping off the rope (e.g., figure-8 knot)
2. End-of-line knot—a knot used to form a loop or other construction in the end of a rope to anchor, tie in, or attach the rope to something (e.g., double bowline knot)
3. Midline knot—a knot used to form a loop in the middle of the rope for clipping into, grasping, or bypassing a piece of damaged rope (e.g., butterfly knot)
4. Knots to join two ropes—a knot used to connect two ropes of equal or unequal diameter (e.g., double fisherman’s bend)
5. Safety knot—a final knot tied into the tail of the rope after the original knot is tied to keep the original knot from deforming or unraveling (e.g., barrel knot)
6. Hitch—a knot that is tied around something, which conforms to the shape of the object around which it is tied and that does not keep its shape when the object around which it is tied is removed (e.g., Prusik hitch)
7. Tied loop—a knot that forms a fixed eye or loop in the end of a rope (e.g., bowline knot)
Anatomy of a Knot
1. The working end of the rope is the section used to tie or rig the knot.
2. The standing part of the rope is the section not actively used to form the knot or rigging.
3. The running end of the rope is the free end.
5. A bight of rope is formed when the rope takes a U-turn on itself so that the running end and standing end run parallel to each other. The U portion, where the rope bends, is referred to as the bight.
6. A loop of rope is made by crossing a portion of the standing end over or under the running end. Note that a loop closes, as compared with a bight. Many knots that form a loop from a bight in the standing part of the rope are named something on a bight, such as figure-8 on a bight.
7. The tail of a rope is the (usually) short, unused length of rope that is left over once the knot is tied.
Examples of knots are presented in Figures 60-1 to 60-24.
Stopper Knots (Figs. 60-1 and 60-2)
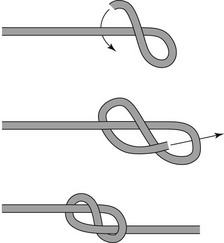
FIGURE 60-1 Figure-8 stopper knot.
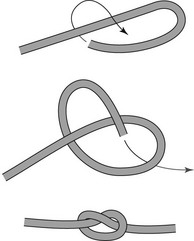
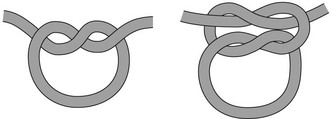
FIGURE 60-2 Overhand stopper knot.
End-of-Line Knots (Figs. 60-3 to 60-6)
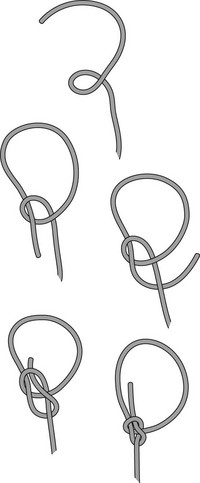
FIGURE 60-3 Bowline.
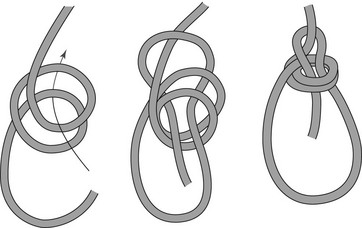
FIGURE 60-4 Double-bowline
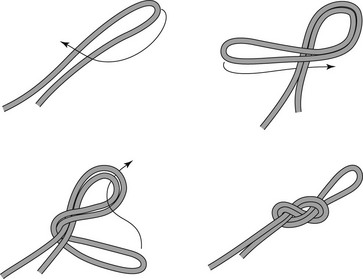
FIGURE 60-5 Figure-8 on a bight.
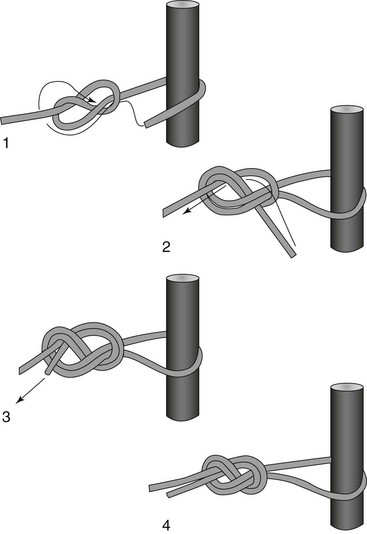
FIGURE 60-6 Retrace figure-8 on a bight.
The double bowline (see Fig. 60-4) is preferred for rescue over the less secure single bowline (see Fig. 60-3).
A figure-8 on a bight (see Fig. 60-5) creates a preformed loop, so it will only function if you can clip into the loop (e.g., with a carabiner).
The figure-8 on a bight is probably the single knot every potential rescue worker should know. Climbers and rescue personnel across the world use it. It is strong and easy to undo when loaded. It can be tied directly into a bight (see Fig. 60-5), or it may be tied as a retrace (or follow-through) (see Fig. 60-6). It is easy to tell when it has been tied correctly by quick visual inspection.
Midline Knots
These knots are used to form loops in the middle of a rope. They are used for clipping into, grasping, or bypassing a piece of damaged rope. A figure-8 on a bight may be used (see Fig. 60-5). In addition, the following knots can be used:
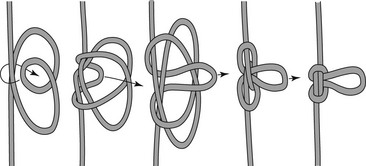
FIGURE 60-7 Butterfly knot.
Overhand on a bight (Fig. 60-8)
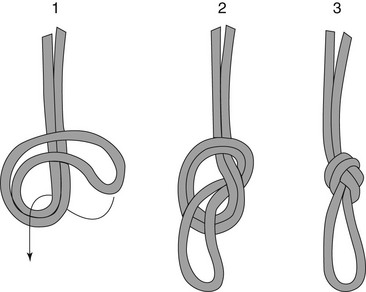
FIGURE 60-8 Overhand on a bight.
Bowline on a bight (Fig. 60-9)
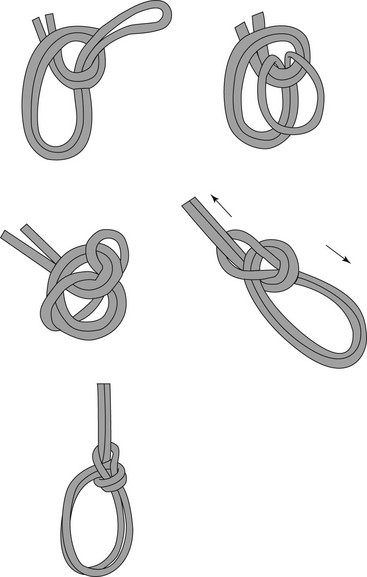
FIGURE 60-9 Bowline on a bight.
Knots to Join Two Ropes
The overhand bend (Fig. 60-10) is functional, simple and easy to tie, but not secure enough for rescue.
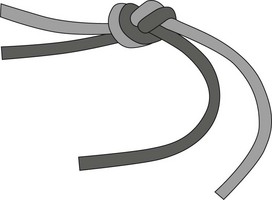
FIGURE 60-10 Overhand bend.
The double fisherman’s bend (Fig. 60-11) is an excellent knot for joining ropes of equal diameter.
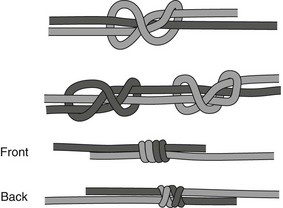
FIGURE 60-11 Double fisherman’s bend.
The double-sheet bend (Fig. 60-12) is an excellent knot for joining ropes of unequal diameter.
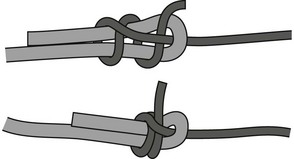
FIGURE 60-12 Double-sheet bend.
The single-sheet bend (Fig. 60-13) is less secure than the double-sheet bend.
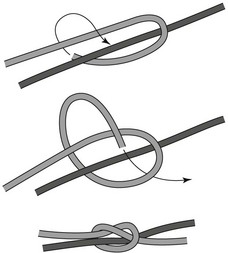
FIGURE 60-13 Single-sheet bend.
The figure-8 bend (Fig. 60-14) is a reasonable choice if tied with the rope ends exiting from opposite ends of the bend. Do not tie it as in Figure 60-15.
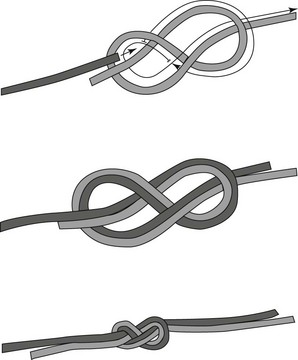
FIGURE 60-14 Figure-8 bend.
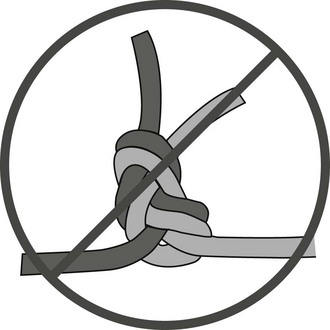
FIGURE 60-15 Incorrectly tied figure-8 bend.
The ring bend (Fig. 60-16) is the ideal knot for joining flat or tubular webbing. It is also used to tie loops of webbing (runners).
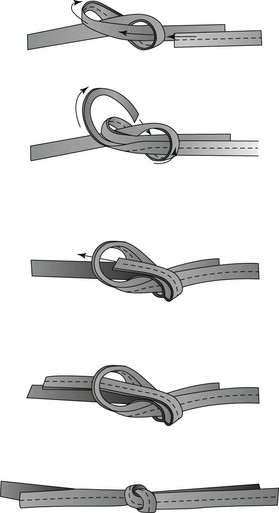
FIGURE 60-16 Ring bend (tape knot, web knot, water knot).
Knot Safety
A safety knot can help prevent mishaps. A safety knot is an overhand knot (see Fig. 60-2) tied into the tail of the rope after a knot is tied. The safety knot is placed to keep the original knot from deforming or unraveling.
Hitches (Figs. 60-17 to 60-20)
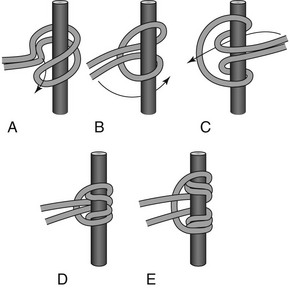
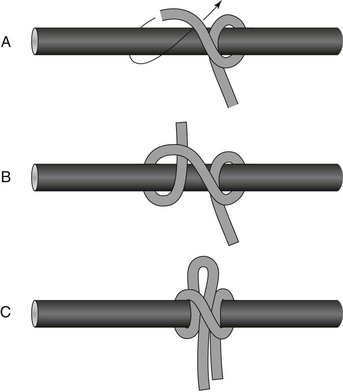
FIGURE 60-17 Prusik hitch. A to C, Tying sequence for the Prusik knot. D, Two-wrap Prusik knot. E, Three-wrap Prusik knot.
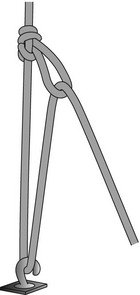
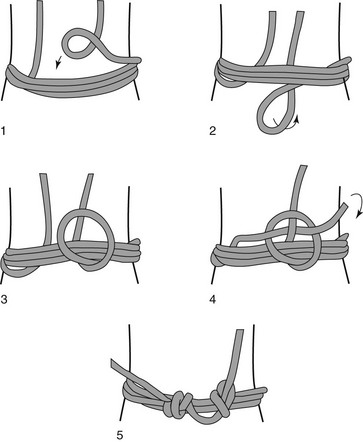
FIGURE 60-18 Trucker’s hitch.
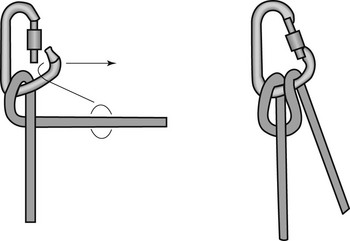
FIGURE 60-20 Munter hitch.
Prusik Hitch
One of the most commonly used hitches is the Prusik hitch (see Fig. 60-17).
1. A Prusik hitch is a sliding hitch by which a cord can be attached to a rope and slid up and down the rope for positioning. However, under tension, the hitch will not slide.
2. A Prusik hitch is created by tying a length of cordage into a loop by means of a double fisherman’s bend.
3. Wrapping the loop around the main rope and through its own loop two or three times and then pulling it tight forms the hitch.
Trucker’s Hitch
A handy hitch, known as a trucker’s hitch, is useful for pulling cord or webbing tight across something (e.g., a load in the bed of a pickup truck [hence the name]) or securing a patient snugly into a litter (see Fig. 60-18).
Clove Hitch
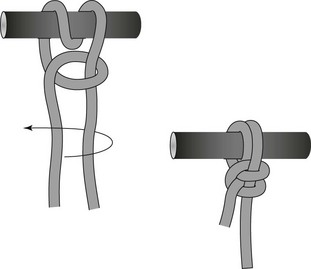
Another fairly common hitch used in climbing and rescue applications is the clove hitch (see Fig. 60-19).

