[level-membership-for-orthopaedics-category]
CHAPTER 1 Knee Arthroscopy: Setup, Diagnosis, Portals, and Approaches
ANATOMY
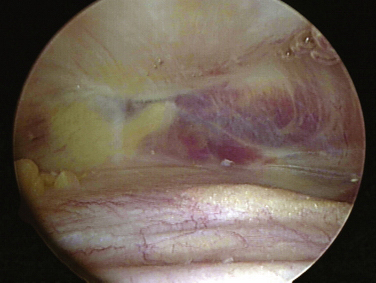
The knee joint, as other joints, is composed of a synovial lining within the capsule. Superior to the patella the synovium extends to form the suprapatellar pouch (Fig. 1-1).1 Superior medial or lateral portals are commonly placed within this pouch. A layer of fat separates the pouch from the distal anterior femoral shaft. The pouch extends medially and laterally along the femoral condyles into the medial and lateral gutters. The suprapatellar pouch and gutters are frequent locations for loose bodies.
The bony anatomy of the knee relevant to arthroscopic knee surgery includes the distal femur, the proximal tibia, and the patella. With the knee at 60 degrees of flexion, the inferior pole of the patella is located above the lateral joint line and is an important guide for anterolateral portal placement (Fig. 1-2). Exceptions to using this landmark, however, occur in cases of patellar alta, baja, dysplasia, or congenital absence. These conditions should be identified preoperatively with physical examination and standard radiography.
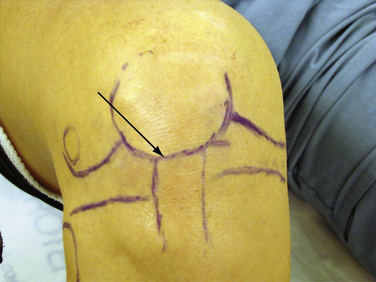
FIGURE 1-2 Photograph of knee showing inferior pole of patella relative to high anterolateral portal placement.
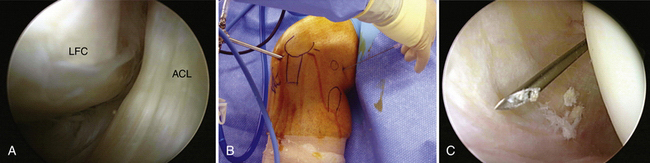
The femoral trochlea consists of medial and lateral trochlear ridges that arise from the corresponding femoral condyle.1 The medial femoral condyle is larger than the lateral from proximal to distal and anterior to posterior. The lateral femoral condyle, however, is wider at the level of the femoral notch. Distally, the femur opens into a notch that contains the femoral origins of the anterior and posterior cruciate ligaments. The notch serves as a target for careful, controlled introduction of cannulas and instruments from anterior portals to avoid injury to articular cartilage (Fig. 1-3). When using the scalpel for anterior portal placement, the blade should be pointed toward the notch but blind insertion beyond the skin and capsule should be avoided, because this would risk injury to the cruciate ligaments.
The medial tibial plateau is larger than the lateral plateau; the two are separated by an intercondylar sulcus or fossa.1 Adjacent to the fossa is a medial and lateral tibial spine that separates the fossa from the corresponding tibial plateau. The femoral condyles and tibial plateaus are incongruous without the medial and lateral menisci. The fibula, although extra-articular, has direct relevance to arthroscopic knee surgery, because it serves as a landmark for portals and surgical approaches. The proximal fibula forms a joint with the proximal posterior surface of the tibia (tibiofibular joint). It also serves as an insertion for the lateral collateral ligament and biceps femoris tendon.
A knowledge of neurovascular anatomy around the knee joint is important for preventing iatrogenic injury during portal placement and surgical approaches.2 Posteriorly, in the midthigh, the sciatic nerve branches into the tibial (or popliteal) and common peroneal nerves. At the posterior joint line of the knee just posterior to the joint capsule, the tibial nerve passes between the two heads of the gastrocnemius muscles, along with the popliteal artery and vein. From medial to lateral, the structures include the nerve, artery, and vein (Fig. 1-4).1 Although Matava and colleagues3 have shown that knee flexion increases the distance between the tibial insertion of the posterior cruciate ligament (PCL) and the popliteal neurovascular structures, other studies have not confirmed this. At 100 degrees of knee flexion, they reported a maximum distance of slightly less than 1 cm between the popliteal artery and PCL insertion.
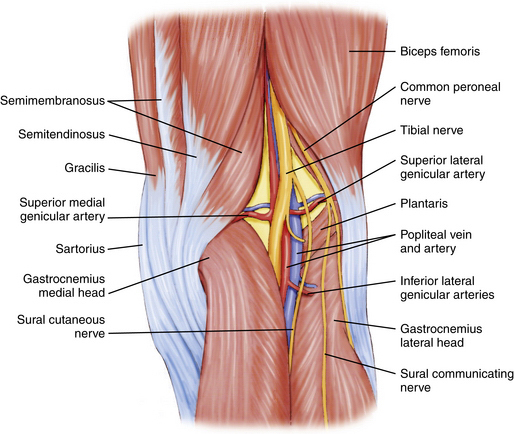
FIGURE 1-4 Posterior aspect of knee showing tibial nerve, popliteal artery, and vein within popliteal fossa.
The common peroneal nerve passes posterior to the biceps femoris tendon and courses between it and the lateral head of the gastrocnemius toward the fibular head (Fig. 1-5).1,2 It then courses laterally around the fibular neck and into the peroneus longus tendon. In most individuals, the biceps femoris tendon insertion onto the fibular head can be palpated in 90 degrees of knee flexion. Placing incisions, portals, and retractors anterior to this landmark will help avoid injury the common peroneal nerve.
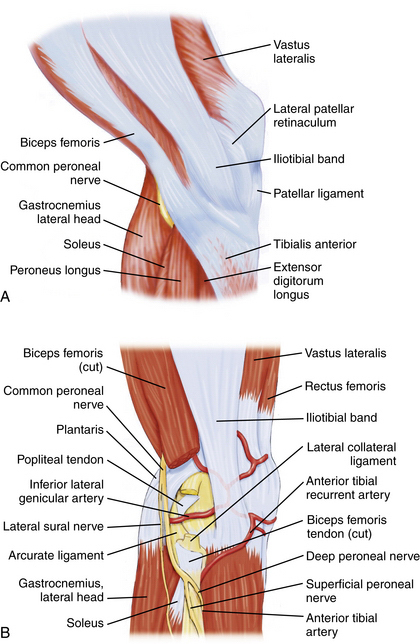
FIGURE 1-5 Lateral aspect of knee. A, Common peroneal nerve passing posterior to biceps femoris tendon. B, Common peroneal nerve passing laterally around the fibular neck.
On the medial aspect of the knee, the saphenous nerve and its infrapatellar branch are at risk for injury during placement of medial and posteromedial portals, as well as during all medial approaches to the knee. The nerve and its branch have a variable course and number of terminal branches.1,2 In general, the saphenous nerve passes between the gracilis and sartorius muscles approximately 3 cm posterior to the medial femoral epicondyle. The infrapatellar branch courses beneath the sartorius (i.e., posterior to it) and runs along the anteromedial aspect of the knee, where it can terminate medially or laterally to the medial border of the patellar tendon (Fig. 1-6).

TREATMENT
Anesthesia Options
Knee arthroscopy can be performed under general, spinal, or local anesthesia. The choice primarily depends on surgeon and patient preference, but in some cases may be influenced by the patient’s medical history. In a prospective randomized study of 400 patients, Jacobson and associates4 compared three anesthesia options and concluded that local anesthesia was technically feasible in 92% of patients undergoing elective knee arthroscopy. However, when comparing patient satisfaction, the local anesthetic group had 90% satisfaction versus 97% for the general anesthesia group. Horlocker and Hebl5 performed an evidence-based review of published studies comparing various anesthetic methods for knee arthroscopy. They reported that the results of most studies were biased by surgeon and patient expectations as well as by differences in postoperative management. They concluded that a single method of anesthesia could not be recommended for all surgeons performing or patients undergoing knee arthroscopy.
Arthroscopic Technique
Operating Room Setup
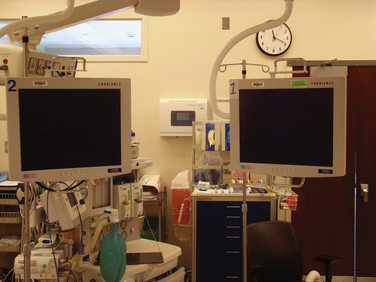
One or more video monitors are required. Traditionally, cathode ray tube (CRT) monitors have been the standard. New flat screen liquid crystal display (LCD) monitors are increasingly being used (Fig. 1-7) and currently most manufacturers of arthroscopic video equipment also offer high definition (HD) monitors. Although only one monitor is needed, many operating rooms use two or more monitors (see Fig. 1-8). Although there is less benefit of multiple monitors for knee arthroscopy, they can be very useful for shoulder and hip arthroscopy.
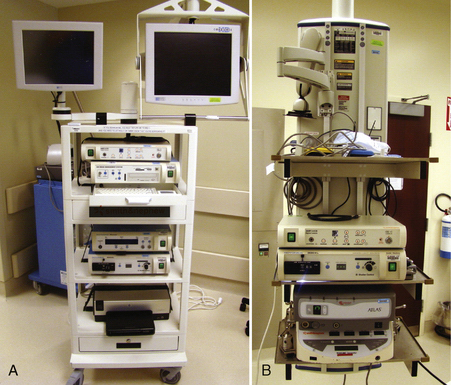
The control boxes for the arthroscopic camera, shavers, pump, and other devices can be placed on a mobile tower (Fig. 1-8A) that is easily moved from room to room or can be contained on a boom (see Fig. 1-8B). The advantage of the boom is that there are less electrical cords across the floor and that the monitor(s) can be positioned independently of the tower.
The use of leg holders or posts is determined by the preoperative diagnosis, surgical plan, and surgeon preference. A variety of different commercial leg holders are available for the operative and nonoperative leg. When operating on both knees, bilateral leg holders are also available (Fig. 1-9A). In most cases, a unilateral leg holder (see Fig. 1-9B and C) or lateral post (see Fig. 1-9D) is used for the operative leg. Leg holders may include padding, and some others require you to apply padding to the leg prior to securing it within the holder. Some holders are designed to hold the leg with a tourniquet (see Fig. 1-9B) and others require the tourniquet to be outside the holder (see Fig. 1-9C). If you prefer a unilateral holder or lateral post, it will be important to determine how to protect the contralateral leg. The use of a leg holder for the nonoperative leg has been shown to increase the risk of compression to the peroneal nerve as courses around the fibular neck.2 Nonoperative leg holders can also cause a stretch injury to the femoral nerve if the hip is held extended. If the foot of the bed is left up for a lateral post, then positioning the nonoperative leg does not require anything special. If the foot is dropped, it is often easiest to place a large pad under the nonoperative thigh to keep the hip flexed (Fig. 1-10). If there is concern about pressure on the peroneal nerve, additional foam padding can be applied in this region, particularly in thin patients.
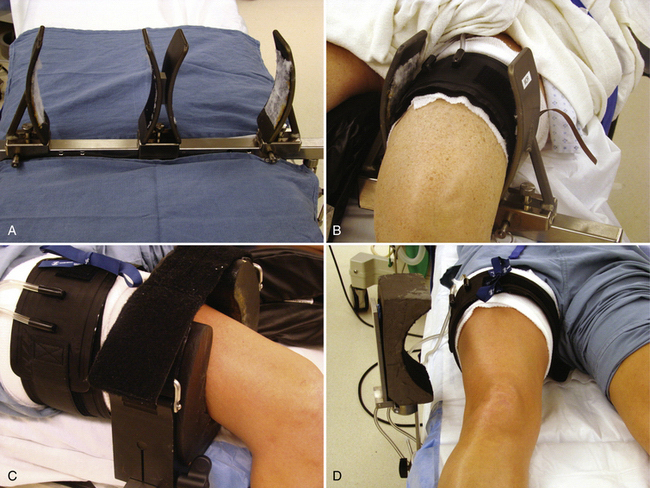
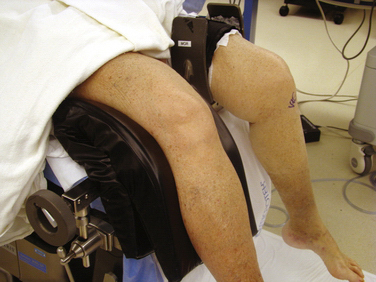
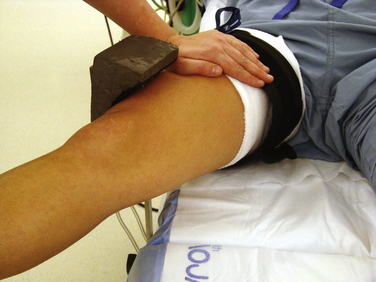
Other issues related to the leg holder include the position of the foot of the bed and the use of hip bumps. For lateral post use, the foot of the bed can remain up (see Fig. 1-9D) or it can be lowered. The advantage of the lateral post is faster setup and positioning, ability to move the leg freely during surgery, ability to hyperflex the knee, and ease of placing the knee in a figure-of-four position. The primary disadvantage is that the leg tends to slide over the post when placing valgus stress on the knee for access to posterior horn of medial meniscus. This can be prevented, however, by having an assistant place downward pressure on the thigh (Fig. 1-11). The major disadvantages associated with a fixed leg holder is the risk of rupturing the medial collateral ligament with excess valgus stress2; knee flexion is limited by the lowered portion table and inability to move the leg freely. The inability to abduct the leg can sometimes pose difficulties in posteromedial portal placement. If this occurs, you can have an assistant carefully abduct the nonoperative leg or the leg holder can be loosened or even removed beneath the sterile drapes. Femur fractures have also been reported with the use of a leg holder, but these are rare.6 Regardless of choice of leg holder, a small sandbag or other hip bump may be helpful for larger patients who tend to rotate their legs excessively externally when lying supine.
The next consideration is the decision on tourniquet usage. There are conflicting reports in the literature as to the usefulness of tourniquets in improving visualization and potential decreased recovery of muscle strength. Johnson and coworkers,7 in a randomized prospective evaluation of 109 patients undergoing knee arthroscopy, reported that routine knee arthroscopy could be performed adequately without a tourniquet. Kirkley and colleagues.8 in a similar evaluation of 120 patients, reported no complications associated with tourniquet use, with a slight trend toward less early postoperative pain and better isokinetic strength at 2 weeks postoperatively in the group in whom a tourniquet was not used. Tourniquets with a wide and/or curved cuff have been shown to decrease the risk of muscle and nerve injury. Rodeo and associates9 have recommended that tourniquet time under 2 hours and pressures less than 350 mm Hg lower the risk of neuropraxia. Several authors have also shown that a tourniquet should not be reinflated during an operative procedure after it is deflated for a period of reperfusion.10,11
Arthroscopy Equipment
Gravity inflow, in which multiple bags of fluid are raised to 8 to 10 feet, is a common method for infusing the joint with fluid. Although more popular in the early days of arthroscopy, it continues to be used today by many surgeons. As technology has improved, the fluid pump has gained popularity. It provides the advantage of improved hemostasis and higher pressures.2 There are a variety of different pumps available, so it is important for the surgeon to have a thorough understanding of the pump that he or she is using. Each pump has different controls for pressure and flow maintenance and the surgeon cannot assume that a set pressure on one pump is equal to the same pressure on another pump. It is also important to recognize that intra-articular pressures can be increased by simply manipulating the knee in flexion or extension.12 Muellner and coworkers13 have compared four pump systems and concluded that there is a significant difference among pumps in the pressure that was set and the actual measured intra-articular pressure. They also noted that all pumps were accurate at pressures below 60 mm Hg but not above this setting.
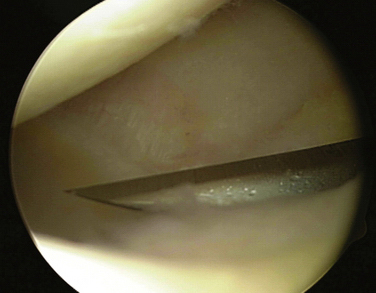
Suction is also be connected to the shaver or burr and, similar to another type of outflow, can be used continuously or intermittently. Again, it is generally preferable to use suction on an intermittent basis to clear debris; continuous use can make it difficult to maintain joint distention. Although different manufacturers have small variations in shavers and burrs, they are usually available in different sizes and levels of aggressiveness. In general, the smallest, least aggressive instrument should be used. However, some smaller shavers and burrs tend to become clogged more easily from debris, which can require frequent cleaning. Regardless of which instrument is selected, it is important for the surgeon to be familiar with its characteristics. In particular, the surgeon should always know which side of the burr or shaver is the cutting side and which is the noncutting side. The surgeon should always maintain a clear view of the cutting side so as not to cause iatrogenic injury (Fig. 1-12). The instrument must be carefully placed (without force) into the joint, moved with the joint, and removed. Minimal if any torque should ever be applied to the shaft, and you should never shave or burr blindly. The surgeon also should not select the most aggressive burr just because is will perform faster. Slow, steady controlled movements are necessary when using a shaver, but especially a burr.
Portals
High Anterolateral Portal.
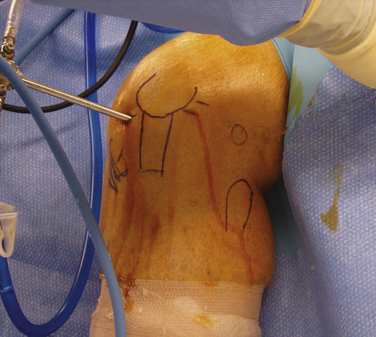
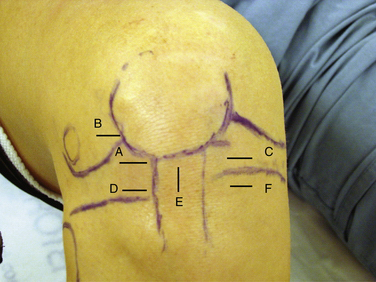
The high anterolateral portal is the most common initial diagnostic portal. It is located above the lateral joint line, adjacent to the patellar tendon’s lateral margin.14 The inferior pole of the patella with the knee in 60 degrees of flexion is a good landmark for the inferior margin of this portal (Fig. 1-13A). It is important, however, to review the preoperative x-rays to make certain that the patient does not have patella alta or baja. The anterolateral portal is useful for examining the medial, lateral, and patellofemoral compartments, visualizing the notch during ACL reconstruction, and treating medial meniscus pathology.15 In addition to a viewing portal, it can be also used for fluid inflow.
In general, basic knee arthroscopy can be performed with a two- or three-portal technique. The two-portal technique requires inflow through the arthroscopic camera sheath while the three portal technique requires a separate superior portal for inflow. Most commonly, this superior portal is placed superolaterally. Stetson and Templin16 have shown faster return to activities and return of quadriceps strength with the two-portal technique.
When pathology is expected in the lateral compartment based on the preoperative diagnosis, Kim and Kim15 have recommended that the initial portal be placed more laterally and higher (patellofemoral axillary portal) than a standard high anterolateral portal. The patellofemoral axillary portal is at the junction or axilla of the lateral edge of the patella and the anterior edge of the lateral femoral condyle (see Fig. 1-13B). The authors stated that this portal allows excellent visualization of the popliteal hiatus, lateral gutter, and lateral compartment.
Anteromedial Portal.
A second working portal is created after performing an initial diagnostic examination through the first portal. Most often, the second portal is the anteromedial portal. The exact position of the portal is determined by the pathology (see Fig. 1-13C). As with all working portals, a spinal needle is used to determine its precise location. If access to the posterior horn of the medial meniscus is needed, the portal should be just above the anterior horn of the medial meniscus. If lateral compartment access is needed, the portal should be high enough to pass over the tibial spines. Alternatively, if pathology in the posterior horn of the lateral meniscus cannot be accessed through the anteromedial portal, a low anterolateral portal (see Fig. 1-13D) can be placed just above the anterior horn of the lateral meniscus.15
Accessory and Other Portals.
A transpatellar tendon or central portal can be created as an accessory working or viewing portal. The portal must be made vertically in line with the tendon fibers to avoid transecting the tendon. The portal is placed at the inferior pole of the patella (see Fig. 1-13E). It can be particularly useful in situations in which the anterolateral portal is too lateral and/or the anteromedial portal is too medial. In these cases, the transpatellar tendon portal can provide excellent visualization and access to the notch. Even when the other portals are placed appropriately, the transpatellar portal can be used as an accessory portal during ACL reconstruction.14
Additional anterior accessory portals can be placed at any location necessary for working or viewing. Most commonly, they are used to access a torn meniscus, articular cartilage defect, loose body, or the femoral tunnel placement for ACL or PCL surgery. The landmarks to avoid for accessory anterior portals are the menisci, articular cartilage, and inferior branch of the saphenous nerve. An accessory low anteromedial portal (see Fig. 1-13F) is often used for placement of a femoral tunnel via a medial portal.
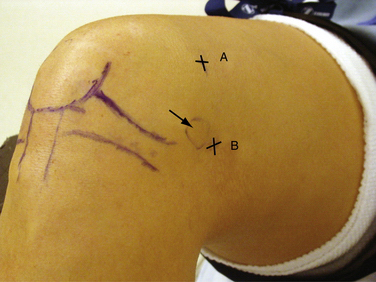
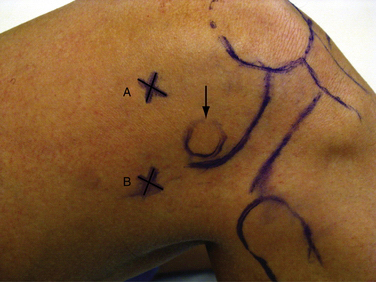
The superomedial portal is placed 3 to 4 cm superior to the superior pole of the patella (Fig. 1-14A). It should be in line with the medial border of the patella or just posterior to it. The cannula and obturator should aim toward the suprapatellar pouch, just posterior to the patellar articular cartilage. This is an excellent portal for viewing patellofemoral tracking or the lateral retinaculum during release. Because the portal does violate the vastus medialis obliquus, it can affect return of postoperative knee function and quadriceps strength.16 The superolateral portal is placed 3 to 4 cm superior to the superior pole of the patella and in line with the lateral border of the patella (Fig. 1-15A). It also provides excellent visualization of patellofemoral tracking. Either superior portal can also be used for fluid inflow.
All arthroscopic knee surgeons should be comfortable with access to the posterior compartments of the knee via posteromedial and posterolateral portals (see Figs. 1-14B and 1-15B, respectively). If unfamiliar with these portals, they should be practiced in the laboratory setting prior to attempting them in the operating room. With the arthroscope in the high anterolateral portal, the camera is advanced into the notch at the interval between the medial femoral condyle and PCL (Fig. 1-16A). Next, the arthroscopic sheath is held in place while the camera is replaced with a blunt trocar. The sheath and trocar are then gently advanced into the posteromedial compartment with the knee in 45 to 60 degrees of flexion. It is helpful to have the index finger of the hand holding the sheath positioned along its shaft. As the sheath is advanced, the index fingertip can be positioned so that it abuts the outside of the knee prior to penetrating the posterior capsule with the sheath and trocar. If difficulty is encountered during attempted passage, a limited inferior medial notchplasty can be performed, taking care to avoid injury to the PCL. This notchplasty may be required in cases of osteoarthritic spurs or otherwise stenotic notches.17 Once in the compartment, the trocar is replaced with the camera and the posteromedial knee is palpated with a gloved finger. This will help in identifying the general area for placement of a spinal needle. The posteromedial portal is approximately 2 cm superior to the medial femoral epicondyle and 1 cm posterior (see Fig. 1-14B). With the knee in 90 degrees of flexion, the needle is directed toward the posterior aspect of the intercondylar notch (i.e., where the camera is located; see Fig. 16B and C). The exact position is dependent on the pathology present. Care should be taken to avoid injury to the popliteal neurovascular structures with transverse insertion of the needle posterior to the posterior capsule.3 Once the correct needle position is attained, a small skin incision is created. A hemostat is then used for blunt separation of soft tissues. This is helpful to prevent injury to the saphenous nerve or its branches. Next, a blunt obturator and cannula are inserted along the same direction as the spinal needle. The entry through the capsule can be directly visualized with the camera. In some cases, the blunt obturator will slide off the capsule in a posterior direction. If the capsule cannot be penetrated after a few careful attempts, the sharp obturator may be needed. This can be safe if you are confident in the direction required to penetrate the capsule. Once the obturator is against the capsule, it can be more easily pushed through it. The sharp obturator, however, increases the risk of injury to neurovascular structures if directed incorrectly.

In a similar fashion, a posterolateral portal can be established with the camera in the anteromedial portal. It is advanced through the notch between the ACL and lateral femoral condyle (Fig. 1-17A). This can often be done without replacing the camera with a trocar, but do not use excessive force. If the camera does not pass easily, it is safest to use a blunt trocar. A spinal needle is again used posterolaterally 2 cm superior to the lateral femoral epicondyle and anterior to the biceps femoris to avoid injury to the common peroneal nerve (see Figs. 1-15B and 1-7B). The needle is directed toward the tip of the camera (see Fig. 1-17C), a skin incision is created, and the cannula is inserted.
Diagnostic Arthroscopy Technique
Next, a probe is inserted through the anteromedial working portal into the medial compartment. Although some have suggested that routine examination of the posterior compartment may be unnecessary,18 result in increased morbidity, and decrease efficiency of the procedure, I prefer to examine posteromedially and posterolaterally through the notch in all knee arthroscopies to avoid missing pathology.19 Usually, this pathology includes a loose body or section of torn meniscus that is flipped posteriorly and not seen from an anterior view of the meniscus. The posteromedial compartment is examined while the arthroscope is still in the high anterolateral portal. If complete visualization is difficult, a 70-degree arthroscope is used, but this is extremely rare.
PEARLS& PITFALLS
PEARLS
PITFALLS
1. Clarke HD, Scott WN, Insall JN, et al. Anatomy. In: Scott WN, ed. Insall & Scott Surgery of the Knee, Vol 1. 4th ed. Philadelphia: Churchill Livingstone, 2006;3-66.
2. Kim TK, Savino RM, McFarland EG, Cosgarea AJ. Neurovascular complications of knee arthroscopy. Am J Sports Med. 2002;30:619-629.
3. Matava MJ, Sethi NS, Totty WG. Proximity of the posterior cruciate ligament insertion to the popliteal artery as a function of the knee flexion angle: implications for posterior cruciate ligament reconstruction. Arthroscopy. 2000;16:796-804.
4. Jacobson E, Forssblad M, Rosenberg J, et al. Can local anesthesia be recommended for routine use in elective knee arthroscopy? A comparison between local, spinal, and general anesthesia. Arthroscopy. 2000;16:183-190.
5. Horlocker TT, Hebl JR. Anesthesia for outpatient knee arthroscopy: Is there an optimal technique?. Region Anesth Pain Med. 2003;28:58-63.
6. Cautilli R. Introduction to basics of arthroscopy of the knee. Clin Sports Med. 1997;16:1-16.
7. Johnson DS, Stewart H, Hirst P, et al. Is tourniquet use necessary for knee arthroscopy? Arthroscopy. 2000;16:648-651.
8. Kirkley A, Rampersaud R, Griffin S, et al. Tourniquet versus no tourniquet use in routine knee arthroscopy: a prospective, double-blind, randomized clinical trial. Arthroscopy. 2000;16:121-126.
9. Rodeo SA, Forster RA, Weiland AJ. Neurological complications due to arthroscopy. J Bone Joint Surg Am. 1993;75:917-926.
10. Mohler LR, Pedowitz RA, Myers RR, et al. Intermittent reperfusion fails to prevent post tourniquet neuropraxia. J Hand Surg [Am]. 1999;24:687-693.
11. Rorabeck CH, Kennedy JC. Tourniquet-induced nerve ischemia complicating knee ligament surgery. Am J Sports Med. 1980;8:98-102.
12. Funk DA, Noyes FR, Grood ES, et al. Effect of flexion angle on the pressure-volume of the human knee. Arthroscopy. 1991;7:86-90.
13. Muellner T, Menth-Chiari WA, Reihsner R, et al. Accuracy of pressure and flow capacities of four arthroscopic fluid management systems. Arthroscopy. 2001;17:760-764.
14. Cohen SB, Fu FH. Three-portal technique for anterior cruciate ligament reconstruction: use of a central medial portal. Arthroscopy. 2007;23:325e1-325e4.
15. Kim SJ, Kim HJ. High portal: practical philosophy for positioning portals in knee arthroscopy. Arthroscopy. 2001;17(3):333-337.
16. Stetson WB, Templin K. Two- versus three-portal technique for routine knee arthroscopy. Am J Sports Med. 2002;30:108-111.
17. Ojeda León H, Rodríguez-Blanco CE, Guthrie TB, et al. Intercondylar notch stenosis in degenerative arthritis of the knee. Arthroscopy. 2005;21:294-302.
18. Lubowitz JH, Rossi MJ, Baker BS, et al. Arthroscopic visualization of the posterior compartments of the knee. Arthroscopy. 2004;20:675-680.
19. Amin KB, Cosgarea AJ, Kaeding CC. The value of intercondylar notch visualization of the posteromedial and posterolateral compartments during knee arthroscopy. Arthroscopy. 1999;15:813-817.
[/level-membership-for-orthopaedics-category][not-level-membership-for-orthopaedics-category]
CHAPTER 1 Knee Arthroscopy: Setup, Diagnosis, Portals, and Approaches
ANATOMY
The knee joint, as other joints, is composed of a synovial lining within the capsule. Superior to the patella the synovium extends to form the suprapatellar pouch (Fig. 1-1).1 Superior medial or lateral portals are commonly placed within this pouch. A layer of fat separates the pouch from the distal anterior femoral shaft. The pouch extends medially and laterally along the femoral condyles into the medial and lateral gutters. The suprapatellar pouch and gutters are frequent locations for loose bodies.
The bony anatomy of the knee relevant to arthroscopic knee surgery includes the distal femur, the proximal tibia, and the patella. With the knee at 60 degrees of flexion, the inferior pole of the patella is located above the lateral joint line and is an important guide for anterolateral portal placement (Fig. 1-2). Exceptions to using this landmark, however, occur in cases of patellar alta, baja, dysplasia, or congenital absence. These conditions should be identified preoperatively with physical examination and standard radiography.
FIGURE 1-2 Photograph of knee showing inferior pole of patella relative to high anterolateral portal placement.
The femoral trochlea consists of medial and lateral trochlear ridges that arise from the corresponding femoral condyle.1 The medial femoral condyle is larger than the lateral from proximal to distal and anterior to posterior. The lateral femoral condyle, however, is wider at the level of the femoral notch. Distally, the femur opens into a notch that contains the femoral origins of the anterior and posterior cruciate ligaments. The notch serves as a target for careful, controlled introduction of cannulas and instruments from anterior portals to avoid injury to articular cartilage (Fig. 1-3). When using the scalpel for anterior portal placement, the blade should be pointed toward the notch but blind insertion beyond the skin and capsule should be avoided, because this would risk injury to the cruciate ligaments.
The medial tibial plateau is larger than the lateral plateau; the two are separated by an intercondylar sulcus or fossa.1 Adjacent to the fossa is a medial and lateral tibial spine that separates the fossa from the corresponding tibial plateau. The femoral condyles and tibial plateaus are incongruous without the medial and lateral menisci. The fibula, although extra-articular, has direct relevance to arthroscopic knee surgery, because it serves as a landmark for portals and surgical approaches. The proximal fibula forms a joint with the proximal posterior surface of the tibia (tibiofibular joint). It also serves as an insertion for the lateral collateral ligament and biceps femoris tendon.
A knowledge of neurovascular anatomy around the knee joint is important for preventing iatrogenic injury during portal placement and surgical approaches.2 Posteriorly, in the midthigh, the sciatic nerve branches into the tibial (or popliteal) and common peroneal nerves. At the posterior joint line of the knee just posterior to the joint capsule, the tibial nerve passes between the two heads of the gastrocnemius muscles, along with the popliteal artery and vein. From medial to lateral, the structures include the nerve, artery, and vein (Fig. 1-4).1 Although Matava and colleagues3 have shown that knee flexion increases the distance between the tibial insertion of the posterior cruciate ligament (PCL) and the popliteal neurovascular structures, other studies have not confirmed this. At 100 degrees of knee flexion, they reported a maximum distance of slightly less than 1 cm between the popliteal artery and PCL insertion.
FIGURE 1-4 Posterior aspect of knee showing tibial nerve, popliteal artery, and vein within popliteal fossa.
The common peroneal nerve passes posterior to the biceps femoris tendon and courses between it and the lateral head of the gastrocnemius toward the fibular head (Fig. 1-5).1,2 It then courses laterally around the fibular neck and into the peroneus longus tendon. In most individuals, the biceps femoris tendon insertion onto the fibular head can be palpated in 90 degrees of knee flexion. Placing incisions, portals, and retractors anterior to this landmark will help avoid injury the common peroneal nerve.
FIGURE 1-5 Lateral aspect of knee. A, Common peroneal nerve passing posterior to biceps femoris tendon. B, Common peroneal nerve passing laterally around the fibular neck.
On the medial aspect of the knee, the saphenous nerve and its infrapatellar branch are at risk for injury during placement of medial and posteromedial portals, as well as during all medial approaches to the knee. The nerve and its branch have a variable course and number of terminal branches.1,2 In general, the saphenous nerve passes between the gracilis and sartorius muscles approximately 3 cm posterior to the medial femoral epicondyle. The infrapatellar branch courses beneath the sartorius (i.e., posterior to it) and runs along the anteromedial aspect of the knee, where it can terminate medially or laterally to the medial border of the patellar tendon (Fig. 1-6).
TREATMENT
Anesthesia Options
Knee arthroscopy can be performed under general, spinal, or local anesthesia. The choice primarily depends on surgeon and patient preference, but in some cases may be influenced by the patient’s medical history. In a prospective randomized study of 400 patients, Jacobson and associates4 compared three anesthesia options and concluded that local anesthesia was technically feasible in 92% of patients undergoing elective knee arthroscopy. However, when comparing patient satisfaction, the local anesthetic group had 90% satisfaction versus 97% for the general anesthesia group. Horlocker and Hebl5 performed an evidence-based review of published studies comparing various anesthetic methods for knee arthroscopy. They reported that the results of most studies were biased by surgeon and patient expectations as well as by differences in postoperative management. They concluded that a single method of anesthesia could not be recommended for all surgeons performing or patients undergoing knee arthroscopy.
Arthroscopic Technique
Operating Room Setup
One or more video monitors are required. Traditionally, cathode ray tube (CRT) monitors have been the standard. New flat screen liquid crystal display (LCD) monitors are increasingly being used (Fig. 1-7) and currently most manufacturers of arthroscopic video equipment also offer high definition (HD) monitors. Although only one monitor is needed, many operating rooms use two or more monitors (see Fig. 1-8). Although there is less benefit of multiple monitors for knee arthroscopy, they can be very useful for shoulder and hip arthroscopy.
The control boxes for the arthroscopic camera, shavers, pump, and other devices can be placed on a mobile tower (Fig. 1-8A) that is easily moved from room to room or can be contained on a boom (see Fig. 1-8B). The advantage of the boom is that there are less electrical cords across the floor and that the monitor(s) can be positioned independently of the tower.
The use of leg holders or posts is determined by the preoperative diagnosis, surgical plan, and surgeon preference. A variety of different commercial leg holders are available for the operative and nonoperative leg. When operating on both knees, bilateral leg holders are also available (Fig. 1-9A). In most cases, a unilateral leg holder (see Fig. 1-9B and C) or lateral post (see Fig. 1-9D) is used for the operative leg. Leg holders may include padding, and some others require you to apply padding to the leg prior to securing it within the holder. Some holders are designed to hold the leg with a tourniquet (see Fig. 1-9B) and others require the tourniquet to be outside the holder (see Fig. 1-9C). If you prefer a unilateral holder or lateral post, it will be important to determine how to protect the contralateral leg. The use of a leg holder for the nonoperative leg has been shown to increase the risk of compression to the peroneal nerve as courses around the fibular neck.2 Nonoperative leg holders can also cause a stretch injury to the femoral nerve if the hip is held extended. If the foot of the bed is left up for a lateral post, then positioning the nonoperative leg does not require anything special. If the foot is dropped, it is often easiest to place a large pad under the nonoperative thigh to keep the hip flexed (Fig. 1-10). If there is concern about pressure on the peroneal nerve, additional foam padding can be applied in this region, particularly in thin patients.
Other issues related to the leg holder include the position of the foot of the bed and the use of hip bumps. For lateral post use, the foot of the bed can remain up (see Fig. 1-9D) or it can be lowered. The advantage of the lateral post is faster setup and positioning, ability to move the leg freely during surgery, ability to hyperflex the knee, and ease of placing the knee in a figure-of-four position. The primary disadvantage is that the leg tends to slide over the post when placing valgus stress on the knee for access to posterior horn of medial meniscus. This can be prevented, however, by having an assistant place downward pressure on the thigh (Fig. 1-11
[/not-level-membership-for-orthopaedics-category]
