Chapter 8
Key musculoskeletal interventions
Lynne Newton Triggs1, Hannah Pugh2, Jean Rogers3 and Anna Timms4
1 Bedford Hospital, Bedford, UK
2 University College Hospital, London, UK
3 Stepping Hill Hospital, Stockport, UK
4 Royal National Orthopaedic Hospital, Stanmore, Middlesex, UK
Introduction
There are a number of key interventions used in the orthopaedic and trauma setting, mainly to support and immobilise limbs while bone and soft tissue healing take place. The three interventions most frequently met by the orthopaedic practitioner are casts, traction and external fixation. Caring for patients with any one of these interventions requires highly specialised, in-depth knowledge of the theory, application, care and complications so that safe, effective care can be provided. The following three sections consider casts, external fixation and traction with a focus on providing an overview of how each works and outlining the care and support required for safe, effective patient care whilst taking into account limitations in the evidence base.
The principles of casting
The aim of this section is to provide an overview of the principles of casting and the care of the patient with a cast. The application of a cast is a specialised technical skill that requires education, training, practice and constant review of competence to ensure patients receive safe, high quality care. Most casts should be applied by practitioners with a specialist casting qualification and experience. It is important, however, that all practitioners working with patients with casts have an in-depth understanding of care needs once the cast has been applied.
A cast is a rigid device used to provide support and protection following injury and surgery and for other musculoskeletal conditions that require immobilisation (Table 8.1). Casts are constructed from flexible bandages impregnated with material which hardens when ‘cured’ following contact with water. The bandage is usually dipped in water, wrapped around the limb or body part and then held in position until the material hardens. This provides a firm support that follows the contours of the area it encases.
Table 8.1 The functions of casts
| Support | Supporting and restricting movement following fracture until healed |
| Rest | Resting soft tissues following fracture, strain or sprain to reduce swelling and muscle spasm |
| Immobilisation | To rest a joint in disease or hold a joint in place following dislocation, particularly if ligaments are damaged. Also used following muscle or tendon surgery to aid healing |
| Positioning | To correct, stabilise and maintain alignment of a limb with a bone disorder or deformity |
| Prevention | To prevent bone deformity |
| Healing | To assist healing of wounds i.e. leg ulcers |
| Comfort | For the comfort of patients to aid pain relief |
A number of materials are used for casting (Table 8.2). Plaster of Paris casts are most often used immediately following injury or surgery as they are relatively cheap and easy to apply. A lighter, more robust, synthetic cast can then be applied for a longer period of time once swelling has subsided. The choice of cast depends on applier preference and the instructions of the consulting surgeon.
Table 8.2 Types of casting materials
| Type of material | Properties | Advantages | Disadvantages |
| Plaster of Paris | Gauze bandages impregnated with powdered calcium carbonate | Relatively inexpensive Easily moulded Very strong Permeable, allowing the skin to breathe Supple at the edges |
Poor strength to weight ratio Disintegrates when wet Requires 24 hours to fully set Affects the visibility of radiographs |
| Synthetic | Flexible fibreglass and polyester substrate impregnated with polyurethane resin | Lighter weight More durable Breathable and porous Radiolucent Water resistant Reaches full rigidity quickly |
More expensive Abrasive and rough May cause skin reactions for patients and staff |
Health and safety is an important consideration for both patients and staff whether a cast is applied in a casting room or other area. Employers and staff have a duty to ensure safety through systems that provide:
- training and education in safe cast application
- staff with the correct skills and experience
- appropriate, well-maintained equipment.
Ideally casting should take place in a casting room where specialist facilities are available. Casting materials and equipment should always be used in accordance with the manufacturer’s instructions and there should be a regular and recorded equipment maintenance programme. The application of casts involves the use of substances which might be hazardous to health. Appropriate risk assessment must, therefore, take place. Manufacturers of casting materials have a legal responsibility to provide information and guidance which must be adhered to. Important precautions include:
- Plaster of Paris application and removal results in dust which can be inhaled by patients and staff. Oscillating saws must be fitted with a vacuum and staff and patients should wear a face mask.
- Gloves need to be worn, particularly when applying synthetic materials as the resin can cause irritation.
- The noise produced by the oscillating cast saw is below the required daily exposure limit for personnel. However, it becomes louder on contact with casting materials and ear defenders should be worn if the saw is to be used for prolonged periods of time.
There must be enough staff available to apply casts safely. Ideally, there should be one person to hold and position the patient’s limb and reassure the patient whilst the other applies the cast.
Casting technique
The basic principles of cast application are the same whether applying plaster of Paris or synthetic casts. Casting is a highly skilled and technical activity that requires great manual dexterity. It should only be undertaken by staff with the knowledge and skills required and who practice the skills regularly. Even so, all staff working in orthopaedic and trauma settings should have a working understanding of the principles of cast application.
A good cast should always:
- Be applied in the recommended position – providing the best possible support of the limb.
- Be functional – not restricting joint movement unnecessarily and not restricting movement of joints that are not within the cast.
- Fit well – to provide adequate splintage but not be too tight. Casts that are too tight restrict blood and nerve supply and must be smooth inside without ridges that cause pressure.
- Be ‘just enough’ – sufficient casting material should be applied to achieve the support necessary whilst keeping the cast as light as possible
- Be complete – the cast should not be a succession of layers but should be moulded so that the materials involved are fully bonded together.
Before applying a cast it is essential to:
- check the patient’s details and the written instructions for the cast
- prepare the area to be used and ensure all equipment is ready for use
- provide verbal and written information and gain consent
- provide reassurance and pain relief prior to any casting
- position and support the patient and limb correctly and comfortably
- maintain privacy and dignity
- assess the condition of the patient’s skin
- ensure that jewellery has been removed from the limb to be casted.
Cast application follows general principles:
- Stockinette and appropriate padding is applied that is not excessive, but adequately protects bony prominences and vulnerable skin.
- Casting materials should be applied in accordance with the manufacturer’s instructions for timings and water temperature.
- The casting material should be applied by starting at one end of the area to be covered and each turn of the casting bandage should be approximately one third of the previous turn.
- All the bandages should be applied carefully, but rapidly; smoothing continuously so that the cast layers laminate together.
- The cast should be applied without tension so that it is not too tight or too loose.
- The cast is then moulded to the shape of the area. This should be done with the palm of the hand and not the fingers, which can cause indentations leading to pressure under the cast.
- Once the cast has set, the edges should be trimmed and the stockinette should be folded back and secured with casting material.
Application of a synthetic cast is very similar but with the following exceptions:
- Padding is used but stockinette is not required.
- Extra strips of adhesive padding are applied at ends where the cast will start and terminate so that it can be turned back over the edges of the cast.
- The bandages are rolled out covering half of the previous turn with controlled tension.
- During the final moulding the cast needs to be held in place until set, otherwise the shape will not be held.
Following completion of the cast:
- The patient’s skin should be cleansed and dried.
- Cast edges should be checked and trimmed as necessary to ensure that joints maintain their full range of movement and that edges do not rub the skin. The edges should then be padded and the stockinette secured in place.
- Cast setting depends on the type of cast applied and the patient should be advised how long this will take and instructed to rest the area and not bear weight on the cast during this time. All limbs in casts should be elevated and rested on pillows.
- The cast should be left uncovered for 48 hours to allow it to dry and should be handled as little as possible to prevent denting and cracking.
- Neurovascular assessment should be undertaken for all limb casts (see Chapter 9) and clearly documented.
- Documentation of any assessment, intervention and follow-up must be clear and precise.
- All advice given verbally should also be given in written format to the patient and carer. It should include care of the cast preventing complications and exercise sheets.
- If equipment such as crutches is required, advice and demonstration/practice should be given in writing and verbally on how to use them both. A physiotherapy referral may be advised.
Cast complications
If a cast is poorly or inappropriately applied the patient is at risk of injury and professional and legal action can be taken. A good quality cast is the best way to make sure that complications do not occur. The complications of casts along with mode of recognition and management are listed in Table 8.3. These complications can also be prevented by making sure the patient knows how to seek help immediately if they have any problems at all.
Table 8.3 Complications of casts
| Complication | Recognition | Management |
| Cracking, softening, breakdown | The cast has not been applied or treated correctly. Patients and carers must be given clear verbal and written instructions |
|
| Bleeding through the cast | If the cast is over an open or surgical wound or if the cast is causing a sore |
|
| Pressure or cast sores | Due to a poorly fitted cast or because the patient has tried to relieve itching under the plaster by using foreign objects. There may be burning under the cast and/or localized heat and with possible swelling and discharge from the cast. Sleep is often disturbed |
|
| Circulatory and/or nerve impairment | Causes:
These can lead to increased pressure within the limb |
|
| Cast syndrome (fluid volume deficit) | A patient with a body cast may exhibit nausea, vomiting and abdominal pain. Caused by hyperextension of the spine causing the duodenum to be compressed between the superior mesenteric artery and the aorta which can lead to intestinal obstruction. This can occur weeks or months after the cast has been applied. |
|
| Joint stiffness | Patient complains of pain and stiffness on movement at a joint |
|
| Skin reactions | Patient complains of itching or has non-localising burning pains or rashes. The skin can also blister. This is unusual and is generally a reaction to the padding |
|
Living with a cast
It is important that practitioners have an understanding of how a patient will cope with life in a cast (Box 8.1). A comprehensive assessment by the multidisciplinary (MDT) team may be required to ensure the patient will be able to manage safely after discharge. This will depend on previous levels of independence, the ability to accept a different level of self-care than before, availability of assistance from others and the practical advice they are given.
Assistance may be required with some activities of daily living including:
- Toileting – a stool to place the leg on if in a long leg cast and a commode and/or hoist if mobility is poor.
- Eating and drinking – food and fluids within easy reach; making sure the patient has their food cut up if their arms are in casts; equipment such as non-slip mats and adapted cutlery.
- Dressing – advice on the best clothing to wear or adaptations to be made such as Velcro fastenings.
- Mobility – assessment of mobility and aids required with instructions for use.
- Sleeping – can be difficult. Extra pillows and bed cradles may help along with short term medication to help re-establish a sleep pattern.
- Socialising – living with a cast can result in significant isolation and additional support is needed in leaving the home such as temporary use of a wheelchair and contact with voluntary organisations to provide transportation.
Cast removal, splitting and bi-valving
Casts may be removed or bi-valved at the end of treatment, when a new cast is needed or if there is a problem with the cast or limb causing neurovascular compromise. Every orthopaedic practitioner should be able to safely remove or bi-valve a cast. Bi-valving involves cutting the cast in half along both sides so that one half of the cast can be removed whilst the limb is still supported with the other half. The same process should be used when removing a cast, allowing the bottom half of the cast to be used as a splint while the limb is inspected. The limb can then be carefully lifted out of the cast to remove it.
Casts are bi-valved or removed using either plaster shears or an oscillating plaster saw. Practitioners must receive training and be competent in the use of either piece of equipment. Prior to cutting, the cast should be marked on the medial and lateral sides so that the cutting lines do not pass over any bony prominences or fragile skin.
Before removing a cast it is important to:
- Check the patient’s details and the written instructions for removal.
- Prepare the area and equipment to be used.
- Give verbal information prior to removal to gain the patient’s cooperation and consent.
- Demonstrate the equipment to be used on the patient prior to use to allay anxiety.
- Adequate pain relief must be provided.
- The patient must be positioned comfortably and the part of the body to have the cast removed must be supported in the correct position.
- Privacy and dignity must be maintained at all times.
- The patient’s cast should be carefully assessed prior to removal to ensure the correct equipment is used for cast removal.
- Mark the cutting area medially and laterally avoiding bony prominences.
- Written information must be given to the patient following cast removal.
All types of casts can be removed with plaster shears or an oscillating saw. Synthetic casts require special saw blades made of tungsten.
Plaster shears are blunt, and crush plaster of Paris between two hinged ‘jaws’. The blade of the shears should be passed between the cast and the padding with the hand nearest the cast being kept parallel to the limb and kept still. If the shears are tilted they can dig in or catch the patient’s skin. The other hand is then used to push the shears together to cut through the cast. Once the cast is cut through on both sides it can be opened with the plaster spreaders and the padding cut all the way through with bandage scissors. Shears are often used to remove children’s casts as the oscillating plaster saw may frighten them. Shears are often not effective with synthetic casts.
Plaster saws have an oscillating circular blade which vibrates back and forth at high speed rubbing through the casting material. It must have a vacuum attached to ensure the dust is collected in keeping with health and safety regulations. The blade is held at right angles to the cast and light pressure is applied to make it cut without dragging the saw along the cast. The blade is then removed and reapplied above or below the original cut in an in-and-out motion. The saw must not be used by someone with wet hands and care must be taken as the blade can become hot and burn the skin if:
- a dragging motion is used instead of the in and out motion
- the saw is used continually for a long period of time
- even in normal use the patient may feel the heat through the padding
- if there is a large cast and it is taking a long time to remove it.
The patient’s skin can also be damaged if:
- the cast is bloodstained and the padding and gauze has hardened
- the patient’s skin is taught through swelling
- the blade of the saw is blunt or damaged
- the cast is unpadded as extra care then needs to be taken to avoid damaging the patient’s skin.
The patient’s limb should be placed back in the remaining half of the cast until it has been assessed and permission is given to remove it.
It is important that the patient is warned that their skin will have flaky yellow scales where the upper layers have been unable to shed. The limb will also appear thin and withered as muscles lose their tone from lack of use. The skin should be carefully inspected and assessed and any signs of pressure or soreness should be reported and documented. The patient should be encouraged to wash and dry the area gently and if the skin is very dry, oils or emollient cream can be applied. The skin will be more sensitive to sunlight.
Orthotics, braces, prosthetics and appliances
Orthotics is a specialty that deals with the design, manufacture and supply of orthoses – a general term for splints, appliances and braces. These are externally applied devices that are used to modify the structural or functional characteristics of the neuromuscular and skeletal systems (BAPA 2000). They can be used for acute injuries, chronic conditions and prevention of injury. Prosthetics are devices used to replace either a whole or part of an absent or deficient limb. An orthosis may be used to:
- control, guide or immobilise a limb, joint or body segment
- restrict movement in a given direction
- assist movement and/or posture
- reduce weight-bearing forces for a particular purpose
- assist with rehabilitation following fractures after the removal of a cast
- provide easier movement capability or reduce pain by correcting the shape and/or function of the body
- act as part of fixed or balanced traction
- prevent or correct deformity
- prophylactically for athletes in contact sports.
The orthotist is a healthcare professional with a key role in an orthopaedic and trauma multidisciplinary team (Chapter 5). They design and fit a variety of orthoses under prescription from a licensed healthcare provider. Orthotists also provide ongoing support and information to the patient and the carers.
Caring for a patient with an orthosis is very much like caring for a patient in a cast. Patients and carers can be taught to undertake their own skin care and advised how to seek help if there are problems. Advice also needs to be given regarding preventing and recognising neurovascular problems, exercising and mobilising safely using the orthosis or prosthesis to prevent joint stiffness and swelling. Verbal and written information and advice on how to care for the orthosis and how to recognise complications must be given to both patients and carers. Adjustments to any orthosis should only be undertaken by staff who have the knowledge and skills required. The complications that can occur for patients with an orthosis are related to poorly fitted devices and are similar to those experienced with casts.
External fixation and pin site care
External fixation is a powerful surgical technique, which involves the use of pins and tensioned wires attached to an external scaffolding framework to hold bones in place. The types of frames used in limb reconstruction correct deformity in children and adults, stabilise high-energy fractures in near-fatal trauma and grow bone lost due to trauma or bone tumours where the only other alternative is amputation.
Stabilisation of fractures using external fixation has been in use for thousands of years and mummified remains of humans with long bone fractures with external splintage have been found. It evolved in the 1950s to include deformity correction following the work of Gavril Abramovich Ilizarov (1921–1992) who first used circular frames with threaded rods and wires to help postwar amputees to overcome flexion contractures. One such patient had an undiagnosed fracture. Rather than distracting the contracture itself, distraction occurred at the fracture site. Subsequent X-rays showed bone formation in the gap. This was termed distraction osteogenesis, a previously unknown phenomenon. Bone actively forms in the endosteum, periosteum and bone marrow when compression and distraction is applied in the presence of stable external fixation. Connective tissue only forms bone by distraction osteogenesis; this is the process by which fibroblasts lay down type 1 collagen, orientated along the line of tension. The tension is supplied through the external fixator gradually distracting the bone ends, normally at a rate of 1mm per day, Osteoblasts then invade the periphery and start laying down bone in columns.
Types of fixator
Many types of external fixator now exist, but they generally fall into two categories: monolateral and circular. Figures 8.1 and 8.2 illustrate just two of many different types of frames. ‘Hybrid’ fixators are a combination of both circular and monolateral fixators. Monolateral fixators are biomechanically less stable than circular fixators.
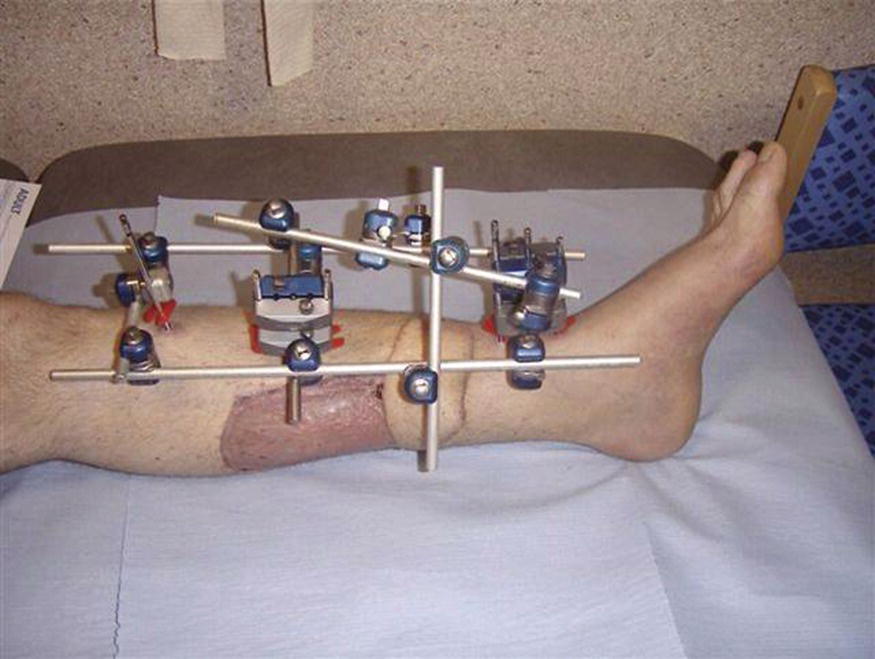
Figure 8.1 Hoffman (monolateral) external fixator frame
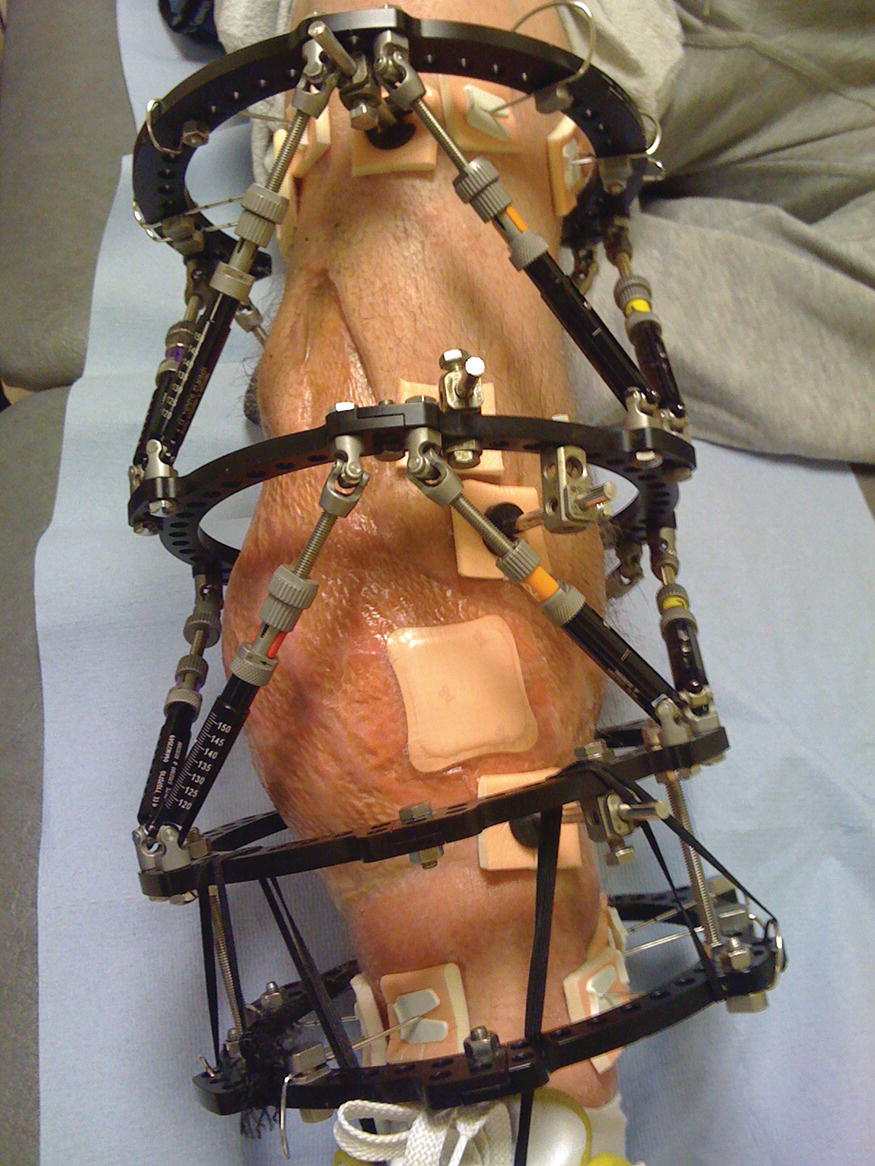
Figure 8.2 Taylor spatial (circular) frame
Monolateral fixators (e.g. Figure 8.1) are usually modular devices used to stabilise a fracture. They enable the surgeon to build their own frame and position half-pins away from any soft tissue injury. Some monolateral fixators can also be used for deformity correction; these usually involve a rail system. Often used for femoral lengthening, they are arguably more comfortable for the patient than a circular fixator, but may not allow early weight bearing.
Circular external fixators (see for example Figure 8.2) are used for both fracture stabilisation and deformity correction. They can be used to correct:
- angulation
- rotation
- translation
- limb length discrepancy.
The circular frame is easily adjustable. Adding load, through early weight bearing to the already tensioned wires, stiffens the frame. Weight bearing increases blood flow to the limb and promotes healing. There are two main types of circular fixator: the Ilizarov and the hexapod. The Ilizarov has straight rods and hinges. The patient or their carer adjusts the fixator (usually with a set of spanners) in four increments per day of 0.25 mm. Hexapods are based on the Gough Stuart platform which is also used in industry, for example in parallel robotics and aircraft simulators. Six telescopic struts are adjusted once daily according to a computer calculated prescription. Depending on the manufacturer of the fixator, it may be single or multi-use. The practitioner should establish if the equipment can be re-used and should the patient be transferred to another hospital, or in the case of death, it is important to ensure its return, as lost or mislaid equipment can lead to considerable financial loss (Timms et al., 2010).
Biomechanics
The biomechanical properties of the frame in addition to its fixation to the bone are important to the success of the treatment. A frame which is either unstable or too stiff can lead to non-union. The skill of the surgeon is of prime importance as poor application of the fixator will lead to failure of the treatment. The fixator can also become unstable due to failure of the hardware. Components of the fixator, wires and half pins may occasionally loosen or break. Pin loosening and pin site infections are known to be related (Saithna 2010). An unstable fixator needs urgent review. If the wire or pin breaks at the interface between the wire and the fixator, it may be possible to ‘re-fix’ the wire. If the wire breaks at the interface with the bone, it will need to be removed and, depending on the stage of treatment, the patient may need further surgery to replace the broken wire or pin. The patient may describe:
- hearing the metal break
- the pin site may have become increasingly painful
- the wire may move freely depending upon where it has broken
- the fixator may feel unstable.
It is important to inform the surgeon of this as one broken wire affects the overall fixator stability which may lead to further wire or pin breakage and a failure of the fixator.
Complications
Pain
Pain is an anticipated result of limb reconstruction and patients should be prepared to deal with some degree of discomfort, particularly in the early stages. Modern analgesic drugs allow much more control of pain and offer several alternatives if a particular drug is found to be unsuitable.
Pin site infection
This is arguably the second most likely complication after pain (Patterson 2006) and should take up a large part of pre-operative counselling. Teaching patients to recognise the signs and symptoms of infection is essential as following discharge from hospital it is unlikely that the patient will see a health professional daily. It is important to explain that should infection occur it is not a failing on the patient’s or clinician’s part; rather a common outcome of having metal work penetrating the protective barrier of the skin for prolonged periods of time (see pin site care below).
Joint stiffness
Prolonged periods of immobility will lead to joint stiffness. Patients should be encouraged, with physiotherapist support, to mobilise and exercise joints not constrained by the frame. In some cases the frame will span a joint – most commonly the knee or ankle – because of the fracture site and it is important to inform the patient that following frame removal a great deal of work will be necessary to regain joint function. Managing expectations is very important as the joint in question may never be as flexible as it was pre-injury.
Swelling
The majority of patients will experience some swelling during the treatment. This is partly a natural biophysical reaction to the presence of metalwork within the body. With lower limb frames, most commonly the swelling is due to the loss of the ‘pumping action’ supplied by the calf muscles when mobilising. Weight bearing through the affected limb can help reduce this. In some circumstances the limb may swell to a degree that the rings are in contact with the skin and steps must be taken to protect the area from pressure damage.
Nerve and blood vessel injury
A complication of any orthopaedic surgery and where the insertion of a particular wire or pin proves to be a problem, it may be necessary to remove and possibly re-site this.
Compartment syndrome
Because frame surgery is often minimally invasive, compartment syndrome is rare. However the same neurovascular assessments should be undertaken throughout treatment and the immediate post-operative period with frame surgery as any other orthopaedic procedure (Chapter 9). Some of the temporary, monolateral fixators are applied following high impact trauma where risk is greatly increased.
Venousthromoboembolism
Any procedure which limits mobility and function puts the patient at risk of VTE (Chapter 9). Pre-operative preparation gives the clinician the opportunity to advise the patient on the signs and symptoms to look out for.
Re-fracture
Although X-rays may look adequate and the patient is reporting positively, a frame is sometimes removed too early. This can result in re-fracture. This will present in a gradual ‘bend’ at the fracture/regenerate site and increased pain. This is why may surgeons are now opting to remove the interlocking struts for a couple of weeks prior to complete removal, if bending occurs the struts can be reinserted and the limb can be left to heal for longer. Others will choose to protect the limb in a cast or orthotic for a few weeks preceding removal. It is considered preferable to remove the frame late rather than too early.
Nursing care
Nursing care for patients with frames can be time-intensive and both physically and emotionally draining for both the patient and carers. Pre-operative counselling improves patient understanding and acceptance, but in cases of new trauma this is not an option. Those with chronic injuries may be facing the decision of having a frame fitted or amputation, raising a discussion about when to abandon limb salvage treatment and offer amputation. This involves intense psychological support, especially given that the patient may have many months or years of treatment in a frame for it to then fail, with the end result being amputation. Therefore, it is worth bearing in mind the work of the Lower Extremity Assessment Project (LEAP) (MacKenzie and Bosse 2006), demonstrating the importance of managing patients’ expectations. Patients should be made aware that following severe trauma, function of the affected limb may never return to its pre-injury state.
Patients, with support from family and friends, will cope with limb reconstruction better than those without a support network (Patterson 2006), especially concerning factors such as reduced mobility, fixator adjustments and getting to multiple hospital appointments. Patient support groups are not widespread, so many will turn to websites and social networking for information. Whilst this should be encouraged, patients should be made aware that much of this information is opinion and not evidence-based.
Another consideration is the frequent X-rays required to monitor bone regeneration. Poor regeneration may result in the need to reduce the rate of adjustment or distraction or it may be appropriate to speed up the adjustment process. Where regeneration is slow or in patients having treatment for non-union, it is especially important to advise on the effects of smoking and non-steroidal anti-inflammatory use. Cigarette smoke contains toxic chemicals which affect both respiratory parenchyma and the fracture healing process as nicotine in the blood supply causes the vessels to constrict by approximately 25% of normal diameter and decreased levels of nutrients are supplied to the bones. This is potentially catastrophic for a patient undergoing further surgery for a non-union. See Box 8.3 for further discussion.
Non-steroidal anti-inflammatory drugs (NSAIDs) are commonly used in orthopaedic trauma and surgery. A lesser known side effect is that of decreased fracture healing. Although much of the available literature is based on animal studies, it demonstrates that NSAID administration in the early stages of fracture healing delays the process (Beck et al., 2003), causing decreased osteoblastic activity, although there is also some dispute of this (Huo et al., 1991). NSAIDs also reduce the synthesis of type I collagen (Ou et al., 2012) and osteocalcin mRNA and diminish angiogenesis (Jones et al., 1999), so many surgeons are now recommending that patients avoid these drugs for a period of time after injury. This may be difficult for patients and it is important that patients are informed of the rationale. A sound knowledge of other analgesics which could be offered as an alternative is important and specialist pain practitioners should be sought. Newer anti-inflammatory drugs, COX inhibitors, act in a different manner to NSAID’s and so may be considered as an alternative.
Mobilising
With the majority of circular frames the patient will be able to fully weight bear and this should be encouraged as controlled stress at the fracture site stimulates fracture healing. Mobilisation also contributes to the patient’s psychological wellbeing at a time when patients may be suffering with feelings of loss of control. It will take time for a patient to be able to fully weight bear through an affected limb, ranging from days to months. Often a good place to build up confidence is in a swimming pool, although this needs to be timed with pin site care.
Work
Returning to work will have a positive psychological impact but may not be practical and a thorough social history will assist in being able to provide advice. Someone who is desk-based is more likely to be able to return to work than a builder, but care will still have to be taken that the environment is suitable; for example, the patient must be able to elevate the limb throughout the day and perhaps alter their method of transport to work.
Sleeping
Sleep can be severely affected following application of a frame. Support of the limb, comfort measures and good pain management may help. Care should also be taken to protect the rest of the body from the frame using padding.
Sexuality
Patients sometimes have a frame for a substantial period of time and may have undergone years of failed treatments, placing considerable strain on relationships. The patient should be given the opportunity to discuss this openly. They may enquire about sexual activity during treatment. It is important the nurse is prepared for this and can offer appropriate guidance when required.
Pin site wounds
The pin site is the point at which the pin or wire penetrates the soft tissues. The nature of the pin site is affected by many biopsychosocial factors and can be influenced by all members of the multidisciplinary team and the patient. These factors include:
- The patient or their carers need to commit to caring for their limb and the fixator, either through self-care, allowing others into their home and/or attending their GP surgery and hospital appointments on a regular basis.
- Pins and wires should be inserted using a slow pulsed technique to prevent the wire becoming overheated and causing thermal necrosis to the soft tissues and bone, providing an ideal environment for bacteria to flourish. Untensioned wires, frames and loose pins are also known to be related to pin site infection (Saithna 2011).
- The nurse is the majority stakeholder in the patient’s care so needs to ensure the patient and their carers feel confident with basic frame care through assessment and education.
- The physiotherapist ensures mobility is maintained wherever possible and educates the patient on the prevention of contractures. Exercise may irritate the pin sites and strategies such as applying more padding with compression to the sites may help alleviate this.
- The occupational therapist assesses the patient and provides aids such as a shower seat to help maintain the patient’s hygiene needs. This is important because there is evidence that a patient’s skin is a major source of bacterial infection contributing to postoperative wound infection (Florman and Nichols, 2007).
Pin site infection
The prevention, identification and treatment of any infection is of prime importance. With pins and wires passing through the skin, muscle and bone, pin site infection is a constant risk. The presence of a foreign body in the wound interrupts the normal healing process, Parallels between the general infection guidelines and the 2010 RCN pin site guidance can be seen (Box 8.3). Pin site care is an area lacking in sufficient high quality research. Cochrane Systematic Reviews (Lethaby et al., 2011) have concluded that there is little or no evidence on which to base practice. In the absence of such research practitioners should implement strategies to minimise infection. Despite there being limited literature regarding pin site infection, there is currently no validated assessment tool. This is important because it affects the validity and comparison of research trials. There is some consensus amongst practitioners (Clint et al., 2010, Santy-Tomlinson et al., 2011) that pin sites appear to fall into three categories:
- A healthy, ‘calm’ or ‘good’ pin site, one which is not inflamed, is dry and resembles a piercing.
- An infected or ‘ugly’ pin site, a site which is painful, inflamed and is heavily discharging, possibly with frank pus.
- The third category being the hardest to quantify but lies at an unknown point between the other two; Santy-Tomlinson et al., (2011) describe these sites as being ‘irritated.’
Wound swabs do not help in the distinction between ‘irritated’ and ‘infected’ sites as they do not distinguish between colonisation and infection. See Box 8.4 for a summary of recommendations for the care of pin sites.
Contemporary traction
Traction is now used much less commonly due to improved implants and surgical techniques for the treatment of fractures. The result of this is that the skills needed to care for patients with traction are often not maintained. However, management by traction remains essential for those patients whose age or condition means that surgical treatment is not appropriate. It is vital that orthopaedic nurses have a basic understanding of the principles of traction, the ability to apply the most common types of traction and the knowledge to care for patients with traction. The evidence base for both the benefits of traction and the care required is very limited because it is now such a small, but important, part of orthopaedic care. This presents the practitioner with little evidence-based guidance and much advice is based on experience and trial and error.
Principles of traction
Traction is the application of a pulling force to a part or parts of the body for the treatment of bone and muscle disorders or injuries. Traction in the opposite direction, counter-traction, is also necessary in accordance with Newton’s third law of motion – that for every action there is an equal and opposite reaction. Control of the injured part by traction facilitates bone and soft tissue healing based on simple mechanical principles but this can lead to complications. Traction can be used to:
- relieve pain due to muscle spasm
- restore and maintain alignment of bone following fracture or dislocation
- rest injured or inflamed joints whilst maintaining a functional position
- allow movement of joints during fracture healing
- prevent or gradually correct deformities due to contraction of soft tissue caused by disease or injury.
Methods of application
In order to apply traction a satisfactory grip must be obtained on a part of the patient’s body via the skin or bone for a specified period of time. This can be achieved manually or via skin or skeletal traction:
- Manual – the pulling force is applied manually usually by the hands; for example when the fracture is being reduced or held in alignment while a cast or a more permanent form of traction is applied. Manual traction is also required during any adjustments to the traction arrangement which necessitates the temporary release of the traction weight.
- Skin – the application of a traction force over a large area of skin which is then transmitted via the soft tissues to the bone. The maximum pull should not exceed that recommended by the manufacturer of the traction appliance. The grip on the body is less secure than with skeletal traction. Skin traction can be adhesive or non-adhesive. Non-adhesive traction is preferable if the traction is only to be on for a short period of time. Adhesive traction should not be used with fragile or damaged skin as removal may cause further skin injury.
- Skeletal – the application of a traction force directly to the bone through metal pins or wires allowing large forces to be transmitted directly to the bone. It is used if traction is to be maintained for a significant amount of time and when greater weight is required. Sites for the insertion of metal pins for skeletal traction include the proximal end of the tibia, the calcaneum, the distal femur, the skull and the olecranon.
There are two mechanisms that can be used for skin and skeletal traction:
- Fixed – the pull is between two fixed points such as Thomas splint traction (Figure 8.3).
- Balanced or sliding – the pull is between the weights and the body weight of the patient (Figure 8.4).
These two forms of traction can be applied in several ways – fixed or sliding skin traction; fixed or sliding skeletal traction; combined fixed and balanced traction and modified skeletal traction. The method that is chosen depends on the condition or injury being treated.

Figure 8.3 Fixed skin traction with a Thomas splint
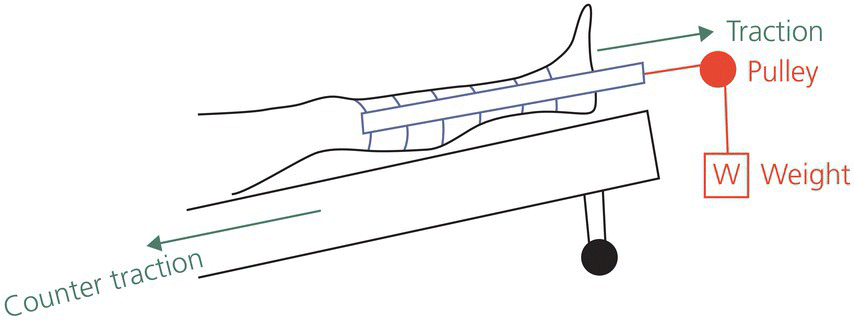
Figure 8.4 Skin traction
Principles of applying traction
Essential principles must be observed if traction is to be effective:
- the grip or hold on the body must be secure
- there must be counter-traction
- the weights used should be prescribed and documented
- there must be minimal friction from cords and pulleys
- frequent checks of the patient and traction equipment should be made and documented to ensure that:
- the traction setup is functioning as planned and is safe
- the patient is not suffering any injury or deterioration due to the traction treatment
- the traction system once set up is maintained at all times.
Traction that is poorly or incorrectly applied and maintained can cause discomfort and further injury.
Mechanics of traction
Traction systems have a number of mechanical components which it is important to understand when providing care:
- Counter-traction – it is essential in any traction system that there is a pull in the opposite direction in order to overcome muscle spasm and to prevent the patient from being dragged towards the traction pull. Counter-traction can be achieved in two ways; balanced sliding traction or fixed traction:
- Balanced (sliding) traction – a system of weights and pulleys are used to apply and direct the traction pull. Counter-traction is exerted by the weight of the patient aided by gravity when the bed is tilted away from the traction pull by elevating the foot or head end of the bed (Figure 8.4).
- Fixed traction – traction and counter-traction is exerted between two fixed points. An appliance such as the Thomas splint is used to gain purchase on the body proximally to the muscles in spasm/injury. Skin extensions on the leg are then tied firmly to the end of the Thomas splint and counter-traction forces are transmitted up the sides of the Thomas splint to the ring encircling the limb. This is a self-contained system that does not require weights or bed elevation to achieve traction and counter-traction (see Figure 8.3). It can be used when transferring patients. A balanced system is sometimes added to elevate the limb and for ease of movement of the patient.
- Position of pulleys – the position of pulleys within the traction system determines the direction of the traction pull and the angle. The number of pulleys used and their position affects the amount of pull that is exerted. For example, in a single pulley system the amount of traction pull is virtually equal to the amount of traction weight used, whereas two pulleys in the line of the same traction weight almost doubles the pull exerted because of the ‘block and tackle’ effect. This can be seen in Hamilton Russell traction where the amount of horizontal pull exerted on the leg is double that of the weight applied (Figure 8.5).
- Vector forces – traction forces in two different, but not opposite, directions to the same body part create a resultant force. The direction of the resultant force is determined by the position of the pulleys which direct the traction cords to the weight. In Hamilton Russell traction, for example, one force – the weight – is broken up into multiple forces to achieve a specific resultant force on the fracture site. The vector forces created can only act in the direction of the traction cords and include an upward force applied directly to the knee by means of the sling and two forces distal to the foot which reaches the femur through the leg (Figure 8.5). Changes and adjustments can be made by altering the weights or the position of the pulleys.
- Friction – the force that acts between any two surfaces and is present within the traction system. It gives resistance to the traction pull and reduces the efficiency of the traction force. Friction cannot be eliminated but can be minimised by ensuring that:
- the pulley wheel runs freely
- the traction cord runs centrally over the groove of the pulley
- the weights are not resting against the bed or on the floor
- the bedclothes are not resting against the traction cords.
- Friction – the force that acts between any two surfaces and is present within the traction system. It gives resistance to the traction pull and reduces the efficiency of the traction force. Friction cannot be eliminated but can be minimised by ensuring that:
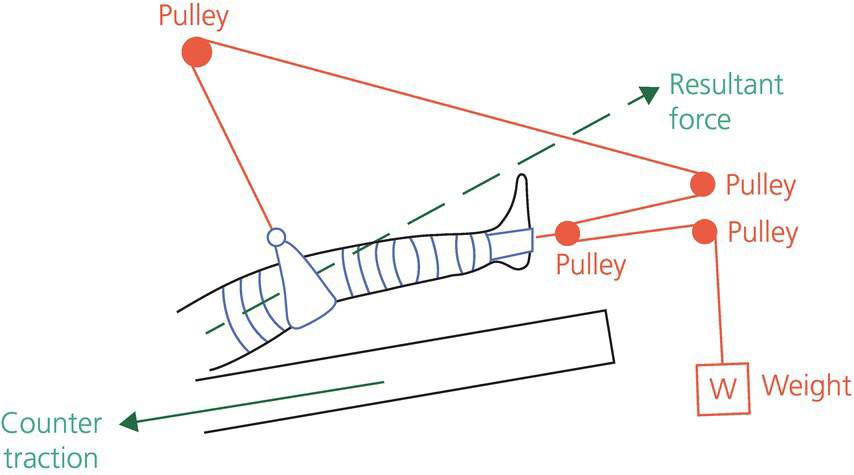
Figure 8.5 Hamilton Russell traction
Care of traction
In addition to the fundamental holistic care of the patient with traction there are a number of checks that should be made on the traction system. These checks should be carried out by a practitioner who has appropriate competence, skill and knowledge:
- Traction equipment should be checked daily to ensure that beams and clamps have not become loose.
- Traction should be checked at least once every shift and following interventions such as movement of the patient, physiotherapy and X-ray as the traction system may have been inadvertently altered.
- Traction cords must be attached securely using standard non-slip knots such as the ‘clove-hitch’ or ‘two-half-hitches’. Only traction cord should be used as it is designed not to stretch and the ends of the cords should be short and bound back on themselves to prevent fraying. The knot should not be covered. Short cords should not be joined together by knots – this prevents the smooth running over pulleys.
- The alignment of the cords should be checked to ensure the maintenance of the appropriate pulling forces and the cord should be running freely over the groove.
- The pulleys must be checked at least once each shift to ensure they are running freely to minimise friction and that the cords are sitting in the groove. There should only be one traction cord per pulley wheel.
- Weights should be hanging freely and not resting on the floor or any other surface as this compromises the efficiency of the traction system. They should also be securely attached.
- Weights should not be hung directly over the patient.
- Bed cradles should be in use to prevent bed clothes from interfering with the free running of traction cords.
- Counter-traction should be maintained at all times.
- If skin traction is in use the skin should be checked at least four-hourly for rubbing or sore areas and the bandages should be monitored to ensure they are not too tight and don’t become loose or slip.
- If skeletal traction is being used the sharp ends of the pins should be covered to prevent injury and the pins should be checked to ensure they have not become loose or moved. In addition the pin sites should be checked for signs of infection as discussed above.
- If a Thomas splint is in use it should fit correctly. Skin under the ring should be kept clean and dry and should be checked and gently moved to prevent skin injury. The traction system may need to be adjusted to avoid increasing pressure under the ring.
Common types of traction
Hamilton Russell traction
A balanced traction system using vectors to effect a pull along the long axis of the femur (Figure 8.5). It is used to:
- maintain the joint space at the hip
- Manage fractures of the acetabulum
- Support fractures of the shaft of femur
Traction can be applied using below-knee skin traction or a skeletal pin.
Gallows/Bryant traction
This is used in the management of fractures of the shaft of femur in very young children and in the preliminary management of congenital dislocation of the hip. It is only safe to use for children who are under two years of age and weigh less than 14 kg due to the risk of vascular complications. Traction is exerted by full length skin extensions to both legs and the child is positioned with the hips flexed to 90° and both legs are suspended vertically. Enough weight is applied so that the child’s pelvis is lifted just clear of the mattress ensuring that counter-traction is provided by the weight of the child’s body (Figure 8.6). Due to the risk of vascular complications a set of baseline neurovascular observations should be documented prior to the application of the traction and these should be repeated hourly for the first 24 hours, then 2-hourly for a further 24 hours and then 2–4 hourly thereafter. The feet should be checked for colour, temperature, capillary return, pulses and active/passive movement.
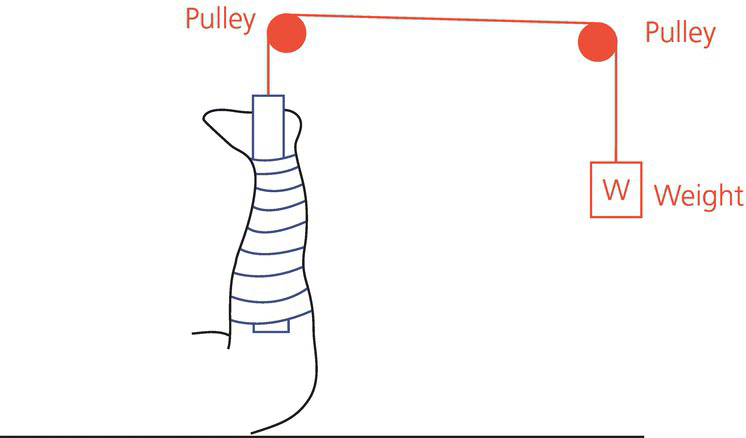
Figure 8.6 Bryants/Gallows traction
Thomas splint traction
The Thomas splint is used in conjunction with skin or skeletal traction to immobilise and position fractures of the femur. It can be used in all age groups. It is a long leg splint with a ring at the hip and extends to beyond the foot (Figure 8.3). The Thomas splint can be suspended in a balanced system using skin or skeletal traction either as a sliding system of traction or as fixed traction. This type of traction allows the injured limb to be maintained and moved in a gravity-free environment (Figure 8.7). The Thomas splint can also be used with fixed traction to transport patients between wards/departments and hospitals.
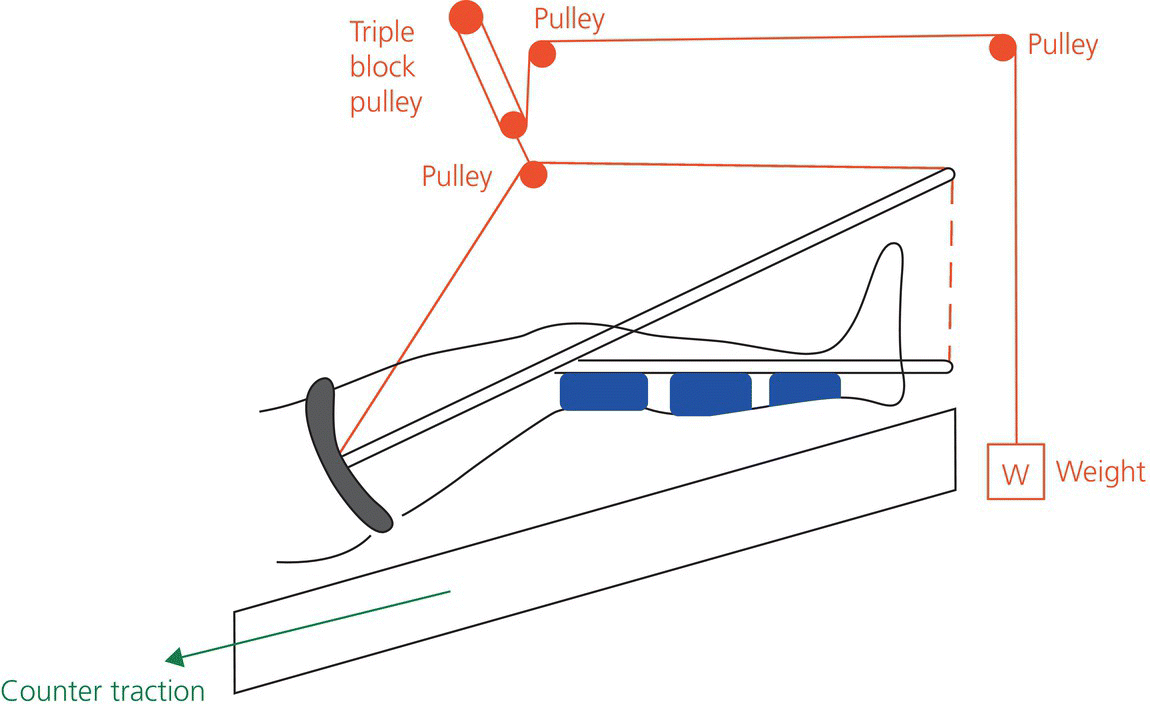
Figure 8.7 Balanced Thomas splint traction with Pearson attachment
Dunlop traction
Dunlop traction is now rarely used for the gradual reduction of supracondylar and transcondylar fractures of the humerus in children and adolescents. The shoulder is abducted 45° and the elbow is flexed to 45°. Lateral pull is exerted on the forearm via the skin extensions and a second force is directed downwards on the distal humerus by the use of a weighted sling. These two forces act in different but not opposite directions and counter-traction is achieved by the weight of the patient’s body when the side of the bed or mattress is elevated (Figure 8.8).
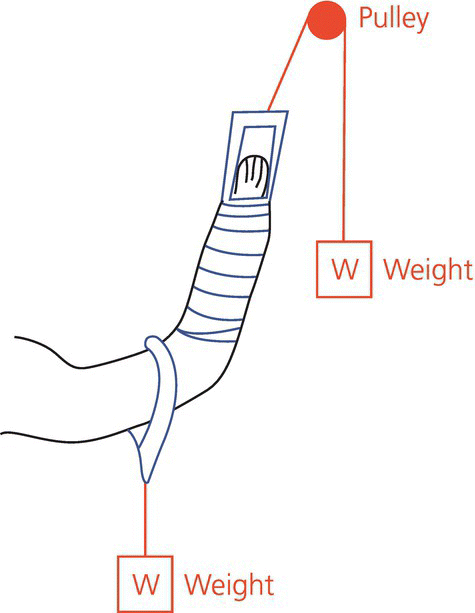
Figure 8.8 Dunlop traction
Recommended further reading
- Jester, R., Santy, J., and Rogers, J. (2011) Oxford Handbook of Orthopaedic and Trauma Nursing. Oxford University Press, Oxford.
- Royal College of Nursing (RCN) (2002) Traction Manual. RCN Publishing, London.
References
- Beck, A., Krischak, G. and Sorg, T. (2003) Influence of diclofenac (group of nonsteroidal anti-inflammatory drugs) on fracture healing. Archives of Orthopaedic and Trauma Surgery, 123, 327–332.
- British Association of Prosthetists and Orthotists (BAPA) (2000) Guidelines for Best Practice. BAPA, Paisley.
- Chen, F., Osterman, A.L. and Mahony, K. (2001) Smoking and bony union after ulna-shortening osteotomy. American Journal of Orthopaedics, 30(6), 486–489.
- Clint, S.A., Eastwood, D.M., Chasseaud, M., Calder, P.R. and Marsh, D.R. (2010) The “good, bad and ugly” pin site grading system: a reliable and memorable method for documenting and monitoring ring fixator pin sites. Injury, 14(2), 147–150.
- Florman, S. and Nichols, R.L. (2007) Current approaches for the prevention of surgical site infections. American Journal of Infectious Diseases, 3(1), 51–61.
- Huo, M.H., Troiano, N.W., Pelker, R.R., Gundberg, C.M. and Friedlaender, G.E. (1991) The influence of ibuprofen on fracture repair: biomechanical, biochemical, histologic, and histomorphometric parameters in rats. Journal of Orthopaedic Research, 9, 383–390.
- Jones, M.K., Wang, H., Peskar, B.M. et al. (1999) Inhibition of angiogenesis by nonsteroidal anti-inflammatory drugs: insight into mechanisms and implications for cancer growth and ulcer healing. Nature Medicine, 5(12), 1418–1423.
- Lethaby, A., Temple, J. and Santy, J. (2011) Pin Site Care for Preventing Infections Associated With External Bone Fixators and Pins. Cochrane Database of Systematic Reviews 12 (Art. No.: CD004551). DOI: 10.1002/14651858.CD004551.pub3.
- MacKenzie, E. and Bosse, M.J. (2006) Factors influencing outcome following limb-threatening lower limb trauma: lessons learned from the Lower Extremity Assessment Project (LEAP) Journal of the American Academy of Orthopaedic Surgeons, 14(10), S205–S210.
- Ou, Y.S., Tan, C. An, H. et al. (2012) The effects of NSAIDs on types I, II, and III collagen metabolism in a rat osteoarthritis model. Rheumatology International, 32(8), 2401–2405.
- Patterson, M. (2006) Impact of external fixation on adolescents: an integrative research review. Orthopaedic Nursing, 25(5), 300–308.
- Saithna, A. (2010) The influence of hydroxyapatite coating of external fixator pins on pin loosening and pin track infection: a systematic review. Injury, 41(2), 128–132.
- Santy-Tomlinson, J., Vincent, M., Glossop, N., Jomeen, J. and Pearcey, P. (2011) Calm, irritated or infected? The experience of the inflammatory states and symptoms of pin site infection and irritation during external fixation. A grounded theory study. Journal of Clinical Nursing, 20(21/22), 3163–3173.
- Timms, A., Sorkin, T., Pugh, H., Barry, M. and Goodier, W.D. (2010) “No-one has ever asked for it back!” A survey assessing the fate of reusable external fixation equipment in mortuaries. Injury, 41(2), 141–143.
- Timms, A., Vincent, M., Santy-Tomlinson, J. and Hertz, K. (2011) RCN Guidance on pin site care. Report and recommendations from the 2010 Consensus Project on Pin Site Care. Royal College of Nursing. 004 137. Available at: http://www.rcn.org.uk/__data/assets/pdf_file/0009/413982/004137.pdf (accessed 30 March 2014).
- Williams, M. (2010) The patient’s experience in a plaster cast. International Journal of Orthopaedic and Trauma Nursing, 14(3), 132–141.
[/level-membership-for-nursing-midwifery-medical-assistant-category][not-level-membership-for-nursing-midwifery-medical-assistant-category]
[/not-level-membership-for-nursing-midwifery-medical-assistant-category]
