[level-membership-for-hematology-oncology-and-palliative-medicine-category]
1 Introduction to peripheral blood smear examination
Wedge smear preparation
Making the peripheral blood smear
Although some automated analyzers prepare and stain blood smears according to established criteria, manual blood smear preparation is still used in many places. The wedge smear is a convenient and commonly used technique for making peripheral blood smears. This technique requires at least two 3 × 1-inch (75 × 25-mm) clean glass slides. High-quality, beveled-edge microscope slides are recommended. One slide serves as the blood smear slide and the other as the spreader slide. These can then be reversed to prepare a second smear. A drop of ethylenediaminetetraacetic acid (EDTA) anticoagulated blood about 3 mm in diameter is placed at one end of the slide. Alternatively, a similar size drop of blood directly from a finger or heel puncture is acceptable. The size of the drop of blood is important. Too large a drop creates a long or thick smear, and too small a drop often makes a short or thin smear. In preparing the smear, the technician holds the pusher slide securely in front of the drop of blood at a 30- to 45-degree angle to the smear slide (Figure 1-1, A). The pusher slide is pulled back into the drop of blood and held in that position until the blood spreads across the width of the slide (Figure 1-1, B). It is then quickly and smoothly pushed forward to the end of the smear slide, creating a wedge smear (Figure 1-1, C). It is important that the whole drop of blood is picked up and spread. Moving the pusher slide forward too slowly accentuates poor leukocyte distribution by pushing larger cells, such as monocytes and granulocytes, to the very end and sides of the smear. Maintaining a consistent angle between the slides and an even, gentle pressure is essential. It is frequently necessary to adjust the angle between the slides to produce a satisfactory smear. For higher than normal hematocrit, the angle between the slides must be lowered so that the smear is not too short and thick. For extremely low hematocrit, the angle must be raised. A well-made peripheral blood smear (Figure 1-2) has the following characteristics:
1. About two-thirds to three-fourths of the length of the slide is covered by the smear.
2. It is slightly rounded at feather edge (thin portion), not bullet shaped.
3. Lateral edges of the smear should be visible. The use of slides with chamfered (beveled) corners may facilitate this appearance.
4. It is smooth without irregularities, holes, or streaks.
5. When the slide is held up to light, the feather edge of the smear should have a “rainbow” appearance.
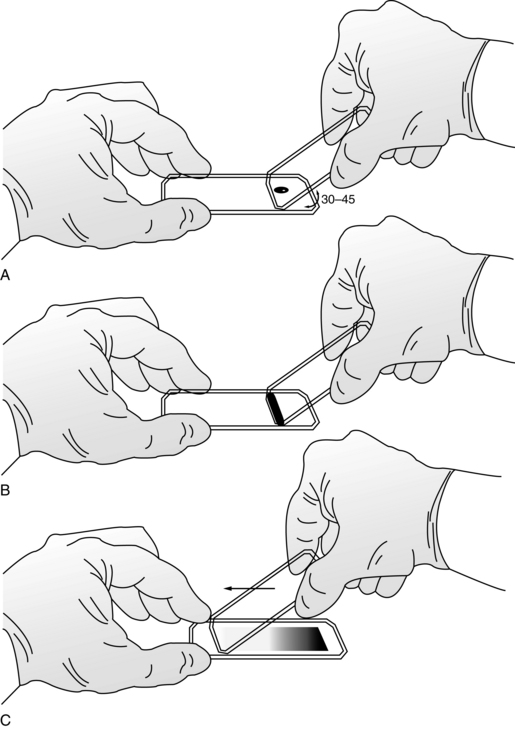
Figure 1–1 Wedge technique of making a peripheral blood smear. A, Correct angle to hold spreader slide. B, Blood spread across width of slide. C, Completed wedge smear.
(From Rodak BF, Fritsma GA, Keohane EM: Hematology: clinical principles and applications, ed 4, St. Louis, 2012, Saunders.)
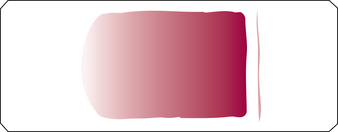
Figure 1–2 Well-made peripheral blood smear.
(From Rodak BF, Fritsma GA, Keohane EM: Hematology: clinical principles and applications, ed 4, St. Louis, 2012, Saunders.)
Figure 1-3 shows examples of unacceptable smears.

Figure 1–3 Unacceptable peripheral blood films. Slide appearances associated with the most common errors are shown, but note that a combination of causes may be responsible for unacceptable films. A, Chipped or rough edge on spreader slide. B, Hesitation in forward motion of spreader slide. C, Spreader slide pushed too quickly. D, Drop of blood too small. E, Drop of blood not allowed to spread across the width of the slide. F, Dirt or grease on the slide; may also be caused by elevated lipids in the blood specimen. G, Uneven pressure on the spreader slide. H, Time delay; drop of blood began to dry.
(From Rodak BF, Fritsma GA, Keohane EM: Hematology: clinical principles and applications, ed 4, St. Louis, 2012, Saunders.)
Staining of peripheral blood smears
The purpose of staining blood smears is to identify cells and recognize morphology easily through the microscope. Wright or Wright-Giemsa stain is the most commonly used stain for peripheral blood and bone marrow smears. These stains contain both eosin and methylene blue, and are therefore termed polychrome stains. The colors vary slightly from laboratory to laboratory, depending on the method of staining.
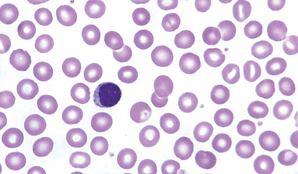
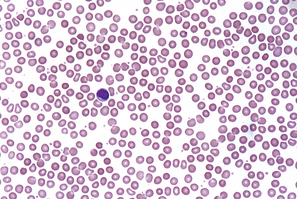
An optimally stained smear (Figure 1-4) has the following characteristics:
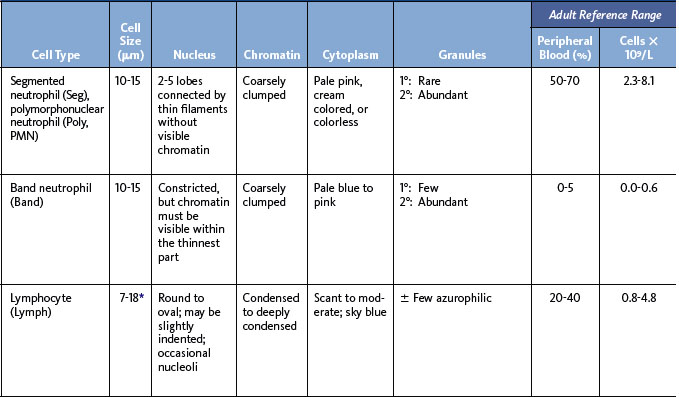
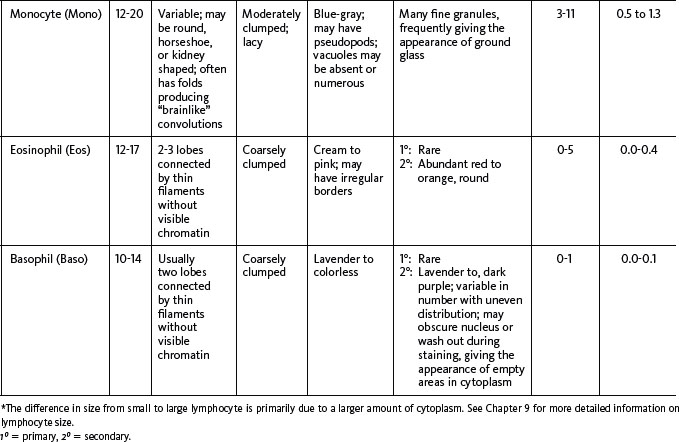
1. The red blood cells (RBCs) should be pink to salmon.
2. Nuclei are dark blue to purple.
3. Cytoplasmic granules of neutrophils are lavender to lilac.
4. Cytoplasmic granules of basophils are dark blue to black.
5. Cytoplasmic granules of eosinophils are red to orange.
6. The area between the cells should be colorless, clean, and free of precipitated stain.
A well-stained slide is necessary for accurate interpretation of cellular morphology. The best staining results are obtained from freshly made slides that have been prepared within 2 to 3 hours of blood collection. Slides must be allowed to dry thoroughly before staining. Box 1-1 lists common reasons for poorly stained slides and may be used as a guide when troubleshooting.
Peripheral smear examination
10× examination
Examination of the blood smear is a multistep process. Begin the smear examination with a scan of the slide using the 10× or low-power objective (total magnification = 100×). This step is necessary to assess the overall quality of the smear, including abnormal distribution of RBCs, suggesting the presence of rouleaux or autoagglutination and/or the presence of a disproportionate number of large nucleated cells, such as monocytes or neutrophils, at the edges of the smear. If the latter exists, another smear should be prepared. In addition, the 10× smear examination allows for the rapid detection of large abnormal cells such as blasts, reactive lymphocytes, and parasites.
40× or 50× examination
Using the 40× (high dry) objective or the 50× oil objective (400× and 500× total magnification, respectively), find an area of the smear in which the RBCs are evenly distributed and barely touching one another (two or three cells may overlap; Figure 1-5). Scan 8 to 10 fields in this area of the smear and determine the average number of white blood cells (WBCs) per field. Although an exact factor varies with the make and model of microscope, in general, an approximate WBC count per cubic millimeter can be determined by multiplying the average number of WBCs per high-power field by 2000 (if 40× is used) or 2500 (if 50× is used). This estimate is a useful quality-control tool for validating WBC counts from hematology analyzers. Any discrepancy between the instrument WBC count and the slide estimate must be resolved. Some reasons for discrepancy include the presence of WBC or platelet clumps, fibrin strands, severe RBC agglutination, cryoprecipitate, giant platelets, as well as a mislabeled smear, a smear made from the wrong patient’s sample, and an instrument malfunction.
100× examination
The next step in smear evaluation is to perform the WBC differential. This is done in the same area of the smear as the WBC estimate but using the 100× oil immersion objective (1000× total magnification). When the correct area of the smear from a patient with a normal RBC count is viewed, about 200 to 250 RBCs per oil immersion field are seen (see Figure 1-4). Characteristically, the differential count includes counting and classifying 100 consecutive WBCs and reporting these classes as percentages. The differential count is performed in a systematic manner using the “battlement” track (Figure 1-6), which minimizes WBC distribution errors. The results are reported as percentages of each type of WBC seen during the count. An example of a WBC differential count is 3% bands, 55% segmented neutrophils, 30% lymphocytes, 6% monocytes, 4% eosinophils, and 2% basophils (Table 1-1). Any WBC abnormalities, such as toxic changes, Döhle bodies, reactive lymphocytes, and Aüer rods, are also reported. When present, nucleated red blood cells (NRBCs) are counted and reported as number of NRBCs per 100 WBCs. The RBC, WBC, platelet morphology evaluation, and platelet estimates are also performed under the 100× oil immersion objective. RBC inclusions, such as Howell-Jolly bodies, and WBC inclusions, such as Döhle bodies, can be seen at this magnification. Each laboratory should have established protocols for standardized reporting of abnormalities.
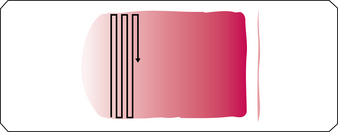
Figure 1–6 “Battlement” pattern for performing a white blood cell differential.
(From Rodak BF, Fritsma GA, Keohane EM: Hematology: clinical principles and applications, ed 4, St. Louis, 2012, Saunders.)
The final step in the performance of the differential count is the estimation of the platelet number. This is done under the 100× oil immersion objective. In an area of the smear where RBCs barely touch, the number of platelets in 5 to 10 oil immersion fields is counted. The average number of platelets is multiplied by 20,000 to provide an estimate of the total number of platelets per cubic millimeter. This estimate is reported as adequate if the estimate is consistent with a normal platelet count, decreased if below the lower limit of normal for that laboratory, and increased if above the upper limit of normal. A general reference range is 150,000 to 450,000/mm3 (150–450 × 109/L). When a patient is extremely anemic or has erythrocytosis, a more involved formula for platelet estimates may be used:

Summary
A considerable amount of valuable information can be obtained from properly prepared, stained, and evaluated peripheral blood smears. Many laboratories use smears made by the wedge technique from EDTA anticoagulated blood and stained with Wright or Wright-Giemsa stain. The smears should be evaluated in a systematic manner using first the 10×, then 40× high dry or 50× oil, and finally the 100× oil immersion objectives on the microscope. WBC differential and morphology and the RBC morphology and platelet estimate are included in the smear evaluation.
[/level-membership-for-hematology-oncology-and-palliative-medicine-category][not-level-membership-for-hematology-oncology-and-palliative-medicine-category]
1 Introduction to peripheral blood smear examination
Wedge smear preparation
Making the peripheral blood smear
Although some automated analyzers prepare and stain blood smears according to established criteria, manual blood smear preparation is still used in many places. The wedge smear is a convenient and commonly used technique for making peripheral blood smears. This technique requires at least two 3 × 1-inch (75 × 25-mm) clean glass slides. High-quality, beveled-edge microscope slides are recommended. One slide serves as the blood smear slide and the other as the spreader slide. These can then be reversed to prepare a second smear. A drop of ethylenediaminetetraacetic acid (EDTA) anticoagulated blood about 3 mm in diameter is placed at one end of the slide. Alternatively, a similar size drop of blood directly from a finger or heel puncture is acceptable. The size of the drop of blood is important. Too large a drop creates a long or thick smear, and too small a drop often makes a short or thin smear. In preparing the smear, the technician holds the pusher slide securely in front of the drop of blood at a 30- to 45-degree angle to the smear slide (Figure 1-1, A). The pusher slide is pulled back into the drop of blood and held in that position until the blood spreads across the width of the slide (Figure 1-1, B). It is then quickly and smoothly pushed forward to the end of the smear slide, creating a wedge smear (Figure 1-1, C). It is important that the whole drop of blood is picked up and spread. Moving the pusher slide forward too slowly accentuates poor leukocyte distribution by pushing larger cells, such as monocytes and granulocytes, to the very end and sides of the smear. Maintaining a consistent angle between the slides and an even, gentle pressure is essential. It is frequently necessary to adjust the angle between the slides to produce a satisfactory smear. For higher than normal hematocrit, the angle between the slides must be lowered so that the smear is not too short and thick. For extremely low hematocrit, the angle must be raised. A well-made peripheral blood smear (Figure 1-2) has the following characteristics:
1. About two-thirds to three-fourths of the length of the slide is covered by the smear.
2. It is slightly rounded at feather edge (thin portion), not bullet shaped.
3. Lateral edges of the smear should be visible. The use of slides with chamfered (beveled) corners may facilitate this appearance.
4. It is smooth without irregularities, holes, or streaks.
5. When the slide is held up to light, the feather edge of the smear should have a “rainbow” appearance.
Figure 1–1 Wedge technique of making a peripheral blood smear. A, Correct angle to hold spreader slide. B, Blood spread across width of slide. C, Completed wedge smear.
(From Rodak BF, Fritsma GA, Keohane EM: Hematology: clinical principles and applications, ed 4, St. Louis, 2012, Saunders.)
Figure 1–2 Well-made peripheral blood smear.
(From Rodak BF, Fritsma GA, Keohane EM: Hematology: clinical principles and applications, ed 4, St. Louis, 2012, Saunders.)
Figure 1-3 shows examples of unacceptable smears.
Figure 1–3 Unacceptable peripheral blood films. Slide appearances associated with the most common errors are shown, but note that a combination of causes may be responsible for unacceptable films. A, Chipped or rough edge on spreader slide. B, Hesitation in forward motion of spreader slide. C, Spreader slide pushed too quickly. D, Drop of blood too small. E, Drop of blood not allowed to spread across the width of the slide. F, Dirt or grease on the slide; may also be caused by elevated lipids in the blood specimen. G, Uneven pressure on the spreader slide. H, Time delay; drop of blood began to dry.
(From Rodak BF, Fritsma GA, Keohane EM: Hematology: clinical principles and applications, ed 4, St. Louis, 2012, Saunders.)
