[level-membership-for-basic-science-category]Histology is the study of the microscopic structure and function of tissues. Tissue is a general word used to describe the components of animals (and plants), and tissues consist of cells and the surrounding support media (extracellular matrix). Historically, four primary tissue types were categorised (in animals) by grouping together cells with similar form and function: they are epithelial tissue, connective tissue, muscle tissue and nerve tissue. The cells within these categories of tissues may vary in structure and be specialised according to their function and location. Most extracellular matrix is derived from the cells that it surrounds, and its composition is related to its function. For example, a very dense, hard, extracellular matrix is formed by bone cells but, in contrast, the matrix in which blood cells flow is fluid (although most blood cells do not contribute to the fluid that supports them). Various combinations of tissues form organs (e.g. the brain and liver), connecting structures (e.g. ligaments) and packing material around organs (e.g. around the kidney). In addition, various combinations of organs and other structures form systems of the body which together perform related functions (see Chapter 10, Chapter 11, Chapter 12, Chapter 13, Chapter 14, Chapter 15 and Chapter 16).
The unaided (good) eye can just about see objects which are 200μm in diameter; very few cells are as big as this, although a very fine hair may be this width. However, there are particular challenges in examining structures smaller than 200μm. Most components of tissues have little colour and contrast, and thus cells and the matrices surrounding them are indistinguishable if light is transmitted through them using a basic light microscope. Indeed, light will only penetrate thin slices of tissues or thin layers of cells growing in vitro. Various types of microscopes and methods of preparing specimens for examination have been developed. Living, isolated, whole cells can be examined using special (phase contrast) light microscopes but contrast is limited and the cells rarely have around them the structures they had in the body. In routine histology, very thin slices of tissues (5–10μm thick) are prepared through which light can penetrate. To achieve sufficient contrast and colours in the tissues so that they may be visualised, dyes or specific chemicals are applied to the slices of tissues. In these specimens, light microscopy can resolve detail of structures about 0.2μm apart. However, by using much thinner slices and electrons instead of light, electron microscopy can resolve detail down to about 0.0002μm. (Note 1mm = 1000μm.)
Numerous advanced techniques, suitable for light and electron microscopy, may be used to identify specific molecules in tissues via their reaction with labelled molecules. The labelled molecule is then detected, e.g. as colour using ordinary light microscopy, as fluorescence by viewing using ultraviolet light or as radioactivity using photographic film. Details of advanced techniques for studying the components of tissues with light and electron microscopes are beyond the scope of this book and the reader is advised to consult other texts. However, we give a brief overview below of basic histological techniques.
Tissue preservation (fixation)
If any piece of the living body is removed it begins to degenerate as cell death occurs: this process is referred to as necrosis. In this process, enzymes in cells are released from their normal location and break down the cells and molecules in surrounding areas. Consequently, the precise three-dimensional arrangement of structures within, and surrounding, cells in life disappears. To study the arrangement of molecules, cells, extracellular matrix, tissues and organs as they were in life, necrosis must be prevented and the molecules, cells, etc. must be preserved. There are various methods for preservation, but a standard way is to place samples of tissue in a solution of formaldehyde as rapidly as possible after death or after removing them from a living body. Formaldehyde changes the conformational state of the proteins (and other large molecules) and prevents enzymes from degrading the tissues: this process is known as fixation. This chemical fixation can be compared with the process of boiling an egg in which heat changes the conformational state of the proteins and, with enough boiling, the proteins in the white and yolk of the egg become solid.
Tissue processing for slicing (sectioning)
Most body tissues are soft in life and only a little harder after they have been fixed in formaldehyde, so they are difficult to slice thinly enough to be examined using a routine microscope. In order to prepare thin slices, tissue samples are impregnated with a substance which makes them solid. The medium used in routine histology to confer rigidity is paraffin wax, which is liquid at about 58°C but solid at room temperature. Wax and water-based tissues are immiscible, so formaldehyde-fixed tissue samples cannot be impregnated directly with wax. Hence, tissue samples are processed through a schedule which removes and replaces the water. This is most easily achieved by transferring the tissue sample through gradually increasing concentrations of alcohol which (at 100%) replaces all the water. Alcohol itself is also immiscible with wax but it is replaced in the tissue sample by processing it through increasing concentrations of a solvent that is miscible with alcohol and wax, e.g. chloroform or xylene. This solvent in turn is removed by placing the tissue sample in several changes of molten wax so that the wax infiltrates the tissue. The sample in the molten wax is then allowed to set and a solid block of wax forms in which the tissue sample is embedded. The tissue is then ready for sectioning. Given the toxicity of the substances used in these processes, appropriate safety precautions must be taken.
Tissue sectioning
Thin sections (slices) are cut using a microtome, a machine that holds an embedded tissue sample firmly in place and cuts thin sections with a very sharp blade. Typically, a wax-embedded tissue sample can be cut at 5μm thick. The sections are then placed on glass microscope slides ready for staining procedures to allow visualisation of the components of the tissue sample.
Methods for visualising tissues for light microscopy
As most staining methods use dyes soluble in water, wax-embedded tissue sections have to be processed through the reverse of the sequence of solvents used to embed the tissues in order to remove the wax and return the tissue sample to an aqueous solution.
Many staining methods depend on the chemical attraction of dyes for particular molecular configurations in tissues. The most common technique used to demonstrate the general topography of tissues uses the dyes haematoxylin and eosin (H&E). About half the illustrations in this book are of photomicrographs of sections stained with the H&E method. Other illustrations are of sections prepared using special methods as indicated in the text and captions.
H&E method
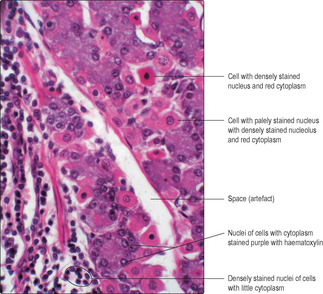
Haematoxylin is a basic dye which binds to acidic components in tissues, producing a blue/purple colour. Typically, haematoxylin binds to nuclei because of their content of deoxyribonucleic acid (DNA) and ribonucleic acid (RNA). Nuclei containing mostly inactive DNA appear as densely stained structures in H&E-stained sections (
Fig. 1.1). In some instances, parts of the nuclei appear palely stained, and this indicates that the DNA is uncoiled and was in active use prior to fixation. In addition, in some palely stained nuclei a small, dense, round region of staining may be apparent; this is a nucleolus (
Fig. 1.1). The dense staining, by haematoxylin, of the RNA in a nucleolus indicates that the cell was actively synthesising protein (see
Chapter 2). Cells synthesising large amounts of protein also contain large amounts of RNA in their cytoplasm, and this too may be visualised as it will bind haematoxylin and appear bluish purple (
Fig. 1.1). In contrast, eosin is an acidic dye and binds to bases. The proteins in the cytoplasm of many cells (
Fig. 1.1) and proteins in extracellular matrices stain with eosin and appear red or pinkish orange.
Histochemistry and immunohistochemistry
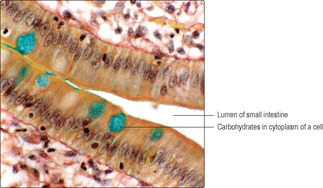
In contrast to staining with dyes, histochemistry and immunohistochemistry techniques involve specific chemical or immunological reactions to detect various components of tissues. For example, histochemistry can be used to detect types, and location, of carbohydrates (
Fig. 1.2) and enzymes. Immunohistochemistry can detect molecules that are antigens by applying labelled antibodies that can be visualised using a microscope. It is beyond the scope of this book to detail the range of methods available for demonstrating specific molecules in tissues.
Illustrations in this book
Most illustrations in this book were photographed on a Zeiss or an Olympus light microscope using lenses which magnify between ×12 and ×120. (Some blood cells were photographed using lenses magnifying at about ×350.) Some images were photographed using colour-positive transparency film (about 10 × 13cm), others using 35mm film (negative and positive) and others using a digital camera with optical magnification of ×4 in addition to magnification by microscope lenses. Over half of the illustrations using light microscopy were taken especially for this book. The other images using light and electron microscopy are from material prepared and archived by the Human Morphology Group at the University of Southampton, Southampton, UK, and are currently in the Centre for Learning Anatomical Sciences, School of Medicine, University of Southampton.
Interpretation in histology
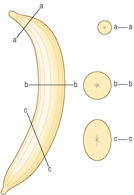
Another challenge in interpreting sections of tissues is that a variety of appearances may result from slicing three-dimensional structures and examining them as very thin slices, effectively as two-dimensional structures. Consider slicing a curved, peeled banana (
Fig. 1.4). Taking a slice along its length will show the curve and that it is a solid object. Slicing at right angles to the length of a banana will produce circular (solid) slices which will be smaller in diameter if sliced close to an end rather than in the middle. Obliquely cut slices will produce solid ellipsoid shapes which will vary in shape and size depending on the angle of cut. Histological sections on microscope slides have to be interpreted by constructing possible three-dimensional shapes from their two-dimensional appearance. For example, if a hollow circular structure is seen in a histological section it may be from a hollow sphere or part of a straight or coiled hollow tube cut at right angles to its length.
Artefacts present other challenges in interpreting histological sections. Artefacts are appearances in histological sections which are there as a consequence of procedures used to prepare the tissue sample. During fixation, e.g. with formaldehyde, many small water-soluble molecules are not ‘fixed’ in place, and even those molecules that are fixed in place may shrink and pull away from adjacent structures. Spaces seen in histological sections (
Fig. 1.1,
Fig. 1.2 and
Fig. 1.3) have to be assessed and their cause (artefact or not) determined. Experience and knowledge of the structures being examined helps to identify the space in
Fig. 1.1 as an artefact. In contrast, the space in
Fig. 1.2 is not an artefact: it is part of the empty lumen of the small intestine. Other empty spaces in tissue samples may be due to the extraction of fat by the organic solvents used in routine histological processing or to components not reacting with the stains used. The apparently large, empty spaces in
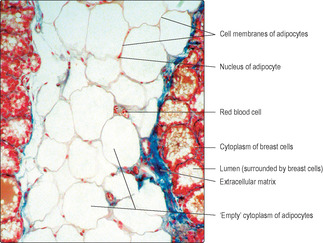
Fig. 1.3 show the typical appearance of adipose cells. These are cells in which fat occupies most of the cytoplasm. Routine processing extracted the fat and only the nucleus and membrane around each adipose cell is seen. In
Fig. 1.2, the cells which have been stained blue due to their carbohydrate content would have bound little or no H&E and would thus have appeared empty in a routine preparation.
Another challenge presented, especially to histopathologists and researchers, is to decide whether the tissue section examined is normal or abnormal. In some instances, if the tissue has not been fixed rapidly after death, necrosis occurs and this changes the appearance of the sectioned tissue. In addition, histopathologists and researchers have to be able to interpret the appearance of a tissue sample and consider the tissue in relation to time in the context of the whole body. Interpreting what has gone before may allow a diagnosis of a disease. Predicting what might yet happen to a patient could be essential, especially if the tissue sample shows signs of cancer. Consider looking at a sliced hard boiled egg (described above as an example of fixation). Consider the two-dimensional slice of the egg in the context of time. What would it have been like 20 or so days earlier before boiling (fixation), or what might it have become 20days later if it had not been boiled?
■ Histology is the study of the microscopic structure and function of tissues.
■ Components of the body are categorised as four tissue types: epithelial, connective, muscle and nerve. Tissues comprise cells and extracellular material which carry out specific functions.
■ Various combinations of tissues form organs and other components of the body.
In order to examine the microscopic structure of tissues, various procedures are necessary. The routine processes for doing this are:
■ Fixation. Tissues are immersed in formaldehyde, which preserves the molecules and their structural arrangement in tissues as near as possible to how they were in life (and prevents necrosis).
■ Processing. These stages replace the water with solvents that are miscible with molten wax.
■ Embedding. Tissues in molten wax are cooled and the solid wax supports the tissue.
■ Sectioning. Thin slices of wax-embedded tissue are cut and attached to microscope slides.
■ Processing. This removes the wax and returns the tissues to an aqueous state.
■ Staining. This allows tissue components to be visualised. Haematoxylin stains acidic substances (e.g. DNA in nuclei) blue/purple and eosin stains basic substances (e.g. many cytoplasmic proteins) red/orange.
Interpretation of microscopic structure may involve assessing:
■ possible three-dimensional structures represented by a two-dimensional image
■ the size and identity of structures (including their chemical composition) and their function
■ whether any appearance is due to artefacts
■ the significance of time in respect of the tissue sample, e.g. does it show that if similar tissue remains in the body it could be harmful.
[/level-membership-for-basic-science-category][not-level-membership-for-basic-science-category]Histology is the study of the microscopic structure and function of tissues. Tissue is a general word used to describe the components of animals (and plants), and tissues consist of cells and the surrounding support media (extracellular matrix). Historically, four primary tissue types were categorised (in animals) by grouping together cells with similar form and function: they are epithelial tissue, connective tissue, muscle tissue and nerve tissue. The cells within these categories of tissues may vary in structure and be specialised according to their function and location. Most extracellular matrix is derived from the cells that it surrounds, and its composition is related to its function. For example, a very dense, hard, extracellular matrix is formed by bone cells but, in contrast, the matrix in which blood cells flow is fluid (although most blood cells do not contribute to the fluid that supports them). Various combinations of tissues form organs (e.g. the brain and liver), connecting structures (e.g. ligaments) and packing material around organs (e.g. around the kidney). In addition, various combinations of organs and other structures form systems of the body which together perform related functions (see Chapter 10, Chapter 11, Chapter 12, Chapter 13, Chapter 14, Chapter 15 and Chapter 16).
The unaided (good) eye can just about see objects which are 200μm in diameter; very few cells are as big as this, although a very fine hair may be this width. However, there are particular challenges in examining structures smaller than 200μm. Most components of tissues have little colour and contrast, and thus cells and the matrices surrounding them are indistinguishable if light is transmitted through them using a basic light microscope. Indeed, light will only penetrate thin slices of tissues or thin layers of cells growing in vitro. Various types of microscopes and methods of preparing specimens for examination have been developed. Living, isolated, whole cells can be examined using special (phase contrast) light microscopes but contrast is limited and the cells rarely have around them the structures they had in the body. In routine histology, very thin slices of tissues (5–10μm thick) are prepared through which light can penetrate. To achieve sufficient contrast and colours in the tissues so that they may be visualised, dyes or specific chemicals are applied to the slices of tissues. In these specimens, light microscopy can resolve detail of structures about 0.2μm apart. However, by using much thinner slices and electrons instead of light, electron microscopy can resolve detail down to about 0.0002μm. (Note 1mm = 1000μm.)
Numerous advanced techniques, suitable for light and electron microscopy, may be used to identify specific molecules in tissues via their reaction with labelled molecules. The labelled molecule is then detected, e.g. as colour using ordinary light microscopy, as fluorescence by viewing using ultraviolet light or as radioactivity using photographic film. Details of advanced techniques for studying the components of tissues with light and electron microscopes are beyond the scope of this book and the reader is advised to consult other texts. However, we give a brief overview below of basic histological techniques.
Tissue preservation (fixation)
If any piece of the living body is removed it begins to degenerate as cell death occurs: this process is referred to as necrosis. In this process, enzymes in cells are released from their normal location and break down the cells and molecules in surrounding areas. Consequently, the precise three-dimensional arrangement of structures within, and surrounding, cells in life disappears. To study the arrangement of molecules, cells, extracellular matrix, tissues and organs as they were in life, necrosis must be prevented and the molecules, cells, etc. must be preserved. There are various methods for preservation, but a standard way is to place samples of tissue in a solution of formaldehyde as rapidly as possible after death or after removing them from a living body. Formaldehyde changes the conformational state of the proteins (and other large molecules) and prevents enzymes from degrading the tissues: this process is known as fixation. This chemical fixation can be compared with the process of boiling an egg in which heat changes the conformational state of the proteins and, with enough boiling, the proteins in the white and yolk of the egg become solid.
Tissue processing for slicing (sectioning)
Most body tissues are soft in life and only a little harder after they have been fixed in formaldehyde, so they are difficult to slice thinly enough to be examined using a routine microscope. In order to prepare thin slices, tissue samples are impregnated with a substance which makes them solid. The medium used in routine histology to confer rigidity is paraffin wax, which is liquid at about 58°C but solid at room temperature. Wax and water-based tissues are immiscible, so formaldehyde-fixed tissue samples cannot be impregnated directly with wax. Hence, tissue samples are processed through a schedule which removes and replaces the water. This is most easily achieved by transferring the tissue sample through gradually increasing concentrations of alcohol which (at 100%) replaces all the water. Alcohol itself is also immiscible with wax but it is replaced in the tissue sample by processing it through increasing concentrations of a solvent that is miscible with alcohol and wax, e.g. chloroform or xylene. This solvent in turn is removed by placing the tissue sample in several changes of molten wax so that the wax infiltrates the tissue. The sample in the molten wax is then allowed to set and a solid block of wax forms in which the tissue sample is embedded. The tissue is then ready for sectioning. Given the toxicity of the substances used in these processes, appropriate safety precautions must be taken.
Buy Membership for Basic Science Category to continue reading.
Learn more here
[/not-level-membership-for-basic-science-category]
Histology An Illustrated Colour Text