Improvised Litters and Carries
SCENE Size-Up
1. Scene safety is the initial priority.
2. The necessary evaluation, called the scene size-up (Box 57-1), involves a (usually hasty) determination of whether the patient, rescuer, or both are immediately threatened by either the environment or the situation.
3. Proper immobilization and patient packaging are always preferable, but sometimes the risk for aggravating existing injuries is outweighed by the immediate danger presented by the physical environment. In such a situation, the rescuer may choose to immediately move the patient to a place of safety before definitive care is provided or packaging is completed.
4. Evacuation options are limited by three variables:
5. Carrying a patient, even over level ground, is an arduous task. At an altitude where walking requires great effort, carrying a patient may be impossible.
6. Complex rescue scenarios requiring specially trained personnel and special equipment are called technical rescues and often involve dangerous environments such as severe terrain, crevasses, avalanche chutes, caves, or swift water. To avoid becoming patients themselves, rescuers must realistically evaluate their abilities to perform these types of rescues.
7. When a patient is transported in an improvised litter, especially over rough terrain, he or she should be kept in a comfortable position, with injured limbs elevated to limit pressure and movement.
8. To splint the chest wall and allow full expansion of the unaffected lung, a patient with a chest injury generally should be positioned so that he or she is lying on the injured side during transport.
9. For a person with a head injury, the head should be elevated slightly, and for a person with dyspnea, pulmonary edema, or myocardial infarction, the upper body should be elevated.
10. When the patient is hypotensive or appears to be physiologically in shock, the legs should be elevated and the knees slightly flexed.
11. Whenever possible, an unconscious patient with an unprotected airway should be positioned so that the person is lying on his or her side during transport to prevent aspiration.
12. When time permits, practice constructing the improvised litter first with an uninjured person, to “work out the kinks.”
Drags and Carries
Blanket Drag (Fig. 57-1, A)
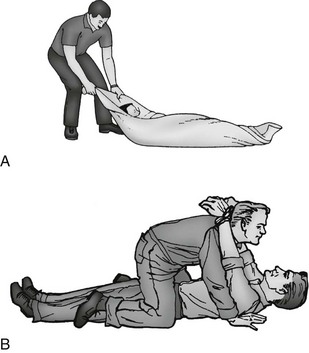
1. This can be performed on relatively smooth terrain by one or more rescuers rolling the patient onto a blanket, tarp, or large coat and pulling it along the ground.
2. This simple technique is especially effective for rapidly moving a person with a spinal injury to safety because the patient is pulled along the long axis of the body.
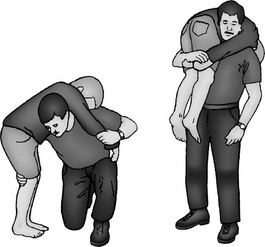
Two-Hand Seat
1. Two carriers stand side by side. Each carrier grasps the other carrier’s wrists with opposite hands (e.g., right to left).
2. The patient sits on the rescuers’ joined forearms.
3. The carriers each maintain one free hand to place behind the back of the patient for support (support hands can be joined).
4. This system places great stress on the carriers’ forearms and wrists.
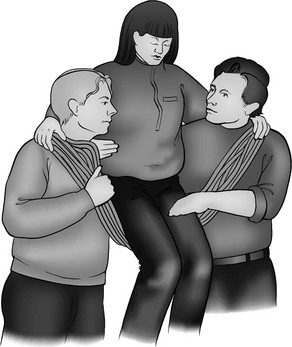
Four-Hand Seat (Fig. 57-4)
1. Two carriers stand side by side. Each carrier grasps his or her own right forearm with the left hand, palms facing down.
2. Each carrier then grasps the forearm of the other with his or her free hand to form a square “forearm” seat.
3. With the forearm seat the patient must support himself or herself with a hand around the rescuers’ backs.
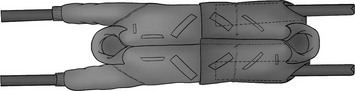
Ski Pole or Ice Ax Carry (Fig. 57-5)
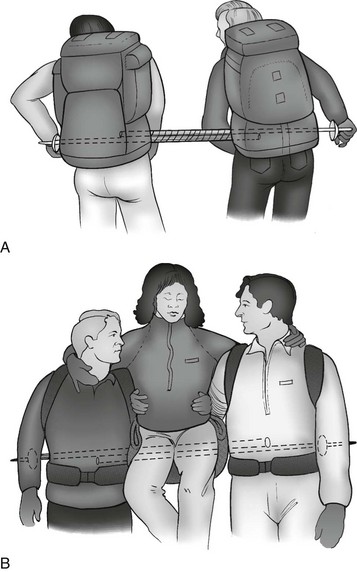
FIGURE 57-5 Ski pole seat. A, Ski poles are anchored by the packs. B, The patient is supported by the rescuers.
1. Two carriers with backpacks stand side by side with four ski poles or joined ice ax shafts resting between them and the base of the pack straps. The ski poles or ice ax shafts can be joined with cable ties, adhesive tape, duct tape, wire, or cord.
2. Because the rescuers must walk side by side, this technique requires wide-open, gentle terrain.
3. The patient sits on the padded poles or shaft with his or her arms over the carriers’ shoulders.
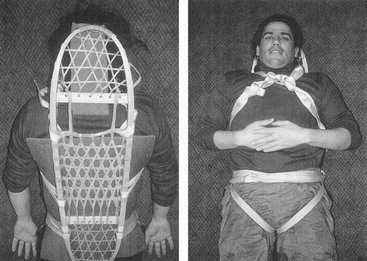
Split-Coil Seat (“Tragsitz”) (Fig. 57-6)
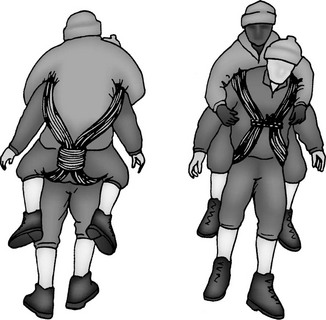
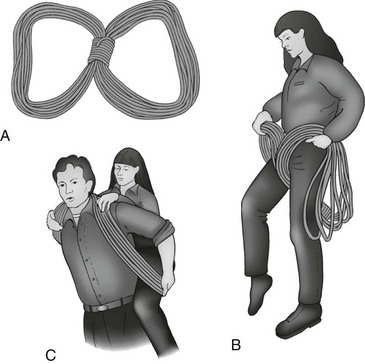
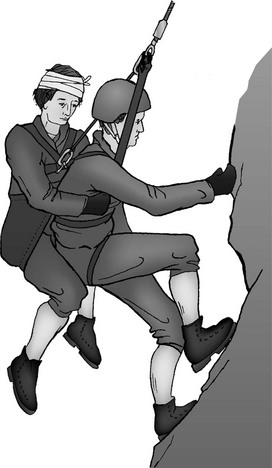
Two-Rescuer Split-Coil Seat (Fig. 57-9)
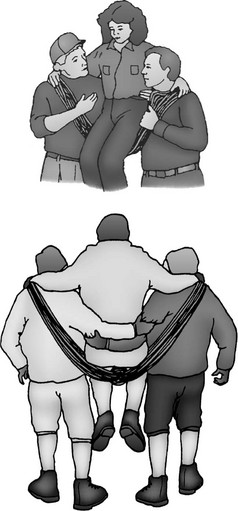
FIGURE 57-9 Two-rescuer split-coil seat.
1. The two-rescuer split-coil seat is essentially the same as the split-coil Tragsitz transport, except that two rescuers split the coil over their shoulders.
2. The patient sits on the low point of the rope between the rescuers (Fig. 57-10). Each rescuer maintains a free hand to help support the patient.
Backpack Carry
1. A large backpack is modified by cutting leg holes at the base. The patient sits in it like a baby carrier.
2. Some large internal frame packs incorporate a sleeping bag compartment in the lower portion of the pack that includes a compression panel. With this style of pack, the patient can sit on the suspended panel and place his or her legs through the unzipped lower section without damaging the pack, or the patient can simply sit on the internal sleeping bag compression panel without the need to cut holes.
Nylon Webbing Carry (Fig. 57-11)
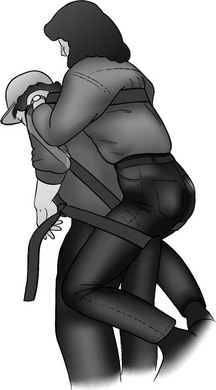
FIGURE 57-11 Webbing carry. Webbing crisscrosses in front of the patient’s chest before passing over the shoulders of the rescuer.
1. Nylon webbing can be used to attach the patient to the rescuer like a backpack.
2. At least 4.6 to 6.1 m (15 to 20 feet) of nylon webbing is needed to construct this transport.
3. The center of the webbing is placed behind the patient and brought forward under the armpits. The webbing is then crossed and brought over the rescuer’s shoulders, then down around the patient’s thighs.
4. The webbing is finally brought forward and tied around the rescuer’s waist. Additional padding is necessary for this system, especially around the posterior thighs of the patient.
Three-Person Wheelbarrow Carry
1. This system is extremely efficient and can be used for prolonged periods on relatively rough terrain.
2. The patient places his or her arms over two rescuers’ shoulders (the rescuers stand side by side). The patient’s legs are then placed over a third rescuer’s shoulders.
3. This system equalizes the weight of the patient very efficiently.
Papoose-Style Sling
1. For carrying infants and small children, a papoose-style sling works well and can easily be constructed by the rescuer tying a rectangular piece of material around his or her waist and neck to form a pouch.
2. The infant or child is then placed inside the pouch, which can be worn on the front or back of the rescuer’s body.
Litter Improvisation
1. When patients are transported in improvised litters, especially over rough terrain, they should be kept in a comfortable position, with injured limbs elevated to limit pressure and movement.
2. For a patient with a head injury, the head should be elevated slightly.
3. For persons with dyspnea, pulmonary edema, or myocardial infarction, the upper body should be elevated. Conversely, when the patient is in shock, the legs should be elevated and the knees slightly flexed.
4. Whenever possible, unconscious patients with unprotected airways should be positioned so that they are lying on their sides during transport to prevent aspiration.
Blanket Litter (Fig. 57-12)
1. A simple, nonrigid litter can be fabricated from two rigid poles, branches, or skis and a large blanket or tarp.
2. The blanket or tarp is wrapped around the skis or poles as many times as possible, and the poles are carried.
3. The blanket or tarp should not be simply draped over the poles. For easier carrying, the poles can be rigged to the base of backpacks.
4. Large external frame packs work best, but internal frame packs can be rigged to do the job.
5. Alternatively, a padded harness to support the litter can be made from a single piece of webbing, in a design similar to a nylon webbing carry.
6. Another improvised blanket litter can be made from a heavy plastic tarpaulin, tent material, or large polyethylene bag (Fig. 57-13).
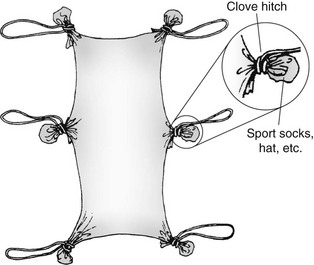
FIGURE 57-13 Improvised handled soft stretcher.
7. By wrapping the material around a rock, wadded sock, or glove and securing it with rope or twine, the rescuer can fashion handles in the corners and sides to facilitate carrying.
8. The advantage of this device is its simplicity, but it can be fragile, so care must be taken not to exceed the capabilities of the materials.
9. This type of nonrigid, “soft” litter can be dragged over snow, mud, or flat terrain but should be generously padded, with extra clothing or blankets placed beneath the patient.
Tree Pole Litter
1. The tree pole litter is similar to the blanket litter.
2. In the tree pole litter, instead of a blanket or a tarp, the side poles are laced together with webbing or rope and then padded.
3. The poles may be fitted through pack frames to aid carrying.
4. To give this litter more stability and to add tension to the lacing, the rescuer should fabricate a rectangle with rigid crossbars at both ends before lacing.
Parka Litter
Sledge (Fig. 57-15)
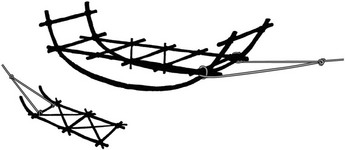
FIGURE 57-15 A sledge.
1. If long distances must be traveled or if pack animals are available, a litter may be constructed so that it can be dragged or slid along the ground like a sled.
2. The litter is fashioned out of two forked tree limbs, with one side of each fork broken off.
3. The limbs form a pair of sled-like runners that are lashed together with cross members to form a patient platform.
4. The sledge offers a solid platform for patient support and stabilization.
5. If sufficient effort is put into fashioning a smooth, curved leading edge to the runners, a sledge can be dragged easily over smooth ground, mud, ice, or snow.
6. Ropes can be attached to the front of the platform for hauling and to the rear for use as brakes when traveling downhill.
Life Jacket Litter
Life jackets can be placed over paddles or oars to create a makeshift nonrigid litter.
Rope Litter (Fig. 57-16)
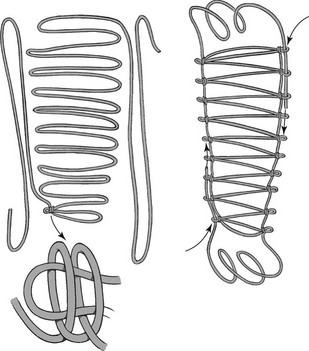
FIGURE 57-16 Rope litter.
1. On mountaineering trips the classic rope litter can be used, but this system offers little back support and should never be used for patients with suspected spine injuries.
2. The rope is uncoiled and staked onto the ground with 16 180-degree bends (8 on each side of the rope center).
3. The rope bends should approximate the size of the finished litter.
4. The free rope ends are then used to clove hitch off each bend (leaving 5 cm [2 inches] of bend to the outside of each clove hitch).
5. The leftover rope is threaded through the loops at the outside of each clove hitch.
6. This gives the rescuers a continuous handhold and protects the bends from slipping through the clove hitches.
7. The rope ends are then tied off.
8. The litter is padded with packs, Therm-a-Rest pads, or foam pads.
9. This improvised litter is somewhat ungainly and requires six or more rescuers for an evacuation of any distance.
10. A rope litter can be tied to poles or skis to add lateral stability if needed.
Improvised Rigid Litters
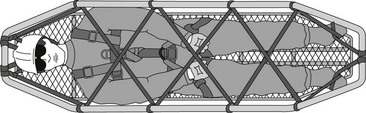
Continuous Loop System (Daisy Chain Litter, Cocoon Wrap, Mummy Litter) (Fig. 57-17)
For the continuous loop system, the following items are necessary:
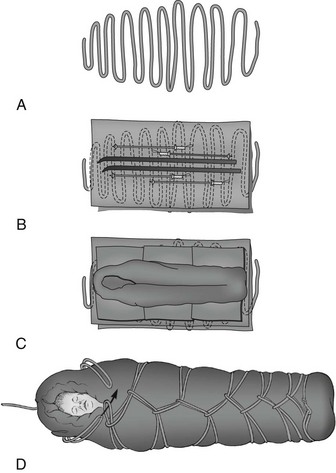
1. Long climbing or rescue rope
3. Sleeping pads (Ensolite or Therm-a-Rest)
4. Stiffeners (e.g., skis, poles, snowshoes, canoe paddles, tree branches)
To construct the continuous loops system:
1. Lay the rope out with even U-shaped loops as shown in Figure 57-17, A.
2. The midsection should be slightly wider to conform to the patient’s width.
3. Tie a small loop at the foot end of the rope and place a tarp on the laid rope.
4. On top of the tarp, lay foam pads the full length of the system (the pads can be overlapped to add length).
5. Lay stiffeners on top of the pads in the same axis as the patient (see Fig. 57-17, B).
6. Add multiple foam pads on top of the stiffeners, followed optionally with a sleeping bag (see Fig. 57-17, C).
7. Place the patient on the pads.
8. To form the daisy chain, bring a single loop through the pretied loop, pulling loops toward the center and feeding through the loops brought up from the opposite side. It is important to take up rope slack continuously.
9. When the patient’s armpits are reached, bring a loop over each shoulder and tie it off (or clip it off with a carabiner) (see Fig. 57-17, D).
10. One excellent modification involves adding an inverted internal frame backpack. This can be incorporated with the padding and secured with the head end of the rope. The pack adds rigidity and padding, and the padded hip belt serves as an efficient head and neck immobilizer (Fig. 57-18).
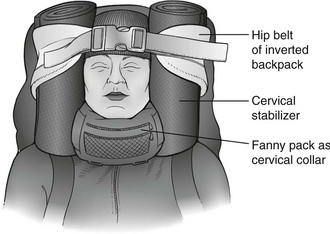
FIGURE 57-18 Inverted pack used as spine board.
11. Although this type of litter offers improved support, strength, and thermal protection, careful thought must be given to the physical and psychological effects that such a restrictive enclosure may have on the patient.
Backpack Frame Litters (Fig. 57-19)
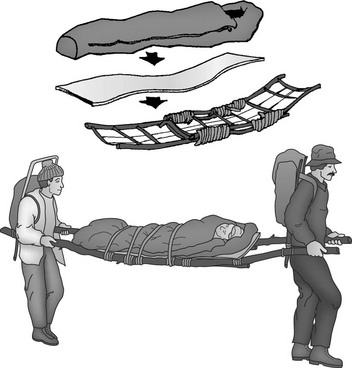
1. Functional litters can be constructed from external frame backpacks.
2. Traditionally, two frames are used, but three or four frames (Fig. 57-20) make for a larger, more stable litter.
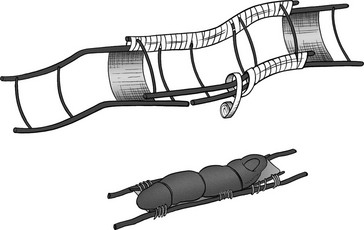
FIGURE 57-20 Backpack frame litter.
3. Cable ties or fiberglass strapping tape simplify this fabrication.
4. These litters can be reinforced with ice axes or ski poles.
Travois
1. A travois is a similar device that is less like a sled and more like a travel trailer (without wheels).
2. A travois is a V-shaped platform constructed of sturdy limbs or poles that are lashed together with cross members or connected with rope or netting.
3. The open end of the V is dragged along the ground, with the apex lashed to a pack animal or pulled by rescuers.
4. Although the travois can be dragged over rough terrain, the less smooth the ground, the more padding and support necessary for comfort and stabilization.
5. A long pole can be passed through the middle of the platform and used for lifting and stabilization by rescuers when rough terrain is encountered.
Kayak System
1. Properly modified, the kayak makes an ideal rigid, long-board improvised litter.
2. First, remove the seat along with sections of the upper deck if necessary.
3. A serrated river knife (or camp saw) makes this improvisation much easier.
4. Open deck canoes can be used almost as they are, once the flotation material has been removed.
Improvised Rescue Sled or Toboggan
1. To build an improvised rescue sled/toboggan, the rescuer needs a pair of skis (preferably the patient’s) and two pairs of ski poles; three 0.6-m (2-foot) sticks (or ski pole sections); 24.4 m (80 feet) of nylon cord; and extra lengths of rope for sled hauling.
2. The skis are placed 0.6 m (2 feet) apart.
3. The first stick is used as the front crossbar and is lashed to the ski tips.
4. Alternately, holes can be drilled into the stick and ski tips with an awl and bolts can be used to fasten them together.
5. The middle stick is lashed to the bindings.
6. One pair of ski poles is placed over the crossbars (baskets over the ski tips) and lashed down.
7. The second set of poles is lashed to the middle stick with baskets facing back toward the tails.
8. A third rear stick is placed on the tails of the skis and lashed to the poles. The lashings are not wrapped around the skis; the crossbar simply sits on the tails of the skis under the weight of the patient.
9. Nylon cord is then woven back and forth across the horizontal ski poles.
10. The hauling ropes are passed through the baskets on the front of the sled.
11. The ropes are then brought around the middle crossbar and back to the front crossbar. This rigging system reverses the direction of pull on the front crossbar, making it less likely to slip off the ski tips.
12. Another sled design includes a predrilled snow shovel incorporated into the front of the sled. A rigid backpack frame can also be used to reinforce the sled. This requires drilling holes into the ski tips and carrying a predrilled shovel. This system holds the skis in a wedge position and may offer slightly greater durability.
Patient Packaging
Patients on stretchers must be secured, or “packaged,” before transport.
Packaging consists of the following:
The rescuer’s goals are as follows:
1. Package the person to avoid causing additional injury.
2. Ensure the patient’s comfort and warmth.
3. Immobilize the patient’s entire body in such a way as to allow continued assessment during transport.
4. Package the patient neatly so that the litter can be moved easily and safely.
5. Ensure that the patient is safe during transport by securing him or her within the litter and belaying the litter as needed. Generally, proper patient packaging must provide for physical protection and psychological comfort.
6. Once packaged in a carrying device, a person feels helpless, so transport preparation must focus on alleviating anxiety and providing rock-solid security.
7. Rescuers must provide for the patient’s ongoing safety, protection, comfort, medical stabilization, and psychological support.
8. Splinting and spinal immobilization are usually achieved by using a full or short backboard.
9. The patient is secured to the board, and then the patient (on the board) is placed into the litter.
10. When the immobilized patient is placed into the litter, adequate padding (e.g., blankets, towels, bulky clothing, sleeping bags) placed under and around him or her contributes to comfort and stability.
11. Avoid placing the legs in full extension at the knees; consider placing a small pad or cloth roll under the knees.
12. For long-duration evacuation, a “diaper” can be improvised with garbage bags, absorbable fleece, and duct tape around the patient’s pelvis and genital area. This helps contain urine and feces, prevents the middle insulating layer from becoming wet, and facilitates changing the improvised diaper.
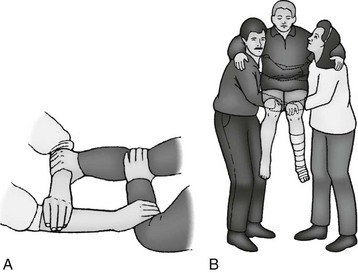
Improvised Short-Board Immobilization
Internal Frame Pack and Snow Shovel System
1. Some internal frame backpacks can be easily modified by inserting a snow shovel through the centerline attachment points (the shovel handgrip may need to be removed first).
2. The patient’s head is taped to the lightly padded shovel (Fig. 57-21); in this context the shovel blade serves as a head bed.
FIGURE 57-21 Head immobilized on a padded shovel.
3. This system incorporates the remainder of the pack suspension as designed (i.e., shoulder and sternum straps with hip belt) and works well with other long-board designs, such as the continuous loop system (see earlier).
Inverted Pack System
1. An efficient short board can be made using an inverted internal or external frame backpack.
2. The padded hip belt provides a head bed, and the frame is used as a short board in conjunction with a rigid or semirigid cervical collar (see Fig. 57-18).
3. Turn the pack upside down, and lash the patient’s shoulders and torso to the pack. Fasten the waist belt around the patient’s head, as in the top section of a Kendrick extrication device.
4. The hip belt is typically too large, but you can eliminate excess circumference with bilateral Ensolite rolls.
5. Unlike the snow shovel system, this system requires that the patient be lashed to the splint.
During Transport
1. During transport, patients like to have something in their hands to grasp, to have pressure applied to the bottom of their feet by a footplate or webbing, and to be able to see what is happening around them.
2. Because persons are vulnerable to falling debris when packaged in a litter, especially in a horizontal high-angle configuration, a cover of some type should always be used to protect the patient. A blanket or tarpaulin works well as a cover to protect most of the body, but a helmet and face shield (or goggles) are also recommended to protect the head and face.
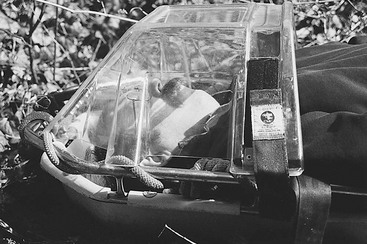
3. Alternatively, a commercially available litter shield can be used and allows easy access to the airway, head, and neck (Fig. 57-23).
4. Remember also that the conscious patient desires an unobstructed view of his or her surroundings.
Securing a Person Within the Litter
1. Most integrate a retention or harness system directly into the litter.
2. A few require external straps to secure the patient to the device.
3. Many users suggest that an independent harness be attached directly to the patient to provide a secondary attachment point in case there is failure of any link in the attachment chain.
4. When a harness is not available, tubular webbing, strips of sturdy material, or rope can be used to secure the patient.
5. One approach uses tubular webbing slings in a figure-8 at the pelvis and shoulders to prevent the patient from sliding lengthwise in the litter. A 10-m (32.8-foot) piece of 5-cm (2-inch) webbing or rescue rope can be used to achieve the same goal (Fig. 57-24).
6. The rope or web is laced back and forth between the rails of the litter in a diamond pattern until the patient is entirely covered and secure.
7. Such a technique also easily incorporates a protective cover and support of the patient’s feet.
8. For any high-angle evacuation, be certain the patient is also secured via a harness (commercial or improvised) to the litter.
9. Regardless of the techniques and equipment used, frequently check vital signs (i.e., distal pulse and capillary refill) during transport to help ensure that strapping does not obstruct circulation.
Carrying a Loaded Litter
1. An evacuation is defined as high angle or vertical when the weight of the stretcher and tenders (stretcher attendants) is primarily supported by a rope and the angle of the rope is 60 degrees or greater.
2. This type of situation is often encountered when a rescue is performed on a cliff or overhang or over the side of a structure, and usually requires only one or two tenders.
3. In high-angle rescue, most often the stretcher is used in the horizontal position, to allow only one tender and to keep the patient supine and comfortable.
4. When the packaged patient and stretcher must be moved through a narrow passage or when falling rock is a danger, the stretcher may be positioned vertically.
Low Angle
1. In a scree or low-angle evacuation, the slope is not as steep, and the tenders support more of the weight of the stretcher, but a rope system is still necessary to help move the load. In this type of rescue, more tenders (usually four to six) are required and the rope is attached to the head of the stretcher.
2. The head of the litter is kept uphill during a low-angle rescue.
Nontechnical Evacuation
1. In a nontechnical evacuation, tenders completely support the weight of the stretcher during a carry out.
2. Generally the terrain dictates the type of evacuation. If the stretcher can be carried without the support of a rope, it is a nontechnical evacuation.
3. If rope is necessary to support the load or to move the stretcher, it is either a low- or high-angle evacuation, depending on the angle of the slope.
Carrying a Litter in the Wilderness
1. It takes at least six rescuers to carry a person in a litter a short distance (0.4 km [0.25 mile] or less) over relatively flat terrain.
2. With six rescuers, four can carry the litter while the other two clear the area in the direction of travel and assist in any difficult spots.
3. Depending on the terrain and weight of the patient, all six rescuers may be necessary to safely carry the litter any distance.
4. If the travel distance is longer, many more rescuers are required (Fig. 57-25).