[level-membership-for-orthopaedics-category]
CHAPTER 28 Humeral Component
Humeral preparation and implantation of the humeral component of a reverse prosthesis are in some ways easier than with unconstrained arthroplasty. In many cases for which a reverse prosthesis is implanted, the rotator cuff is severely compromised or absent, which facilitates exposure of the proximal humerus. Additionally, because of the nonanatomic nature of the reverse prosthesis, preset resection guides are used in humeral preparation, thereby decreasing the importance of identification of the anatomic neck of the humerus, which is critical during implantation of an anatomically designed unconstrained shoulder arthroplasty.
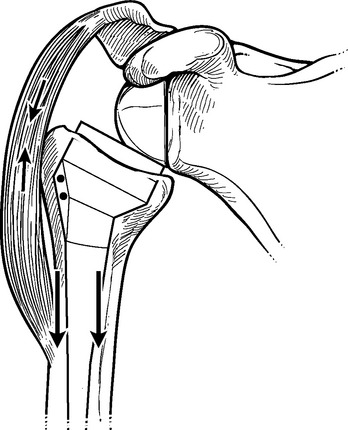
We implant all reverse-prosthesis humeral components with polymethylmethacrylate. The forces acting on the glenohumeral joint of a reverse prosthesis combined with the proximal humeral osteopenia that is often present in candidates for implantation of a reverse prosthesis may contribute to subsidence of uncemented reverse humeral components (Fig. 28-1). Subsidence of the humeral component may cause a critical loss of soft tissue tension and lead to glenohumeral dislocation. Consequently, most manufacturers recommend the use of cement fixation of the humeral component of reverse-design prostheses.
TECHNIQUE FOR INSERTION OF A REVERSE-PROSTHESIS HUMERAL COMPONENT
Once the inferior capsule is released from the neck of the glenoid as described in Chapter 27, humeral preparation begins. The humeral head retractor is removed, and the humeral head is dislocated by externally rotating and extending the arm. This maneuver is typically easier than in cases of unconstrained arthroplasty because the compromised rotator cuff offers little resistance to proximal humeral dislocation. A Hohmann retractor positioned superior to the coracoid process is moved to the margin of the humeral head, which is often “bald” (devoid of any discernible rotator cuff), and a modified Hohmann retractor is placed inferiorly and medially at the surgical neck of the humerus to complete the proximal humeral exposure (Fig. 28-2).
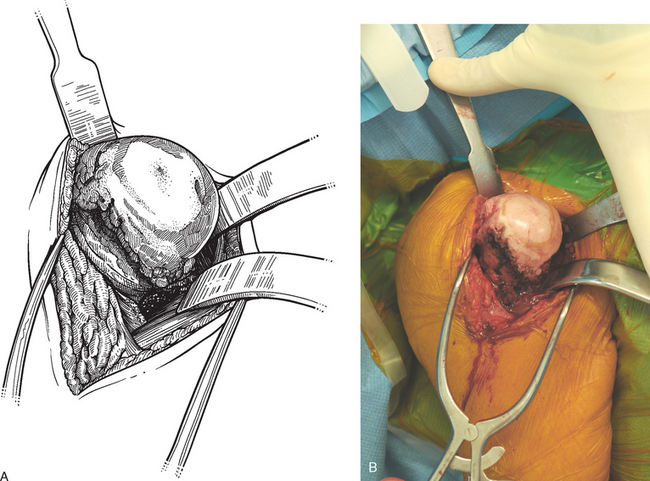
Figure 28-2 A and B, Completed exposure of the proximal humerus in preparation for insertion of a reverse prosthesis.
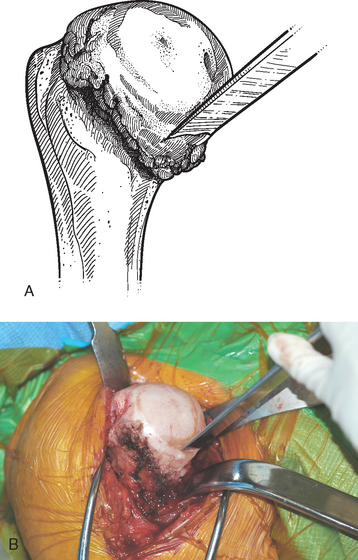
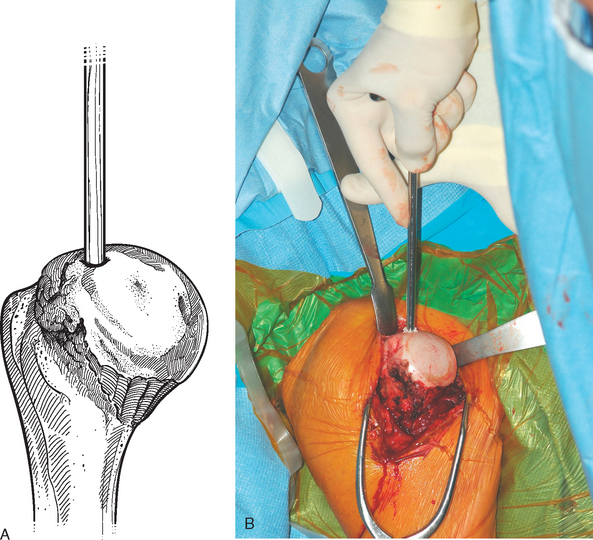
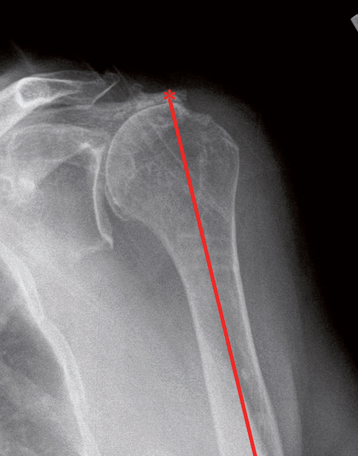
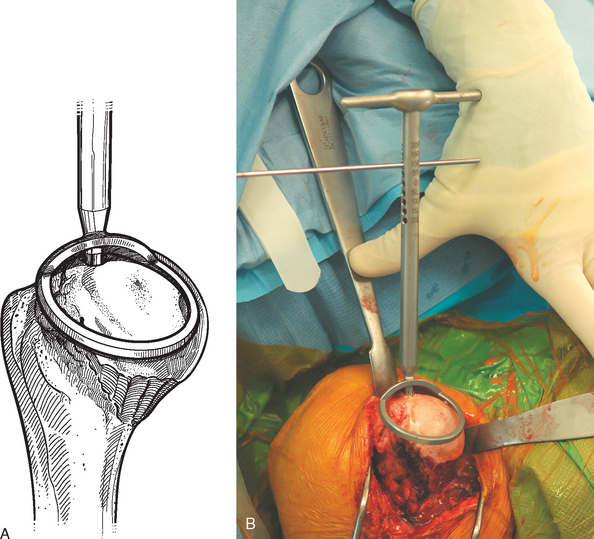
In most patients being treated with a reverse prosthesis, minimal if any peripheral humeral head osteophytes are present. In the uncommon situation in which large humeral osteophytes exist, they are removed with a half-inch osteotome and mallet, just as in cases of unconstrained shoulder arthroplasty (see Chapter 11). In contrast to cases of anatomic arthroplasty in which humeral osteophytes are removed to facilitate identification of the anatomic neck of the humerus to guide resection of the humeral head, osteophytes are removed in reverse-prosthesis procedures to avoid mechanical impingement between the osteophytes and the axillary border of the scapula (Fig. 28-3). A starter awl is used to open the humeral canal (Fig. 28-4). It is helpful to refer to preoperative radiographs to select the proper starting point for the awl, which should be in line with the humeral canal (Fig. 28-5). The humeral head can become deformed in patients with long-standing rotator cuff tears and can make identification of this starting point difficult. The humeral cutting guide, which sets resection at a 155-degree angle of inclination, is placed down the humeral canal (Fig. 28-6).
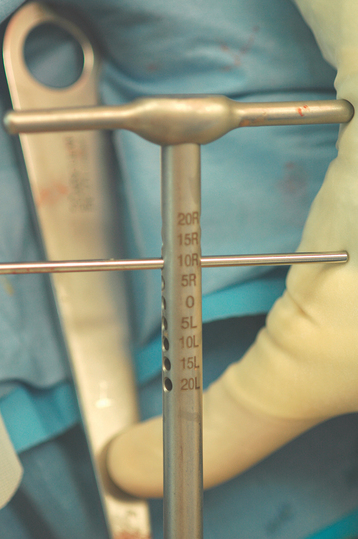
The system that we use allows selection of humeral cut version from neutral to 20 degrees of retroversion with the forearm used as a reference (Fig. 28-7). The advantage of resecting the humeral head in neutral is that less potential impingement may take place between the medial aspect of the humeral component and the lateral border of the scapula with internal rotation (Fig. 28-8). The disadvantage of resecting the humeral head in neutral is that in some cases the humeral cut may nearly miss the articular surface because the patient may normally have excessive humeral retroversion (Fig. 28-9). Conversely, the advantage of resecting the humeral head in 20 degrees of retroversion is that the humeral cut appears more nearly anatomic (Fig. 28-10). The disadvantage of resecting the humeral head in 20 degrees of retroversion is that more inferior impingement may take place with internal rotation (Fig. 28-11). As a compromise between these two extremes, we routinely select 10-degree retroversion with the alignment guide (Fig. 28-12). Resection of the humeral head is performed by resecting a small amount of bone by cutting just under the guide (Fig. 28-13).


With the system that we use, two epiphyseal component sizes are available, 36 and 42 mm. The advantage of the 36-mm component is that it can be used for virtually every case. The advantage of the 42-mm component is that it may impart more stability to the prosthesis, although its large size prohibits use in many cases. Because prosthetic instability has been a rare problem in our experience, we prefer to use the 36-mm implant in nearly all cases. Epiphyseal reaming is performed with a 36-mm-diameter acetabular-type reamer while keeping the reamer’s orientation perpendicular to the cut humeral surface (Fig. 28-14). A single-size metaphyseal reamer is introduced (Fig. 28-15). Progressive diaphyseal reaming is performed until the appropriate diaphyseal diameter is attained, as evidenced by the diaphyseal reamer’s reaching the inner humeral cortex (Fig. 28-16). The trial stem is assembled by screwing the selected diaphyseal component onto the 36-mm metaphyseal component (Fig. 28-17). The trial is attached to the insertion guide, which is marked for humeral version with respect to the forearm (Fig. 28-18). The trial implant is inserted at 10 degrees of humeral retroversion by using the insertion guide (Fig. 28-19). The location of the lateral fin of the trial is marked with the electrocautery on the humeral metaphysis to use as a reference when later inserting the final humeral implant (Fig. 28-20). The trial implant is removed and a sponge is placed in the humeral metaphysis before retracting the humerus posteriorly for preparation of the glenoid (Fig. 28-21). Alternatively, some systems allow insertion of a humeral cut protector to avoid fracture of the anterior aspect of the humerus during posterior retraction (Fig. 28-22). We have, however, found it necessary in many cases to create a “controlled fracture” of the lesser tuberosity during posterior retraction of the humerus to obtain adequate access to the glenoid (Fig. 28-23). In our experience, this controlled fracture technique has had no detrimental consequences.
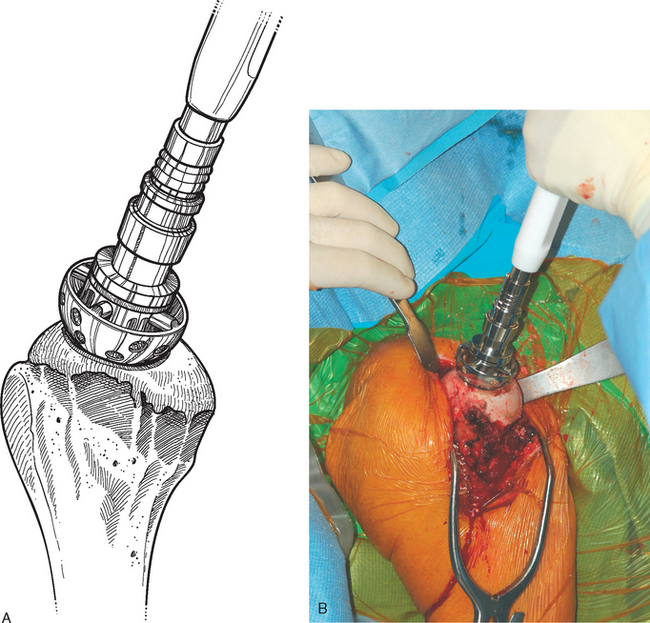
Figure 28-14 A and B, Epiphyseal reaming with an acetabular-type reamer perpendicular to the cut humeral surface.


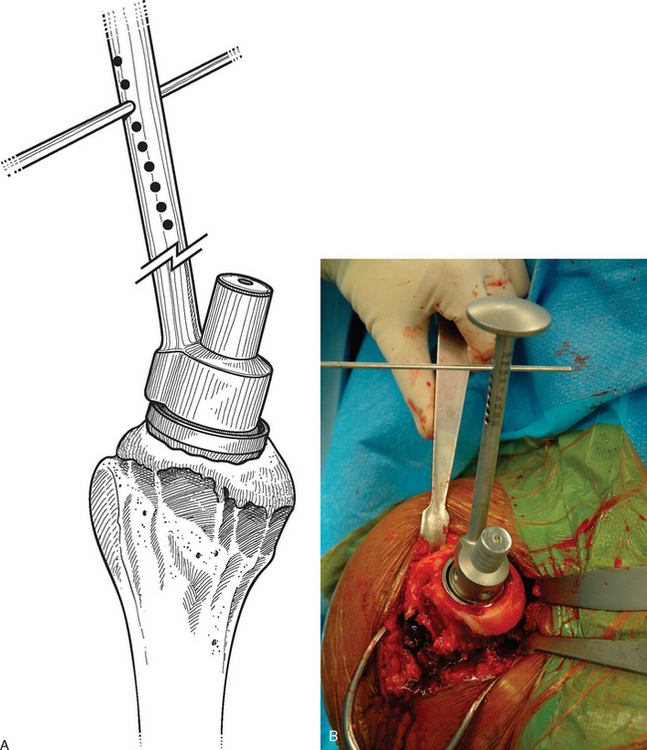
Figure 28-19 A and B, Insertion of the trial humeral component in 10 degrees of humeral retroversion.

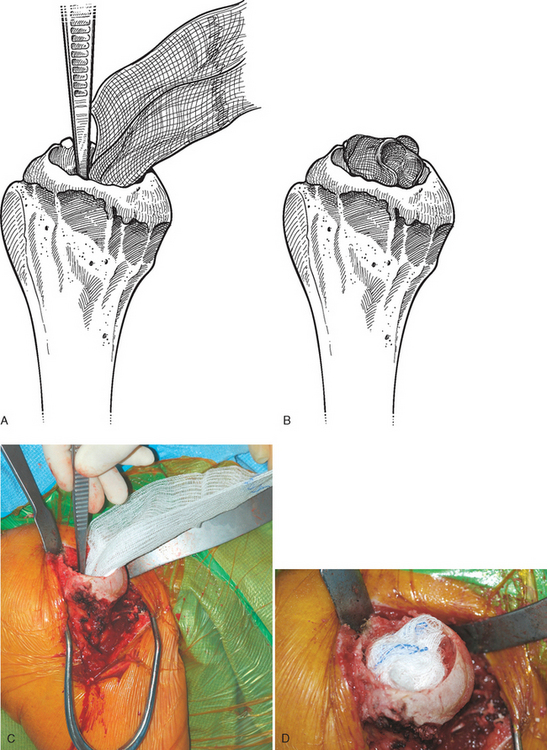
Figure 28-21 A to D, A sponge is placed in the humeral metaphysis after the trial humeral component is removed.

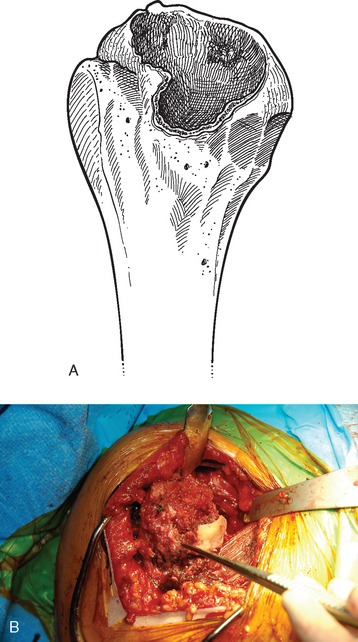
Figure 28-23 A and B, “Controlled fracture” of the anterior aspect of the proximal humerus to allow exposure of the glenoid.
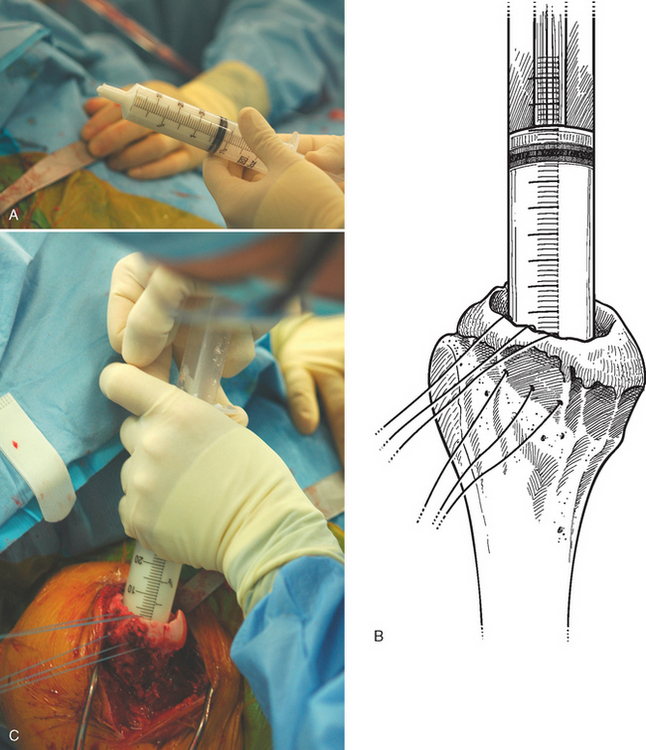
The glenoid is prepared and implanted as detailed in Chapter 29. The final humeral implant is assembled by securing the metaphyseal component to the insertion handle and screwing the diaphyseal component onto the metaphyseal portion with the wrenches provided (Fig. 28-24). The proximal humerus is dislocated anteriorly and the sponge removed from the humeral metaphysis. A cement restrictor is placed at the appropriate level to create a 1-cm cement mantle distal to the tip of the stem (Fig. 28-25). If the subscapularis is present, three transosseous no. 2 permanent braided sutures are placed through the stump of the subscapularis tendon and the lesser tuberosity for later use in reattachment of the subscapularis (Fig. 28-26). The humeral canal is irrigated and dried. Fast-curing polymethylmethacrylate cement (DePuy 2 bone cement, DePuy, Inc., Warsaw, IN) is placed in the humeral canal with a catheter tip 60-mL syringe that has been modified by cutting off the distal aspect of the plastic tip with heavy bandage scissors (Fig. 28-27). The insertion handle is used to place the prosthesis. Care is taken to ensure that the prosthesis is placed in 10 degrees of retroversion by using the previously made electrocautery mark on the humerus and the insertion guide (Fig. 28-28). In most cases the prosthesis will be rotationally stable immediately after insertion, thus allowing immediate placement of a trial spacer and reduction to check soft tissue tension (Fig. 28-29). In cases of proximal humeral bone loss, the cement should be allowed to cure completely before reduction of the prosthesis to maintain proper version (Fig. 28-30).


[/level-membership-for-orthopaedics-category][not-level-membership-for-orthopaedics-category]
CHAPTER 28 Humeral Component
Humeral preparation and implantation of the humeral component of a reverse prosthesis are in some ways easier than with unconstrained arthroplasty. In many cases for which a reverse prosthesis is implanted, the rotator cuff is severely compromised or absent, which facilitates exposure of the proximal humerus. Additionally, because of the nonanatomic nature of the reverse prosthesis, preset resection guides are used in humeral preparation, thereby decreasing the importance of identification of the anatomic neck of the humerus, which is critical during implantation of an anatomically designed unconstrained shoulder arthroplasty.
We implant all reverse-prosthesis humeral components with polymethylmethacrylate. The forces acting on the glenohumeral joint of a reverse prosthesis combined with the proximal humeral osteopenia that is often present in candidates for implantation of a reverse prosthesis may contribute to subsidence of uncemented reverse humeral components (Fig. 28-1). Subsidence of the humeral component may cause a critical loss of soft tissue tension and lead to glenohumeral dislocation. Consequently, most manufacturers recommend the use of cement fixation of the humeral component of reverse-design prostheses.
TECHNIQUE FOR INSERTION OF A REVERSE-PROSTHESIS HUMERAL COMPONENT
Once the inferior capsule is released from the neck of the glenoid as described in Chapter 27, humeral preparation begins. The humeral head retractor is removed, and the humeral head is dislocated by externally rotating and extending the arm. This maneuver is typically easier than in cases of unconstrained arthroplasty because the compromised rotator cuff offers little resistance to proximal humeral dislocation. A Hohmann retractor positioned superior to the coracoid process is moved to the margin of the humeral head, which is often “bald” (devoid of any discernible rotator cuff), and a modified Hohmann retractor is placed inferiorly and medially at the surgical neck of the humerus to complete the proximal humeral exposure (Fig. 28-2).
Figure 28-2 A and B, Completed exposure of the proximal humerus in preparation for insertion of a reverse prosthesis.
In most patients being treated with a reverse prosthesis, minimal if any peripheral humeral head osteophytes are present. In the uncommon situation in which large humeral osteophytes exist, they are removed with a half-inch osteotome and mallet, just as in cases of unconstrained shoulder arthroplasty (see Chapter 11). In contrast to cases of anatomic arthroplasty in which humeral osteophytes are removed to facilitate identification of the anatomic neck of the humerus to guide resection of the humeral head, osteophytes are removed in reverse-prosthesis procedures to avoid mechanical impingement between the osteophytes and the axillary border of the scapula (Fig. 28-3). A starter awl is used to open the humeral canal (Fig. 28-4). It is helpful to refer to preoperative radiographs to select the proper starting point for the awl, which should be in line with the humeral canal (Fig. 28-5). The humeral head can become deformed in patients with long-standing rotator cuff tears and can make identification of this starting point difficult. The humeral cutting guide, which sets resection at a 155-degree angle of inclination, is placed down the humeral canal (Fig. 28-6).
The system that we use allows selection of humeral cut version from neutral to 20 degrees of retroversion with the forearm used as a reference (Fig. 28-7
[/not-level-membership-for-orthopaedics-category]
