1 How to use this book
Preparation before using the book
• Verify all the information that has been presented and familiarize yourself with the layout of the book! If you have checked it yourself you will have learnt a lot about emergency drug doses and reassured yourself that the content is sound (we really hope you don’t find any errors).
• Check which doses have been presented, as a higher or lower dose may be appropriate for different clinical scenarios. In general the most commonly used dose that is known to be effective has been selected, or one that is found in a high-profile source. If a drug has more than one use, such as agents employed in procedural sedation for example, make sure that you know which dose is to be found in the EDDC book. We encourage you to read up on the doses and agents contained in this book as they all form a core part of paediatric emergency practice.
• Check which formulation has been used for the dilution. This is a perennial problem as comprehensive paediatric formularies do not exist. If your local preparation differs from the one that we have used then be sure to note the necessary changes in your book.
• Use the Broselow® tape or PAWPER tape (see p. 5) to determine the patient’s weight. Flip to that weight section in this book: everything that is needed will be on those pages, from drug doses to equipment sizes to information for emergency infusion initiation. Everything is alphabetical to help making navigating around the book easier.
• Make sure that you have read the pharmacology chapter in this book so that you can decide how best to tailor or adapt your drug doses based on age as well as body weight (total/ideal/adjusted body weight or according to the age of your patient).
• Select the drug or equipment that you need and read off the dose or size. If you have an accurate weight, then use that weight as the reference. It may be necessary to interpolate between doses if a patient’s weight falls between the reference weights in the book. If you are not sure how to interpolate then read the following examples. In general, however, the reference weights have been selected such that there is a small increase in volume to administer (such as 1 mL).
• As a general rule give all medications slowly unless there is a specific reason not to (such as with adenosine)! Some drug doses may need to be repeated for appropriate clinical results. Monitor the effect and move on to the next appropriate management step.
• Keep the book with you whenever it might be needed – it will do you no good if it is in your car/your bag/your study and you are up to your elbows in trouble in the ED, ICU or paediatric ward.
• This book is meant to provide assistance to a TEAM and not just the doctor, so make sure that your team knows how to use it too. This applies especially to the team members who will be preparing and administering the drug dilution.
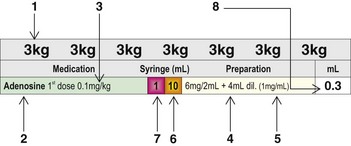
Guide to using the bolus drug dose tables
1. Turn to the page of the book with the correct weight, or the closest weight if that exact weight is not presented. Whether you use the closest higher or lower weight depends on the drugs you wish to use, but in general use the closest higher weight to ensure that the dose that you administer is effective. Interpolation may be necessary at the higher end of the weight spectrum.
2. This is the generic drug name, with an indication of the route of administration if more than one is presented.
3. This is the dose that was selected to be presented in this book because it was considered to be the most appropriate and the safest to ensure efficacy while avoiding overdosage or toxicity.
4. This is the suggested dilution of the drug to provide a manageable volume to administer accurately: this has to be a balance between too much volume (especially for infants less than 10 kg) and too much ‘fiddling’ required. The milligrams per ampoule or vial as well as the volume in the ampoule or vial are reflected, with the amount of diluent to be added. Drugs in powder form may be required to be diluted with a special diluent or may be dissolved directly into normal saline, water for injection or 5% dextrose water. Most drugs can be diluted into any of these solutions, but some manufacturers recommend specific diluents (e.g. dextrose water for amiodarone). In a true emergency any diluent may be used.
5. This is the final strength of the drug dilution. This value allows for easy cross-checking to ensure that correct doses are administered. It also allows for alternative dilutions with different preparations as long as the final dilution is the same.
6. This is the size of the syringe needed to prepare the diluted drug solution. The volume of the final solution does not always fill the syringe, however.
7. For smaller children a 1 mL syringe may be needed to withdraw small volumes of diluted drug from the larger syringe. This transfer can be accomplished easily with a 3-way stopcock. This allows for a greater precision in the delivery of a small volume. Even when a volume of greater than 1 mL is to be administered it might be advantageous to draw the volume up into a smaller syringe (e.g. a 2 mL or 3 mL syringe) to accurately administer volumes such as 1.2 mL or 1.8 mL.
8. This is the millilitre volume of the diluted solution to give via intravenous or intraosseous line. In general, give slowly to avoid adverse effects (except e.g. adenosine). This volume may be further diluted into the IV burette chamber (Buretrol/Volutrol/Soluset) to facilitate slow administration.
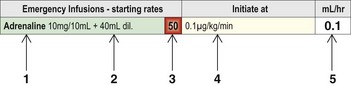
Guide to using the emergency infusion tables
• It is often necessary to commence infusions of vasoactive or other medications in the ED. The starting rates of commonly used infusions may be found in the same section as the bolus drug doses.
• To use the infusion starting dose panel, draw up the indicated amount of drug and dilute it with the specified amount of diluent into a 50 mL syringe.
• Some infusions require a bolus before commencing the infusion. Make sure that you are familiar with how each infusion should be initiated.
• A syringe-driver system is generally the most accurate and convenient system for administering infusions. If you are not using a syringe-driver system then the drug can be mixed into 200 mL of diluent and the infusion run at four times the indicated rate. Alternately, four times the amount of drug can be added to 200 mL and the infusion run at the same indicated rate.
• Begin the infusion at the starting rate as shown in the far right panel; this is usually the lowest effective dose and is always in mL/hr.
• If the desired clinical response is not achieved, then the rate of infusion may be increased as shown in the full infusion panel in Chapter 6 of this book.
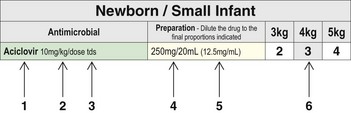
Guide to using the antimicrobial dose tables
1. The generic drug name of the antimicrobial.
2. The recommended dose for serious infections is always expressed as ‘per dose’ rather than ‘per day’ to minimize chances of confusion.
3. The suggested frequency of administration of the antimicrobial. The dose that is presented might only apply to the loading dose or the first dose and you should ensure that you are familiar with the medication before prescribing or using it.
4. The suggested dilution of drug. The milligram dose of the drug to be infused, with the amount of diluent to be added is shown. Drugs in powder form may be required to be diluted with a special diluent or may be dissolved directly into normal saline, water for injection or 5% dextrose water.
5. This is the final strength of the drug dilution. This value allows for easy cross-checking to ensure that correct doses are administered. It also allows for alternative dilutions with different preparations as long as the final dilution is the same.
6. The final volume to be administered. It should be administered in an appropriate fashion according to the agent (e.g. as a short infusion).
Using the Broselow® tape and the PAWPER tape
How to use the Broselow® paediatric emergency tape
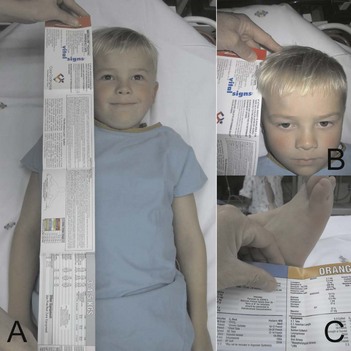
1. Place child supine on the stretcher.
2. Align the Broselow® tape alongside the child (Fig. 1.4).
3. Measure from the child’s head to their heel – placing the side that has the arrow and says ‘MEASURE FROM THIS END’ at the child’s head.
4. Take note of the weight and block colour reached at the patient’s heel.
5. Check for the drug required and the dosage thereof in the weight panel if available.
6. If the drug required is not available, use the weight measurement obtained and consult that weight page in the EDDC.
How to use the Paediatric Advanced Weight Prediction in the Emergency Room (PAWPER) tape
1. Place child supine on the stretcher.
2. Unroll tape alongside the child (Fig. 1.5).
3. Measure from the child’s head to their heel – placing the side that has the five arrows and says ‘MEASURE FROM THIS LINE’ at the child’s head.
4. Take note of the weight in the block obtained.
5. The main bold weight (Fig. 1.6) can be used if the child is of average build.
6. The other four weights are used if the child is not of average build in order to adjust for the child’s body habitus. These weights correspond to the habitus score (HS) which is assigned during the tape measurement procedure (Fig. 1.7).
7. Check for the drug required and the dosage thereof in this book.
8. If the drug required is not available, use the weight measurement obtained in order to calculate the dosage.