Figure 4.1 Correct fitting of a trial frame with each pupil in the centre of each aperture, both horizontally and vertically.
Back vertex distance
Place a lens (of any value) in the trial frame. Ask the patient to fixate on a distant target, and use a rule to measure from the patient’s cornea to the back of the lens (the surface of the lens nearest the cornea). A normal BVD is 10 to 12 mm.
The power of a lens system depends upon the distance of the lens from the cornea. This concept is known as ‘lens effectivity’ and explains why a myope’s contact lens prescription will be numerically weaker than their spectacle prescription. It also explains why patients with powerful prescriptions get a blurred view when their spectacles slip down their nose.
Therefore, the BVD is important when a frame is to be constructed, since the function of the lens system depends not only on the lens power but also on the lens position relative to the cornea. Practically, this is relevant for prescriptions of more than 4 dioptres, but it is good practice to always record the BVD. Formulae exist to allow correction of any given prescription as well as BVD to a different prescription and BVD that will have an equivalent effect.
Visual acuity
‘Acuity’ is a measure of the resolving power of the eye – the ability to discriminate between two points. Distance charts that you should be comfortable with include the Snellen and the LogMAR. Near vision charts that you should be comfortable with include the N-series.
In any clinical setting, it is important to check the distance visual acuity for each eye (unaided, aided and pinhole) and the near acuity for each eye (unaided and aided). If aided, it is useful to state if this is with spectacles or contact lenses. The eye not being tested should be correctly occluded.
For the purpose of the exam, the patient’s spectacles will not be available, so the following will need to be established for each eye:
- distance acuity unaided (Snellen or LogMAR)
- distance acuity with pinhole
- near acuity unaided (N-series; remember to use a bright lamp).
Pinholes only allow axial rays through to the eye, hence reduce the effect of refractive error. Remember that the pinhole vision gives a good idea of potential vision for that eye once the refractive error has been corrected. Ideally, your target end-refraction visual acuity should be at least as good as the pinhole acuity.
Remember that eyes with reduced pinhole vision or reduced vision despite adequate refractive correction have acuity that is limited by amblyopia, ocular pathology or cerebral visual impairment. Pinhole acuity tends to partially improve with corneal or lens pathology but will not improve with amblyopia, retinal, nerve or cerebral pathology (pinhole acuity can be worse than unaided acuity in patients with macular pathology, since it precludes eccentric fixation).
Always consider – why is the vision poor?
Refractive error:
… improves with pinhole.
Amblyopia:
… no improvement with pinhole.
Ocular pathology:
… if of retina or nerve origin, will not improve with pinhole
… if of cornea or lens origin, may improve with pinhole.
Cerebral visual impairment:
… no improvement with pinhole.
Note, of course, a mixture of these reasons commonly coexist.
Refraction estimation
Checking the visual acuity will give you an idea of the refractive error:
- 1 dioptre of spherical error gives 6/12
- 2 dioptres of spherical error give 6/24 to 6/36
- 3 dioptres of spherical error give 6/60.
However, note that this guide is for spherical error and ignores that the patient may have astigmatism. The impairment in acuity is about half that for cylindrical errors relative to spherical errors. Therefore, a patient with 0.00/+2.00 @ 080 would be approximately 6/12 unaided.
This guide should only be used as an approximation, since patients will have a mixture of spherical and cylindrical error.
This refraction estimation alone does not, however, suggest whether the patient is myopic or hypermetropic. For example, if they are 6/24 unaided, their refraction could be –1.75 or +1.75 spherical dioptres. To estimate if the patient is myopic or hypermetropic, compare their unaided distance acuity with their unaided near acuity. This concept is more useful if the patient is presbyopic, since otherwise the effect of accommodation confounds the estimation. If a patient has poor distance vision but good near vision, you know they are myopic. For example, if a presbyope has an unaided Snellen distance acuity of 6/60, yet is N5 at reading distance (on the near vision N-series reading chart), their refraction is probably around –2.00 to –3.00 spherical dioptres.
If they have poor distance vision and poor near vision, you know they are hypermetropic (or they have amblyopia, or ocular pathology or cerebral visual impairment – this should be clear from your history).
Visual acuity testing of a child
Although children can be unpredictable, which adds stress to an examination setting since it is something you cannot control, there are a number of useful ways of handling this that come with experience in assessing the visual behaviour of children.
It is important to spend time with orthoptic staff, since this is the best way to learn to be comfortable with the following:
- patching as a means of occlusion (note that objection to occlusion implies poor acuity in the other eye)
- assessing if a child’s vision is central (i.e. no squint), steady (i.e. conjugate movements with no nystagmus) and maintained through the duration of a blink (i.e. there is sufficient acuity to fixate on and follow an object of interest, demonstrating that it is seen)
- preselected tests, such as Cardiff Cards, Kay Pictures, single optotype or crowded charts, used to assess binocular and monocular distance acuity.
Retinoscopy (objective refraction)
Retinoscopy basics
The aim of retinoscopy is to obtain an objective refraction – that is, an estimation of the patient’s spectacle prescription using a process that does not require any decisions to be made by the patient.
Retinoscopy also gives a good benchmark from which the prescription can be fine-tuned using subjective techniques (using subjective rather than objective refraction from the beginning takes considerably longer).
Retinoscopy is an invaluable process for children or adults with learning disability, as these patients will not be able to answer the questions required for subjective refraction. For these patients, your spectacle prescription will be based on your retinoscopy alone.
A retinoscope produces a light, which, with the cuff fully down, is linear (the scope slit). For more information on the retinoscope, see Appendix 2. Quite simply, the scope slit light is passed across the patient’s pupil and a light within the pupil (the reflex) is observed. By noting the quality of this reflex, various lenses are then placed in the trial frame to neutralise the reflex. As neutralisation is approached, the reflex will become faster and brighter. A dull, slow reflex implies neutralisation is not close. At neutralisation, the reflex is a glowing bright pupil; at this point, the lenses in the trial frame provide the objective spectacle prescription (once corrected for working distance).
The scope slit is held at a certain angle (say, vertically) then swept across the pupil in a direction perpendicular to the orientation of the scope slit (in this case, horizontally). As the scope slit passes across the pupil, the reflex can be noted to have certain characteristics: (a) direction, (b) orientation, and (c) brightness and speed.
Characteristics of retinoscope reflex
Direction:
- with or against or neutralised.
Orientation:
- vertical, horizontal or oblique
- scissor reflex.
Brightness and speed:
- bright and fast
- dull and slow.
Direction of reflex
A ‘with’ reflex is seen if, as your slit passes across the pupil, a light within the pupil (the reflex) moves in the same direction (see Figure 4.2). A plus lens must be added to the trial frame to approach neutralisation.
An ‘against’ reflex is seen if, as your slit passes across the pupil, a light within the pupil (the reflex) moves in the opposite direction (see Figure 4.3). A minus lens must be added to the trial frame to approach neutralisation.
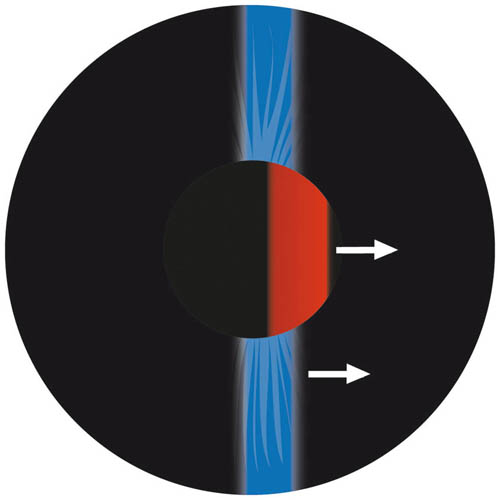
Figure 4.2 A ‘with’ reflex. The scope slit is orientated vertically and swept horizontally across the pupil to give a with reflex
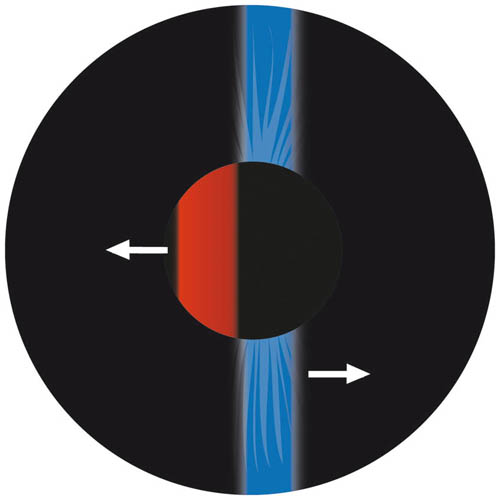
Figure 4.3 An ‘against’ reflex. The scope slit is orientated vertically and swept horizontally across the pupil to give an against reflex
To neutralise:
with reflex … add plus lens
against reflex … add minus lens.
Therefore, to approach neutralisation, either a plus (if with reflex) or minus (if against reflex) must be added to the trial frame. If the reflex is already quite fast and bright, only 0.25 or 0.50 may be sufficient to reach neutralisation. To confirm neutralisation, you can lean backwards, further away from the patient (reflex becomes against) or lean forwards closer to the patient (reflex becomes with). This is because the closer you are, the more minus must be added to correct for the working distance (see ‘Correction for working distance’, p. 34). Alternatively, to ensure the end point has been reached, add a +0.25 lens, which should give an against reflex. Such reversal of the reflex is important to achieve, since it highlights that the true end point of neutralisation has been established.
Note that the lenses added to approach neutralisation are either spherical or cylindrical. If a sphere is added to neutralise the reflex, it will also alter the subsequent lenses required in the perpendicular axis to obtain neutralisation. If a cylindrical lens is added (with the axis orientated the same way as the scope slit, so the power of the cylindrical lens will act in the same plane as the scope sweep), neutralisation in this plane is approached and has no effect on the other principal meridian.
Orientation of reflex
The orientation of the retinoscope’s slit light should be parallel to the pupil reflex.
If there is no astigmatism, or if the astigmatism is either with the rule or against the rule, the reflex will be orientated vertically and horizontally. In these situations, ensure the slit is vertical then horizontal (rotate the slit by rotating the cuff slightly) to neutralise these meridians.
With oblique astigmatism, the principal meridians are still perpendicular but do not lie vertically and horizontally. Therefore, when a horizontal scope sweep is made with the slit orientated vertically, the orientation of the pupil reflex will be oblique and not lie vertically (it will lie between 045 and 090 or 090 and 135) – see Figure 4.4. Similarly, if the scope slit was orientated horizontally and a sweep made vertically, the orientation of the pupil reflex will again be oblique and not be horizontal (it will lie between 000 and 045 or 135 and 180). For oblique astigmatism, the scope slit should be rotated by turning the cuff slightly so the slit is parallel to the pupil reflex to aid subsequent neutralisation. The perpendicular meridian can then be neutralised by rotating the slit 90 degrees (e.g. if one meridian is at 110, the other will be at 020).

Figure 4.4 With oblique astigmatism, the orientation of the reflex will not be horizontal or vertical but oblique
Another type of reflex is the ‘scissor reflex’, which occurs with a high degree of irregular corneal astigmatism, such as keratoconus. These reflexes can be difficult or simply not possible to neutralise. Keratoconus is a corneal ectasia, characterised by progressive stromal thinning and conical distortion, associated with increasing irregular astigmatism and myopia. It is appropriate to examine the eye on the slit lamp for other signs of keratoconus (stromal thinning/cone, Vogt’s striae, Fleischer ring). Investigations include corneal topography so the degree of irregular astigmatism can be quantified and mapped. This aids the consideration of the various available treatment options for keratoconus, including contact lenses, scleral contact lenses or surgical intervention (riboflavin with ultraviolet A/collagen cross-linking, intra-stromal implants, deep lamellar or penetrating keratoplasty).
Brightness and speed of reflex
As mentioned, the brighter and faster the reflex, the closer to neutralisation. In these situations, use a small magnitude of lens power alteration (0.25 or 0.50 dioptres) since neutralisation is close.
Therefore, a dull, slow reflex is far from neutralisation and sometimes it pays to begin with a ±5 or ±10 spherical lens to start off with.
Remember, a dull reflex also occurs with medial opacity (such as with a cataract or vitreous haemorrhage). A dull reflex can also occur as a result of flat retinoscope batteries!
Correction for working distance
‘Working distance’ is the distance from the patient’s cornea to your retinoscope.
It is necessary to alter the sphere of the lenses in the trial frame to give a corrected full prescription based upon the value of the working distance.
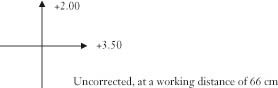
The retinoscope is constructed so that if retinoscopy is performed at 1 m from the patient, the lenses in the trial frame to give neutralisation are equal to the spectacle prescription. However, we do not do retinoscopy at 1 m, but rather at 66 cm (when working with trial frames) or 50 cm (if you have shorter arms or when working without trial frames – for example, with children, examination under anaesthesia or a model eye). Therefore, once neutralisation is obtained, to convert to the corrected prescription, it is necessary to add a –1.50 sphere to the trial frame (to correct for a 66 cm working distance) or a –2.00 sphere (to correct for a 50 cm working distance). Note that the cyl remains unchanged.
Therefore, a –1.50 myope will neutralise without any lenses if working at 66 cm. A –2.00 myope will neutralise without any lenses if working at 50 cm.
Here are some other examples:
- neutralisation occurs with +4.25/–1.75 @ 030 at 66 cm, so the corrected refraction will be +2.75/–1.75 @ 030, since +4.25 plus –1.50 = +2.75
- neutralisation occurs with –3.75/+0.75 @ 044 at 50 cm, so the corrected refraction will be –5.75/+0.75 @ 044, since –3.75 plus –2.00 = –5.75.
Therefore, the working distance correction factor is the reciprocal of the working distance in metres and this must be subtracted from the retinoscopy result.
Whenever a result is recorded, it is vital to state whether this is uncorrected or corrected for the working distance and what that working distance is. Therefore, add a –1.50 spherical lens for a working distance of 66 cm and add a –2.00 spherical lens for a working distance of 50 cm.
The correction of working distance can be done at the end of the retinoscopy once neutralisation has been achieved, whilst working at 66 cm or 50 cm. However, it can be done at the start of retinoscopy. In this case, before using the retinoscope, you must add +1.50 (for 66 cm) or +2.00 (for 50 cm) to the trial frame (or your fingers, if working with no frame), and the resultant lens summation at neutralisation will give the corrected prescription. Whether you decide to correct for working distance at the end or the start of retinoscopy does not matter – but it must be done and your results should be clearly recorded to demonstrate at what stage a correction for working distance was made.
Static versus dynamic retinoscopy
‘Static’ retinoscopy means that the working distance is fixed throughout retinoscopy. This is what most practice and is what is detailed in this book.
Experienced practitioners can use the concept of working distance to their advantage by varying their working distance to obtain neutralisation (rather than changing the lenses). This is known as ‘dynamic’ retinoscopy.
For example, an emmetrope neutralises at 1 m, a –1.50 myope at 66 cm, a –2.00 myope at 50 cm, a –5.00 myope at 20 cm and so on. Imagine you get an against movement at 66 cm – rather than adding a minus lens (in the case of static retinoscopy), you instead lean forward to 50 cm and neutralisation occurs – the patient’s refraction in that meridian is therefore –2.00.
Dynamic retinoscopy is less practical for hypermetropes, since hypermetropes neutralise with a working distance of more than 1 m.
Dynamic retinoscopy takes considerable practise but is extremely useful for refracting challenging patients (such as children) because it is so rapid.
Retinoscopy technique
Ideally, the room should be dim. The darker the room, the easier it is to note the reflex characteristics; if the room is too dark, you will struggle to find your lenses. A useful trick is to use your retinoscope light as a torch if you cannot see the lens markings easily.
Ensure that your retinoscope cuff is all the way down on the shaft of the retinoscope.
Key points for retinoscopy
- Establish a dim room.
- Fog (or occlude, if necessary) the fellow eye.
- Scope the patient’s right eye with your right eye/right hand.
- Scope the patient’s left eye with your left eye/left hand.
- Keep your scope as close as possible to their visual axis, without interrupting continuous distant fixation.
- Correct for working distance (add –1.50 sphere if at 66 cm; add –2.00 sphere if at 50 cm).
- Record in either positive cyl notation for both eyes or negative cyl notation for both eyes (never positive for one eye and negative for the other).
The first step is to examine the patient’s right eye with the retinoscope. For non-cycloplegic refraction of patients who are not presbyopic (especially if they are myopic), it is necessary to fog (blur) the fellow left eye. This involves placing a +1.50 or +2.00 spherical lens on top of the presumed refraction (estimated from their acuity, which you have just checked), so that the acuity is poorer than that of the eye being examined with the retinoscope.
Adequate fogging can be confirmed by ensuring that the retinoscopy reflex is against or, alternatively, checking the acuity in each eye with the fog in place and ensuring the fogged eye has poorer acuity than the eye about to be objectively refracted. If the patient is 6/6 with the presumed refraction, a +1.50 or +2.00 spherical dioptre fog typically renders the eye to 6/12 to 6/24.
The reason why the fellow eye should be fogged is to reduce accommodation, which would give a false result when examining the fellow eye with the retinoscope. With cycloplegic refraction (typically in children), there is no need to fog, since the accommodative component is removed by the cycloplegia. For non-cycloplegic refraction (most adults), fogging is required to reduce any accommodative drive (especially if the patient is a myope who is not yet presbyopic).
This fogging induces less accommodation than simple occlusion with a black occluder – hence, the effort made to fog rather than simply occlude.
Occlusion, rather than fogging, should be avoided, as it stimulates more accommodation. However, occlusion is required in the following situations:
- when the eye being tested is densely amblyopic (since the eye not being tested must have a poorer acuity to help avoid accommodation and a +2.00 lens will probably be insufficient to achieve this)
- if the patient markedly objects to fogging due to diplopia or asthenopia
- if you are unable to estimate acuity and provide an adequate fog lens.
Once you have adequately fogged (or, if necessary, occluded) the fellow eye, ask the patient to fixate on the white light or green target in the distance. Explain to them that it is important that they continue to look into the distance and not at your own white light. Ask them to let you know if your head obscures their view of the distant fixation target. It is vital to ensure that your head is as close as possible to their visual axis, without actually obscuring their distant fixation target – this ensures that your retinoscope light will be close to their visual axis (see Figure 4.5). Failure to be ‘on axis’ in this way can result in spurious astigmatism, thus it is important to be wary of this when refracting children who shift their position.

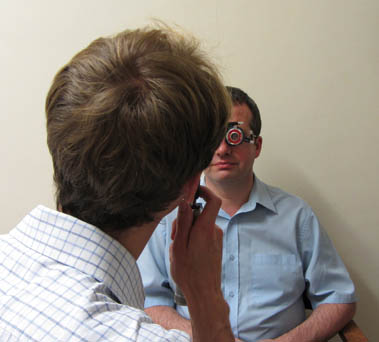
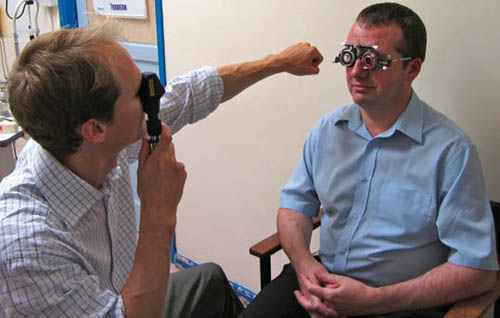
Figure 4.5 Use your left hand to perform retinoscopy of the patient’s left eye (left photo), since incorrectly using your right hand will obstruct their view (central photo). Check working distance with arm (right photo).
Use your right hand and right eye to scope their right eye. Scope first with a vertical, then a horizontal and finally a diagonal slit to locate the principal meridians. If only a dull, slow reflex is seen, try using a ±5 or even a ±10 lens. Then proceed by refracting in plus or minus cyls or spheres alone (see ‘Working in plus/minus cyls or spheres’, p. 39).
Once you have objectively refracted the right eye, correct for your working distance (add a –1.50 sphere if at 66 cm) and record your result (state ‘corrected for working distance’). Then fog the right eye and use your left hand and left eye to scope their left eye. Once you have objectively refracted the left eye, again correct for working distance and record this. You should now turn the lights on, check the visual acuity and move onto subjective refraction.
Remember that if a with reflex is seen, then a plus lens should be added and if an against reflex is seen then a minus lens should be added to approach neutralisation. The brighter and faster the reflex, the closer you are to neutralisation (the entire pupil lights up when the slit enters the pupil), whereas a dull and slow reflex implies you are not close to neutralisation.
Working in plus/minus cyls or spheres
It is possible to refract with your retinoscope in three different ways:
- using positive cyls
- using negative cyls
- using spheres only.
Using positive cyls
This means that your retinoscopy result will be in a plus cyl format.
Identify the orientation of the two principal meridians, which will be perpendicular to each other. The principal meridian that has an against reflex – or, if both reflexes are with, it will be the least with reflex (which is fastest and brightest, as it is nearest neutralisation) – is neutralised first with spheres. This will result in the other principal meridian giving a with reflex, which is then neutralised with positive cyls (the axis on the lens in the same orientation as the scope slit). The resultant prescription will be the lenses in the trial frame (which must then be corrected for working distance).
For example, you identify an against reflex with scope slit at 135 and a with reflex at 045. Add minus spheres until the against reflex at 135 is neutralised (say, –3.00 causes neutralisation). Then add plus cyls (with the axis in the same orientation as the scope slit at 045) to neutralise the with reflex (say, +1.50 at 045 causes neutralisation). The axis line on the cyl lens should be parallel to the scope slit and light reflex (perpendicular to its power). The lenses in the trial frame then give the retinoscopy result in plus cyl format: –3.00/+1.50 @ 045, which must then be corrected for working distance (if at 66 cm, this gives –4.50/+1.50 @ 045).
This may sound complicated, but simply consider that a patient with regular astigmatism requires a sphere with a cyl superimposed upon it to correct their refractive error. The sphere is found by neutralising the most against reflex, and the perpendicular meridian will then give a with reflex, which can be neutralised with plus cyls to give the sphero-cylindrical correction (which must be corrected for working distance).
Using negative cyls
This means that your retinoscopy result will be in a minus cyl format.
Identify the orientation of the two principal meridians, which will be perpendicular to each other. First, neutralise the most with reflex with plus spheres then neutralise the perpendicular against reflex with minus cyls. The lenses in the trial frame will give the retinoscopy result in minus cyl format, which must then be corrected for working distance.
Using spheres only
It is possible to obtain an objective refractive result without using any cylindrical lenses. Identify the two principal meridians. Neutralise one of the meridians with a sphere, record the result and orientation of reflex then remove the sphere. Following this, neutralise the perpendicular meridian with a sphere and record the result and orientation of the reflex. The refractive result can then be expressed in either plus or minus cyl format; in both cases, the magnitude of the cyl is the difference between the two spheres. It can be useful to use a power cross to generate the resultant prescription.
Power crosses
As noted, if working in plus or minus cyls, the resultant refraction obtained by retinoscopy will simply be the lenses in the trial frame (this does not apply if working in spheres). This can then be corrected for working distance.
Therefore, it is not necessary to draw power crosses and power crosses are not required for the Refraction Certificate Examination (at the time of writing). However, since some practitioners use power crosses it is good practice to understand them. Furthermore, if you work only in spheres, it is useful to use a power cross to obtain your resultant refraction.
Each arrowed arm of a power cross represents the direction of movement of the retinoscope sweep. For example, when sweeping horizontally with the scope slit orientated vertically, the power in the horizontal plane (180) is examined. Therefore, if a sphere with power +3.50 dioptres neutralises a horizontal sweep, this implies the power in the horizontal direction is +3.50 dioptres. If a sphere with power +2.00 dioptres is then required to neutralise a vertical sweep with a horizontally orientated scope slit (to assess vertically acting power), the resultant power cross would be:
Correcting for working distance would give:

To obtain the prescription from the power cross in positive cyl notation:
- record the least positive sweep as the sphere
- record the cyl as the difference between the two sweeps
- record the axis as the same axis of the most positive sweep (remembering that the axis is perpendicular to the direction of action of the power arrow).
[level-membership-for-opthalmology-category]
Therefore, this example gives the prescription +0.50/+1.50 @ 090, which, when transposed, may also be written +2.00/–1.50 @ 180.
Here is another power cross example:
With slit at 045, power sweep at 135, a sphere of power –1.50 dioptres is required for neutralisation. With slit at 135, power sweep at 045, a sphere of power +0.25 dioptres is required for neutralisation. This gives the power cross:
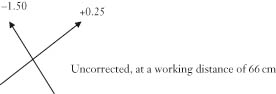
Which, when corrected for working distance, gives:
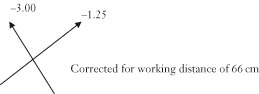
Which gives the prescription –3.00/+1.75 @ 135.
Therefore, if working in plus or minus cyls, power crosses are not necessary since the resultant prescription, once corrected for working distance, is simply the lenses in the frame. However, if refracting in spheres, power crosses are useful for obtaining the prescription.
Interpreting the initial retinoscopy sweeps
When you are just starting, it is useful to have a clear idea in your mind of how to interpret the initial retinoscopy sweeps, since it is from here that you will make sequential decisions.
The level of your experience will become painfully obvious to the examiners at this early stage, so it is important to be confident and decisive at this point.
It is useful to make three sweeps: one with the slit vertical, one with it horizontal and one that is obliquely orientated at a meridian that has become clear to you following the vertical and horizontal sweeps, if there is an oblique reflex.
Assuming you are working at 66 cm and have decided to work in plus cyls format, consider the seven possible initial scope sweep results:
- Neutralised in all meridians.
The patient has a spherical refractive error of –1.50 dioptres (no cyl).
- A dull, slow reflex that is difficult to interpret.
Provided your retinoscope battery has not been exhausted from all your enthusiastic work, the patient has a high degree of ametropia, so try interposing a ±5 or ±10 spherical lens. Remember, aphakia is a common cause of high hypermetropia.
- An against reflex in all meridians that is equally fast and bright.
The patient is more myopic than –1.50 dioptres, and there is no significant astigmatism (neutralise with minus spheres).
- A with reflex in all meridians that is equally fast and bright.
The patient is more plus than –1.50 dioptres, and there is no significant astigmatism (neutralise with plus spheres).
- An against reflex in one meridian but more against (slower and duller) in another.
The patient has compound myopic astigmatism. Add minus spheres until the most against cyl is neutralised, leaving a perpendicular with reflex that can be neutralised with plus cyls.
- A with reflex in one meridian but more with (slower and duller) in another.
The patient has compound hypermetropic (or rather more plus than –1.50 dioptres) astigmatism. Add plus spheres until the least with cyl (faster and brighter reflex) is neutralised leaving a perpendicular with reflex that can be neutralised with plus cyls.
- A with reflex in one meridian and an against reflex in the perpendicular meridian.
The patient has mixed astigmatism. Add minus spheres to neutralise the against reflex then add plus cyls to neutralise the with reflex.
Cycloplegic versus non-cycloplegic retinoscopy
‘Cycloplegia’ refers to paralysis of the ciliary muscle, so that accommodation is not possible. Cycloplegics, such as topical cyclopentolate, will cause mydriasis (pupil dilatation) in addition to cycloplegia.
Non-cycloplegic retinoscopy is often sufficient for the majority of adult patients, especially if they are presbyopic (no effective accommodation). However, in the following situations it is useful to perform cycloplegic refraction:
- in children and young adults (especially if they are myopic) to remove accommodation, which gives a falsely myopic refraction if not removed
- in adults with small pupils or opaque media (such as a corneal scar or cataract) who have a poor-quality retinoscopic reflex without pupil dilatation.
Ensure that the cycloplegia is complete by instilling the cycloplegic and waiting at least 30 minutes. Check that there is no miosis following illumination of the pupil. Since cyclopentolate can sting, consider first giving a topical anaesthetic for children. Note that the pupil dilatation occurs before the full cycloplegic effect, so it is necessary to wait the full 30 minutes, even if the pupil is dilated after 10 minutes.
Other aspects of cycloplegic retinoscopy
- If the patient is a child (or an adult with learning disability), trial frames are not always tolerated. Try half-aperture child trial frames or simply place lenses in your own fingers in front of the child’s eye.
- Children are less likely to remain still. The challenge here is to ensure your retinoscope light is on the visual axis of the child, since spurious astigmatism is noted if you are not co-axial to the eye. It is also harder to keep a constant working distance, which is typically shorter for a child (50 cm, with a –2.00 dioptre working distance correction) than for an adult (66 cm, with a –1.50 dioptre working distance correction).
- Neutralisation can be harder to appreciate. The direction of the initial retinoscopic reflex can be easier to determine in dilated eyes, but this can give a false sense of security, as the neutralisation point can be more difficult to establish. It may seem that neutralisation occurs over a wider range of lenses relative to non-cycloplegic refraction – it is important to watch the central reflex of the dilated pupil and ‘push’ the lenses until clear reversal is seen. For example, it may seem that neutralisation occurs at +2.00 dioptres, but do not settle for this – push the plus. It will then become apparent, for example, that the central reflex gives a better neutralisation reflex at +3.00 dioptres and reversal is seen with +3.25 dioptres.
- Accommodation is not active – hence, there is no need for the patient to comply with distant fixation and there is no need to fog the fellow eye.
Other aspects of non-cycloplegic retinoscopy
- Trial frames are typically tolerated in adult non-cycloplegic retinoscopy, and these can help with establishing a more accurate angle of an astigmatic meridian.
- Patients are generally still. This makes it easier for your retinoscope’s light to remain co-axial with the patient’s eye, thus reducing the risk of spurious astigmatism.
- With small pupils or opaque media (such as a corneal scar or cataract), the reflex can be difficult to interpret. A dim room will dilate the pupil and help with this.
- Accommodation is active in pre-presbyopes (especially if myopic); this can be reduced by fogging the fellow eye adequately, maintaining distant fixation and avoiding prolonged retinoscopy bursts (try to make a decision within the first couple of sweeps and always within a few seconds).
Reducing accommodation in non-cycloplegic retinoscopy:
- fog fellow eye
- ensure patient maintains distant fixation
- avoid prolonged retinoscopy bursts.
Failure to reduce accommodation gives a spuriously myopic result.
Finally, some important retinoscopy tips.
- Keep your lenses tidy (it will infuriate the examiners having to tidy up after you).
- Put your next lens into the trial frame before taking a lens out (this will help to minimise any accommodation).
- No retinoscopy sweep should last more than a few seconds. Prolonged sweeps not only induce accommodation (if non-cycloplegic) but also demonstrate to the examiners that you do not know how to act in response to what you see. Therefore, if you are not sure after a few seconds, come away, put a different lens in and try again.
- If the reflex is too dull to interpret, check your retinoscope battery. If the battery is OK, you are dealing with high ametropia. Try interposing a ±5 or ±10 sphere.
- If the results are too minus, check that the patient is not accommodating, either because they are not looking at the distant target (patients need constant reminders to do this) or because you have occluded rather than fogged the fellow eye. Occlude the fellow eye when checking visual acuity, but when using your retinoscope and for subjective refraction fog the fellow eye (with a +2 to +4 add on your estimated prescription to reduce accommodation). If the patient is amblyopic or diplopic, avoid fogging and simply occlude the fellow eye for retinoscopy and subjective refraction. If accommodation is an issue (as it is with all children), cycloplegic refraction is required.
- If the results are too plus, remember to subtract the working distance correction factor.
Subjective refraction
Subjective refraction involves the patient making conscious decisions so that a prescription that has been approximated by objective means (retinoscopy) can be fine-tuned.
Therefore, this is not always possible in children or patients with learning disability, so your retinoscopy result will provide the basis for spectacle prescription in these patients.
The process of subjective refraction should start within 10 minutes of the refractive process and take no longer than 10 minutes. The process includes the following stages:
- refining the sphere
- refining the cyl axis
- refining the cyl power with sphere compensation
- duochrome testing
- binocular balance testing
- MR and PCT
- near vision testing.
The refinement of the sphere and cyl and duochrome test is completed first for the right eye then for the left eye.
Binocular balance is then tested with both eyes open.
The MR test (and possibly PCT) is used to assess the tendency of the eyes to dissociate, to establish if prisms are required to control a symptomatic tropia.
Following this, the near vision is corrected and tested with appropriate correction for the right then the left eye (test each eye independently).
Retinoscopy should be conducted in dim light. Subjective refraction should be conducted in good light – so, when you put your retinoscope down, turn the lights back on.
Ensure you have recorded your retinoscopy results (corrected for working distance) and the visual acuity that was obtained with these.
As with retinoscopy, during subjective refraction, it remains important to fog the fellow eye (or, if appropriate, occlude the fellow eye – see p. 37). This not only reduces accommodation in non-cycloplegic refraction but also ensures that the patient’s answers to your subjective refraction questions are based entirely on the eye being examined.
In addition, as with retinoscopy, when changing a lens, always put the next lens into the trial frame before taking a lens out, to minimise accommodation.
Refining the sphere
Ask the patient to fixate on one of the letters on the lowest line of the acuity chart that they can see comfortably.
Ask the patient:
‘Is that letter clearer with [place a +0.25 sphere in front of their eye] or without the lens [remove the +0.25 sphere] or about the same?’
If a response is not immediately given, after only a couple of seconds remove the lens, wait a couple of seconds, then re-offer them the lens and the question. Do not simply hold the lens up waiting for a decision, since the quality of the answer diminishes rapidly with time. If no response is succinctly given, it is likely that the letter remains about the same.
If the patient reports that the letter is better or about the same, add the plus lens to the frame and repeat.
If they report that the letter is worse with the plus lens, do not give the plus lens. Instead, now offer them a –0.25 sphere and ask them:
‘Is that letter better, or just smaller and darker?’
This minus lens should only be offered for a brief moment to avoid accommodation. If they immediately report that the letter is better, add the –0.25 sphere to the trial frame and repeat. If they report that the letter is smaller and darker, check the acuity and move onto refining the cyl. If they report that the letter is worse (even though you did not ask them this), also check the acuity and move onto refining the cyl.
Noticing that a letter is smaller and darker rather than actually better can be difficult, and there is the danger of overcorrecting accommodating myopes. Therefore, be slightly reluctant to keep giving minus spheres to a myope (such experience comes with practise).
Note that when the –0.25 sphere is offered, only hold this up for a couple of seconds. If the patient does not make a decision quickly, remove the –0.25 sphere and re-offer them the lens and the question. Do not simply hold the lens up waiting for a decision, since the quality of the decision will decrease with time and, in the case of this minus lens, the patient will accommodate.
Using a ±0.25 sphere to refine the sphere is appropriate if the acuity is 6/9 or better. If the acuity is between 6/12 and 6/18, use a ±0.50 sphere, and consider using a ±1.00 sphere if it is worse than 6/18.
At this stage, do not panic if the acuity is poor and cannot be improved. It may be that the patient has a large cyl (a high degree of astigmatism). Therefore, move onto refining the cyl when an end point is reached, rather than persevering only with spheres in the pursuit of perfect acuity.
Refining the cyl axis
Refining the cyl follows refining the sphere.
The fogging of the fellow eye should remain in place and, for the purpose of the Refraction Certificate Examination, if demonstrating subjective refraction of the cylinder only, adequate fogging must first be ensured (see p. 37).
The cylindrical component of the spectacle prescription is fine-tuned subjectively using the Jackson cross cylinder (JCC), which was popularised by Edward Jackson (1893–1929).
The JCC is a sphero-cylindrical (toric) lens in which the power of the cylinder is twice the power of the sphere and of the opposite sign. The JCC is equivalent to superimposing two cylindrical lenses of equal power but opposite sign with their axes perpendicular to each other. The handle of the JCC is 45 degrees to the axes of the cyls. Since there are two perpendicular opposing cyls, an axis for the JCC is not denoted. The spherical equivalent (equal to the sphere plus half the cyl) of a JCC is therefore zero.
If a –0.25 cyl is superimposed perpendicularly with a +0.25 cyl the net result is equivalent to –0.25/+0.50 (when transposed equivalent to +0.25/–0.50). This would be a 0.50 JCC, since the JCC is defined by the power of the cyl notation.
JCCs are available in various powers, typically 0.50 and 1.00, and this is usually written on the shaft (see Figures 4.6 and 4.7). The power is named after the power of the cyl given by its notation. Hence a –0.25/+0.50 (same as +0.25 / –0.50) is a 0.50 JCC and a –0.50/+ 1.00 (same as +0.50 / –1.00) is a 1.00 JCC. The 0.50 JCC is used if acuity is 6/12 or better whereas the 1.00 JCC is used if acuity is worse than 6/12.
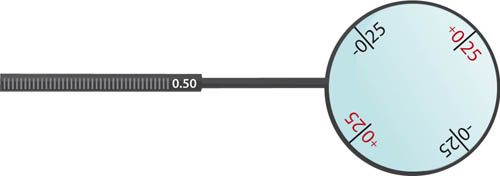
Figure 4.6 A 0.50 JCC (–0.25/+0.50)
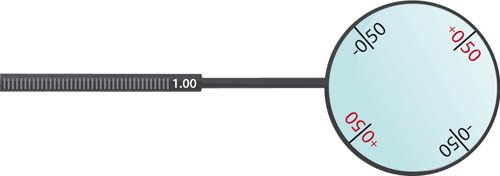
Figure 4.7 A 1.00 JCC (–0.50/+1.00)
Do not rely on the colour of the JCC axes to confirm which is plus and which is minus – the only way to be sure is to look at the lens markings. A 0.50 JCC will have +0.25 written on the lens and, perpendicular to this, –0.25 will be denoted. A 1.00 JCC will have +0.50 written on the lens and, perpendicular to this, –0.50 will be denoted. It should be acceptable to take your own JCCs to the examination if you wish.
To check the cyl axis (established by retinoscopy) with the JCC, hold the handle along the proposed plus axis. Ask the patient to look at the letter O (or other types of circular targets such as two double rings).
Ask them:
‘Does the O look rounder and clearer with lens 1 [position 1 – handle along axis] or lens 2 [position 2 – twist 180 degrees] or about the same?’
Note that this question forces a comparison between the JCC in position 1 and the JCC position 2, not a comparison without the JCC. If the patient reports that both are equally as bad, this should be interpreted as meaning that position 1 is the same as position 2.
When working in plus cyls, if the patient prefers position 1, rotate the cyl so the axis moves towards the plus cyl of the JCC when in position 1.
If the patient prefers position 2, rotate the cyl so the axis moves towards the plus cyl of the JCC when in position 2.
The amount of rotation required (range 2 to 20 degrees in any alteration) depends upon the acuity and the strength of the cyl. If acuity is already good, only move the cyl by small amounts to avoid losing the good acuity. If the cyl is large, avoid large movements, since only a couple of degrees of movement of a large cyl can make quite a difference. This appreciation comes with practise. If unsure, apply the ‘bracketing’ technique, in which you initially move the axis by 20 degrees, then re-check and move by 10 degrees, then 5 degrees, then 2 degrees to reach the desired end point. Never underestimate how important it is to obtain the correct axis for a high-powered cyl.
If the patient reports that position 1 is the same as position 2 (or, as is quite common, appears to reject both of them) an end point has been reached and a satisfactory axis has been obtained. Now move onto refining the cyl power.
Refining the cyl power with sphere compensation
Ask the patient to focus again on the distant circular target.
When working in plus cyls, hold the plus JCC axis over the plus cyl axis in the trial frame (position 3 – this increases the cyl power).
Ask the patient to:
‘Look at the O – does the O look rounder and clearer with lens 3 [position 3] or lens 4 [position 4 – twist 180 degrees, this places the minus JCC axis over the plus cyl axis in the trial frame to decrease the cyl power] or about the same?’
Again, the forced comparison is between the two positions of the cross cyl, and not a comparison with no cross cyl.
If position 3 is preferred, add +0.50 cyl to the plus cyl and add –0.25 sphere. This sphere compensation when adjusting the cyl ensures the spherical equivalent of the lenses is maintained (spherical equivalent = sphere + cyl/2). To maintain the spherical equivalent, the sphere must be changed by half the amount of the cyl and in opposite direction.
If position 4 is preferred, reduce the plus cyl power by 0.50 cyl and add +0.25 sphere to maintain the same spherical equivalent.
If the cyl power is changed (and sphere compensated), it is necessary to re-check the axis, then again challenge the cyl power. If you do not trust the cyl obtained, reduce the cyl (or remove if small) and see if the patient prefers this (i.e. test for rejection of cyl), since patients are more likely to prefer under rather than over astigmatic correction.
Continue this process until an end point is reached for both the cyl axis and cyl power (i.e. until the patient reports that position 1 is same as 2, and position 3 is same as 4).
Re-check the acuity then proceed to the duochrome test.
Duochrome test
This is a monocular subjective test to minimise accommodation whilst the distance prescription is worn, which is especially important in myopes.
If a myope is overcorrected (prescription too minus), they are effectively rendered hypermetropic and may experience asthenopia (eye strain) due to prolonged accommodation.
The principle of the duochrome test relies on chromatic aberration, which is where white light, when refracted at an optical interface, is dispersed into its different colours (wavelengths).
An emmetropic eye focuses distant yellow-green light (555 nm wavelength) perfectly onto the retina. Red and green light are used for the duochrome, since their wavelength foci straddle yellow-green light by equal amounts (about 0.4 dioptres on either side), with green being deviated more than red, since red has the longer wavelength (see Figure 4.8).
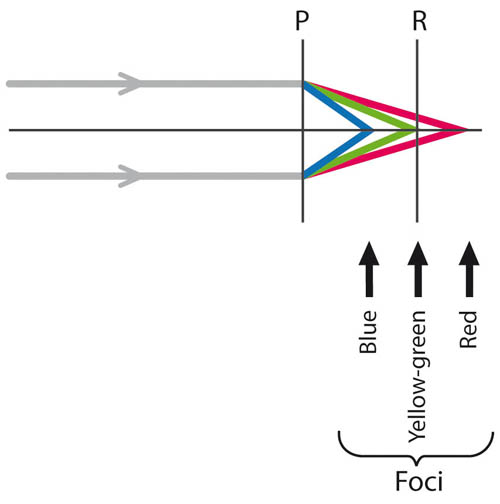
Figure 4.8 Dispersion and the human eye. Yellow-green light (555 nm) is focused perfectly onto the retina (R) by an emmetropic eye, when light is dispersed by the principal plane (P) of the optical interface. Green light falls in front of the retina and red light falls behind the retina by equal amounts
The duochrome consists of a ring of black circles or letters on a red and green background (see Figure 4.9).
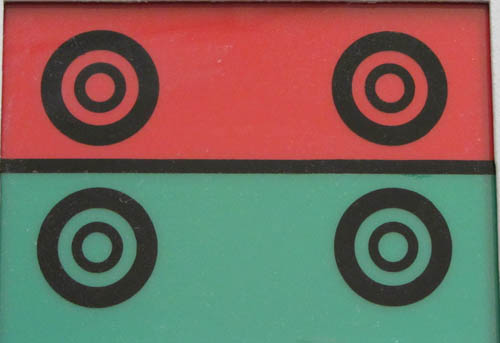
Figure 4.9 The duochrome
After the JCC test, whilst the fellow eye is still fogged, ask the patient to look at the distant duochrome and ask them if the circles/letters are clearer on the red, green or about the same. If they prefer green, add +0.25 sphere and repeat the question. Adding plus spheres should shift the preference from green to indifferent to red, and should relieve any accommodation with sacrificing the acuity.
Most practitioners would agree to leave myopes just on the red. For myopes, green is generally considered unacceptable, indifference (equal red and green) acceptable and just on the red preferable. The reason why myopes should not be left on the green is that they will be accommodating, as the prescription is too minus (i.e. overcorrected, rendering them hypermetropic).
This test is less important for hypermetropes – leave them indifferent or just on the green.
Note that the test can also be done in patients who are colour blind, since the test is dependent on the position of the image with respect to the retina. Therefore, colour-blind patients can be asked if the left or right (or upper or lower) rank is clearer, rather than the red or green rank.
Once adjusted, re-check the acuity.
As an extra step in myopes, it is useful to try the +1.00 blur back test, in which a +1.00 sphere is added that should blur the acuity to 6/12. If the myope remains 6/6, the prescription is too minus (overcorrected) and this +1.00 spherical lens should be added to their prescription to remove their accommodation, whilst retaining distance acuity.
The duochrome test is then repeated for the left eye (remember to fog the right eye).
Binocular balance
This is a final step to balance any accommodation and is done once both eyes have independently been subjectively refracted. It is particularly useful in young myopes to ensure that their prescription is too minus (overcorrected) and is an alternative to the +1.00 blur back test already described (see above).
Check the binocular acuity (remove any fogging or occluding lenses).
Now ask the patient to fixate on a letter on the lowest line that they can see.
Then place a +1.00 sphere over the left eye and a +0.25 sphere over the right eye and ask:
‘Is the letter better, worse or about the same?’
If the letter is better or about the same, add the +0.25 sphere to the right eye and repeat. Do not give the plus lens if the letter appears worse (blurred).
Repeat the process with the +1.00 sphere over the right eye and the +0.25 sphere over the left eye.
If any lenses are added, re-check the binocular acuity to ensure that it has not reduced. If acuity has fallen, remove the plus lens.
Cover and alternate cover tests
These tests are useful in assessing the angle of deviation in eyes that have a squint or a tendency to drift.
It is important to understand these, since they are very quick to perform and often yield invaluable information. They also form a basic standpoint from which the PCT or MR test progresses from so that the squint can be quantified with prisms and prismatic incorporation can be considered in the spectacle prescription for significantly symptomatic patients.
Cover test
This is a quick test that is used to detect a manifest squint (tropia).
Remember that children (or adults with untreated childhood squint) with a manifest squint will suppress the image from the weaker, non-fixating eye and therefore not complain of diplopia. In contrast, adults with a recently acquired squint will complain of binocular diplopia that is worse when they look in the direction of extra-ocular muscle under-action.
The cover test should be performed:
- with and without spectacles
- with and without any compensatory head posture
- for distance and near (to torchlight and an accommodative target)
- always in the primary position and, if necessary, in the different directions of gaze.
For the distance cover test, ask the patient to fixate on a distant (6 m) target. Remember to first gently guide the patient’s head into the primary position to remove any compensatory head posture.
Cover the left eye and observe for any movement in the right eye (see Figure 4.10).
- Esotropia (convergent squint) when the right eye initially is pointing nasally and then moves temporally on cover test.
- Exotropia (divergent squint) when the right eye initially is pointing temporally and then moves nasally on cover test.
- Right hyper-/hypo- tropia (vertical squint) when the right eye initially is higher/lower than the left and then moves downwards/upwards on cover test.
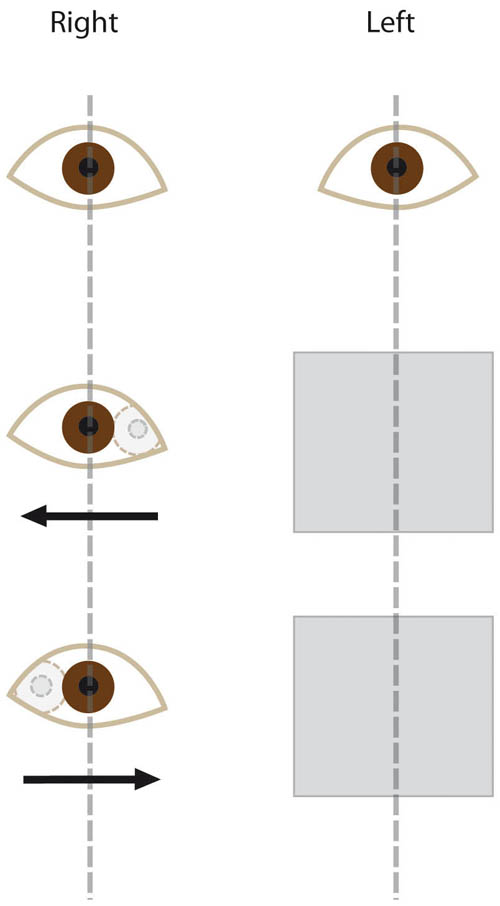
Figure 4.10 The cover test demonstrating a right esotropia (middle picture) and exotropia (bottom picture)
Now repeat the cover test with the right eye occluded, observing the movement of the left.
If there was movement with left eye occlusion but not for right eye occlusion, the tropia will be a ‘right eye’ tropia (e.g. right esotropia if the right eye moved temporally), since the left eye is the more stable eye that is adopting fixation (and vice versa for movement with right eye occlusion but not left eye occlusion).
Repeat the cover test with spectacles and with any compensatory head posture. Then repeat the cover test with a near torchlight followed by a near accommodative target, such as a small attention-holding image at 33 cm (reading distance).
Alternate cover test
The alternate cover test is a dissociative test that dissociates, or uncouples, the eyes. As each eye ‘sees’ a different fixation target, their true tendency to drift is released. As the alternate cover test continues, this tendency to drift often becomes more marked.
Therefore, the amount of deviation noted with the alternate cover test is the sum of the both the manifest squint (detected with the cover test) and the latent component of the squint (the tendency of the eyes to drift once dissociated). If the deviation is observed with the cover test alone, this is known as a ‘-tropia’. If there is no deviation with the cover test but there is with the alternate cover test, this isolated latent component is known as a ‘-phoria’.
As with the cover test, the alternate cover test should be performed:
- with and without spectacles
- with and without any compensatory head posture
- for distance and near (to torchlight and an accommodative target)
- always in the primary position and, if necessary, in the different directions of gaze.
For the distance alternate cover test, ask the patient to fixate on a distant (6 m) target. Remember to first gently guide the patient’s head into the primary position to remove any compensatory head posture.
Cover the left eye and observe for any movement in the right eye. Then swiftly move the occluder to cover the right eye and observe for any movement as the left eye becomes uncovered. Repeat this a few times, until the degree of movement has settled (since it will increase with time) and once you have noted the direction of movement.
- A temporal movement (from initial nasal, convergent position) implies an esodeviation.
- A nasal movement (from an initial temporal, divergent position) implies an exodeviation.
- A down/up movement (from an initial high/low position) implies a hyper-/hypo- (vertical) deviation.
If the eyes rapidly take up fixation, this suggests the acuity and subsequent neural link with the visual pathways is similar for each eye. If one eye is slow to take up fixation (sometimes requiring verbal encouragement), it is likely that the acuity in this eye is poor.
Repeat the alternate cover test for near torchlight then a near accommodative target at 33 cm reading distance.
Prism cover test
The PCT allows the measurement of the angle of deviation, which allows objective quantification of the squint and subsequent prescription of the prism for symptomatic control if necessary.
As with the cover test, the PCT should be performed:
- with and without spectacles
- with and without any compensatory head posture
- for distance and near (the patient can hold the near accommodative target)
- always in the primary position and, if necessary, in the different directions of gaze.
Note that the PCT should be performed for distant and near accommodative targets and different prisms may be required for distance and near prescriptions, since patients tend to converge on near fixation. Since the examiner requires one hand to hold the prism bar and one hand to move the occluder, when testing the angle for a near accommodative target, it is necessary to ask the patient to hold, and look at, the accommodative target.
A prism can be held in front of either eye, since the angle of deviation relates to the angle between the eyes. If you are right-handed, you may find it easier to hold the occluder in your left hand and the prisms in your right hand. The prisms can be held individually or in the form of a prism bar – whichever you feel more comfortable with.
A combination of horizontal and vertical prisms may be needed. First, establish the horizontal angle. Once this is corrected, look specifically for a vertical deviation and superimpose vertical prisms on the horizontal prism to correct the vertical component.
Vertical deviations are typically smaller than horizontal deviations but, in the absence of suppression (such as with an acquired squint in an adult in the case of thyroid eye disease or cranial nerve 4 palsy), they are often more symptomatic due to the binocular fusion range being smaller vertically rather than horizontally.
Note that prisms will have a form of demarcation, such as a cross, at their base to help orientation.
For the distance PCT, ask the patient to fixate on a distant (6 m) target. Remember to first gently guide the patient’s head into the primary position to remove any compensatory head posture.
Perform an alternate cover test as described (see p. 59).
Repeat the alternate cover test with a prism in place:
- for exodeviations, a base-in (BI) prism is needed
- for esodeviations, a base-out (BO) prism is needed
- for hyper-/hypodeviations, a base-down (BD)/base-up (BU) prism is needed.
There is no need to remember these listed points – just remember that the correcting prism must have its apex pointing in the direction of deviation.
If the movement is in the same direction with this corrective prism, the strength of the prism must be increased. If the movement has reversed direction, the prism strength must be reduced. The aim is to alter the prisms until reversal is noted, to obtain a satisfactory end point, which is when the eyes remain still during the alternate cover test since the prisms have neutralised any deviation. This can be confirmed by asking the patient if their double vision has been eliminated.
As mentioned, first correct the horizontal angle then look specifically for a vertical component and correct this, if present, by superimposing vertical prisms upon the correcting horizontal prism.
Now repeat the test for a near accommodative target (held by the patient at 33 cm reading distance). The patient should wear their near spectacles (albeit without prisms at this stage).
When incorporating prisms into the spectacle prescription, the term ‘prism dioptre’ can be denoted by a triangle (∆). However, as this can be mistaken for a zero, it is safer to use the abbreviation ‘pd’ in the spectacle prescription. The amount of deviation in degrees is corrected by a prism with a power double that magnitude in prism dioptres. For example, a 15-degree angle of deviation is corrected by a 30 pd prism.
Typically, the prismatic correction is halved between the two lenses and the bases will be in the same direction for horizontal deviations and in opposite directions for vertical deviations. For example, a 13 pd exodeviation will be corrected by a 6 pd BI correction in front of the right eye and a 7 pd BI correction in front of the left eye. A 4 pd right hyperdeviation will be corrected by a 2 pd BD correction in front of the right eye and a 2 pd BU correction in front of the left eye.
Remember that the apex of the correcting prism is always in the direction of squint deviation.
Maddox rod test
The Maddox rod (MR) test is a subjective assessment of extra-ocular muscle balance and estimates the degree of phoria (tendency of eyes to drift so they are not directed at the same target).
The majority of patients do not needs prisms. Prisms should only be incorporated into the spectacle prescription if:
- there is a history of double vision, or significant asthenopic (eye strain) symptoms, associated with a demonstrable phoria (latent squint)
- if a manifest squint (tropia) is noticed with the cover test
- restoration of orthophoria is achieved with the proposed prisms using the MR test (and PCT).
If there is no double vision and if no tropia is seen with a cover test, the MR test is unnecessary, as, regardless of what it shows, there will be no need for prismatic correction. Therefore, in the Refraction Certificate Examination, always consider that the correct answer might be to order no prisms.
You may find that some patients without any refractive correction have acuity that is too poor to allow them to appreciate multiple images. Without their spectacles, they do not complain of diplopia since everything is just simply blurred. In these cases, you will notice that once you have improved the acuity of both eyes the patient will start to complain of double vision. These patients will benefit from the MR test and prismatic control.
The MR consists of a series of strong, concave (plus) cylindrical red glass rods that convert the appearance of a white spot of light into a red streak (see Figure 4.11). When the rods are orientated vertically, the streak will be horizontal, and vice versa. Light from a distant source passes through the red cyls with no deviation in the same meridian as the axis of the cyls (since they have no power in the direction of their axis). Since there are multiple red rods, this gives a single red line on the retina and is perceived. Light rays in other meridians are converged by these powerful rods to a point focus just in front of the eye that is too close for it to be appreciated (this is not seen).
Figure 4.11 The Maddox rod consists of red cylinders. Here the Maddox rod is held with the rods orientated vertically, and this results in a horizontal red line of light, when light from a distant source is viewed through the Maddox rod
By placing the MR in front of one eye whilst the patient fixates at a distant white light, the two eyes are dissociated, since one eye stares at the red line whilst the other stares at the white light. If orthophoric, the red line will appear to pass through the white light when the red line is orientated either vertically or horizontally. If there is a horizontal phoria, when the red line is orientated vertically (rods horizontal), the red line will appear to one side. If there is a vertical phoria when the red line is orientated horizontally (rods vertical), the red line will appear either above or below the white light.
This may sound complex, but, with practise, the MR test can be completed in less than 1 minute with ease. Remember that corrective prisms have their apexes directed in the direction of eye deviation.
The distant cover test is useful to do prior to the MR test, since it gives an objective starting point that the MR test subjective result should match.
Now turn the room lights down. Ensure the patient is wearing their binocular, distance prescription and ask them to fixate at a distant white dot light (somebody holding a pen torch at the end of the room is sufficient if no white dot light is in the light box).
Hold the MR in front of the right eye with the bars orientated horizontally and ask the patient if they can see a vertical red line. If they cannot, occlude their left eye momentarily and they will usually see the red line. Ask them if the red line is to the right, left or straight through the white dot.
If the line goes through the white dot, no prismatic correction in the horizontal plane is required.
If the line is to the right, they have an esophoria, so BO prisms should be placed in front of the left eye until the red line is through the white spot. In theory, a BO prism could also be placed in front of the right eye to correct an esophoria, but because the MR is in front of the right eye, it is easier to place prisms in front of the left eye.
If the line is to the left, they have an exophoria, so BI prisms should be placed in front of the left eye until the red line is through the white spot. Again, this could also be corrected with a BI prism in front of the right eye, but as the MR is in front of the right eye, it is easier to place prisms in front of the left eye.
A 3 pd lens can be used first to try to shift the position of the red line to pass through the white spot or, if overcorrected, to pass over to the other side. In patients without diplopia, 3 pd is usually sufficient to shift the line and confirms that no prisms need to be incorporated into the spectacle prescription. In patients with diplopia, more than 3 pd will probably be required to shift the red line to pass through the white spot. The resultant prismatic correction should then be shared between the two eyes. For example, if 8 pd BO is required to correct an esodeviation, 4 pd BO in front of the right eye and 4 pd BO in front of the left eye should be prescribed. If 13 pd BI is required to correct an exodeviation, 7 pd BI in front of the right eye and 6 pd BI in front of the left eye should be prescribed.
Now hold the MR in front of the right eye with the rods orientated vertically and ask the patient if they can see a horizontal red line. Ask them if the red line is above, below or straight through the white light.
If the line goes through the white dot, no prismatic correction in the vertical plane is required.
If the line lies above the white dot, they have a left hyperdeviation, which can be corrected with a BD prism in front of the left eye. This could also be corrected with a BU prism in front of the right eye.
If the line lies below the white dot, they have a left hypodeviation, which can be corrected with a BU prism in front of the left eye (or a BD prism in front of the right eye).
Again, for vertical deviations, a 3 pd lens can be used, but note that patients are generally more sensitive to vertical deviations. For example, a 3 pd deviation in the horizontal plane is usually fused and does not result in symptomatic diplopia, whereas 3 pd in the vertical plane may not be fused and the patient may have diplopia. If a vertical prismatic correction is required, again this should be shared between the two eyes; however, unlike for horizontal deviations, in vertical deviations the prisms are orientated in opposite directions. For example, a 5 pd left hyperdeviation can be managed with 3 pd BD in front of the left eye and 2 pd BU in front of the right eye.
You may have realised that if the MR is placed in front of the right eye and the corrective prisms are then placed in front of the left eye, the apex of the prism is always in the same direction that the patient reports the red line to appear, relative to the white dot:
- line to the left: place prism with apex to left
- line to the right: place prism with apex to right
- line above: place prism with apex upwards
- line below: place prism with apex downwards.
Therefore, it is simple to place the MR in front of the right eye and use corrective prisms in front of the left eye with the apex pointing to where the red line lies. The only situation in which this is not possible is when the right eye has relatively poor best corrected acuity (due to amblyopia or ocular pathology). In this case, the MR should be held in front of the left eye.
Near vision
‘Accommodation’ refers to the process of the focal point of the eye shifting from a distant target to a near target.
Patients who are presbyopic are unable to read clearly whilst wearing their distant spectacle prescription due to an inability to accommodate.
Presbyopia manifests at an earlier age in hypermetropes (from age 35 years) than in emmetropes (from age 40 years) and may not ever manifest in myopes.
Near vision is also improved by pupillary constriction, which increases the depth of focus. Adequate macular function is also vital for satisfactory near vision. For these reasons, checking near vision with good illumination is most helpful.
Given that patients will converge with near targets, they may also require a prismatic correction different to their distant correction (see ‘Prism cover test’, p. 60).
To estimate an initial near add, obtain a brief relevant history:
- their age
- whether they have had previous cataract surgery with an intra-ocular lens implant (pseudophakia)
- their activities of daily living that involve near visual tasks – reading, needle work, model making, etc., since this will alter their near working distance.
The following guide should be a useful starting point.
Age Near add
40–50 years +1.00 to +1.50
50–60 years +1.50 to +2.00
>60 years +2.00 to +3.00
Pseudophakia +2.50 to +3.00
To assess near vision, ask the patient to hold the reading chart at the comfortable near working distance for the near task they would like correction for; for example:
- reading – typically, about 33 cm
- needle work, model making, etc. – may be much closer and, therefore, require a greater near add
- computer work – such an intermediate distance may require a weaker add to the distant prescription, relative to full near correction required for reading.
Occlude the left eye and ask them to read the smallest print they can on the N-series reading chart held at their working distance. Now add the appropriate near plus lens and record the corrected near acuity (aiming for N5 or N6 in the absence of ocular disease).
Ask the patient to look at a letter then ask:
‘Is the letter clearer with [place a +0.25 sphere in front of their eye] or without the lens [remove the +0.25 sphere] or about the same?’
If they report that the letter is better with the lens or about the same, add the +0.25 sphere and repeat until acuity is optimal.
Repeat the process for the left eye (occlude the right) then check that the reading speed is good with both eyes not occluded.
The patient’s near add is typically the same for both eyes, but this should still be checked because pre-presbyopes that have had unilateral cataract surgery will require a high near add in their pseudophakic eye and perhaps only a small near add in their phakic eye.
[/level-membership-for-opthalmology-category][not-level-membership-for-opthalmology-category]
[/not-level-membership-for-opthalmology-category]
