[level-membership-for-orthopaedics-category]
Chapter 2. History and clinical examination
By the end of this chapter you should be able to:
• Take an appropriate history.
• Perform a competent general clinical examination of all joints.
• Understand and use the correct orthopaedic terminology.
• Competently perform the common examinations of large joints.
If you are uncertain about the meaning of a word, look it up in the Glossary on p. 467.
History
In most branches of medicine there is seldom any argument about the correct management once the diagnosis has been established. Orthopaedic surgery is different: the diagnosis is easy but the choice of management is difficult. The appropriate treatment varies from one patient to the next and is determined by age, sex, occupation and home circumstances, all of which must be established while the history is taken. The patient’s attitude is also important and it is helpful to consider the following points while taking the history.
General aspects of a consultation
1. Why has the patient come?
2. How well motivated is the patient?
3. Does the patient have a reason (litigation, for example) not to hope for recovery?
4. Does the patient have realistic expectations of treatment?
5. Has the patient really understood what you have said?
The patient
Reason for consultation
Most patients will be looking for the relief of pain or deformity but many seek only an explanation of their condition and its likely progress. A patient with sudden pain in one joint may be worried because a relative had severe arthritis that began with pain in just one joint and the patient fears that she, too, is destined for a wheelchair. Other patients fear that their pain is the first sign of widespread cancer, particularly if a relative died with bone metastases; and parents’ worries about the shape of their children’s feet can be fuelled by concerned grandparents, friends or health visitors.
These patients need nothing more than a sympathetic ear, firm and authoritative reassurance, and a careful explanation of the condition and its prognosis. To treat the symptoms energetically will only increase the patient’s anxiety.
Motivation
Motivation is very important. Many orthopaedic operations demand hard work and complete cooperation from the patient in the postoperative period. If the patient gives the impression of being unable or unwilling to take an active part in the rehabilitation process, there is unlikely to be a good result from operation, however well it is done. To detect such people before operation is difficult, but only too easy after operation.
Litigation
When symptoms are the result of a road traffic accident or an injury at work, the patient may be involved in legal action to obtain compensation. Although the great majority of patients give a perfectly honest and straightforward account of their symptoms, they cannot help becoming a little introspective if they think that compensation is related directly to the severity of symptoms. Most people involved in litigation will say so, but if this is not mentioned and patients begin the history with the exact date when the symptoms began, they should be asked specifically about impending litigation. A clear and careful record of the symptoms is essential in these patients and may be a little more difficult than usual to obtain.
Patients’ expectations
Sensible patients understand that no operation is painless and that all leave a permanent scar, but some expect the impossible. Athletes cannot accept that declining performance is due to age, and patients with gross osteoarthritis expect a perfect cure. If treatment is offered to patients with unrealistic expectations they are bound to be disappointed, and are sometimes even vengeful. It is as well to recognize such people before any definitive treatment is suggested.
Does the patient understand?
No matter how thorough the explanation of the condition or proposed operation, it is unlikely that the patient will remember everything that has been said. Some understand more than others but a few do not remember a word. Because close cooperation between patient and doctor is particularly important in orthopaedic surgery, special attention must be given to ensuring that the patient understands as clearly as possible exactly what the treatment involves.
Specific questions
Apart from general impressions of the patient’s attitude, specific questions must be asked, both to establish the diagnosis and to select management. Social and occupational histories are vital because the impact of symptoms on lifestyle varies from one patient to the next. It is essential to have detailed information about the patient’s occupation and home circumstances before any treatment is suggested.
Specific questions
1. Symptoms. Record them as precisely as possible.
2. Occupation. Find out the exact nature of the patient’s work.
3. Impact of treatment. How will it affect the patient’s work, life, leisure, etc.?
4. Home circumstances. Are the stairs at home easy to climb? How far away are the shops? Is there any help in the house?
Symptoms
Pain, deformity, swelling and loss of movement in a joint are the commonest complaints in an orthopaedic clinic. The duration, manner of onset (sudden or gradual) and variability of the symptoms must all be established. If there is a joint swelling, is it related to use of the limb? If so, does it begin during the activity, or the next day? These are the same straightforward questions needed in any clinical history except that, when asking about pain, special attention should be paid to referred pain, a classic pitfall for the unwary. The commonest example is pain in the knee caused by disease at the hip.
Occupation
Find out not only the name of the patient’s job but also exactly what it involves. One driver may spend the entire day sitting behind the steering wheel but another will have to load and unload the vehicle, which entails a great deal of heavy physical work. A lathe operator who stands for most of the day could not work with a painful foot but could manage with a stiff knee, while a motor mechanic could tolerate a painful foot but a stiff knee would make it impossible to work in tight corners or under vehicles. The loss of the terminal phalanx of the ring finger would be of little consequence to a labourer, but disastrous to a musician.
Impact of treatment
Treatment always disturbs the patient’s life, sometimes seriously. To suggest an operation that would make a self-employed tradesman unable to work for 2 or 3 months needs careful thought. Timing is also important: to be rendered unfit during the harvest could bring financial ruin to a single-handed arable farmer for whom the quietest period of the year is at Christmas; on the other hand, shopkeepers need to be at their fittest during the Christmas period and, except in a tourist centre, would probably choose August for operation.
Home circumstances
Knowledge of the home circumstances is vital when dealing with the elderly. Problems are inevitable if the patient cannot climb stairs and the only lavatory is on the top floor. If the patient cannot walk out of the house, who will do the shopping?
These mundane details have no bearing on the diagnosis or the operations that are technically possible but they have everything to do with selecting the right treatment for the individual patient.
Clinical examination
Approaching the patient
Every clinical examination should be conducted carefully, confidently and without hurting the patient needlessly, which is difficult when muscles are tight or rigid. The patient must be encouraged to relax. If an injured, perhaps broken limb is to be put into the hands of a stranger, the patient must have complete confidence in the person carrying out the examination.
The simplest and best way of obtaining the patient’s full confidence is to conduct the examination calmly, methodically and without fumbling. The patient can easily tell (as can an examiner) if a doctor or student is doing something for the first time. Only practice brings confidence.
Routine of examination
The established routine for clinical examination in orthopaedic surgery is as follows:
Routine for clinical examination
| Inspection Palpation |
Listen to what the patient tells you. Look at the area. Feel gently for swelling, painful areas, temperature changes and tenderness. Measure limb length and girth. |
| Movement | Move the limb to assess the range of motion. Active movement is observed first, then passive. |
| Stressing | Strain the ligaments to look for abnormal movements. Radiographs are useful but do not replace any part of the clinical examination. |
| Note: Examine painful areas last! | |
Take heed of that final note – in practice there is much to be said for leaving the most painful manoeuvre until last, even if this means breaking the routine of examination. In particular, do not start the examination by leaping to the most painful area, prodding it and making the patient jump; to begin the examination thus usually marks the end of cooperation. There is also much to be said for examining any available radiographs before examining the patient, especially if there is a fracture.
Children, particularly between the ages of 1 and 3 years, must be approached with caution. It is virtually impossible to derive any useful information by examining a screaming and struggling child, but there are several ways to overcome this problem.
First, do not overwhelm the child with attention as soon as he or she enters the consulting room. A quiet talk with the parents will give the child time to appraise the doctor and decide that there is no threat.
Second, children do not like to be laid flat on an examination couch; if any part of the examination can be conducted with the child sitting on the mother’s knee, so much the better.
Third, children do not like strangers examining their bodies but they rather enjoy strangers admiring their clothes, and this vanity can be exploited. To look carefully at a child’s shoes, for example, gives the opportunity to put the hip, knee and ankle through a full range of movement, assess limb length and muscle tone and look for deformities.
Finally, if a child does have to be stripped and laid flat on the couch, leave that until last.
Inspection
Much information can be gained simply from looking at the patient as a whole rather than concentrating on details; a slow, careful inspection of the painful area can give more information than palpation and manipulation combined. The area must be fully exposed and properly prepared: a shoulder cannot be examined through a shirt or a knee through trousers.
When examining a limb, always compare the two and ask yourself the following questions:
1. Is one limb straighter or shorter than the other?
2. Are the joints swollen?
3. Is there muscle wasting?
4. Are there any scars and, if so, are they surgical or traumatic?
Examining a limb
• Deformity?
• Shortening?
• Swelling?
• Wasting?
• Scars?
Measurement is part of inspection. To measure the distance between bony points, choose fixed points that are easily recognizable, such as the medial malleolus or anterior superior iliac spine, rather than variable points, such as the umbilicus or the centre of the patella. When applying the end of the tape, run the finger past the bony point and bring the tape back up to it (Fig. 2.1). This reduces the error caused by overlying soft tissue.
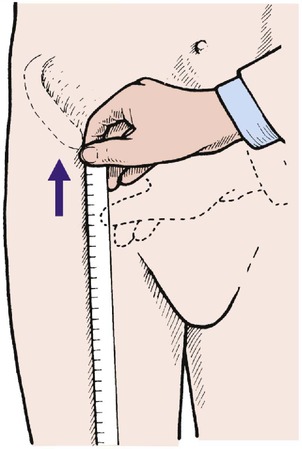 |
| Fig. 2.1
Measuring the distance from a bony point. Move the hand just past the bony point and then back up to it.
|
When measuring limb girth, be sure that the measurements are reproducible and that the point of measurement is recorded, e.g. the narrowest part of the ankle, the widest part of the calf, or the thigh at a measured distance above the tibial tubercle.
Palpation
There is a strange temptation to start palpation by poking the painful area, but this should always be deferred until last. A hand laid gently on the affected area will detect abnormal warmth, and gentle pressure will identify soft tissue swelling or a joint effusion.
Firmer pressure will locate swellings and tender areas, and show whether the patient is apprehensive when the area is touched. Apprehension is significant, particularly if the joint is unstable, as in patients with recurrent dislocation of the patella.
Sensibility. Sensibility is examined in the usual way, but with a special effort to try to relate the pattern of abnormal sensibility to anatomical structures, such as the distribution of a cutaneous nerve or dermatome (see Ch. 3).
Movement
Always compare the range of movement with the opposite limb. This is essential because there is a wide variation in the ‘normal’ range of movement.
The quality of movement is also important. Is the movement free, or stiff? Smooth or noisy? Does the joint feel loose and unstable? Is it sound? These are subjective assessments and judgement only comes with experience.
Range of movement. The movement in a joint is always measured from 0°, every joint being at 0° when the body is in the anatomical position (Fig. 2.2). This convention is now almost universal but there are still a few who refer to the straight joint as being at 180° instead of 0°, and this causes untold confusion.
 |
| Fig. 2.2
The anatomical position with the palms facing forwards and thumbs outwards.
|
In most joints, flexion/extension are in the sagittal plane and abduction/adduction, which represent movements away from and towards the midline of the body, in the coronal plane. Abduction and adduction of the toes and fingers are measured from the second toe and the middle finger (Fig. 2.3).
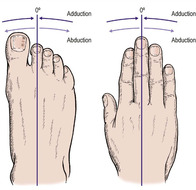 |
| Fig. 2.3
Abduction and adduction of the digits. The toes are adducted to the second toe and the fingers to the middle finger.
|
Rotation occurs about the long axis of a structure and circumduction is movement of a limb in a circular direction.
The only slight exceptions to these rules are for the thumb, the movements of which are in a plane facing about 30° forward from the coronal plane. Flexion and extension, abduction and adduction of the thumb are all measured relative to this plane (Fig. 2.4).
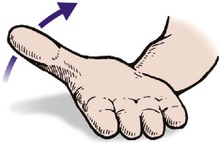 |
| Fig. 2.4
Movement of the thumb in the direction of the arrow is adduction.
|
Stressing, straining and strength
Ligaments. Ligamentous instability, which is difficult to assess, is detected by stressing the ligaments and looking for excess movement.
Muscle power. Muscle weakness must be looked for and recorded. The muscle power is graded according to the MRC (Medical Research Council) scale, which recognizes six grades of muscle power (0, 1, 2, 3, 4, 5 – do not forget 0):
This may sound complicated but it can be simplified by remembering that 0 is complete absence of power and 5 is normal, and the difference between 2 and 3 is the ability to move the limb against gravity.
Examination of individual areas
Every area must be examined carefully according to a routine but the important parts of the examination vary from area to area. This section sets out the things which should be looked for particularly carefully but this does not mean that the rest of the examination is unnecessary.
Cervical spine
Inspection
Although deformity of the cervical spine is unusual, always look at the head and neck as a whole before palpating or assessing movement. Patients with cervical spondylosis, for example, may have a ‘poke’ neck, and deformities of the cervical spine are seen in the Klippel–Feil syndrome (p. 447) and a few other conditions. Check also that the patient can support the head without difficulty – instability of the cervical spine can be easily missed in a recumbent patient.
Palpation
Midline tenderness over the supraspinous ligament is found after injuries to the neck, such as a sprain or whiplash injury. A defect is sometimes felt in the supraspinous ligament following a major spinal injury, and is a serious finding (p. 152). Tenderness and spasm of the paraspinal muscles extending down to the trapezius are found in cervical spondylosis.
Movement
Movement of the neck cannot be assessed in degrees like a simple synovial joint; it is expressed as a percentage or fraction of the usual range, e.g. two-thirds normal, half normal, 50% normal (Fig. 2.5). The patient can be examined sitting down, to eliminate compensatory movements in the thoracic and lumbar spine. The following movements are recorded:
• Flexion – ‘look downwards’.
• Extension – ‘look upwards’.
• Lateral rotation – ‘look over your shoulder’.
• Lateral flexion – ‘lean your head sideways’.
 |
| Fig. 2.5
Movements of the cervical spine.
|
The combined range of flexion and extension is about 110°. Flexion and extension are best seen from beside the patient, and the lateral movements from behind.
Stressing the cervical spine is not helpful.
Thoracic spine
Inspection
Deformities of the thoracic spine are important.
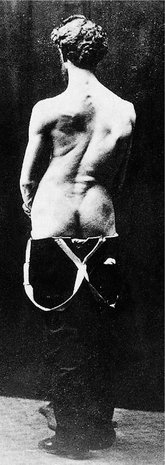
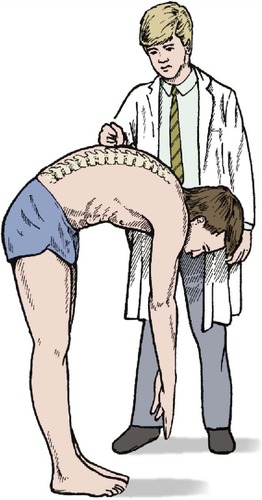
Scoliosis usually develops during adolescence but also occurs in early childhood. The rib ‘hump’ is demonstrated by standing behind the patient and asking them to bend forward with the hands held together (Fig. 2.6 and Fig. 2.7).
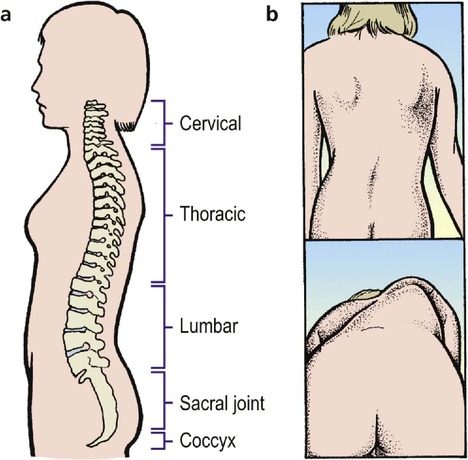 |
| Fig. 2.6
The spine: (a) the successive lordosis and kyphosis of the cervical, thoracic, lumbar and sacral regions; (b) scoliosis can be seen with the patient standing but is more marked when the patient leans forward.
|
 |
| Fig. 2.7
Thoracic scoliosis.
From Sayre LA (1877) Spinal Disease and Spinal Curvature. By kind permission of the Wellcome Institute Library, London.
|
Kyphosis is best seen from the side (Fig. 2.8). An even, regular and rounded kyphosis is seen in Scheuermann’s disease and is of little significance, but a sharp angular bump like a knuckle may indicate collapse of a vertebra, nowadays most often due to a tumour or a pathological fracture in porotic bone but in the past usually due to tuberculosis. Such a lump is called a gibbus. The opposite of a kyphosis, a lordosis, may also be seen, but is rarely a serious problem.
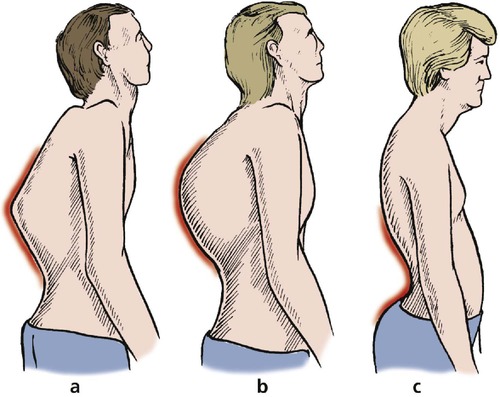 |
| Fig. 2.8
Spinal deformities: (a) a knuckle kyphosis with gibbus; (b) rounded kyphosis; (c) exaggerated lordosis.
|
Palpation
Tenderness can be elicited by gently percussing, tapping the spinous processes with the patient leaning forward (Fig. 2.9). Tenderness in the midline at the thoracolumbar junction may be due to collapse of the T12 or L1 vertebra. In an elderly patient this is usually caused by osteoporosis, sometimes following a surprisingly trivial injury. In the younger patient, more force – such as a fall from scaffolding – is needed, but the physical signs are the same as in the elderly.
 |
| Fig. 2.9
Testing for tenderness of the lumbar vertebra by gentle percussion of the vertebral spine with the spine flexed.
|
Movement
There is little movement in the thoracic spine. Stressing is not applicable.
Lumbar spine
Inspection
Look for deformities, particularly scoliosis with the patient leaning forward. This is best done when movement is examined.
Palpation
Tenderness at the lumbosacral junction may be caused by a simple ligament strain, but if there is a step at the lumbosacral junction, spondylolisthesis is likely (p. 457).
Movement
The commonest abnormality in the lumbar spine is a loss of movement. Osteoarthritis is the most common problem in the older patient but prolapsed intervertebral discs and ankylosing spondylitis also present with pain and loss of movement in the lumbar spine.
Movement can be recorded either as a percentage or fraction of normal, as with the cervical spine, or by noting how far the patient can reach. Forward flexion can be recorded as ‘fingertips to the knees’, ‘fingertips to the ankles’, etc. (Fig. 2.10), and lateral flexion as the distance of the fingers from the fibular head. This is quick and easy but has the disadvantage that stiffness of the hips also restricts motion. An alternative is to measure the amount of movement, using a tape measure. This is more reliable and takes a little longer.
 |
| Fig. 2.10
Movement of the lumbar spine. Movement can be recorded by noting how far the fingers can reach, e.g. fingertips to knees, mid-tibia, ankles, etc.
|
The pattern of flexion and extension is also important. Generalized stiffness and loss of the normal lumbar curvature in the elderly patient are often due to osteoarthritis. Asymmetrical flexion with spasm of the paraspinal muscles may indicate a disc prolapse or a structural scoliosis, and a painful catch as the spine is straightened from the flexed position suggests mechanical instability or a muscle strain.
Root involvement. Prolapse of an intervertebral disc usually involves a neurological deficit and at least 90% of disc lesions occur at the L4–5 or L5–S1 levels. The fifth lumbar and the first sacral roots are therefore most often involved, and examination of these roots is an essential part of the examination of the lumbar spine.
Remember that because the ankle jerk is supplied by a single root (S1), it is usually either normal or absent altogether, while the knee jerk, supplied by three roots (L3, 4 and 5), may be only slightly diminished. A ‘slightly diminished ankle jerk’ is probably an incorrect finding, and the commonest cause of a ‘completely absent knee jerk’ is poor examination technique. A crude test for the power of dorsiflexion and plantar flexion is to ask the patient to walk on heels and toes, respectively.
Check also for perianal anaesthesia, which is rare but a sure sign of a cauda equina lesion that needs urgent action.
Straight leg raising. A prolapsed disc will press upon a nerve root, stretch it and cause pain. Lifting the leg straight increases the tension and reproduces the pain. Several tests based on this phenomenon are available (Fig. 2.11). Conversely, if the range of straight leg raising is normal, a disc prolapse is unlikely.
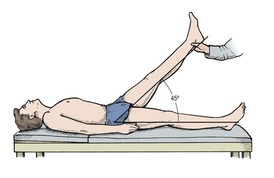 |
| Fig. 2.11
Straight leg raising. The angle between the leg and the couch is recorded. The end point is reached when the patient experiences pain or moves the pelvis.
|
Chest
Inspection
Apart from pectus carinatum, pectus excavatum and scoliosis, there is little to be found on examination of the chest.
Palpation
Localized tenderness of the ribs may be the only sign of a broken rib or metastasis.
Movement
Restriction of chest expansion to less than 5 cm may be the first objective sign of ankylosing spondylitis.
Stressing
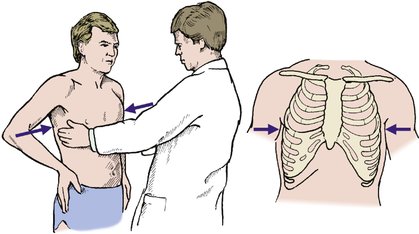
‘Springing’ the ribs (Fig. 2.12) is a useful screening test for fracture of the ribs.
 |
| Fig. 2.12
‘Springing’ the ribs. Lateral compression of the chest induces pain if there is a rib fracture.
|
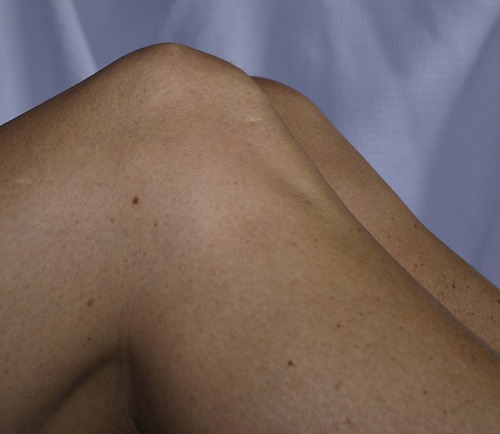
Shoulder
Inspection
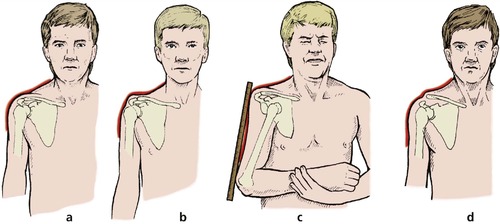
Look for an abnormal contour. In a dislocated shoulder the humeral head is less prominent than normal and the tip of the acromion can be joined to the lateral epicondyle with a straight line (Fig. 2.13). A similar appearance is seen in patients with a paralysed deltoid, whose shoulders have a characteristic square outline but with the humeral head in the correct position. Look also for swelling around the shoulder, wasting of the supraspinatus, and a step at the acromioclavicular joint. Be sure to inspect the shoulder from the front, side and back. If this is not done a posterior dislocation may be missed.
 |
| Fig. 2.13
Shoulder contours. (a) Normal. (b) Wasting of the deltoid. (c) Dislocated shoulder with a positive Hamilton’s ruler sign. A ruler will touch both the acromion and the lateral epicondyle. (d) Acromioclavicular separation. There is a step at the acromioclavicular joint.
|
Palpation
There is tenderness at the tip of the acromion in patients with supraspinatus tendinitis, and the acromioclavicular joint is tender if it is abnormal. Tenderness in the biceps groove at the front of the shoulder indicates bicipital tendinitis.
Movement
Movement of the glenohumeral joint must be distinguished from scapulothoracic movement, which can disguise stiffness at the shoulder joint, as movement of the lumbar spine can disguise stiffness at the hip. Look at the rhythm of movement by standing behind the patient and looking at the way the shoulder girdle moves as a whole, comparing one side with the other.
Scapulothoracic movement can be almost completely eliminated by holding the palm downwards (Fig. 2.14). When the full range of glenohumeral abduction has been reached, the patient can turn the palm upwards and complete abduction by rotating the scapulothoracic joint. Holding the palm downwards prevents this final range of movement.
 |
| Fig. 2.14
Scapulothoracic versus glenohumeral movement: (a) pure glenohumeral movement with the palm facing downwards will lift the shoulder only to 90°. In order to elevate the arm completely (b) the scapula must rotate.
|
Forward flexion is examined with the palm facing medially, and must also be separated from scapulothoracic movement. This and other shoulder movements are measured in degrees. Flexion of the shoulder with the arm abducted is called horizontal flexion and is recorded separately.
Rotation is measured with the elbows flexed and tucked into the waist. Extension can also be measured but is less important than abduction and rotation.
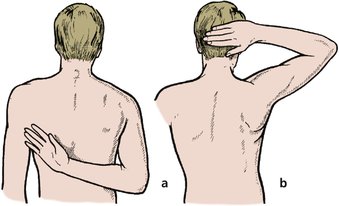
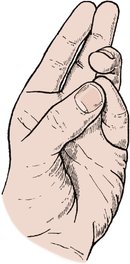
Most movements at the shoulder involve composite movements of the whole shoulder girdle. A useful test of overall shoulder function is to ask the patient to put the hand behind the head and then behind the back (Fig. 2.15). For a woman, this is equivalent to combing hair and fastening a bra. The first movement requires external rotation and full abduction; the second requires full internal rotation and extension.
 |
| Fig. 2.15
Shoulder movement: (a) full internal rotation and extension; (b) full external rotation and abduction.
|
The difference between active and passive motion is very important and the two must be examined separately. A full range of active movement may be impossible if there is inflammation of the supraspinatus tendon because it is accompanied by a painful arc of movement between 30 and 120°. In these patients, a full range of passive movement is possible but active movement is limited because active contraction of the supraspinatus presses the painful tendon against bone.
Check also the function of serratus anterior by asking the patient to push against the examiner’s hand, or a wall. Winging of the scapula indicates weakness of serratus anterior muscle.
The rotator cuff can be assessed by resisted contraction of the cuff muscles.
Stressing
Stressing the shoulder is often useful. Unstable shoulders make the patient apprehensive when they are put into abduction and external rotation, and anteroposterior movement of the humeral head is helpful in the assessment of capsular lesions and osteoarthrosis.
Abnormal movement can be detected at the acromioclavicular joint and osteophytes here cause pain on abduction and external rotation.
Acromioclavicular joint
Try to separate the shoulder and the acromioclavicular joint in your mind when examining the shoulder area. The acromioclavicular joint causes different problems from the shoulder joint.
Inspection
Look for a step at the acromioclavicular joint when the arm is hanging. There is much variation between one individual and another and the other side must be used for comparison.
Palpation
The acromioclavicular joint may be tender and there may be osteophytes around it. If the joint is disrupted the acromion can be lifted back to its normal position. To do this put one hand on the clavicle and lift the elbow with the other. The acromion will rise to meet the clavicle.
Look also for abnormal backward and forward movement between the acromion and the end of the clavicle.
Elbow
Inspection
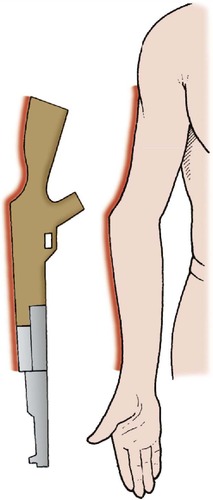
Apart from abnormalities of growth resulting from injuries in childhood, such as a gunstock deformity from a malunited supracondylar fracture (Fig. 2.16), swelling from a joint effusion and the knobbly osteophytes of osteoarthritis, there is seldom much to find on inspection of the elbow.
 |
| Fig. 2.16
Gunstock deformity of the elbow, often due to supracondylar fracture.
|
Palpation
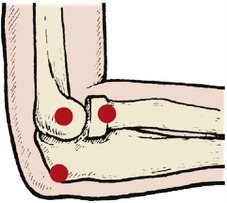
Tenderness of the lateral epicondyle is common in ‘tennis elbow’, the medial epicondyle in ‘golfer’s elbow’ and the radial head in rheumatoid arthritis (Fig. 2.17).
 |
| Fig. 2.17
Bony points around the elbow. The lateral epicondyle, radial head and olecranon are marked.
|
Movement
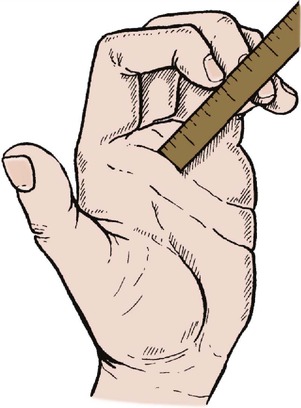
Flexion and extension are the only movements of the elbow and are recorded in degrees. Always compare with the opposite elbow; hyperextension is common.
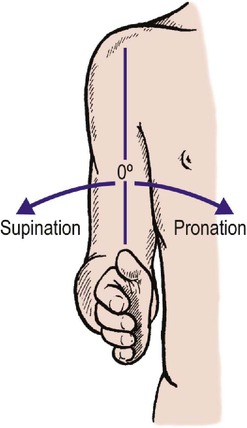
Pronation and supination occur about an axis that runs through the head of the radius and the lower end of the ulna (Fig. 2.18). Rest the ulnar margin of the forearm on a table and then pronate and supinate the forearm to see how this works. A pencil held in the clenched fist can be used to indicate the range of movement. The movement is complex and involves not only the two joints at the lower ends of the forearm but the muscles and interosseous membrane.
 |
| Fig. 2.18
Pronation and supination of the forearm.
|
Stressing the elbow is not helpful.
Wrist
Inspection
A ‘dinner fork’ deformity of the wrist is seen after a Colles’ fracture and is the commonest deformity at the wrist. Deformity is also seen in rheumatoid arthritis and bizarre abnormalities such as congenital absence of the radius (p. 214).
Palpation
Tenderness of the radial styloid often indicates a fracture of this bone following a minor fall. De Quervain’s tenosynovitis is also a cause of tenderness in this area and can be confirmed by flexing the wrist and adducting the hand while the fingers hold the thumb, a manoeuvre which stretches the long tendons of the thumb and reproduces the patient’s pain.
Movement
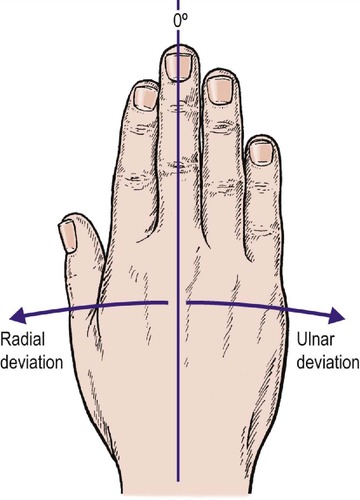
Flexion, extension and radial and ulnar deviation at the wrist are measured in degrees (Fig. 2.19). Extension is easily measured by putting the hands together as if in prayer, and flexion by the opposite position (Fig. 2.20). Like the shoulder, most movements of the wrist are composite, and a general appraisal of circumduction gives an overall assessment of all the joints involved.
 |
| Fig. 2.19
Radial and ulnar deviation of the hand relative to the forearm.
|
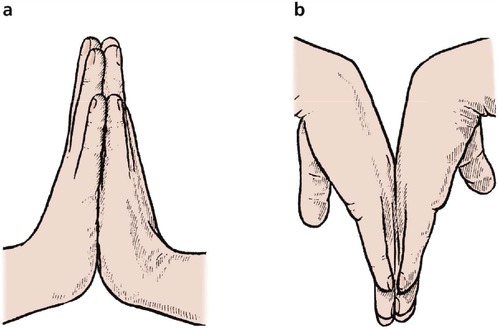 |
| Fig. 2.20
An easy way of testing (a) extension and (b) flexion of the wrists.
|
Stressing the wrist is seldom helpful.
Hand and fingers
Assessment of the hand and fingers is an enormous subject and many tests are described (see Ch. 23).
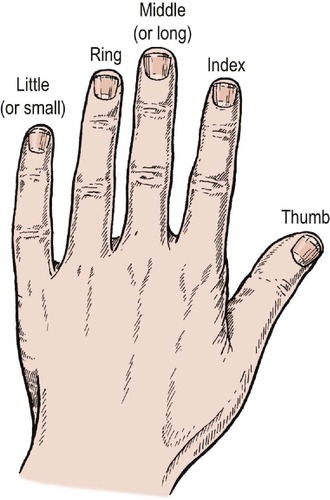
Naming digits
Digits must be named, not numbered (Fig. 2.21). The thumb is the first digit and the second digit is the first finger, unless you count from the little finger, in which case the index is the fourth finger. Confusion of this degree is unacceptable, especially when writing operating lists, where it has resulted in amputation of the wrong finger. Always use these names for the fingers:
Thumb
Index
Middle (long in America)
Ring
Little (small in America)
 |
| Fig. 2.21
Naming of digits.
|
Americans call the middle finger the long finger and the ‘little’ finger the small finger to avoid confusion when dictating.
Inspection
Careful inspection for deformities (Fig. 2.22), cuts, scars and wounds is essential, as in other areas, but with special emphasis on possible damage to nerves and tendons.
 |
| Fig. 2.22
Reduplicated thumbs in an infant.
|
Palpation
Tenderness of the anatomical snuffbox (Fig. 2.23) indicates a possible fracture of the scaphoid; tenderness over the joints may be the first sign of rheumatoid arthritis.
 |
| Fig. 2.23
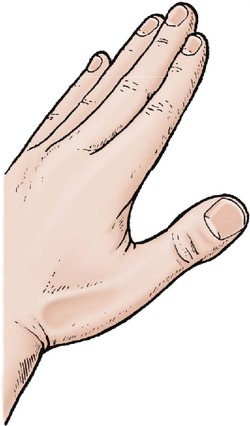
The ‘anatomical snuffbox’, produced by extending the thumb with the fingers extended.
|
Sensibility. The innervation of the hand is described on page 42 and page 43. An attempt should be made to fit sensory symptoms such as numbness or paraesthesiae into an anatomical distribution. Carpal tunnel syndrome due to median nerve compression at the wrist is a good example. Patients with this condition have sensory abnormalities in the distribution of the median nerve below the wrist.
Movement
Movement of the fingers includes flexion, extension, adduction and abduction as well as opposition of the thumb and little finger (Fig. 2.24). Movement can be recorded in degrees (°) of motion at each joint but a more convenient way is to note the distance from the pulp of the fingertip to the palm of the hand with the finger fully flexed (Fig. 2.25).
 |
| Fig. 2.24
Opposition of the thumb and little finger.
|
 |
| Fig. 2.25
Measuring finger movements. ‘Fingertips 5 cm (2 in) from palm’.
|
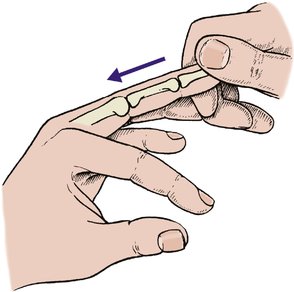
Tendons. The function of every tendon should be tested and any difference between active and passive movement recorded. Test the flexors carefully. Flexor profundus is the only flexor attached to the distal phalanx and flexion of the distal interphalangeal joint is only possible if this tendon is intact. If the patient is asked to flex the whole finger without controlling the proximal interphalangeal joint, flexor superficialis will come into play and a profundus lesion may be missed (Fig. 2.26). The flexor profundus can only be tested by holding the proximal and middle phalanges down while asking the patient to flex the finger. If the patient can flex the distal interphalangeal joint, the flexor digitorum profundus is intact (Fig. 2.26a). If this is not done, the flexor superficialis will flex the entire digit and the lesion may be missed.
 |
| Fig. 2.26
(a) Assessing the function of the flexor digitorum profundus by holding down both the proximal and middle phalanges as the patient tries to flex the finger; (b) the flexor superficialis tendon is assessed by asking the patient to flex the finger while holding the other fingers extended.
|
The integrity of the flexor superficialis can be assessed by holding the adjoining fingers in extension (Fig. 2.26b) to eliminate the action of the flexor digitorum profundus.
Stressing
Longitudinal pressure on the fingers is a useful screening test for the mechanical integrity of the metacarpals and phalanges (Fig. 2.27). Longitudinal pressure can also be used to test the toes.
 |
| Fig. 2.27
Testing the integrity of the phalanges and metacarpals by longitudinal pressure along the finger.
|
Function
Testing the function of the hand is described on page 22. Many tests exist, including the different types of grip, e.g. pinch grip, power grip, and key grip. Coordination and function may be tested with the many tests of manual dexterity.
Pelvis
Inspection
As with the chest, inspection is seldom helpful.
Palpation
Palpation may reveal tender areas over a fracture.
Movement
Unless there is a grossly unstable fracture, movement is absent in the pelvis.
Stressing
‘Springing’ the pelvis is an invaluable test for fractures and should be performed routinely in any patient with a crush injury of the trunk (Fig. 2.28) or possible pelvic fracture.
 |
| Fig. 2.28
‘Springing’ the pelvis. Lateral pressure on the pelvis produces pain if there is a pelvic fracture.
|
Hip
Examination of the hip is an essential part of orthopaedic examination, and is best done in an orderly manner.
Inspection
Although inspection of the hip itself is seldom helpful, measurement of limb length is essential.
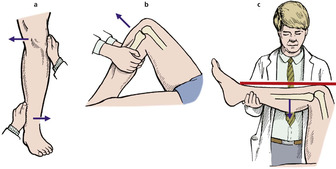
Real and apparent shortening. It is important to be able to measure limb length, both for clinical practice and for examination purposes. Real shortening, in which there is loss of bone length, must not be confused with apparent loss due to a deformity at the hip, in which there is no loss of bone length (Fig. 2.29).
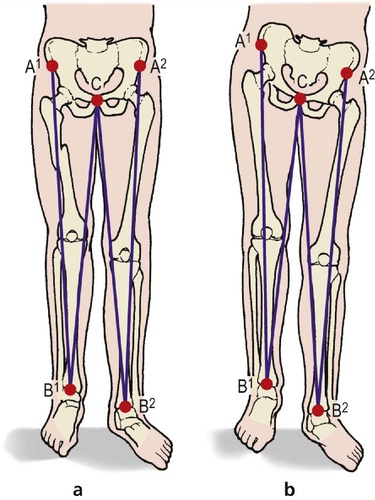 |
| Fig. 2.29
Real (a) and apparent (b) shortening of the lower limb. In (a) A 1B 1 is shorter than A 2B 2. In (b) they are the same length. In both (a) and (b), CB 1 is shorter than CB 2.
|
True length is measured from the anterior superior iliac spine to the medial malleolus, and apparent length from a midline structure, such as the pubic symphysis, to the medial malleolus. The patient must be lying as straight as possible when these measurements are made.
Palpation
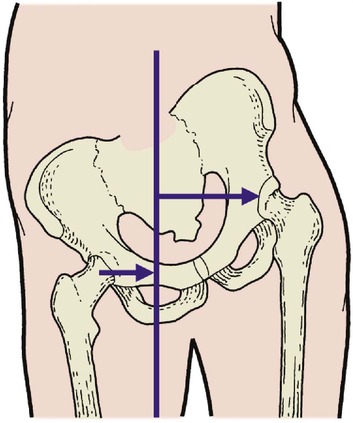
Feel for bony prominences and check that they are in their correct relationship. The greater trochanter lies more proximal than normal in most mechanical instabilities of the hip.
The relationship of the greater trochanter to the rest of the pelvis can be estimated by Nélaton’s line, which joins the anterior superior iliac spine to the ischial tuberosity (Fig. 2.30). Run a tape between these two points: if the tip of the greater trochanter lies proximal to the tape, the hip joint is abnormal.
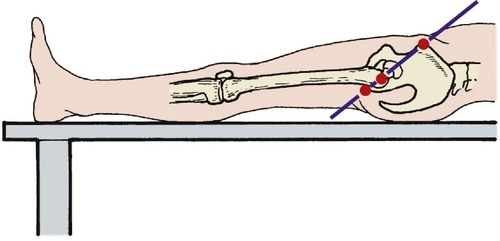 |
| Fig. 2.30
Nélaton’s line joining the anterior superior iliac spine, greater trochanter and ischial tuberosity.
|
Movement
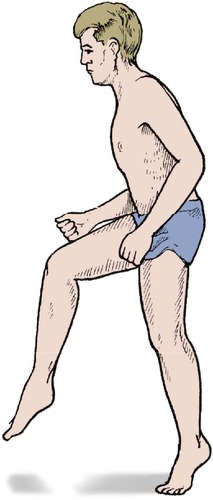
Flexion, extension, abduction, adduction, external rotation and internal rotation are recorded in degrees. The movements are self-explanatory but rotation in flexion always causes confusion because, with both knee and hip flexed, internal rotation at the hip moves the foot outwards and vice versa. If in doubt, rotate the hip and straighten the knee to see which way the foot is pointing (Fig. 2.31).
 |
| Fig. 2.31
(a) External rotation of the hip in flexion; (b) internal rotation of the hip in flexion. If this is confusing, imagine the position of the hip with the knee extended.
|
It is sometimes difficult to distinguish movement of the hip from movement of the spine. To be sure that movement is occurring at the hip alone, rest a hand on the pelvis and note when it begins to move.
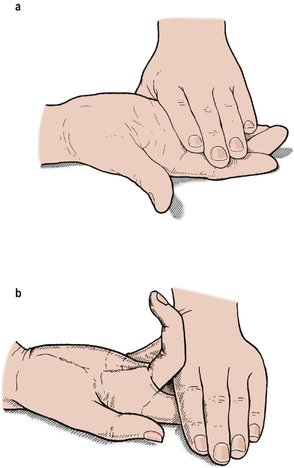
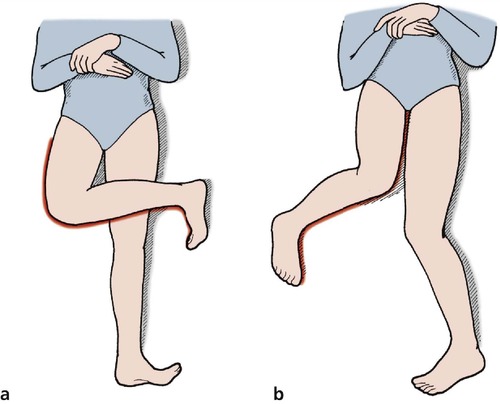
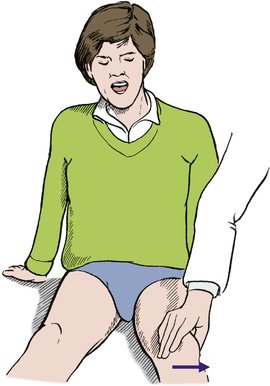
Fixed flexion deformity and Thomas’ test. If the hip has a fixed flexion deformity, common in osteoarthritis, the patient will hide the deformity on the examination couch by arching the back so that the leg lies flat (Fig. 2.32 and Fig. 2.33). This is partly because it is more comfortable to lie with the leg flat, and partly because the weight of the limb pulls it onto the couch. Lying in this way conceals the flexion deformity from the unwary, but it can always be exposed by flexing the opposite hip and knee fully, so that the pelvis is brought back to its correct position and the flexion deformity exposed. This is Thomas’ test and is very reliable, even if both hips are affected.
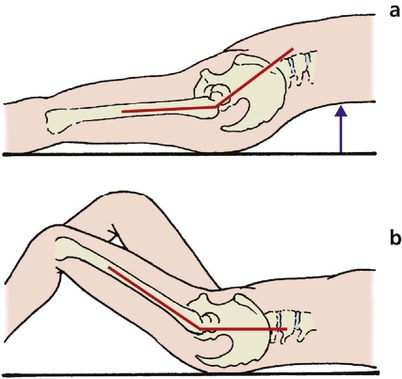 |
| Fig. 2.32
Thomas’ test. (a) If there is a fixed flexion deformity of the hip, the patient can put the leg flat on the couch by arching the back; (b) flexing the knee puts the back flat against the couch and reveals a flexion deformity.
|
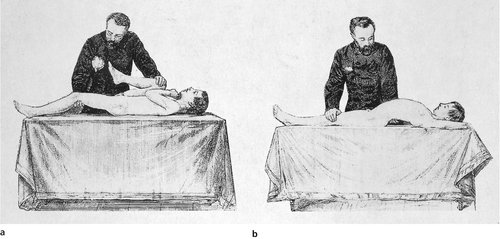 |
| Fig. 2.33
(a), (b) H. O. Thomas performing the Thomas test.
From Thomas H O (1876) Diseases of the Hip, Knee and Ankle Joints, T Dobbs, Liverpool. By kind permission of the Wellcome Institute Library, London.
|
Trendelenburg test. Standing on one leg without support and with the spine vertical is only possible if the hip is stable and the muscles around it are working normally (Fig. 2.34). The Trendelenburg test is useful as an overall assessment of the function of the hip and will expose dislocations of the hip or weakness of the glutei, but beware of false negatives and trick movements.
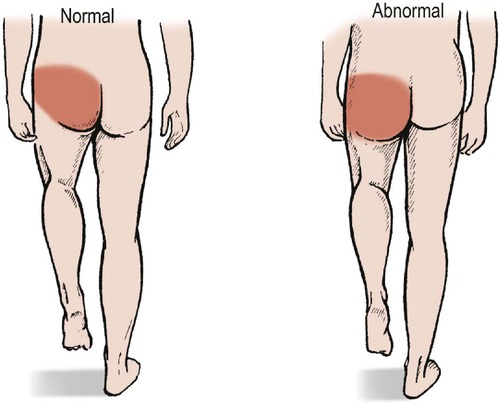 |
| Fig. 2.34
The Trendelenburg test. If the pelvis droops when the left leg is raised, there is an abnormality of the abductors in the right hip.
|
Stressing
Stressing the hip is not helpful in itself but the following tests of function are most important.
Gait
Gait involves many joints but the hip is the most important. Gait is assessed by watching patients walk, preferably without being aware that they are being watched. The following are the most common abnormal gaits.
Antalgic (pain-relieving) hip gait. The patient leans the body over to the side of the painful hip when weight-bearing, in order to reduce the load on the hip, and takes a short stride to minimize the time that the painful limb bears weight (Fig. 2.35). The commonest cause is osteoarthritis.
 |
| Fig. 2.35
Tilting the pelvis moves the centre of gravity nearer to the hip joint, reducing the load across the joint.
|
Scissor gait of cerebral palsy. In a true scissor gait, adductor spasm makes the legs cross over one another. In less severely affected patients the thighs are internally rotated and held firmly together.
Drop foot gait. If the ankle dorsiflexors are weak because of a common peroneal palsy or a lumbar root lesion, the patient lifts the knee unusually high and puts the foot down toe first to produce a high stepping gait that is easily recognizable (Fig. 2.36).
 |
| Fig. 2.36
A high stepping gait.
|
Hemiplegic gait. The abnormal gait of hemiplegia is caused by flexor spasm on the affected side. The upper limb is usually affected as well and the abnormal posture and gait are easily identified.
Trendelenburg gait. If the hip is unstable or the abductors inadequate, the Trendelenburg sign will be positive on every step and the pelvis will tilt downwards on weight-bearing to produce a dipping or rolling gait.
Painful foot gait. Patients with painful feet walk with a typical shuffling gait to minimize sudden increases in load. This gait can be caused by simple problems such as a blister or a stone in the shoe. Most people are familiar with this gait from personal experience.
Other abnormal gaits result from weakness of the tibialis anterior, rupture of the tendo Achillis and choreoathetosis.
Knee
Inspection
Unlike the hip, the knee is a superficial joint and many abnormalities are easily visible.
Alignment. Look for varus and valgus deformities at the knee by asking the patient to stand. The hip, knee and ankle should lie in the same straight line and this can be checked with a tape measure (Fig. 2.37).
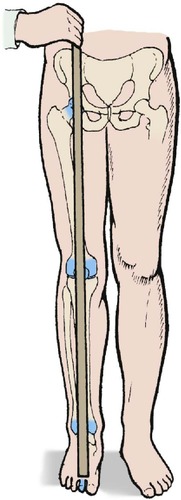 |
| Fig. 2.37
Alignment of joints of the lower limb. The hip, knee and ankle should be one above the other.
|
Effusion. A large collection of fluid in the knee is seen as a swelling above the patella but a small effusion will only fill the hollows on either side of it. A small effusion (5–10 ml) is detected by stroking the fluid into the opposite gutter of the knee and then pushing it back to the other side, when the gutter can be seen to fill (Fig. 2.38).
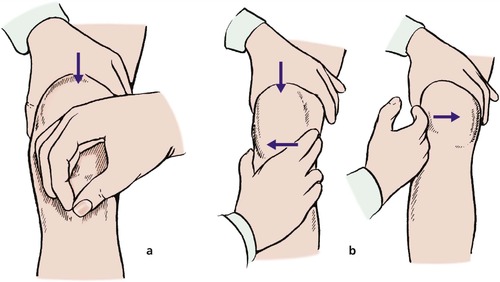 |
| Fig. 2.38
Two methods of assessing a knee effusion: (a) patellar tap; (b) stroking fluid into and out of a parapatellar gutter.
|
This test is much more sensitive than the ‘patellar tap’, in which fluid is pushed up into the suprapatellar pouch so that the patella can be bounced against the femur. This test is only positive if there is a large effusion.
Thigh circumference. The thigh circumference gives a rough indication of muscle bulk. The hamstrings and quadriceps waste rapidly if the knee is injured and thigh circumference is sometimes used as a guide to the fitness of the leg as a whole. Although undue importance is attached to this sign, it is useful to know how to measure thigh circumference accurately in order to satisfy examiners.
First, look at the two legs and see if one is thinner than the other, particularly in the region of vastus medialis. Next, mark a point on the thigh approximately 20 cm above the tibial tubercle and measure the circumference of each thigh at this level. More than 1 cm of wasting may mean that at some stage in life the patient has not used one leg as vigorously as the other one, but soft tissue swelling, joint effusion, or the callus round a fracture increase thigh circumference and make the test meaningless.
Do not talk of ‘quadriceps circumference’. The hamstrings are larger than the quadriceps and contribute more to the thigh circumference. The tape cannot distinguish between them.
Palpation
Jointline tenderness is a non-specific sign found in any patient with synovial irritation, including those with torn menisci, generalized synovitis and osteoarthritis.
Movement
Flexion and extension at the knee can be easily measured in degrees but the two legs must always be compared. Many knees hyperextend (back knee) and a knee which goes straight has a block to extension if the other knee hyperextends. Feel for crepitus, clicks and other abnormal thuds or sounds.
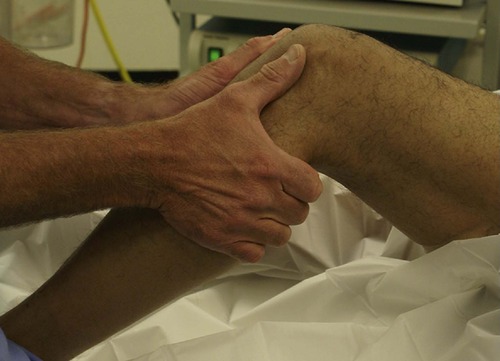
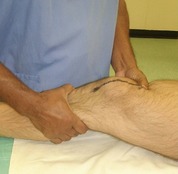
Stressing
Stressing the knee will reveal abnormal mobility due either to lax ligaments or to bone collapse, and abnormal clicks and clunks from meniscal tears.
Medial ligament. Laxity of the medial ligament should be tested in full extension and slight flexion. A slight jog is always present in slight flexion and comparison of a flexed knee with a straight knee is meaningless (Fig. 2.39a).
 |
| Fig. 2.39
Tests for ligament stability of the knee: (a) medial ligament stability; (b) anterior drawer test for anterior cruciate rupture; (c) posterior sag sign in posterior cruciate rupture.
|
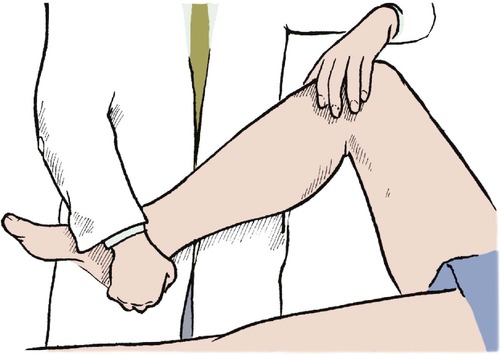
Anterior cruciate. The anterior cruciate holds the tibia back relative to the femur. If the anterior cruciate is ruptured, the tibia moves anteriorly when the anterior drawer test is performed (Fig. 2.39 and Fig. 2.40). The test can also be performed with greater accuracy when the knee is flexed a few degrees only. This is called the Lachman test (Fig. 2.41).
 |
| Fig. 2.40
Performing the anterior drawer test.
|
 |
| Fig. 2.41
The Lachman test for anterior cruciate rupture. The tibia is moved forwards and backwards relative to the femur in almost full extension.
|
The anterior cruciate cannot be properly assessed unless the patient is fully relaxed and lying flat. If sitting up, drawing the tibia forwards will pull the patient down the bed. The hamstrings contract and relaxation becomes impossible.
The pivot shift, or jerk test, is positive if the anterior cruciate is ruptured and reproduces the collapsing that the patient experiences. The test is done by applying a valgus and internal rotational strain while pushing the proximal tibia forwards, which subluxes the lateral tibial plateau in front of the femoral condyle (Fig. 2.42). The knee is then flexed and the tibia reduces to its correct position with a sharp jerk, which the patient will recognize as reproducing the symptoms (p. 420). This is a difficult test to perform.
 |
| Fig. 2.42
The pivot shift test for anterior cruciate rupture. The upper end of the tibia is pushed forwards, the foot internally rotated and a valgus strain applied as the knee is flexed and extended.
|
Posterior cruciate. The posterior cruciate holds the tibia forwards relative to the femur; if the posterior cruciate ligament is ruptured, the tibia sags posteriorly (Fig. 2.39 and Fig. 2.43). The sag is visible even if the patient is not fully relaxed because the hamstrings tend to pull the tibia backwards, exaggerating the abnormality.
 |
| Fig. 2.43
The posterior sag sign. The tibia sags backwards in relation to the femur. A straight line drawn up the front of the nearer tibia would pass through the patella but a similar line drawn on the far tibia would pass just in front of the patella.
|
Meniscal tests. A meniscal fragment can sometimes be displaced into the joint space by rotating the tibia on the femur in flexion, producing a distinct and painful click. The test can be repeated while loading the medial and lateral compartments alternately to decide which meniscus is torn (Fig. 2.44). This is McMurray’s test, and must be distinguished from the click which is often felt in the normal knee when the tibia is rotated in full flexion. The meniscal click of the McMurray test is louder, more easily felt and painful.
 |
| Fig. 2.44
McMurray’s test for meniscal lesions. The tibia is rotated on the femur as the knee is extended from flexion.
|
Patellofemoral joint
Inspection
Look at the size and position of the patella. Small or high patellae are often unstable.
Palpation
Abnormalities of the patellofemoral joint cause pain around the front of the knee when it is bent under load, and the patella may be tender. If the bone is worn, crepitus will be felt when a hand is placed over the patella as the knee is flexed, and firm backward pressure of the patella against the femur causes pain.
Movement
Watch the ‘flight path’ of the patella as the knee flexes. Unstable patellae, particularly small high patellae, have excessive lateral movement at the start of flexion.
Stressing
If the patella is unstable, attempts to push it laterally will make the patient apprehensive – the ‘apprehension’ sign (Fig. 2.45).
 |
| Fig. 2.45
Patellar apprehension test. If the patella is unstable, lateral pressure makes the patient apprehensive.
|
Ankle, subtalar joint and foot
Inspection
Examine the patient standing, both wearing shoes and without shoes, and inspect the shoes for abnormal wear or stretching. The weight-bearing foot looks very different from the relaxed foot.
Next, examine the foot and look particularly for deformities. These include pes planovalgus (flat foot), pes cavus (claw foot) (Fig. 2.46), congenital talipes equinovarus ( club foot, or CTEV) and calcaneovalgus deformities (Fig. 2.47) (p. 352). The commonest deformity is probably the adducted forefoot, or metatarsus adductus, of early childhood (p. 351). The adducted forefoot can be distinguished from a club foot by looking at the hindfoot. Cover up the forefoot; if the hindfoot is normal, the patient does not have a club foot (p. 351).
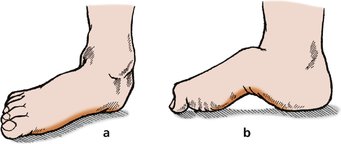 |
| Fig. 2.46
(a) Flat foot (pes planus); (b) high arched foot (pes cavus).
|
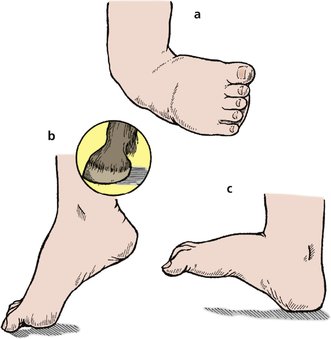 |
| Fig. 2.47
Foot deformities: (a) equinovarus deformity; (b) equinus deformity; (c) calcaneovalgus deformity.
|
Palpation
Look for areas of tenderness, particularly over bony prominences and the metatarsal heads.
Movement
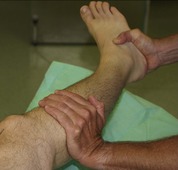
The ankle, subtalar and midtarsal joints function as a unit and must be distinguished from each other (Fig. 2.48). The ankle is a hinge joint allowing up and down movement (dorsiflexion and plantar flexion), measured in degrees.
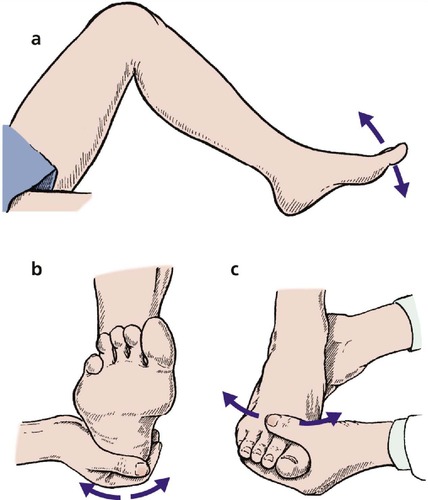 |
| Fig. 2.48
(a) Ankle movement; (b) subtalar joint movement, assessed by moving the calcaneum relative to the leg; (c) tarsal joint movement, assessed by moving the forefoot while holding the calcaneum steady.
|
The subtalar joint between the talus and calcaneum is complex and consists of two separate articulations with an oblique axis that allows inversion and eversion, which are measured as a fraction or percentage of normal.
The midtarsal joint is a collection of small plane joints between the tarsal bones and allows pronation and supination about the long axis of the foot, also measured as a fraction or percentage of normal.
Stressing
Stressing the ankle ligaments may reveal instability, and stressing the ankle, subtalar and tarsometatarsal joints in turn will often determine the site of pain. Longitudinal pressure on the toes (as for the fingers) produces pain if there is a fracture.
[/level-membership-for-orthopaedics-category][not-level-membership-for-orthopaedics-category]
Chapter 2. History and clinical examination
By the end of this chapter you should be able to:
• Take an appropriate history.
• Perform a competent general clinical examination of all joints.
• Understand and use the correct orthopaedic terminology.
• Competently perform the common examinations of large joints.
If you are uncertain about the meaning of a word, look it up in the Glossary on p. 467.
History
In most branches of medicine there is seldom any argument about the correct management once the diagnosis has been established. Orthopaedic surgery is different: the diagnosis is easy but the choice of management is difficult. The appropriate treatment varies from one patient to the next and is determined by age, sex, occupation and home circumstances, all of which must be established while the history is taken. The patient’s attitude is also important and it is helpful to consider the following points while taking the history.
General aspects of a consultation
1. Why has the patient come?
2. How well motivated is the patient?
3. Does the patient have a reason (litigation, for example) not to hope for recovery?
4. Does the patient have realistic expectations of treatment?
5. Has the patient really understood what you have said?
The patient
Reason for consultation
Most patients will be looking for the relief of pain or deformity but many seek only an explanation of their condition and its likely progress. A patient with sudden pain in one joint may be worried because a relative had severe arthritis that began with pain in just one joint and the patient fears that she, too, is destined for a wheelchair. Other patients fear that their pain is the first sign of widespread cancer, particularly if a relative died with bone metastases; and parents’ worries about the shape of their children’s feet can be fuelled by concerned grandparents, friends or health visitors.
These patients need nothing more than a sympathetic ear, firm and authoritative reassurance, and a careful explanation of the condition and its prognosis. To treat the symptoms energetically will only increase the patient’s anxiety.
Motivation
Motivation is very important. Many orthopaedic operations demand hard work and complete cooperation from the patient in the postoperative period. If the patient gives the impression of being unable or unwilling to take an active part in the rehabilitation process, there is unlikely to be a good result from operation, however well it is done. To detect such people before operation is difficult, but only too easy after operation.
Litigation
When symptoms are the result of a road traffic accident or an injury at work, the patient may be involved in legal action to obtain compensation. Although the great majority of patients give a perfectly honest and straightforward account of their symptoms, they cannot help becoming a little introspective if they think that compensation is related directly to the severity of symptoms. Most people involved in litigation will say so, but if this is not mentioned and patients begin the history with the exact date when the symptoms began, they should be asked specifically about impending litigation. A clear and careful record of the symptoms is essential in these patients and may be a little more difficult than usual to obtain.
Patients’ expectations
Sensible patients understand that no operation is painless and that all leave a permanent scar, but some expect the impossible. Athletes cannot accept that declining performance is due to age, and patients with gross osteoarthritis expect a perfect cure. If treatment is offered to patients with unrealistic expectations they are bound to be disappointed, and are sometimes even vengeful. It is as well to recognize such people before any definitive treatment is suggested.
Does the patient understand?
No matter how thorough the explanation of the condition or proposed operation, it is unlikely that the patient will remember everything that has been said. Some understand more than others but a few do not remember a word. Because close cooperation between patient and doctor is particularly important in orthopaedic surgery, special attention must be given to ensuring that the patient understands as clearly as possible exactly what the treatment involves.
Specific questions
Apart from general impressions of the patient’s attitude, specific questions must be asked, both to establish the diagnosis and to select management. Social and occupational histories are vital because the impact of symptoms on lifestyle varies from one patient to the next. It is essential to have detailed information about the patient’s occupation and home circumstances before any treatment is suggested.
Specific questions
1. Symptoms. Record them as precisely as possible.
2. Occupation. Find out the exact nature of the patient’s work.
3. Impact of treatment. How will it affect the patient’s work, life, leisure, etc.?
4. Home circumstances. Are the stairs at home easy to climb? How far away are the shops? Is there any help in the house?
Symptoms
Pain, deformity, swelling and loss of movement in a joint are the commonest complaints in an orthopaedic clinic. The duration, manner of onset (sudden or gradual) and variability of the symptoms must all be established. If there is a joint swelling, is it related to use of the limb? If so, does it begin during the activity, or the next day? These are the same straightforward questions needed in any clinical history except that, when asking about pain, special attention should be paid to referred pain, a classic pitfall for the unwary. The commonest example is pain in the knee caused by disease at the hip.
Occupation
Find out not only the name of the patient’s job but also exactly what it involves. One driver may spend the entire day sitting behind the steering wheel but another will have to load and unload the vehicle, which entails a great deal of heavy physical work. A lathe operator who stands for most of the day could not work with a painful foot but could manage with a stiff knee, while a motor mechanic could tolerate a painful foot but a stiff knee would make it impossible to work in tight corners or under vehicles. The loss of the terminal phalanx of the ring finger would be of little consequence to a labourer, but disastrous to a musician.
Impact of treatment
Treatment always disturbs the patient’s life, sometimes seriously. To suggest an operation that would make a self-employed tradesman unable to work for 2 or 3 months needs careful thought. Timing is also important: to be rendered unfit during the harvest could bring financial ruin to a single-handed arable farmer for whom the quietest period of the year is at Christmas; on the other hand, shopkeepers need to be at their fittest during the Christmas period and, except in a tourist centre, would probably choose August for operation.
Home circumstances
Knowledge of the home circumstances is vital when dealing with the elderly. Problems are inevitable if the patient cannot climb stairs and the only lavatory is on the top floor. If the patient cannot walk out of the house, who will do the shopping?
These mundane details have no bearing on the diagnosis or the operations that are technically possible but they have everything to do with selecting the right treatment for the individual patient.
Clinical examination
Approaching the patient
Every clinical examination should be conducted carefully, confidently and without hurting the patient needlessly, which is difficult when muscles are tight or rigid. The patient must be encouraged to relax. If an injured, perhaps broken limb is to be put into the hands of a stranger, the patient must have complete confidence in the person carrying out the examination.
The simplest and best way of obtaining the patient’s full confidence is to conduct the examination calmly, methodically and without fumbling. The patient can easily tell (as can an examiner) if a doctor or student is doing something for the first time. Only practice brings confidence.
Routine of examination
The established routine for clinical examination in orthopaedic surgery is as follows:
Routine for clinical examination
| Inspection Palpation |
Listen to what the patient tells you. Look at the area. Feel gently for swelling, painful areas, temperature changes and tenderness. Measure limb length and girth. |
| Movement | Move the limb to assess the range of motion. Active movement is observed first, then passive. |
| Stressing | Strain the ligaments to look for abnormal movements. Radiographs are useful but do not replace any part of the clinical examination. |
| Note: Examine painful areas last! | |
Take heed of that final note – in practice there is much to be said for leaving the most painful manoeuvre until last, even if this means breaking the routine of examination. In particular, do not start the examination by leaping to the most painful area, prodding it and making the patient jump; to begin the examination thus usually marks the end of cooperation. There is also much to be said for examining any available radiographs before examining the patient, especially if there is a fracture.
Children, particularly between the ages of 1 and 3 years, must be approached with caution. It is virtually impossible to derive any useful information by examining a screaming and struggling child, but there are several ways to overcome this problem.
First, do not overwhelm the child with attention as soon as he or she enters the consulting room. A quiet talk with the parents will give the child time to appraise the doctor and decide that there is no threat.
Second, children do not like to be laid flat on an examination couch; if any part of the examination can be conducted with the child sitting on the mother’s knee, so much the better.
Third, children do not like strangers examining their bodies but they rather enjoy strangers admiring their clothes, and this vanity can be exploited. To look carefully at a child’s shoes, for example, gives the opportunity to put the hip, knee and ankle through a full range of movement, assess limb length and muscle tone and look for deformities.
Finally, if a child does have to be stripped and laid flat on the couch, leave that until last.
Inspection
Much information can be gained simply from looking at the patient as a whole rather than concentrating on details; a slow, careful inspection of the painful area can give more information than palpation and manipulation combined. The area must be fully exposed and properly prepared: a shoulder cannot be examined through a shirt or a knee through trousers.
When examining a limb, always compare the two and ask yourself the following questions:
1. Is one limb straighter or shorter than the other?
2. Are the joints swollen?
3. Is there muscle wasting?
4. Are there any scars and, if so, are they surgical or traumatic?
Examining a limb
• Deformity?
• Shortening?
• Swelling?
• Wasting?
• Scars?
Measurement is part of inspection. To measure the distance between bony points, choose fixed points that are easily recognizable, such as the medial malleolus or anterior superior iliac spine, rather than variable points, such as the umbilicus or the centre of the patella. When applying the end of the tape, run the finger past the bony point and bring the tape back up to it (Fig. 2.1). This reduces the error caused by overlying soft tissue.
|
|
| Fig. 2.1
Measuring the distance from a bony point. Move the hand just past the bony point and then back up to it.
|
When measuring limb girth, be sure that the measurements are reproducible and that the point of measurement is recorded, e.g. the narrowest part of the ankle, the widest part of the calf, or the thigh at a measured distance above the tibial tubercle.
Palpation
There is a strange temptation to start palpation by poking the painful area, but this should always be deferred until last. A hand laid gently on the affected area will detect abnormal warmth, and gentle pressure will identify soft tissue swelling or a joint effusion.
Firmer pressure will locate swellings and tender areas, and show whether the patient is apprehensive when the area is touched. Apprehension is significant, particularly if the joint is unstable, as in patients with recurrent dislocation of the patella.
Sensibility. Sensibility is examined in the usual way, but with a special effort to try to relate the pattern of abnormal sensibility to anatomical structures, such as the distribution of a cutaneous nerve or dermatome (see Ch. 3).
Movement
Always compare the range of movement with the opposite limb. This is essential because there is a wide variation in the ‘normal’ range of movement.
The quality of movement is also important. Is the movement free, or stiff? Smooth or noisy? Does the joint feel loose and unstable? Is it sound? These are subjective assessments and judgement only comes with experience.
Range of movement. The movement in a joint is always measured from 0°, every joint being at 0° when the body is in the anatomical position (Fig. 2.2). This convention is now almost universal but there are still a few who refer to the straight joint as being at 180° instead of 0°, and this causes untold confusion.
|
|
| Fig. 2.2
The anatomical position with the palms facing forwards and thumbs outwards.
|
In most joints, flexion/extension are in the sagittal plane and abduction/adduction, which represent movements away from and towards the midline of the body, in the coronal plane. Abduction and adduction of the toes and fingers are measured from the second toe and the middle finger (Fig. 2.3).
|
|
| Fig. 2.3
Abduction and adduction of the digits. The toes are adducted to the second toe and the fingers to the middle finger.
|
Rotation occurs about the long axis of a structure and circumduction is movement of a limb in a circular direction.
The only slight exceptions to these rules are for the thumb, the movements of which are in a plane facing about 30° forward from the coronal plane. Flexion and extension, abduction and adduction of the thumb are all measured relative to this plane (Fig. 2.4).
|
|
| Fig. 2.4
Movement of the thumb in the direction of the arrow is adduction.
|
Stressing, straining and strength
Ligaments. Ligamentous instability, which is difficult to assess, is detected by stressing the ligaments and looking for excess movement.
Muscle power. Muscle weakness must be looked for and recorded. The muscle power is graded according to the MRC (Medical Research Council) scale, which recognizes six grades of muscle power (0, 1, 2, 3, 4, 5 – do not forget 0):
This may sound complicated but it can be simplified by remembering that 0 is complete absence of power and 5 is normal, and the difference between 2 and 3 is the ability to move the limb against gravity.
Examination of individual areas
Every area must be examined carefully according to a routine but the important parts of the examination vary from area to area. This section sets out the things which should be looked for particularly carefully but this does not mean that the rest of the examination is unnecessary.
Cervical spine
Inspection
Although deformity of the cervical spine is unusual, always look at the head and neck as a whole before palpating or assessing movement. Patients with cervical spondylosis, for example, may have a ‘poke’ neck, and deformities of the cervical spine are seen in the Klippel–Feil syndrome (p. 447) and a few other conditions. Check also that the patient can support the head without difficulty – instability of the cervical spine can be easily missed in a recumbent patient.
Palpation
Midline tenderness over the supraspinous ligament is found after injuries to the neck, such as a sprain or whiplash injury. A defect is sometimes felt in the supraspinous ligament following a major spinal injury, and is a serious finding (p. 152). Tenderness and spasm of the paraspinal muscles extending down to the trapezius are found in cervical spondylosis.
Movement
Movement of the neck cannot be assessed in degrees like a simple synovial joint; it is expressed as a percentage or fraction of the usual range, e.g. two-thirds normal, half normal, 50% normal (Fig. 2.5). The patient can be examined sitting down, to eliminate compensatory movements in the thoracic and lumbar spine. The following movements are recorded:
• Flexion – ‘look downwards’.
• Extension – ‘look upwards’.
• Lateral rotation – ‘look over your shoulder’.
• Lateral flexion – ‘lean your head sideways’.
|
|
| Fig. 2.5
Movements of the cervical spine.
|
The combined range of flexion and extension is about 110°. Flexion and extension are best seen from beside the patient, and the lateral movements from behind.
Stressing the cervical spine is not helpful.
Thoracic spine
Inspection
Deformities of the thoracic spine are important.
Scoliosis usually develops during adolescence but also occurs in early childhood. The rib ‘hump’ is demonstrated by standing behind the patient and asking them to bend forward with the hands held together (Fig. 2.6 and Fig. 2.7).
|
|
| Fig. 2.6
The spine: (a) the successive lordosis and kyphosis of the cervical, thoracic, lumbar and sacral regions; (b) scoliosis can be seen with the patient standing but is more marked when the patient leans forward.
|
|
|
| Fig. 2.7
Thoracic scoliosis.
From Sayre LA (1877) Spinal Disease and Spinal Curvature. By kind permission of the Wellcome Institute Library, London.
|
Kyphosis is best seen from the side (Fig. 2.8
Buy Membership for Orthopaedics Category to continue reading. Learn more here
[/not-level-membership-for-orthopaedics-category]
