[level-membership-for-plastic-reconstructive-surgery-category]
CHAPTER 23 Highly Cohesive Textured Form Stable Gel Implants
Principles and Technique
Summary/Key Points
Indications
The indications for primary breast augmentation that have been adopted by the authors include:
Patient Selection
During the consultation, it is imperative to evaluate several factors related to the patient’s body characteristics and her state of mind. Central to the process of selecting patients for any type of aesthetic surgical procedure is the well-being and safety of the patient. Wrongly scheduling a patient for surgery will be detrimental to the patient, the surgeon and the surgical practice. At times, the ‘best’ surgery is the one never performed.1
Medical history
In the authors’ practice, the patient’s physical health is carefully evaluated by the surgeon in charge and the anesthesiologists. Surgery can be scheduled if the medical risk of the procedure, including anesthetic, is expected to be negligible. Furthermore, if the patient has an ongoing psychiatric condition she should have documentation from her treating doctor stating that she is suitable for surgery and that the procedure will not worsen her condition.1
Patient expectations and requests
It is always the surgeon’s responsibility to inform the patient of the end result, regarding what shape is achievable, given her specific body characteristics. Involving a patient in the implant selection process without risking long-term adverse consequences requires a delicate balance. At times, patients present unrealistic expectations that make them unsuitable for surgery. An example is the very thin patient with ptotic breasts in need of a submuscular breast augmentation, but who refuses a necessary mastopexy. Another example is the patient wanting too large implants that might look disproportionate and, more importantly, exert excessive pressure on the tissue. The surgeon, together with the patient, should choose implants based on the patient’s chest wall and existing breast tissue, using different kinds of shaped implants to create the desired shape of breast. It is therefore necessary to have a thorough, ongoing discussion between surgeon and patient. The patient should be denied surgery if she requests unreasonably large implants compared with what the surgeon believes would be sound in the long term.6,7
Body dysmorphic disorder
As when dealing with any cosmetic surgical procedure, it is important to exclude patients suffering from body dysmorphic disorder, as surgery only reinforces the condition. During the consultation, it often becomes evident if a patient is suffering from body dysmorphic disorder, but at times, a few screening questions are required. If the patient has a history of bulimia or anorexia, she should have been declared healthy at least six months prior to the consultation.2,3
Patient information and education
Each patient should be made as knowledgeable as possible through extensive preoperative information. The information may, for example, be delivered through an informative web-site, verbally and in written form. If the patient is well informed prior to the consultation, the discussion between the surgeon and the patient becomes more meaningful and the patient can participate fully in the choice of implants. It is imperative that the patient understands that additional surgery might be required at some point in the future. The patient should also be aware of the risk of capsular contracture and its consequences.8
Body characteristics and implant range
In recent decades, the range of implants on the market has increased steadily. Several implant systems from different manufacturers are now available with anatomical, teardrop-shaped implants varying in height, width and projection, as well as round implants varying in diameter and projection. The sheer number of available implants and shapes might at first seem daunting, but as the chest wall shape and breast size among women in a uniform population usually do not vary greatly, a relatively small number of implants is required to solve most cases. In the authors’ experience, a majority of breast augmentations can be performed using fewer than 10 different available implants. However, given the great implant diversity, it is possible to find and fit an implant for virtually every patient’s features and desires. This allows the surgeon who is striving for perfection to challenge and solve both minor and more difficult cases involving breast and chest wall asymmetries in a way never possible before.4,5
Implant Selection
Most frequently used are the anatomical, teardrop-shaped implants.
In general, anatomical implants have their advantage in cases where a certain shape is more important than just added volume for thin patients, and for correction of breast asymmetries. The authors prefer textured implants with highly cohesive silicone gel, as these provide excellent control over the aesthetic result both in the short and long term. Furthermore, the risk of implant rupture, rippling9, bottoming out and visibility is low over time.
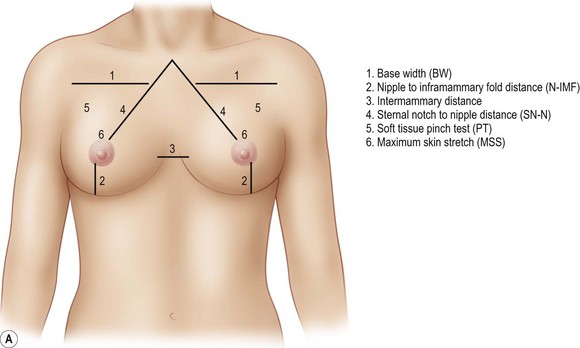
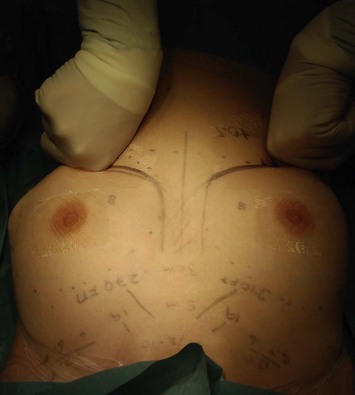
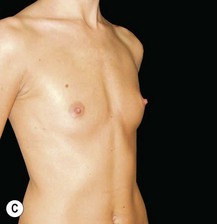
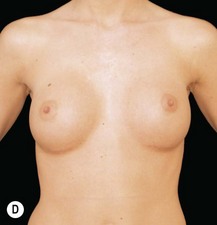
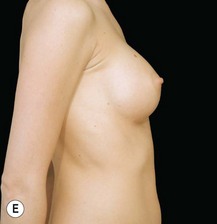
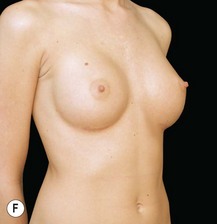
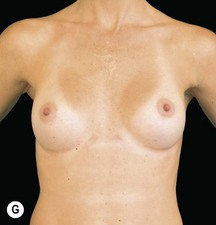
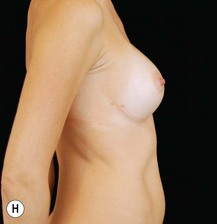
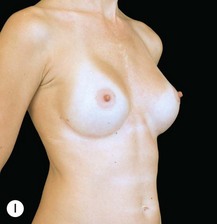
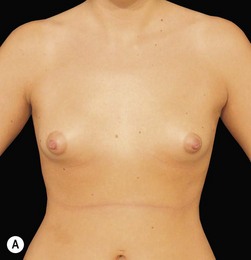
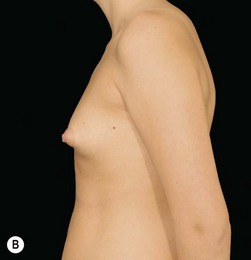
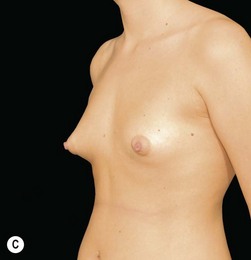
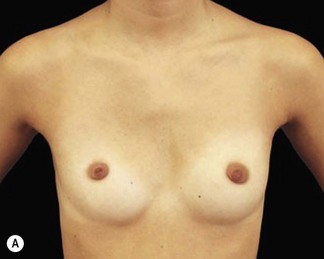
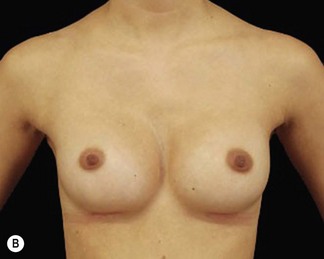
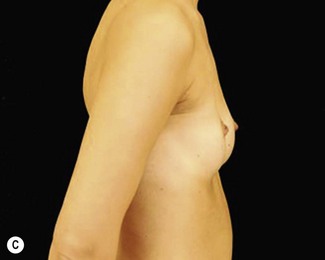
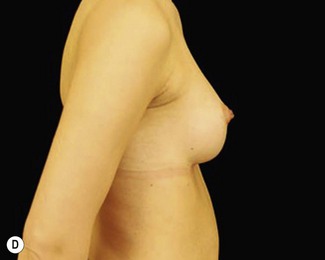
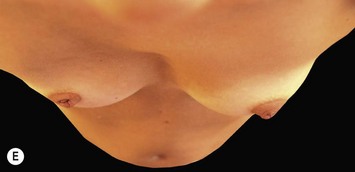
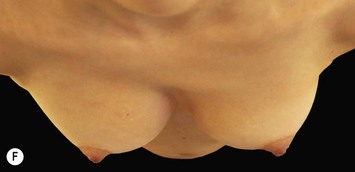
The surgeon then moves on to measuring the patient’s chest wall and breasts. The measurements should include the base width (BW), the nipple to inframammary fold (N-IMF) distance measured under maximum stretch, the intermammary distance, sternal notch to nipple distance (SN-N), a pinch test of the tissue in the breasts’ upper pole and a skin stretch test (Fig. 23.1AB).
Preoperative Planning and Marking
Positioning of IMF Incision
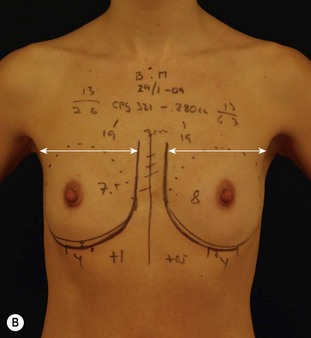
The senior author Dr. Randquist has developed an easy and understandable system when calculating the positioning of the implant and IMF incision by controlled lowering of the inframammary fold as illustrated in Figure 23.2. Randquist’s experience is that highly cohesive, textured, form-stable gel implants in a precise pocket work as controlled tissue expanders. As such, depending on how the volume of gel is distributed in the implant, it will apply tissue expansion and skin stretch where most of the gel is distributed. Once the cohesive gel implant has expanded the tissue in accordance to predesigned shape, it does not influence or alter the breast shape or positioning any more with time. The algorithm developed for implant positioning is as follows:
Scrubbing and draping
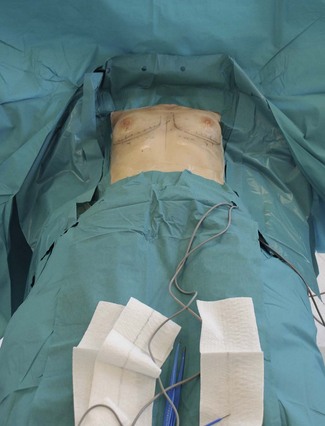
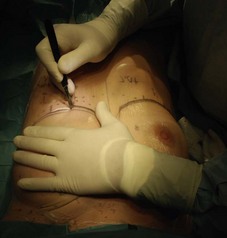
With the patient anesthetized, a rectangular area reaching cranially just above the clavicles, laterally to the dorsal axillary line and caudally to the umbilicus is scrubbed using 10% chlorhexidine solution. The solution is allowed to dry thoroughly for optimal effect. The patient is draped using a specially designed draping set (Victoriakliniken Breast Augmentation Set, Mölnlycke, Sweden), with one large rectangular opening exposing the breasts and some surrounding skin (Fig. 23.3). Besides the drapings, the set contains everything needed for the operation except the instruments, such as needles, syringes, etc.
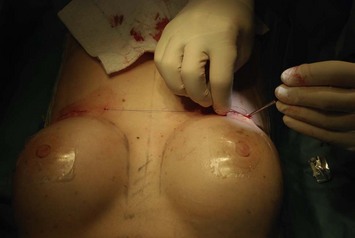
Double-check of preoperative markings and local anesthetics
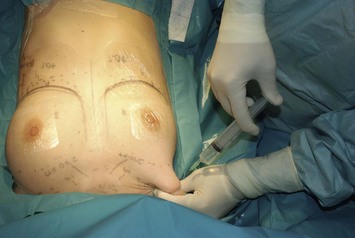
To reduce postoperative pain, approximately 5 cc of lidocaine with adrenaline is injected deep into the upper portion of each major pectoral muscle (Fig. 23.4). The authors do not inject local anesthetics in the incision lines as this might cause a subcutaneous hematoma.
Surgery
The surgical procedure of breast augmentation can be divided into eight different steps as follows:
1 Skin Incision
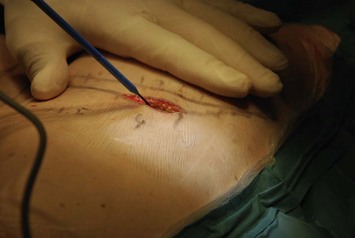
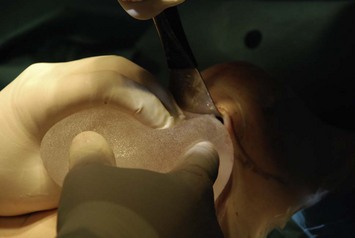
An incision is made according to the preoperative markings using a sharp scalpel (Fig. 23.5). As discussed above, the authors’ preferred placement of the scar is in the inframammary fold where the lowest part of the IMF curve is located. The length of the incision depends on the size of the implant. A 4 cm long incision is sufficient for a 300 g implant and a 4.5 cm long incision is sufficient for a 400 g implant. These relatively short incision lengths are applicable if the surgeon is experienced in the method of inserting the implant. If necessary, the incision should be made wider in order for the implant to be inserted easily without the risk of gel rupture.
2 Dissection through the deep dermis and subcutaneous fat
Using the monopolar needle electrocautery, the dissection continues down through the dermis (Fig. 23.6). For the best scarring results, care must be taken to create a clean cut perpendicularly to the skin, avoiding burns to the epidermis. The dissection continues down through the subcutaneous fat. Here, the cut should be made directly downward to the musculature without erring cranially or caudally. This part of the dissection should be swift and without hesitation, taking seconds in time. As soon as the musculature has been made visible, the surgeon switches to the monopolar electrocautery dissection forceps and continues with the muscular incision (Fig. 23.7).
3 Identification of the major pectoral muscle
When reaching the musculature, it is of utmost importance to identify the visible muscle or muscles and to locate the major pectoral muscle. The muscles that may be encountered at this point are: (1) the major pectoral muscle; (2) the rectus abdominal muscle; (3) the external oblique abdominal muscle; and (4) the serratus anterior muscle (often located more laterally, but at times having very medial insertions). The objective is now to locate the lower lateral insertions of the major pectoral muscle onto the ribcage. This is normally not difficult and, in the standard case, the surgeon, after having gone through the skin and subcutaneous tissue, will end up just below or on top of the lower part of the major pectoral muscle. Using the short end of the double-ended retractor, the surgeon now grasps the subcutaneous tissue and elevates the musculature anteriorly. If it is the major pectoral muscle, it will follow the movement of the retractor easily, thus displaying elevated muscle fibers traversing in direction from the chest wall and anteriorly (Fig. 23.7). The other muscles in the area will, in most cases, not behave in this fashion. The muscle is now incised laterally, perpendicular to the muscle fibers at a point approximately 5 mm above its insertion on the chest wall. Leaving a thin strip of muscle fibers at the insertion prevents blood vessels within the muscle, often intercostal perforators, from retracting into the underlying tissue.
4 Entrance into the subpectoral space
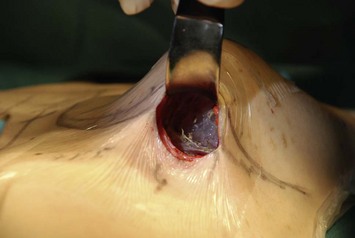
When the major pectoral muscle has been identified and incised laterally, entrance to the space under the muscle is usually not a problem. The correct entrance into the subpectoral space is often facilitated by moving medially from the lateral edge of the muscle insertions. The surgeon will often notice a natural opening, obscured only by a thin, white veil of areolar tissue (Fig. 23.8). At this point, the opening through the major pectoral muscle should be made wide enough for the broader end of the retractor to enter. The retractor should be moved forward and repositioned further and further under the major pectoral muscle as the sharp dissection proceeds cranially. The retractor is at all times kept firmly elevated in order to help continuous identification of the major pectoral muscle, avoiding any contact with the perichondrium.
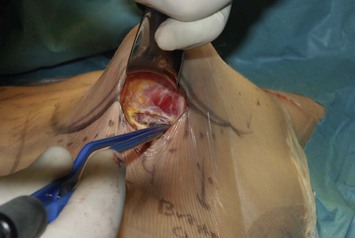
5 Creation of the implant pocket
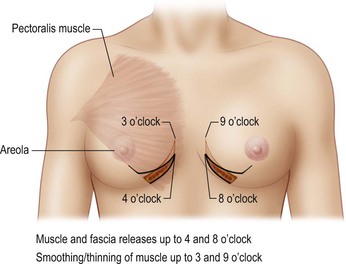
It must be emphasized that the bulk of the medial attachments of the muscle, cranial to the above described 4 and 8 o’clock level should not, under any circumstances, be completely divided. This holds true even if the patient has a very wide intermammary space. If these medial aspects of the muscle insertions are divided, the risk of future implant visibility and synmastia increases. However there should be a smooth transition where the muscle is trimmed down to the last centimeter before total release at 4 and 8 o’clock (Figs 23.9 and 23.10).
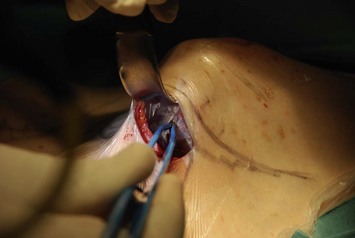
After the dissection has been performed on both sides, the surgeon should take time to palpate the pockets simultaneously using the index fingers, ensuring that all surfaces are even, that the pockets are wide enough and that the tissue release in the anterior direction is sufficient (Figs 23.11 and 23.12).
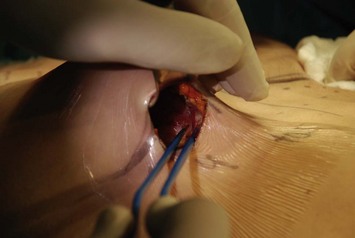
6 Implant insertion
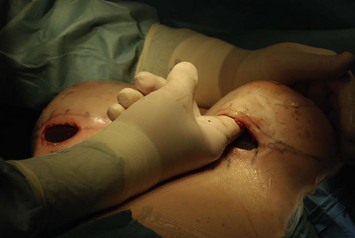
Insertion of the implant into the pocket should be made in a firm and consistent fashion, with which the surgeon should become thoroughly familiar (Figs 23.13 and 23.14). The authors use a bimanual technique and the implant should be inserted with its narrowest part going through the incision. An implant with a greater height than width should be inserted with the apex first, whereas an implant with a greater width than height should be rotated 45° clockwise before being inserted. The authors use a small amount of sterile lubricating gel to aid the insertion, allowing the textured implant to slide easily on the tegaderm without foreign body contact. During the insertion, the right hand is used to massage the implant into the pocket using a squeezing motion with the palm and the fingers. The left hand is kept more fixed and aids the insertion by maintaining a constant pressure on the implant into the pocket. The movements require some practice and the incision should be sufficiently wide in order for the implant to be inserted easily, as mentioned above. If the implant is inserted using excessive force, this might cause fracturing of the implant’s gel.
7 Wound closure
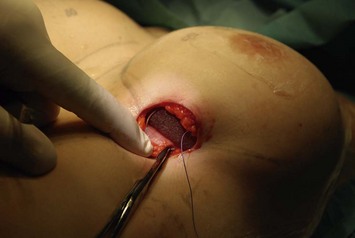
The wound is closed in three layers as follows. First a deep layer with three 2-0 absorbable sutures is made (Fig. 23.15). The needle is first passed through the tissue of the chest wall surface. It is important to get a good grip in the muscle fascia and musculature so that the thread does not cut through the tissue. However, the surgeon must be careful not to go too deep, thus running the risk of causing injury to the pleura. The amount of available tissue depends on the constitution of the patient, and a superficial grip in the periosteum might be needed in a very thin patient. The needle is subsequently passed through the deep layers of fat and Scarpa’s fascia on both sides of the wound before the knot is made. When placed correctly, this first row of sutures will approximate the edges of the wound.
The next layer of sutures serves to approximate the wound edges further and to bring tissue into a crest on both sides of the wound. Inverted sutures using a 3-0 absorbable thread is used (Fig. 23.16). The needle is passed through the subcutaneous fat superficial to the Scarpa’s fascia, up more superficially grasping the deep dermis and back again in the most superficial subcutaneous fat. Again, a row of three sutures is placed.

Finally, the most superficial layer of sutures is placed. Here, the authors use a 2-0 non-absorbable nylon thread on a straight needle (Fig. 23.17). This suture is used to approximate the superficial dermis and the epidermis, and is removed two to three weeks after the operation.
Dissection technique
Great emphasis should be put on the dissection technique, with care at all times taken to avoid tissue damage and bleeding. The entire pocket dissection is performed using a monopolar electrocautery forceps. For example, neither a blunt dissection using the fingers nor a sharp dissection using instruments such as scissors or the scalpel is to be performed. The dissection is at all times performed under direct visual observation aided by the correct use of the retractor. As a light source, the authors use a head lamp. The tissue is handled delicately and care is taken not even to touch the periosteum or perichondrium. Care is also taken at all times to avoid even the slightest bleeding. Visible blood vessels are grasped with the tip of the electrocautery forceps for a sufficient amount of time (Fig. 23.18). Cauterization and the subsequent cutting of the vessel should not leave too short an end on the vessel close to the ribcage. This could otherwise cause the blood vessel end to escape into the underlying tissue, with the risk of a concealed bleeding.
Pitfalls and How to Correct Them

The lower constricted pole
The lower constricted pole, meaning a short N-IMF distance and a tight tissue envelope, is challenging to deal with. If not handled correctly, the patient’s existing breast tissue and skin will end up as a visible mass on top of the lower middle part of the implants causing a so called ‘double bubble.’ In order to avoid this happening, the surgeon should use implants containing highly cohesive gel and, during surgery, the surgeon should score the tissue from underneath. Highly cohesive implants working as controlled tissue expanders in a precise pocket will modulate the tissue positively in a period of months up to a couple of years, forcing and stretching the tissue in an anterocaudal direction, depending on the shape of the implant. This forces the tissue to drape the implant nicely. Scoring of the breast tissue releases tight strands of connective tissue, enabling the tissue to spread out over the anterior and lower surface of the implant.10
Asymmetries
There is a strong correlation between asymmetries of the breast and chest wall deformities.11 It is therefore important to perform a close examination of the ribcage, evaluating concave or convex asymmetries/deformities.
1 Blackburn VF, Blackburn AV. Taking a history in aesthetic surgery: SAGA – the surgeon’s tool for patient selection. J Plast Reconstr Aesth Surg. 2008;61:723-729.
2 Crerand CE, Franklin ME, Sarwer DB. Body dysmorphic disorder and cosmetic surgery. Plast Reconstr Surg. 2006;118:167e-180e.
3 Sarwer DB. The psychological aspects of cosmetic breast augmentation. Plast Reconstr Surg. 2007;120:110S-117S.
4 Stevens WG, Pacella SJ, Gear AJ, et al. Clinical experience with a fourth-generation textured silicone gel breast implant: a review of 1012 Mentor MemoryGel breast implants. Aesth Surg J. 2008;28:642-647.
5 Spear SL, Heden P. Allergan’s silicone gel breast implants. Expert Rev Med Devices. 2007;4:699-708.
6 Cash TF, Duel LA, Perkins LL. Women’s psychosocial outcomes of breast augmentation with silicone gel-filled implants: a 2-year prospective study. Plast Reconstr Surg. 2002;109:2112-2121.
7 Solvi AS, Foss K, von Soest T, et al. Motivational factors and psychological processes in cosmetic breast augmentation surgery. J Plast Reconstr Aesth Surg. 2010;63:673-680.
8 Tebbetts JB. Achieving a predictable 24-hour return to normal activities after breast augmentation: Part II. Patient preparation, refined surgical techniques, and instrumentation. Plast Reconstr Surg. 2002;109:293-305.
9 Jewell M. Form-stable silicone gel breast implants. Clin Plast Surg. 2009;36:75-89.
10 Tebbetts JB. Dual plane breast augmentation: optimizing implant–soft-tissue relationships in a wide range of breast types. Plast Reconstr Surg. 2001;107:1255-1272.
11 Rohrich RJ, Hartley W, Brown S. Incidence of breast and chest wall asymmetry in breast augmentation: a retrospective analysis of 100 patients. Plast Reconstr Surg. 2006;118:7S-13S.
[/level-membership-for-plastic-reconstructive-surgery-category][not-level-membership-for-plastic-reconstructive-surgery-category]
CHAPTER 23 Highly Cohesive Textured Form Stable Gel Implants
Principles and Technique
Summary/Key Points
Indications
The indications for primary breast augmentation that have been adopted by the authors include:
Patient Selection
During the consultation, it is imperative to evaluate several factors related to the patient’s body characteristics and her state of mind. Central to the process of selecting patients for any type of aesthetic surgical procedure is the well-being and safety of the patient. Wrongly scheduling a patient for surgery will be detrimental to the patient, the surgeon and the surgical practice. At times, the ‘best’ surgery is the one never performed.1
Medical history
In the authors’ practice, the patient’s physical health is carefully evaluated by the surgeon in charge and the anesthesiologists. Surgery can be scheduled if the medical risk of the procedure, including anesthetic, is expected to be negligible. Furthermore, if the patient has an ongoing psychiatric condition she should have documentation from her treating doctor stating that she is suitable for surgery and that the procedure will not worsen her condition.1
Patient expectations and requests
It is always the surgeon’s responsibility to inform the patient of the end result, regarding what shape is achievable, given her specific body characteristics. Involving a patient in the implant selection process without risking long-term adverse consequences requires a delicate balance. At times, patients present unrealistic expectations that make them unsuitable for surgery. An example is the very thin patient with ptotic breasts in need of a submuscular breast augmentation, but who refuses a necessary mastopexy. Another example is the patient wanting too large implants that might look disproportionate and, more importantly, exert excessive pressure on the tissue. The surgeon, together with the patient, should choose implants based on the patient’s chest wall and existing breast tissue, using different kinds of shaped implants to create the desired shape of breast. It is therefore necessary to have a thorough, ongoing discussion between surgeon and patient. The patient should be denied surgery if she requests unreasonably large implants compared with what the surgeon believes would be sound in the long term.6,7
Body dysmorphic disorder
As when dealing with any cosmetic surgical procedure, it is important to exclude patients suffering from body dysmorphic disorder, as surgery only reinforces the condition. During the consultation, it often becomes evident if a patient is suffering from body dysmorphic disorder, but at times, a few screening questions are required. If the patient has a history of bulimia or anorexia, she should have been declared healthy at least six months prior to the consultation.2,3
Patient information and education
Each patient should be made as knowledgeable as possible through extensive preoperative information. The information may, for example, be delivered through an informative web-site, verbally and in written form. If the patient is well informed prior to the consultation, the discussion between the surgeon and the patient becomes more meaningful and the patient can participate fully in the choice of implants. It is imperative that the patient understands that additional surgery might be required at some point in the future. The patient should also be aware of the risk of capsular contracture and its consequences.8
Body characteristics and implant range
In recent decades, the range of implants on the market has increased steadily. Several implant systems from different manufacturers are now available with anatomical, teardrop-shaped implants varying in height, width and projection, as well as round implants varying in diameter and projection. The sheer number of available implants and shapes might at first seem daunting, but as the chest wall shape and breast size among women in a uniform population usually do not vary greatly, a relatively small number of implants is required to solve most cases. In the authors’ experience, a majority of breast augmentations can be performed using fewer than 10 different available implants. However, given the great implant diversity, it is possible to find and fit an implant for virtually every patient’s features and desires. This allows the surgeon who is striving for perfection to challenge and solve both minor and more difficult cases involving breast and chest wall asymmetries in a way never possible before.4,5
Implant Selection
Most frequently used are the anatomical, teardrop-shaped implants.
In general, anatomical implants have their advantage in cases where a certain shape is more important than just added volume for thin patients, and for correction of breast asymmetries. The authors prefer textured implants with highly cohesive silicone gel, as these provide excellent control over the aesthetic result both in the short and long term. Furthermore, the risk of implant rupture, rippling9, bottoming out and visibility is low over time.
The surgeon then moves on to measuring the patient’s chest wall and breasts. The measurements should include the base width (BW), the nipple to inframammary fold (N-IMF) distance measured under maximum stretch, the intermammary distance, sternal notch to nipple distance (SN-N), a pinch test of the tissue in the breasts’ upper pole and a skin stretch test (Fig. 23.1AB).
Preoperative Planning and Marking
Positioning of IMF Incision
The senior author Dr. Randquist has developed an easy and understandable system when calculating the positioning of the implant and IMF incision by controlled lowering of the inframammary fold as illustrated in Figure 23.2
[/not-level-membership-for-plastic-reconstructive-surgery-category]
