CHAPTER 1 Gross Anatomy of the Ankle Joint
The first attempts of arthroscopic interventions were made in the beginning of the 20th century.1 Originally, the knee joint was the focus of attention because of its more accessible anatomy than other joints, such as the ankle, shoulder, and smaller joints. Technical difficulties and the lack of appropriate equipment contributed to the late emergence of ankle arthroscopy compared with other joints.
In the late 1970s, Watanabe and subsequently some of his followers reported on the first attempts of ankle arthroscopy.2 Later, Ferkel, Guhl, and others reported series of ankle arthroscopies, outlining the indications, the type of pathology that could be treated, and long-term outcomes.3–5 They also reported a methodology to evaluate and address the ankle joint from an arthroscopic approach.
TOPOGRAPHIC ANATOMY
Anterior Ankle Topographic Anatomy
The anteromedial aspect of the ankle joint presents the most superficial portion of the distal tibia and the medial malleolus, whose tip is approximately 1 cm distal to the joint line. Slightly anterior to the medial malleolus are the saphenous nerve and the saphenous vein, both of which are located medial to the anterior tibialis tendon. The saphenous vein is at risk for being punctured during the creation of the anteromedial portal (Fig. 1-1).3

The anterior tibialis tendon represents the lateral margin of the so-called soft spot of the ankle joint. The soft spot is delineated by the anterior tibialis tendon laterally, the most distal portion of the tibial plafond superiorly, and the lateral margin of the medial malleolus medially. This soft spot is the site of choice for placement of the anteromedial portal and for performing intra-articular injections of the ankle joint. The distal medial aspect of the tibia demonstrates a superiorly oriented notch of variable height known as the notch of Harty. This notch often affords easier initial placement of the arthroscopic cannula into the joint. In both applications, penetration of the ankle joint through the soft spot should be as lateral as possible and close to the anterior tibialis tendon to avoid damage to the saphenous vein and possibly to the more medially located saphenous nerve. Portal placement immediately adjacent to the medial border of the tibialis anterior tendon and as far away from the medial malleolus as possible facilitates manipulation of the arthroscope and instruments, avoiding mechanical impingement of the cannula on the medial malleolus.
The extensor digitorum longus (EDL) tendon is located lateral to the anterior neurovascular bundle. Lateral to it, the dorsal cutaneous branch of the superficial peroneal nerve is found, which can be visualized or palpated in most patients by placing the foot in forced maximum plantar flexion and adding maximal plantar flexion of fourth metatarsophalangeal (MTP) joint.6 At the level of the ankle joint line, the course of the dorsal cutaneous branch of the superficial peroneal nerve ranges from the anterior margin of the lateral malleolus to the lateral aspect of the extensor digitorum longus tendon (Fig. 1-2).7
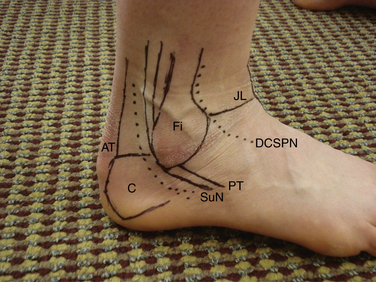
Creation of the anterolateral portal should take the location of the dorsal cutaneous branch of the superficial peroneal nerve into consideration to avoid damage to the nerve. The dorsal cutaneous branch of the superficial peroneal nerve is the neurologic structure at highest risk for complication during ankle arthroscopy.4 It is important to avoid injury to the superficial peroneal nerve by using proper portal creation technique, known as the nick and spread technique. First, only the skin is incised. The knife blade is not allowed to penetrate into the subcutaneous tissues. Second, the subcutaneous tissues are bluntly dissected using a small mosquito forceps. Third, the portal is created using a blunt trocar. The joint capsule is quite thin, and avoiding sharp trocars helps to minimize the likelihood of nerve injury.
Posterior Ankle Topographic Anatomy
The sural nerve is located between the peroneal tendons and the Achilles tendon, approximately 1 to 1.5 cm distal to the tip of the fibula and 1.5 to 2 cm posterior to it.5 The location of the sural nerve has some variability within the posterolateral aspect of the ankle joint. It is always located close to the lesser saphenous vein.8 These two structures are the only ones at risk in the posterolateral aspect of the ankle joint (Fig. 1-3).
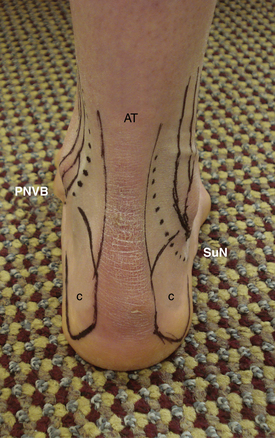
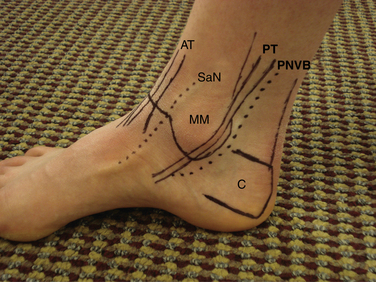
The Achilles tendon has an average width of 1 to 1.5 cm immediately above the superior margin of the calcaneus tuberosity. The deep flexor tendons are located medial to the Achilles tendon, and the flexor hallucis longus (FHL) tendon is the most lateral of the deep flexor tendons. Identification of this tendon is key to avoiding damage to the posterior neurovascular structures. The posterior neurovascular bundle is located immediately adjacent and medial to the FHL, and it includes the posterior tibial artery, veins, and tibial nerve. The flexor digitorum longus (FDL) tendon is located medial to the posterior neurovascular bundle. The posterior tibialis tendon is anterior and medial to the FDL. The posterior tibialis tendon is located on the medial malleolus at the level of the joint line (Fig. 1-4).
INTRA-ARTICULAR ANATOMY AND ACCESS
The ankle joint is inspected first from the anteromedial portal. Ferkel described a 21-point inspection of the intra-articular anatomy.4 Regardless of the method chosen to inspect the ankle joint, it is crucial to do it in a systematic way to avoid missing any unexpected findings and pathology.
The anterocentral portal has fallen out of favor because of the potential for increased complications associated with it.8,9 Another feature contributing to its lack of popularity is that most pathology can be visualized through the more standard anteromedial and anterolateral portals and the occasional use of accessory anteromedial and anterolateral portals.
Anterior Access to the Ankle Joint
Anteromedial Portal
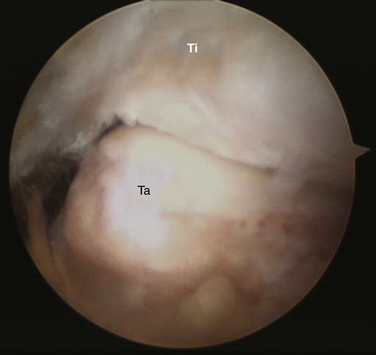
The anteromedial portal is created along the soft spot of the ankle joint as close as possible to the anterior tibialis tendon to avoid any damage to the saphenous nerve and vein. On entrance into the ankle joint, the anterior aspect of the tibia and the dorsal and medial aspects of the neck of the talus can be visualized. The most superior aspect of the neck of the talus may reveal some intra-articular dorsal osteophytes. Ankle dorsiflexion helps to visualize the osteophytes by distention of the most anterior and distal portion of the capsule (Fig. 1-5). The distal anterior tibia may also reveal some intra-articular osteophytes. They may require some retraction and elevation of the most superior portion of the capsular attachment for better visualization. Moving laterally, examination of this area of the ankle may be difficult if there is hypertrophic synovitis or lack of sufficient intra-articular fluid pressure while performing the arthroscopy (Fig. 1-6).
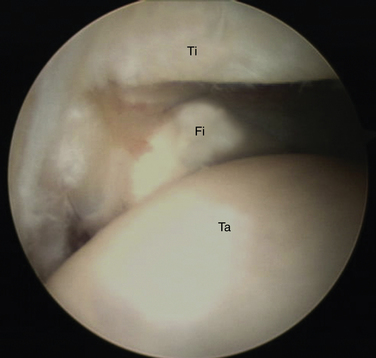
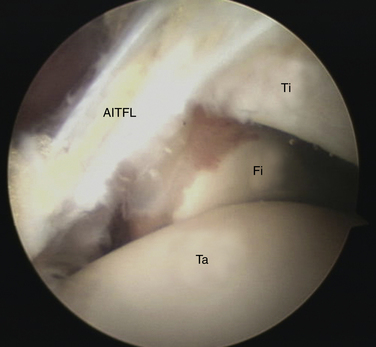
The lateral gutter is difficult to assess from the anteromedial portal, and its inspection is limited to the most anterior portion. The most anterior margin of the distal fibula also is visualized at this level. The anterior-inferior tibiofibular ligament may also be visualized at this point, with its fibers running in an oblique fashion at approximately 45 degrees from proximal and medial to distal and lateral (Fig. 1-7). The lateral malleolus reveals its articular surface against the lateral wall of the talus.
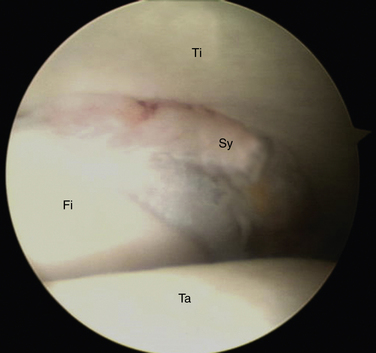
The most distal portion of the ankle syndesmosis can be visualized, and some hypertrophic soft tissue may be seen along the recess located between the fibula and the tibia as a result of previous ankle syndesmosis injuries (Fig. 1-8).
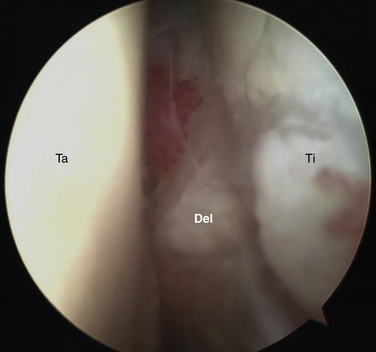
More posteriorly, the posterior-inferior tibiofibular ligament is visualized. The posterior fibers have an oblique arrangement similar to that of their anterior counterpart (Fig. 1-9). The tibial attachment of the posterior-inferior tibiofibular ligament may extend medially all the way to the most medial portion of the tibia (Fig. 1-10). More medially, an invagination of the posterior capsule is visualized, which correlates with the FHL tendon (Fig. 1-11). Along the most posteromedial corner of the joint, the articular surface of the medial malleolus and the most distal portion of the medial gutter are inspected (Figs. 1-12 and 1-13).
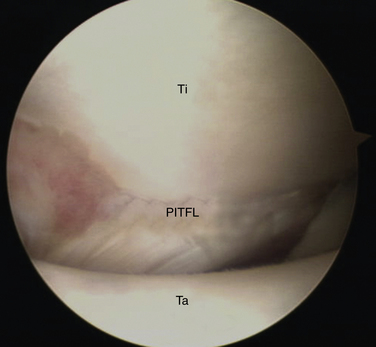
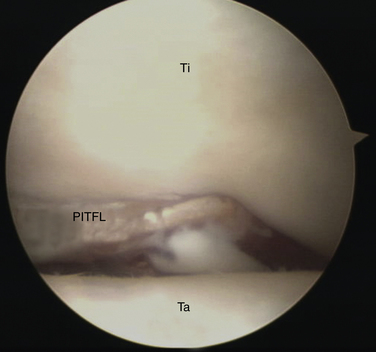
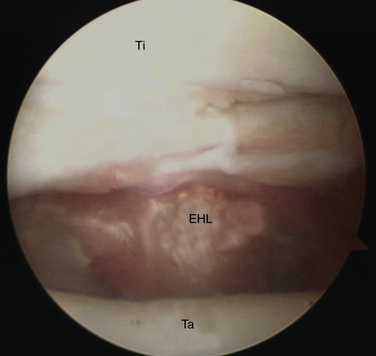

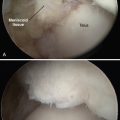
FIGURE 1-12 Medial gutter of the ankle joint visualized from the anteromedial portal. Ta, talus; Ti, tibia.
Anterolateral Portal
A spinal needled is used first to create the anterolateral portal. After the needle is placed into the joint, the tip of the needle should be carefully placed across the tibiotalar joint line. The direction of the needle is observed, and the portal location is moved proximal or distal according to the angle of the needle. If the needle is pointing proximally, the portal is moved superiorly, and if the needle is pointing distally, the portal is moved distally. The location of the dorsal cutaneous branch of the superficial peroneal nerve also determines the location of the portal. To address medially located pathology, the portal usually is positioned medial to the dorsal cutaneous branch of the superficial peroneal nerve and vice versa for laterally located pathology. After creation of the anterolateral portal, inspection of the anterior aspect of the lateral gutter is quite feasible, as is the most distal portion of the gutter itself (Fig. 1-14).
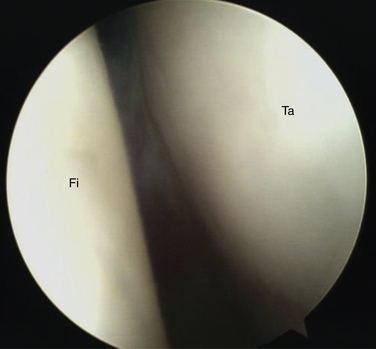
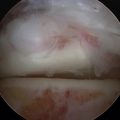
FIGURE 1-14 Lateral gutter of the ankle joint visualized from the anterolateral portal. Fi, fibula; Ta, talus.
The syndesmosis is easier to visualize from this portal. Instability of the syndesmosis may be assessed by observing the presence of diastasis between the tibia and the fibula. The fibula and the tibia may be easily stressed from this approach with the use of a working instrument. An advantage of the anterolateral portal is to have a clear visualization of the anterior and medial portion of the tibia, especially the medial malleolus. This area offers the landmark to proceed with an adequate resection of the most distal and anterior tibial osteophytes.
Accessory Anterior Portals
The accessory anteromedial portal is created 1 cm distal and medial to the anteromedial portal. Similarly, the accessory anterolateral portal is created 1 cm distal and lateral to the anterolateral portal. Some difficulties can be expected when simultaneously using the arthroscopic instruments along the anteromedial and accessory anteromedial portals because of the proximity of the portals and the angle required for placing the instruments in such a limited space. The same principle applies to the laterally located portals over the ankle joint (Figs. 1-15 to 1-18).
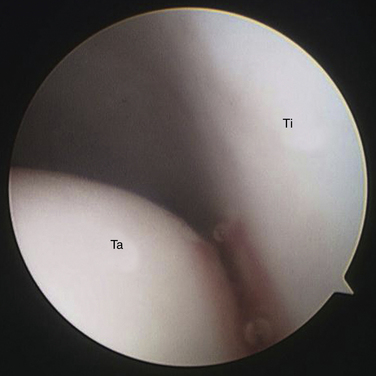
FIGURE 1-15 Anteromedial aspect of the ankle joint visualized from the anteromedial portal. Ta, talus; Ti, tibia.


Posterior Access to the Ankle Joint
Posterior portals are best accessed with the patient in the prone position (Figs. 1-19 to 1-23). This approach can significantly facilitate visualization of the ankle joint, improve understanding of the topographic anatomy of the posterior aspect of the ankle, and decrease the chances for contamination of the surgical field.
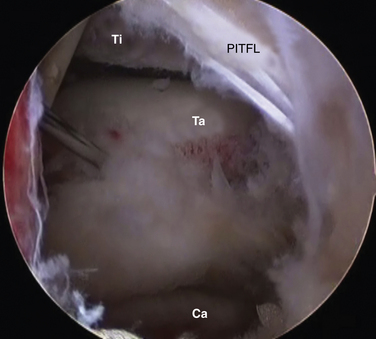
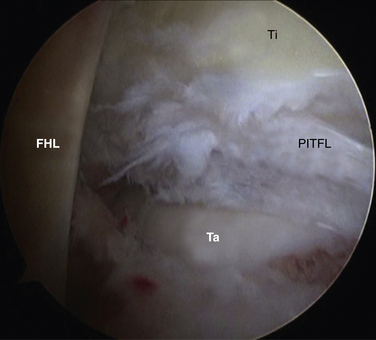
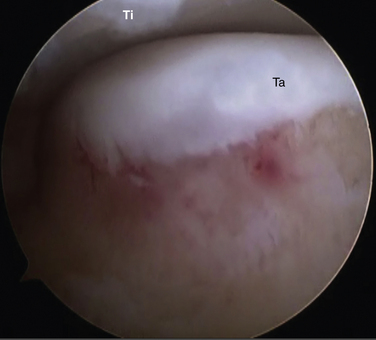
FIGURE 1-21 Posterolateral aspect of the ankle visualized from posteromedial portal. Ta, talus; Ti, tibia.

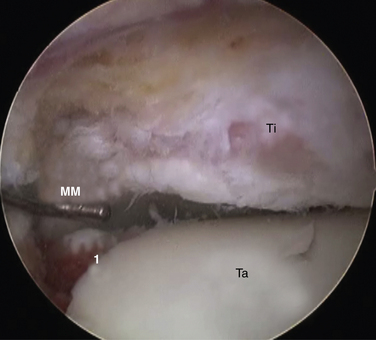
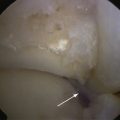
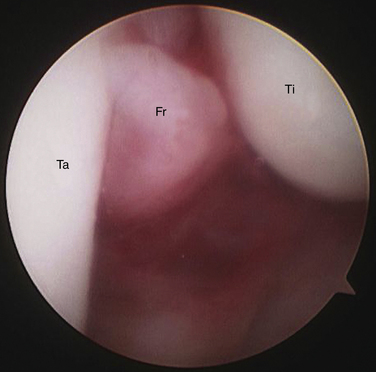
FIGURE 1-23 Posteromedial corner of the ankle. MM, medial malleolus; Ta, talus; Ti, tibia; 1, intra-articular split fracture of the posterior aspect of the talus.
Posterolateral Portal
The posterior-inferior tibiofibular ligament fibers are located superior to the entry site to the ankle joint. Otherwise, visualization of the ankle would be significantly more difficult and demanding. At this point, the FHL tendon is visualized, and it is always kept medial to our working instruments.
Posteromedial Portal
PEARLS& PITFALLS
1. Burman MS. Arthroscopy or the direct visualization of joints. J Bone Joint Surg Am. 1931;13:669-695.
2. Watanabe M. Selfoc-Arthroscope. Watanabe No. 24 Arthroscope. Tokyo, Japan: Teishin Hospital; 1972.
3. Ewing JW, Tasto JA, Tippert JW. Arthroscopic surgery of the ankle. Instr Course Lect. 1995;44:325-340.
4. Ferkel RD. Arthroscopic Surgery. The Foot and Ankle. Philadelphia, PA: Lippincott-Raven; 1996:85-103.
5. Sitler DF, Amendola A, Bailey CS, et al. Posterior ankle arthroscopy. an anatomic study, J Bone Joint Surg Am. 2002;84A 763-769.
6. Stephens MM, Kelly PM. Fourth toe flexion sign. a new clinical sign for identification of the superficial peroneal nerve, Foot Ankle Int. 21 2000 860-863.
7. Horwitz MT. Normal anatomy and variations of the peripheral nerves of the leg and foot. Arch Surg. 1938;36:626.
8. Feiwell LA, Frey CC. Anatomic study of arthroscopic protal sites of the ankle. Foot Ankle. 1993;14:142-147.
9. Voto SJ, Ewing JW, Fleissner PRJr, et al. Ankle arthroscopy. neurovascular and arthroscopic anatomy of standard and trans-Achilles tendon portal placement, Arthroscopy. 51989 41-46.