[level-membership-for-emergency-medicine-category]36
Global Humanitarian Relief and Disaster Medicine
Fundamental Humanitarian Principles
1. Humanity: Assistance is provided without discrimination to prevent and alleviate suffering, to protect life and health, and to ensure respect for the human being. Aid is intended to promote mutual understanding, friendship, cooperation, and lasting peace.
2. Universality: All victims of conflict, disaster, or calamity are worthy of assistance and protection.
3. Impartiality: Assistance and protection are due to all victims of a conflict, no matter the side of the conflict they are on, without regard to race, religion, class, or political affiliation. Aid is given strictly and proportionately according to the need, and priority is given to the most urgent cases.
4. Neutrality: Humanitarians do not take sides and must stand apart from the political issues unless the treatment of humans is egregious.
5. Independence: Humanitarians remain independent of political or other affiliations whose interests, past actions, and policies may impinge on universality and impartiality.
6. Voluntary: Relief is provided on a voluntary basis and not prompted by desire for personal, political, or financial gain.
Needs in Humanitarian Crises
1. Initial assessment: thorough and rapid to assess the current situation, identify existing and necessary resources, interventions needed, and possibilities for specific interventions
a. Each individual should have, on average, 15 L/day (15.9 qt/day) of clean water for drinking, cooking, and personal hygiene. The goal is to provide 20 L/day (21.1 qt/day).
b. Water-gathering points should be within 500 m (1640 ft) of each household.
c. Lines to gather water should be no longer than 15 minutes. The time to fill 20-L (21.1-qt) containers should be 3 minutes or less.
a. A maximum of 20 persons should use each toilet.
b. Toilets (generally latrines) should ideally be provided for each household.
c. Community toilets should be segregated by gender.
d. Large pit latrines may be needed.
e. Toilets should be no further than 50 m (164 ft) from homes. They should be kept maintained and clean.
f. Security from assaults should be provided around community toilets.
a. Provide 2100 kcal/day of food.
b. Assess the global acute malnutrition rate, paying particular attention to populations at risk (e.g., children under 5 years of age, pregnant and nursing mothers, the chronically ill).
c. Provide micronutrients to populations exhibiting symptoms or at risk for deficiencies.
d. Use local food sources when available.
e. Refer to the International Committee of the Red Cross Nutrition Manual for Humanitarian Action.
a. Temporary shelters should provide a minimum of 3.5 m2 (37.7 sq ft) of covered space per person.
b. Ensure adequate access to water, toilets, and health care facilities.
c. Try to keep families and social networks intact.
d. Provide clothing, bedding, pots, plates, utensils, soap, and burial materials.
e. Build on a site with no more than 6% gradient and proximity to water supplies and a transportation route.
a. Provide adequate lighting and gender-separated latrines.
b. Provide security personnel.
c. Protect from invading forces and on-site crime.
d. Consider creating a physical barrier or perimeter around the camp.
a. Be prepared for acute, chronic, and epidemic illnesses, as well as injuries and malnutrition.
b. Be prepared for mental health issues.
c. Health care facilities should be equipped to care for medical and surgical conditions, obstetrics, and chronic diseases such as human immunodeficiency virus (HIV) and tuberculosis.
8. Control of communicable diseases and epidemics (refer to Communicable Disease Control in Emergencies: A Field Manual by the World Health Organization)
a. Diseases to anticipate are infectious diarrhea, measles, respiratory diseases, and malnutrition. One must also be prepared to treat malaria, meningococcal meningitis, typhus, hepatitis, encephalitis, and hemorrhagic viruses, such as yellow fever and dengue.
b. Consider mass vaccinations.
c. Identify laboratories to assist in identification of epidemic diseases.
Causes of Epidemic Disease in Acute Crisis
Suggested Packing List for Responders to Humanitarian Crises
Items with an asterisk (*) should be packed in your carry-on bag.
Documents
Immunization card* (plus copy)
Letter of invitation by nongovernmental organization*
Medical evacuation insurance card* (plus copy)
Driver’s license (consider an international driver’s license)*
ATM/credit cards (may not work)*
Cash (generally U.S. currency, but check with contacts)*
Gear
Electronics
First-Aid Kit
Field Disinfection of Surgical Tools
2. Soak tools in cold water containing a surfactant or proteolytic enzyme, such as Power Zyme.
3. Scrub the tools to remove visible debris.
4. Immerse the tools in boiling water for at least 1 full minute. A gentle, rolling boil reduces evaporation and the need for frequent water replacement.
5. Adding sodium bicarbonate to achieve a 2% concentration raises the boiling point and reduces instrument corrosion. Alternatively, boiling in water with a 1% concentration of acetic acid (white vinegar) can reduce lime deposits.
6. If it is not possible to boil tools, then soak them for 30 minutes in 7.5% hydrogen peroxide solution or for 20 minutes in 2% glutaraldehyde solution.
If available, one may then use a battery-operated handheld UV sterilizer.
Fasciotomy
Upper Extremity
Volar Forearm
Make a single curvilinear incision down to fascia that begins just proximal to the antecubital fossa on the ulnar side, sweeps in a curve radially across the volar forearm, and swings back to the ulnar side to terminate in the middle of the palm ulnar to the thenar crease (Fig. 36-1). Try not to extend the incision on the palm any farther radially than the midaxis of the ring finger. Where fascia is observed overlying the compartment, carefully release it by using blunt-pointed scissors, taking care to avoid cutting nerves, tendons, and blood vessels.
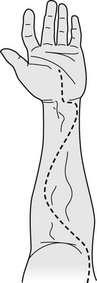
FIGURE 36-1 Incision line for fasciotomy of upper extremity.
Lower Extremity—Two-Incision Technique
The four compartments (Fig. 36-2) to be decompressed below the knee are the anterior, lateral, superficial posterior, and deep posterior.
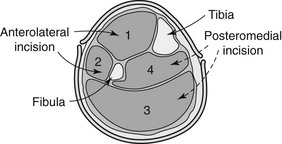
Anterolateral Incision
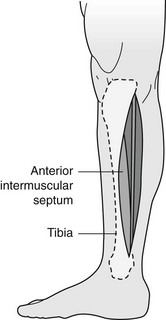
The incision is positioned halfway between the fibular shaft and the tibia (Fig. 36-3). If the anatomy is difficult, it can be made directly over the fibula.
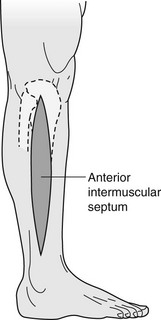
1. Make a longitudinal incision down to fascia beginning at or just below the level of the fibular head, and extend it for approximately 15 cm or to a few centimeters above the lateral malleolus.
2. This incision is thereby placed over the anterior intermuscular septum that separates the anterior and lateral compartments and allows access to each compartment.
3. A small transverse incision is then made in the fascia over the anterior and lateral compartments, which exposes the intermuscular septum and identifies the two compartments.
4. Identify the superficial peroneal nerve and avoid cutting it. It is usually found in the anterior compartment.
5. To release the anterior compartment: A small cut is made in the fascia over the anterior compartment. The fascia is then opened on the side of the septum toward the anterior compartment proximally and distally using blunt-pointed scissors.
6. To release the lateral compartment: A small cut is made in the fascia over the lateral compartment posterior to the superficial peroneal nerve, if the nerve has been identified. The fascia is then opened proximally and distally using blunt-pointed scissors.
Posteromedial Incision
The incision is positioned 2 cm posterior to the posterior medial palpable edge of the tibia (Fig. 36-4).
1. Make a 15-cm longitudinal incision down to fascia beginning just below the knee, and extend it to a few centimeters above the level of the medial malleolus.
2. Undermine anteriorly to the posterior tibial margin, which will avoid the saphenous vein and nerve, which should be retracted anteriorly.
3. Make a small transverse incision in the fascia to identify the superficial and deep compartments. It may be necessary to use fingers to dissect the superficial posterior compartment away from the tibia in order to identify the deep posterior compartment.
4. To release the superficial posterior compartment: Use blunt-pointed scissors to open the fascia proximally and distally. Release this compartment before attempting the deep posterior compartment.
5. To release the deep posterior compartment: Use blunt-pointed scissors to open the fascia proximally and distally. To completely release the deep compartment, the soleus muscle must usually be at least partially detached from the medial side of the tibia.
Disposing of Dead Bodies
1. Respect local custom and practice when possible. Burial is the preferred method of body disposal in an emergency situation.
2. Graveyards and burial sites should be at least 50 m (164 ft) from drinking water sources and 500 m (1640 ft) from the nearest habitat. Plan burial depth to be at least 1.5 m (4.9 ft) above the groundwater table, with at least 1 m (3.3 ft) of covering soil.
4. Attempt to identify the person early, before decomposition distorts recognizable features (24 to 48 hours), and certainly before disposal. Keep a record of identifying features (facial photographs, fingerprints) and possessions.
6. If individual disposal is desired, bodies are best refrigerated in morgues.
7. If refrigeration is not available, maintain bodies for 24 to 48 hours in a single-layer, 1-m deep grave surrounded by dry ice and covered by a tarpaulin.
8. In the absence of dry ice, place bodies into a shallow, organized grave preceding final burial. It is not necessary to sprinkle lye or disinfectant on the bodies.
9. For single bodies, use body bags or wrap in plastic sheets.
10. The location of disposed bodies should be well marked.
11. If cremation is performed, the site should be at least 500 m (1640 ft) downwind from dwellings.
Avoiding Land Mine Risk
1. Obtain information about the country in which you will be traveling.
2. Consult local officials if traveling or working in a mined region.
3. If you are with a guided group, ask your guide about mine risks.
4. Stay on well-traveled roads and paths.
5. Do not leave the paved areas of the road—not even to walk along the side of the road to take a photograph.
6. Do not be the first person or vehicle in a convoy that is going into a region that may have been freshly mined.
7. Follow behind larger vehicles by at least 100 m (328 ft).
8. Sit on your flak jacket while driving.
9. Never touch or handle suspicious items or devices.
10. Do not pick up objects as souvenirs that appear to have a military function.
Strategies to Reduce Risk for Terrorist Attack While Traveling to High-Risk Areas
1. Schedule direct flights if possible. Avoid stops in high-risk airports.
2. Try to minimize the time spent in the public area of an airport. Move quickly from the check-in counter to a secured area. Upon arrival, leave the airport as soon as possible.
3. Refuse unexpected packages.
4. Keep an eye out for abandoned packages, briefcases, and other suspicious items. Report them to airport authorities, and leave the area promptly.
5. Avoid obvious terrorist targets, such as places where Westerners are known to congregate. These include nightclubs, shopping malls, and tourist destinations.
6. Keep a mental note of safe havens, such as police stations, hotels, and hospitals.
7. Develop a plan of action for what you will do if a bomb explodes or if there is nearby gunfire.
8. Select your own taxicabs at random. Do not take a vehicle that is not clearly identified as a taxi. Compare the face of the driver with the one on his or her posted license.
9. Check for loose wires or other suspicious activity around your car.
10. Drive with car windows closed in crowded streets, because bombs can be thrown through open windows.
11. If you are in a situation where somebody starts shooting, drop to the floor or get down as low as possible. Do not move until you are certain that the danger has passed. Shield yourself behind a solid object. If you must move, crawl on your stomach.
12. Do not attempt to help rescuers, and do not pick up a weapon.
How to Behave in a Hostage Situation
1. Avoid resistance and sudden or threatening movements.
2. Do not struggle or try to escape unless you are certain of being successful.
3. Do not try to be a hero; this could endanger you and others.
4. Consciously put yourself in a mode of passive cooperation.
5. Talk normally. Do not complain, avoid belligerency, and comply with all orders and instructions.
6. If questioned, keep your answers short. Do not volunteer information or make unnecessary overtures.
7. Make a concerted effort to relax.
8. Prepare yourself mentally, physically, and emotionally for the possibility of a long ordeal.
9. Try to remain inconspicuous.
10. Avoid direct eye contact and the appearance of observing your captors’ actions.
11. Avoid alcoholic beverages.
12. Eat what they give you, even if it does not look or taste appetizing.
13. Keep consumption of food and beverages at a moderate level. Loss of appetite and weight is normal.
14. If you are involved in a drawn-out situation, try to establish rapport with your captors.
15. Avoid political discussion or other confrontational subjects.
16. Establish a daily program of mental and physical activities.
17. Think positively, and avoid a sense of despair. You are a valuable commodity to your captors, and it is important to them to keep you alive and well.
Checklist for Personal Security While Traveling
1. Register your trip with your home embassy before departing on the journey. For U.S. citizens, this process is available online at https://travelregistration.state.gov/ibrs/ui/.
2. Arrange an alternative to your hotel or lodging so that if you are forced to flee, you have a safe haven.
3. Establish contact with someone local who can be trusted, and keep their contact information with you.
4. Note the location of United Nations compounds, international organizations, and high-end hotels as possible destinations when you are in trouble.
5. Be aware of people loitering around your hotel or people who keep reappearing to assist you.
6. Remain friendly, but avoid discussing personal matters, your itinerary, or your program.
7. Do not leave personal or business papers in your hotel room.
8. Keep copies of your documents in an alternate location.
9. Avoid predictable times and routes of travel.
10. Report suspicious activity to local police and the nearest U.S. embassy or consulate.
11. Be sure of the identity of visitors before accepting riders or opening the door of your hotel room or any vehicle.
12. Do not meet strangers at unknown or remote locations.
13. Have a plan in the event there is a bomb blast, gunfire, or sudden military activity in or around your hotel. Check exits and access routes in advance.
How to Seek Safety during a Natural Disaster
1. Drop down onto your hands and knees.
2. Cover your head and neck (and entire body, if possible) under a sturdy table or desk. If there is not shelter and you are indoors, get close to an interior wall.
3. Hold the shelter over you until the shaking stops.
4. If you are outdoors, move to a clear area and avoid power lines, trees, signs, buildings, and vehicles. In particular, stay away from exterior walls of buildings that may collapse.
5. If you are driving, pull over to the side of the road, stop, and set the parking brake. Stay in the vehicle until the shaking stops. Avoid stopping near or under buildings, bridges, trees, overpasses, and utility wires.
6. Near the sea coast, move to high ground 30 m (98.4 ft) above sea level or 3 km (1.9 miles) inland. Move quickly, and remain in a safe location until it is communicated that there is no hazard from a tsunami.
7. If trapped under debris, do not light matches, try not to kick up dust, cover your mouth and nose with a cloth, and tap or whistle to attempt to seek assistance. Shouting can cause you to inhale dangerous amounts of dust.
Landslide or Mudslide
1. Be familiar with the land around you.
2. During an intense storm, stay alert and awake. Listen to a National Oceanic and Atmospheric Administration (NOAA) weather radio.
3. Leave if it is safe to do so. If you cannot leave, move to a second or higher story within a building.
4. Listen for unusual sounds, such as trees cracking, that might indicate moving debris.
5. Move from the path of potential or actual flow.
6. If you cannot escape, curl into a ball and protect your head and airway.
Tsunami
1. You are at risk if you live in a low-lying coastal area.
2. Stay away from bodies of water. If there is an earthquake, move to high ground 30 m (98.4 ft) above sea level or 3 km (1.9 miles) inland. Move quickly, and remain in a safe location until it is communicated that there is no hazard from a tsunami.
3. If a tsunami warning sounds, evacuate to high ground or an evacuation site.
4. If you are in the surf and the water is pulled far out as if an extreme low tide is occurring, then evacuate quickly to higher ground.
5. If you are unable to quickly move inland, then seek refuge in a high, reinforced-concrete building on the third floor or above.
Hurricane or Typhoon
1. Listen to the radio or TV for information.
2. Secure the dwelling, close storm shutters, and secure outdoor objects or bring them indoors.
3. Turn off utilities if instructed to do so. Otherwise, set the refrigerator thermostat to its coldest setting, and keep the door closed.
6. Ensure a supply of water by filling toilets and tubs.
7. Evacuate if instructed. Do not remain in a mobile home or temporary structure.
8. Do not stay in higher levels of high-rise structures.
9. Do not remain on the coast, on a floodplain, near a river, or on an inland waterway.
10. If you are caught in the storm, remain indoors away from doors and windows, close all interior doors, brace external doors, keep curtains and blinds closed, take refuge in a small interior room or closet on the lowest level, or lie on the floor under a table or another sturdy object.
Tornado or Cyclone
1. Be alert for a tornado if weather conditions are changing, or if you note dark greenish sky, large hail, dark rotating clouds, or loud roaring noise. If you see an approaching storm or danger signs, take shelter.
2. What to do if a tornado is present and you are in the following locations:
a. Indoors: Go to a predesignated shelter area such as a safe room, basement, storm cellar, or the lowest building level. If there is no basement, go to the center of an interior room on the lowest level (closet, interior hallway) away from corners, windows, doors, and outside walls. Put as many walls as possible between you and the outside. Get under a sturdy table and use your arms to protect your head and neck. In a high-rise building, go to a small interior room or hallway on the lowest floor possible. Do not open windows.
b. In a vehicle, trailer, or mobile home: Get out immediately, and go to the lowest floor of a sturdy, nearby building or a storm shelter. Mobile homes, even if tied down, offer little protection from tornadoes.
c. Outside with no shelter: Lie flat in a nearby ditch or depression and cover your head with your hands. Be aware of the potential for flooding. Do not get under an overpass or bridge; you are safer in a low, flat location. Never try to outrun a tornado in urban or congested areas in a car or truck. Instead, leave the vehicle immediately for safe shelter. Watch out for flying debris. Flying debris from tornadoes causes most fatalities and injuries.
Flood
1. Be aware of stream, drainage channels, canyons, and other areas known to flood suddenly. Flash floods can occur in these areas with or without typical warnings such as rain clouds or heavy rain.
2. Do not walk through moving water. Six inches of moving water can make you fall. If you have to walk in water, walk where the water is not moving. Use a stick to check the firmness of the ground in front of you and for balance.
3. Do not drive into flooded areas. If floodwaters rise around your car, abandon the car and move to higher ground if you can do so safely.
4. Do not camp or park your vehicle along streams, rivers, or creeks, particularly during threatening conditions.
[/level-membership-for-emergency-medicine-category][not-level-membership-for-emergency-medicine-category]36
Global Humanitarian Relief and Disaster Medicine
Fundamental Humanitarian Principles
1. Humanity: Assistance is provided without discrimination to prevent and alleviate suffering, to protect life and health, and to ensure respect for the human being. Aid is intended to promote mutual understanding, friendship, cooperation, and lasting peace.
2. Universality: All victims of conflict, disaster, or calamity are worthy of assistance and protection.
3. Impartiality: Assistance and protection are due to all victims of a conflict, no matter the side of the conflict they are on, without regard to race, religion, class, or political affiliation. Aid is given strictly and proportionately according to the need, and priority is given to the most urgent cases.
4. Neutrality: Humanitarians do not take sides and must stand apart from the political issues unless the treatment of humans is egregious.
5. Independence: Humanitarians remain independent of political or other affiliations whose interests, past actions, and policies may impinge on universality and impartiality.
6. Voluntary: Relief is provided on a voluntary basis and not prompted by desire for personal, political, or financial gain.
Needs in Humanitarian Crises
1. Initial assessment: thorough and rapid to assess the current situation, identify existing and necessary resources, interventions needed, and possibilities for specific interventions
a. Each individual should have, on average, 15 L/day (15.9 qt/day) of clean water for drinking, cooking, and personal hygiene. The goal is to provide 20 L/day (21.1 qt/day).
b. Water-gathering points should be within 500 m (1640 ft) of each household.
c. Lines to gather water should be no longer than 15 minutes. The time to fill 20-L (21.1-qt) containers should be 3 minutes or less.
a. A maximum of 20 persons should use each toilet.
b. Toilets (generally latrines) should ideally be provided for each household.
c. Community toilets should be segregated by gender.
d. Large pit latrines may be needed.
e. Toilets should be no further than 50 m (164 ft) from homes. They should be kept maintained and clean.
f. Security from assaults should be provided around community toilets.
a. Provide 2100 kcal/day of food.
b. Assess the global acute malnutrition rate, paying particular attention to populations at risk (e.g., children under 5 years of age, pregnant and nursing mothers, the chronically ill).
c. Provide micronutrients to populations exhibiting symptoms or at risk for deficiencies.
d. Use local food sources when available.
e. Refer to the International Committee of the Red Cross Nutrition Manual for Humanitarian Action.
a. Temporary shelters should provide a minimum of 3.5 m2 (37.7 sq ft) of covered space per person.
b. Ensure adequate access to water, toilets, and health care facilities.
c. Try to keep families and social networks intact.
d. Provide clothing, bedding, pots, plates, utensils, soap, and burial materials.
e. Build on a site with no more than 6% gradient and proximity to water supplies and a transportation route.
a. Provide adequate lighting and gender-separated latrines.
b. Provide security personnel.
c. Protect from invading forces and on-site crime.
d. Consider creating a physical barrier or perimeter around the camp.
a. Be prepared for acute, chronic, and epidemic illnesses, as well as injuries and malnutrition.
b. Be prepared for mental health issues.
c. Health care facilities should be equipped to care for medical and surgical conditions, obstetrics, and chronic diseases such as human immunodeficiency virus (HIV) and tuberculosis.
8. Control of communicable diseases and epidemics (refer to Communicable Disease Control in Emergencies: A Field Manual by the World Health Organization)
a. Diseases to anticipate are infectious diarrhea, measles, respiratory diseases, and malnutrition. One must also be prepared to treat malaria, meningococcal meningitis, typhus, hepatitis, encephalitis, and hemorrhagic viruses, such as yellow fever and dengue.
b. Consider mass vaccinations.
c. Identify laboratories to assist in identification of epidemic diseases.
Causes of Epidemic Disease in Acute Crisis
Suggested Packing List for Responders to Humanitarian Crises
Items with an asterisk (*) should be packed in your carry-on bag.
Documents
Immunization card* (plus copy)
Letter of invitation by nongovernmental organization*
Medical evacuation insurance card* (plus copy)
Driver’s license (consider an international driver’s license)*
ATM/credit cards (may not work)*
Cash (generally U.S. currency, but check with contacts)*
Gear
Alarm clock (that runs on batteries)
Swiss Army knife (not for carry-on)
Pocket tissues (toilet paper)*
Luggage locks (for hotel, not flight)
Water purifier or disinfection tablets
[/not-level-membership-for-emergency-medicine-category]
