Fundoscopy
Examining the fundus with an ophthalmoscope is often thought to be particularly difficult. This need not be the case with an understanding of how to use an ophthalmoscope, a clear idea of what is normal and what are normal variants, the appearances of common and important abnormalities and, of course, practice.
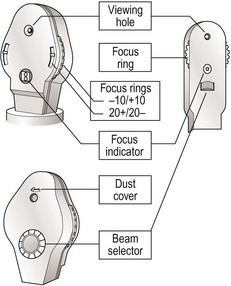
Setting up the ophthalmoscope
Set focus ring to 0 (Fig. 1). Remove dust cover. Select beam to plain. Some people remove their own glasses; if so then move the focus ring to correct. Make sure the light works.


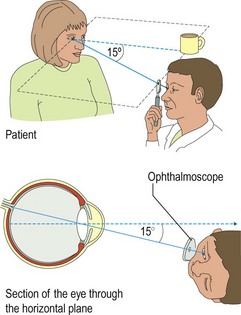
Sit the patient comfortably and ask him or her to look at a particular point in the distance. Draw curtains, turn down lights. With your eye in the same plane as the patient’s eye and the fixation point, and at 15° from the line between eye and point of fixation (so you are aiming at the centre of the occiput), look at the eye from about 30 cm (Fig. 2). Look at the red reflex. Any lens or vitreous opacity will be seen in silhouette. Gradually move in towards the eye. The disc should come into view. The ophthalmoscope may need focusing. If the disc is not seen, find a vessel and track it from branches to trunk.
Look at the disc (Figs 3 and 4). You may be able to see pulsation in the veins as they turn into the optic disc. This is venous pulsation and is normal and is seen in 70% of normal patients. If present it indicates intracranial pressure is normal. It is lost in raised intracranial pressure, though its absence does not indicate raised intracranial pressure.
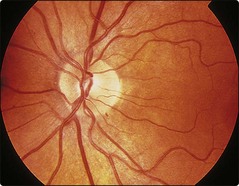
Look at the vessels from the disc to the periphery. Look at the background retina (Fig. 3). In patients who have had cataract surgery and not had a lens replacement it is easiest to examine the fundi when their glasses are kept on.
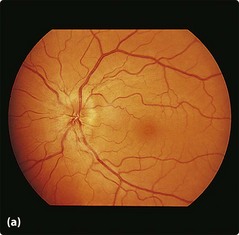
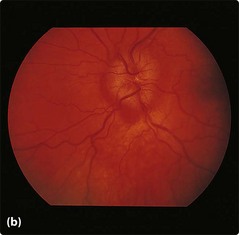
Papilloedema
Papilloedema (Fig. 5) is commonly due to raised intracranial pressure: its absence does not exclude raised pressure. It is also seen in hypertension and hypercapnoea. Vision is normal in most patients with papilloedema, but long-term chronic papilloedema produces an enlarged blind spot and peripheral field loss. Papillitis has the same ophthalmoscopic appearances but is associated with significant visual loss; this is commonly caused by multiple sclerosis.

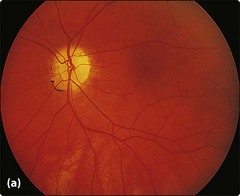
Optic atrophy
Optic atrophy (Fig. 6) indicates optic nerve pathology, either prior optic neuritis, optic nerve compression, prior papilloedema or due to rarer degenerative conditions.
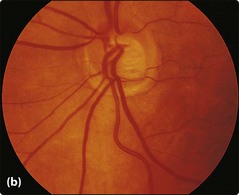
Chronic glaucoma
In chronic glaucoma (Fig. 7) the intraocular pressure is increased, resulting in widening of the optic cup. This produces peripheral field defects.
Hypertensive retinopathy

| Stage | Appearance |
|---|---|
| 1 | Arteriolar narrowing and irregularity |
| 2 | Arteriovenous nipping |
| 3 | Flame-shaped haemorrhages, hard exudates and cotton wool spots |
| 4 | Papilloedema |


