FRACTURES AND DISLOCATIONS
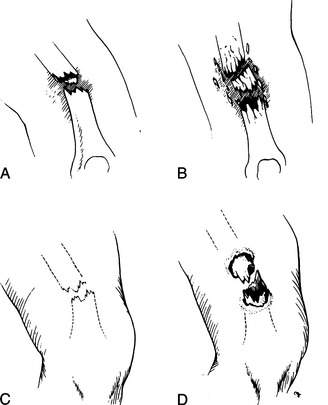
A bone fracture (break) may be simple (one clean break) or comminuted (multiple breaks or shattered) (Figure 38). Furthermore, it may be closed (skin intact) or open (“compound,” with the skin broken, often with the bone visible in the wound). An open fracture is highly prone to infection. A fracture may be associated with injuries to adjacent nerves and blood vessels.
A broken bone or dislocation (displacement of a bone at the joint) should be suspected whenever there has been sufficient force to cause such an injury, if a snap or crack was heard, if the victim cannot move or bear weight on the body part, or if an injured body part is painful, swollen, discolored, or deformed. A broken or dislocated bone should be compared with the normal opposite limb; asymmetry is a key sign of a significant injury. Pain with a broken bone tends to be instantaneous, constant, and worsened considerably with motion, which may also create a grating sensation and noise. A small child with a fracture or dislocation will not use the affected body part and will cry vigorously with the slightest manipulation. If you think that a bone may be broken, it is best to treat it as a break until an x-ray can be obtained or the situation shows obvious marked improvement (which usually requires 4 to 6 days).
Because of the force necessary to break or displace a bone, any person with a fracture or dislocation should be examined carefully for other injuries. All fractures and some dislocations cause a certain amount of bleeding, which can be significant with the larger bones (femur, pelvis). For instance, it is possible to lose 250 to 500 mL of blood at the site of a humerus fracture, 350 to 650 mL from a tibia fracture, and 800 to 1,200 mL from a femur fracture. Be prepared to treat the victim for shock (see page 60). Do not manipulate a broken limb unnecessarily, even if circulation to the limb seems normal; excess motion increases the risk of damage to the bones, nerves, and blood vessels. When examining an injury, always begin with an uninjured area and work toward the injury, so that the victim’s response to pain doesn’t interfere with your exam.
If the skin has been disrupted in the vicinity of the broken bone, the fracture is open. The bone end may or may not be visible through the wound, and bleeding may be minor or major. If a victim has sustained an open fracture, is alert enough to swallow liquids, and is more than 6 hours distant from a medical facility, administer penicillin, erythromycin, amoxicillin, or cephalexin 500 mg by mouth every 4 hours. Rinse the wound gently to remove any obvious dirt, and then cover it with a sterile dressing. Do not vigorously scrub or irrigate the wound. Unless there are signs of loss of circulation (coldness, blue color or paleness, numbness) or it is necessary to realign the limb to allow splinting and evacuation, do not try to reposition the injury or to push the bone back under the skin. If you must manipulate the limb, rinse any visible bone with water or disinfectant (such as povidone iodine 10% solution), and then allow the bone to slide under the skin without touching it. While holding traction (pulling on the end portion of a limb in a longitudinal axis to achieve correct anatomic alignment), immediately apply a splint (see page 74) to prevent further motion and damage.
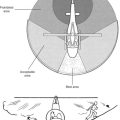
In general, it is unwise to manipulate an injured limb. If the extremity is deformed, but the circulation is intact (normal pulses, sensation, temperature, and color), do not attempt to straighten it; instead, splint it in the position in which you found it (“splint ‘em as they lie”). On the other hand, if the circulation to an extremity is obviously absent (the extremity is numb, cold, and blue or pale), if the victim is in extreme discomfort, or if gross deformity prevents moving the victim out of a dangerous situation or prevents the application of a splint, then an attempt to restore the part to a normal position is justified. Early realignment is easier than delayed realignment, may alleviate a major amount of pain, helps control blood loss into the surrounding soft tissues, may decrease the incidence of fat emboli (fat from the bone marrow entering the bloodstream and causing severe illness), and often allows easier splinting and transport. Be advised, however, that the relocation of a fracture or dislocation may be difficult and transiently very painful for the victim. If you are going to make an attempt to realign a limb, it should be done as soon as possible after the injury (preferably, within 3 hours), before swelling and increasing pain and muscle spasm make the maneuver impossible. If there is no deformity, splint the injured body part in the “position of function” (the position it would assume if it were at rest) (Figure 39).
COMPARTMENT SYNDROME
Within the limbs (legs, arms, forearms, feet, hands, and fingers), there are “compartments” defined by inelastic boundaries of tough connective tissue, or fascia. These compartments contain bones, groups of muscles, blood vessels, and nerves. If swelling occurs within a compartment—typically caused by bleeding, continuous excessive external pressure, or a crush injury—the pressure can exceed 30 mm of mercury, which is the pressure at which blood travels through microscopic blood vessels, such as capillaries. This effectively squeezes the tiniest blood vessels and occludes flow through them, cutting off circulation to the compartment and rapidly causing tissue death. The most common cause of compartment syndrome in a wilderness enthusiast is swelling surrounding a broken bone or associated with a severe blunt injury, such as occurs after a fall. The lower leg and forearm are the most common sites. Compartment syndrome is rare following snakebite (see page 346), because most of the swelling following a bite is confined to superficial soft tissues.
Signs and symptoms include severe pain that seems out of proportion to the injury. The underlying tissue feels extremely tight, and pain is increased markedly with external pressure. Stretching the muscles that run through the compartment causes worsened pain. There may be decreased sensation or tingling in those skin areas supplied by the nerves that run through the compartment—for example, decreased sensation to pinprick or light touch on the top of the foot in the web space between the great and second toes because of pressure on the deep peroneal nerve, which runs through the anterior leg compartment. The limb may become pale or show a bluish tinge. When pulses become diminished or lost, the situation has become severe, and the limb will be weak or become useless (paralyzed).
SPLINTS AND SLINGS
These general guidelines should be followed in the application of splints:
1. Examine every suspected fracture to see if it is open or closed (see page 70). Check the circulation below the fracture site by inspecting pulses, skin color, sensation, and movement of fingers and toes. In the arm, check the radial and brachial pulses; in the leg, check the popliteal, dorsalis pedis, and posterior tibial pulses (see Figure 16).
2. Control bleeding (see page 54) and apply a dressing if necessary.
3. Splint the joint above and below the injury. For instance, to keep the knee from moving, you often need to prevent motion at the ankle, knee, and hip. There will be times when this is difficult, but do the best you can.
4. If possible, fashion the splint first on an uninjured body part, and then transfer it to the injured area. This lessens manipulation of the injured part and minimizes pain associated with splinting.
5. Splints can be fashioned from sticks, cardboard, foam pads, rolled newspapers, pack frames, ski poles, or other similar objects (Figure 40). The SAM Splint has become a standard item for the outdoor first aid kit. The core of the SAM Splint is a long rectangle of “O” temper, ultrathin aluminum alloy. The covering layers are made of dermatologically safe closed-pore foam. The splint is available in a standard size of 4 ¼ in by 36 in, which rolls easily to become a 3 in by 4 ¼ in cylinder. It can be shaped to splint a great number of body parts. The splints also comes in a 5½ in wide XL version, in prepackaged lengths of 18 inches and 9 inches, and as a finger splint that measures 3.75 by 1.75 in.
6. When applying a splint, don’t cut off the circulation. Pad all bony prominences, other pressure points, and injuries as best as possible. This may be done with foam, a sleeping pad, pack material, or clothing.
7. If the injury is closed (skin unbroken) and there are no signs of decreased circulation, apply ice packs intermittently to the swollen area. Do not apply ice directly to the skin.
8. Remove all constrictive jewelry (watches, bracelets, rings, and so forth). Left in place, these can become inadvertent tourniquets on swollen limbs and fingers (see page 477).
9. Administer appropriate pain medication.
10. After a splint is applied, check the limb periodically to make certain that swelling inside the splint has not cut off the circulation. This is particularly important in cold weather, where numbness can be a confusing factor.
11. Elevate the injured part as much as possible, to minimize swelling.
12. Insist that all victims seek medical evaluation when they return home, to be certain that all bones are properly aligned and that no further intervention is needed.
To learn more about specific splints and slings, read about the specific injuries (below).
SPECIFIC INJURIES
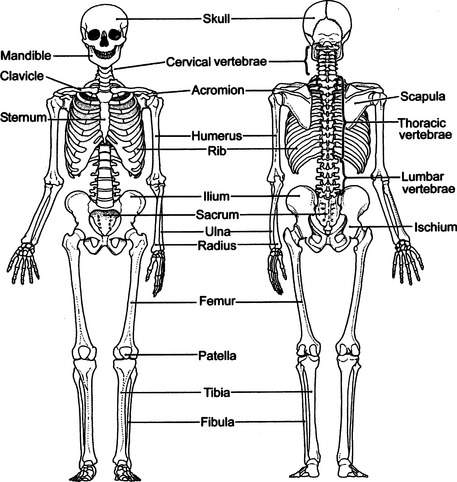
The major bones of the skeleton are illustrated in Figure 41.
Neck
If a fracture of the cervical spine is suspected because of neck pain, weakness or loss of feeling in an arm or leg, tingling in an arm or leg, or mechanism of injury (for instance, a victim who has fallen, is unconscious, and has a face or head injury), you must immediately immobilize the head and neck. This can be done by taping the head to a backboard or stretcher, by applying a rigid collar (which may be fashioned from a SAM Splint, as in Figure 22), or by placing sandbags or their equivalent on either side of the head (see Figure 21). Never move the neck to reposition it.
For the ambulatory, cooperative victim with minor neck discomfort, a thick pad (rolled towel, jacket) can be placed posteriorly at the base of the neck. Secure this by wrapping tape or cloth around the forehead, and then cross it over the pad and bring it back out under the armpits to be tied across the chest (see Figure 23). Alternatively, use a thick removable waistband from a backpack or a rolled Ensolite pad in a horse-collar configuration. Soft-collar techniques should not be relied on to hold the neck immobile; they merely offer gentle support.
If the victim is uncooperative or agitated, hold his head until you can firmly immobilize it and restrain the victim from motion (see Figure 24). All of this is necessary to avoid injury to the spinal cord. If the victim must be moved or turned on his side (most commonly to allow vomiting or to place insulation beneath him), hold his head fixed between your forearms while you hold his shoulders with your hands. In this way the victim can be “logrolled,” using as many rescuers as possible to avoid unnecessary head, neck, and spine motion.
Logrolling the Victim (see Figure 25)
1. The first rescuer approaches the victim from the head, and keeps the head and shoulders in a fixed position so that the neck doesn’t move.
2. The second rescuer extends the victim’s arm (on the side over which the victim is to be rolled) above the victim’s head. The first rescuer uses this arm to help hold the victim’s head in proper position.
3. All rescuers work together to roll the victim without moving the neck.
Skull and Face
See page 61. If there is a fracture of the skull, the victim may demonstrate black eyes (“raccoon eyes”), bruising behind the ears (“Battle’s sign”), or cerebrospinal (clear or watery blood-tinged) fluid leaking from the nose or ears. If there are fractures of bones in the face, there will usually be swelling and pain of the overlying soft tissues. If the swelling is severe around the nose, breathing may be impaired. If the bones around the eye socket are broken, there may be double vision or inability of the affected eye (or eyes) to traverse its full range of motion.
Jaw
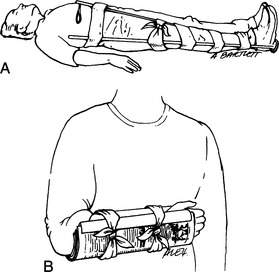
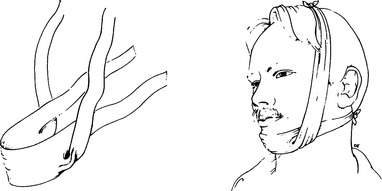
A fractured jaw is usually caused by a fall or a blow from a closed fist. The lower bone (mandible) may be broken in one or more places. The victim will complain of pain, swelling, inability to close his mouth, improper fit of the teeth, perhaps missing or broken teeth, and difficulty talking. If the fracture extends into the oral cavity, there may be bleeding from the mouth. Treatment is to wrap a bandage over the top of the head and under the jaw for support (Figure 42). It should be easily removable in case the victim needs to vomit. A liquid diet should be maintained until the victim can reach the hospital.
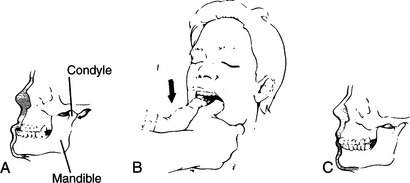
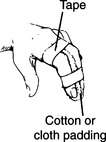
A dislocated jaw can occur from a blow, from a widemouthed yawn, or even during sleep. The mandible slips loose from its two bony sockets below the ears and slides forward (Figure 43). To reposition the mandible, grasp the jaw by placing your thumbs (with cloth or gauze padding for traction) inside the mouth against the lower molars (rear teeth), holding the bone firmly with your remaining fingers. Exert steady pressure straight down until you feel the mandible “pop” back into place, and the victim says his teeth fit properly (Figure 43, B). After the jaw is repositioned, tie a bandage under the chin and over the top of the head to keep the jaw from easily dislocating again (see Figure 42). The bandage should be easily removable in case the victim needs to vomit.
Wrist, Hand, and Finger
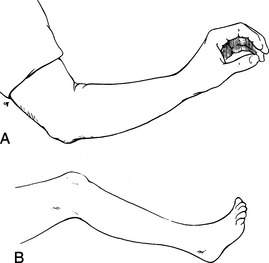
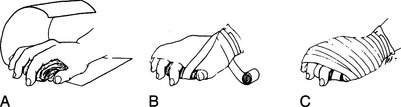
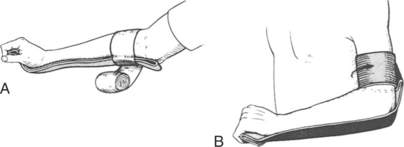
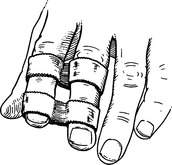
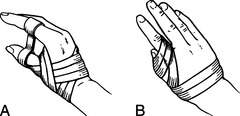
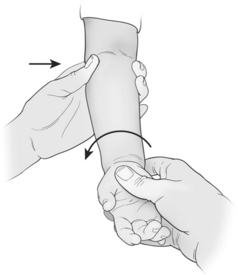
A fracture or dislocation of the hand, wrist, or finger should be positioned and splinted in the normal resting position (position of function; see Figure 39, A). For a wrist or hand injury, this may be accomplished by allowing the victim’s fingers to rest around a padded object in his palm (such as a rolled pair of socks, rolled elastic bandage, or wadded cloth; Figure 44), with a circumferential wrap to maintain position (Figure 45). Every attempt should be made to allow the fingertips to remain uncovered, to assess circulation. If the wrist is involved, place a rigid splint on the underside of the hand, wrist, and forearm to prevent motion (Figure 46). Fingers may be splinted independently or taped together (with padding in between) for support (Figures 47 and 48).
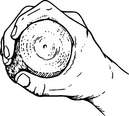
Figure 44 A rolled elastic bandage is gripped gently to maintain the hand in the “position of function.”
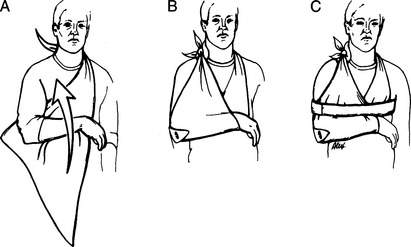
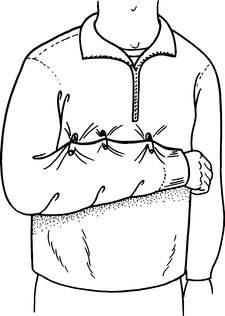
A sling can be applied to the forearm for support and pain relief. A swathe may be added for further immobilization. To make a classic arm sling out of a triangular bandage, lay the bandage under the arm as shown in Figure 49. Tie two corners together with a square knot at the opposite shoulder—which creates the arm cradle—and then pin the remaining elbow corner up onto the body of the sling. A rolled or folded triangular bandage becomes a cravat (see page 277), which is wrapped around the sling-encased arm and chest (as a swathe) to hold the arm snug against the body wall (see Figure 49, C). If materials to fashion a sling are not available, the victim’s shirt can be pulled up and pinned to create a crude hammock for the arm (Figure 50), or you can pin the shirt sleeve to the body of the shirt after the elbow is flexed to the proper position (Figure 51).

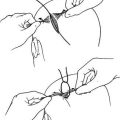
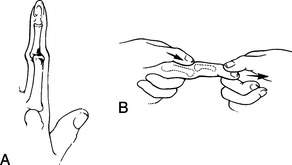
If a finger is dislocated at the middle or distal joint (Figure 52, A), make a gentle attempt at relocation by applying steady, firm traction to the fingertip (Figure 52, B). Do not try to reposition the joint with a sudden forceful snap. It is often easiest to relocate a finger if you hold the joint slightly bent and push the distal (overriding) bone back into position with your thumb(s) while you are pulling the bones back into their proper position. It is nearly impossible to reduce a dislocation at the knuckle of the index finger without an operation. After a finger is realigned, it should be taped to one or two adjacent fingers for splinting (see Figures 47 and 48).
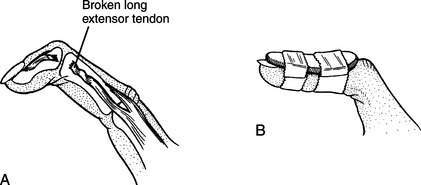
A “mallet finger” (Figure 53, A) results from disruption of the extensor tendon, which normally pulls the tip of the finger into a straight position. The finger should be splinted with a slight amount of hyperextension (Figure 53, B).
If the thumb is dislocated or fractured, it can be taped to prevent further injury, by fixing it with an anchor to the index finger (Figure 54, A) or directly against the hand (Figure 54, B). You can use the anchor technique to hold any two fingers together.
Forearm
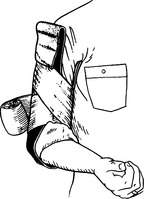
A fracture of the forearm should be splinted to immobilize the wrist and bent elbow (see Figure 46, B). This may also be done in a “sugar tong” fashion (Figure 55). Fashion a sling and attach it to the trunk with a swathe (see Figure 49).
Elbow
A fracture of the elbow should be splinted to include the wrist and shoulder, if possible, and at an angle of 60 to 90 degrees. However, if it is painful for the victim to move his elbow, splint it in the position in which you found it. A sling should be fashioned and attached to the trunk with a swathe. A dislocated elbow should be realigned if necessary to restore circulation to the hand. Hold the arm bent 45 to 90 degrees at the elbow and use a lever motion to pull the bones of the forearm back into position, while holding the upper arm fixed in countertraction (Figure 56). This may require a fair amount of force to accomplish and is usually difficult if the victim cannot relax.
“Nursemaid’s Elbow.” The radius and ulna are the long bones of the forearm, and join with the humerus (the long bone of the upper arm) at the elbow joint. In young children, if a sudden straight pulling force is applied to the arm, such as when a child’s hand is tugged to pull him along, or he is swung in a circle vigorously by the arms, the ligament that holds the radius in place may slip off the head of the radius within the elbow. There may be an audible snapping sound and immediate pain, but the pain may subside rapidly, after which the child will not use the arm. If this occurs and you are close to medical care, splint the arm as for a fracture. However, if you are far from care and wish to see if you can remedy the situation (that is, return the ligament to its proper position), take the child’s arm and do the following. First, bend the elbow to 90 degrees and rotate the hand and forearm such that the thumb moves away from the body (accentuated hitchhiker’s gesture) (Figure 57). If no “pop” is felt or heard, keep the thumb pointed away from the body and move the forearm toward the upper arm (that is, “flex” the arm) until you have moved it as far as you can (Figure 58). If the ligament moves back to its proper position, the child will begin to use his arm again within 10 minutes. After that, there is no need for a sling or splint. If the child still will not use his arm, seek medical attention.
Upper Arm
The entire length of the bone of the upper arm (humerus) can be palpated for tenderness or deformity from the arm’s inner aspect. A fracture of the humerus can be differentiated from a dislocated shoulder by observing how the victim holds his arm. With a humeral fracture, the arm is often held close to the chest, whereas a dislocation of the head of the humerus from the shoulder socket (shoulder dislocation—see page 89) prevents the victim from pulling his arm into his body.
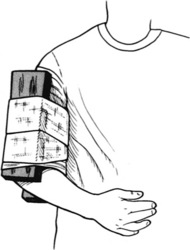
A fracture of the upper arm, particularly if it is close to the shoulder, is often quite difficult to splint. A “sugar tong” splint can be fashioned using a SAM Splint, by laying the splint along the inner and outer surfaces of the arm, with the U of the “tong” at the elbow (Figure 59). If possible, the elbow should be kept bent at 90 degrees and the arm placed in a sling. Attach the sling to the body by using a circumferential (around the chest) swathe fashioned from a belt, rope, or long piece of cloth to prevent motion of the arm at the shoulder (see Figure 49).
Two padded board splints can be used to stabilize an arm fracture above the elbow (Figure 60). The splints cross the upper part of the arm and the midforearm to create a triangle with the elbow. A sling is added for support.
Collarbone
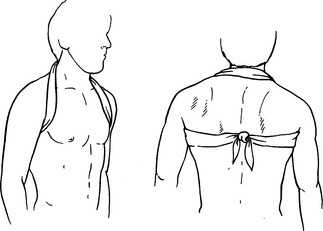
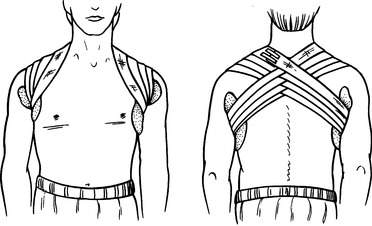
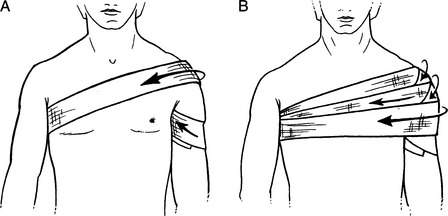
A fracture of the collarbone is best managed with a sling and swathe (see Figure 49) or a modified figure-of-eight bandage (or both). The latter is created by draping a rope, cloth, or cravat behind the neck across the shoulders, then forward over the shoulders and under the arms (pad the armpits, if possible), to be tied in the back (Figure 61). This will pull the shoulders back into the military position. To provide a tighter fit, tie the cross-shoulder section to the lower knot (giving a figure-of-eight appearance). After the figure-of-eight bandage is pulled snug, the affected arm may be fixed to the chest using a sling and swathe. Another technique is to weave a figure-of-eight bandage with a long, rolled elastic bandage (Figure 62). If any figure-of-eight bandage increases the victim’s discomfort, you can use a sling and swathe alone. A collarbone fracture appears to heal equally well with either technique, so the major issue is immobilization for comfort.
Shoulder Dislocation
The long bone (humerus) of the upper arm fits into the shoulder joint with a ball-and-socket mechanism, held in place by muscles and tendons (Figure 63, A). When a person falls onto his shoulder or an outstretched arm, or has his arm twisted or pulled forcefully, the head of the humerus can dislocate out of the shoulder joint (Figure 63, B). This is usually quite painful and may be associated with a fracture of the humerus or the lip of the shoulder socket. The diagnosis of shoulder dislocation is made by observing and feeling a depression in the shoulder where the upper arm bone should be (see Figure 63, B), noting that the victim holds the arm up and away from the body (Figure 64), and feeling the head of the humerus as a firm ball 2 to 3 in (5 to 7.5 cm) below its normal location. There is reduced range of motion of the joint and absence of a “grating sensation” (indicating absence of a broken bone). Those who have previously suffered shoulder dislocations are often prone to recurrent episodes with lesser forces applied to the joint.
If the injured victim can be transported to a medical facility within 3 hours, there is no need to attempt relocation of the arm unless he is in extreme pain. Place the arm in a sling, position some padding underneath the arm and against the chest, and secure the sling to the victim’s chest with a swathe to minimize motion and discomfort (see Figure 49).
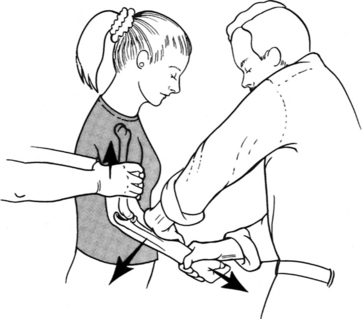
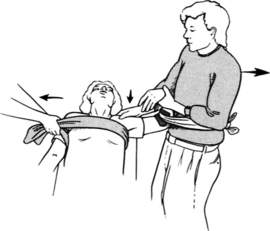
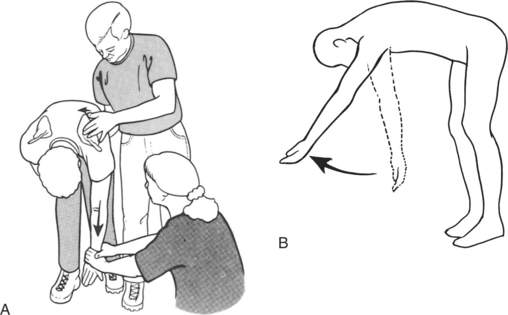
If more than 3 hours will elapse before medical help is obtained, if the dislocation is recurrent (has happened to the same shoulder before), or if the victim is suffering intolerable pain, you can make an attempt to reposition the arm bone in its socket. Do not attempt relocation if the upper arm or elbow is deformed (indicating a broken bone). The safest and simplest technique for relocation is to pull with steady, forceful traction on the injured arm, directed at a 45- to 90-degree angle away from the body. At the same time, someone should provide countertraction by holding a sheet or blanket that is wrapped across the victim’s chest and under the affected armpit (Figure 65). The easiest technique is to tie a sheet, belt, webbed strapping, or avalanche cord around the rescuer’s waist and the victim’s bent forearm, so that the rescuer (standing or kneeling) can lean back to apply traction, keeping his hands free to guide the head of the humerus back into position (Figure 66). In all cases, place padding in the armpit and bend of the elbow to prevent a pressure injury to sensitive nerves beneath the skin. A single rescuer can provide countertraction by placing his foot against the victim’s chest just below the armpit, or fixing the countertraction sheet or rope to a tree or ice ax buried in the ground; he can also use a life jacket as a foot brace (Figure 67). Do not jerk the arm, attempt to twist or lever it into position, or pull with a tugging motion.
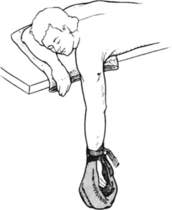
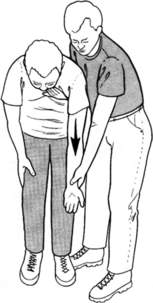
Another technique is to have the victim lie prone so that his injured arm can dangle free. Place a thick pad under the injured shoulder. Attach a 10 to 20 lb (4.5 to 9 kg) weight to the wrist or forearm (do not have the victim attempt to hold the weight) and allow it to exert steady traction on the arm, using gravity to relocate the humeral head (Figure 68). Alternatively, have the standing victim bend forward at the waist as you pull steadily downward on his arm to simulate the gravity effect, with gentle side-to-side (at the wrist) rotation (Figure 69).
In the scapular manipulation technique, the victim is placed in a prone position so that his injured arm can dangle free. Apply traction for 5 to 10 minutes. Then, while maintaining traction, push the tip (lower edge) of the scapula (“wingbone”) in toward the spine while pulling the upper portion (toward the shoulder) of the scapula away from the midline. This can also be done with the victim in a standing position (Figure 70, A). If the victim is standing, it may help to pull the arm forward as well as down (Figure 70, B).
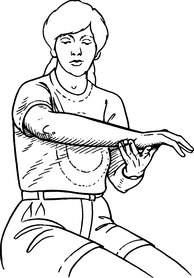
In the Milch technique, the victim attempts self-reduction of the dislocation. He should sit, stand, or lie on his back and slowly reach, using the hand of the injured shoulder, behind the head in order to touch the opposite shoulder. Another way to describe this technique is to have the victim reach up and backward with the injured arm as if going into a windup to throw a baseball. If the technique works, the victim will feel a “pop” as the dislocation is corrected. If you wish to assist the victim, use one hand to gently cup his elbow and assist him with this procedure, while using your other hand to steady the affected shoulder.
If pain medicine is available, the victim should be medicated before relocation is attempted, to allow the greatest possible shoulder and chest muscle relaxation. As the arm bone moves back into proper position (this may require 15 minutes of steady traction), it will sometimes “give” in little movements, with a final “pop” back into the socket. Once the bone is back in place, the victim will be able to bring his arm across the chest. If the victim cannot relax his muscles sufficiently to allow relocation, if your attempts cause excruciating pain, or if you are otherwise unsuccessful after 30 minutes, leave well enough alone (no one ever died of a dislocated shoulder). Place padding in the armpit and fix the arm near the body in as comfortable a position as possible with swathe bandages, and then head for help. A shoulder harness (Figure 71) may be useful. The victim who cannot walk should be transported in a sitting (for comfort) position, if possible. If the shoulder relocates, it should be placed in a sling and swathe, to prevent a repeat dislocation (see Figure 49). A first-time shoulder dislocation that is relocated should be immobilized for 3 weeks. A recurrent dislocation that is relocated can be exercised gently after 3 to 5 days.
Shoulder Separation
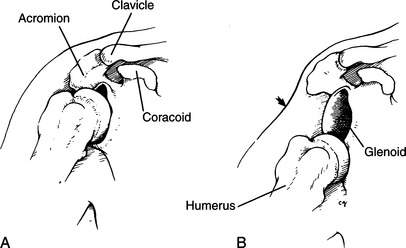
A shoulder separation, as contrasted with a dislocation, occurs when the collarbone’s ligamentous attachments to the acromion and coracoid structures of the triangular scapula (“wingbone”) are weakened or disrupted (Figure 72). This can range from small tears in the ligaments, which do not result in a visible deformity, to full disruption of the ligaments, leading to a “free-floating” collarbone. The injury usually follows a direct blow to the shoulder, such as occurs when you fall onto your side and cannot break the fall with an outstretched arm.

If tenderness is elicited when pressing directly over the acromioclavicular joint (AC joint), particularly with swelling and a spongy sensation over the end of the collarbone, suspect a shoulder separation. Treat as for a broken collarbone (see page 87).
Rib
A broken rib can be very painful, but there is little that the rescuer can do to improve the situation. Pad the chest wall with blankets or clothing (if the victim needs to be carried out on a stretcher) to restrict unnecessary motion and contact. Never bind the chest tightly; this inhibits deep breathing and prevents full expansion of the lungs, which predisposes the victim to partial lung collapse and pneumonia. Encourage the victim to breathe deeply (sigh) or cough a few times an hour. If there is a segment of detached (flail) ribs (see page 41), attempt to stabilize its position with padding (see Figures 26 and 29). Because of the force necessary to break a rib, anticipate internal bleeding (lungs, liver, and spleen) (see page 59). A rib will sometimes break during forceful coughing. In this case, internal injury is not a concern.
Spine (Chest and Lower Back)
A victim who falls a great distance and lands on his feet frequently fractures his heel(s), ankle(s), and lumbar vertebrae (lower bones of the spine—see Figure 41). Symptoms of spinal cord injury include back pain, weakness, numbness or tingling below the injury, loss of bladder or bowel control, and low blood pressure (“spinal shock”). If a fractured spine is suspected, the victim must be completely immobilized to avoid damage to the spinal cord. Position him on a firm litter or backboard, and secure him so that no motion of the back is possible (see page 37). If a scoop stretcher or backboard is not available and the victim must be moved, he should be logrolled (see page 39).
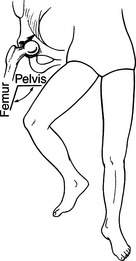
Pelvis
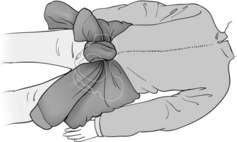
If pressing inward on the victim’s hips or downward on the pubic bone causes pain, suspect a fracture of the pelvis, and immobilize the victim from his waist down. A pelvic fracture is frequently associated with severe internal injuries and bleeding, so rapid evacuation is a high priority. Be prepared to treat the victim for shock (see page 60). Do not allow a victim with a suspected pelvic fracture to walk. A SAM Pelvic Sling is a force-controlled circumferential pelvic sling belt for effective reduction and stabilization of pelvic fractures. Another device is the pelvicbinder (www.pelvicbinder.com). If one of these devices is not available, the pelvis can be wrapped tightly with a sheet, sleeping pad (held in place with tape), blanket, or jacket to attempt to keep the bone fragments from moving, which hopefully diminishes instability, internal bleeding, and pain (Figure 73). Before applying any pelvic sling, be sure to empty the patient’s pockets and remove his belt so that the external pressure doesn’t press any items against the pelvis. For transport, place padding between the victim’s legs and gently tie his legs together to minimize motion and improve comfort.
Femur
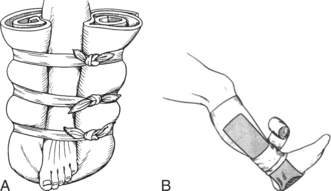
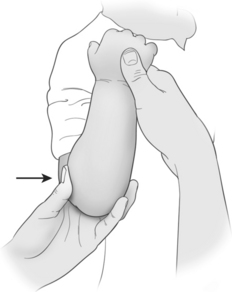
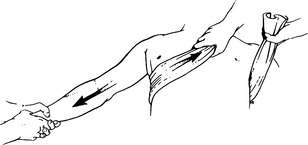
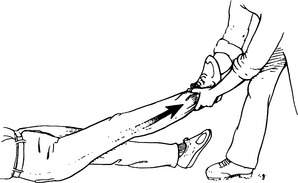
A fracture of the femur (the large bone of the upper leg—the longest and strongest bone in the body) can be diagnosed by severe pain, inability to bear weight, deformity, and rapid swelling (from bleeding). Often, the affected leg is shortened and the foot is rotated away from the other leg. Sometimes a fracture of the neck of the femur can be subtle, as the victim complains only of minor pain on the inside of the groin or knee, and may continue to walk. On close inspection, the affected leg may be seen to be slightly shortened, and there may be some swelling and pain in the anterior hip area. Any disabling femur fracture requires splinting from the hip to the ankle. Because the muscles of the thigh are quite powerful and will tend to force the broken bone ends to overlap (Figure 74, A), traction is often necessary to control bleeding, maintain position, decrease pain, and prevent further internal muscle and blood vessel damage (Figure 74, B). If sufficient rescuers are available, one person should maintain firm traction on the leg at the ankle to oppose the strong muscle contractions of the thigh (Figure 75). A broken femur can bleed 2 quarts (liters) of blood into the thigh rapidly, so evacuation is a high priority. Be prepared to treat the victim for shock (see page 60).

You can also prepare an improvised traction splint that replicates the features of a Thomas splint: a half ring to anchor up against the pelvic bone (ischial tuberosity) underneath the lower crease of the buttock, two longitudinal rigid rods to run the length of the leg, a fixed spacer at the lower (foot) end between the two rods, and a traction mechanism to pull on the leg to align the fracture.
The ankle should be padded with foam or cloth pads, or a boot should be worn. If the latter is done, you can cut away the toe section to assess the circulation (skin color, sensation) (Figure 76).
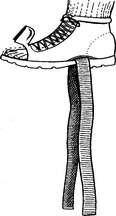
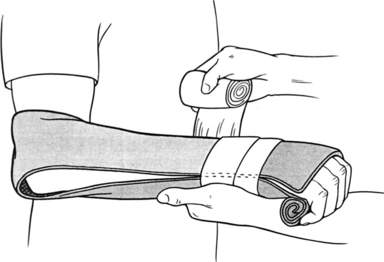
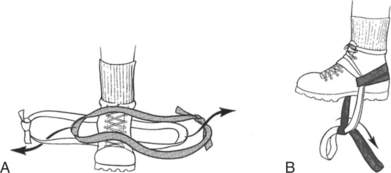
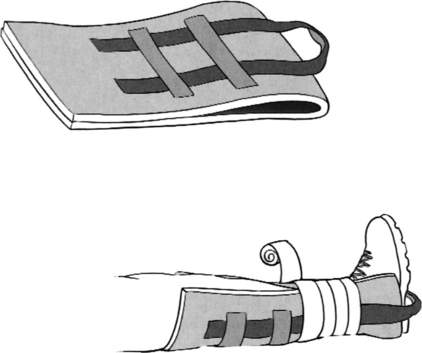
A traction harness must be created to pull the leg straight down away from the head. One method is to cut two slits through the victim’s sturdy boot, above the sole just in front of the heel and directly below the leg bones. Pass a cravat or nylon webbing (such as a pack strap) through the opening (see Figure 76); the ends of the strap will be secured to the rigid object that will form the spacer at the foot end of the leg splint. The paired-loop (“double runner”) method of creating an ankle hitch uses paired lengths of cravat, nylon webbing, or rope (Figure 77, A). Fold each in half, creating a single turn at one end. Lay one cravat over the top of the ankle and one behind the ankle (behind the Achilles tendon), with the curved ends pointed in opposite directions. Pass the free ends of each cravat through the loop in the other cravat, and tighten the cravats so that they fit snugly and flat against the ankle. The free ends should now hang down (Figure 77, B) and will be secured to the spacer, directly or with an interposed pulley system, that connects the long, rigid rods of the splint. Another method to apply traction is “Buck’s traction,” in which a pad is secured firmly around the lower leg in such a way that the pad can get enough purchase to allow it to anchor tape stirrups (Figure 78).
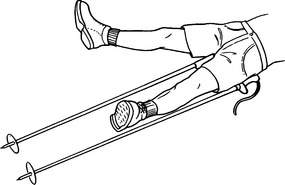
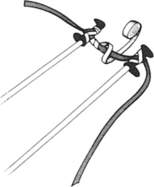
The traction splint rods can be fashioned from two ski poles, rigid tree limbs or saplings, tent poles, or anything else that is approximately a foot (30 cm) longer than the distance from the top of the thigh to the bottom of the foot. To measure the proper length, lay the rods next to the victim on either side of the thigh, with the top of the inner rod tucked up against the groin crease and the top of the outer at the top of the thigh. Cut the lengths to be even at a distance of approximately 8 to 12 in (20 to 30 cm) below the foot (Figure 79).
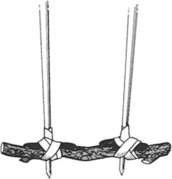
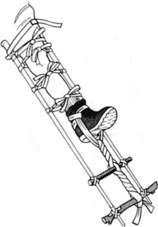
Construct the splint away from the victim. Using a cravat, ski pole straps, webbing, or rope, attach the tops of the two poles with a length that approximates half the circumference of the thigh at this point, to create the “half ring” that will be snugged up underneath the victim into the lower buttock crease (Figure 80). At the lower (foot) ends of the rods, attach a perpendicular rigid spacer about 8 in (20 cm) in length (Figure 81). This could be a piece of ski pole, a wrench, a piece of tree limb, or the like. Then lay four cravats (two for above the knee, two for below) or straps (that can be fastened) over the rods and wind them to be configured as cradle hitches (Figure 82). These will fix the rods to the leg after traction has been applied. Velcro straps are nice, if you have them.
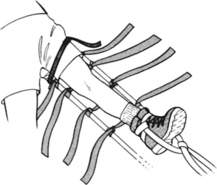
Holding traction on the leg, lift it enough to slide the splint underneath. Snug the half ring up into the buttock crease, remembering to keep the shorter rod on the inside of the leg. Attach the splint firmly to the leg with tape or a cravat around the front of the thigh (over thick padding, if available) at the top of the splint above the suspected point of the fracture (Figure 83).
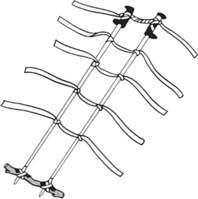
Tie the free ends from the traction harness (which you created through the boot or around the ankle) to the spacer at the end of the long splint. Create a “Spanish windlass” by inserting a short, rigid stick or rod between the tied-down free ends and twisting to produce the desired amount of traction (Figure 84). Fix the twister rod in place by tying it to the adjacent long splint rods (Figure 85).
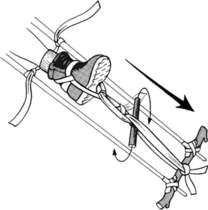
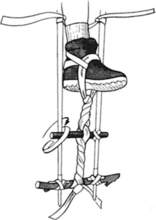
Finally, secure the splint to the leg with the cradle hitches, two above the knee and two below (Figure 86). Pad everything. The victim may be more comfortable if you apply traction while his knee is slightly bent.
With a broken femur, the rescuer would ideally remove the victim’s shoe or boot to be able to assess whether or not the circulation is intact, by checking the dorsalis pedis artery pulse on the top of the foot (see page 33) and observing for normal skin color and sensation. This should only be done if it will not interfere with splinting and if the foot can be protected from the elements (e.g., to avoid frostbite). If the footwear is removed, tent up the sock and cut a hole just large enough to allow a finger to enter to find the pulse and to get a peek at the skin color.
Hip
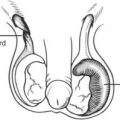
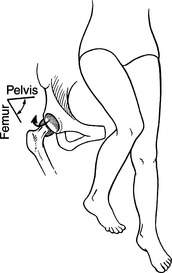
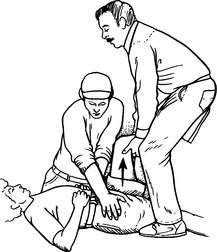
If a person (usually elderly) falls with great force directly onto his knee, the large leg bone may be forced backward out of the hip socket and create a posterior hip dislocation. In such a case, the affected leg appears shorter and is bent at the knee; the foot and knee are also turned inward (toward the other leg) (Figure 87). With an anterior hip dislocation, the ball of the femur slips forward out of the hip socket, and the leg is shorter and externally rotated (knee and foot face outward) (Figure 88). Either dislocation is a serious condition, because the blood supply to the head of the femur (the “ball” of this ball-and-socket joint) is disrupted. If medical attention cannot be reached within 1 hour, make an attempt at relocation—unless there is a deformity of the upper leg or knee (indicating a fracture). Hold the leg and knee of the victim firmly, and exert forceful traction pulling on the thigh directly down toward the victim’s feet, in an attempt to slide the head of the femur back into the hip socket. If this is successful, you will feel a “give,” and the leg, knee, and foot will regain proper alignment.
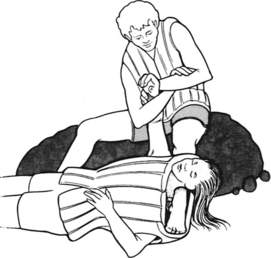
Because of the force required to perform this maneuver, it is generally necessary to have a second rescuer provide countertraction to the victim’s upper body. The two-rescuer method involves the first rescuer straddling the supine victim directly over his hips, facing toward the victim’s head and holding the victim’s bent leg between his knees. The second rescuer holds the victim’s pelvis to the ground while the first lifts upward on the dislocated femur (Figure 89). If relocation is successful, firmly splint the hip by securing the victim’s legs together, slightly bent at the hips and knees with padding in between; he should be promptly evacuated, and should not attempt to walk.
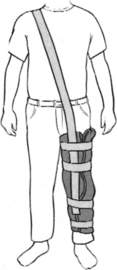
Knee and Kneecap
A suspected fracture of the knee or kneecap should be splinted from hip to ankle. If there is such great deformity that the foot becomes numb and turns blue or pale and cold (usually with severe dislocation of the knee joint), and pulses cannot be felt, then dislocation of the knee joint should be suspected and the rescuer should use traction to attempt to realign the leg in a position of function (with the knee bent at a 15- to 30-degree angle; see Figure 39, B) to reestablish circulation. If pulses do not return after the knee is repositioned, the major artery that traverses the knee joint may have been torn or crushed and occluded. This is a surgical emergency. If the relocation attempt is successful, the victim still must be evacuated promptly for a full evaluation.
If the kneecap becomes dislocated, gently straighten the leg while pushing the kneecap from the lateral side back into place. Occasionally, the kneecap will not pop back into position. If the maneuver is painful or not easily accomplished, do not apply force. After the kneecap is repositioned, splint the leg straight or at a 15-degree bend (knee) using an Ensolite or foam pad and elastic bandage(s). If the splint slips, duct tape can be used to fashion suspenders (Figure 90). To prevent the kneecap from becoming dislocated, a person with a history of frequent (patellar) dislocation may choose to wear an Aircast patellar brace or similar support. This stabilizes the kneecap and compresses the surrounding soft tissue with a circular cushion of air.
The knee can be sprained (or strained) when it twists or withstands impact. The supporting ligaments that bind the joint on the outside and inside (lateral and medial collateral ligaments) and those that cross front to back through the interior of the knee joint (cruciate ligaments) can be stretched, slightly torn, or completely disrupted. This causes immediate pain with weight bearing (walking), motion (trying to bend the knee or extend the leg), or touch (pressing against the injured side of the knee). Often, there is swelling and a spongy feel to the knee. As swelling increases, the knee becomes less flexible and more difficult to bend. If you suspect more than a minor sprain, immobilize the knee as if for a fracture; the victim should avoid weight bearing. Sometimes the mechanism of injury can suggest what has been damaged:
• Striking the bent knee from the outside commonly injures the medial collateral ligament.
• Striking the straight knee from the inside commonly injures the lateral collateral ligament.
• Striking the front of the knee commonly injures the posterior cruciate ligament.
• A knee being severely twisted or completely giving out on impact or pivot commonly is caused by anterior cruciate ligament disruption.
• Pain with knee rotation or clicking/locking of the knee may indicate meniscal (cartilaginous cushion within the knee joint) tear.
• Inability to step up (“climb stairs”) after a “pop” is felt or heard may indicate injury to the quadricep/patellar tendon.
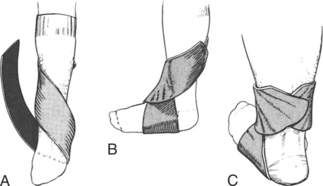
Ankle
A fracture of the ankle can be stirrup-splinted or wrapped to prevent movement. This can be accomplished using a SAM Splint, parka, or piece of rolled foam taped or wrapped into place (Figures 91 and 92). Remove or loosen the boot or shoe to avoid entrapment due to swelling, which could impair circulation. However, if the victim must walk out under his own power, replace footwear as soon as possible, before swelling makes this impossible.