[level-membership-for-plastic-reconstructive-surgery-category]
CHAPTER 24 Form Stable Shaped High Cohesive Gel Implants

Summary/Key Points
Introduction
With the introduction of shaped textured implants surgeons started to think in terms of shape and dimensions rather than volume and cup size.1 In order to fully exploit the opportunity for creation of a natural breast shape offered by the shaped devices, careful attention must be given to the surgical techniques of pocket dissection and implant placement for shaped devices.2–5
In the last decade much of the discussions in the plastic surgery literature has focused on the difference between shaped and round implants, however, a much greater divergence relates to the use of form stable versus non-form stable implants (Fig. 24.1). Basically most aspects of such breast augmentations are different. The way of selecting implants is different. Patient preoperative markings, surgical techniques and postoperative recommendations and results also differ. These are not just new type implants, they represent a new concept in breast augmentation surgery. Surgeons who believe that form stable implants behave in the same way as non-form stable implants will tend to plan, select implants and perform surgery in traditional ways. Unfortunately, they are bound to encounter significantly more complications and problems.
Patient and Implant Selection
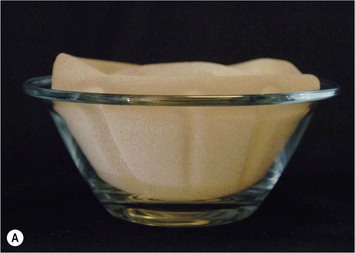
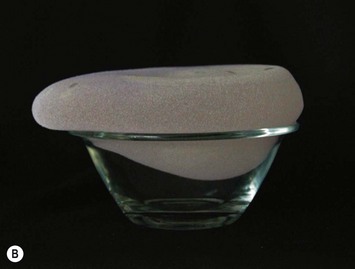
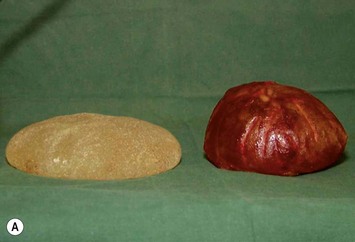
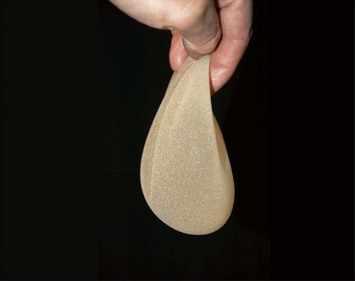
Ever since silicone breast implants were introduced in the early 1960s implant selection has been a relatively arbitrary process where the surgeon has estimated the volume of the implant in relation to patients’ desires and biological prerequisites based on his own experience. As form stable implants cannot be deformed (Fig. 24.2) dimensional planning and implant selection is necessary. Instead of estimating an appropriate volume the ideal dimensions of the implant are calculated.
Definition of Patient Desires
The general information about breast augmentation surgery can be conveyed in many different ways and well educated patient coordinators and/or in the written form and a patient information book have proved extremely useful.28 A full size mirror in the doctor’s office is also an extremely important part of the consultation process as the dimension and proportions of the expected result can be demonstrated for the patient by displacing the breast medially and laterally, showing expected borders of the new breast and showing projection of different implants. To use sizers in a sports bra should not be part of the consultation in the first stages but final testing with suitable sizer in a sports bra can be a good way to create final trust in the implant selection for the patient.
Examination of the Breast Tissue and its Envelope
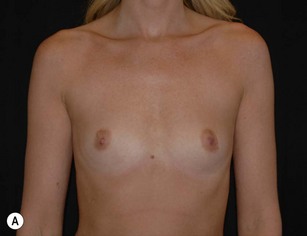
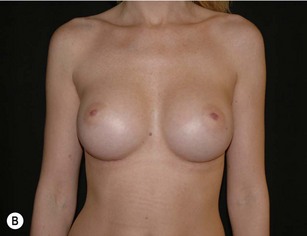
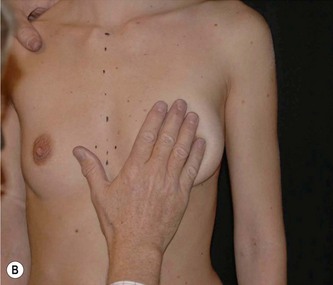
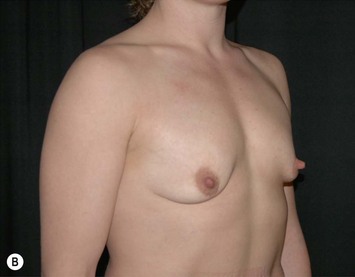
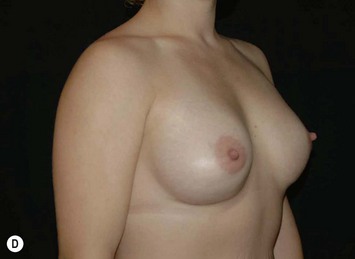
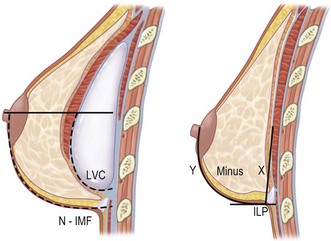
As breast asymmetries are extremely common but not always noted by patients, these smaller asymmetries should be noted and pointed out to the patient. The characteristics and distribution of the glandular tissue should be examined as it has implications on implant selection. A patient with a dense, relatively constricted gland and short nipple inframammary fold distance has increased risk for a double bubble deformity in the lower pole and they may do better with a more projecting implant and shorter implant heights. The surgeon may also need to modify the gland with scoring or unfolding of a glandular flap.6 When selecting implants it is also very important to consider the envelope’s characteristics. A lax envelope may need more implant projection to fill it. A simplified way of estimating envelope laxity is to do an anterior pull stretch test (APSS) according to the TEPID-system.7 By grabbing the areola tissue beside the nipple and pulling firmly (warn the patient before doing this procedure as it may be uncomfortable), the extensibility of the envelope can be measured. This will provide information on suitable implant projection. An alternative to this is to measure the nipple–inframammary fold distance on the relaxed tissue and maximum stretch and put this in relation to implant dimension (see LVC and N-ILP measurements below). Obviously the selected implant has to suit the characteristics of the gland and envelope in accordance with all tissue based planning systems.7,8 However, it should also be remembered that patient desires must be considered and for a patient with relatively lax tissue who desires a small augmentation, but needs a larger implant to fill the envelope an alternative is to combine a small augmentation with a mastopexy, which both takes patient desires and the envelope characteristics into consideration. Also, patients with very tight tissue could be treated with more projecting implants than the anterior pull test indicates as the tissue will expand over time (Fig. 24.3).
Operative Technique I: Selection of Adequate Implant Dimensions
Selection of ideal implant width
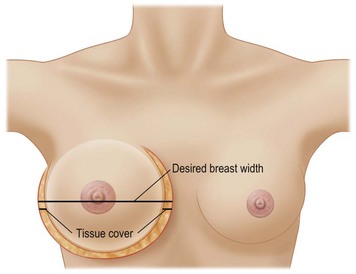
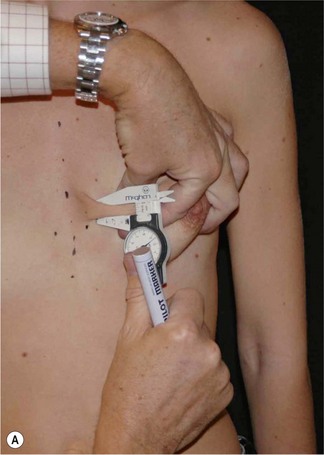
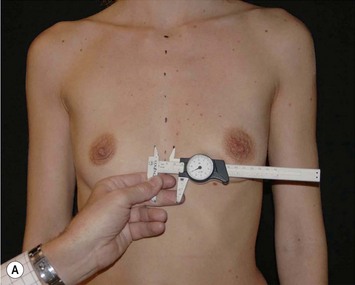
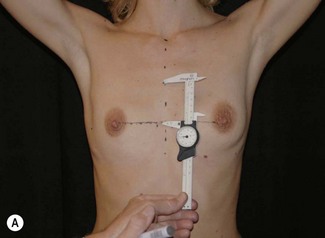
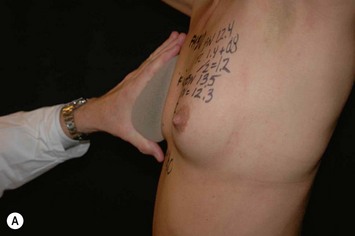
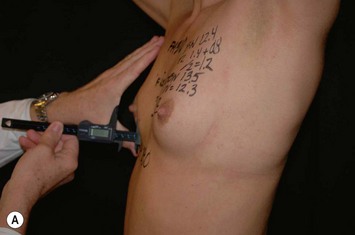
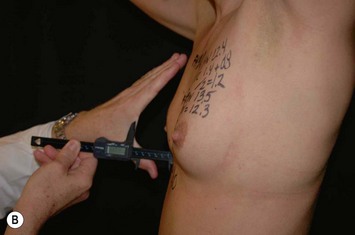
Having communicated with the patient and examined the biological prerequisites, the next step is the definition of the ideal implant dimension. The first and most important part of this is to define the ideal implant width. This is equal to the desired breast width minus the tissue cover on the implant (Fig. 24.4). Thus the medial and lateral thickness of tissue has to be examined. This is done at the height of the nipple–areola complex at the expected inner and lateral border of the implant (Fig. 24.5). Tissue cover is measured with a pinch and as a pinch of tissue is a double fold of skin and subcutaneous tissue, the measurement in the medial and lateral part of the breast should be divided by two when subtracting this number from the desired breast width. The desired breast width usually should leave an intermammary distance between 2 and 3 cm and the lateral protrusion of the breast should respect the anterior axillary line (Fig. 24.6). The distance between these two points can be measured with a caliper and the tissue cover, as mentioned according to the description above, is then subtracted for information about ideal implant width. The existing breast width should also be measured as implant selections that are considerably wider than the existing breast width should be avoided as it increases the risk for complications such as palpability and visibility of the implant.

Selection of implant height
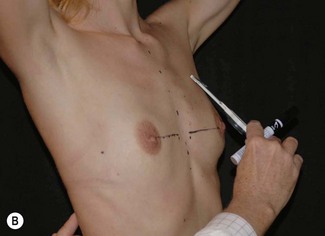
Having defined and communicated ideal implant width with the patient, the next step is to recommend a suitable implant height. It should be remembered that preoperative upper and lower pole appearance is of great importance for the implant height selection. For example, bulging upper thoraxes may be exaggerated by selection of full height implants whereas depressions in the upper thorax more favorably could be treated with full height implants. When selecting implant height it is important to measure and localize where the lower and upper pole of different implants will be located and compare this to how the upper pole shape is estimated to appear and how the implant correlates to the existing submammary fold and the lower pole appearance of the breast (Fig. 24.8). To be able to estimate where the upper and lower pole of different implants will be located during the consultation, the patient is asked to put her hands on top of her head. This 45° elevation of the arms above the horizontal plane is an accurate estimation of where the nipples will be positioned after a proportionate breast augmentation (see preoperative markings below). Knowing ideal implant width the height of different implants can easily be looked up in the manufacturers’ charts. Usually half of the implant height should be positioned above the nipple–areola complex after the augmentation and half below. Thus it is easy to measure above and below the nipple with the arms on top of the head to estimate how the upper and lower poles of the breast will appear with different implant heights.
Selection of adequate implant projection
This recommendation of the ideal footprint (height and width) or base plate of the implant obviously has no volume as it is only two-dimensional. The projection, the third dimension of the implant, will provide the final volume of the implant. Implant projection is highly dependent on patient desires, but remember to consider the envelope characteristics as loose envelopes may need more projection or a mastopexy. Also, patients with a contracted lower pole may have less risk for double bubble deformity if more projecting implants, for instance Allergan Style 510, are selected (Fig. 24.7). A good way of selecting implant projection is to communicate this with the patient standing in front of the mirror.
Indications
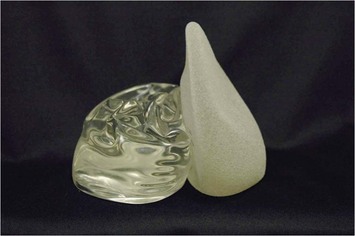
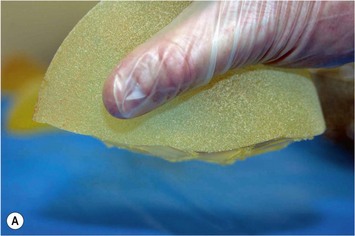
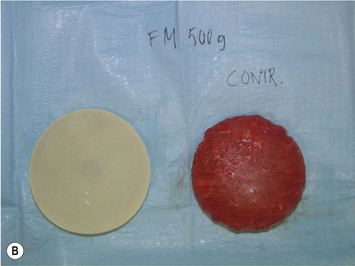
Form stable breast implants are considered more demanding and difficult to use. An obvious question is then why is there a need for them. The answer to this question is that form stable implants control the shape of the breast in a much better way, especially if we consider long-term effects of a breast augmentation. The high cohesive silicone gel breast implant retains its shape even if it is cut into two pieces and even if it is put under pressure (Fig. 24.9). On the other hand, relatively small forces are needed to deform a responsive low cohesive silicone gel implant. The clinical consequence of this is that a low cohesive silicone gel implant easily is deformed into a spherical shape during capsular contraction (Fig. 24.10). Contrary to this, capsular contraction on high cohesive silicone gel implants deforms implants much less. Clinically, this difference has been observed by the author in a number of cases. A textured shaped form stable implant should also be positioned into a snug fitting implant pocket and one implication of this is that it moves less in the cranial direction during capsular contraction compared to a round smooth implant which usually is massaged to retain a large implant pocket and softness. Thus circumferential shrinkage during capsular contracture moves a smooth walled implant in a large pocket more in the cranial direction (Fig. 24.11). Consequently, these benefits of form stable implants have improved the appearance and the control of the breast shape better and long-term follow up (>10 years) indicates good stability of results (Fig. 24.12). The use of shaped form stable implants constitutes a new era in breast augmentation surgery: The era of breast shaping and long-term customized control of breast shape versus the traditional breast volumetric filling or stuffing era. Obviously a prerequisite for controlled shaping of the breast is not only to have a form stable shaped implant, but also a wide variety of different implant shapes.

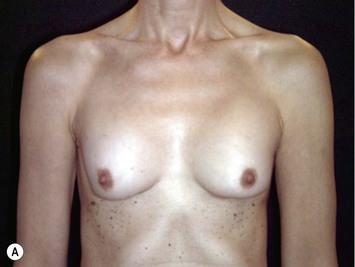
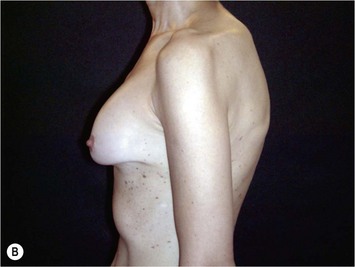

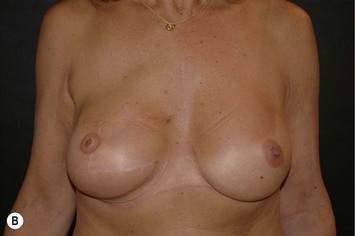
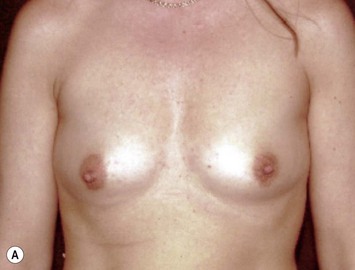
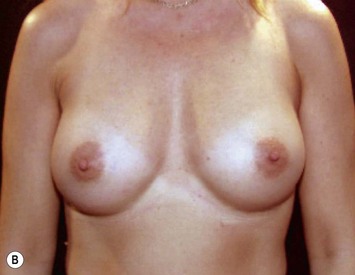
Other advantages relating to these devices have been reviewed elsewhere.9 Among these are that breast augmentation can be more customized than ever before and that the great variability of different implant shapes makes it possible to compensate for breast asymmetries. This is also a great advantage when it comes to breast reconstructive procedures where bilateral treatment with different sized implants (Fig. 24.13) and different shaped implants can provide a long-term stability of the results compared to unilateral implantation of a round, non-form stable device.10 High cohesive silicone gel also minimizes gel bleeding and leakage after a shell rupture and as the filler is form stable, irregularities such as fold and rippling are significantly less common.11 Capsular contracture rates have also been lower for form stable implants compared to implants filled with saline or regular low cohesive silicone gel.12 It is also likely that the form stable filler minimizes the envelope movements, and thus the wear of the envelope, giving better chances of low long-term risk for ruptures. This has also been clinically proven in long-term magnetic resonance imaging (MRI) evaluation of these devices.13 The rupture frequency has been as low as 0.3% after up to 9 years of implantation, and comparing this to other similar MRI studies on non-form stable breast implants these have shown that the risk for rupture has been considerably (3.5–17%) higher.14–17 Others have also confirmed the low rupture of Allergan form stable implants whereas other manufacturers’ form stable implants have not been confirmed to have this low incidence of ruptures.18,19
In spite of all these advantages several surgeons refrain from use of form stable implants. A common argument against is that patients are happy with the non-form stable devices provided. This is true as patients usually are happy even with inferior result, but this is no reason why we should refrain from doing our best to improve results. It is also claimed that non-form stable implants deform into an ‘anatomical’ shape when a patient is standing,20 which also is true if the device is underfilled with a low cohesive filler and if there is no capsular contraction (Fig. 24.14). However, during capsular contraction the implants become more round and artificial in their appearance (Fig. 24.10) and also the shaped ‘deformity’ of a round implant increase rippling and irregularities in the upper pole which is likely to increase the wear of the envelope. It is sometimes also claimed that form stable implants behave unnaturally on the chest wall giving unnatural appearance when the patient is lying on their back. This has not been our clinical experience as even these implants move laterally when the patient is lying on her back. The firmness and movement of the implant is more related to common and small degrees of capsular contraction not regarded as true Baker II deformities. These small degrees of capsular activity usually regarded as natural softness are relatively common and by the author regarded to be more important for the movement and firmness of the breast than the firmness of the implant itself.
To compare the results after implantation of shaped and round implants similar conditions have to be present. Thus, it is not possible to compare a patient with a subglandular shaped implant in a small breast to a submuscular round implant in a patient with a large breast and a large amount of tissue cover. Also the degree of capsular activity influences the appearance. However, if similar conditions are present relating to the position in relation to the muscle, the type of breast examined, the degree of capsular activity and the subcutaneous thickness, shaped implants produce more natural appearance in its upper pole compared to round ones. This is even more apparent when comparing round form stable implants to shaped form stable implants. Round form stable implants retain their upper pole shape and fullness more than round non-form stable implants (if no capsular contracture is present). Thus these devices give an extra rounded appearance in the upper pole, especially if they are highly projecting (example Allergan INSPIRA TSX models). There are patients who request this more artificial breast appearance and this is where round highly projecting form stable devices are better suited than shaped ones. Most patients, however, request a natural appearance of the breast and recent market research21 indicates that only 29% of patients have size as a primary request when seeking for a breast augmentation, 71% of patients have desires that relate to the shape of the breast as primary goals with their breast augmentation.
Operative technique summary
Preoperative planning
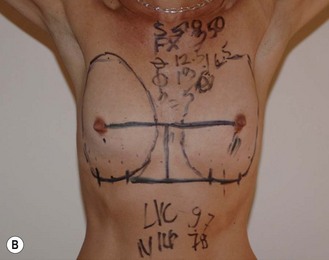
In breast augmentation surgery the vertical height of the implant on the thoracic wall should be adjusted to the nipple position. This is contrary to mastopexy augmentation cases where the nipple position is adjusted to the implant dimensions. Unfortunately, the planning of the implant position has often been relatively arbitrary, based on surgeons’ experience instead of careful analysis and measurements. Throughout the history of breast augmentation surgery many different preoperative markings and planning methods have been described; the majority of these are, however, not mathematical in spite of the fact that a breast implant has certain dimensions and proportions that can be calculated, measured and taken into consideration when performing preoperative markings. In 1994 the first form stable implant and the Biodimensional planning system by the McGhan Co. was introduced. However, this system, that recommended how to adjust the areola–inframammary fold distances in relation to implant base width, was not made on true mathematical calculations. This development initiated the author to develop the Akademikliniken system for mathematical planning in breast augmentation surgery and this is the first truly mathematical breast implant planning system described.2,22 This new preoperative planning system is especially important in difficult cases to calculate how to position the implant vertically on the chest wall and how to calculate amount of skin in the lower pole of the breast (Fig. 24.15). With this system two important questions should be answered. The first is how to calculate the ideal vertical implant position on the thoracic wall in relation to the nipple–areola complex. In the mid 1990s the author made some fundamental and important observations, not previously focused on in the plastic surgery literature. The first of these observations was that a correctly performed breast augmentation elevates the NAC. The second observation made was that if a line was drawn from the nipple to the fixed tissue along the sternum, this line (NS-line) could be used to illustrate the amount of nipple elevation achieved. Thirdly it was also observed that a preoperative arm elevation could be used to simulate the amount of nipple elevation achieved by the augmentation (Fig. 24.16). The elevation of the NAC is the result of increased projection and outward–upward rotation of the NAC. This elevation necessitated that the implant is placed correctly in the breast (Fig. 24.17). If the implant is placed too high no elevation is achieved and in fact a downward push and rotation of the NAC could be the result instead. In a careful clinical evaluation of several hundred augmentation patients it was found that nipple elevation could be accurately preoperatively simulated by an arm elevation 45° above the horizontal plane. Knowledge of the postoperative nipple position and marking of this with a horizontal NS-line could be used to calculate the ideal vertical implant position on the chest wall based on implant dimensions. According to the Akademikliniken method (or AK method) these so-called NS-ILP measurements are performed by elevation of the arms 45° above the horizontal plane (a simple way to achieve this is to ask the patient to clasp her hands on top of her head). A horizontal line is then drawn from the nipple to the fixed tissues in the midline along the sternum (NS-line). The arms are then lowered again and in the midline as much of the implant as desired to be distal to the nipple position is measured distally. Usually for a shaped form stable implant this is equal to half the height of the implant. At the distal end of this midline measurement a horizontal line is extended laterally. This horizontal line (ILP-line) indicates the implant’s lower pole. The NS-line and ILP-line are extremely valuable guidelines during the surgical procedure as they will guide the surgeon on how to position the lower pole of the implant and also to illustrate where the nipple will be located after the augmentation. Also, the NS-line is a valuable guideline when dividing the inferior origin of the pectoral muscle as the muscle division always should respect the NS-line and stay well distal to this line.


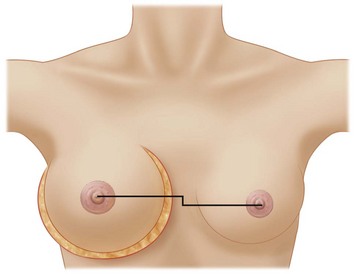
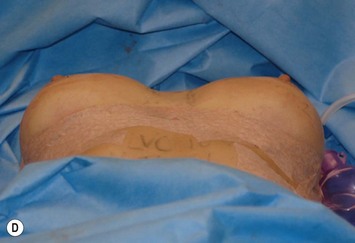
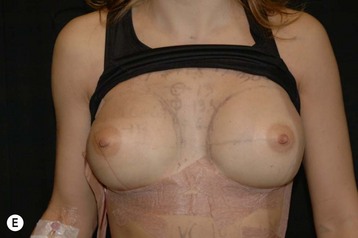
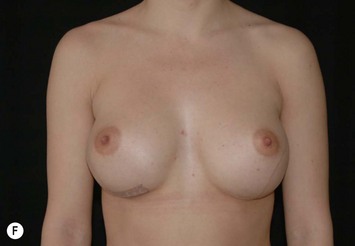
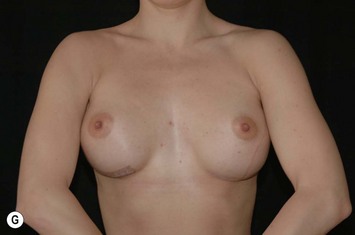
With the Akademikliniken preoperative planning system the second important question to answer during the preoperative markings is the calculation of ideal length of skin needed between the nipple and the new inframammary fold (Fig. 24.18). This distance is highly influenced by the width and the projection of the implant, but also by the amount of glandular tissue and when marking this distance on the breast the envelope characteristics also must be considered. It is amazing that we have been doing breast augmentation surgery for almost 40 years without considering the obvious fact that a wider based implant needs a longer nipple to inframammary fold distance and more projecting implants also need longer nipple to inframammary fold distance than lower projecting ones. Thus the new nipple to inframammary fold distance in relation to the selected implant is equal to the distance between the ideal nipple projection point on the implant’s ventral surface measured down to the implant’s lower border, the LVC. This distance could be measured on a piece of paper, but the LVC-values for Allergan’s different implants has also been calculated by the author and can be provided by the company or by communicating with the author. If a patient is completely flat this LVC-value is the only distance needed between the nipple and the new inframammary fold, but as most patients have a certain amount of glandular tissue this also has to be considered and additional length provided in relation to the amount of gland. The distance that has to be added to the LVC-value of the implant for the amount of covering tissue can be calculated in three different ways. The first and most accurate way to calculate is to measure the distance between the nipple and the previously marked ILP-line with the arms elevated on top of the head and from this distance subtracting half of the implant height. This means that we measure the difference between the convex side of the breast and the posterior side (equal to half the implant’s height). A second alternative to calculate additional length of skin needed for the amount of covering tissue is to measure a pinch at nipple level with a caliper and divide it by two. This is also relatively accurate, but not as accurate as the first alternative described above. A third way is just to approximate the amount of extra distance needed between the nipple and inframammary fold in relation to the amount of gland and for small breasts to add 0–1 cm, for moderate sized breasts add 1–1.5 cm and for larger sized breasts 1.5–2.5 cm.
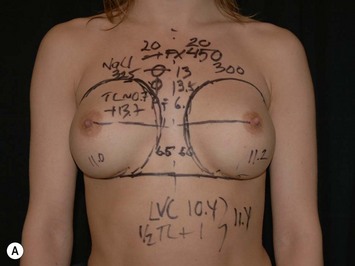
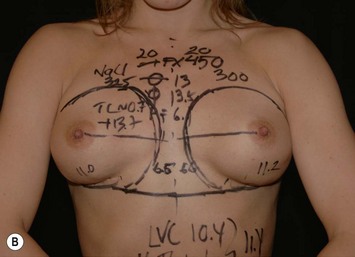
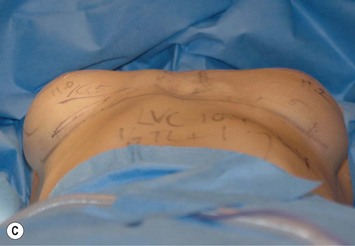
These measuring techniques are sometimes regarded as complicated in spite of the fact that the arithmetic is simple (Figs 24.19 and 24.20). However, these planning systems produce more predictability in the results and surgery also becomes faster. Reoperations related to poor implant positioning etc. can also be reduced.
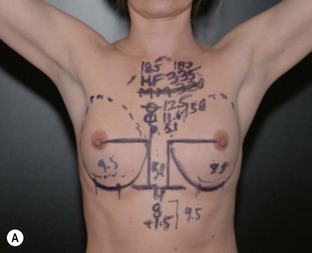
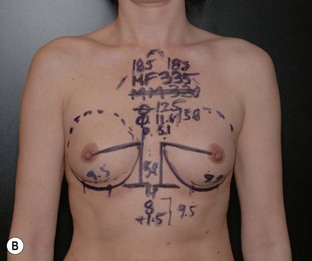
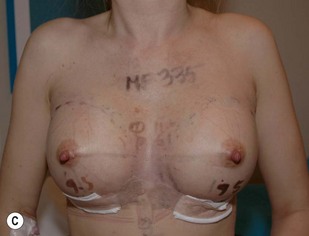
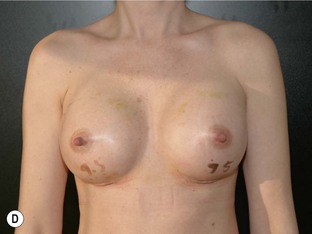
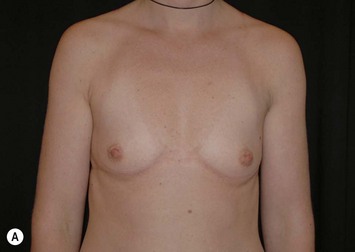
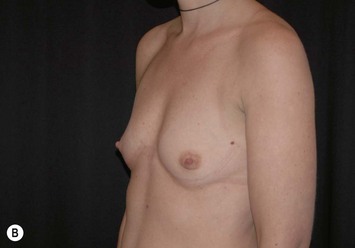
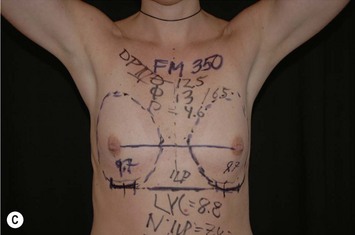
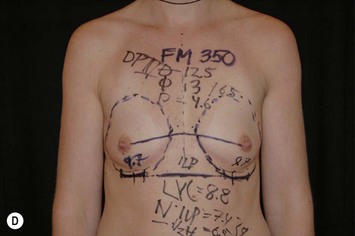
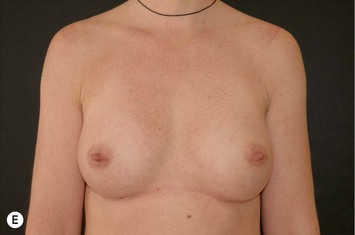
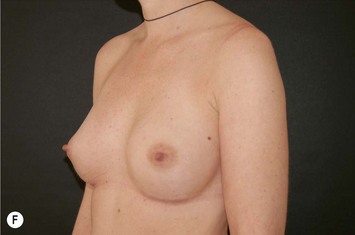
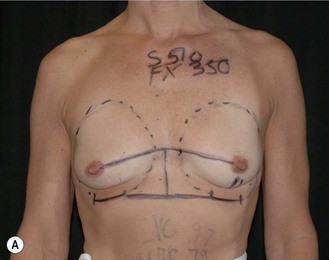
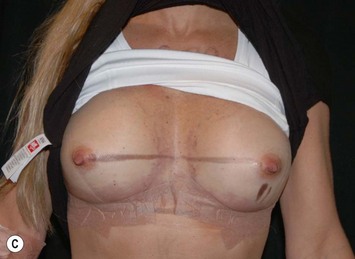
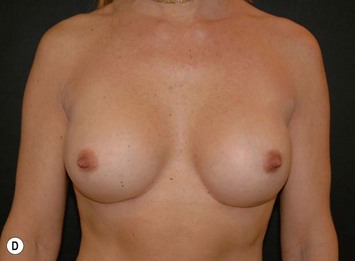
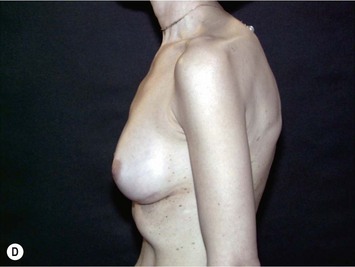
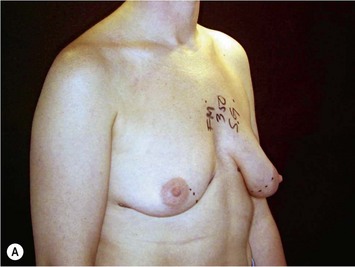
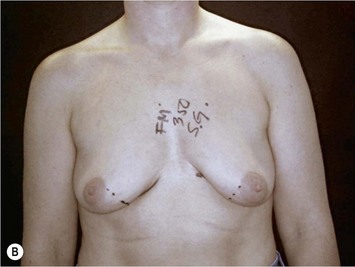
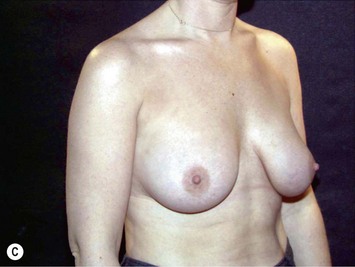
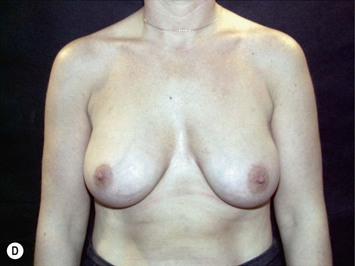
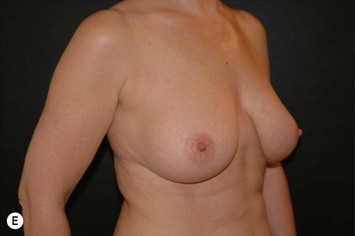
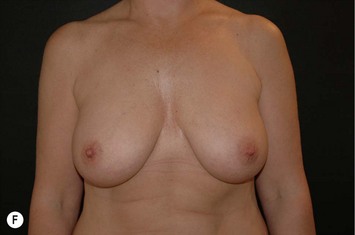
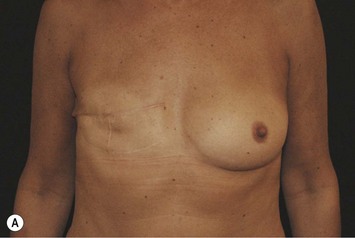
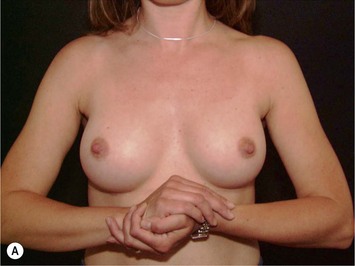
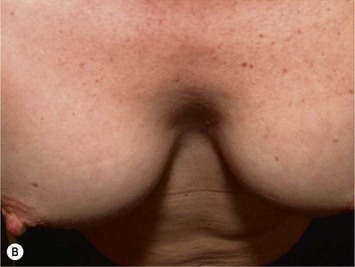
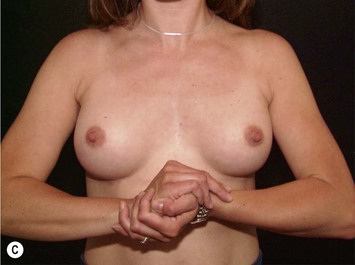
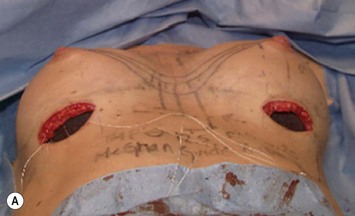
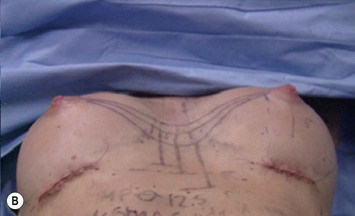
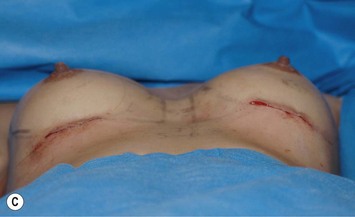
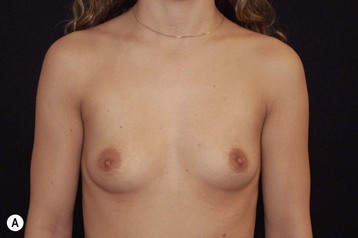
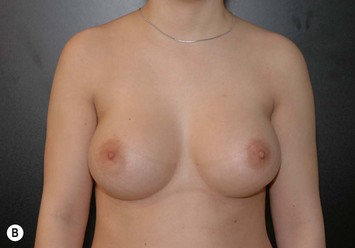
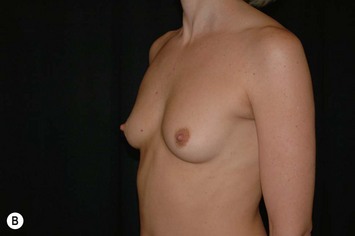
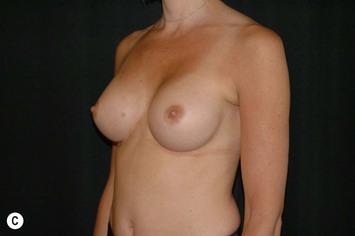
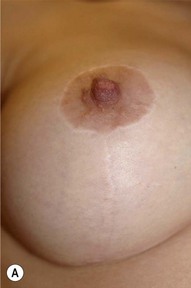
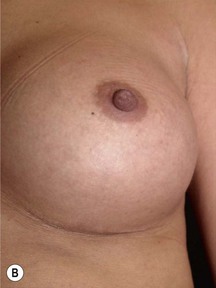
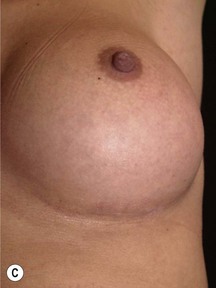
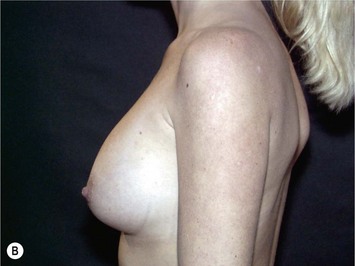
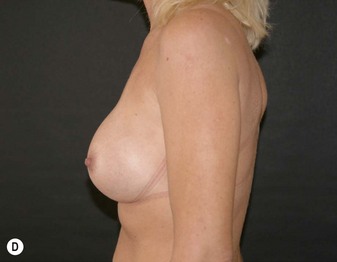
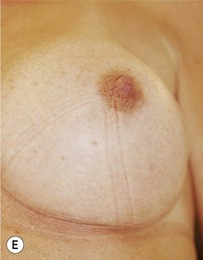
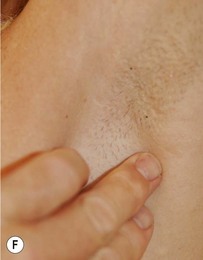
Fig. 24.20 A Preoperatively before markings AP view. B Oblique view. C Preoperatively markings with arms elevated on top of the head (marking technique description in Fig. 24.19). D Note shift of NS-line with arms hanging. E Six months postoperatively (Style 410 FM 350 g implant). F Oblique view 6 months postoperative.
Operative Technique II: Surgical Technique
The importance of a exact surgical technique when using shaped implants has been stressed in several publications.2,3,22
Implant position in relation to the pectoral muscle
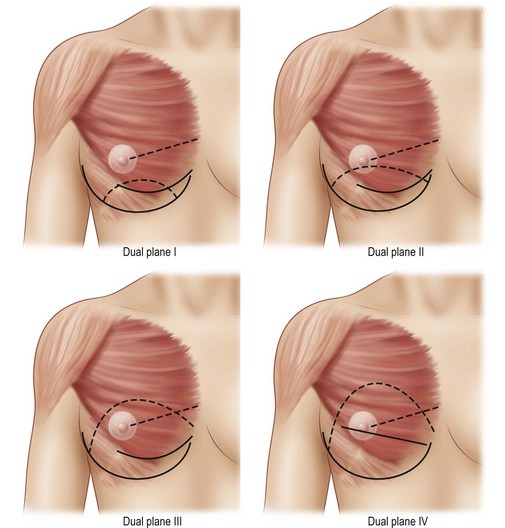
Before commencing the surgical procedure the position of the implant in relation to the pectoral muscle is decided. Of fundamental importance for this decision is to evaluate tissue cover at the upper border of the implant. A tissue pinch and measurements of the cover should be done prior to the procedure. If the tissue pinch is less than 2 cm then submuscular placement is always recommended. With less tissue cover, implant edge visibility, irregularities and rippling are more likely. Implants with more tapered edges such as the Allergan Style 510 implants perform better in the subglandular position than other types of implants if tissue cover is on the borderline of being too thin. A tissue pinch at the upper border of the implant of more than 4 cm usually coincides with large natural breasts and in these cases subfascial or subglandular placement may be recommended.23 With long-term aging, descent of large breasts is expected. With a subfascial or subglandular placement of the implant, the implant is more prone to descend together with the breast. In young patients with between 2–4 cm of upper border pinch, then submuscular implantation may still be advantageous to avoid problems with the long-term aging process. With the new submuscular dual plane techniques described in recent years, the benefits of subglandular implant positioning have been reduced and today the majority of implants are placed with some type of muscle cover in the décolletage area (the upper medial border of the breast). Dual plane positioning5,22,24 is possible with dual plane I–IV techniques (Fig. 24.21). This type of dissection minimizes animation of the breast during pectoralis muscle activity after a breast augmentation (Figs 24.17 and 24.22).

Incisional approach
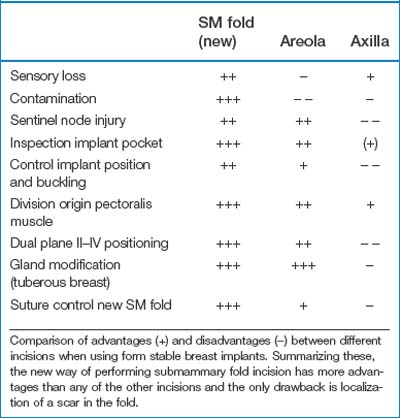
When using form stable implants a submammary fold approach is recommended for several reasons.2 This approach is however considerably different compared to the historical and traditionally used submammary fold incision. This new submammary fold incision is an exact calculation (as described above) of the position in relation to the implant’s dimensions and the amount of glandular tissue. Also the reinforcement and/or re-creation of the fold by suturing is an important part of this new way of performing submammary fold incisions (see description below). Historically the submammary fold incision has had a bad reputation as the resulting scar was not always placed exactly in the new fold. A scar located in the submammary fold is considerably less conspicuous than a scar located in the lower pole of the breast. The axillary, periareolar and new submammary fold incisions all have both advantages and disadvantages (Table 24.1). The new submammary fold approach has more advantages and is the incision of choice when using form stable implants.
The surgical procedure
Intravenous antibiotic infusion is administered 20 minutes before commencing the procedure. Gram-positive cocci are most important to cover and therefore 2 g of cloxacillin is the method of choice for the author. Also before commencing the surgery, local anesthetic infusion has several advantages, as it minimizes the depth of anesthesia and need for narcotic preparation during the procedure. It also minimizes preoperative bleeding and has a long-lasting pain reducing effect. It is interesting to observe that the pain reduction is longer lasting than the usual duration of the local anesthetics.25 We have found that this regimen speeds up recovery time significantly and the majority of patients leave the clinic within three hours after the procedure. Usually up to 80 ml of local anesthetic is used per breast (1/4% xylocaine with epinephrine 5 µg/ml). Infusion is done along the incision line and the fascia and intramuscularly at the border of where the implant is to be positioned.
Following this subglandular pocket dissection the muscle is divided. The lateral border of the pectoralis muscle is identified and elevated with a forceps off the chest wall. The height of the muscle division depends on which type of dual plane positioning is selected. In the dual plane II (Fig. 24.21A) and III the muscle is divided distally approximately 2 cm above the ILP-line (if the origin of the pectoralis major muscle extends to this level). Leaving 2–3 cm of muscle distally provides good conditions for suturing of Scarpa’s fascia of the incision to the chest wall at the end of the procedure. In the dual plane IV (Fig. 24.21B) technique the muscle is divided higher laterally, usually all the way up to the NAC. This provides a true subglandular placement in the lower pole. This is advantageous in tuberous breasts with poor tissue cover in the upper pole and in more ptotic breasts. Lifting the muscle off the chest wall facilitates the division with the electrocautery needle tip. It is important to divide the muscle parallel to the ribcage. The benefit of this is, first, that the lateral inferior fibers of the pectoralis muscle are weakened and this minimizes later animation during pectoralis muscle activity. Second, it minimizes the risk in entering into the intercostal muscles and causing a pneumothorax. This oblique muscle division is continued until the loose connective tissue below the pectoralis muscle is visualized. A retractor is inserted and the muscle is elevated. Sharp electrocautery dissection is preferred and blunt dissection should be avoided. A proactive hemostasis is used burning all small vessels before producing any bleeding. This type of dissection can usually be done with virtually no blood loss at all. Even small amounts of hematoma may contribute to development of capsular contracture.26
The benefit of this is that the risk for elevation of the lateral pectoralis minor fibers is minimized. Sweeping from the upper medial part of the pocket laterally enters in the space on top of the pectoralis minor. The only area of the dissection that may be blunt is in the area of the axilla to minimize sensory nerve disturbances in the NAC. The final step of the submuscular dissection is to horizontally divide the inferior medial origin of the pectoralis major muscle. It is easiest to do this from the deep side of the muscle until fat is visualized. Dissection along the sternum in a proximal direction should be minimized. Note that the nipple–sternum (NS) line previously marked always should be respected when doing this dissection. Usually the dissection stays well distal to this position. Dissection above or to the NS line has a high risk for postoperative inferior medial irregularities of the muscle during muscle contraction. During the dissection the loose connective tissue is left intact on the ribcage by dissecting with a Colorado tip deep to the pectoralis muscle (Fig. 24.23). This loose connective tissue contains lymph and blood vessels and is protective minimizing the risk for seroma and postoperative pain. The size of the pocket usually extends the width of the implant with 0.5 cm medially and laterally, but proximally the pocket is 1–2 cm longer than the implant to provide good draping of the upper pole. The lateral subglandular dissection and type of muscle division described provides good retraction of the lateral border of the pectoral muscle and minimizes animation during pectoralis muscle activity. Only a moderate widening of the intermammary space is seen in the majority of cases during muscle tightening. As bleeding or exudation through drains with this technique is negligible, usually drains could be avoided. However, in secondary breast augmentations drains are usually used.
Implantation
It is recommended to minimize contamination of the implant during implantation. Contamination of the implant surface may produce a biofilm and contribute to development of capsular contracture.27 To minimize contamination several steps are vital: as previously mentioned prophylactic antibiotics should be administered intravenously before the start of the procedure. The submammary fold incision minimizes contamination of Staphylococcus epidermidis known to exist in the gland of the breast. To further minimize contamination a protective adhesive tape on the nipple during the procedure is recommended (Tegaderm). Irrigation of the implant pocket with Betadine or antibiotic solution has also been recommended.28,29 During implantation the so-called ‘no-touch technique’ is also another step in minimizing implant contamination. The no-touch technique involves glove change to powder free gloves and placement of a clean drape below the breast. When the package of the implant is opened it is only touched by the surgeon and implanted directly with care in an incision that is large enough to minimize the manipulation of the implant. Too small an incision may also create a fracture and irregularity of the form stable gel. Some type of lubrication such as Betadine or saline solution on the implant surface further facilitates implantation. If a shaped implant is inserted at 90° where the top of the implant first is rotated into the pocket this also facilitates implantation. When the marking dots along the vertical axis of the implant are seen at the lower border of the breast and half of the implant is in place in the implant pocket, pushing the left, right and deep side of the implant usually easily positions the implant in the correct place. Before finalizing the procedure the implant border should be carefully palpated to see that it fits snugly into the implant pocket without irregularities and folds and that the vertical axis of the implant is correctly positioned. Finally, the lower pole of the implant is positioned along the previously marked ILP-line.
Incision closure
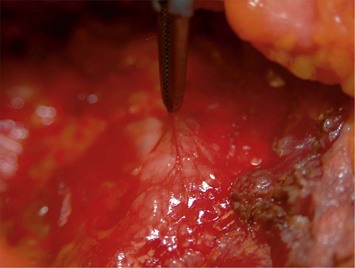
An important step of the procedure is the re-creation of the submammary fold. This is especially true when the submammary fold is lowered or other situations where the ILP-line and incisions are not at the same level. A strong grip into the thoracic fascia with a 3-0 or 2-0 Monocryl suture along the ILP-line and the lower border of the implant is taken (Fig. 24.24). A horizontal grip at the supra-Scarpal fascia level of the incision (above and below) is placed. Usually a middle stitch is first inserted and left untied, followed by a lateral and medial closure of the wound in a similar fashion. With these three deep sutures the incision is pulled down to the new submammary fold. This deep closure is followed by deep dermal relaxing stitches in a ridge fashion. These ridging sutures take a good grip of the dermis far away from the wound edges and are positioned deeper in the dermis at the wound edge. When these stitches are tied a very strong relaxation of the deep dermis is achieved and a ridging appearance of the incision is noted. This is finally followed by a subcuticular running stitch, also in a ridged fashion, to provide good long-term relaxation of the scar. Usually Monocryl 3-0 is used in all layers of the closure.
Pitfalls and How to Correct
With the introduction of form stable shaped and round implants breast augmentation surgery has entered into a new era. With this we have been forced to be more analytical and exact in our implant selection and preoperative planning taking not only patient desires but also the biological prerequisites into consideration (Figs 24.25–24.28). The surgical technique is also much more precise. This new era is more demanding and has a steeper learning curve, but on the other hand it has increased the predictability and speed of breast augmentation procedures. The need for preoperative sizers is virtually non-existent because the planning is so precise and much more accurate. This has also resulted in very favorable and long-term stable results with higher patient satisfaction and a reduced risk for rupture and reoperations. Even if this is not the globally predominant technique in breast augmentation today it is the author’s belief that this new era represents the future in breast augmentation surgery.
Between December 1995 and July 2008, 10,120 form stable high cohesive silicone gel implants were inserted at Akademikliniken. Throughout this period the number of form stable shaped implants has increased from 20% to more than 90% of cases performed. Most of the implants inserted were the Allergan Style 410 implants, but in recent years growing numbers of Allergan Style 510 have also been inserted (Fig. 24.30).
Our earlier results using shaped form stable implants were published in Clinics of Plastic Surgery 2001,2 and with these early results the reoperation frequency was 5%. Long term this reoperation frequency has increased to 11% as calculated per patient and most of these were related to inability to control capsular formation (6% capsular contraction and non-adhesion including rotation).
Rotation may be seen in primary augmentation surgery and this may be related to poor surgical technique with overdissection of the implant pocket; thus the surgical technique for use of form stable implants has to differ compared to use of non-form stable implants (see Surgical technique above). Rotation has however in our experience been uncommon and accounts for 0.42%2 to 0.7%30 of reoperations. The texturization of the envelope should have a pore size of >300 µm to allow tissue in-growth and fixation.31,32 Without fixation to surrounding tissues the risk for rotational problems increase. Texturization also minimizes capsular contracture.33–38
To minimize the risk for rotational problems in secondary cases it is recommended that a new implant pocket be made. Smooth-walled implant pockets do not permit tissue ingrowth into the texturing of the implant. The creation of a neosubmuscular pocket was described by the author in the late 1990s and this is a good way to treat complications such as rotation, descent, poor animation during pectoralis activity, etc. (Figs 24.11, 24.17 and 24.29). The capsule is then exposed and followed proximally without removal of the old implant. The dissection is carried on as far as possible until it becomes technically difficult, the implant is then removed and the capsule stretched distally with vessel clamps and the dissection is carried out between the capsule and the muscle until the appropriate pocket is created. The incision in the capsule is closed and the anterior capsule is left behind as the posterior wall in the new implant pocket. Secondary cases should always be drained when using form stable implants.


Postoperative Care
Modern surgical techniques have dramatically improved the recovery after breast augmentation surgery and it is generally accepted that a 24 hour recovery period is feasible.39 To speed up the recovery the postoperative regimen is also of importance. A sports bra is kept around the abdomen during the procedure and after dressing of the wounds (Micropore tape, 3M Co.), the sports bra is put in place on the breast as the only supportive garment. In the recovery room arm movement is encouraged and the patients are asked to put their hands on top of the head as soon as they wake up. This muscle stretching minimizes postoperative pain according to the experience of the author. This type of muscle stretching and movement is performed once or twice per hour during the first postoperative day. Within 24 hours most patients resume normal activity, but are instructed to minimize too vigorous activity as this may increase seroma formation. Patients are allowed to shower the day after the surgery with surgical tape on the wound. Patients are also instructed to avoid exercise that produces sweating during the first 3 postoperative weeks. After three weeks patients can resume gym activities but should avoid bouncing movements such as trampoline jumping, horseback riding and jogging. Bouncing movement may be negative for tissue ingrowth into the implant surface. Non-adhesion of the implant has been noted in 0.7% of patients.30 It is not known how long tissue ingrowth or fixation of the implant takes to occur, but this process is expected to be finalized at 3 months, possibly sooner. During the first 3 months patients are also instructed to minimize excessive scar tension. Movement that puts perpendicular strain on the wound, for instance the tennis serve movement, may increase scar widening. Patients are also instructed to keep Micropore tape on their scars for 6 months. The tape is changed at the first follow up 1 week after the procedure and the ends of the subcuticular running Monocryl stitches are cut at the skin surface. The surgical tape could be left in place during showers and normal daily activity but usually it starts to peel off after 1–2 weeks and is then changed after washing and drying of the scar followed by reapplying new tape. This regimen minimizes the risk for widening of the scar and also helps it to mature.
With the suture technique and postoperative regimen described it has been noted that 94.5% of the patients have an inconspicuous scar (Figs 24.29 and 24.30) less than 1 mm wide located at the fold both with arms lowered and elevated on top of the head. 3.1% of patients have an atrophic, slightly widened scar and 1.6% of patients have a scar that is wider than 2 mm, but still atrophic, 0.8% had a tendency for hypertrophy.13
1 McGeorge DD, Mahdi S, Tsekouras A. Breast reconstruction with anatomical expanders and implants: our early experience. Br J Plast Surg. 1996;49(6):352-357.
2 Hedén P, Jernbeck J, Hober M. Breast augmentation with anatomical cohesive gel implants: the world’s largest current experience. Clin Plast Surg. 2001;28(3):531-552.
3 Tebbetts JB. Use of anatomic breast implants: ten essentials. Aesth Surg J. 1998;18(5):377-384.
4 Tebbetts JB. Patient evaluation, operative planning, and surgical techniques to increase control and reduce morbidity and reoperations in breast augmentation. Clin Plast Surg. 2001;28(3):501-521.
5 Tebbetts JB. Dual plane breast augmentation: optimizing implant-soft-tissue relationships in a wide range of breast types. Plast Reconstr Surg. 2001;107(5):1255-1272.
6 Puckett CL, Concannon MJ. Augmenting the narrow-based breast: the unfurling technique to prevent the double-bubble deformity. Aesth Plast Surg. 1990;14(1):15-19.
7 Tebbetts JB. A system for breast implant selection based on patient tissue characteristics and implant-soft tissue dynamics. Plast Reconstr Surg. 2002;109(4):1396-1409.
8 Tebbetts JB, Adams WP. Five critical decisions in breast augmentation using five measurements in 5 minutes: the high five decision support process. Plast Reconstr Surg. 2006;118(S1):35S-45S.
9 Spear SL, Hedén P. Allergan’s silicone gel breast implants. Expert Rev Med Devices. 2007;4(5):699-708.
10 Kroll SS, Evans GR, Reece GP. Comparison of resource costs between implant-based and TRAM flap breast reconstruction. Plast Reconstr Surg. 1996;97(2):364-372.
11 Panettiere P, Marchetti L, Accorsi D. Soft cohesive silicone gel breast prostheses: a comparative prospective study of aesthetic results versus lower cohesivity silicone gel prostheses. J Plast Reconstr Aesth Surg. 2007;60(5):482-489.
12 Kulmala I, McLaughlin JK, Pakkanen M, et al. Local complications after cosmetic breast implant surgery in Finland. Ann Plast Surg. 2004;53(5):413-419.
13 Hedén P, Bone B, Murphy DK, Slicton A, Walker PS. Style 410 cohesive silicone breast implants: safety and effectiveness at 5 to 9 years after implantation. Plast Reconstr Surg. 2006;118(6):1281-1287.
14 Collis N, Litherland J, Enion D, Sharpe DT. Magnetic resonance imaging and explantation investigation of long-term silicone gel implant integrity. Plast Reconstr Surg. 2007;120(5):1401-1406.
15 Hedén P, Nava MB, van Tetering JP, et al. Prevalence of rupture in Inamed silicone breast implants. Plast Reconstr Surg. 2006;118(2):303-308.
16 Holmich LR, Friis S, Fryzek JP, et al. Incidence of silicone breast implant rupture. Arch Surg. 2003;138(7):801-806.
17 Spear SL, Murphy DK, Slicton A, Walker PS. Inamed silicone breast implant core study results at 6 years. Plast Reconstr Surg. 2007;120(S1):8S-16S.
18 Bengtson BP, Van Natta BW, Murphy DK. Style 410 highly cohesive silicone breast implant core study results at 3 years. Plast Reconstr Surg. 2007;120(S1):40S-48S.
19 Cunningham B. The Mentor Study on Contour Profile Gel Silicone MemoryGel Breast Implants. Plast Reconstr Surg. 2007;120(S1):33S-39S.
20 Nipshagen MD, Beekman WH, Esmé DL, de Becker J. Anatomically shaped breast prosthesis in vivo: a change of dimension? Aesth Plast Surg. 2007;31(5):540-543.
21 Allergan Co. Breast implant market research data, 2007.
22 Hedén P. Breast augmentation with anatomical, high-cohesive silicon gel implant. In: Spear SL, editor. Surgery of the breast: principles and art. 2nd ed. Philadelphia: Lippincott Williams & Wilkins; 2006:1344-1367.
23 Graf RM, Bernardes A, Rippel R, et al. Subfascial breast implant: a new procedure. Plast Reconstr Surg. 2003;111(2):904-908.
24 Spear SL, Carter JC, Ganz JC. The correction of capsular contracture by conversion to ‘dual-plane’ positioning: technique and outcomes. Plast Reconstr Surg. 2003;112(2):456-466.
25 Metaxotos NG, Asplund O, Hayes M. The efficacy of bupivacaine with adrenaline in reducing pain and bleeding associated with breast reduction: a prospective trial. Br J Plast Surg. 1999;52(4):290-293.
26 Handel N, Cordray T, Gutierrez J, Jensen JA. A long-term study of outcomes, complications, and patient satisfaction with breast implants. Plast Reconstr Surg. 2006;117:757.
27 Pajkos A, Deva AK, Vickery K, et al. Detection of subclinical infection in significant breast implant capsules. Plast Reconstr Surg. 2003;111(5):1605-1611.
28 Adams WPJr, Conner WC, Barton FEJr, Rohrich RJ. Optimizing breast pocket irrigation: an in vitro study and clinical implications. Plast Reconstr Surg. 2000;105(1):334-338.
29 Adams WPJr, Conner WC, Barton FEJr, Rohrich RJ. Optimizing breast-pocket irrigation: the post-betadine era. Plast Reconstr Surg. 2001;107(6):1596-1601.
30 Hedén P. Safety and performance of the Style 410 cohesive silicone breast implants in a cohort of over 4000 women. In preparation.
31 Danino A, Rocher F, Blanchet-Bourdon C, Revol M, Servant JM. A scanning electron microscopy study of the surface of porous-textured breast implants and their capsules. Description of the ‘velcro’ effect of porous-textured breast prostheses. Ann Chir Plast Esthet. 2001;46(1):23-30.
32 Danino AM, Basmacioglu P, Saito S, et al. Comparison of the capsular response to the Biocell RTV and Mentor 1600 Siltex breast implant surface texturing: a scanning electron microscopic study. Plast Reconstr Surg. 2001;108(7):2047-2052.
33 Barnsley GP, Sigurdson LJ, Barnsley SE, et al. Textured surface breast implants in the prevention of capsular contracture among breast augmentation patients: a meta-analysis of randomized controlled trials. Plast Reconstr Surg. 2006;117(7):2182-2190.
34 Burkhardt BR, Demas CP. The effect of Siltex texturing and povidone-iodine irrigation on capsular contracture around saline inflatable breast implants. Plast Reconstr Surg. 1994;93(1):123-128.
35 Burkhardt BR, Eades E. The effect of Biocell texturing and povidone-iodine irrigation on capsular contracture around saline-inflatable breast implants. Plast Reconstr Surg. 1995;96(6):1317-1325.
36 Collis N, Coleman D, Foo IT, Sharpe DT. Ten-year review of a prospective randomized controlled trial of textured versus smooth subglandular silicone gel breast implants. Plast Reconstr Surg. 2000;106(4):786-791.
37 Hakelius L, Ohlsen L. Tendency to capsular contracture around smooth and textured gel-filled silicone mammary implants: a five-year follow-up. Plast Reconstr Surg. 1997;100(6):1566-1569.
38 Wickman M, Jurell G. Low capsular contraction rate after primary and secondary breast reconstruction with a textured expander prosthesis. Plast Reconstr Surg. 1997;99(3):692-697.
39 Tebbetts JB. Achieving a predictable 24-hour return to normal activities after breast augmentation: Part II. Patient preparation, refined surgical techniques, and instrumentation. Plast Reconstr Surg. 2002;109(1):293-305.
40 Hedén P. Plastic Surgery and You. Stockholm: Silander and Fromholtz Publishing; 2001.
[/level-membership-for-plastic-reconstructive-surgery-category][not-level-membership-for-plastic-reconstructive-surgery-category]
CHAPTER 24 Form Stable Shaped High Cohesive Gel Implants
Summary/Key Points
Introduction
With the introduction of shaped textured implants surgeons started to think in terms of shape and dimensions rather than volume and cup size.1 In order to fully exploit the opportunity for creation of a natural breast shape offered by the shaped devices, careful attention must be given to the surgical techniques of pocket dissection and implant placement for shaped devices.2–5
In the last decade much of the discussions in the plastic surgery literature has focused on the difference between shaped and round implants, however, a much greater divergence relates to the use of form stable versus non-form stable implants (Fig. 24.1). Basically most aspects of such breast augmentations are different. The way of selecting implants is different. Patient preoperative markings, surgical techniques and postoperative recommendations and results also differ. These are not just new type implants, they represent a new concept in breast augmentation surgery. Surgeons who believe that form stable implants behave in the same way as non-form stable implants will tend to plan, select implants and perform surgery in traditional ways. Unfortunately, they are bound to encounter significantly more complications and problems.
Patient and Implant Selection
Ever since silicone breast implants were introduced in the early 1960s implant selection has been a relatively arbitrary process where the surgeon has estimated the volume of the implant in relation to patients’ desires and biological prerequisites based on his own experience. As form stable implants cannot be deformed (Fig. 24.2) dimensional planning and implant selection is necessary. Instead of estimating an appropriate volume the ideal dimensions of the implant are calculated.
Definition of Patient Desires
The general information about breast augmentation surgery can be conveyed in many different ways and well educated patient coordinators and/or in the written form and a patient information book have proved extremely useful.28 A full size mirror in the doctor’s office is also an extremely important part of the consultation process as the dimension and proportions of the expected result can be demonstrated for the patient by displacing the breast medially and laterally, showing expected borders of the new breast and showing projection of different implants. To use sizers in a sports bra should not be part of the consultation in the first stages but final testing with suitable sizer in a sports bra can be a good way to create final trust in the implant selection for the patient.
Examination of the Breast Tissue and its Envelope
As breast asymmetries are extremely common but not always noted by patients, these smaller asymmetries should be noted and pointed out to the patient. The characteristics and distribution of the glandular tissue should be examined as it has implications on implant selection. A patient with a dense, relatively constricted gland and short nipple inframammary fold distance has increased risk for a double bubble deformity in the lower pole and they may do better with a more projecting implant and shorter implant heights. The surgeon may also need to modify the gland with scoring or unfolding of a glandular flap.6 When selecting implants it is also very important to consider the envelope’s characteristics. A lax envelope may need more implant projection to fill it. A simplified way of estimating envelope laxity is to do an anterior pull stretch test (APSS) according to the TEPID-system.7 By grabbing the areola tissue beside the nipple and pulling firmly (warn the patient before doing this procedure as it may be uncomfortable), the extensibility of the envelope can be measured. This will provide information on suitable implant projection. An alternative to this is to measure the nipple–inframammary fold distance on the relaxed tissue and maximum stretch and put this in relation to implant dimension (see LVC and N-ILP measurements below). Obviously the selected implant has to suit the characteristics of the gland and envelope in accordance with all tissue based planning systems.7,8 However, it should also be remembered that patient desires must be considered and for a patient with relatively lax tissue who desires a small augmentation, but needs a larger implant to fill the envelope an alternative is to combine a small augmentation with a mastopexy, which both takes patient desires and the envelope characteristics into consideration. Also, patients with very tight tissue could be treated with more projecting implants than the anterior pull test indicates as the tissue will expand over time (Fig. 24.3).
Operative Technique I: Selection of Adequate Implant Dimensions
Selection of ideal implant width
Having communicated with the patient and examined the biological prerequisites, the next step is the definition of the ideal implant dimension. The first and most important part of this is to define the ideal implant width. This is equal to the desired breast width minus the tissue cover on the implant (Fig. 24.4). Thus the medial and lateral thickness of tissue has to be examined. This is done at the height of the nipple–areola complex at the expected inner and lateral border of the implant (Fig. 24.5). Tissue cover is measured with a pinch and as a pinch of tissue is a double fold of skin and subcutaneous tissue, the measurement in the medial and lateral part of the breast should be divided by two when subtracting this number from the desired breast width. The desired breast width usually should leave an intermammary distance between 2 and 3 cm and the lateral protrusion of the breast should respect the anterior axillary line (Fig. 24.6). The distance between these two points can be measured with a caliper and the tissue cover, as mentioned according to the description above, is then subtracted for information about ideal implant width. The existing breast width should also be measured as implant selections that are considerably wider than the existing breast width should be avoided as it increases the risk for complications such as palpability and visibility of the implant.
Selection of implant height
Having defined and communicated ideal implant width with the patient, the next step is to recommend a suitable implant height. It should be remembered that preoperative upper and lower pole appearance is of great importance for the implant height selection. For example, bulging upper thoraxes may be exaggerated by selection of full height implants whereas depressions in the upper thorax more favorably could be treated with full height implants. When selecting implant height it is important to measure and localize where the lower and upper pole of different implants will be located and compare this to how the upper pole shape is estimated to appear and how the implant correlates to the existing submammary fold and the lower pole appearance of the breast (Fig. 24.8). To be able to estimate where the upper and lower pole of different implants will be located during the consultation, the patient is asked to put her hands on top of her head. This 45° elevation of the arms above the horizontal plane is an accurate estimation of where the nipples will be positioned after a proportionate breast augmentation (see preoperative markings below). Knowing ideal implant width the height of different implants can easily be looked up in the manufacturers’ charts. Usually half of the implant height should be positioned above the nipple–areola complex after the augmentation and half below. Thus it is easy to measure above and below the nipple with the arms on top of the head to estimate how the upper and lower poles of the breast will appear with different implant heights.
Selection of adequate implant projection
This recommendation of the ideal footprint (height and width) or base plate of the implant obviously has no volume as it is only two-dimensional. The projection, the third dimension of the implant, will provide the final volume of the implant. Implant projection is highly dependent on patient desires, but remember to consider the envelope characteristics as loose envelopes may need more projection or a mastopexy. Also, patients with a contracted lower pole may have less risk for double bubble deformity if more projecting implants, for instance Allergan Style 510, are selected (Fig. 24.7). A good way of selecting implant projection is to communicate this with the patient standing in front of the mirror.
Indications
Form stable breast implants are considered more demanding and difficult to use. An obvious question is then why is there a need for them. The answer to this question is that form stable implants control the shape of the breast in a much better way, especially if we consider long-term effects of a breast augmentation. The high cohesive silicone gel breast implant retains its shape even if it is cut into two pieces and even if it is put under pressure (Fig. 24.9). On the other hand, relatively small forces are needed to deform a responsive low cohesive silicone gel implant. The clinical consequence of this is that a low cohesive silicone gel implant easily is deformed into a spherical shape during capsular contraction (Fig. 24.10). Contrary to this, capsular contraction on high cohesive silicone gel implants deforms implants much less. Clinically, this difference has been observed by the author in a number of cases. A textured shaped form stable implant should also be positioned into a snug fitting implant pocket and one implication of this is that it moves less in the cranial direction during capsular contraction compared to a round smooth implant which usually is massaged to retain a large implant pocket and softness. Thus circumferential shrinkage during capsular contracture moves a smooth walled implant in a large pocket more in the cranial direction (Fig. 24.11). Consequently, these benefits of form stable implants have improved the appearance and the control of the breast shape better and long-term follow up (>10 years) indicates good stability of results (Fig. 24.12). The use of shaped form stable implants constitutes a new era in breast augmentation surgery: The era of breast shaping and long-term customized control of breast shape versus the traditional breast volumetric filling or stuffing era. Obviously a prerequisite for controlled shaping of the breast is not only to have a form stable shaped implant, but also a wide variety of different implant shapes.
Other advantages relating to these devices have been reviewed elsewhere.9 Among these are that breast augmentation can be more customized than ever before and that the great variability of different implant shapes makes it possible to compensate for breast asymmetries. This is also a great advantage when it comes to breast reconstructive procedures where bilateral treatment with different sized implants (Fig. 24.13) and different shaped implants can provide a long-term stability of the results compared to unilateral implantation of a round, non-form stable device.10 High cohesive silicone gel also minimizes gel bleeding and leakage after a shell rupture and as the filler is form stable, irregularities such as fold and rippling are significantly less common.11 Capsular contracture rates have also been lower for form stable implants compared to implants filled with saline or regular low cohesive silicone gel.12 It is also likely that the form stable filler minimizes the envelope movements, and thus the wear of the envelope, giving better chances of low long-term risk for ruptures. This has also been clinically proven in long-term magnetic resonance imaging (MRI) evaluation of these devices.13 The rupture frequency has been as low as 0.3% after up to 9 years of implantation, and comparing this to other similar MRI studies on non-form stable breast implants these have shown that the risk for rupture has been considerably (3.5–17%) higher.14–17 Others have also confirmed the low rupture of Allergan form stable implants whereas other manufacturers’ form stable implants have not been confirmed to have this low incidence of ruptures.18,19
In spite of all these advantages several surgeons refrain from use of form stable implants. A common argument against is that patients are happy with the non-form stable devices provided. This is true as patients usually are happy even with inferior result, but this is no reason why we should refrain from doing our best to improve results. It is also claimed that non-form stable implants deform into an ‘anatomical’ shape when a patient is standing,20 which also is true if the device is underfilled with a low cohesive filler and if there is no capsular contraction (Fig. 24.14). However, during capsular contraction the implants become more round and artificial in their appearance (Fig. 24.10) and also the shaped ‘deformity’ of a round implant increase rippling and irregularities in the upper pole which is likely to increase the wear of the envelope. It is sometimes also claimed that form stable implants behave unnaturally on the chest wall giving unnatural appearance when the patient is lying on their back. This has not been our clinical experience as even these implants move laterally when the patient is lying on her back. The firmness and movement of the implant is more related to common and small degrees of capsular contraction not regarded as true Baker II deformities. These small degrees of capsular activity usually regarded as natural softness are relatively common and by the author regarded to be more important for the movement and firmness of the breast than the firmness of the implant itself.
[/not-level-membership-for-plastic-reconstructive-surgery-category]
