[level-membership-for-emergency-medicine-category]22
Foot Problems and Care
Disorders
Treatment
1. Cut an oval hole in the middle of a rectangular piece of moleskin or Molefoam the size of the hot spot. Center this over the affected area and secure it in place, making sure that the sticky surface is not on inflamed skin (Fig. 22-1). Reinforce adhesion of the moleskin or Molefoam with tape or a piece of nonwoven adhesive knit dressing.
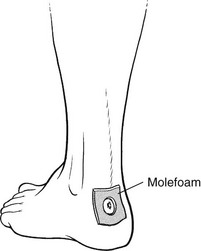
FIGURE 22-1 Hot spot treated with Molefoam.
2. If moleskin or Molefoam is not available, place a piece of tape over the hot spot, provided that it will not rub or slide. Moleskin may be improvised from the cuff of a sweatshirt or flannel shirt and Molefoam from a piece of padding from a backpack shoulder strap or hip belt. The improvised moleskin can be secured in place with cyanoacrylate “superglue,” Dermabond, or other tissue glue.
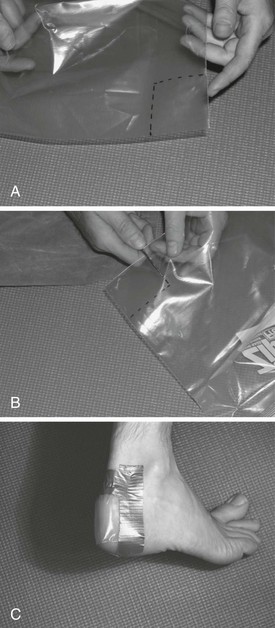
3. If available, apply a Blist-O-Ban bandage or improvised friction relief bandage (Fig. 22-2) directly to the hot spot.
Blisters
Treatment
1. If the blister is small and still intact, do not puncture or drain it.
2. Place a piece of moleskin or Molefoam, with a hole cut out slightly larger than the blister, over the site. Make sure it is thick enough to keep footwear from rubbing against the blister (similar to hot spot treatment; see Fig. 22-1). Additional layers may be required. Secure this with tape.
3. If the blister is large but still intact, gently clean the skin, then aspirate fluid from the blister using a needle and syringe. Alternatively, the blister can be punctured with a clean needle or safety pin at its base and fluid massaged out of the bleb.
4. Debride any dead, stiff, or necrotic skin using scissors.
5. Clean the area with an antiseptic or with soap and water.
6. Apply antiseptic ointment or aloe vera gel, and cover with a nonadherent dressing.
a. An excellent dressing for a blister is Spenco 2nd Skin. Made from an inert, breathable gel of 4% polyethylene oxide and 96% water, it absorbs anything oozing from the wound, helps prevent infection, relieves pain, and reduces further friction. It comes packaged between two sheets of cellophane. First, remove the cellophane from the gooey side and place the dressing against the blister. Once it adheres to the skin surface, remove the cellophane from the outside surface. Secure the dressing in place with the adhesive knit bandage that comes with the product. Replace the entire dressing daily.
b. Other excellent dressings for blisters are Spyroflex, Compeed’s hydrocolloid dressing, and Elasto-Gel.
7. Place a piece of Molefoam, with a hole cut out slightly larger than the blister, around the site. Secure this with tape or a piece of nonwoven adhesive knit dressing. Benzoin applied to the skin around the blister site will help hold the Molefoam in place.
8. When supplies are limited, improvise by draining the fluid from the blister with a pin or knife and injecting a small amount of a superglue or benzoin into the evacuated space. This may be very painful initially.
Improvised Blister Management
1. To dress a blister without moleskin, Molefoam, or other commercial blister dressing, improvise with a piece of duct tape. Duct tape’s smooth outer surface provides protection from friction, while its adhesive side adheres strongly to skin.
2. A sandwich bag can be used to improvise another type of blister dressing. It somewhat simulates the Blist-O-Ban bandage. The smooth, gliding surface of the bag helps to stop friction and reduce development of hot spots and blisters. Create this bandage by cutting off the corner of a sandwich bag, and apply a lubricant between the two surfaces. Secure the piece of bag to the blister site with tape or glue (see Fig. 22-2).
3. One can improvise a blister dressing from a piece of gauze, antibacterial ointment, and water.
a. Moisten the gauze with water.
b. Squeeze out any excess water, then smear the ointment onto both sides of the gauze. Apply this to the blister.
4. A small square of silk can be glued to the heel or other pressure point.
5. Methyl acrylate–based glue can be used to repair skin fissures.
Prevention
1. Make sure that footwear fits properly. A shoe that is too tight causes pressure sores; one that is too loose leads to friction blisters.
2. Wear a thin liner sock (synthetic materials like acrylic are better than cotton) under a heavier one. The liner will promote wicking of moisture, and friction will then occur between the socks instead of between footwear and skin.
3. Dry feet regularly, and use foot powder.
4. Keep toenails short and beveled downward to reduce the incidence of subungual hematomas. Before a big event, consider having a professional pedicure at least a week before the planned outing, allowing time for manipulations to the epidermis and cuticles to heal, to prevent potential bacterial entry and infection on the trail.
5. Carry a foot care kit (Box 22-1).
6. Apply moleskin to sensitive areas where blisters typically occur before hot spots develop.
7. Petroleum jelly or a gauze pad, covered by duct tape, is a reliable method of preventing blisters.
8. Duct tape placed on the inner lining of shoes decreases friction between the sock and shoe.
Subungual Hematoma
Treatment
Subungual hematomas need be drained only if they cause pain.
1. Hold an 18-gauge needle perpendicular to the proximal nail bed over the area of greatest fullness (Fig. 22-3).
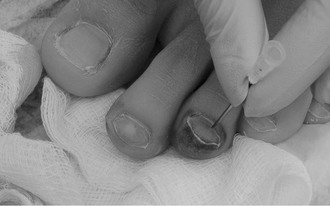
FIGURE 22-3 A subungual hematoma about to be drained with an 18-gauge hypodermic needle. (Courtesy Brandee Waite, MD.)
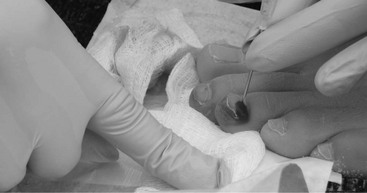
2. With gentle downward pressure, hold the needle between the thumb and first finger. Twirl the needle back and forth between the thumb and finger to drill through the nail, releasing the hematoma (Fig. 22-4).
3. Another method is to heat one end of the wire of a paper clip and use this to burn a hole through the nail. The release of blood under pressure through the hole may be dramatic, causing it to squirt, so use appropriate universal precautions.
[/level-membership-for-emergency-medicine-category][not-level-membership-for-emergency-medicine-category]22
Foot Problems and Care
Disorders
Treatment
1. Cut an oval hole in the middle of a rectangular piece of moleskin or Molefoam the size of the hot spot. Center this over the affected area and secure it in place, making sure that the sticky surface is not on inflamed skin (Fig. 22-1). Reinforce adhesion of the moleskin or Molefoam with tape or a piece of nonwoven adhesive knit dressing.
FIGURE 22-1 Hot spot treated with Molefoam.
2. If moleskin or Molefoam is not available, place a piece of tape over the hot spot, provided that it will not rub or slide. Moleskin may be improvised from the cuff of a sweatshirt or flannel shirt and Molefoam from a piece of padding from a backpack shoulder strap or hip belt. The improvised moleskin can be secured in place with cyanoacrylate “superglue,” Dermabond, or other tissue glue.
3. If available, apply a Blist-O-Ban bandage or improvised friction relief bandage (Fig. 22-2) directly to the hot spot.
Blisters
Treatment
1. If the blister is small and still intact, do not puncture or drain it.
2. Place a piece of moleskin or Molefoam, with a hole cut out slightly larger than the blister, over the site. Make sure it is thick enough to keep footwear from rubbing against the blister (similar to hot spot treatment; see Fig. 22-1). Additional layers may be required. Secure this with tape.
3. If the blister is large but still intact, gently clean the skin, then aspirate fluid from the blister using a needle and syringe. Alternatively, the blister can be punctured with a clean needle or safety pin at its base and fluid massaged out of the bleb.
4. Debride any dead, stiff, or necrotic skin using scissors.
5. Clean the area with an antiseptic or with soap and water.
[/not-level-membership-for-emergency-medicine-category]
