5 Foot and Ankle Injuries
Ankle Sprains
Ankle sprains are common injuries in active individuals, with an estimated incidence of 61 ankle sprains per 10,000 persons each year (Maffulli and Ferran 2008). They are the most common injury sustained by high school and collegiate athletes, accounting for up to 30% of sports injuries (Hass et al. 2010). An age of 10 to 19 years old is associated with higher rates of ankle sprains. Half of all ankle sprains occur during athletic activity. Although most of these injuries respond well to conservative therapy, chronic instability and dysfunction are known risks. In a study of 202 elite track and field athletes with lateral ankle sprains, Malliaropoulos et al. (2009) found that 18% sustained a second sprain within 24 months; low-grade acute ankle sprains (grade I or II) resulted in a higher risk of reinjury than high-grade (grade III) sprains. Because of the potential for reinjury and chronic dysfunction and the importance of a normally functioning ankle in active people, it is important that ankle sprains be managed correctly with a thorough rehabilitation and reconditioning program.
Relevant Anatomy
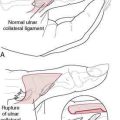
The ankle, or talocrural joint, is a junction of the tibia, fibula, and talus (Fig. 5-1). The anterior talofibular ligament (ATFL), calcaneofibular ligament (CFL), and posterior talofibular ligament (PTFL) provide static support to the joint laterally (Fig. 5-2A), whereas the deltoid ligament complex (DLC), made up of the anterior and posterior tibiotalar ligaments, the tibiocalcaneal ligament, and the tibionavicular ligament, provides medial support (Fig. 5-2B). The inferior anterior and posterior tibiofibular ligaments and the interosseous membrane provide additional support for the talocrural joint (Fig. 5-2C and D).

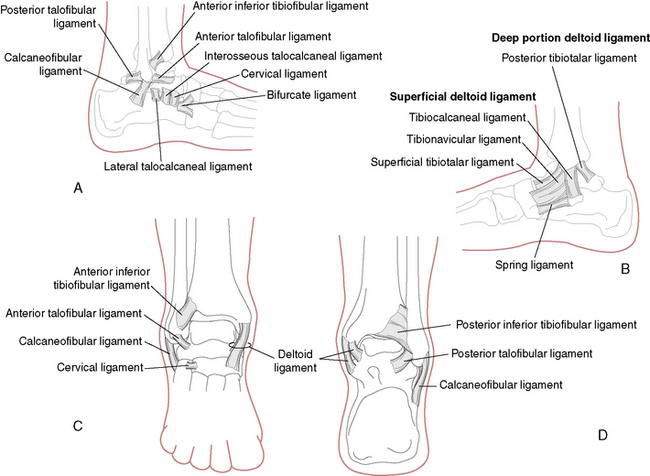
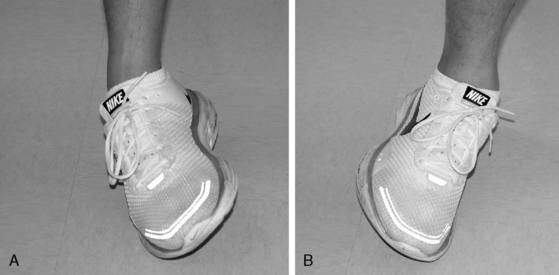
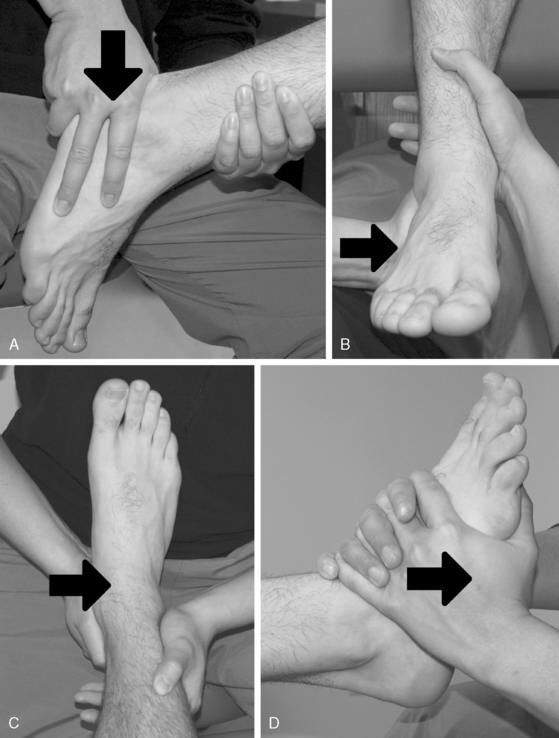
The ATFL is the most commonly injured ligament, followed by the CFL. The CFL is usually injured in combination with the ATFL. Sprains to both the ATFL and CFL are a result of a combined inversion and plantarflexion mechanism (Fig. 5-3A). A less likely mechanism of eversion may cause injury to the DLC (Fig. 5-3B). Injury to the anterior and posterior tibiofibular ligaments (syndesmosis) and the interosseous membrane are discussed later in this chapter.
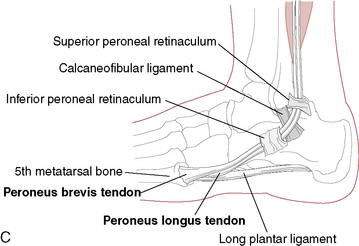
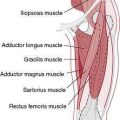
The muscles that attach to and act upon the foot provide dynamic control of the ankle. The peroneal muscle group, composed of the peroneus brevis, longus, and tertius muscles, is of significant importance because they are responsible for everting the ankle and, therefore, resisting inversion (Fig. 5-3C). Because there are no muscles that attach directly to the talus, motion of the talus is dictated by foot and ankle position. The most stable position of the ankle is in dorsiflexion. As the foot moves into dorsiflexion, the talus glides posteriorly and the widest portion of the talus becomes wedged into the ankle mortise. As the ankle moves into plantarflexion, the talus glides anteriorly and the ankle becomes less stable, which is why most ankle sprains involve some degree of plantarflexion as the mechanism.
Classification of Ankle Sprains
Diagnosis
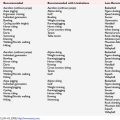
It is only through a thorough examination that the severity of an ankle sprain can be established (Table 5-1). Detailed information on conducting a thorough examination of the ankle is beyond the scope of this text; however, common signs and symptoms associated with each grade of lateral ankle sprain are listed in Table 5-2. The examiner must also be aware of additional injuries that can occur with ankle sprains. Such injuries include, but are not limited to, avulsion fractures, fractures, muscle and tendon strains, articular cartilage damage of the ankle mortise, and tarsal subluxations and dislocations. Although some of these injuries (such as muscle strains) can be adequately treated with the following standard treatment protocol, others (such as articular cartilage damage) may require revisions of the standard treatment protocol for ankle sprains.
Table 5-1 Examination of the Ankle After an Inversion Injury
| Palpation of the Lateral Collaterals (Anterior Talofibular Ligament and Calcaneofibular Ligament) |
| Medial palpation of the deltoid ligament |
| Palpation of the proximal fibula close to the knee to rule out a Maisonneuve fracture (tearing of the interosseous membrane and proximal fibula fracture) |
| Squeeze test to rule out ankle syndesmosis tearing with resultant ankle mortise instability |
| External rotation (Cotton) test to test for syndesmosis injury |
| Palpation of the proximal (base) fifth metatarsal to rule out avulsion fracture from peroneus brevis pull |
| Anterior Drawer and Inversion (Talar Tilt) Stress Testing |
| Motor testing of posterior tibial (inversion) and peroneal tendons (eversion) |
Table 5-2 Clinical Signs and Symptoms Associated with Ankle Sprains
| Grade I | Grade II | Grade III |
|---|---|---|
| Stretching of ligaments, usually the ATFL Point tenderness Limited dysfunction No laxity Able to bear full weight Little to no edema |
Partial tearing of ligaments, usually the ATFL and CFL Point and diffuse tenderness Moderate dysfunction Slight to moderate laxity Antalgic gait and pain with FWB, may need supportive device to ambulate Mild to moderate edema |
Substantial tearing of ligaments, may involve the PTFL in addition to the ATFL and CFL Point and diffuse tenderness Moderate to severe dysfunction Moderate to severe laxity Limited to no ability for FWB without supportive device Severe edema |
ATFL, anterior talofibular ligament; CFL, calcaneofibular ligament; FWB, full weightbearing; PTFL, posterior talofibular ligament.
Treatment and Rehabilitation Protocol for Acute Ankle Sprain
Without ignoring where the injury is in the healing process, the clinician should progressively manage the patient’s signs and symptoms, functional limitations, and impairments instead of solely focusing on the number of days since the injury. Table 5-3 lists the common signs and symptoms associated with each stage of tissue healing. Changes in the signs and symptoms, in addition to the number of days postinjury, can help the clinician determine when to progress the patient’s treatment and rehabilitation program.
Table 5-3 Clinical Signs and Symptoms Associated with the Stages of Tissue Healing
| Acute Stage | Subacute Stage | Maturation Stage |
|---|---|---|
| Pain at rest, ⇑ w/ activity TTP ⇑ swelling Heat Protective guarding and muscle spasm Loss of function* Restricted and painful ROM Laxity w/ stress tests* |
⇓ pain, TTP, swelling, heat ⇓ spasm and guarding ⇑ function ⇑ ROM w/ ⇓ pain ⇓ laxity w/ stress tests* |
No s/s of inflammation ⇑ function ⇑ ROM |
⇑, increased; TTP, tenderness to palpation; ROM, range of motion; ⇓, decreased; s/s, signs and symptoms.
* Presence and amount depend on severity of sprain.
The steps in treating and rehabilitating ankle sprains typically follow this progression:
While the rehabilitation program is progressing through these steps that focus on the injured ankle, it is important to maintain overall strength and conditioning for the rest of the body. Rehabilitation Protocol 5-1 provides an outline of the ankle sprain rehabilitation protocol described here.
REHABILITATION PROTOCOL 5-1 Ankle Sprain Rehabilitation
Lateral Ankle Sprain
Acute Phase
Goal: Protect from further injury
Goal: Encourage tissue healing
Goal: Limit pain, swelling, spasm
Goal: Maintain function of noninjured tissues
Subacute Phase
Goal: Minimize pain and inflammation
Goal: Restore range of motion and flexibility
Goal: Re-establish neuromuscular control and restore muscular strength and endurance
Goal: Re-establish proprioception, agility, and coordination
Maturation Phase:
Goal: Restore ROM and flexibility
Goal: Improve muscular strength, endurance, and power
Goal: Improve proprioception, agility, and coordination
Goal: Restore functional/sports-specific skills
Acute Stage: Goals and Interventions After Ankle Sprain
During the acute phase the primary goals of the rehabilitation program are as follows:
Goal A: Protect the Injured Tissues from Further Injury
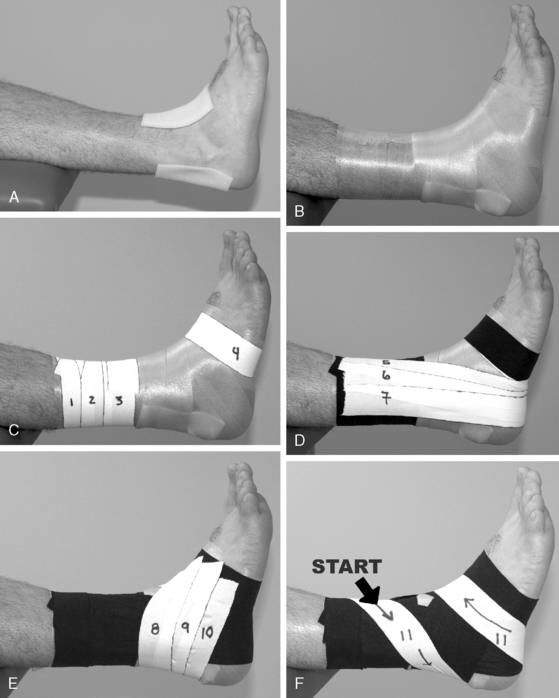
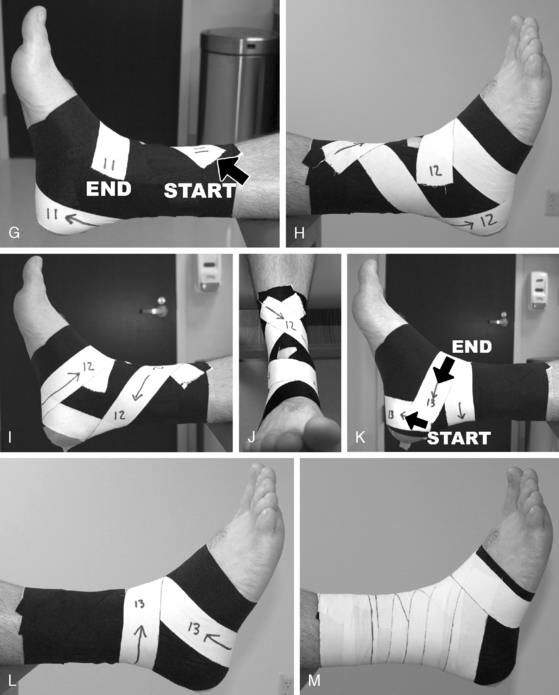
Protection with splinting, bracing, taping (Fig. 5-4 A–M), or wrapping the injured ankle may be necessary, especially in grade II or III sprains. A systematic review (Kerkhoffs et al. 2001) concluded that lace-up supports were most effective, that taping was associated with skin irritation and was no better than semi-rigid supports, and that elastic bandages were the least effective form of stabilization.
Patients with grade II or III sprains also may need supportive devices such as crutches, a walking cane, or a walking boot to move about. Although there has long been debate as to whether or not to immobilize sprained ankles or omit immobilization and immediately begin a “functional treatment” plan, current practices are to use a functional treatment plan, especially when managing grades I and II sprains. A functional treatment plan limits immobilization and encourages pain-free activities that do not overstress the injured ligaments. Functional rehabilitation has been shown to be associated with more frequent return to sports and higher rates of patient satisfaction than immobilization (Kerkhoffs et al. 2001). If the patient’s ankle is to be immobilized, it should be noted that long periods of immobilization may lead to prolonged joint stiffness and contractures, weakening of noninjured ligaments, and muscle atrophy.
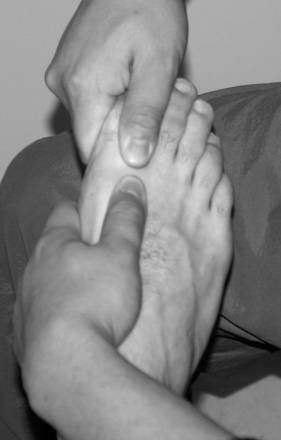
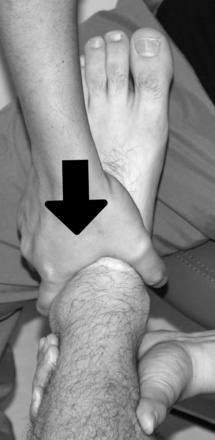
Goal C: Limit Pain, Swelling, and Spasm
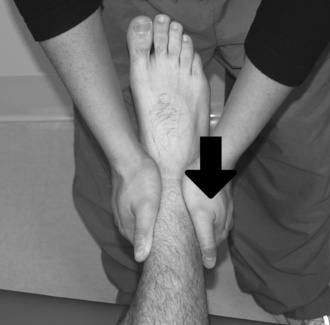
Grade I joint mobilization techniques to the talus can also be used to minimize pain in the ankle joint. Performing a joint mobilization technique to the distal tibiofibular joint often provides pain relief when a “positional fault” is present. An anterior positional fault of the distal fibula is often seen in patients with a lateral ankle sprain. Applying a posterior mobilizing force to the distal fibula may help correct the anterior positional fault (Fig. 5-5).
Goal D: Maintain Function of Noninjured Tissues
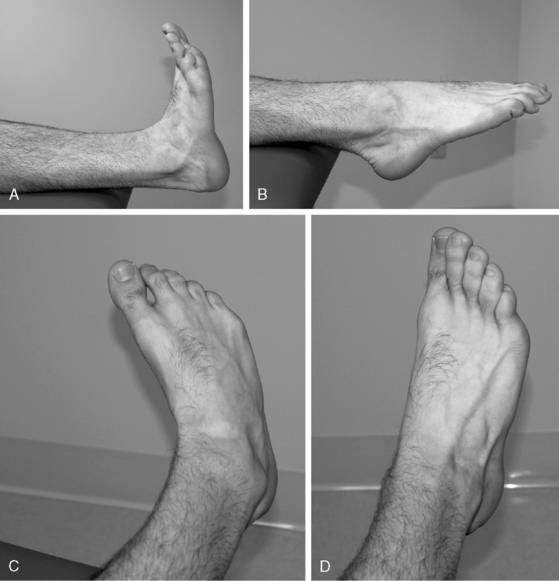
Figure 5-6 Active range of motion (AROM). A, Dorsiflexion. B, Plantarflexion. C, Inversion. D, Eversion.
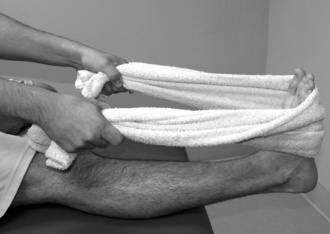
It is especially important to perform these types of activities if the patient is placed in a cast, splint, or walking boot or if the patient is using crutches or a cane. Prolonged use of these assistive and protective devices can result in disuse of healthy tissues around the ankle. If the patient is immobilized, placed in a walking boot, or prevented from full weightbearing (FWB) ambulation for a period, the metatarsophalangeal (MTP) joints should also be treated with some form of mobilization activities (joint mobilizations, PROM, AAROM, AROM, stretches) (Fig. 5-9). At times, patients may be hesitant to attempt partial weightbearing (PWB) or FWB, general mobility exercises, or stretching activities, even though they have been cleared to do so. In this situation, the use of cryokinetics may be warranted. One way to include cryokinetics is to place the injured ankle in a cold whirlpool bath for 15 to 20 minutes or until it becomes “numb.” While the ankle is numb, the patient can begin to increase the weightbearing on the ankle, stretch, or perform general mobility exercises. This allows the patient to perform the appropriate activities in a pain-free state.
Subacute Stage: Goals and Interventions
During the subacute phase the primary goals are as follows:
Goal G: Minimize Pain and Inflammation
Continued use of therapeutic modalities is warranted at this time. As the initial signs and symptoms of acute inflammation diminish, thermotherapy techniques such as warm whirlpools and hot packs should be introduced. Thermotherapy techniques help to reduce pain, spasm, and subacute inflammation. Therapeutic ultrasound may also be used at this time, progressing from pulsed to continuous duty cycles. Continuous ultrasound also assists with pain relief, tissue healing, and reduction of subacute edema. The continued use of electrical stimulation can assist with minimizing pain and inflammation. It is still wise to continue cryotherapy, especially after activity, to reduce pain and limit inflammation. Although the goal is to minimize pain and inflammation, it should be noted that an increase in pain or inflammation, especially after the acute stage, often is a sign that the injured structures are not ready for the activity being performed. If the patient experiences an increase in pain, inflammation, or both, he or she should be re-evaluated to ensure there is no worsening of the injury and the rehabilitation protocol should be slowed until the pain and inflammation are under control. Grades I and II joint mobilizations are also indicated at this time to assist with pain control (Fig. 5-10).
Goal I: Restore Range of Motion and Flexibility
The general mobility and ROM exercises that were begun in the acute stage are continued. As the subacute stage progresses, so should the sets and reps of the exercises, the degree of motion performed, and the intensity of the stretches. The patient should be encouraged to perform ROM exercises and stretches several times throughout the day. Initially, dorsiflexion and limited plantarflexion should be emphasized. Pedaling on a stationary bike can help with both plantarflexion and dorsiflexion. If not done in the acute stage, the use of PROM or AAROM should be replaced by AROM. Use of a BAPS or wobble board can be introduced, first in a NWB position before progressing to PWB then FWB position (Fig. 5-11). The patient should be instructed to perform the motions in a slow and controlled manner at all times. The patient should begin with dorsiflexion, plantarflexion, and eversion before incorporating inversion, then progress to circling the board while touching all sides of the board in both clockwise and counterclockwise directions. With all of the stretches and ROM activities, the patient is instructed to gradually increase the ROM, taking extra caution with plantarflexion and inversion or other motions that cause pain. Inversion with plantarflexion should be introduced and progressed as tolerated. Cryokinetics are still indicated in the early portion of the subacute phase and can be used until the patient has little to no discomfort with the activities. Progressing from grade II to grade III joint mobilizations can be used for decreased ROM caused by altered arthrokinematics and positional faults to the fibula and talus (Fig. 5-12). Caution must be taken, however, when performing an anterior mobilization technique of the talus in a patient with a grade II or III lateral ligament sprain because an anterior movement of the talus stresses the anterior talofibular ligament and mimics the movement of the talus that occurred with the plantarflexion and inversion mechanism of injury. Because the talus subluxes anteriorly in a sprain caused by plantarflexion and inversion, a posterior mobilization to the talus may be more appropriate (see Fig. 5-10). Massage, myofascial release, and other manual therapy techniques to treat soft tissue restrictions may also help restore ROM, flexibility, and tissue mobility.
Goal J: Re-Establish Neuromuscular Control and Restore Muscular Strength and Endurance
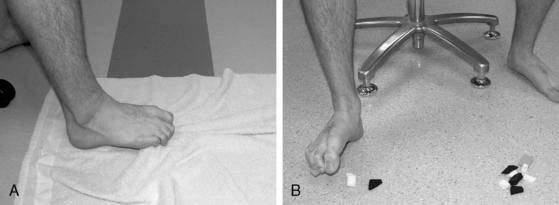
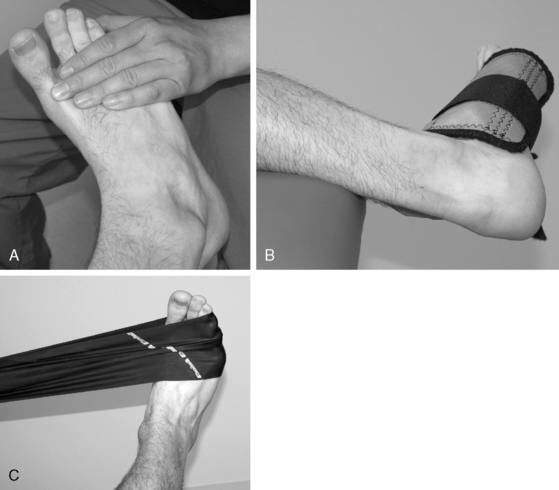
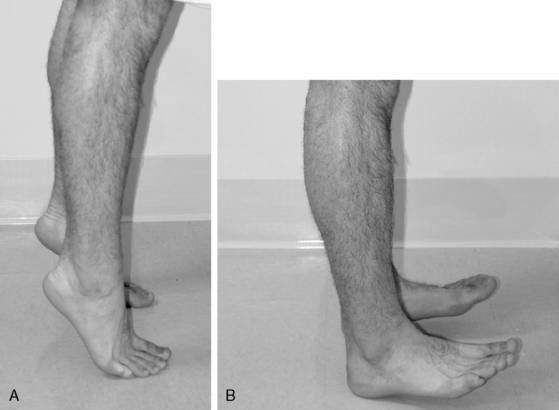
Towel curls and marble pick-ups were included with the general mobility exercises in the acute stage; however, they also can be used to strengthen the intrinsic muscles of the foot (see Fig. 5-8). Patients can begin isometric exercises in a neutral ankle position against plantarflexion, dorsiflexion, inversion, and eversion forces. Because strength gains related to isometric exercises only strengthen the muscle at that length, it is important to progress to performing isometrics in a variety of degrees within a ROM, but painful ROM should be avoided. Isometric exercises should begin with submaximal contractions and progress to maximal contractions. Isometric exercises should be progressed to isotonic exercises as tolerated. Resistance can be provided manually, with cuff weights or elastic bands or cords (Fig. 5-13). Isotonic exercises should begin with a limited ROM and progress to full ROM as tolerated and should progress from submaximal resistance to maximal efforts. As weightbearing becomes tolerated, heel and toe raises can be incorporated as can walking on the heels or toes (Fig. 5-14). As the patient’s pain-free ROM increases, proprioceptive neuromuscular facilitation (PNF) techniques can be used.
Goal K: Re-Establish Proprioception, Agility, and Coordination
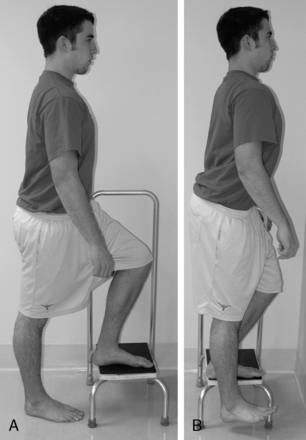
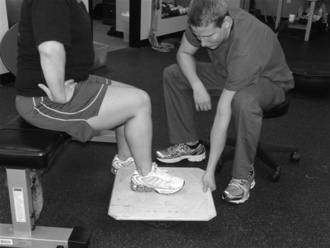
In the early phase of proprioception training, the patient may need to perform unloaded exercises such as joint repositioning if PWB or FWB are contraindicated or poorly tolerated. The patient should progress to PWB and FWB exercises as tolerated. Early exercises to encourage loading of the ankle include “weight shifts” in various directions. With weight shifts, the patient stands with his or her weight shifted to the noninjured leg, then progressively shifts the weight onto the injured leg before returning to the NWB position. This process is repeated for a prescribed number of sets. The patient should progressively shift more of his or her weight to the injured leg until equal weight is distributed on both legs. This progresses to the patient shifting more weight on the injured leg until he or she can finally bear full weight on the injured leg. These shifts should begin in a stance with the feet about shoulder-width apart and progress to a staggered stance requiring the patient to shift forward, backward, and laterally. Another exercise has the patient stepping onto a step or box and stepping down on the uninjured ankle. Once that is tolerated, the patient can step down from the box onto the injured ankle. The patient may need an assistive device such as a chair or railing in the beginning of this progression, but use of the device should be discontinued as soon as tolerated. Again, the patient should perform these step-ups and step-downs in various directions (Fig. 5-15).
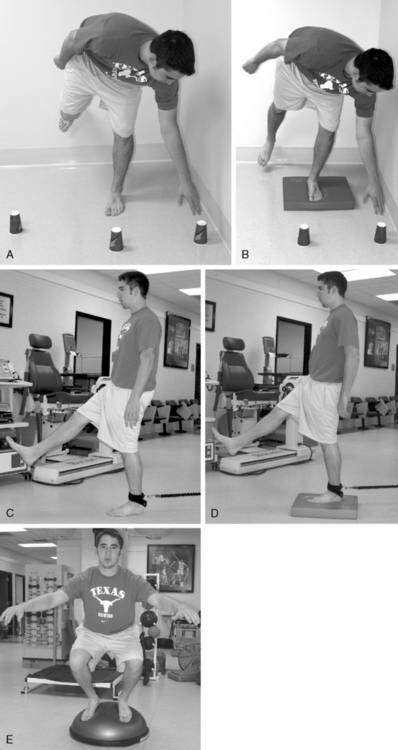
The patient next progresses to activities with patient-controlled perturbations. The patient stands first in a two-foot stance with the weight evenly distributed while performing upper extremity or trunk exercises such as pulling on elastic bands in various directions, moving a weighted medicine ball in various directions, or bending over to pick up an object. The patient may also perform motions with the noninjured leg instead of, or in addition to, the upper extremity motions (Fig. 5-16). The patient should begin with uniplanar motions and progress to multiplanar motions. The patient can also perform these activities in a tandem stance (heel to toe) or a single-legged stance.
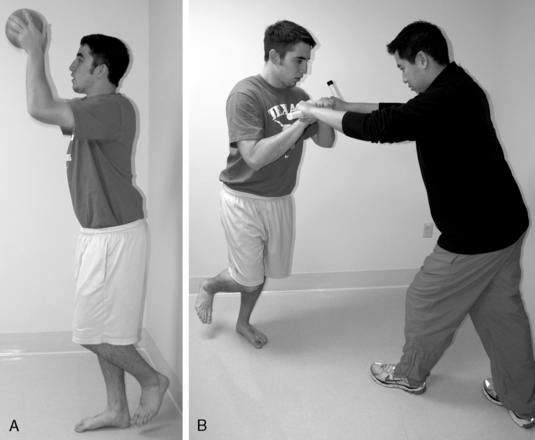
The patient then progresses to activities where he or she must react to perturbations provided by the clinician. These types of activities involve the patient standing in a two-foot stance, a tandem stance, or a single-legged stance and reacting to a perturbation caused by the clinician. These types of perturbations include pushing or pulling on the patient’s body, either by direct contact or with elastic tubing or a stick, and playing catch with the patient (Fig. 5-17).
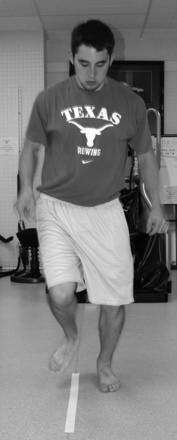
As the patient’s proprioception improves, agility and coordination exercises should be introduced. Walking, walking backward, front lunges, back lunges, side lunges, step-ups, step-downs, and so on can be incorporated as tolerated. Patients can also perform lateral movement exercises on a slide board or Fitter machine (Fig. 5-18).

Goal L: Maintain Overall Body Conditioning
The same upper body and trunk exercises that were used during the acute phase can still be used in the subacute phase. As the patient better tolerates weightbearing, closed kinetic chain (CKC) lower extremity strength training exercises such as lunges, squats, leg presses, and calf raises can be added to the program (Fig. 5-19). Cardiovascular exercises such as walking, light jogging, climbing stairs (i.e., Stairmaster), and swimming can also be added.
Maturation Stage: Goals and Interventions
During the maturation phase the primary goals are as follows:
Return to Activity Criteria After Acute Ankle Sprain
Prevention of Ankle Sprains
Because ankle sprains are one of the most common injuries in active individuals, it is prudent to attempt to prevent their occurrence and recurrence, especially in high-risk activities like basketball and soccer. A “prehab” program uses exercises commonly used in the rehabilitation protocol to prevent ankle sprains from occurring or recurring. Some of the more commonly used exercises include those described in the proprioception and strengthening phases in Rehabilitation Protocol 5-1. Hübscher et al. (2010) in a systematic review determined that balance training alone resulted in a significant reduction in the risk of ankle sprain, confirming the results of an earlier systematic review (McKeon and Hertel 2008) that found a substantially reduced risk of ankle sprains with prophylactic bracing, especially in those with a history of a previous sprain. Special emphasis should be placed on strengthening the muscles that evert the foot.
Another common practice is the use of prophylactic ankle braces or taping techniques. Many ankle braces are on the market, ranging from slide-on neoprene sleeves to lace-up braces to semi-rigid ankle orthosis. Whereas most braces offer some form of protection, the semi-rigid type braces offer the most support. The effectiveness of bracing in preventing ankle sprain is still unclear. One recent study of prophylactic ankle bracing on the incidence of ankle injuries in a group of high school volleyball players (Frey et al. 2010) found that overall the use of an ankle brace did not significantly alter the frequency of ankle sprains. In contrast, a systematic review (Dizon and Reyes 2010) concluded that ankle sprains were reduced by 69% with the use of ankle brace and by 71% with taping in previously injured athletes, and a study of collegiate female volleyball players (Pedowitz et al. 2008) found that a double-upright brace significantly reduced the rate of ankle sprain. When a brace is not available or is impractical (such as in dancers), ankle taping can be used. Figure 5-4 (A–M) demonstrates one ankle taping technique. Although the order of the specific strips can vary, the basic techniques are common with most taping protocols. One of the major drawbacks of taping is skin irritation and that the tape eventually loosens and loses its support.
Ankle-Specific Perturbation Training
Michael Duke, PT, CSCS, and S. Brent Brotzman, MD
Perturbation training has been studied and used successfully in the treatment of anterior cruciate ligament (ACL) injuries of the knee. Perturbation training involves applying destabilizing forces to the involved knee to enhance neuromuscular awareness, neuromuscular response, and dynamic stability of the knee to stabilize the knee joint. The goal of perturbation training is to educate the patient to elicit selective adaptive muscle reactions of the periarticular knee musculature in response to force administered on the platform to gain knee protective neuromuscular response. (See Chapter 4.)
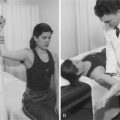
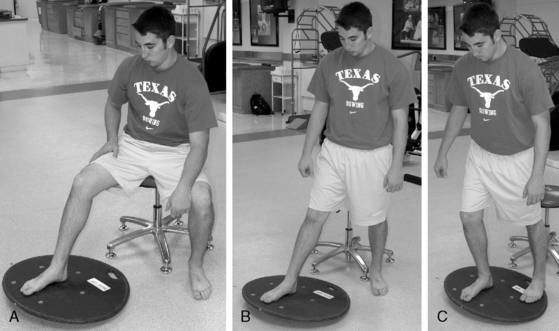
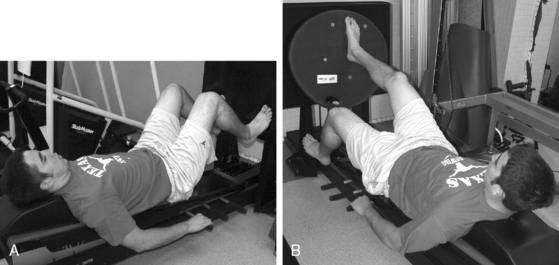
Seated tilt board perturbations (Fig. 5-20) can be implemented early in the rehabilitation process with good patient tolerance. The patient is seated in a chair, with knee bent to 90 degrees and foot on the tilt board. The therapist applies a force to the tilt board that would elicit rocking of the board, but the patient is instructed to not allow the board to move. The therapist can apply rhythmic, alternating forces; increase speed and intensity; and vary the angle of tilt. The patient can be instructed to look at the board (easier) or to look away (more difficult). Use of a BAPS board or wobble board can further increase the difficulty of the exercise. Once the patient can easily perform these challenges, the patient can then be placed in a standing position, involved limb on the tilt board, and uninvolved limb on a block of similar height.
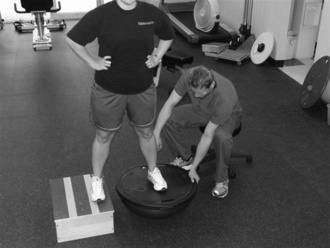
Standing BOSU and platform perturbations (Fig. 5-21) are performed with the involved limb on the BOSU platform, flat side up, and the uninvolved limb on a stationary platform of similar height. It is important that the patient be instructed to bear weight greater than 75% on the uninvolved limb to allow some movement of the BOSU. The patient is also instructed to not allow movement of the BOSU while the therapist applies force in varying directions, intensities, rhythms, and hold times, challenging the patient’s ability to maintain stability of the ankle with these external forces. Instruct the patient to look away, toss a ball, or juggle to add difficulty to the exercise.
Chronic Symptoms After a “Simple” Ankle Sprain
If chronic symptoms persist after an ankle sprain, further workup should be performed. A myriad of associated injuries may account for ongoing symptoms (Table 5-4). Of note, Gerber et al. (1998) found that the factor most predictive of residual symptoms after a lateral ankle sprain is presence of a syndesmosis sprain. Therefore, in patients with ongoing ankle pain after lateral sprain, make sure there is not concomitant missed syndesmotic injury.
Table 5-4 Possible Etiologies of Recalcitrant (Chronic) Ankle Pain
| Chronic ankle ligament instability (instability with minor provocation, such as stepping off a curb) |
| Reflex sympathetic dystrophy syndrome (RSDS) |
| Undetected syndesmotic sprain or diastasis |
| Undetected tear of the deltoid ligament (medially) |
| Stress fracture |
| Posterior tibial tendon (PTT) injury (medially) |
| Osteochondral fracture (very common) or osteochondritis dissecans (OCD) of the talus or tibial plafond |
| Os trigonum fracture (posterior pain, clicking, positive x-ray) |
| Subtalar joint sprain or instability |
| Tibiotalar synostosis (ossification of the syndesmosis impairing normal tibiofibular motion with restricted dorsiflexion on examination) |
| Midfoot sprain of the transverse tarsal (midtarsal), intertarsal, or tarsometatarsal joints |
| Bony impingement from osteophytes off the anterior tibia, with soft tissues trapped between the spur and the talus during dorsiflexion |
| Ankle arthritis |
| Undetected fractures |
Chronic Ankle Instability
Peters et al. (1991) found chronic lateral instability occurs in 10% to 30% of individuals after an acute lateral ankle sprain. Persistent pain, recurrent sprains, and repeated episodes of the ankle giving way are typical symptoms of chronic instability. Chronic ankle instability can not only limit activity, but also may lead to an increased risk of articular cartilage degeneration and subsequent ankle osteoarthritis.
Both mechanical and functional factors related to the initial injury have been cited as contributing to chronic ankle instability (Maffulli and Ferran 2008).
Mechanical factors include the following:
Functional factors include the following:
Identifying and appropriately treating chronic ankle instability are important to slow or prevent the progression of degenerative arthritis of the ankle joint. Sugimoto et al. (2009) found on ankle arthroscopy of patients with chronic ankle instability 77% of patients had chondral lesions of some degree. The duration of instability was not a factor affecting severity of chondral lesions found. The risk factors for increased severity of chondral lesions were increased age, a larger talar tilt, and varus inclination of the tibial plafond.
Treatment
Generally, conservative treatment is used first to treat proprioceptive deficits and any static disorders. Balance deficits have been identified in most patients with chronic ankle instability (Brown and Mynark 2007, Hale et al. 2007, Wikstrom et al. 2010). A systematic analysis (Webster and Gribble 2010) found that functional rehabilitation interventions were associated with improved ankle stability for both postural control and self-reported function in patients with chronic ankle instability, whereas a randomized controlled trial (McKeon et al. 2008) found that 4 weeks of balance training significantly improved self-reported function, static postural control, and dynamic postural control. In another group of patients with a history of ankle sprains, balance was improved after 4 weeks of elastic resistance exercise (Han et al. 2009). Patients with primarily functional instability are more likely to benefit from rehabilitation than patients with primarily mechanical instability (Ajis and Maffulli 2006).
Taping and Bracing for Chronic Ankle Instability
The efficacy of bracing and taping remains undetermined, with some studies reporting no benefits (Gribble et al. 2010, Hopper et al. 2009) and others reporting some stabilizing effects (Delahunt et al. 2009).
Common Surgical Techniques for Management of Chronic Lateral Ankle Instability
Anatomic repair may involve the following:
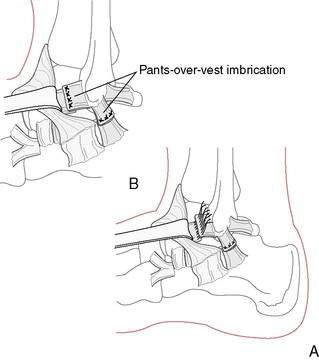
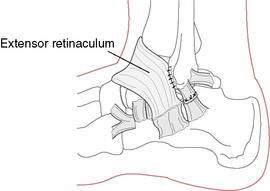
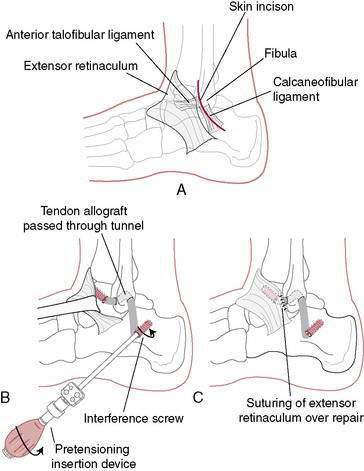
Figure 5-24 Allograft Biotenodesis Broström-type procedure using allograft anterior tibial tendon or hamstring.
In general, anatomic repair techniques have produced better results than tenodesis techniques (e.g., Watson-Jones or Chrisman Snook). One comparative study reported 80% good to excellent results with anatomic reconstruction and 33% good or excellent results with the Evans procedure (Krips et al. 2002). Arthroscopy can be used to identify and treat intra-articular conditions such as osteochondral talar lesions, impingement, loose bodies, painful ossicles, adhesions, and osteophytes, and arthroscopic techniques have been developed for tendon reconstruction (Lui 2007). Regardless of the surgical technique, functional rehabilitation has been shown to produce better results than 4 to 6 weeks of immobilization (de Vries et al. 2006).
Rehabilitation Protocol 5-2 shows a postoperative Broström ligament rehabilitation protocol.
REHABILITATION PROTOCOL 5-2 After Modified Broström Ankle Ligament Reconstruction
Modified Hamilton Protocol
Week 4
Remove walking boot at 4 to 6 weeks.
Apply air splint for protection, to be worn for 6 to 8 weeks after surgery.
Begin gentle range of motion (ROM) exercises of the ankle.
Begin isometric peroneal strengthening exercises.
Avoid adduction and inversion of ankle until 6 weeks postoperative.
Week 6
Begin proprioception/balancing activities.
Unilateral balancing for timed intervals.
Unilateral balancing with visual cues.
Balancing on one leg and catching #2 plyoball.
Slide board, increasing distance.
Fitter activity, catching ball.
Side-to-side bilateral hopping (progress to unilateral).
Front-to-back bilateral hopping (progress to unilateral).
Shuttle leg press and rebounding, bilateral and unilateral.
Positive deceleration, ankle everters, Kin-Com.
Complete rehabilitation of the peroneals is essential.
Early in rehabilitation, deweighted pool exercises may be beneficial.
Dancers should perform plantarflexion/eversion exercises with a weighted belt (2–20 pounds).