13 Flaps
The proper development and implementation of the skin flap is a key skill in reconstruction of skin defects, especially facial defects, following trauma or the removal of benign skin lesions or skin cancers. Although the surgeon should always consider primary, linear closure of a skin defect, there are many circumstances in which a skin flap may be the ideal choice for reconstruction.1,2
Skin flaps may be chosen instead of a primary linear closure to:
Terminology
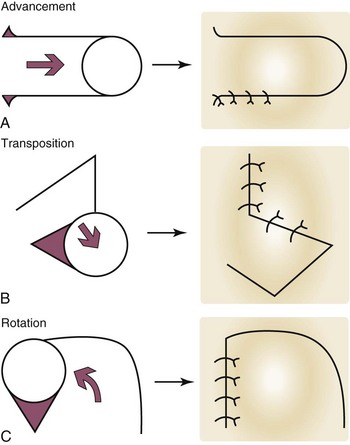
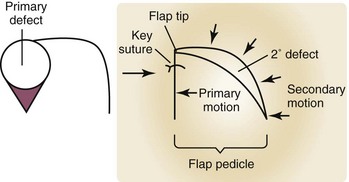
The random pattern flap is further classified by its movement. The three basic types of movement are (Figure 13-1):
The initial wound that is to be reconstructed is the primary defect, and here it refers to the result of the removal of a skin tumor (Figure 13-2). Once a flap has been advanced, transposed, or rotated into position to close the primary defect, the wound that remains behind at the donor site of the flap is the secondary defect. The primary motion of a flap is the movement that the flap makes when it advances, transposes, or rotates into and closes the primary defect (Figure 13-2). The secondary motion is the movement that the tissue adjacent to and surrounding the flap makes when the final defect is closed. Both the primary and secondary motion of a flap are important in proper flap design. The very end of the flap that fills the primary defect, furthest from the donor site is the flap tip. The flap pedicle is that portion of the flap that connects it to the surrounding skin, and is the conduit for the vascular supply of the flap. The key suture of a local flap is the location in which the first suture is typically placed to provide the initial correct alignment of a flap to fill the primary defect and to direct additional placement of sutures to close the secondary defect. Standing cutaneous cones (dog ears) are areas of local tissue redundancy that occur in wound closure, but that can be minimized, eliminated, or moved to more cosmetically advantageous locations by the correct choice of and meticulous planning for a flap.
Advancement Flap
Conceptual
The primary motion of the advancement flap is the sliding of the flap, usually in a single linear vector as it advances into the primary defect. This sliding motion may be unidirectional (single advancement flap) or bidirectional (double advancement flap).3 Although there are several variations on this type of flap, the two main benefits of the advancement flap are as follows:
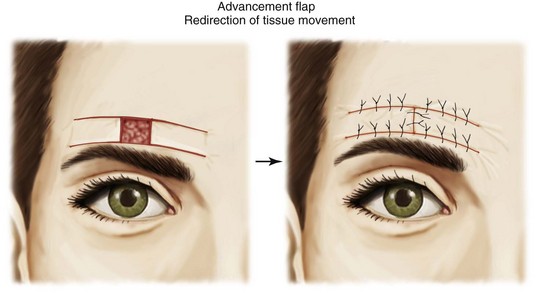
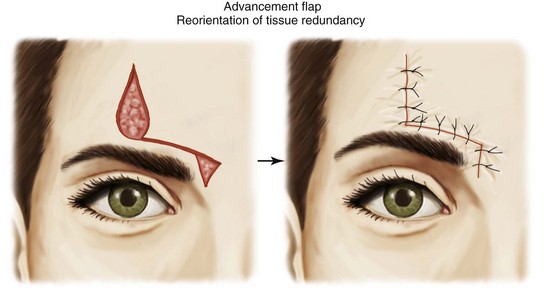
FIGURE 13-4 Reorientation of tissue redundancy to a more acceptable location away from the primary defect.
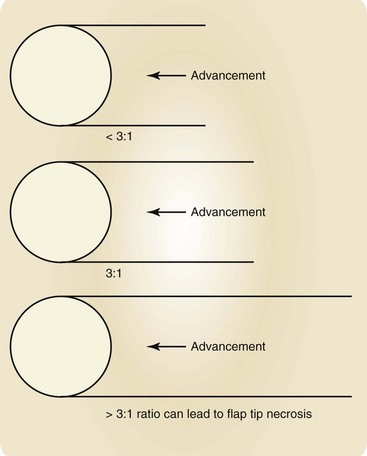
Advancement flaps are also limited by their blood supply. The pedicle of skin and soft tissue must not be compromised. A length:width ratio should ideally not exceed 3 : 1. A long, thin advancement flap in violation of this ratio runs a high risk of distal flap tip necrosis (Figure 13-5).
Single-Pedicle Advancement Flap (U-Plasty)
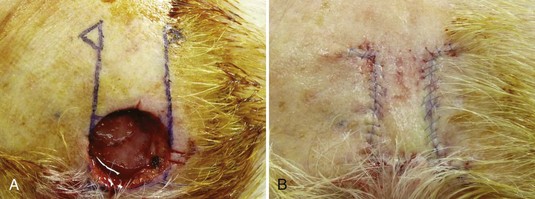
The classic form of the advancement flap is the single-pedicle advancement flap, also known as the U-plasty (Figure 13-6). This is an older technique that has been advocated for repairs on the forehead, because it may fit in well with horizontal relaxed skin tension lines in this area. It may also be used on the sideburn or eyebrow to move hair-bearing skin together and hide the scars in the hair. A significant disadvantage to the flap is that it creates numerous surgical lines, and in an area such as the forehead, may provide an inferior surgical result compared to a primary linear closure. It has been advocated as well for use on the glabella and nasal bridge, but other flaps are nearly always preferable in these areas.
Bilateral Advancement Flap (H-Plasty)
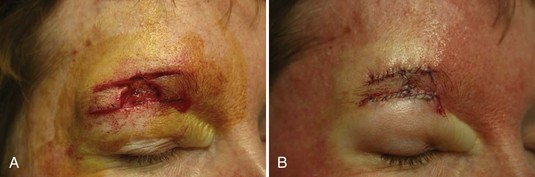
The bilateral advancement flap is similar to the classic single-pedicle advancement flap except that another pedicled advancement flap is created on the opposite side of the defect. The two flaps need not necessarily be symmetrical or parallel, but may be curved or slightly shortened on one side as anatomic structures allow. Unfortunately, this flap creates even more incisions than the single-pedicle advancement flap and therefore its clinical usefulness is limited. This flap could be useful for the closure of a defect in the eyebrow, because the lines could be camouflaged along the brow’s edges (Figure 13-7). It may also be reserved for situations in which a single pedicle is first employed and then judged inadequate to close a defect. At that point, a second pedicle is created to provide further tissue movement.
T-Plasty (O-T Flap)
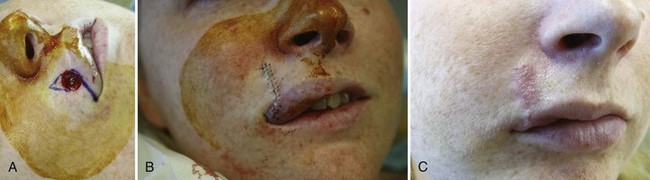
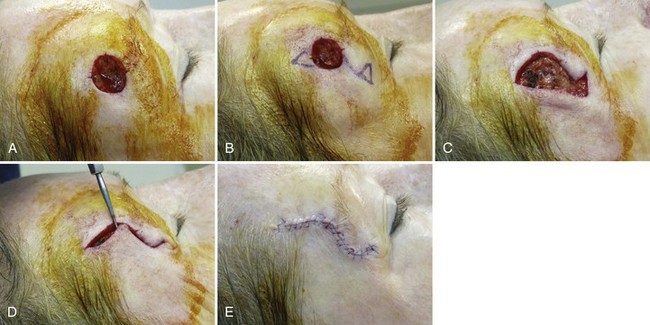
The T-plasty bilateral advancement flap has great utility in facial reconstruction. It is best suited for the repair of defects at the edge of a free margin such as the lip, or at the junction of two cosmetic subunits when it is preferable to keep the repair from crossing the junction such as when closing a chin defect and preventing the closure from crossing the mental crease. The final suture line in the T configuration is a result of a Burow’s triangle excision on one side of the defect that is approximately the length of the defect, and two incisions (each the width of the defect) on the other side to create the bilateral flaps. These incisions need not be completely straight and can be somewhat curved and tailored to the necessary skin tension lines (Figure 13-8). The resulting redundancies along the flap edges can be sewn out by the rule of halves, or resolved with small Burow’s triangle excisions.
L-Plasty
The L-plasty is a single advancement flap that is employed to redirect tissue redundancy and maintain the repair in a single cosmetic subunit. The tissue redundancy has been distributed along the edge of the advancing flap and no Burow’s triangle has been excised (Figure 13-9).
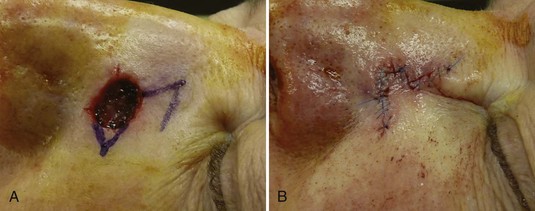
Advancement Flap: Step-by-Step Instructions
Island Pedicle Flap
Island Pedicle Flap: Step-by-Step Instructions
Rotation Flap
Conceptual
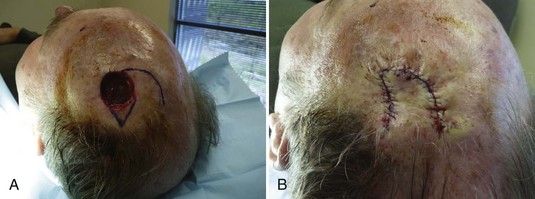
The rotation flap consists of tissue rotating in an arc to fill the primary defect. The rotation flap differs from primary closure and the advancement flap in that the tension is directed not in a single, linear vector, but rather from several different directions. Once the flap is put into position with the first key suture, the primary defect is filled, leaving a much longer curvilinear secondary defect. Closing this secondary defect results in the redirection of wound tension, as well as the redirection of tissue redundancy. This redistribution of wound tension is the great advantage of a well-chosen rotation flap. It can recruit significant laxity from the surrounding tissue and greatly aid in closing defects under significant tension such as large, tight scalp defects, or it can result in moving the secondary motion of a flap away from a critical anatomic structure, such as when a rotation flap is used to close a wound in the infraorbital region.4
Single-Rotation Flap
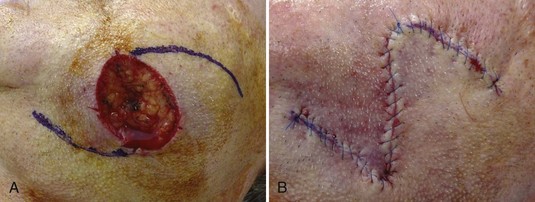
The single-rotation flap is the rotation flap in its most basic form. A single flap is rotated into the defect. A single Burow’s triangle is excised to remove tissue redundancy created by primary flap movement (Figure 13-12).
Bilateral O-Z Rotation Flap
The bilateral rotation flap is helpful with wounds under high tension. Often, a wound can be approached with a single rotation flap, and if it is inadequate to close a very tight wound, another rotation flap can be incised and rotated in to provide more movement for final wound closure. Often, no Burow’s triangle need be excised (Figure 13-13).
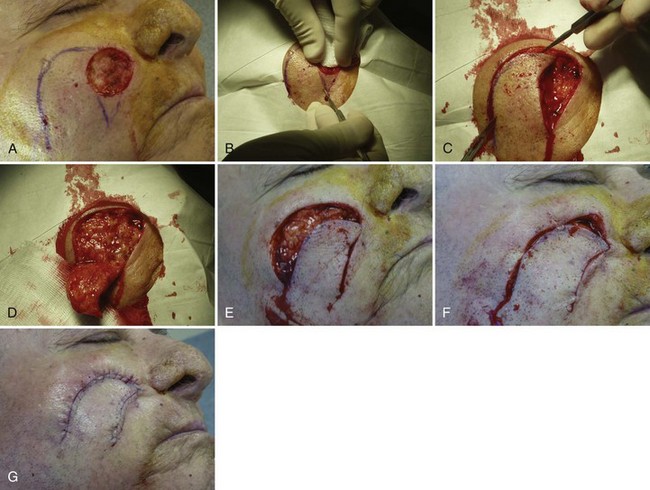
Rotation Flap: Step-by-Step Instructions
Transposition Flap
Conceptual
Both the design and tissue movement of the transposition flap is more difficult than with the other random pattern flaps. Like the rotation flap, tissue is harvested from an area of laxity to be used to repair the primary defect, but instead of advancing or rotating into the defect, the flap is transposed over an area (Figure 13-1B) of normal skin. The great advantage of the transposition flap is its ability to redirect the wound closure tension. A wound inferior to the free margin of the lower eyelid is often at high risk for ectropion. A transposition flap can transpose skin into the defect to close the wound while reorienting the tension parallel to the eyelid margin. Similarly, a wound of the lower nose can often be difficult to close without pulling up on the nasal tip. A transposition flap can be employed to redirect the tension away from the tip, while moving more pliable skin from the upper nose to resurface the wound.
Rhombic Transposition Flap
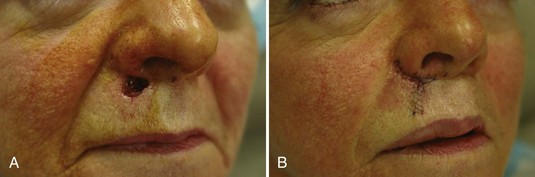
The rhombic flap may be the most commonly used type of transposition flap. Although many variants exist, the classic rhombic flap is easily visualized as a parallelogram with the flap tip having a 60-degree angle. The primary defect may be cut to fit the flap, or the flap may be trimmed to fit the defect when it is placed. It is useful to redirect wound tension away from the primary defect. This type of flap is often deployed on the upper nose and periorbital areas (Figure 13-15).
Zitelli Bilobed Transposition Flap
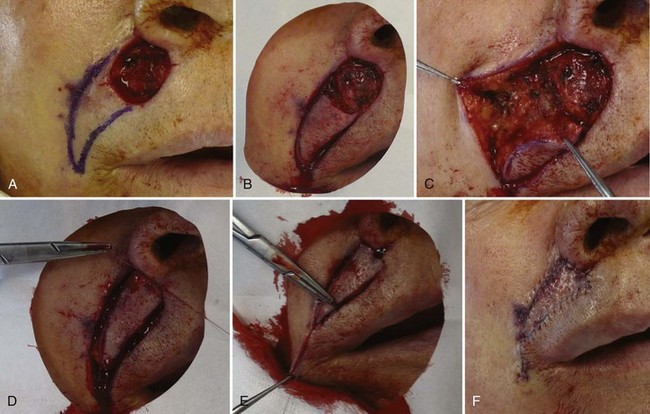
The Zitelli bilobed flap is a more specialized variant of the transposition flap. Although more complex, we include it here because of its great usefulness in reconstruction of wounds of the sebaceous and inflexible skin of the lower nose. The bilobed flap is excellent for closing small to intermediate-sized wounds less than 1.5 cm in diameter. The placement of the extra lobe allows greater movement of tissue from the upper nose5,6 (Figure 13-16).
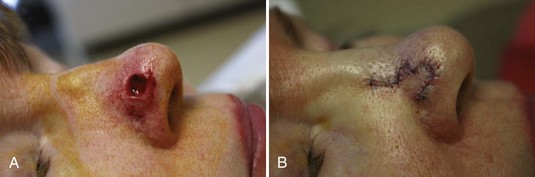
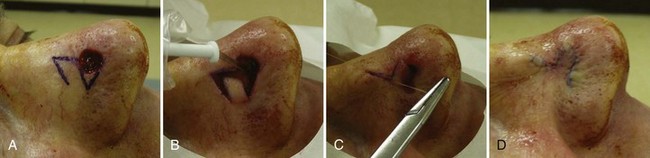
Transposition Flap: Step-by-Step Instructions
Coding and Billing Pearls
The specific code is determined by the location and size of the defect. The term defect includes the primary defect resulting from the excision and the secondary defect resulting from flap design to perform the reconstruction. The areas of both defects are added together to determine the code (see Box 13-1 for the actual CPT codes).
1. Bowman PH, Fosko SW, Hartstein ME. Periocular reconstruction. Semin Cutan Med Surg. 2003;22:263-272.
2. Chen EH, Johnson TM, Ratner D. Introduction to flap movement: reconstruction of five similar nasal defects using different flaps. Dermatol Surg. 2005;31:982-985.
3. Krishnan R, Garman M, Nunez-Gussman J, Orengo I. Advancement flaps: a basic theme with many variations. Dermatol Surg. 2005;31:986-994.
4. Seline PC, Siegle RJ. Scalp reconstruction. Dermatol Clin. 2005;23:13-21. v
5. Aasi SZ, Leffell DJ. Bilobed transposition flap. Dermatol Clin. 2005;23:55-64. vi
6. Collins SC, Dufresne RGJr, Jellinek NJ. The bilobed transposition flap for single-staged repair of large surgical defects involving the nasal ala. Dermatol Surg. 2008;34:1379-1385.